

"In 2024, Efficient Broadcast Techniques Incorporating YouTube Loops on TV"
Efficient Broadcast Techniques: Incorporating YouTube Loops on TV
Loop is a YouTube video format that allows viewers to watch a continuous sequence of videos. Loop is similar to traditional YouTube videos, but it can be played on a TV screen like a traditional TV show. Loop is a great way to keep viewers engaged with your content. It’s like a one-stop shop for all your content needs. You can use it to promote your latest video series.
Why looping YouTube videos on a TV is a great idea? First, it can be a fun way to watch your favorite videos without having to worry about the time. Second, it can be a way to save money on your cable. By watching your favorite videos on loop, you can cut down on the number of times you need to watch them.
If you are watching a series of videos, for example, looping them can help you to remember what happened in each one. Secondly, it can help you to learn new information more easily. If you are watching a tutorial or a video about a new topic, looping can help you to remember the details better.
Free Download For Win 7 or later(64-bit)
Free Download For macOS 10.14 or later


Part 1: How to Create a Loop Video for YouTube
There is a lot of debate around whether or not creating a loop video is necessary for success on YouTube. Some people believe that it’s not necessary, while others believe that it is a must. The main benefit of creating a loop video is that it helps to keep your audience engaged. It also helps to create a sense of continuity between your videos.
Creating a loop video for your YouTube channel increases engagement because viewers can watch the video over and over again. This can lead to more clicks on your ads, which can lead to more revenue. It can also increase your subscribers and views. Maybe some people want to watch the same video multiple times in a row without having to keep pressing the play button on the remote.
Filmora is the best video loop editor:
If you need a powerful video editing tool that will let you create high-quality clips with multiple loops, look no further than Filmora . This software allows you to make various loops of your videos for use in social media, on your website or wherever desired. Plus, with Filmora, there is no limit on the number of loops you can create.
Loop video works well for corporate presentations, tutorials, explainer videos, and much more. You can create looping videos by choosing from one of Filmora’s many templates or creating your own. It’s easy to get started with looping video editing in Filmora! Some people want to watch a video while they do other things, like work on the computer.
Filmora is incredibly easy to use. You can quickly create videos by importing footage, editing and adding effects, and exporting your videos. Plus, the software has several built-in tools that let you customize your videos further. It has many features that make it an excellent choice for anyone looking to create high-quality videos quickly and easily.
How can we loop a video on Filmora? Follow these steps to create a looping video on Filmora:
Step 1 Download the Filmora and create a project
Free Download For Win 7 or later(64-bit)
Free Download For macOS 10.14 or later
You can download the Filmora for free. After installation of this software open it and click on Create New Project. Filmora is not only the video maker or editor, you can also add text and music to your videos, and share them on social media or with friends.

Step 2 Open the video and make copies
Open the video in your timeline. All you need to do is right-click on the video and click on copy. Then simply click or press Ctrl+V on your keyboard and do that for times. You can make as many copies as you want. Then you will have the same clip over and over again which creates the loop effect.
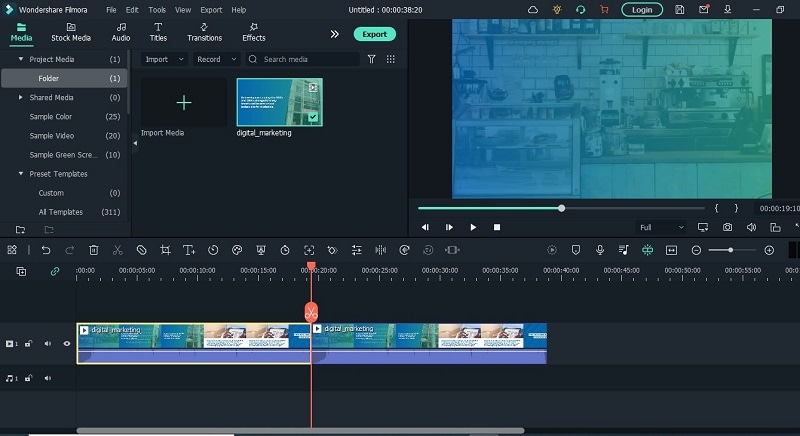
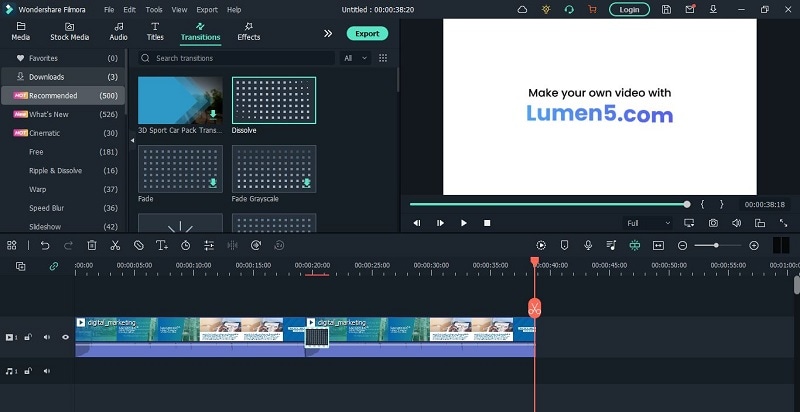
Step 3 Add Transition or any title in the video
After making copies of your video. Add some transitions in your video. Adding transitions to videos can help to keep your videos looking polished and professional. Not only do transitions add an extra layer of visual interest, but they can also help to underscore specific points in your video.
Benefits to create loop video on Filmora
There are many benefits to creating looping videos, especially when using a tool like Filmora. Loop videos are great for social media since they can be set to play on a loop and are viewable without sound. They’re also perfect for short attention spans since you can watch them over and over again without getting bored.
This can be useful for marketing purposes, as it can keep people interested in your video content. Additionally, looping can create a more engaging video experience for viewers, as it keeps them engaged by playing the same clip over and over again. You can easily add captions, and titles to your loop video.
When viewers can pause, rewind, and playback a video over and over again, they are more engaged with it. This increases the chances that they will watch the entire video, and may even share it with friends. You can create a sense of community and connection with your customers. And best of all? You can keep the magic going by adding sound effects and music!
Part 2: Loop a YouTube Video on TV from a Mobile
One of the great features of YouTube is that you can loop YouTube videos on your TV. This means that you can watch a video over and over again without having to fast forward through it. This is great for kids who are constantly asking to watch the same video over and over again. You can also use this feature to watch videos that you have missed.
There is something about relaxing music on the loop that can help to take the edge off. Whether it’s to help you wind down before bed, or to help you relax after a long day, there’s no doubt that looping YouTube on TV can be helpful. Whether you’re looking for something light and calming, or something to help you wind down after a long day, there’s sure to be something on YouTube that can fit the bill.
Let’s have a look at some steps that how to repeat YouTube videos on smart TV.
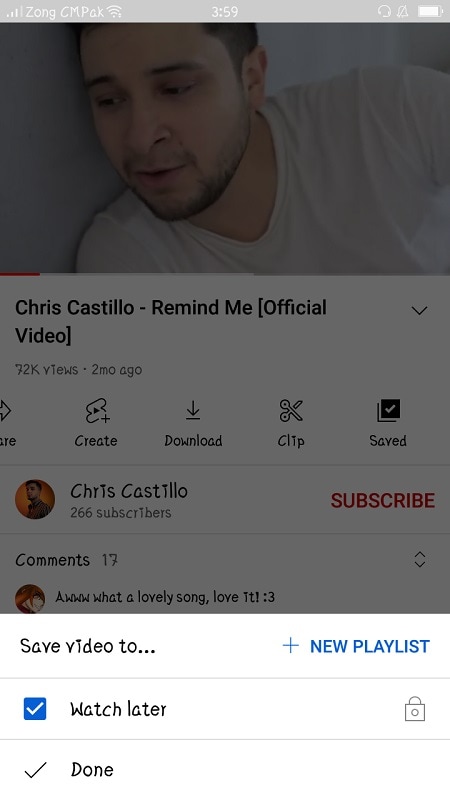
Step 1 Create a Playlist of one or multiple videos
The YouTube app is available on the google play store. You can easily download it from your mobile phones, android, etc. When you open a video on YouTube, several options will appear (like, share, subscribe). You can save the video in your existing playlist or you can create a new playlist.
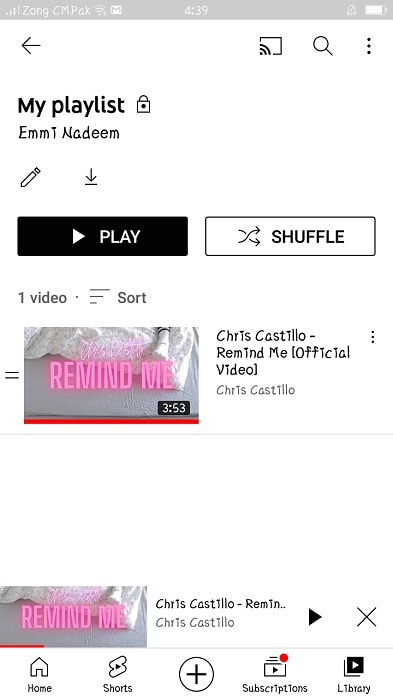
Step 2 Go to the library and select the loop symbol
Click on library this will take you to a list of libraries that have YouTube collections. This can be a great way to find new material to watch, or to find old material that you may have missed. Play back the playlist that you want to loop on the smart TV.
Step 3 Loop the playlist and send the list to the TV
Play the list and click on the loop symbol. At last, launch the YouTube video on your TV. The video will start playing in a loop. It can only be stopped from your mobile phone on which you start playing the list.

Why you might want to loop a YouTube video on a smart TV?
Some people want to watch a video over and over again without having to wait for it to load each time. Looping in a YouTube video can help you do this. Another reason to loop a YouTube video on your TV is if you want to watch it while you are doing something else. YouTube only loops the playlist.
Looping a YouTube video on your TV can also be useful if you have a lot of videos that you want to watch but don’t have enough time for. Looping YouTube videos on your television is a great way to keep your young ones entertained and engaged. Not only are they getting their daily dose of educational content, but they are also being kept enertained.
Wondershare Filmora Loop YouTube videos on PC and Mac with simple clicks.
Free Download Free Download Learn More

![]()
Conclusion
Looping YouTube videos on smart TV is an excellent way to watch the content you love, no matter where you are. While it may be true that loop YouTube videos on a smart TV are not imminent, there are some major benefits to be gained from implementing the new technology.
It’s easy to do, and it can be a great way to spend time with family members and friends. Looping YouTube videos on a smart TV is a great way to add some fun and excitement to your experience. The best part is, there are no limitations or restrictions you can loop as many videos as you want, and watch them in any order For Win 7 or later(64-bit)
Free Download For macOS 10.14 or later
Part 1: How to Create a Loop Video for YouTube
There is a lot of debate around whether or not creating a loop video is necessary for success on YouTube. Some people believe that it’s not necessary, while others believe that it is a must. The main benefit of creating a loop video is that it helps to keep your audience engaged. It also helps to create a sense of continuity between your videos.
Creating a loop video for your YouTube channel increases engagement because viewers can watch the video over and over again. This can lead to more clicks on your ads, which can lead to more revenue. It can also increase your subscribers and views. Maybe some people want to watch the same video multiple times in a row without having to keep pressing the play button on the remote.
Filmora is the best video loop editor:
If you need a powerful video editing tool that will let you create high-quality clips with multiple loops, look no further than Filmora . This software allows you to make various loops of your videos for use in social media, on your website or wherever desired. Plus, with Filmora, there is no limit on the number of loops you can create.
Loop video works well for corporate presentations, tutorials, explainer videos, and much more. You can create looping videos by choosing from one of Filmora’s many templates or creating your own. It’s easy to get started with looping video editing in Filmora! Some people want to watch a video while they do other things, like work on the computer.
Filmora is incredibly easy to use. You can quickly create videos by importing footage, editing and adding effects, and exporting your videos. Plus, the software has several built-in tools that let you customize your videos further. It has many features that make it an excellent choice for anyone looking to create high-quality videos quickly and easily.
How can we loop a video on Filmora? Follow these steps to create a looping video on Filmora:
Step 1 Download the Filmora and create a project
Free Download For Win 7 or later(64-bit)
Free Download For macOS 10.14 or later
You can download the Filmora for free. After installation of this software open it and click on Create New Project. Filmora is not only the video maker or editor, you can also add text and music to your videos, and share them on social media or with friends.
Step 2 Open the video and make copies
Open the video in your timeline. All you need to do is right-click on the video and click on copy. Then simply click or press Ctrl+V on your keyboard and do that for times. You can make as many copies as you want. Then you will have the same clip over and over again which creates the loop effect.
Step 3 Add Transition or any title in the video
After making copies of your video. Add some transitions in your video. Adding transitions to videos can help to keep your videos looking polished and professional. Not only do transitions add an extra layer of visual interest, but they can also help to underscore specific points in your video.
Benefits to create loop video on Filmora
There are many benefits to creating looping videos, especially when using a tool like Filmora. Loop videos are great for social media since they can be set to play on a loop and are viewable without sound. They’re also perfect for short attention spans since you can watch them over and over again without getting bored.
This can be useful for marketing purposes, as it can keep people interested in your video content. Additionally, looping can create a more engaging video experience for viewers, as it keeps them engaged by playing the same clip over and over again. You can easily add captions, and titles to your loop video.
When viewers can pause, rewind, and playback a video over and over again, they are more engaged with it. This increases the chances that they will watch the entire video, and may even share it with friends. You can create a sense of community and connection with your customers. And best of all? You can keep the magic going by adding sound effects and music!
Part 2: Loop a YouTube Video on TV from a Mobile
One of the great features of YouTube is that you can loop YouTube videos on your TV. This means that you can watch a video over and over again without having to fast forward through it. This is great for kids who are constantly asking to watch the same video over and over again. You can also use this feature to watch videos that you have missed.
There is something about relaxing music on the loop that can help to take the edge off. Whether it’s to help you wind down before bed, or to help you relax after a long day, there’s no doubt that looping YouTube on TV can be helpful. Whether you’re looking for something light and calming, or something to help you wind down after a long day, there’s sure to be something on YouTube that can fit the bill.
Let’s have a look at some steps that how to repeat YouTube videos on smart TV.
Step 1 Create a Playlist of one or multiple videos
The YouTube app is available on the google play store. You can easily download it from your mobile phones, android, etc. When you open a video on YouTube, several options will appear (like, share, subscribe). You can save the video in your existing playlist or you can create a new playlist.
Step 2 Go to the library and select the loop symbol
Click on library this will take you to a list of libraries that have YouTube collections. This can be a great way to find new material to watch, or to find old material that you may have missed. Play back the playlist that you want to loop on the smart TV.
Step 3 Loop the playlist and send the list to the TV
Play the list and click on the loop symbol. At last, launch the YouTube video on your TV. The video will start playing in a loop. It can only be stopped from your mobile phone on which you start playing the list.
Why you might want to loop a YouTube video on a smart TV?
Some people want to watch a video over and over again without having to wait for it to load each time. Looping in a YouTube video can help you do this. Another reason to loop a YouTube video on your TV is if you want to watch it while you are doing something else. YouTube only loops the playlist.
Looping a YouTube video on your TV can also be useful if you have a lot of videos that you want to watch but don’t have enough time for. Looping YouTube videos on your television is a great way to keep your young ones entertained and engaged. Not only are they getting their daily dose of educational content, but they are also being kept enertained.
Wondershare Filmora Loop YouTube videos on PC and Mac with simple clicks.
Free Download Free Download Learn More
![]()
Conclusion
Looping YouTube videos on smart TV is an excellent way to watch the content you love, no matter where you are. While it may be true that loop YouTube videos on a smart TV are not imminent, there are some major benefits to be gained from implementing the new technology.
It’s easy to do, and it can be a great way to spend time with family members and friends. Looping YouTube videos on a smart TV is a great way to add some fun and excitement to your experience. The best part is, there are no limitations or restrictions you can loop as many videos as you want, and watch them in any order!
4 Secrets for Adding Online Vids Seamlessly in PPT
How to Embed a YouTube Video in PowerPoint

Richard Bennett
Mar 27, 2024• Proven solutions
There might be several instances where you want your audiences to watch a video so that you can elaborate your idea or explain your point more clearly. You may want to do this without leaving the presentation window in order to avoid losing focus from the agenda of the meeting. To make this happen, it is imperative to learn how to embed a YouTube video in PowerPoint.
When talking about PowerPoint, it is an efficient and powerful tool to prepare animated and static presentations, and embedding videos is yet another useful option that the app offers to its users.
That said, here you will learn a couple of methods to embed YouTube video in PowerPoint.
How to Insert YouTube Video into PowerPoint? (4 Methods)
After understanding the benefits of have a video embedded to your presentation, it is now time to learn how to add YouTube video to PowerPoint.
The four most used methods of getting this done are discussed in detailed in the following sections:
Method 1: Using YouTube Video’s URL
Because every YouTube video has a URL (Uniform Resource Locator) that is unique for that particular clip, PowerPoint allows you to use it to embed the footage to any of its slides. The process is simple, and you can follow the steps given below to get this done:
Step 1: Copy the URL
Open your default web browser, go to the YouTube video you want to embed to PowerPoint, and copy its URL from the address bar at the top.
Step 2: Add URL to PowerPoint

Launch PowerPoint if it is not already open, go to the slide you want to embed the YouTube video to, click Insert from menu bar present above the Ribbon, click Video from the Media section at the right end of the Ribbon, click Online Video from the list that appears, in the Enter the URL for the online video field on the Online Video box, paste the URL that you copied earlier, and click Insert to insert YouTube video into PowerPoint.

Step 3: Position the Player
Once the video is added to the PowerPoint slide, drag its frame and reposition it to a suitable location.
Method 2: Embed a YouTube Video with Embed Code (For Microsoft PowerPoint 2016)
Unlike PowerPoint 2019 that accepts URLs and embed codes in a single URL field, MS PowerPoint 2016 lets you choose how you want to insert a video. The step-by-step instructions given below explain how this can be done:
Step 1: Obtain Embed Code
Go to the YouTube video you want to embed to your PowerPoint slide, click the SHARE icon from the left area under the video player, click the Embed icon in the Share box, and click COPY from the bottom-right corner of the Embed Video box that appears next.

Step 2: Get to the PowerPoint’s Insert Video Box
Launch MS PowerPoint 2016, click Insert from the menu bar at the top, from the Media section in the right of the Ribbon, click Video, and then click Online Video to open the Insert Video box.
Step 3: Embed the Video
Paste the embed code you copied earlier in the Paste embed code here field present next to the From a Video Embed Code option, and press Enter to embed YouTube video in PowerPoint.
Method 3: Insert YouTube Video into PowerPoint by Searching Names (For Microsoft PowerPoint 2016)
Microsoft Office 2016 has another lucrative feature that allows users to embed YouTube video in PowerPoint by searching its name. You can follow the steps given below to find the videos published on YouTube, and insert them to your presentation:
Step 1: Get to the Insert Video Box
Use the process explained in Step 2 of Method 2 to get to the Insert Video box after selecting the slide you want to add a video to.
Step 2: Search and Embed a Video
In the Search YouTube field next to the YouTube option, type the name of the video you want to search on YouTube, press Enter, select the video you want to embed, and click Insert to insert YouTube video into PowerPoint.
Method 4: Insert Video from PC
Another method to embed YouTube video in PowerPoint is by downloading the clip to your PC, and then inserting the footage from there. You can use any free YouTube downloader to obtain a video that is available on YouTube.
Once the file is on your computer, the following steps explain how it can be embedded to your PowerPoint slide:
WARNING: YouTube videos may be subject to copyright. Therefore, before downloading and embedding a video to your PowerPoint slide, make sure that you have proper rights to do so, or that the video can be used for the purpose without any written permission from its creator.
Step 1: Get to the Insert Ribbon
Open PowerPoint and select the slide you want to embed a YouTube video to. Go to Insert from the menu bar at the top.
Step 2: Insert the Video
Click the Video icon from the Media section of the Ribbon, click Video on My PC from the list, and use the Insert Video box that appears to select and insert the video to your PowerPoint slide.
Step 3: Resize and/or Modify the Video
Grab any of the six handles of the video you inserted, and drag it inward to decrease the size of the frame. It is advisable to use the corner handle and drag them diagonally to maintain proper aspect ratio of the player’s frame. Next, right-click anywhere inside the frame, click Format Video from the context menu, and use the options that appear in the right pane to make necessary adjustments to the clip like color correction, manage brightness and contrast, etc.
YouTube Embedding Supported PowerPoint Version Checklist
Depending on the version of Microsoft Office you are using, you may or may not be able to embed a YouTube video in PowerPoint. Also, if your version of PowerPoint allows you to do so, the interface and the options may vary from those you see on your friends’ computer or in some online tutorials.
That said, the following table gives a clear picture of which version of Microsoft Office has video embedding option, and/or what level of integration does it allow:
| MS Office Version | Insert YouTube Via URL | Insert an Online Video with an Embed Code | Insert by Searching for the YouTube Video | Play Embedded YouTube Video Offline |
|---|---|---|---|---|
| Microsoft 365 | Yes | No | No | No |
| PowerPoint 2019 | Yes | Yes | No | No |
| PowerPoint 2016 | No | Yes | Yes | No |
| PowerPoint 2013 | No | No | Yes | No |
| PowerPoint 2010 | No | No (Adobe Flash Player Support Discontinued) | No (Adobe Flash Player Support Discontinued) | No |
| PowerPoint 365/2019 for Mac | Yes | No | No | No |
Frequently Asked Questions About Embedding YouTube Videos in PowerPoint
1. Why Can’t I Embed a YouTube Video in PowerPoint 2010?
PowerPoint 2010 uses Adobe Flash Player to play YouTube videos. Since support for Flash Player is discontinued, PowerPoint 2010 isn’t able to play the videos anymore. To resolve this issue, you need to upgrade your version of Microsoft Office to 2013 or later.
2. Why Can’t I Embed YouTube Videos in PowerPoint for Mac?
You can insert YouTube videos only in Office 365 and Office 2019 versions for Mac. If you are using Office 2016 for Mac, you are required to install an add-in called Web Video Player that can be downloaded from the https://appsource.microsoft.com/en-us/product/office/WA104221182 link. However, if it is PowerPoint 2011 for Mac that you are using, you can’t insert YouTube video to it, and you need to upgrade your MS Office to a higher version for that purpose.
3. Why Can’t I Embed a YouTube Video in PowerPoint 2013?
The version of PowerPoint 2013 that was released initially didn’t allow YouTube video embedding. However, with an update 4018374 that Microsoft rolled out in August 2018, the feature got enabled. You can download and install the update from https://support.microsoft.com/en-us/help/4018374/august-7-2018-update-for-powerpoint-2013-kb4018374 link, and then try inserting a YouTube video to your version of PowerPoint.
4. How Do I Embed a YouTube Video in PowerPoint without Being Online?
YouTube videos that you embed to your PowerPoint presentations can’t be played in offline mode. However, there is a workaround to this. You can download the video from YouTube to your computer using any YouTube downloader, and then use the process explained in Method 4 to insert the clip from your PC.
Conclusion
Although the above sections explain how to embed a YouTube video in PowerPoint, the process to do so may vary in different versions of Microsoft Office. Also, depending on what edition of the program you are using, embedding YouTube videos may or may not be supported according to the availability of the add-ins or updates that Microsoft has rolled out for that particular built of the app.
Richard Bennett
Richard Bennett is a writer and a lover of all things video.
Follow @Richard Bennett
Richard Bennett
Mar 27, 2024• Proven solutions
There might be several instances where you want your audiences to watch a video so that you can elaborate your idea or explain your point more clearly. You may want to do this without leaving the presentation window in order to avoid losing focus from the agenda of the meeting. To make this happen, it is imperative to learn how to embed a YouTube video in PowerPoint.
When talking about PowerPoint, it is an efficient and powerful tool to prepare animated and static presentations, and embedding videos is yet another useful option that the app offers to its users.
That said, here you will learn a couple of methods to embed YouTube video in PowerPoint.
How to Insert YouTube Video into PowerPoint? (4 Methods)
After understanding the benefits of have a video embedded to your presentation, it is now time to learn how to add YouTube video to PowerPoint.
The four most used methods of getting this done are discussed in detailed in the following sections:
Method 1: Using YouTube Video’s URL
Because every YouTube video has a URL (Uniform Resource Locator) that is unique for that particular clip, PowerPoint allows you to use it to embed the footage to any of its slides. The process is simple, and you can follow the steps given below to get this done:
Step 1: Copy the URL
Open your default web browser, go to the YouTube video you want to embed to PowerPoint, and copy its URL from the address bar at the top.
Step 2: Add URL to PowerPoint
Launch PowerPoint if it is not already open, go to the slide you want to embed the YouTube video to, click Insert from menu bar present above the Ribbon, click Video from the Media section at the right end of the Ribbon, click Online Video from the list that appears, in the Enter the URL for the online video field on the Online Video box, paste the URL that you copied earlier, and click Insert to insert YouTube video into PowerPoint.
Step 3: Position the Player
Once the video is added to the PowerPoint slide, drag its frame and reposition it to a suitable location.
Method 2: Embed a YouTube Video with Embed Code (For Microsoft PowerPoint 2016)
Unlike PowerPoint 2019 that accepts URLs and embed codes in a single URL field, MS PowerPoint 2016 lets you choose how you want to insert a video. The step-by-step instructions given below explain how this can be done:
Step 1: Obtain Embed Code
Go to the YouTube video you want to embed to your PowerPoint slide, click the SHARE icon from the left area under the video player, click the Embed icon in the Share box, and click COPY from the bottom-right corner of the Embed Video box that appears next.
Step 2: Get to the PowerPoint’s Insert Video Box
Launch MS PowerPoint 2016, click Insert from the menu bar at the top, from the Media section in the right of the Ribbon, click Video, and then click Online Video to open the Insert Video box.
Step 3: Embed the Video
Paste the embed code you copied earlier in the Paste embed code here field present next to the From a Video Embed Code option, and press Enter to embed YouTube video in PowerPoint.
Method 3: Insert YouTube Video into PowerPoint by Searching Names (For Microsoft PowerPoint 2016)
Microsoft Office 2016 has another lucrative feature that allows users to embed YouTube video in PowerPoint by searching its name. You can follow the steps given below to find the videos published on YouTube, and insert them to your presentation:
Step 1: Get to the Insert Video Box
Use the process explained in Step 2 of Method 2 to get to the Insert Video box after selecting the slide you want to add a video to.
Step 2: Search and Embed a Video
In the Search YouTube field next to the YouTube option, type the name of the video you want to search on YouTube, press Enter, select the video you want to embed, and click Insert to insert YouTube video into PowerPoint.
Method 4: Insert Video from PC
Another method to embed YouTube video in PowerPoint is by downloading the clip to your PC, and then inserting the footage from there. You can use any free YouTube downloader to obtain a video that is available on YouTube.
Once the file is on your computer, the following steps explain how it can be embedded to your PowerPoint slide:
WARNING: YouTube videos may be subject to copyright. Therefore, before downloading and embedding a video to your PowerPoint slide, make sure that you have proper rights to do so, or that the video can be used for the purpose without any written permission from its creator.
Step 1: Get to the Insert Ribbon
Open PowerPoint and select the slide you want to embed a YouTube video to. Go to Insert from the menu bar at the top.
Step 2: Insert the Video
Click the Video icon from the Media section of the Ribbon, click Video on My PC from the list, and use the Insert Video box that appears to select and insert the video to your PowerPoint slide.
Step 3: Resize and/or Modify the Video
Grab any of the six handles of the video you inserted, and drag it inward to decrease the size of the frame. It is advisable to use the corner handle and drag them diagonally to maintain proper aspect ratio of the player’s frame. Next, right-click anywhere inside the frame, click Format Video from the context menu, and use the options that appear in the right pane to make necessary adjustments to the clip like color correction, manage brightness and contrast, etc.
YouTube Embedding Supported PowerPoint Version Checklist
Depending on the version of Microsoft Office you are using, you may or may not be able to embed a YouTube video in PowerPoint. Also, if your version of PowerPoint allows you to do so, the interface and the options may vary from those you see on your friends’ computer or in some online tutorials.
That said, the following table gives a clear picture of which version of Microsoft Office has video embedding option, and/or what level of integration does it allow:
| MS Office Version | Insert YouTube Via URL | Insert an Online Video with an Embed Code | Insert by Searching for the YouTube Video | Play Embedded YouTube Video Offline |
|---|---|---|---|---|
| Microsoft 365 | Yes | No | No | No |
| PowerPoint 2019 | Yes | Yes | No | No |
| PowerPoint 2016 | No | Yes | Yes | No |
| PowerPoint 2013 | No | No | Yes | No |
| PowerPoint 2010 | No | No (Adobe Flash Player Support Discontinued) | No (Adobe Flash Player Support Discontinued) | No |
| PowerPoint 365/2019 for Mac | Yes | No | No | No |
Frequently Asked Questions About Embedding YouTube Videos in PowerPoint
1. Why Can’t I Embed a YouTube Video in PowerPoint 2010?
PowerPoint 2010 uses Adobe Flash Player to play YouTube videos. Since support for Flash Player is discontinued, PowerPoint 2010 isn’t able to play the videos anymore. To resolve this issue, you need to upgrade your version of Microsoft Office to 2013 or later.
2. Why Can’t I Embed YouTube Videos in PowerPoint for Mac?
You can insert YouTube videos only in Office 365 and Office 2019 versions for Mac. If you are using Office 2016 for Mac, you are required to install an add-in called Web Video Player that can be downloaded from the https://appsource.microsoft.com/en-us/product/office/WA104221182 link. However, if it is PowerPoint 2011 for Mac that you are using, you can’t insert YouTube video to it, and you need to upgrade your MS Office to a higher version for that purpose.
3. Why Can’t I Embed a YouTube Video in PowerPoint 2013?
The version of PowerPoint 2013 that was released initially didn’t allow YouTube video embedding. However, with an update 4018374 that Microsoft rolled out in August 2018, the feature got enabled. You can download and install the update from https://support.microsoft.com/en-us/help/4018374/august-7-2018-update-for-powerpoint-2013-kb4018374 link, and then try inserting a YouTube video to your version of PowerPoint.
4. How Do I Embed a YouTube Video in PowerPoint without Being Online?
YouTube videos that you embed to your PowerPoint presentations can’t be played in offline mode. However, there is a workaround to this. You can download the video from YouTube to your computer using any YouTube downloader, and then use the process explained in Method 4 to insert the clip from your PC.
Conclusion
Although the above sections explain how to embed a YouTube video in PowerPoint, the process to do so may vary in different versions of Microsoft Office. Also, depending on what edition of the program you are using, embedding YouTube videos may or may not be supported according to the availability of the add-ins or updates that Microsoft has rolled out for that particular built of the app.
Richard Bennett
Richard Bennett is a writer and a lover of all things video.
Follow @Richard Bennett
Also read:
- Jittery Text Magic Two Dynamic Techniques Explored
- A Step-by-Step Strategy for Merging Your YouTube & TikTok Presence for 2024
- [New] A Step-by-Step Guide to Amplify Your Content Through Spotlighting
- Increasing Viewership and Revenue FameBit's Roadmap to Partnerships
- Top 5 Free YouTube Video Editor Apps for Apple Users
- Exploring the Depths of ASMR Audio Magic
- Amplify Your Audience Maximizing YouTube Viewership
- Elevate Your Vlogs with Epic YouTube Reactions – Discover 3 Pro Tips
- 2024 Approved Comparing Profit Potential DailyMovement and Youtube's Earnings
- 2024 Approved Beyond Boundaries Channel Youtube for Exciting Green Screens
- 2024 Approved Building a Successful Career Through YouTube Short Film-Making
- Skyrocketing Influence Growth in YouTube Audience
- Step-by-Step Finding Your Digital Filming Suite on YouTube
- [Updated] Beginner's Guide to Crafting Trendy Mac Video Content
- [Updated] Design Strategies for Top-Tier Valorant Thumbnails on Social Media
- Create Standout Videos with These Top 7 Free Thumbnail Builders for 2024
- Unlocking YouTube Shorts Secrets
- Epic YouTube's Ultimate Magic & Trick Editing Showstoppers!
- Elevating Brand Awareness with Tailored, Engaging YouTube Banners
- Creating Captivating Mukbang Content Step-By-Step for 2024
- [New] Budget-Conscious Filmmaker's Essential Video Gear List
- 2024 Approved Elevate Your Videography Premiere to YouTube Upload
- 2024 Approved Creating an Ideal Oculus Rift Environment
- Complete Tutorial to Use VPNa to Fake GPS Location On Honor Magic 6 Pro | Dr.fone
- [Updated] Becoming an Exclusive Guest on TikTok Live
- [New] Beyond TikTok The Top 5 Platforms for Video Content Creators
- All About Factory Reset, What Is It and What It Does to Your Vivo Y27s? | Dr.fone
- The Fundamentals of Adding Sound to Still Art Forms for 2024
- 3 Methods to Mirror Honor 100 Pro to Roku | Dr.fone
- [New] Capture Cinematic Moments Seamlessly Across PCs & Smartphones
- [Updated] Top Strategies for High-Quality TikTok Filming
- Capture Brilliance Essential Lighting Hacks for IPhone for 2024
- Can I Bypass a Forgotten Phone Password Of Oppo A38?
- In 2024, Does Airplane Mode Turn off GPS Location On Nokia C110? | Dr.fone
- The Ultimate Guide to Get the Rare Candy on Pokemon Go Fire Red On Honor X9a | Dr.fone
- [New] In 2024, VidCap Quality Check Top Choices for Capturing Action
- Title: "In 2024, Efficient Broadcast Techniques Incorporating YouTube Loops on TV"
- Author: Kevin
- Created at : 2024-06-18 20:20:45
- Updated at : 2024-06-19 20:20:45
- Link: https://youtube-videos.techidaily.com/in-2024-efficient-broadcast-techniques-incorporating-youtube-loops-on-tv/
- License: This work is licensed under CC BY-NC-SA 4.0.
