
:max_bytes(150000):strip_icc()/ArtificalIntelligenceChatbotConcept-c0e491e36fae46ef84b670334af5095f.jpg)
"In 2024, Digital Dollars Crafting an Online Wealth Journey"
Digital Dollars: Crafting an Online Wealth Journey
How To Make Money on YouTube

Richard Bennett
Mar 27, 2024• Proven solutions
Not many YouTubers begin making videos with the aim to get rich. For most, it’s a way to scratch a creative itch, to enjoy being in front of an audience and as an outlet for their talents and opinions. However, the potential to make money on YouTube is huge, and eventually any busy channel is going to start asking itself, how do YouTubers make money?
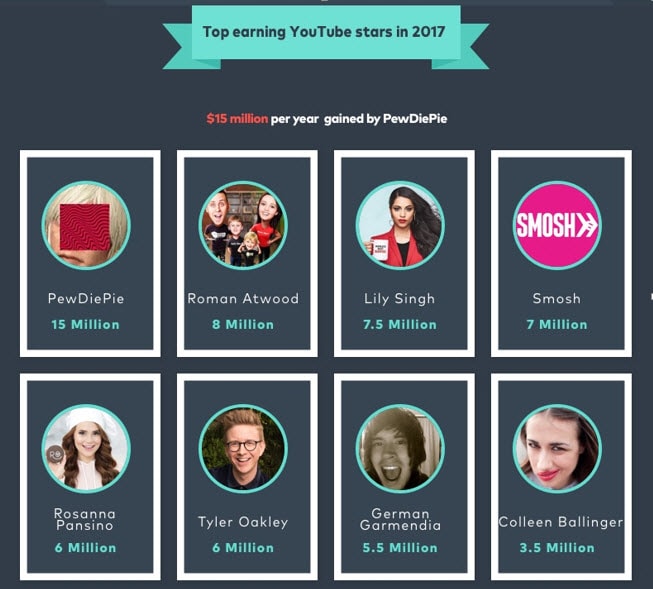
This subject is less about ‘if’ you can make money and more about how to make money on YouTube. It’s been proven time and again that the potential is there, with popular stars like Lily Singh and Roman Atwood generating around $8 million a year. And, of course, everyone’s heard of PewDiePie and his whopping $15 million income.
You don’t need to have a following of millions to earn money on YouTube though; even small channels have a variety of methods available to them to start making their hard work pay. If you’d like to learn how to make money on YouTube, we’re going to look at eight ways of generating an income via your videos. Let’s get started.
How to make money on YouTube
We’ve discovered that making money on YouTube can be split into two main categories; making money through advertising or making money without ads involved. We’ve split our article into these two categories to make it easier for you to see what your options are.
Make money on YouTube with ads
By far the easiest way to start earning money on YouTube is to monetize your channel using ads. Until relatively recently, anyone could enable monetization on their YouTube channel and start earning for every watch of their video. But that all changed in January this year, when Google announced they would be raising the standards required to have ads shown on your channel.
Now, you need to be part of the YouTube Partner Program (YPP), which means you need to have met certain minimum criteria before you can start benefitting from ads. These include:
- Having 4,000 or more watch hours
- Securing 1,000 or more subscribers in the last 12 months
This means that, before you can even consider being a part of the YPP, you’ll need to knuckle down and grow your subscribers. There’s lots of helpful tips out there on increasing subscriber numbers, but it all boils down to creating excellent content. As they say, ‘if you build it, they will come’, so work on creating new and exciting content for your channel to get where you need to be.
Should you join YouTube partner or not?
Meeting the minimum requirements of the YPP is crucial to starting to host ads, but even when you’ve hit the 1k subscribers and 4k hours viewed, should you be monetizing your channel right away? Put it this way; in order to make any money from ads, you’re going to need a lot of views and loyal subscribers, which means your focus needs to be firmly on creating content rather than complying with advertising rules.
Sometimes it’s actually better to hold off for a while when you’re early on in your YouTube journey. This will mean that, rather than being distracted by the question of how to earn money from YouTube, your energy is targeted at what matters most, which is building up a library of awesome videos instead.
How to Join the YouTube Partner Platform?
1. Go to your Account Settings and, under Channel, select Status and features.
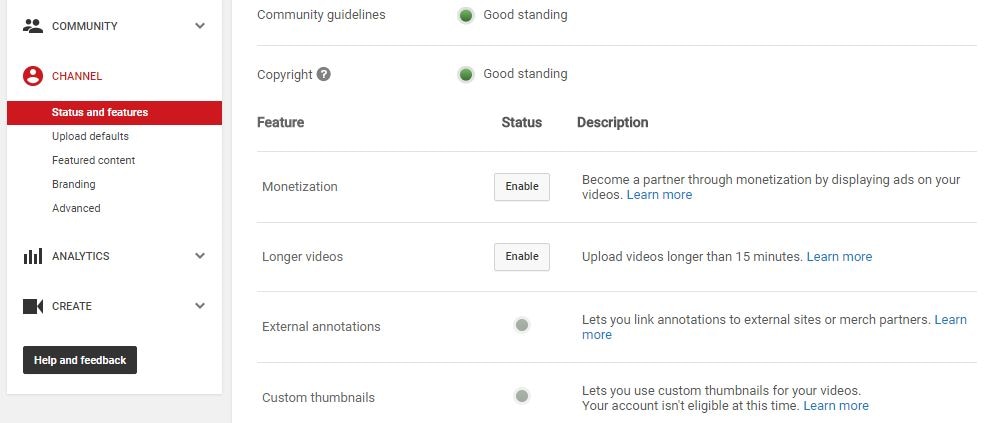
2. Click on Enable next to Monetization.
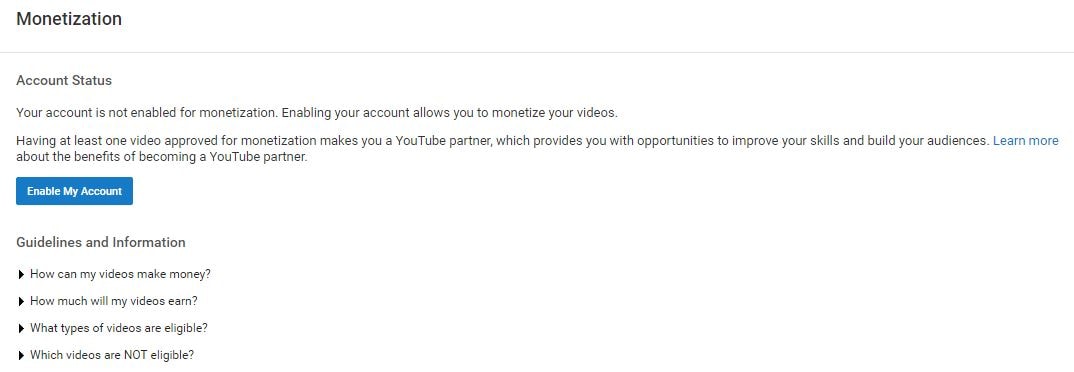
3. In the next screen, click the blue Enable my Account button.
4. The YouTube Partner Program Terms will pop up. Compared to a lot of the “Terms” you are asked to read and agree to when signing up for things online the Partner Terms are fairly short and readable.
5. After reading the terms there are three boxes you will need to check to proceed. The first is to confirm that you read the Terms. The second box is a promise not to click on the ads in your own videos to try to create profits artificially.
The third box requires you to promise not monetize content that you do not own. The most extreme version of this would be stealing somebody else’s video and trying to monetize it on your channel. However, using a song or sound effect in your video you do not have the rights to also counts. There are a lot of places you can get free music to use in your monetized videos, and YouTube’s own Audio Library is one of them.
6. After you have checked all the boxes and moved on you will see a pop up explaining how to monetize your individual videos.
Your channel is now monetized, but you will not be able to earn money until you have linked your channel to your AdSense account.
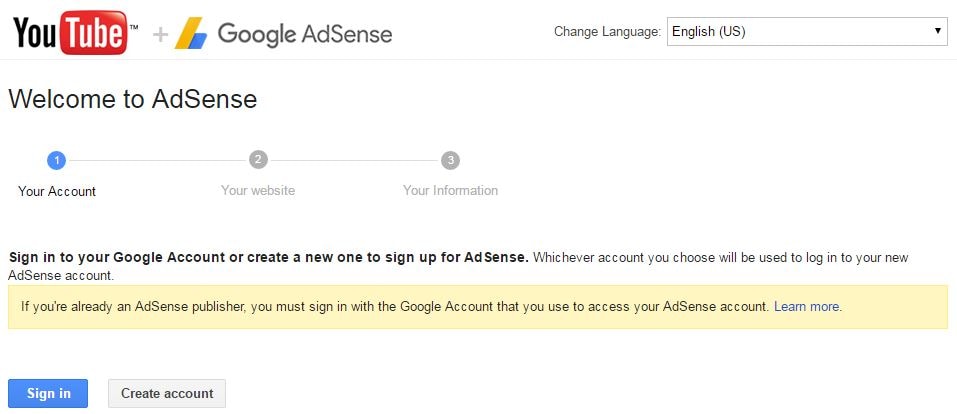
7. There will be a reminder to link your channel and your AdSense account in the next screen. Click on the Link my account button. Or, go to Google.com/adsense and click Sign Up Now. Either method will take you to the Welcome to AdSense page.
8. Click Sign In to sign in to your Google account, which is the same as your YouTube account.
9. After you have signed in it will show you your channel url next to My website and give you a chance to change your language. Click Continue.
10. The last step is to fill out all your contact information before you submit your application. Your approval should come within two days.
11. Go to your Video Manager and check the boxes next to all the videos you want to enable ads for.
12. Click on Actions and then select Monetize.
13. In the window that pops up you will be given a chance to choose what kinds of ads you want to allow in your videos. You must also specify here if you have included paid product placement in your video.
14. Wait for the review process to finish and ads to start appearing in your videos. If you are using any licensed, royalty free, content (like a music track) then YouTube may ask you to prove you have the rights to it.
How much you can get from Ads
The ad revenue generated on YouTube is split between Google and you. You’ll get 55 per cent and Google / YouTube will take the remaining 45 per cent. This means that, if an advertiser spends $200 on your channel, you could be earning $110 directly. You’ll earn both for ‘impressions’, which is the number of views the ad received, and ‘click throughs’, which is when someone clicks on the ad for more information.
Be aware that, in order to get paid, your audience will need to have viewed at least 30 seconds of the ad, or to have clicked through to the advertiser. As a rule, around 15 per cent of viewers will convert into ad revenue, so you can start to calculate just how much your video could be worth.
To give you an example, if you enjoy daily video views in the region of 3,000 views per day and achieve click through / view rates of the average 15 per cent, you’d be earning $0.85 - $1.40 per day or $25 - $43 a month for that one video. If you could increase your views to 5,000 per day, your monthly earnings would rise to $41 - $70 per month.
When working out how to make money on YouTube, keep in mind that every single video has the potential to earn you money. Although one video might only make a dollar a day, imagine when you’ve got 10 videos performing to the same standard, or 100. As you build up your library of content, you have the potential to earn exponentially more as time goes on.
Want to know how much you can get from Ads? Check this YouTube Money Calculator
How to optimize your video to attract advertisers
There is, understandably, a good deal of competition for hosting advertisements on YouTube. In order to get more and better brands advertising in your space, you’ll need to make sure you’ve done all that you can to make your channel attractive to them.
- Target a specific demographic
Your advertisers want to place their products in front of a very specific audience, so the more embedded in your niche your videos are, the more likely you are to attract investment. If you try to be all things to all people, advertisers are going to see that you’re a risky prospect and will move on to a channel that’s more targeted.
To check demographics, YouTube has everything already there for you. In the YouTube Studio, you’ll find the exact demographics of your audience profile, including age, country of origin and gender. You can see how appealing your videos are to the people you are targeting by checking the spread of representation here.
- Pay attention to your video metadata
YouTube metadata is an often-overlooked element of content that is actually incredibly important, both for advertising revenue and for views in general. What we mean when we talk about metadata is your tags, title and description of your video, all of which should make use of high traffic keywords that you’ve researched as being relevant.
YouTube’s own keyword suggestion tool can be a great place to start finding those golden keywords that will get you noticed. Advertisers often use your metadata to locate videos that their customers are watching, so SEO is crucial here. Not only that, but when viewers are looking for new videos to watch, the SEO of your metadata will define where in the search results you fall, so putting some time and energy into this can get you more views too.
- Avoid dodgy video content
There are some types of content which are just not a good idea for YouTube. In fact, the platform could exclude you from advertising altogether if your content is found to contain any of the following:
- Sexually suggestive content: This includes making jokes based around sexual topics, as well as partial nudity of anyone in the video.
- Violence: This ranges from topics of extremism to videos of people sustaining serious injuries, as well as threats and suggestions of violence.
- Inappropriate language: Even the most popular YouTubers have started bleeping out their profanities, so avoid vulgar language or anything that could be construed as being threatening.
- Drugs: Promotion of the use, sale or abuse of drugs and other controlled substances is forbidden.
- Sensitive subjects: This includes references to wars, race crimes, natural disasters, political conflicts, even if you don’t show images of the situation itself.
When you’re considering how do YouTubers make money, you should recognize that those who make the most money avoid creating content that breaches any of these rules. YouTube does notify you if it feels your video is in breach of ‘advertiser friendly’ policies, and you’ll have the chance to contest the ban, but if you steer clear of dodgy content in the first place you shouldn’t run into any issues.
Make money on YouTube without ads
Of course, life is not all about ads, and with YouTube continuing to tighten its criteria around advertising it can be a good idea not to have all your eggs in one basket. Add to this the huge viewership you’re going to need in order to make serious money, it’s worth investigating other methods of making money on YouTube. Here are some of the best ideas.
- Work with brands
Influencer marketing is big business right now, and brands all over the world are investing in individuals who have secured the loyalty and trust of their target demographic. Sponsored videos might feature product placement, promoting a product from your sponsor, or you may be asked to produce a particular piece of content to support their campaign. Check out influencer marketplaces like Famebit, Grapevine Logic and Crowdtap to see what’s available to you. If you want to make work with brands, you can check out InflueNex , a powerful influencer marketing platform, which will help you to build good relationship with brands.
- Selling products or merchandise
Selling ‘merch’ is a great way to discover how to earn money from YouTube. T-shirts, tote bags, mugs, hats…whatever fits with you and your brand can become an amazing source of revenue for your business. Not only does this increase your exposure as a brand by putting it out there into the non-YouTube world, it also gives your fans a way to literally buy into what you’re doing.
- Affiliate marketing
Affiliate marketing doesn’t have to be hard work or complicated. Registering with big sales platforms such as Amazon is often as simple as filling out a couple of forms. Once registered, you can use your own special links to hook your viewers up with a product that you would recommend, and you’ll get a proportion of the final sale value. It’s not only Amazon who offer affiliate programs; most major brands will offer some kind of sales commission, so if you’re in a niche that calls for specialist products to promote, do contact brands directly to find out what they can offer.
- Crowdfund
If you’ve got an amazingly creative idea but lack of funds is stopping you from putting it into action, crowdfunding could be the way to go. Crowdfunded projects can use the money they make to buy better production equipment, hire people to work on the project, pay for props, anything really. A good way to get started with crowdfunding a particular idea is to create a ‘trailer’ or sneak peek that gives people a better idea of what you want to do. Make sure it gets them so excited that they can’t help but donate to your cause!
- Renting out your video
You have the ability to rent out individual videos for cold, hard cash, just like a pay per view service. The options for this are in the Creator Studio, where you can set the amount you want to rent it out for as well as creating an enticing trailer to encourage people to buy. Choose to either sell your video permanently, letting the person view it whenever they like, or rent for a limited time, usually 24 to 72 hours.
- License your content to the media
If you’re lucky enough to make a video that goes viral, you can make serious bucks by licensing it to the wider media. From online news sites to TV shows, there are loads of other content creators out there willing to pay good money to use your amazing clip, and may will reach out to you directly with offers. You can also proactively offer your content for sale via sites like Juken Media, where others can find it and purchase it directly.
Now you know how to earn money from YouTube, what are you going to try? Let us know how you get on and which ways make money for you!
Richard Bennett
Richard Bennett is a writer and a lover of all things video.
Follow @Richard Bennett
Richard Bennett
Mar 27, 2024• Proven solutions
Not many YouTubers begin making videos with the aim to get rich. For most, it’s a way to scratch a creative itch, to enjoy being in front of an audience and as an outlet for their talents and opinions. However, the potential to make money on YouTube is huge, and eventually any busy channel is going to start asking itself, how do YouTubers make money?
This subject is less about ‘if’ you can make money and more about how to make money on YouTube. It’s been proven time and again that the potential is there, with popular stars like Lily Singh and Roman Atwood generating around $8 million a year. And, of course, everyone’s heard of PewDiePie and his whopping $15 million income.
You don’t need to have a following of millions to earn money on YouTube though; even small channels have a variety of methods available to them to start making their hard work pay. If you’d like to learn how to make money on YouTube, we’re going to look at eight ways of generating an income via your videos. Let’s get started.
How to make money on YouTube
We’ve discovered that making money on YouTube can be split into two main categories; making money through advertising or making money without ads involved. We’ve split our article into these two categories to make it easier for you to see what your options are.
Make money on YouTube with ads
By far the easiest way to start earning money on YouTube is to monetize your channel using ads. Until relatively recently, anyone could enable monetization on their YouTube channel and start earning for every watch of their video. But that all changed in January this year, when Google announced they would be raising the standards required to have ads shown on your channel.
Now, you need to be part of the YouTube Partner Program (YPP), which means you need to have met certain minimum criteria before you can start benefitting from ads. These include:
- Having 4,000 or more watch hours
- Securing 1,000 or more subscribers in the last 12 months
This means that, before you can even consider being a part of the YPP, you’ll need to knuckle down and grow your subscribers. There’s lots of helpful tips out there on increasing subscriber numbers, but it all boils down to creating excellent content. As they say, ‘if you build it, they will come’, so work on creating new and exciting content for your channel to get where you need to be.
Should you join YouTube partner or not?
Meeting the minimum requirements of the YPP is crucial to starting to host ads, but even when you’ve hit the 1k subscribers and 4k hours viewed, should you be monetizing your channel right away? Put it this way; in order to make any money from ads, you’re going to need a lot of views and loyal subscribers, which means your focus needs to be firmly on creating content rather than complying with advertising rules.
Sometimes it’s actually better to hold off for a while when you’re early on in your YouTube journey. This will mean that, rather than being distracted by the question of how to earn money from YouTube, your energy is targeted at what matters most, which is building up a library of awesome videos instead.
How to Join the YouTube Partner Platform?
1. Go to your Account Settings and, under Channel, select Status and features.
2. Click on Enable next to Monetization.
3. In the next screen, click the blue Enable my Account button.
4. The YouTube Partner Program Terms will pop up. Compared to a lot of the “Terms” you are asked to read and agree to when signing up for things online the Partner Terms are fairly short and readable.
5. After reading the terms there are three boxes you will need to check to proceed. The first is to confirm that you read the Terms. The second box is a promise not to click on the ads in your own videos to try to create profits artificially.
The third box requires you to promise not monetize content that you do not own. The most extreme version of this would be stealing somebody else’s video and trying to monetize it on your channel. However, using a song or sound effect in your video you do not have the rights to also counts. There are a lot of places you can get free music to use in your monetized videos, and YouTube’s own Audio Library is one of them.
6. After you have checked all the boxes and moved on you will see a pop up explaining how to monetize your individual videos.
Your channel is now monetized, but you will not be able to earn money until you have linked your channel to your AdSense account.
7. There will be a reminder to link your channel and your AdSense account in the next screen. Click on the Link my account button. Or, go to Google.com/adsense and click Sign Up Now. Either method will take you to the Welcome to AdSense page.
8. Click Sign In to sign in to your Google account, which is the same as your YouTube account.
9. After you have signed in it will show you your channel url next to My website and give you a chance to change your language. Click Continue.
10. The last step is to fill out all your contact information before you submit your application. Your approval should come within two days.
11. Go to your Video Manager and check the boxes next to all the videos you want to enable ads for.
12. Click on Actions and then select Monetize.
13. In the window that pops up you will be given a chance to choose what kinds of ads you want to allow in your videos. You must also specify here if you have included paid product placement in your video.
14. Wait for the review process to finish and ads to start appearing in your videos. If you are using any licensed, royalty free, content (like a music track) then YouTube may ask you to prove you have the rights to it.
How much you can get from Ads
The ad revenue generated on YouTube is split between Google and you. You’ll get 55 per cent and Google / YouTube will take the remaining 45 per cent. This means that, if an advertiser spends $200 on your channel, you could be earning $110 directly. You’ll earn both for ‘impressions’, which is the number of views the ad received, and ‘click throughs’, which is when someone clicks on the ad for more information.
Be aware that, in order to get paid, your audience will need to have viewed at least 30 seconds of the ad, or to have clicked through to the advertiser. As a rule, around 15 per cent of viewers will convert into ad revenue, so you can start to calculate just how much your video could be worth.
To give you an example, if you enjoy daily video views in the region of 3,000 views per day and achieve click through / view rates of the average 15 per cent, you’d be earning $0.85 - $1.40 per day or $25 - $43 a month for that one video. If you could increase your views to 5,000 per day, your monthly earnings would rise to $41 - $70 per month.
When working out how to make money on YouTube, keep in mind that every single video has the potential to earn you money. Although one video might only make a dollar a day, imagine when you’ve got 10 videos performing to the same standard, or 100. As you build up your library of content, you have the potential to earn exponentially more as time goes on.
Want to know how much you can get from Ads? Check this YouTube Money Calculator
How to optimize your video to attract advertisers
There is, understandably, a good deal of competition for hosting advertisements on YouTube. In order to get more and better brands advertising in your space, you’ll need to make sure you’ve done all that you can to make your channel attractive to them.
- Target a specific demographic
Your advertisers want to place their products in front of a very specific audience, so the more embedded in your niche your videos are, the more likely you are to attract investment. If you try to be all things to all people, advertisers are going to see that you’re a risky prospect and will move on to a channel that’s more targeted.
To check demographics, YouTube has everything already there for you. In the YouTube Studio, you’ll find the exact demographics of your audience profile, including age, country of origin and gender. You can see how appealing your videos are to the people you are targeting by checking the spread of representation here.
- Pay attention to your video metadata
YouTube metadata is an often-overlooked element of content that is actually incredibly important, both for advertising revenue and for views in general. What we mean when we talk about metadata is your tags, title and description of your video, all of which should make use of high traffic keywords that you’ve researched as being relevant.
YouTube’s own keyword suggestion tool can be a great place to start finding those golden keywords that will get you noticed. Advertisers often use your metadata to locate videos that their customers are watching, so SEO is crucial here. Not only that, but when viewers are looking for new videos to watch, the SEO of your metadata will define where in the search results you fall, so putting some time and energy into this can get you more views too.
- Avoid dodgy video content
There are some types of content which are just not a good idea for YouTube. In fact, the platform could exclude you from advertising altogether if your content is found to contain any of the following:
- Sexually suggestive content: This includes making jokes based around sexual topics, as well as partial nudity of anyone in the video.
- Violence: This ranges from topics of extremism to videos of people sustaining serious injuries, as well as threats and suggestions of violence.
- Inappropriate language: Even the most popular YouTubers have started bleeping out their profanities, so avoid vulgar language or anything that could be construed as being threatening.
- Drugs: Promotion of the use, sale or abuse of drugs and other controlled substances is forbidden.
- Sensitive subjects: This includes references to wars, race crimes, natural disasters, political conflicts, even if you don’t show images of the situation itself.
When you’re considering how do YouTubers make money, you should recognize that those who make the most money avoid creating content that breaches any of these rules. YouTube does notify you if it feels your video is in breach of ‘advertiser friendly’ policies, and you’ll have the chance to contest the ban, but if you steer clear of dodgy content in the first place you shouldn’t run into any issues.
Make money on YouTube without ads
Of course, life is not all about ads, and with YouTube continuing to tighten its criteria around advertising it can be a good idea not to have all your eggs in one basket. Add to this the huge viewership you’re going to need in order to make serious money, it’s worth investigating other methods of making money on YouTube. Here are some of the best ideas.
- Work with brands
Influencer marketing is big business right now, and brands all over the world are investing in individuals who have secured the loyalty and trust of their target demographic. Sponsored videos might feature product placement, promoting a product from your sponsor, or you may be asked to produce a particular piece of content to support their campaign. Check out influencer marketplaces like Famebit, Grapevine Logic and Crowdtap to see what’s available to you. If you want to make work with brands, you can check out InflueNex , a powerful influencer marketing platform, which will help you to build good relationship with brands.
- Selling products or merchandise
Selling ‘merch’ is a great way to discover how to earn money from YouTube. T-shirts, tote bags, mugs, hats…whatever fits with you and your brand can become an amazing source of revenue for your business. Not only does this increase your exposure as a brand by putting it out there into the non-YouTube world, it also gives your fans a way to literally buy into what you’re doing.
- Affiliate marketing
Affiliate marketing doesn’t have to be hard work or complicated. Registering with big sales platforms such as Amazon is often as simple as filling out a couple of forms. Once registered, you can use your own special links to hook your viewers up with a product that you would recommend, and you’ll get a proportion of the final sale value. It’s not only Amazon who offer affiliate programs; most major brands will offer some kind of sales commission, so if you’re in a niche that calls for specialist products to promote, do contact brands directly to find out what they can offer.
- Crowdfund
If you’ve got an amazingly creative idea but lack of funds is stopping you from putting it into action, crowdfunding could be the way to go. Crowdfunded projects can use the money they make to buy better production equipment, hire people to work on the project, pay for props, anything really. A good way to get started with crowdfunding a particular idea is to create a ‘trailer’ or sneak peek that gives people a better idea of what you want to do. Make sure it gets them so excited that they can’t help but donate to your cause!
- Renting out your video
You have the ability to rent out individual videos for cold, hard cash, just like a pay per view service. The options for this are in the Creator Studio, where you can set the amount you want to rent it out for as well as creating an enticing trailer to encourage people to buy. Choose to either sell your video permanently, letting the person view it whenever they like, or rent for a limited time, usually 24 to 72 hours.
- License your content to the media
If you’re lucky enough to make a video that goes viral, you can make serious bucks by licensing it to the wider media. From online news sites to TV shows, there are loads of other content creators out there willing to pay good money to use your amazing clip, and may will reach out to you directly with offers. You can also proactively offer your content for sale via sites like Juken Media, where others can find it and purchase it directly.
Now you know how to earn money from YouTube, what are you going to try? Let us know how you get on and which ways make money for you!
Richard Bennett
Richard Bennett is a writer and a lover of all things video.
Follow @Richard Bennett
Unwind YouTube Videos: Advanced Retrospectives
Best YouTube Video Reverser Online
Richard Bennett
Mar 27, 2024• Proven solutions
While working on the movies in a professional post-production environment, there might be instances where you want to reverse YouTube video to show flashback effect, or to replay a sequence so the audience can experience more thrills while watching.
With that said, not every media player or video editing application is capable enough to reverse a movie clip, not at least with merely a few mouse clicks. Therefore, the following sections suggest some such programs that can help you play YouTube video backward.
Part 1: Best Free YouTube Video Reversers Online
There are a few online web programs that are capable of reversing YouTube videos with efficiency. However, some of them may have certain restrictions like file size limit, number of supported formats, fewer or absolutely no editing options, etc.
Nevertheless, the best five online solutions to reverse YouTube video along with the process of using them are discussed below:
1. Clideo
Clideo is not merely a video reverser, but can also convert media files to your preferred format. You can paste the URL of a YouTube video to upload or import the videos from your computer, Dropbox or Google Drive storage. At the time of this writing, Clideo allows only up to 500MB videos to be uploaded to reverse or convert. As for the acceptability, the portal supports almost all the commonly used formats.

To play YouTube video backward with Clideo:
- Visit Clideo’s online reverse tool page: https://clideo.com/reverse-video ;
- Hover mouse over the down arrow icon next to the Choose file button and paste the URL of the YouTube video that you want to reverse;
- After Clideo fetches the video and opens the next page, choose your preferred speed from the right section
- Leave the Mute video box checked, or uncheck it if required and then click Reverse button to reverse YouTube video. The maximum reverse speed that you can apply is 2X.
2. Kapwing
This web solution also supports almost all types of video formats including 3GPP, AVI, MP4, etc. When talking about the limitations of a free user, you can only upload the videos that are up to 7 minutes long. At the time of this writing, Kapwing can accept the source files from your computer, and from the YouTube URL.

To reverse YouTube video with Kapwing:
- Go to Kapwing’s online video reverser page: https://www.kapwing.com/tools/reverse-video ;
- Paste the URL of the YouTube video in the Paste a URL field;
- Select your preferred playback speed of the reversed video from the Reverse speed section in the left pane;
- Choose whether or not Kapwing should mute the output video;
- Optionally, click Trim video from the upper-left corner of the right window to edit the footage if needed;
- Click CREATE from the bottom-left corner to play YouTube video backward. The maximum reverse speed that you can apply on Kapwing is also 2X.
3. EZGIF
With the ability to support almost all major video formats, and the capability to accept the media files of up to 100MB, Ezgif allows you to upload the footages from your PC, or paste their URL if they are published on YouTube. Even though the landing page has a few distracting adverts, the overall process to play YouTube video backward and save it to your PC is simple.

To reverse YouTube video with Ezgif:
- Go to the reverser tool page: https://ezgif.com/reverse-video and then paste the URL of the YouTube video in the available field;
- Click Upload video and optionally click the speed icon from the toolbar at the top;
- Use the checkboxes and input fields to mute the audio and adjust the playback speed as needed;
- Choose your preferred encoding method from the Output format and encoding drop-down list and then click Reverse video to reverse the video.
Note: It seems that you can’t customize the reverse speed on EZGif but you can choose to mute the reversed audio or not.
4. VideoReverser
Although this web solution has an extremely simple interface, the files that you can upload must not exceed 10MB in size. The portal supports formats like MPG, MPEG, MP4, AVI, M4V, 3GP, etc. for reversing. In addition to uploading the clips from your PC, VideoReverser also allows you to paste the URL of the footages if they are published on YouTube.

To play YouTube video backward with VideoReverser:
- Launch your favorite Internet browser, and then visit https://www.videoreverser.com/ ;
- Paste the URL of the YouTube video in the available text field;
- Choose your preferred output format from the Select output format drop-down list;
- Use the Remove audio track checkbox to get rid of the acoustics or leave the sound enabled;
- Click Start to reverse YouTube video.
5. Pixiko
With almost all formats’ support, Pixiko is yet another web-based media editor that can also reverse YouTube video with a few mouse clicks. At the time of this writing, Pixiko only accepts the source files from your PC, which means you can’t paste the YouTube link to it directly. At first, you need to download or save the YouTube video on computer and then either drag those clips from your local hard drive to the portal.

To play YouTube video backward with Pixiko:
- On the page https://pixiko.com/editor/video-reverse , click anywhere inside the Blue rectangle;
- Locate, select, and upload the downloaded YouTube source video from your PC;
- Click Reverse from the lower-right section of the video player window;
- Follow the on-screen instructions from there to manage and reverse YouTube video as needed;
Bonus: Reversing YouTube Video with Wondershare Filmora
With easily reachable editing options and self-explanatory buttons, Wondershare Filmora has gained a decent amount of popularity in the recent years. The program is available for both Windows and Mac platforms, and gives tough competition to other leading tools of the industry such as Adobe Premiere Pro, Final Cut Pro X, etc.
 Download Mac Version ](https://tools.techidaily.com/wondershare/filmora/download/ )
When talking about the playback speed, with the help of available presets, it can be increased or decreased by 100x or 0.01x respectively. One of the presets also enables you to reverse the direction of the playback quite easily, i.e. while keeping the speed intact. In addition, the ‘Custom Speed’ option lets you control the preferences more granularly.
You can follow the simple instructions given below to reverse YouTube video with Wondershare Filmora:
Note: To remain compliant with the terms and conditions, and to respect the copyright policies, Wondershare Filmora doesn’t allow you to download other people’s videos from YouTube. However, once you have a footage on your PC, you can jump to the following step-by-step process to reverse its playback.
1. Import the Source Video to the Timeline
Launch Wondershare Filmora on your Windows or Mac computer (Windows 10 here), making sure that the Media button in the standard toolbar at the top is selected, click inside the Media window, and select and import the YouTube source video to the program. Next, drag the YouTube video clip to the Timeline, and when the confirmation box appears, click the Match to Media or Keep Project Settings button as needed to get the footage to the Timeline.

2. Reverse the Video (Using the Preset)
Click and select the media clip in the Timeline, click the Speed icon present above the Timeline itself, and click the Reverse option from the menu that appears to reverse the video playback.
![]()
3. Reverse the Video (Manual Control)

Select the media clip in the Timeline and click the Speed icon as explained in the previous step. From the menu that appears, click Custom Speed this time. When the Custom Speed box appears, use the Speed slider to adjust the playback speed of the media clip, and check the Reverse box to reverse YouTube video. Optionally, you can also modify the Duration and Ripple options to customize the preferences. Finally, click OK to save the changes.
4. Export the Video or Upload to YouTube Directly
Back on the main window, click EXPORT from the top. Filmora provides several ways to saving and sharing the video.

You can select the Local tab, choose your preferred output format from the list in the left, in the right window, define a name and location for the file that you are about to export, and click EXPORT from the bottom-right corner to export the video with the reverse playback.

Or, go to the YouTube tab and sign in your YouTube account to upload the reversed video to YouTube directly. In the YouTube upload interface, you can optimize the YouTube SEO elements and revise the video title, description, category and tags.
Download Mac Version ](https://tools.techidaily.com/wondershare/filmora/download/ )
Conclusion
Even though the online video reversers are free and offer simple process to get the job done, the desktop programs like Wondershare Filmora offer more flexibility when it comes to making changes to the media clips, controlling the playback speed, adding effects, applying the modifications only to certain sections of the footage, selecting output preferences, etc. before you can reverse YouTube video.
Richard Bennett
Richard Bennett is a writer and a lover of all things video.
Follow @Richard Bennett
Richard Bennett
Mar 27, 2024• Proven solutions
While working on the movies in a professional post-production environment, there might be instances where you want to reverse YouTube video to show flashback effect, or to replay a sequence so the audience can experience more thrills while watching.
With that said, not every media player or video editing application is capable enough to reverse a movie clip, not at least with merely a few mouse clicks. Therefore, the following sections suggest some such programs that can help you play YouTube video backward.
Part 1: Best Free YouTube Video Reversers Online
There are a few online web programs that are capable of reversing YouTube videos with efficiency. However, some of them may have certain restrictions like file size limit, number of supported formats, fewer or absolutely no editing options, etc.
Nevertheless, the best five online solutions to reverse YouTube video along with the process of using them are discussed below:
1. Clideo
Clideo is not merely a video reverser, but can also convert media files to your preferred format. You can paste the URL of a YouTube video to upload or import the videos from your computer, Dropbox or Google Drive storage. At the time of this writing, Clideo allows only up to 500MB videos to be uploaded to reverse or convert. As for the acceptability, the portal supports almost all the commonly used formats.
To play YouTube video backward with Clideo:
- Visit Clideo’s online reverse tool page: https://clideo.com/reverse-video ;
- Hover mouse over the down arrow icon next to the Choose file button and paste the URL of the YouTube video that you want to reverse;
- After Clideo fetches the video and opens the next page, choose your preferred speed from the right section
- Leave the Mute video box checked, or uncheck it if required and then click Reverse button to reverse YouTube video. The maximum reverse speed that you can apply is 2X.
2. Kapwing
This web solution also supports almost all types of video formats including 3GPP, AVI, MP4, etc. When talking about the limitations of a free user, you can only upload the videos that are up to 7 minutes long. At the time of this writing, Kapwing can accept the source files from your computer, and from the YouTube URL.
To reverse YouTube video with Kapwing:
- Go to Kapwing’s online video reverser page: https://www.kapwing.com/tools/reverse-video ;
- Paste the URL of the YouTube video in the Paste a URL field;
- Select your preferred playback speed of the reversed video from the Reverse speed section in the left pane;
- Choose whether or not Kapwing should mute the output video;
- Optionally, click Trim video from the upper-left corner of the right window to edit the footage if needed;
- Click CREATE from the bottom-left corner to play YouTube video backward. The maximum reverse speed that you can apply on Kapwing is also 2X.
3. EZGIF
With the ability to support almost all major video formats, and the capability to accept the media files of up to 100MB, Ezgif allows you to upload the footages from your PC, or paste their URL if they are published on YouTube. Even though the landing page has a few distracting adverts, the overall process to play YouTube video backward and save it to your PC is simple.
To reverse YouTube video with Ezgif:
- Go to the reverser tool page: https://ezgif.com/reverse-video and then paste the URL of the YouTube video in the available field;
- Click Upload video and optionally click the speed icon from the toolbar at the top;
- Use the checkboxes and input fields to mute the audio and adjust the playback speed as needed;
- Choose your preferred encoding method from the Output format and encoding drop-down list and then click Reverse video to reverse the video.
Note: It seems that you can’t customize the reverse speed on EZGif but you can choose to mute the reversed audio or not.
4. VideoReverser
Although this web solution has an extremely simple interface, the files that you can upload must not exceed 10MB in size. The portal supports formats like MPG, MPEG, MP4, AVI, M4V, 3GP, etc. for reversing. In addition to uploading the clips from your PC, VideoReverser also allows you to paste the URL of the footages if they are published on YouTube.
To play YouTube video backward with VideoReverser:
- Launch your favorite Internet browser, and then visit https://www.videoreverser.com/ ;
- Paste the URL of the YouTube video in the available text field;
- Choose your preferred output format from the Select output format drop-down list;
- Use the Remove audio track checkbox to get rid of the acoustics or leave the sound enabled;
- Click Start to reverse YouTube video.
5. Pixiko
With almost all formats’ support, Pixiko is yet another web-based media editor that can also reverse YouTube video with a few mouse clicks. At the time of this writing, Pixiko only accepts the source files from your PC, which means you can’t paste the YouTube link to it directly. At first, you need to download or save the YouTube video on computer and then either drag those clips from your local hard drive to the portal.
To play YouTube video backward with Pixiko:
- On the page https://pixiko.com/editor/video-reverse , click anywhere inside the Blue rectangle;
- Locate, select, and upload the downloaded YouTube source video from your PC;
- Click Reverse from the lower-right section of the video player window;
- Follow the on-screen instructions from there to manage and reverse YouTube video as needed;
Bonus: Reversing YouTube Video with Wondershare Filmora
With easily reachable editing options and self-explanatory buttons, Wondershare Filmora has gained a decent amount of popularity in the recent years. The program is available for both Windows and Mac platforms, and gives tough competition to other leading tools of the industry such as Adobe Premiere Pro, Final Cut Pro X, etc.
Download Mac Version ](https://tools.techidaily.com/wondershare/filmora/download/ )
When talking about the playback speed, with the help of available presets, it can be increased or decreased by 100x or 0.01x respectively. One of the presets also enables you to reverse the direction of the playback quite easily, i.e. while keeping the speed intact. In addition, the ‘Custom Speed’ option lets you control the preferences more granularly.
You can follow the simple instructions given below to reverse YouTube video with Wondershare Filmora:
Note: To remain compliant with the terms and conditions, and to respect the copyright policies, Wondershare Filmora doesn’t allow you to download other people’s videos from YouTube. However, once you have a footage on your PC, you can jump to the following step-by-step process to reverse its playback.
1. Import the Source Video to the Timeline
Launch Wondershare Filmora on your Windows or Mac computer (Windows 10 here), making sure that the Media button in the standard toolbar at the top is selected, click inside the Media window, and select and import the YouTube source video to the program. Next, drag the YouTube video clip to the Timeline, and when the confirmation box appears, click the Match to Media or Keep Project Settings button as needed to get the footage to the Timeline.
2. Reverse the Video (Using the Preset)
Click and select the media clip in the Timeline, click the Speed icon present above the Timeline itself, and click the Reverse option from the menu that appears to reverse the video playback.
![]()
3. Reverse the Video (Manual Control)
Select the media clip in the Timeline and click the Speed icon as explained in the previous step. From the menu that appears, click Custom Speed this time. When the Custom Speed box appears, use the Speed slider to adjust the playback speed of the media clip, and check the Reverse box to reverse YouTube video. Optionally, you can also modify the Duration and Ripple options to customize the preferences. Finally, click OK to save the changes.
4. Export the Video or Upload to YouTube Directly
Back on the main window, click EXPORT from the top. Filmora provides several ways to saving and sharing the video.
You can select the Local tab, choose your preferred output format from the list in the left, in the right window, define a name and location for the file that you are about to export, and click EXPORT from the bottom-right corner to export the video with the reverse playback.
Or, go to the YouTube tab and sign in your YouTube account to upload the reversed video to YouTube directly. In the YouTube upload interface, you can optimize the YouTube SEO elements and revise the video title, description, category and tags.
Download Mac Version ](https://tools.techidaily.com/wondershare/filmora/download/ )
Conclusion
Even though the online video reversers are free and offer simple process to get the job done, the desktop programs like Wondershare Filmora offer more flexibility when it comes to making changes to the media clips, controlling the playback speed, adding effects, applying the modifications only to certain sections of the footage, selecting output preferences, etc. before you can reverse YouTube video.
Richard Bennett
Richard Bennett is a writer and a lover of all things video.
Follow @Richard Bennett
Also read:
- Professional Guide to Moving Videos From YouTube to Dailymotion
- Discovering New Horizons in Online Videos The Best 27 Non-YouTube Sites for 2024
- In 2024, Edu-Favorites Best Learning YT Channels
- 2024 Approved Essential 3D Toolkit Creating Engaging Video Beginnings
- Laughter Lane Navigating to the Top 15 Funny YouTubers
- 2024 Approved Engaging Your Audience with Optimal Video Concepts
- [Updated] Boosting YouTube Ad Revenue Keeping CC Active
- 2024 Approved Elevate Engagement Top Video Release Slots
- Unveiling Secrets to Boost Engagement in Gaming Vlogs via Hashes
- 2024 Approved Dive Deep Into Video Creation with These Top 12 Vlogger-Friendly Cameras
- [New] Bridging Platform Gaps YouTube Shorts to MP4 Transformation
- 2024 Approved Does YouTube Offer Regular Viewers Money?
- Insightful Comparisons Top Android Applications for YouTube Download
- 2024 Approved Digital Dynamics Mastering YouTube Video Distribution on Facebook
- In 2024, Educational History Vlogs - The Ultimate List
- [Updated] Boost Views Through Effective YouTube Thumbnail Selection
- [Updated] Building a Strong Network How to Form Effective YouTube Partner Relationships
- Efficient Fortnite Imagery Design Quickly for 2024
- In 2024, How to Come up With the Best Pokemon Team On Samsung Galaxy S24 Ultra? | Dr.fone
- [Updated] In 2024, Inception Filming Review Examination
- [Updated] 2024 Approved Pro Tools 2021 Elevating Your TikTok Footage on Mac
- New In 2024, Movie Magic Made Easy Upgrade Your Home Videos to Hollywood Quality
- 2024 Approved Trim, Cut, and Split AVI Files Like a Pro Updated
- New Audio Cutting Techniques for MP4 Video Files for 2024
- 2024 Approved Expert Tips for Maximizing Facebook Video Marketing
- In 2024, How To Pause Life360 Location Sharing For Motorola Moto E13 | Dr.fone
- The Only Guide to Make 2D Rigging Clear to You
- How to Record Your Memorable Honeymoon Video
- [New] Tagging Strategy The List of Powerful Insta Hashtags for 2024
- In 2024, Frame Rates, Speed, and Wondershare Filmora An Overview
- [Updated] Enabling Autoplay Youtube Videos in Social Media Network
- [New] Top 7 Audio Capturers 2023 Edition
- [Updated] From Concept to Creation A Blueprint for Powerful Snap Campaigns for 2024
- [Updated] Optimized OBS Operations on Android Platforms
- Title: "In 2024, Digital Dollars Crafting an Online Wealth Journey"
- Author: Kevin
- Created at : 2024-05-25 15:33:49
- Updated at : 2024-05-26 15:33:49
- Link: https://youtube-videos.techidaily.com/in-2024-digital-dollars-crafting-an-online-wealth-journey/
- License: This work is licensed under CC BY-NC-SA 4.0.
