
:max_bytes(150000):strip_icc()/iphone_photo-5beafcda46e0fb00514cbb56.jpg)
"In 2024, Design Dynamics Top 20 Font Choices for YouTube Success"
Design Dynamics: Top 20 Font Choices for YouTube Success
YouTube has grown in popularity since it was developed and launched. You can watch YouTube videos for educational purposes, entertainment, or catch up with your favorite content creators. Thumbnails are a massive element of what makes a YouTube video successful. You can incorporate numerous fonts into your thumbnails, leaving you feeling stuck on which is the best option.
This article will discuss the 20 best YouTube thumbnail fonts to make your videos amazing.

- Bebas Neue - Popular YouTube Thumbnail Font
- Impact - YouTube Thumbnail Font for Strong Sense
- Montserrat - Good Font for YouTube Thumbnail
- Alfa Slab - YouTube Thumbnail Text Font With a Futuristic Vibe
- Againts - Best Font for YouTube Thumbnail
- Dancing Script - YouTube Thumbnail Font With a Sweat Vibe
- Oswald
- Arial Negrata - Print Font for YouTube Thumbnails
- BlackOpsOne - Best YouTube Thumbnail Font for Gaming Videos
- Beauty and the Beast
- Chucklesome
- Caribold
- Bernhard - Serious YouTube Thumbnail Font
- Dustin Font Quartet
- The Tide - Chunky-Letter Font for YouTube Thumbnails
- Badaboom BB
- River Drive
- Traveler Note
- Free Love Script
- Config Rounded
20 Best Fonts for YouTube Thumbnails To Bring Traffic to Your Videos
Your thumbnail is the first thing your audience will see as they browse on YouTube. Since you only have a few seconds to make a good first impression, it would be wise to make the most out of it.
YouTube thumbnails capture the viewer’s attention and spark their interest. The more eye-catching your thumbnail is, the more likely they will click on your video. If you take your time to make good thumbnails for your YouTube videos, you will undoubtedly increase your channel’s traffic and expand your reach.
Recent research reveals that YouTube thumbnails with text and numbers get more clicks than thumbnails with plain images. Therefore, choosing a great font to accompany your thumbnail would be wise and make it more visually appealing. Stick around for the fun part of the article, where we discuss twenty best fonts for your YouTube thumbnails.
1. Bebas Neue - Popular YouTube Thumbnail Font
The first YouTube thumbnail font on our list is a popular one known as Bebas Neue. You can use this font for your videos and thumbnails regardless of what content you post. The elegant yet sublime design makes it a perfect choice for you if you are just starting out or have yet to explore other options.

2. Impact - YouTube Thumbnail Font for Strong Sense
If you want a straightforward font for your thumbnail, look no further than Impact. Its strong sense makes it the best font for YouTube thumbnails. Even though it is versatile for any content, it is most frequently used on reaction videos, pranks, or reviews.

3. Montserrat - Good Font for YouTube Thumbnail
The letters in the Montserrat video are very simple, with the slightest shadowing and outline. This font is pretty versatile, and you can use it to make thumbnails for laid-back content or more serious and factual videos.

4. Alfa Slab - YouTube Thumbnail Text Font With a Futuristic Vibe
The Alfa slab font has a futuristic vibe to it, making it the perfect choice for content about new innovations or the future of technology. The blocky yet simple letters are easy to read and don’t take away from the main message or the background.

5. Againts - Best Font for YouTube Thumbnail
Suppose you post lots of travel content, share videos of you lounging on the best, or sample a new restaurant. The Againts font has a unique outdoor vibe that makes your videos pop and makes your audience anticipate where you will travel next.
6. Dancing Script - YouTube Thumbnail Font With a Sweat Vibe
The Dancing Script font is a must-have in your arsenal if you wouldn’t want your videos to be too serious. The slanted letters also give your thumbnail a feminine touch, making it great for fashion vlogs or videos about life hacks for ladies.

7. Oswald
The letters in this Oswald font are encapsulated in a dark grey rectangle, making them stand out and easy to read. You could use this font with other backgrounds in your thumbnail to highlight keywords you wouldn’t want your audience to miss as they scroll through YouTube.

8. Arial Negrata - Print Font for YouTube Thumbnails
We couldn’t forget to mention Arial Negrata, which has a beautiful print font and complementary sub-fonts. You can easily vary the fonts’ sizes for emphasis and to capture the interest of your audience.

9. BlackOpsOne - Best YouTube Thumbnail Font for Gaming Videos
Are you tired of the boring print fonts and girly cursive text? If you answer yes, you should check out the BlackOpsOne font, which is unlike anything you have ever seen. This font is perfect for gaming videos or content that involves long streams.

10. Beauty and the Beast
If you are a streamer, gamer, or like to post life hack videos on YouTube, you are probably looking for some good fonts for YouTube thumbnails to make your video less serious. The Beauty and the Beast font is very whimsical, giving your thumbnail a playful feel.

11. Chucklesome
You will immediately recognize this font if you grew up watching many cartoons and reading comic books. Chucklesome is another font with the best font color for YouTube thumbnails, making it an excellent choice if your YouTube channel is about games, movies, or comic books. The artsy typeface, bold letters, and bright colors can capture your audience’s attention from a mile away.

12. Caribold
As the name suggests, the Caribold font for YouTube thumbnails is very bold, and the letters almost jump out of the screen at you. The borders, outline, and shadows emphasize the font, making it hard to miss. You can use this font to create thumbnails for “How To” videos.

13. Bernhard - Serious YouTube Thumbnail Font
Depending on the content you post, you might want to discard the whimsical feel and give your thumbnail a more serious vibe. The Bernhard font is technically an enlarged script font that makes your videos and thumbnails look fresh and elegant. You can use this font for historical or factual videos.

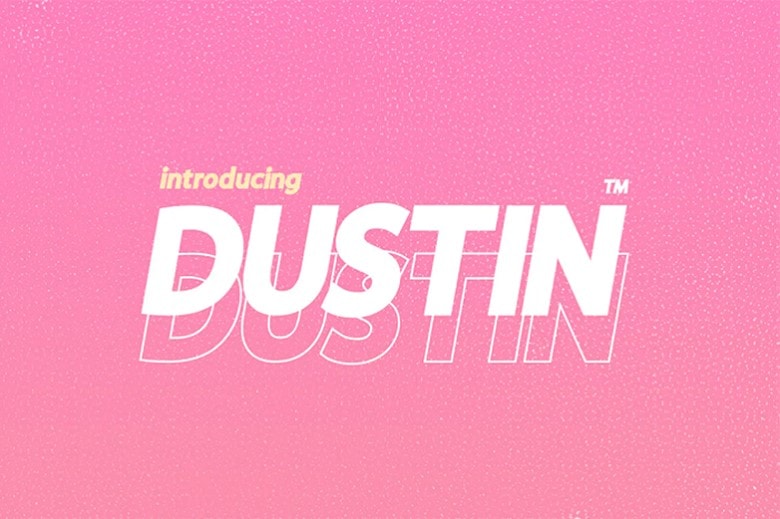
14. Dustin Font Quartet
It is not uncommon for thumbnails to draw inspiration from other brands. The Dustin font is an excellent example of such a font, which is similar to the Supreme brand logo. This font is pretty versatile as it comes in a pack of four fonts, making you spoilt for choice!
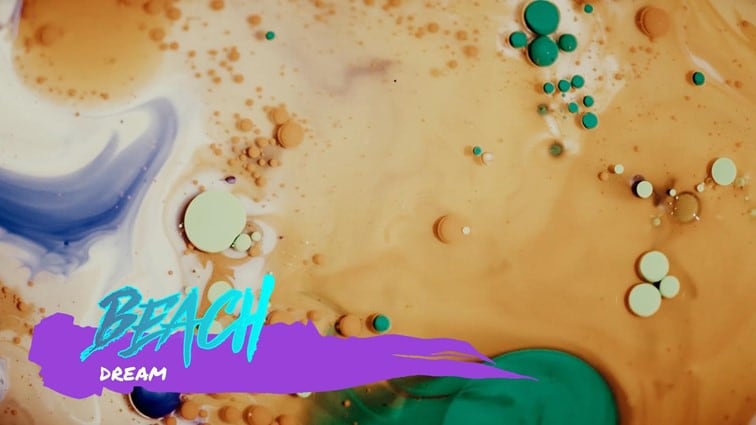
15. The Tide - Chunky-Letter Font for YouTube Thumbnails
The Tide thumbnail font gives a relaxing beach vibe that would be great if you love posting laid-back content. This font also comes with chunky letters, which are easy to read and grab the attention of anyone scrolling through the platform.

16. Badaboom BB
The best font for YouTube thumbnail is Badaboom BB font, which has vibrant colors and unique letters. The red and yellow colors are an absolute showstopper and a must-have if you want your audience to notice you. This font style is excellent for gaming and streaming YouTube videos, where you just want your audience to have a good time.

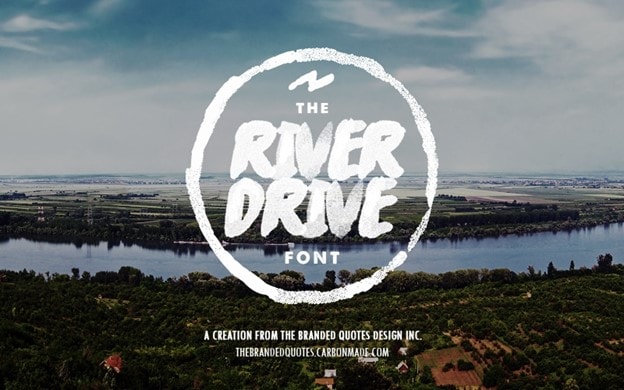
17. River Drive
When inserting text into a thumbnail, you must balance the visual elements to ensure the letters don’t overshadow the image. The River Drive font allows you to create bold yet legible text without removing the stunning photo in the background.
18. Traveler Note
Adventure and travel channels help us know what it’s like to visit a place, even though we haven’t left our couches. The Traveler Note font brings life and cheer to your travel vlogs as you continue introducing us to different parts of the world.

19. Free Love Script
Perhaps your YouTube is missing that feminine touch to tie everything together. The curvy lettering in the Free Love Script is perfect for lifestyle videos or fashion vlogs, which could use a bit of femininity to drive the message home.

20. Config Rounded
If your channel is professional or you post informative content about finances, business, and other important topics, the best YouTube thumbnail font for you is the Config rounded font. It looks pretty modern and works well with any background.

Generate Cool YouTube Thumbnail Texts With Wondershare Filmora
If you have been making YouTube videos for a while now, then you must be familiar with Wondershare Filmora , a top-tier video editing tool. If not, we will discuss some of the features that make it a great editing tool in a short while. You can also use this platform to create and design the perfect thumbnail for your YouTube video.
Free Download For Win 7 or later(64-bit)
Free Download For macOS 10.14 or later

The title editing feature on this platform allows you to add creative text to your video and customize it as you see fit. You can also use Wondershare Filmora to make a title with customizable parameters. For instance, you can edit the text titles using three different fill types: color fill, gradient fill, and image fill.
Wondershare Filmora is an excellent tool to help bring your thumbnails alive and reel the masses in to view more videos from your channel. You cannot possibly exhaust the 107 animation styles, 12 types of shadow effects, and more than ten borders that make your text stand out from the rest. If you are unhappy with your current font, you can choose from over 30 categories of titles till you find one that tickles your fancy.
We couldn’t forget to mention the 3D titles feature with Wondershare Filmora. Gone are the days when creators would use 2D titles to introduce their videos to their audience. Even though not many content creators use 3D titles, you can be among the few that do and gain a competitive advantage. Ensure you peruse through the various categories and find one that speaks to you and fits the kind of content you create.
Below is a step-by-step guide on how to edit YouTube thumbnail text fonts.
Step1 Launch Wondershare Filmora on your device and select “New Project.”

Step2 Click on the icon shown below to import media from your device.

Step3 Drag and drop your photos as shown below to create your YouTube Thumbnail on the platform.
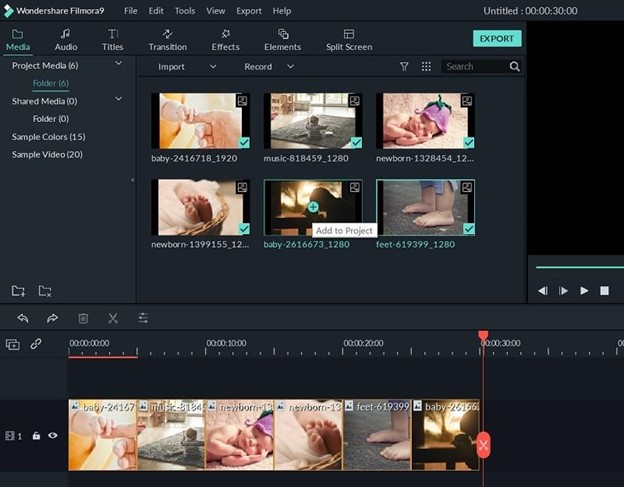
Step4 Add titles to customize the texts in your Thumbnail.

Step5 In the Titles panel, you can customize the font. Filmora offers hundreds of fonts for your choosing.

Step6 Select a still frame to be your thumbnail. Click the camera icon on the right side to take a snapshot.

Step7 The snapshot will appear on the Media panel. Right click the snapshot, and select “Reveal in Explorer” to locate it in your local drive. Then you can use it as your YouTube Thumbnail.

You don’t need to search for fonts on the Internet when Wondershare Filmora offers downloadable fonts. If you are interested in installing fonts in Filmora, watch this video to learn how.
Conclusion
As you generate thumbnails for your YouTube videos, it would be wise to ensure you make them full-sized. The ideal dimension for a YouTube thumbnail should be 1280*720. Since most of your viewers use their mobile phones to watch YouTube videos, it would help to ensure the thumbnail looks the same on your laptop and your mobile device.
A hazy or pixelated thumbnail could discourage the viewer from clicking on your video. We hope you have found a font you like and will incorporate it into your next YouTube video.
20 Best Fonts for YouTube Thumbnails To Bring Traffic to Your Videos
Your thumbnail is the first thing your audience will see as they browse on YouTube. Since you only have a few seconds to make a good first impression, it would be wise to make the most out of it.
YouTube thumbnails capture the viewer’s attention and spark their interest. The more eye-catching your thumbnail is, the more likely they will click on your video. If you take your time to make good thumbnails for your YouTube videos, you will undoubtedly increase your channel’s traffic and expand your reach.
Recent research reveals that YouTube thumbnails with text and numbers get more clicks than thumbnails with plain images. Therefore, choosing a great font to accompany your thumbnail would be wise and make it more visually appealing. Stick around for the fun part of the article, where we discuss twenty best fonts for your YouTube thumbnails.
1. Bebas Neue - Popular YouTube Thumbnail Font
The first YouTube thumbnail font on our list is a popular one known as Bebas Neue. You can use this font for your videos and thumbnails regardless of what content you post. The elegant yet sublime design makes it a perfect choice for you if you are just starting out or have yet to explore other options.
2. Impact - YouTube Thumbnail Font for Strong Sense
If you want a straightforward font for your thumbnail, look no further than Impact. Its strong sense makes it the best font for YouTube thumbnails. Even though it is versatile for any content, it is most frequently used on reaction videos, pranks, or reviews.
3. Montserrat - Good Font for YouTube Thumbnail
The letters in the Montserrat video are very simple, with the slightest shadowing and outline. This font is pretty versatile, and you can use it to make thumbnails for laid-back content or more serious and factual videos.
4. Alfa Slab - YouTube Thumbnail Text Font With a Futuristic Vibe
The Alfa slab font has a futuristic vibe to it, making it the perfect choice for content about new innovations or the future of technology. The blocky yet simple letters are easy to read and don’t take away from the main message or the background.
5. Againts - Best Font for YouTube Thumbnail
Suppose you post lots of travel content, share videos of you lounging on the best, or sample a new restaurant. The Againts font has a unique outdoor vibe that makes your videos pop and makes your audience anticipate where you will travel next.
6. Dancing Script - YouTube Thumbnail Font With a Sweat Vibe
The Dancing Script font is a must-have in your arsenal if you wouldn’t want your videos to be too serious. The slanted letters also give your thumbnail a feminine touch, making it great for fashion vlogs or videos about life hacks for ladies.
7. Oswald
The letters in this Oswald font are encapsulated in a dark grey rectangle, making them stand out and easy to read. You could use this font with other backgrounds in your thumbnail to highlight keywords you wouldn’t want your audience to miss as they scroll through YouTube.
8. Arial Negrata - Print Font for YouTube Thumbnails
We couldn’t forget to mention Arial Negrata, which has a beautiful print font and complementary sub-fonts. You can easily vary the fonts’ sizes for emphasis and to capture the interest of your audience.
9. BlackOpsOne - Best YouTube Thumbnail Font for Gaming Videos
Are you tired of the boring print fonts and girly cursive text? If you answer yes, you should check out the BlackOpsOne font, which is unlike anything you have ever seen. This font is perfect for gaming videos or content that involves long streams.
10. Beauty and the Beast
If you are a streamer, gamer, or like to post life hack videos on YouTube, you are probably looking for some good fonts for YouTube thumbnails to make your video less serious. The Beauty and the Beast font is very whimsical, giving your thumbnail a playful feel.
11. Chucklesome
You will immediately recognize this font if you grew up watching many cartoons and reading comic books. Chucklesome is another font with the best font color for YouTube thumbnails, making it an excellent choice if your YouTube channel is about games, movies, or comic books. The artsy typeface, bold letters, and bright colors can capture your audience’s attention from a mile away.
12. Caribold
As the name suggests, the Caribold font for YouTube thumbnails is very bold, and the letters almost jump out of the screen at you. The borders, outline, and shadows emphasize the font, making it hard to miss. You can use this font to create thumbnails for “How To” videos.
13. Bernhard - Serious YouTube Thumbnail Font
Depending on the content you post, you might want to discard the whimsical feel and give your thumbnail a more serious vibe. The Bernhard font is technically an enlarged script font that makes your videos and thumbnails look fresh and elegant. You can use this font for historical or factual videos.
14. Dustin Font Quartet
It is not uncommon for thumbnails to draw inspiration from other brands. The Dustin font is an excellent example of such a font, which is similar to the Supreme brand logo. This font is pretty versatile as it comes in a pack of four fonts, making you spoilt for choice!
15. The Tide - Chunky-Letter Font for YouTube Thumbnails
The Tide thumbnail font gives a relaxing beach vibe that would be great if you love posting laid-back content. This font also comes with chunky letters, which are easy to read and grab the attention of anyone scrolling through the platform.
16. Badaboom BB
The best font for YouTube thumbnail is Badaboom BB font, which has vibrant colors and unique letters. The red and yellow colors are an absolute showstopper and a must-have if you want your audience to notice you. This font style is excellent for gaming and streaming YouTube videos, where you just want your audience to have a good time.
17. River Drive
When inserting text into a thumbnail, you must balance the visual elements to ensure the letters don’t overshadow the image. The River Drive font allows you to create bold yet legible text without removing the stunning photo in the background.
18. Traveler Note
Adventure and travel channels help us know what it’s like to visit a place, even though we haven’t left our couches. The Traveler Note font brings life and cheer to your travel vlogs as you continue introducing us to different parts of the world.
19. Free Love Script
Perhaps your YouTube is missing that feminine touch to tie everything together. The curvy lettering in the Free Love Script is perfect for lifestyle videos or fashion vlogs, which could use a bit of femininity to drive the message home.
20. Config Rounded
If your channel is professional or you post informative content about finances, business, and other important topics, the best YouTube thumbnail font for you is the Config rounded font. It looks pretty modern and works well with any background.
Generate Cool YouTube Thumbnail Texts With Wondershare Filmora
If you have been making YouTube videos for a while now, then you must be familiar with Wondershare Filmora , a top-tier video editing tool. If not, we will discuss some of the features that make it a great editing tool in a short while. You can also use this platform to create and design the perfect thumbnail for your YouTube video.
Free Download For Win 7 or later(64-bit)
Free Download For macOS 10.14 or later
The title editing feature on this platform allows you to add creative text to your video and customize it as you see fit. You can also use Wondershare Filmora to make a title with customizable parameters. For instance, you can edit the text titles using three different fill types: color fill, gradient fill, and image fill.
Wondershare Filmora is an excellent tool to help bring your thumbnails alive and reel the masses in to view more videos from your channel. You cannot possibly exhaust the 107 animation styles, 12 types of shadow effects, and more than ten borders that make your text stand out from the rest. If you are unhappy with your current font, you can choose from over 30 categories of titles till you find one that tickles your fancy.
We couldn’t forget to mention the 3D titles feature with Wondershare Filmora. Gone are the days when creators would use 2D titles to introduce their videos to their audience. Even though not many content creators use 3D titles, you can be among the few that do and gain a competitive advantage. Ensure you peruse through the various categories and find one that speaks to you and fits the kind of content you create.
Below is a step-by-step guide on how to edit YouTube thumbnail text fonts.
Step1 Launch Wondershare Filmora on your device and select “New Project.”
Step2 Click on the icon shown below to import media from your device.
Step3 Drag and drop your photos as shown below to create your YouTube Thumbnail on the platform.
Step4 Add titles to customize the texts in your Thumbnail.
Step5 In the Titles panel, you can customize the font. Filmora offers hundreds of fonts for your choosing.
Step6 Select a still frame to be your thumbnail. Click the camera icon on the right side to take a snapshot.
Step7 The snapshot will appear on the Media panel. Right click the snapshot, and select “Reveal in Explorer” to locate it in your local drive. Then you can use it as your YouTube Thumbnail.
You don’t need to search for fonts on the Internet when Wondershare Filmora offers downloadable fonts. If you are interested in installing fonts in Filmora, watch this video to learn how.
Conclusion
As you generate thumbnails for your YouTube videos, it would be wise to ensure you make them full-sized. The ideal dimension for a YouTube thumbnail should be 1280*720. Since most of your viewers use their mobile phones to watch YouTube videos, it would help to ensure the thumbnail looks the same on your laptop and your mobile device.
A hazy or pixelated thumbnail could discourage the viewer from clicking on your video. We hope you have found a font you like and will incorporate it into your next YouTube video.
Adobe Premiere Tips: YouTube Video Uploads
How Do I Use Adobe Premiere To Upload YouTube Videos?

Benjamin Arango
Mar 27, 2024• Proven solutions
Whilst getting the editing and post work just right on any project is what we all aim for, the ultimate aim is for other people to see our creations, and the most popular way to achieve that is YouTube . Chances are, if you are producing video, you will be putting some of it on YouTube at some point, so let’s have a look at the most efficient way to get your work from Premiere to YouTube.
Check if your computer meet the Premiere System Requirements >>
This is a basic tutorial about Adobe Premiere, professional video editing software. However, if video editing is new to you, consider Wondershare Filmora , which is a powerful but easy-to-use tool for users just starting out. Download the free trial version below.
 Download Mac Version ](https://tools.techidaily.com/wondershare/filmora/download/ )
How Do I Use Adobe Premiere To Upload YouTube Videos
1. Master Copy
Before exporting your work, it is important to first create a master copy of your project that is ‘as is’, in that it reflects the settings and codecs used in the original footage.
To do this you simply select the sequence within the Timeline or in the Project Panel, and go through the menu tree via File > Export > Media to bring up the export dialogue.

To create your Master Copy, simply select the first option of ‘Match Sequence Settings’, this exports a file that is of the same quality as your original footage, essentially producing a digital copy of the work for archiving before anything else is done.
With you work safe and secure it is now time to look at ensuring the project is suitable for YouTube. With our sequence selected in the Timeline or Project Panel again, we go through the same File > Export > Media path to bring up the media export dialogue as before.
2. Container
The first option we have to consider is the file format that our finished video needs to be in. Here you should refer to YouTube for its guidelines, whilst they do accept a number of file formats, digging through the YouTube help system to find the settings for highest quality we find that they recommend MPEG4 as the container, using the codec.

We can also see further recommended settings in this screenshot that will be covered later.
The good news is that Premiere automatically selects the appropriate container for us when we select our codec, however it is worth knowing the file type YouTube is expecting just to check yourself.
3. Video Codec
So having established that YouTube recommends the MPEG4 container using the codec, the first option we need to look for in the media export dialogue is to select the appropriate Format.
This is the first drop down in the dialogue box, and in this case we simply select from the list.

Once you select you can check the ‘output name’ field and see that premiere is automatically set the output file to .mp4 which is exactly what we need.
4. Preset
The next field we come to is the ‘Preset’ dropdown menu. This is a major help to most people, as Adobe have very kindly included large numbers of presets to quickly adapt video settings to suit specific uses. They vary depending on the exact version of Premiere you are using, and each format type does have its own list of presets, as we can see has a large number for YouTube, but also has many presets for specific devices (presets for iPad, Kindle, Nook, various other tablets and phones, Vimeo and a host of others) to make getting the right settings that bit easier for us.

It is important here to select the correct preset from the various YouTube options. You want to select the resolution and frame rate that match your source file, for the best results. So, if your source file is 1080p with a frame rate of 29.97 fps then that is the YouTube setting you would select.
Once a preset is selected a summary of the settings is displayed below, normally these will be well suited to your project, however you can fine tune anything you wish by selecting the video or audio tabs at the bottom which give you the chance to adjust each parameter individually. If you do this, you can save these changes as a custom preset by clicking the button at the side of the Preset dropdown menu and simply use it on later projects by selecting it from the list the same as any other, a great time saving tool.

5. Rendering
Once you are satisfied with the settings, either from the Preset alone or if you have adjusted anything yourself, you are nearly ready to render the file and export it.
For YouTube it is recommended you select the ‘Use Maximum Render Quality’ option to maintain the best output you can, it does add time to the render process but if you value the quality of your work it is worthwhile.
Finally you can choose a suitable filename and the destination of the file by clicking on the ‘Output Name’ field.
I normally use a filename that includes the destination medium so I can differentiate between different versions of a project and know which one to upload where, in this case I include ‘youtube’, but if I were planning on uploading clips of the project to vimeo as well for instance there may be a cut of the project with ‘vimeo’ in the name too. The destination is personal preference, because I do use filenames to differentiate versions I can put the various iterations into a single project file, others have folder structures for each type of file , so all YouTube output goes into a single folder and so on, how you organize is entirely dependent on how you work.

Once those are selected clicking ‘Export’ starts the rendering process, and eventually (how long depends on the speed of your computer and the size and type of file involved), you will end up with your YouTube optimized video in the location you chose.
Here I created 4 key frames that let the ‘Animation’ object move around the ‘Demo Text’ Object and finally come to rest below it. Whilst this type of effect does look very effective on screen, such is the ease of use of After Effects it really is just a few minutes work to achieve.
Learn more details about How to add text in Premiere >>
6. Uploading
Now you have your file, the next step is to go to your YouTube account and log in if you need to.
On the top of your homepage on the right is the upload button, selecting that brings up the select file menu as below.

You can either drag your file into the window or click on it to open a standard file browser to locate the desired file, click and the upload will begin. The dropdown underneath allows you to set the video as Public, Unlisted or Private. You can change this at any time once the video is uploaded as well.
This opens the upload progress window, where you can add in a name, description and tags as well as add the video to a playlist or adjust the privacy settings as the video is uploading.

Once the upload as finished, you can do final adjustments to settings and choose a thumbnail for the video. The final step is to click the ‘Publish’ button and your video will be processed and go live.

Benjamin Arango
Benjamin Arango is a writer and a lover of all things video.
Follow @Benjamin Arango
Benjamin Arango
Mar 27, 2024• Proven solutions
Whilst getting the editing and post work just right on any project is what we all aim for, the ultimate aim is for other people to see our creations, and the most popular way to achieve that is YouTube . Chances are, if you are producing video, you will be putting some of it on YouTube at some point, so let’s have a look at the most efficient way to get your work from Premiere to YouTube.
Check if your computer meet the Premiere System Requirements >>
This is a basic tutorial about Adobe Premiere, professional video editing software. However, if video editing is new to you, consider Wondershare Filmora , which is a powerful but easy-to-use tool for users just starting out. Download the free trial version below.
Download Mac Version ](https://tools.techidaily.com/wondershare/filmora/download/ )
How Do I Use Adobe Premiere To Upload YouTube Videos
1. Master Copy
Before exporting your work, it is important to first create a master copy of your project that is ‘as is’, in that it reflects the settings and codecs used in the original footage.
To do this you simply select the sequence within the Timeline or in the Project Panel, and go through the menu tree via File > Export > Media to bring up the export dialogue.
To create your Master Copy, simply select the first option of ‘Match Sequence Settings’, this exports a file that is of the same quality as your original footage, essentially producing a digital copy of the work for archiving before anything else is done.
With you work safe and secure it is now time to look at ensuring the project is suitable for YouTube. With our sequence selected in the Timeline or Project Panel again, we go through the same File > Export > Media path to bring up the media export dialogue as before.
2. Container
The first option we have to consider is the file format that our finished video needs to be in. Here you should refer to YouTube for its guidelines, whilst they do accept a number of file formats, digging through the YouTube help system to find the settings for highest quality we find that they recommend MPEG4 as the container, using the codec.
We can also see further recommended settings in this screenshot that will be covered later.
The good news is that Premiere automatically selects the appropriate container for us when we select our codec, however it is worth knowing the file type YouTube is expecting just to check yourself.
3. Video Codec
So having established that YouTube recommends the MPEG4 container using the codec, the first option we need to look for in the media export dialogue is to select the appropriate Format.
This is the first drop down in the dialogue box, and in this case we simply select from the list.
Once you select you can check the ‘output name’ field and see that premiere is automatically set the output file to .mp4 which is exactly what we need.
4. Preset
The next field we come to is the ‘Preset’ dropdown menu. This is a major help to most people, as Adobe have very kindly included large numbers of presets to quickly adapt video settings to suit specific uses. They vary depending on the exact version of Premiere you are using, and each format type does have its own list of presets, as we can see has a large number for YouTube, but also has many presets for specific devices (presets for iPad, Kindle, Nook, various other tablets and phones, Vimeo and a host of others) to make getting the right settings that bit easier for us.
It is important here to select the correct preset from the various YouTube options. You want to select the resolution and frame rate that match your source file, for the best results. So, if your source file is 1080p with a frame rate of 29.97 fps then that is the YouTube setting you would select.
Once a preset is selected a summary of the settings is displayed below, normally these will be well suited to your project, however you can fine tune anything you wish by selecting the video or audio tabs at the bottom which give you the chance to adjust each parameter individually. If you do this, you can save these changes as a custom preset by clicking the button at the side of the Preset dropdown menu and simply use it on later projects by selecting it from the list the same as any other, a great time saving tool.
5. Rendering
Once you are satisfied with the settings, either from the Preset alone or if you have adjusted anything yourself, you are nearly ready to render the file and export it.
For YouTube it is recommended you select the ‘Use Maximum Render Quality’ option to maintain the best output you can, it does add time to the render process but if you value the quality of your work it is worthwhile.
Finally you can choose a suitable filename and the destination of the file by clicking on the ‘Output Name’ field.
I normally use a filename that includes the destination medium so I can differentiate between different versions of a project and know which one to upload where, in this case I include ‘youtube’, but if I were planning on uploading clips of the project to vimeo as well for instance there may be a cut of the project with ‘vimeo’ in the name too. The destination is personal preference, because I do use filenames to differentiate versions I can put the various iterations into a single project file, others have folder structures for each type of file , so all YouTube output goes into a single folder and so on, how you organize is entirely dependent on how you work.
Once those are selected clicking ‘Export’ starts the rendering process, and eventually (how long depends on the speed of your computer and the size and type of file involved), you will end up with your YouTube optimized video in the location you chose.
Here I created 4 key frames that let the ‘Animation’ object move around the ‘Demo Text’ Object and finally come to rest below it. Whilst this type of effect does look very effective on screen, such is the ease of use of After Effects it really is just a few minutes work to achieve.
Learn more details about How to add text in Premiere >>
6. Uploading
Now you have your file, the next step is to go to your YouTube account and log in if you need to.
On the top of your homepage on the right is the upload button, selecting that brings up the select file menu as below.
You can either drag your file into the window or click on it to open a standard file browser to locate the desired file, click and the upload will begin. The dropdown underneath allows you to set the video as Public, Unlisted or Private. You can change this at any time once the video is uploaded as well.
This opens the upload progress window, where you can add in a name, description and tags as well as add the video to a playlist or adjust the privacy settings as the video is uploading.
Once the upload as finished, you can do final adjustments to settings and choose a thumbnail for the video. The final step is to click the ‘Publish’ button and your video will be processed and go live.
Benjamin Arango
Benjamin Arango is a writer and a lover of all things video.
Follow @Benjamin Arango
Also read:
- Pursuing Well-Being Top 10 Yoga Channel Recommendations
- The Breakdown How Your Earnings Are Divided in YouTube Shorts
- In 2024, A Streamlined System for Scrutinizing YouTube Subscriber Profits 3-Step Guide
- In 2024, A Comprehensive Guide to Creating Viral YouTube Shorts Videos
- A Comprehensive Overview Recording, Saving & Sharing YouTube Videos for Free
- Cultivating a Unique Vibe in Your Own Mukbang Content for 2024
- YT Thumbnails Downloading via Browser, App & Command Line
- Securely Download Your YouTube Playlist at Any Time
- In 2024, Cool Climates, Cozy Cinematics Selecting Winter Backgrounds
- Convert Your Streaming Top Free Video to Audio Tools
- [Updated] Economical Options Best 11 Vlogging Gear
- Mastering YouTube A Guide for Gamers' Live Broadcasts
- YouTube's Income Leap at 500 Subs Count
- [Updated] Don't Overlook Tags in Video Description
- Harmonic Hits Top-Rated DJ Template Downloads
- [Updated] How to Buy 1 Million YouTube Views Safely From Trusted Providers
- [New] Essential Gear Picking the Very Best Among Top 9 Free Logomakers
- Decoding Best Practices Navigating Through Top 9 Free Logo Creators
- Efficiently Broadcasting Twitch Streams to YouTube Audiences
- [Updated] Double the Joy Master Looping of YouTube Media on Televisions
- [Updated] Dynamic Thumbnails Captivating Vistas
- [Updated] Discover the Top 9 Free Online Tools to Craft Your Logo
- In 2024, Discovering 8 Ultimate Mirrorless Vlogging Cameras
- In 2024, Engaging Audiences with Effective Haul Video Strategies
- Banner Bliss Savor Your Complimentary Set of Designs!
- In 2024, A Complete Guide to YouTube's Live Image Lore
- The Art and Science of Striking YouTube Live Images
- In 2024, Does Your Channel Benefit From Regular YouTube Payments?
- Top Effort for Quick Setup YouTube Biz Channel Ideas
- Chasing Likes and Loads Jake Paul's YouTube Ambition for 2024
- [Updated] Captivate Crowds Social Media Growth Hacks for YouTube
- 2024 Approved Best Free YouTube Video Editing Apps for iPhone & iPad & How-Tos
- Unleashing Potential Strategic Hashtags for Video Success
- Quick Guide YouTube Videos for Your Instagram Story
- [Updated] Balancing Creativity and Monetization in YouTube Shorts
- 2024 Approved Create a Standout Presence with YouTube Custom Imagery
- In 2024, Brightening Filmmaking Ranking the 17 Best Lights
- Ultimate List Most-Watched Videos Surpassing 100M Views by 2024
- Creating Content with Confidence Free YouTube Training
- 2024 Approved Advanced Filmmaking Techniques Selecting Top-Notch Lenses
- In 2024, 5 Innovative YouTube Thumbnail Designers for Aspiring Filmmakers
- 11 Best Location Changers for Honor X7b | Dr.fone
- The Ultimate List Free Online Video Conferencing Software
- Audio Alchemy Fusing Music and Visuals on Instagram for 2024
- Efficient Game Recordings in the Era of Win10 for 2024
- Will the iPogo Get You Banned and How to Solve It On Motorola G54 5G | Dr.fone
- Updated In 2024, Seek Out Terrifying Auditory Images
- [Updated] Premier Guide to Filmed Action Preservation for 2024
- [Updated] Elevate Your Engagement Essential Apps for Insta Growth
- New In 2024, 8 Frame Rate Video Converters for a Professional Finish
- How to Mirror Vivo V29 Pro to Mac? | Dr.fone
- Updated 2024 Approved Rip & Convert A Step-by-Step Guide to Digitizing Your DVDs
- In 2024, How to Transfer Data from Samsung Galaxy M34 5G to Samsung Phone | Dr.fone
- 6 Proven Ways to Unlock Xiaomi Redmi 12 5G Phone When You Forget the Password
- [New] Essential List 11 Streamers' Go-To Audio Devices for 2024
- In 2024, How to Reset a Tecno Spark Go (2023) Phone that is Locked?
- In 2024, Easy Ways to Manage Your Infinix Hot 30 5G Location Settings | Dr.fone
- In 2024, Android Unlock Code Sim Unlock Your Xiaomi Redmi Note 12 Pro+ 5G Phone and Remove Locked Screen
- In 2024, The 6 Best SIM Unlock Services That Actually Work On Your Lava Yuva 2 Device
- [Updated] In 2024, 8 Best Open Source Video Conferencing Software for Enterprise
- Capture Every Moment - The Power of Spring ScreenRecorder for 2024
- In 2024, How to Detect and Stop mSpy from Spying on Your Motorola Edge 2023 | Dr.fone
- Top Techniques for Awesome Instagram Videos
- 2024 Approved Best Music Video Production Companies for Unforgettable MVs
- [New] 2024 Approved Top 5 iOS Emulators That Bring Your Favorite PSP Worlds to Life
- [New] Vimeo Revenue A Step-by-Step Money-Making Blueprint
- [Updated] 2024 Approved Your Guide to the Funniest & Most Touching Memes on Instagram
- In 2024, Delete Gmail Account With/Without Password On Poco C50
- How to Mirror PC Screen to Oppo Reno 8T Phones? | Dr.fone
- [New] Inadvertent TikTok Redownload – What's Next for 2024
- Top 10 Password Cracking Tools For Samsung Galaxy M54 5G
- [New] Nintendo Switch Pugilists The Ultimate 10-Game Guidebook for 2024
- [Updated] In 2024, Targeted Thought Leadership with Profound FB Video Strategies
- Title: "In 2024, Design Dynamics Top 20 Font Choices for YouTube Success"
- Author: Kevin
- Created at : 2024-05-25 15:33:27
- Updated at : 2024-05-26 15:33:27
- Link: https://youtube-videos.techidaily.com/in-2024-design-dynamics-top-20-font-choices-for-youtube-success/
- License: This work is licensed under CC BY-NC-SA 4.0.
