
:max_bytes(150000):strip_icc()/Childlearningonline_WillieBThomas_Getty-3e51600a64d742a0b5db4fadacead069.jpg)
In 2024, Cut Through the Noise with These Top 10 YT Short Standout Strategies
Cut Through the Noise with These Top 10 YT Short Standout Strategies
10 Expert Suggestions to Make Your YT Shorts Stand Out

Shanoon Cox
Oct 26, 2023• Proven solutions
To make it easier for its audience to find crisp and entertaining content, YouTube has recently come up with a dedicated “Shorts” feature.
Ideally, any YouTube user can find the Shorts option on the app to watch interesting videos of 60 seconds or less. Though, it might take a lot of effort to make your YouTube Shorts videos appealing.
If you also want to go viral, then get to know about these YouTube Shorts tips that every content creator should follow.
YouTube Shorts Feature and Shorts Fund: Things to Know
Before we make you familiar with all kinds of YouTube Shorts tips and tricks, let’s cover some basics. Ideally, YouTube has recently come up with the Shorts feature to focus on short-length videos (and to rival Instagram Reels and TikTok).
You can now find the Shorts icon at the bottom panel on the YouTube app. Using it, you can watch or record short videos on YouTube easily. These are short-form clips of 60 seconds or less that you can create via the Shorts interface of the YouTube app.
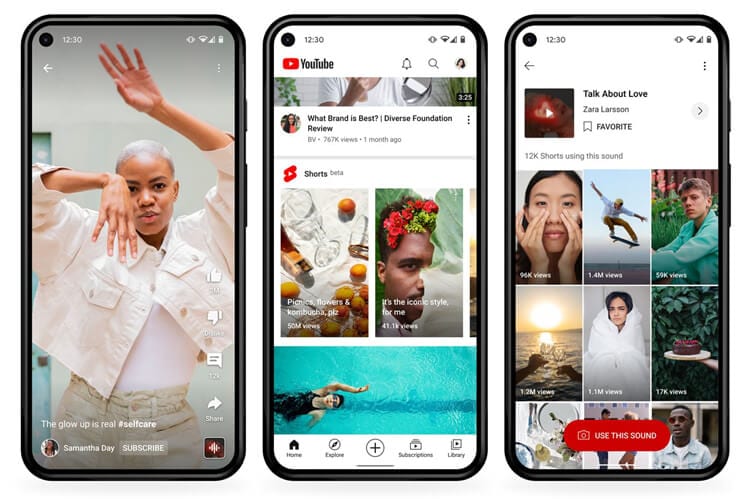
The interface would let you record multiple videos at different intervals and add sound to your clips as well. Later, you can post these short clips on your channel to get more views on YouTube.
YouTube Shorts Fund
YouTube Shorts already hosts a massive number of more than 6 billion daily views as of now. To promote it, Google has come up with a YouTube Shorts Fund of $100M that would be rewarded to various content creators each month.
That is, a “Shorts Bonus” would be added to the account of content creators to appreciate their viral content.
Top 10 Tips for YouTube Shorts That You Must Follow
Now when we have covered all the basics, let’s get to know about some effective YouTube Shorts tricks that would help you come up with interesting content and get more audience for it.
Tip 1: Learn How to Shoot YouTube Shorts
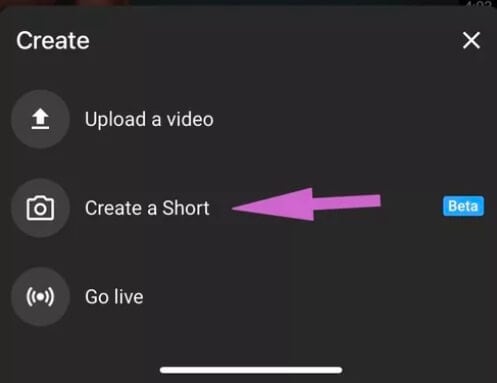
Before you start posting videos on YouTube Shorts, you should know how the feature works. Ideally, you can find a dedicated option for Shorts from the bottom panel on the updated YouTube app. From here, you can watch Shorts or simply choose to create them as well.
You can give YouTube access to your smartphone camera before you start recording. To record anything, you can just tap and hold the red button (the recording icon) on the interface.
As you would release it, the recording would be stopped. In this way, you can seamlessly move from one scene to another without worrying about editing in post-production.
Tip 2: Stick to a Selective Niche
To have a consistent growth of audience on YouTube shorts, you should stick to a specific niche. If you search on YouTube, you can find short videos related to funny, inspirational, fitness, romantic, and all kinds of niches.
Most of the prominent content creators already apply these YouTube Shorts tips in which they first identify their target audience. Based on that, you can work on the type of content that you want to create and share to attain consistent growth on YouTube.
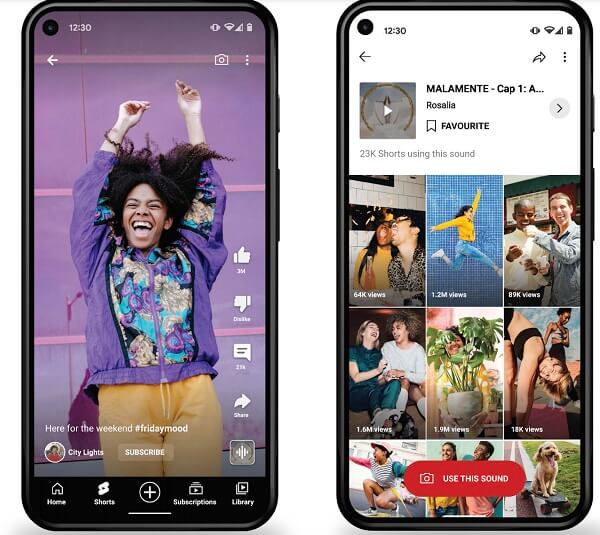
Tip 3: Add Appropriate Background Music to Your Short Videos
One of the best things about YouTube Shorts is that it lets us add a snippet of the music in the background, according to our content. Therefore, you must implement these tips for YouTube Shorts to make the most of this free feature of the app.
After recording your videos, you can tap on the “Sound” or the “Add Music” feature from the interface.
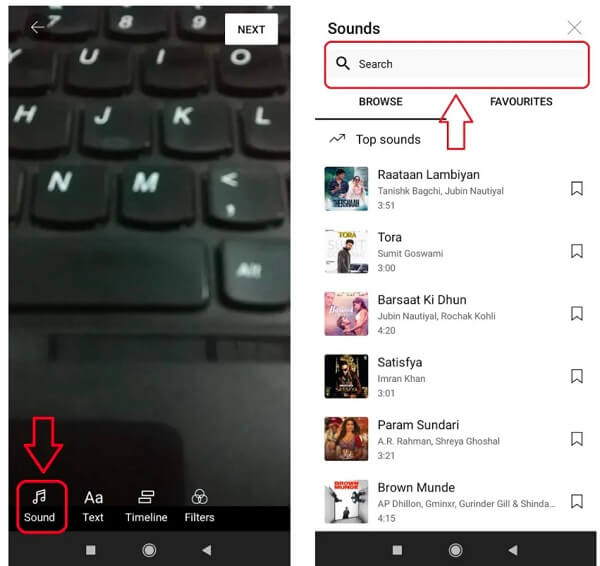
Now, YouTube will automatically load all kinds of trending music that you can use for free. If you want, you can enter the name of any song on the search option of YouTube shorts.
As you would select a track, it will automatically be loaded as the background music for your video. Though, you can also select a specific segment of the track and clip it accordingly to place it on your videos the way you like.
Tip 4: Insert Captions and Text Effects on Your Shorts
Apart from music, you can also add all kinds of text effects to make your YouTube Shorts videos appealing. After you have recorded a video, you can just tap on the text option from the bottom/side panel of the app.
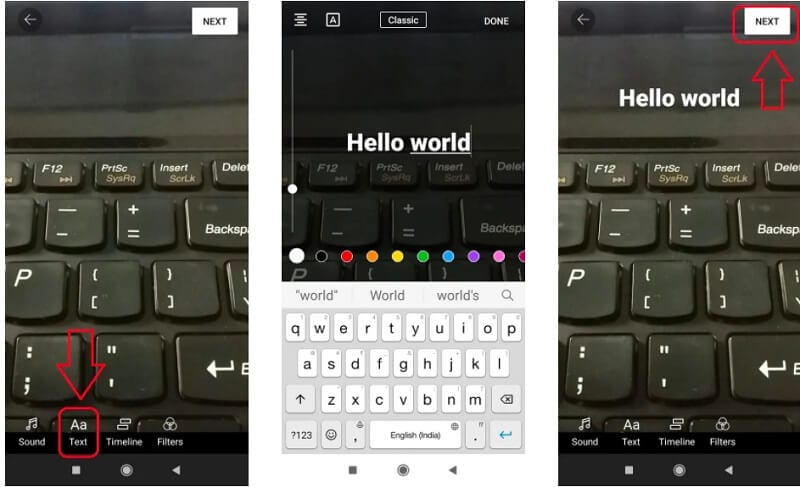
You can now type anything and place it on the video to make it more interesting. If you want, you can also implement these YouTube Shorts tips to add subtitles or pre/post video captions without any hassle.
Tip 5: Adjust the Playback Speed of YouTube Shorts
Since a lot of content creators are coming up with YouTube Shorts, you would have to walk an extra mile to make them more appealing. In these YouTube Shorts tricks, I would recommend adjusting the playback speed of the video.
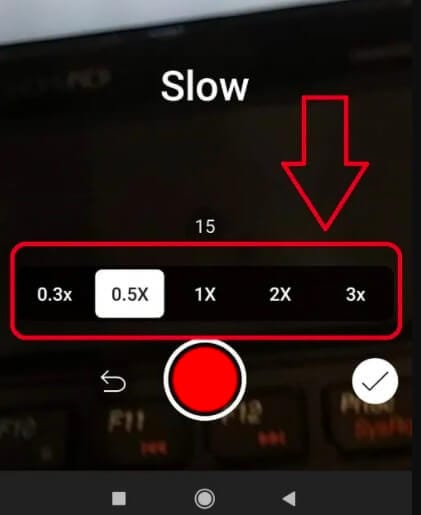
After recording the video, you can tap on the speed icon from the bottom/side panel. Here, you can make your videos play in slow motion or fast forward (in a range of 0.3x to 3x). This will add seamless speed control features to your videos without any technical issues.
Tip 6: Consider the Overall Length of Your Shorts Video
Even though the maximum length of the YouTube Shorts videos is 60 seconds, you don’t have to make it so long. If you look at most of the popular videos on YouTube Shorts, then you will find that they are of less than 30 seconds in length.
Remember, your goal is to come up with crisp and interesting content via YouTube Shorts. To implement these YouTube Shorts tips, you can consider the ideal length of 30-45 seconds and only have essential content in your videos.
Tip 7: Use the Timer Feature to Shoot Your Videos Correctly
A lot of people make the rookie mistake of shooting their videos for too long in Shorts. Therefore, if you want to implement these YouTube Shorts tips and tricks, then consider using the timer feature of the app.

Before shooting the video, you can tap on the timer button from the bottom and set up a preferred duration for it (like 10 or 15 seconds). In this way, you can be sure that you won’t go overboard and keep your videos short automatically.
Tip 8: Set a Preferred Target Audience for YouTube Shorts
Great! Now when you have recorded and edited your video by applying these tips for YouTube Shorts, you are ready to post them. While posting your videos, you would be asked whether the video is targeted at kids or not. If the video is made for kids, then you should select the relevant prompt, as YouTube would improve the overall visibility of your videos in this case.
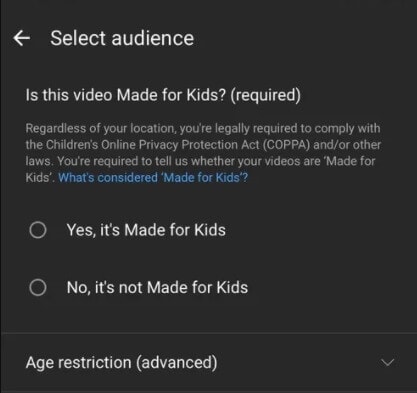
Though, if your videos are targeted at adults, then you should go with the second option instead. This would help you reach out to your target audience on YouTube easily.
Tip 9: Post Your YouTube Shorts the Right Way
Apart from setting the audience preferences of your YouTube Shorts videos, you should also take care of a couple of other things. For instance, you can consider making the visibility of your final video “Public” so that anyone on YouTube can watch it.
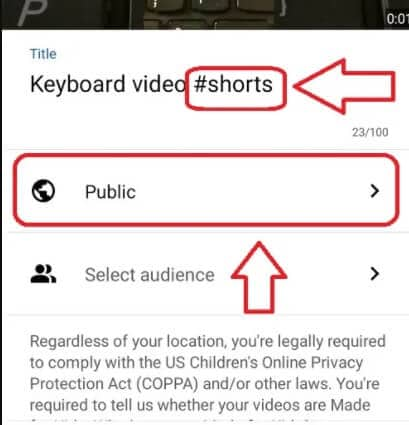
Besides that, it is also recommended to have the keyword “#Shorts” in the title of the video. You can also make the title of the video attractive and can even add a short description that would make your audience click on your YouTube video for sure.
Tip 10: Promote Your YouTube Shorts Video on Other Places
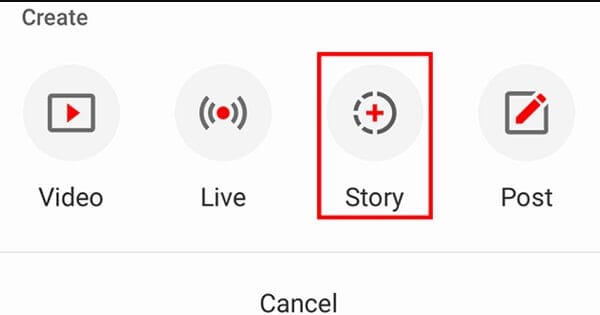
Lastly, posting the YouTube Shorts video is not enough, as you should also promote it to get more views. One of the best YouTube Shorts tips for promotion would be posting the snippet of the video as your Stories on YouTube.
You can also post your YouTube Shorts on other popular social media platforms like Facebook, Twitter, Reddit, WhatsApp, Instagram, etc. by sharing their link. In this way, you can easily redirect your audience from other platforms and increase the visibility of your video.
Bonus Tip: Use a Professional Editor for Your YouTube Shorts Videos
As you can see after going through these YouTube Shorts tricks that the native tool of the app has limited editing options. Therefore, if you want to come up with better videos, then consider using a professional tool like Wondershare Filmora.


The desktop video editing tool has hundreds of filters, transitions, captions, stickers, and other effects to elevate the overall visual appeal of your videos. You can also access numerous AI-integrated features in Filmora and can directly export your videos in YouTube-compatible formats.
Conclusion
That’s a wrap, everyone! I’m sure that after following these expert YouTube Shorts tips and tricks, you can make the most of this newly added YouTube feature. You can consider following the above-listed YouTube Shorts tips to record your videos and make them interesting by adding sound and caption effects.
Though, if you want to make your videos even more appealing, then consider using a reliable and smart video editor like Wondershare Filmora.
Shanoon Cox
Shanoon Cox is a writer and a lover of all things video.
Follow @Shanoon Cox
Shanoon Cox
Oct 26, 2023• Proven solutions
To make it easier for its audience to find crisp and entertaining content, YouTube has recently come up with a dedicated “Shorts” feature.
Ideally, any YouTube user can find the Shorts option on the app to watch interesting videos of 60 seconds or less. Though, it might take a lot of effort to make your YouTube Shorts videos appealing.
If you also want to go viral, then get to know about these YouTube Shorts tips that every content creator should follow.
YouTube Shorts Feature and Shorts Fund: Things to Know
Before we make you familiar with all kinds of YouTube Shorts tips and tricks, let’s cover some basics. Ideally, YouTube has recently come up with the Shorts feature to focus on short-length videos (and to rival Instagram Reels and TikTok).
You can now find the Shorts icon at the bottom panel on the YouTube app. Using it, you can watch or record short videos on YouTube easily. These are short-form clips of 60 seconds or less that you can create via the Shorts interface of the YouTube app.
The interface would let you record multiple videos at different intervals and add sound to your clips as well. Later, you can post these short clips on your channel to get more views on YouTube.
YouTube Shorts Fund
YouTube Shorts already hosts a massive number of more than 6 billion daily views as of now. To promote it, Google has come up with a YouTube Shorts Fund of $100M that would be rewarded to various content creators each month.
That is, a “Shorts Bonus” would be added to the account of content creators to appreciate their viral content.
Top 10 Tips for YouTube Shorts That You Must Follow
Now when we have covered all the basics, let’s get to know about some effective YouTube Shorts tricks that would help you come up with interesting content and get more audience for it.
Tip 1: Learn How to Shoot YouTube Shorts
Before you start posting videos on YouTube Shorts, you should know how the feature works. Ideally, you can find a dedicated option for Shorts from the bottom panel on the updated YouTube app. From here, you can watch Shorts or simply choose to create them as well.
You can give YouTube access to your smartphone camera before you start recording. To record anything, you can just tap and hold the red button (the recording icon) on the interface.
As you would release it, the recording would be stopped. In this way, you can seamlessly move from one scene to another without worrying about editing in post-production.
Tip 2: Stick to a Selective Niche
To have a consistent growth of audience on YouTube shorts, you should stick to a specific niche. If you search on YouTube, you can find short videos related to funny, inspirational, fitness, romantic, and all kinds of niches.
Most of the prominent content creators already apply these YouTube Shorts tips in which they first identify their target audience. Based on that, you can work on the type of content that you want to create and share to attain consistent growth on YouTube.
Tip 3: Add Appropriate Background Music to Your Short Videos
One of the best things about YouTube Shorts is that it lets us add a snippet of the music in the background, according to our content. Therefore, you must implement these tips for YouTube Shorts to make the most of this free feature of the app.
After recording your videos, you can tap on the “Sound” or the “Add Music” feature from the interface.
Now, YouTube will automatically load all kinds of trending music that you can use for free. If you want, you can enter the name of any song on the search option of YouTube shorts.
As you would select a track, it will automatically be loaded as the background music for your video. Though, you can also select a specific segment of the track and clip it accordingly to place it on your videos the way you like.
Tip 4: Insert Captions and Text Effects on Your Shorts
Apart from music, you can also add all kinds of text effects to make your YouTube Shorts videos appealing. After you have recorded a video, you can just tap on the text option from the bottom/side panel of the app.
You can now type anything and place it on the video to make it more interesting. If you want, you can also implement these YouTube Shorts tips to add subtitles or pre/post video captions without any hassle.
Tip 5: Adjust the Playback Speed of YouTube Shorts
Since a lot of content creators are coming up with YouTube Shorts, you would have to walk an extra mile to make them more appealing. In these YouTube Shorts tricks, I would recommend adjusting the playback speed of the video.
After recording the video, you can tap on the speed icon from the bottom/side panel. Here, you can make your videos play in slow motion or fast forward (in a range of 0.3x to 3x). This will add seamless speed control features to your videos without any technical issues.
Tip 6: Consider the Overall Length of Your Shorts Video
Even though the maximum length of the YouTube Shorts videos is 60 seconds, you don’t have to make it so long. If you look at most of the popular videos on YouTube Shorts, then you will find that they are of less than 30 seconds in length.
Remember, your goal is to come up with crisp and interesting content via YouTube Shorts. To implement these YouTube Shorts tips, you can consider the ideal length of 30-45 seconds and only have essential content in your videos.
Tip 7: Use the Timer Feature to Shoot Your Videos Correctly
A lot of people make the rookie mistake of shooting their videos for too long in Shorts. Therefore, if you want to implement these YouTube Shorts tips and tricks, then consider using the timer feature of the app.
Before shooting the video, you can tap on the timer button from the bottom and set up a preferred duration for it (like 10 or 15 seconds). In this way, you can be sure that you won’t go overboard and keep your videos short automatically.
Tip 8: Set a Preferred Target Audience for YouTube Shorts
Great! Now when you have recorded and edited your video by applying these tips for YouTube Shorts, you are ready to post them. While posting your videos, you would be asked whether the video is targeted at kids or not. If the video is made for kids, then you should select the relevant prompt, as YouTube would improve the overall visibility of your videos in this case.
Though, if your videos are targeted at adults, then you should go with the second option instead. This would help you reach out to your target audience on YouTube easily.
Tip 9: Post Your YouTube Shorts the Right Way
Apart from setting the audience preferences of your YouTube Shorts videos, you should also take care of a couple of other things. For instance, you can consider making the visibility of your final video “Public” so that anyone on YouTube can watch it.
Besides that, it is also recommended to have the keyword “#Shorts” in the title of the video. You can also make the title of the video attractive and can even add a short description that would make your audience click on your YouTube video for sure.
Tip 10: Promote Your YouTube Shorts Video on Other Places
Lastly, posting the YouTube Shorts video is not enough, as you should also promote it to get more views. One of the best YouTube Shorts tips for promotion would be posting the snippet of the video as your Stories on YouTube.
You can also post your YouTube Shorts on other popular social media platforms like Facebook, Twitter, Reddit, WhatsApp, Instagram, etc. by sharing their link. In this way, you can easily redirect your audience from other platforms and increase the visibility of your video.
Bonus Tip: Use a Professional Editor for Your YouTube Shorts Videos
As you can see after going through these YouTube Shorts tricks that the native tool of the app has limited editing options. Therefore, if you want to come up with better videos, then consider using a professional tool like Wondershare Filmora.
The desktop video editing tool has hundreds of filters, transitions, captions, stickers, and other effects to elevate the overall visual appeal of your videos. You can also access numerous AI-integrated features in Filmora and can directly export your videos in YouTube-compatible formats.
Conclusion
That’s a wrap, everyone! I’m sure that after following these expert YouTube Shorts tips and tricks, you can make the most of this newly added YouTube feature. You can consider following the above-listed YouTube Shorts tips to record your videos and make them interesting by adding sound and caption effects.
Though, if you want to make your videos even more appealing, then consider using a reliable and smart video editor like Wondershare Filmora.
Shanoon Cox
Shanoon Cox is a writer and a lover of all things video.
Follow @Shanoon Cox
Uploading Made Simple: IOS and YouTube Collaboration
Create High-Quality Video - Wondershare Filmora
An easy and powerful YouTube video editor
Numerous video and audio effects to choose from
Detailed tutorials provided by the official channel
Initially, iOS users had the option to load videos directly to YouTube via the tap-to-upload feature. However, this option is missing in the recent iOS devices versions. Therefore, many users search for possible ways to post a video on YouTube from iPhone. For this, you have to put some considerations into place before moving on. The video title length should not exceed 100 characters, while the description is maintained at 5,000 characters. Also, ensure the video length doesn’t exceed 15 minutes. Let’s roll out the best ways to upload your videos and make that big catch on subscribers.

In this article
01 [ How to upload a video to YouTube from iPhone or iPad](#Part 1)
02 [Why your phone doesn’t post videos to YouTube](#Part 2)
03 [Make your YouTube video better with Filmora](#Part 3)
How to upload a video to YouTube from iPhone or iPad
Are you ready to start on that big adventure and share your videos on YouTube? Follow these steps to learn how to upload a video to YouTube from your iPhone.
Method 1: Upload using the YouTube iOS app
Using the YouTube app is the simplest way to upload your YouTube videos. The YouTube app should be installed on your iOS device.
Step 1. Launch the YouTube app on your device, then sign in to your account. If you don’t have an account yet, you will need to “Sign up” for a new one before continuing the upload process.
Step 2. Click on the “+” icon found at the bottom of the screen.
Step 3. Then choose the “Upload a video” option from the populated list of options.
Step 4. Check out the pop-up that appears and “Allow access” to it.
Step 5. Edit your video to your preference by trimming or cropping as you desire. Then click on the “Next” option.

Step 6. Add “title and description” to your video. Remember, the title should contain less than 100 characters and the description no more than 500 characters.
Step 7. Then set the visibility mode as “Public” to enable you to share your video over the internet.
Step 8. Click on the “Upload” button to finally upload your video to YouTube.

Method 2: Upload using Photo App
The Photo App has a “Share” option that you can use to upload your videos to YouTube. Here is the guide.
Step 1. Go to your iOS device and tap on the “Photos” app.
Step 2. Then tap on the “Videos Folder” to locate the video you wish to upload to YouTube.

Step 3. Next, tap on the video that you want to upload.
Step 4. Then tap on the “Share” icon located at the bottom left of your iOS device screen.
Step 5. You’ll then access a “Share” menu from where you have various share options for your video.
Step 6. Choose the “YouTube” option to continue to share your video there. At this juncture, ensure you have logged in to your Google Account.

Step 7. You need to provide a “Title” and “Description” of your video. Then go to the “Privacy” Options and make your video “Public.”
Step 8. Finally, tap on the “Publish” tab found at the top-right corner of your screen to make your video viewable by the public.

Method 3: Upload video to YouTube using Safari
Safari is another alternative method to upload a video to YouTube.
Step 1. First, go to “youtube.com” on Safari and sign in.

Step 2. Then tap on the “account” icon at the top right side of the screen.
Step 3. Hit on the “Upload” icon and wait to be redirected to the YouTube Studio desktop site.
Step 4. Click on the “Select Files” option.
Step 5. Choose the video you wish to add to YouTube from the “Photo” library and tap on the “Add” button.

Step 6. Add your video’s “title and description” and hit the “Next” button.
Step 7. Tap on the “Next” button once more to go to the “Visibility” page.
Step 8. Select the “Public” option to upload your video to the public.
Why your phone doesn’t post videos to YouTube
Despite learning how to upload to YouTube from iPhone, you may be perplexed to realize that your phone refuses to post videos to YouTube. What could be the reason?
1) YouTube issues
In most cases, the problem doesn’t arise from your phone but from YouTube. This streaming app may also experience some hitches along the way. Remember that even if your phone sync with your YouTube account to upload videos from the “Camera Roll,” YouTube isn’t managed from the Camera Roll but the YouTube app directly. You can solve the issue by signing out of your YouTube account and signing back in.
2) Connection Strength
Some videos may appear quite large and cause a time-out during the upload process. Check your Wi-Fi or internet connection strength to determine if it needs a boost or wait until the streaming strength is strong for a quick upload. Test your internet speed by searching “internet test speed” on Google. Then click the “Run Speed Test” in the search box. A window will open and give you an estimate of the Mbps that your connection is operating at. If too low, switch to other alternatives.
3) Verify your YouTube account
Verifying your account will help you to enjoy YouTube’s full features. It’s then that you’ll manage to upload videos without any drawbacks. Also, that’s when you’ll manage to upload longer videos that go beyond the 15-minute duration.
4) Pay attention to the video size
There is a limit for videos to post to YouTube. If it is too large or long, the upload will cancel before completion.
5) Be patient
YouTube can save your partial upload for 24 hours. So, you can continue to upload from where you left. Learn to be patient as there could be a surge of user traffic, especially during evenings.
Make your YouTube video better with Filmora
Good video quality will make you go miles ahead of your marketing gig. You can use Filmora mobile application to make your videos look better before uploading them to YouTube. This intuitive video editing app has advanced features and several ways to compose creative videos.
- Stunning video effects that let you add animated text to video
- Easily record your voice-overs with its perfect sound effects
- Split functionality that allows you to slice your video footage into two or more separate video clips
- Playback your clips in reverse and adjust the speed for fast or slow motion
- Select the best aspect ratio for your video
- Advanced camera to create emoji selfies and other video beautification
- Directly share your videos to social media sites like YouTube and Facebook.
Check out the steps to edit your video with Filmora on your iOS device
Step 1. Download and install Filmora
For iOS devices, go to the “Apple Store” to download and install the app. Also, allow it to access your videos, camera, and pictures in the process.
Step 2. Import video
You may already have a video in your library that you wish to upload to YouTube. Nonetheless, you can shoot a video afresh to add. To shoot one, you need to settle on a topic before recording and downloading other images you may need. Ensure you watch what you are filming and use adequate lighting during the shooting process.
Next, begin to import your video file. Just open the application and select the “Create new video” option. Then choose the “Video” icon and select a folder that contains the video to be added. Hit the “Add” button from the bottom right corner.
Step 3. Edit video
Filmora has several editing features to make your video better. Use the “Edit tools” feature to turn your video into an impeccable piece. Easily add filters, adjust the speed, or create subtitles, among other functions. You can also split, trim, or delete the unwanted clip parts.
It is important to add a title and description to your video. Just use the “Titles” button to add the title. Other precepts that you can add include transitions, sound like voice-over,
Step 4. Export and share
You’ve just finished creating and editing your video. Click on the “Save” tab and let the application export your video. Then select the “Save to Camera Roll” option to save the video to your iPhone. Finally, you can upload and share the video directly to your YouTube account.
Conclusion
● However, it appears to be a difficult task; you must have found relief after going through these procedures. You don’t need prior knowledge on how to upload a video to YouTube from your iPhone. Several options are at your disposal. You can use the Safari, YouTube app, or the Photo app to upload your videos. The better part is that you can create top-notch videos with Filmora. This mobile video editing app has a lot to offer, ensuring quality content.
Initially, iOS users had the option to load videos directly to YouTube via the tap-to-upload feature. However, this option is missing in the recent iOS devices versions. Therefore, many users search for possible ways to post a video on YouTube from iPhone. For this, you have to put some considerations into place before moving on. The video title length should not exceed 100 characters, while the description is maintained at 5,000 characters. Also, ensure the video length doesn’t exceed 15 minutes. Let’s roll out the best ways to upload your videos and make that big catch on subscribers.
In this article
01 [ How to upload a video to YouTube from iPhone or iPad](#Part 1)
02 [Why your phone doesn’t post videos to YouTube](#Part 2)
03 [Make your YouTube video better with Filmora](#Part 3)
How to upload a video to YouTube from iPhone or iPad
Are you ready to start on that big adventure and share your videos on YouTube? Follow these steps to learn how to upload a video to YouTube from your iPhone.
Method 1: Upload using the YouTube iOS app
Using the YouTube app is the simplest way to upload your YouTube videos. The YouTube app should be installed on your iOS device.
Step 1. Launch the YouTube app on your device, then sign in to your account. If you don’t have an account yet, you will need to “Sign up” for a new one before continuing the upload process.
Step 2. Click on the “+” icon found at the bottom of the screen.
Step 3. Then choose the “Upload a video” option from the populated list of options.
Step 4. Check out the pop-up that appears and “Allow access” to it.
Step 5. Edit your video to your preference by trimming or cropping as you desire. Then click on the “Next” option.
Step 6. Add “title and description” to your video. Remember, the title should contain less than 100 characters and the description no more than 500 characters.
Step 7. Then set the visibility mode as “Public” to enable you to share your video over the internet.
Step 8. Click on the “Upload” button to finally upload your video to YouTube.
Method 2: Upload using Photo App
The Photo App has a “Share” option that you can use to upload your videos to YouTube. Here is the guide.
Step 1. Go to your iOS device and tap on the “Photos” app.
Step 2. Then tap on the “Videos Folder” to locate the video you wish to upload to YouTube.
Step 3. Next, tap on the video that you want to upload.
Step 4. Then tap on the “Share” icon located at the bottom left of your iOS device screen.
Step 5. You’ll then access a “Share” menu from where you have various share options for your video.
Step 6. Choose the “YouTube” option to continue to share your video there. At this juncture, ensure you have logged in to your Google Account.
Step 7. You need to provide a “Title” and “Description” of your video. Then go to the “Privacy” Options and make your video “Public.”
Step 8. Finally, tap on the “Publish” tab found at the top-right corner of your screen to make your video viewable by the public.
Method 3: Upload video to YouTube using Safari
Safari is another alternative method to upload a video to YouTube.
Step 1. First, go to “youtube.com” on Safari and sign in.
Step 2. Then tap on the “account” icon at the top right side of the screen.
Step 3. Hit on the “Upload” icon and wait to be redirected to the YouTube Studio desktop site.
Step 4. Click on the “Select Files” option.
Step 5. Choose the video you wish to add to YouTube from the “Photo” library and tap on the “Add” button.
Step 6. Add your video’s “title and description” and hit the “Next” button.
Step 7. Tap on the “Next” button once more to go to the “Visibility” page.
Step 8. Select the “Public” option to upload your video to the public.
Why your phone doesn’t post videos to YouTube
Despite learning how to upload to YouTube from iPhone, you may be perplexed to realize that your phone refuses to post videos to YouTube. What could be the reason?
1) YouTube issues
In most cases, the problem doesn’t arise from your phone but from YouTube. This streaming app may also experience some hitches along the way. Remember that even if your phone sync with your YouTube account to upload videos from the “Camera Roll,” YouTube isn’t managed from the Camera Roll but the YouTube app directly. You can solve the issue by signing out of your YouTube account and signing back in.
2) Connection Strength
Some videos may appear quite large and cause a time-out during the upload process. Check your Wi-Fi or internet connection strength to determine if it needs a boost or wait until the streaming strength is strong for a quick upload. Test your internet speed by searching “internet test speed” on Google. Then click the “Run Speed Test” in the search box. A window will open and give you an estimate of the Mbps that your connection is operating at. If too low, switch to other alternatives.
3) Verify your YouTube account
Verifying your account will help you to enjoy YouTube’s full features. It’s then that you’ll manage to upload videos without any drawbacks. Also, that’s when you’ll manage to upload longer videos that go beyond the 15-minute duration.
4) Pay attention to the video size
There is a limit for videos to post to YouTube. If it is too large or long, the upload will cancel before completion.
5) Be patient
YouTube can save your partial upload for 24 hours. So, you can continue to upload from where you left. Learn to be patient as there could be a surge of user traffic, especially during evenings.
Make your YouTube video better with Filmora
Good video quality will make you go miles ahead of your marketing gig. You can use Filmora mobile application to make your videos look better before uploading them to YouTube. This intuitive video editing app has advanced features and several ways to compose creative videos.
- Stunning video effects that let you add animated text to video
- Easily record your voice-overs with its perfect sound effects
- Split functionality that allows you to slice your video footage into two or more separate video clips
- Playback your clips in reverse and adjust the speed for fast or slow motion
- Select the best aspect ratio for your video
- Advanced camera to create emoji selfies and other video beautification
- Directly share your videos to social media sites like YouTube and Facebook.
Check out the steps to edit your video with Filmora on your iOS device
Step 1. Download and install Filmora
For iOS devices, go to the “Apple Store” to download and install the app. Also, allow it to access your videos, camera, and pictures in the process.
Step 2. Import video
You may already have a video in your library that you wish to upload to YouTube. Nonetheless, you can shoot a video afresh to add. To shoot one, you need to settle on a topic before recording and downloading other images you may need. Ensure you watch what you are filming and use adequate lighting during the shooting process.
Next, begin to import your video file. Just open the application and select the “Create new video” option. Then choose the “Video” icon and select a folder that contains the video to be added. Hit the “Add” button from the bottom right corner.
Step 3. Edit video
Filmora has several editing features to make your video better. Use the “Edit tools” feature to turn your video into an impeccable piece. Easily add filters, adjust the speed, or create subtitles, among other functions. You can also split, trim, or delete the unwanted clip parts.
It is important to add a title and description to your video. Just use the “Titles” button to add the title. Other precepts that you can add include transitions, sound like voice-over,
Step 4. Export and share
You’ve just finished creating and editing your video. Click on the “Save” tab and let the application export your video. Then select the “Save to Camera Roll” option to save the video to your iPhone. Finally, you can upload and share the video directly to your YouTube account.
Conclusion
● However, it appears to be a difficult task; you must have found relief after going through these procedures. You don’t need prior knowledge on how to upload a video to YouTube from your iPhone. Several options are at your disposal. You can use the Safari, YouTube app, or the Photo app to upload your videos. The better part is that you can create top-notch videos with Filmora. This mobile video editing app has a lot to offer, ensuring quality content.
Also read:
- [Updated] Cutting-Edge Techniques for Setting the Optimal Size of Your YouTube Videos
- In 2024, Essential Tips for YouTube Thumbnail Size
- Crafting a Captivated Audience in 3 Steps for 2024
- Discovering the Top Tools for Engaging Video Beginnings for 2024
- Revealing the Identity of Viewers on YouTube
- How Sony Vegas Transforms Ordinary Footage Into YouTube Stardom
- Premier Video Breakdown FIFA Analysis Graphs
- 2024 Approved Cutting-Edge Video Communities Eclipsing Youtube
- Boosting Your Channel's Viewer Count - 12 Must-Try Approaches for 2024
- How to Create Animated Bouncing Text [2 Ways]
- How to Elevate YouTube Rankings with Optimized Metadata
- The Initial Stages of Joining YouTube as a Chanel Owner
- [New] Cross-Platform Strategies to Boost YouTube Presence
- Mastering Multimedia Strategies for Gamers on Youtube
- [Updated] Achieve Perfect Views with Aspect Ratio Knowledge on YOUTUBE
- Cutting-Edge Templates Unlocking Your Video's Potential
- [Updated] Bridging the Budget Barrier Channel Size Doesn't Matter
- Free Movie Feast Your 2024 Ultimate YouTube Collection
- 2024 Approved 24-Hour Scoreboard Top Ten Viewership Heavyweights on YT
- Unveiling the 2024 Techniques for YouTube to Facebook Synergy
- 2024 Approved DIY Tips to Cut Unwanted Sounds From Your Videos
- [Updated] Elite Audio Modifying Tools Tailored to YouTube Creators
- Secrets Unlocked Starting Your Own Hit Gaming Stream
- In 2024, Dominating the Index YouTube SEO Tools That Work
- [New] Dive Deep Into Duality Mastering Multi-Video Watching on YouTube
- [Updated] Cutting-Edge Techniques Elevating Your YouTube Edits Using iMovie
- Monetization Mastery How AJay Achieves Wealth Online
- Unlocking the Door to Dual Video Playback
- [New] Discover The 7 Most Popular Video Apps for iPhones & Android Live Streaming
- Elevate Your Stream A Comprehensive Ad Revenue Guide on YouTube for 2024
- Top 15 YouTube Intro Templates for Your YouTube Video
- [New] Clearing Up Confusion Addressing YouTube Short Concerns
- [Updated] Channel Collaboration Unified Watch Experience Across Platforms
- Unlock Creator Studio Secrets A Step-by-Step Tutorial
- [Updated] Direct From Device to Digital World Recording Your Apple Gadgets
- Maximizing Online Exposure on YouTube by Keeping Up Creative Commons Usage
- Methodically Uncovering Hidden Video Wonders on YouTube
- In 2024, Everything You Need To Know About Unlocked Apple iPhone 14 Pro Max | Dr.fone
- How To Factory Unlock Your Telstra Apple iPhone SE
- Create the Stranger Things Upside Down Effect Video for 2024
- From Game to Gigabyte An Essential Guide
- 2024 Approved Lightning-Fast Instagram Videos Tips for Mobile Users
- Updated Exploring the Premier Free and Open-Source Windows Audio Tools for 2024
- In 2024, Getting the Pokemon Go GPS Signal Not Found 11 Error in Samsung Galaxy Z Flip 5 | Dr.fone
- Updated Best Websites to Flip Videos Online Without Cost
- [New] 2024 Approved Premier Programs to Transform Webcam Footage
- [New] In 2024, How to Edit Photos on Snapchat
- In 2024, Getting the Pokemon Go GPS Signal Not Found 11 Error in Samsung Galaxy M14 5G | Dr.fone
- In 2024, Pattern Locks Are Unsafe Secure Your Honor X9b Phone Now with These Tips
- How To Teleport Your GPS Location On OnePlus 11 5G? | Dr.fone
- [New] Leveraging Snapchat for Professional Networking & Sales
- In 2024, How to Change Your Oppo Find X6 Pro Location on life360 Without Anyone Knowing? | Dr.fone
- 2024 Approved Perfecting Your Podcast In-Depth Zoom Video Recording Tutorial
- [New] Top 10 TikTok Secrets to Social Success for 2024
- 2024 Approved Banishing Bogus Followers From Instagram Landscape
- Mastering IPTV Screen Capture Techniques for 2024
- [Updated] Guide to Instagram Video Backup with Computer or Laptop
- [Updated] Enhancing Your Feed Step-by-Step Guide for Uploading Videos to Instagram Desktop
- [New] The Complete Handbook for Saving Movies on Desktop, Laptop & Android
- Title: In 2024, Cut Through the Noise with These Top 10 YT Short Standout Strategies
- Author: Kevin
- Created at : 2024-05-25 15:32:15
- Updated at : 2024-05-26 15:32:15
- Link: https://youtube-videos.techidaily.com/in-2024-cut-through-the-noise-with-these-top-10-yt-short-standout-strategies/
- License: This work is licensed under CC BY-NC-SA 4.0.
