

In 2024, Constructing YouTube Playlists Made Simple
Constructing YouTube Playlists Made Simple
How to Create a Playlist on YouTube

Richard Bennett
Mar 27, 2024• Proven solutions
Want to watch the missed-out episodes of your favorite serial? As well know it irritates to find out every single episode on order? But why to worry when YouTube has a separate playlist on your famous tv-series. Want to watch new trending music of 2020? YouTube has a playlist for it. Missing comedy videos from the favorite show on TV? YouTube has a playlist on it. Need to know different ideas about marketing on improving your brand? Yes, you got my point. There is a playlist on YouTube for that as well.

Although it isn’t the latest one on the Internet, it is still the unbeatable application that brings everything in a single screen from trending tunes, entertaining videos, industry backgrounds, and the latest news to your notice that happens every second. Especially if you are an individual with a marketing background or a brand developer, YouTube playlists can do a lot from its side? Need to know what are its benefits and how to create a playlist on YouTube? You are in the right spot.
- Part 1: What is a YouTube Playlist?
- Part 2: YouTube Channel vs. YouTube Playlist
- Part 3: Benefits of Creating a playlist on YouTube
- Part 4: How to Make a YouTube Playlist?
- Part 5: Tips to Improve Your Video SEO
What is a YouTube Playlist?
Irritated from surfing over the Internet for videos related to your concept or topic you are searching for? Else are you a party-hard person who needs continuously playing of fantastic music to keeping the fun going? YouTube playlists are the better option: a collection of videos that keep playing in order, sequentially, and play one after another automatically unless you change it manually.
It is closely related to the music playlists like the ones we find in Spotify and Apple music. Different playlists on YouTube are available in all genres, like entertainment, fun, relaxation, thrilling, and educational niches. Do you have a monotonous routine at the office? Let’s play something crazy and fun-filled like the comedy series or bloopers? Need some workout ideas? Check out the compilation of different custom fitness workouts as a playlist on YouTube. Whatever you want, you can find everything in YouTube playlists.
It is a fantastic app that can do wonders that one could think. Besides being used for the fun-filled purposes, they are content curation tools that can be used by marketers as a platform to attract customers and engage with them with various product videos under a single roof called playlists.
If you are a tricky person who has a changing mindset and different mood-offs, you can create your playlists that combine all your favorite videos from varied niches.
Difference between a Channel and a Playlist on YouTube
There are times where one gets confused with the YouTube channels and playlists. While some say they are similar, the fact is both are different. A person with a specific name creates a channel, and it is the place where the person posts all the videos or uploads them for his/her subscribers to get likes and more audience.
But YouTube playlists are auto-generated contents that consist of videos from different channels but with the same content concept. For example, a PewDiePie channel will have his uploaded videos. Still, PewDiePie playlists will have all his videos and the ones similar to his stream but off the channel. Likewise, self-created playlists will have videos that you have saved to see them later or often.
What are the benefits of a playlist on YouTube?
There are various YouTube and video creators who have undervalued playlists’ importance, and hence the hidden benefits are often off-screen. So, we have listed the top 5 reasons why YouTube playlists are essential and how a YouTuber can benefit from playlists.
1. YouTube playlists help you organize videos in order
YouTube these days appears scattered with numerous information where some are important at the critical instances of time. You also have some playlists that are the effective ones grouped based on a common theme. Suppose your company focuses on selling musical equipment. In that case, you can make separate playlists for a guitar or pianos so that viewers can come across different equipment styles, available variants allowing them to navigate through various parts in your channel. Alongside this, you can tell your viewers what the YouTube channel or the organization is all about at first glance as the first impression is the best expression!
2. Increase the rank of your video
If your video gets added to a playlist, there are high chances for it to be in the YouTube watchlist even it is less popular but related to the ones that the audience prefers. In turn, this act raises your video’s rank as the “total watch time” is a vital factor that drives your video to the highly ranked video list.
3. Playlists account to discoverability and improve visibility on search engines
Apart from being enlisted as single videos, individual videos indexed in playlists get opportunities to appear on the search engines based on the keywords. Playlists are bread slices packed with jam as keywords providing likelihood to emerge on multiple times. But to catch the gain of this method, one has to enrich the video with an outstanding keyword, titles, or description and optimize the video with remarkable SEO techniques.
4. Get more views
When your video comes under a theme and is categorized, the YouTube algorithm places it over with the other related to each other. The next time, your video will appear on the right sidebar below the “related videos.” As the video plays automatically, one after the other, the number of views increases. “Amazing playlists can make viewers watch it longer!”
5. Playlists are best for video SEO
Such playlists can boost and help one to reach your YouTube channel. Especially when it comes to educators or artists, they provide value and save time. Playlists get ranked for keywords that help your audience in reaching you on YouTube.
How to Make a YouTube Playlist?
Surprised to know that a simple playlist has handy benefits that you weren’t aware of still now? Are you excited and eager to create your playlists on YouTube? Here is a step-by-step guide that will guide you on how to make a playlist on YouTube.
1. Open your channel page on YouTube
To start with, open your YouTube channel page and tap the “Customize Channel” button.
2. Create your YouTube playlist
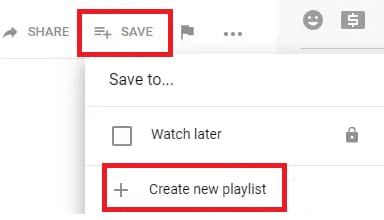
Now, find or select the video you wish to add to the playlist. To save it, click on the “Plus” icon. You can click on “Watch later” that will add the video to your already created playlist from the drop-down.
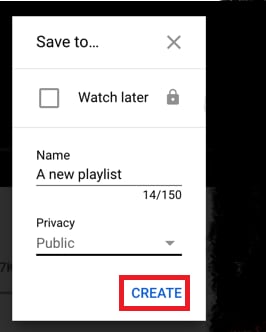
3. Give the playlist a name
Name your new YouTube playlist and make sure it fulfills the criteria of a maximum of 150 characters. Specify the privacy level and make it to the public so that anyone can view it. Once satisfied, tap the “Create” option.
4. Your YouTube playlist is now live
You have successfully made the playlist and added the video to find by clicking on the “Library” option.
Tips to Improve Your Video SEO
As said before, to improve your video playlist and bring it to rank, optimizing your playlists with SEO is mandatory.
1. Make use of appealing titles and depiction
While many viewers don’t prefer reading through the entire description, the title and the Metadata are the major factors that attract viewers at first glance. Hence, pay attention and spend time to build and craft an appealing title. Give importance to the thumbnail image and ensure that it is engaging.
2. Concentrate on keywords
Surf through the various playlists and find keywords used in popular videos related to your niche. Remember, keywords can be included in your titles and increase the chances of increasing the ranking of the video.
3. Prefer the optimal video hosting platform
Set a goal and choose a wise video hosting platform to gain traffic and generate new leads. Before deciding with the right one, consider making trails or find a review from the Internet.
Conclusion
So, now you know every nook and corner on the answers to how to make YouTube playlists and create them through a simple guide yourself. Besides using it for product marketing or brand deliverance, you can use it to make your YouTube channel a popular one. Yes, do you have a collection of videos to showcase the world? Upload them on YouTube as a playlist and optimize it with SEO tips discussed today. Maybe it is an ASMR video or a vlogging one. It can help in reaching your YouTube target audience for sure!
Richard Bennett
Richard Bennett is a writer and a lover of all things video.
Follow @Richard Bennett
Richard Bennett
Mar 27, 2024• Proven solutions
Want to watch the missed-out episodes of your favorite serial? As well know it irritates to find out every single episode on order? But why to worry when YouTube has a separate playlist on your famous tv-series. Want to watch new trending music of 2020? YouTube has a playlist for it. Missing comedy videos from the favorite show on TV? YouTube has a playlist on it. Need to know different ideas about marketing on improving your brand? Yes, you got my point. There is a playlist on YouTube for that as well.
Although it isn’t the latest one on the Internet, it is still the unbeatable application that brings everything in a single screen from trending tunes, entertaining videos, industry backgrounds, and the latest news to your notice that happens every second. Especially if you are an individual with a marketing background or a brand developer, YouTube playlists can do a lot from its side? Need to know what are its benefits and how to create a playlist on YouTube? You are in the right spot.
- Part 1: What is a YouTube Playlist?
- Part 2: YouTube Channel vs. YouTube Playlist
- Part 3: Benefits of Creating a playlist on YouTube
- Part 4: How to Make a YouTube Playlist?
- Part 5: Tips to Improve Your Video SEO
What is a YouTube Playlist?
Irritated from surfing over the Internet for videos related to your concept or topic you are searching for? Else are you a party-hard person who needs continuously playing of fantastic music to keeping the fun going? YouTube playlists are the better option: a collection of videos that keep playing in order, sequentially, and play one after another automatically unless you change it manually.
It is closely related to the music playlists like the ones we find in Spotify and Apple music. Different playlists on YouTube are available in all genres, like entertainment, fun, relaxation, thrilling, and educational niches. Do you have a monotonous routine at the office? Let’s play something crazy and fun-filled like the comedy series or bloopers? Need some workout ideas? Check out the compilation of different custom fitness workouts as a playlist on YouTube. Whatever you want, you can find everything in YouTube playlists.
It is a fantastic app that can do wonders that one could think. Besides being used for the fun-filled purposes, they are content curation tools that can be used by marketers as a platform to attract customers and engage with them with various product videos under a single roof called playlists.
If you are a tricky person who has a changing mindset and different mood-offs, you can create your playlists that combine all your favorite videos from varied niches.
Difference between a Channel and a Playlist on YouTube
There are times where one gets confused with the YouTube channels and playlists. While some say they are similar, the fact is both are different. A person with a specific name creates a channel, and it is the place where the person posts all the videos or uploads them for his/her subscribers to get likes and more audience.
But YouTube playlists are auto-generated contents that consist of videos from different channels but with the same content concept. For example, a PewDiePie channel will have his uploaded videos. Still, PewDiePie playlists will have all his videos and the ones similar to his stream but off the channel. Likewise, self-created playlists will have videos that you have saved to see them later or often.
What are the benefits of a playlist on YouTube?
There are various YouTube and video creators who have undervalued playlists’ importance, and hence the hidden benefits are often off-screen. So, we have listed the top 5 reasons why YouTube playlists are essential and how a YouTuber can benefit from playlists.
1. YouTube playlists help you organize videos in order
YouTube these days appears scattered with numerous information where some are important at the critical instances of time. You also have some playlists that are the effective ones grouped based on a common theme. Suppose your company focuses on selling musical equipment. In that case, you can make separate playlists for a guitar or pianos so that viewers can come across different equipment styles, available variants allowing them to navigate through various parts in your channel. Alongside this, you can tell your viewers what the YouTube channel or the organization is all about at first glance as the first impression is the best expression!
2. Increase the rank of your video
If your video gets added to a playlist, there are high chances for it to be in the YouTube watchlist even it is less popular but related to the ones that the audience prefers. In turn, this act raises your video’s rank as the “total watch time” is a vital factor that drives your video to the highly ranked video list.
3. Playlists account to discoverability and improve visibility on search engines
Apart from being enlisted as single videos, individual videos indexed in playlists get opportunities to appear on the search engines based on the keywords. Playlists are bread slices packed with jam as keywords providing likelihood to emerge on multiple times. But to catch the gain of this method, one has to enrich the video with an outstanding keyword, titles, or description and optimize the video with remarkable SEO techniques.
4. Get more views
When your video comes under a theme and is categorized, the YouTube algorithm places it over with the other related to each other. The next time, your video will appear on the right sidebar below the “related videos.” As the video plays automatically, one after the other, the number of views increases. “Amazing playlists can make viewers watch it longer!”
5. Playlists are best for video SEO
Such playlists can boost and help one to reach your YouTube channel. Especially when it comes to educators or artists, they provide value and save time. Playlists get ranked for keywords that help your audience in reaching you on YouTube.
How to Make a YouTube Playlist?
Surprised to know that a simple playlist has handy benefits that you weren’t aware of still now? Are you excited and eager to create your playlists on YouTube? Here is a step-by-step guide that will guide you on how to make a playlist on YouTube.
1. Open your channel page on YouTube
To start with, open your YouTube channel page and tap the “Customize Channel” button.
2. Create your YouTube playlist
Now, find or select the video you wish to add to the playlist. To save it, click on the “Plus” icon. You can click on “Watch later” that will add the video to your already created playlist from the drop-down.
3. Give the playlist a name
Name your new YouTube playlist and make sure it fulfills the criteria of a maximum of 150 characters. Specify the privacy level and make it to the public so that anyone can view it. Once satisfied, tap the “Create” option.
4. Your YouTube playlist is now live
You have successfully made the playlist and added the video to find by clicking on the “Library” option.
Tips to Improve Your Video SEO
As said before, to improve your video playlist and bring it to rank, optimizing your playlists with SEO is mandatory.
1. Make use of appealing titles and depiction
While many viewers don’t prefer reading through the entire description, the title and the Metadata are the major factors that attract viewers at first glance. Hence, pay attention and spend time to build and craft an appealing title. Give importance to the thumbnail image and ensure that it is engaging.
2. Concentrate on keywords
Surf through the various playlists and find keywords used in popular videos related to your niche. Remember, keywords can be included in your titles and increase the chances of increasing the ranking of the video.
3. Prefer the optimal video hosting platform
Set a goal and choose a wise video hosting platform to gain traffic and generate new leads. Before deciding with the right one, consider making trails or find a review from the Internet.
Conclusion
So, now you know every nook and corner on the answers to how to make YouTube playlists and create them through a simple guide yourself. Besides using it for product marketing or brand deliverance, you can use it to make your YouTube channel a popular one. Yes, do you have a collection of videos to showcase the world? Upload them on YouTube as a playlist and optimize it with SEO tips discussed today. Maybe it is an ASMR video or a vlogging one. It can help in reaching your YouTube target audience for sure!
Richard Bennett
Richard Bennett is a writer and a lover of all things video.
Follow @Richard Bennett
Slash the Size: Efficient Techniques for Reducing YouTube Video Lengths
How to Trim YouTube Videos?
Richard Bennett
Mar 27, 2024• Proven solutions
The world’s largest video sharing platform currently has nearly two billion active monthly users who upload over 400 hours of video content to their channels each minute. It is to see from these statistics why every video aspiring YouTubers post on their channels has to be perfect in every way in order to reach a wide audience. Fortunately, trimming a video even after you’ve uploaded it to YouTube is a quick and easy process, and in this article, we are going to show you a few different methods you can use to trim the videos you upload to YouTube. So, let’s get started.
In this article
- How to Trim a Video After You Upload it to Your YouTube Channel?
- Trimming a Video Before Posting On YouTube with Filmora Video Editor [4 Ways]
- Using Online Video Editing Platforms to Trim YouTube Videos
How to Trim a Video After You Upload it to Your YouTube Channel?
The YouTube Studio is no longer in beta phase, which means that the feature is here to stay. This is good news for all video creators who frequently update their YouTube videos after they upload them, as they no longer have to go through the endless uploads just because they wanted to trim a video.
Make sure that you’re signed into your YouTube channel, then click on your profile picture and select the YouTube Studio (Beta) option. On the left side of the screen, you’ll be able to see a menu that contains different subcategories like Analytics, Dashboard or Videos, so just click on the Videos option and proceed to select a video you’d like to trim. After the Videos submenu appears on the screen you should click on the Editor option and the video you selected will open in the YouTube’s video editor.

Click on the Trim button to start trimming the video and drag the blue bars located at the start and the end of the file to designate the portion of the video you’d like to remove. Preview the changes and confirm what you’ve made by clicking on the Save button located in the upper right corner of the screen and the new shortened version of the video will become available within a couple of hours.

In this way, you don’t need to take down the original video, edit it and re-upload. One of the benefits of trimming YouTube videos with the Trim feature in YouTube Editor is that this will keep your video URL and views and ranks etc.
Trimming a Video Before Posting On YouTube with Filmora Video Editor [4 Ways]


Method 1: Trim on Timeline
YouTubers who don’t want to rely on YouTube’s video editing capabilities can trim their footage with Filmora (to be honest, the Editor in YouTube platform has limited features). Filmora video editing software for PC and Mac computers offers a few different tools for trimming videos. After you’ve created a new project in Filmora, you should import a video clip into the editor by clicking on the Import drop-down menu and select the Import Media Files option. Each file you add to a project will be displayed in the Media tab, and you can just drag and drop it to a video track on the timeline.
All you have to do in order to trim a video after you’ve placed it on the timeline is drag one of its ends to the left or to the right. As you drag one of the clip’s edges the editor will only display the remaining footage while rendering the rest invisible. If at any point you want to access a portion of the video you’ve trimmed you just have to extend the file by dragging it until you’re able to see the segment you’re searching for.

Method 2: Using Filmora Split Tool
Filmora’s Split tool can help you separate the portion of the clip you want to remove from the segment you’d like to keep. Simply place the playhead at the exact location in the video clip where you want to make a cut, and click on the Split icon that looks like a pair of scissors. After the video is split, you should click on the clip you no longer need in order to select it and then hit the Delete button on your keyboard to remove it from the timeline.
Method 3: Using Scene Detection
Wondershare’s video editor also offers an automatic way to split a video clip into a number of separate scenes. Right-click on the video file located in the Filmora’s Media tab, and select the Scene Detection option from the menu and proceed to click on the Detect button, after the Scene Detection window pops up on the screen. The software will then automatically analyze the footage and divide it into separate scenes. Simply click on the Add to Timeline button once the process is completed to continue editing the video clip you’ve just split.

Method 4: Using Instant Cutter Tool
The Instant Cutter Tool enables you to quickly trim or merge high-resolution files recorded on action cameras as soon as you import them into a project in Filmora. Select the Import with Instant Cutter Tool option from the Import drop-down menu and wait for the Filmora Instant Cutter window to appear on the screen. In the upper left corner of this window, you will be able to see Trim and Merge tabs. Make sure that the Trim tab is selected and then click on the Open File button to import a video clip you’d like to trim. You can then use the trimming sliders to designate the parts of the video you’d like to remove or the set the In and Out points by clicking on the Set In Point or Set Out Point icons. Click on the Export button to save the new version of the video clip and click OK to complete the process.

Using Online Video Editing Platforms to Trim YouTube Videos
In case you’re looking for a tool that lets you save extracts of scenes from YouTube to your computer free of charge YT Cutter may be one of your best options.

This online video editing platform is remarkably easy to use since you just have to copy the link to the YouTube video you’d like to trim into YT Cutter’s URL box and then select how long the new video should be. Click on the Start and End buttons to set the duration of the video and click on the Download button to choose if you want to create a video, GIF or an audio file. The trimmed YouTube video will be available for download as soon as the platform processes it, and you just need to specify a folder on your hard drive before clicking on the Save button.
There’re many online video trimmers available on the market, some of them are totally free to use, check our guide about How to Trim Videos for Free Online .
Read More to Get : How to Download YouTube Videos without Any Software Easily >>
Conclusion
Trimming a video online or with a video editing software like Filmora is an effortless task that can be completed in just a couple of minutes. However, it is better to complete the entire video editing process before you upload a video to your YouTube channel because YouTube Studio and other online video editing platforms still offer only a limited amount of video editing tools. Which method of trimming YouTube videos do you like using the most? Leave a comment and share your opinions with us.
Richard Bennett
Richard Bennett is a writer and a lover of all things video.
Follow @Richard Bennett
Richard Bennett
Mar 27, 2024• Proven solutions
The world’s largest video sharing platform currently has nearly two billion active monthly users who upload over 400 hours of video content to their channels each minute. It is to see from these statistics why every video aspiring YouTubers post on their channels has to be perfect in every way in order to reach a wide audience. Fortunately, trimming a video even after you’ve uploaded it to YouTube is a quick and easy process, and in this article, we are going to show you a few different methods you can use to trim the videos you upload to YouTube. So, let’s get started.
In this article
- How to Trim a Video After You Upload it to Your YouTube Channel?
- Trimming a Video Before Posting On YouTube with Filmora Video Editor [4 Ways]
- Using Online Video Editing Platforms to Trim YouTube Videos
How to Trim a Video After You Upload it to Your YouTube Channel?
The YouTube Studio is no longer in beta phase, which means that the feature is here to stay. This is good news for all video creators who frequently update their YouTube videos after they upload them, as they no longer have to go through the endless uploads just because they wanted to trim a video.
Make sure that you’re signed into your YouTube channel, then click on your profile picture and select the YouTube Studio (Beta) option. On the left side of the screen, you’ll be able to see a menu that contains different subcategories like Analytics, Dashboard or Videos, so just click on the Videos option and proceed to select a video you’d like to trim. After the Videos submenu appears on the screen you should click on the Editor option and the video you selected will open in the YouTube’s video editor.
Click on the Trim button to start trimming the video and drag the blue bars located at the start and the end of the file to designate the portion of the video you’d like to remove. Preview the changes and confirm what you’ve made by clicking on the Save button located in the upper right corner of the screen and the new shortened version of the video will become available within a couple of hours.
In this way, you don’t need to take down the original video, edit it and re-upload. One of the benefits of trimming YouTube videos with the Trim feature in YouTube Editor is that this will keep your video URL and views and ranks etc.
Trimming a Video Before Posting On YouTube with Filmora Video Editor [4 Ways]
Method 1: Trim on Timeline
YouTubers who don’t want to rely on YouTube’s video editing capabilities can trim their footage with Filmora (to be honest, the Editor in YouTube platform has limited features). Filmora video editing software for PC and Mac computers offers a few different tools for trimming videos. After you’ve created a new project in Filmora, you should import a video clip into the editor by clicking on the Import drop-down menu and select the Import Media Files option. Each file you add to a project will be displayed in the Media tab, and you can just drag and drop it to a video track on the timeline.
All you have to do in order to trim a video after you’ve placed it on the timeline is drag one of its ends to the left or to the right. As you drag one of the clip’s edges the editor will only display the remaining footage while rendering the rest invisible. If at any point you want to access a portion of the video you’ve trimmed you just have to extend the file by dragging it until you’re able to see the segment you’re searching for.
Method 2: Using Filmora Split Tool
Filmora’s Split tool can help you separate the portion of the clip you want to remove from the segment you’d like to keep. Simply place the playhead at the exact location in the video clip where you want to make a cut, and click on the Split icon that looks like a pair of scissors. After the video is split, you should click on the clip you no longer need in order to select it and then hit the Delete button on your keyboard to remove it from the timeline.
Method 3: Using Scene Detection
Wondershare’s video editor also offers an automatic way to split a video clip into a number of separate scenes. Right-click on the video file located in the Filmora’s Media tab, and select the Scene Detection option from the menu and proceed to click on the Detect button, after the Scene Detection window pops up on the screen. The software will then automatically analyze the footage and divide it into separate scenes. Simply click on the Add to Timeline button once the process is completed to continue editing the video clip you’ve just split.
Method 4: Using Instant Cutter Tool
The Instant Cutter Tool enables you to quickly trim or merge high-resolution files recorded on action cameras as soon as you import them into a project in Filmora. Select the Import with Instant Cutter Tool option from the Import drop-down menu and wait for the Filmora Instant Cutter window to appear on the screen. In the upper left corner of this window, you will be able to see Trim and Merge tabs. Make sure that the Trim tab is selected and then click on the Open File button to import a video clip you’d like to trim. You can then use the trimming sliders to designate the parts of the video you’d like to remove or the set the In and Out points by clicking on the Set In Point or Set Out Point icons. Click on the Export button to save the new version of the video clip and click OK to complete the process.
Using Online Video Editing Platforms to Trim YouTube Videos
In case you’re looking for a tool that lets you save extracts of scenes from YouTube to your computer free of charge YT Cutter may be one of your best options.
This online video editing platform is remarkably easy to use since you just have to copy the link to the YouTube video you’d like to trim into YT Cutter’s URL box and then select how long the new video should be. Click on the Start and End buttons to set the duration of the video and click on the Download button to choose if you want to create a video, GIF or an audio file. The trimmed YouTube video will be available for download as soon as the platform processes it, and you just need to specify a folder on your hard drive before clicking on the Save button.
There’re many online video trimmers available on the market, some of them are totally free to use, check our guide about How to Trim Videos for Free Online .
Read More to Get : How to Download YouTube Videos without Any Software Easily >>
Conclusion
Trimming a video online or with a video editing software like Filmora is an effortless task that can be completed in just a couple of minutes. However, it is better to complete the entire video editing process before you upload a video to your YouTube channel because YouTube Studio and other online video editing platforms still offer only a limited amount of video editing tools. Which method of trimming YouTube videos do you like using the most? Leave a comment and share your opinions with us.
Richard Bennett
Richard Bennett is a writer and a lover of all things video.
Follow @Richard Bennett
Also read:
- Trailblazers Creating Engaging Marvellous Universe
- Essential Techniques for Enhanced YouTube Long-Form Videos for 2024
- 2024 Approved Elevate Your Vlogging Game with Tripod Mastery
- [Updated] Elevate Your Content YouTube Video Editing Secrets Revealed
- 2024 Approved Best 8 YouTube Marketing Apps & Solutions
- How to Add Logo/Watermark to YouTube Video
- Building Business via Beauty Vlogs for 2024
- [New] Chuckle Collective Top 15 Hilarious YouTubers for Boredom Beaters
- Nirvana of Movement – YouTube’s Top 10 Yoga Creators
- Exquisite Couple Clips The Best Weddings Online (8 Picks)
- 2024 Approved Crafting Snug Winter Atmospheres for Engaging Online Content
- YouTube Producers' Favorite Cameras & Lenses
- Simple Guide to Free YouTube Downloads
- Professional Insights Crafting YouTube Trailers Using Filmora
- In 2024, Curated List of Top 10 YouTube Video Cutting Apps
- Delving Into Trending Video Exchange for 2024
- [Updated] Channel Collaboration Unified Watch Experience Across Platforms
- Go Live with Google Meet YouTube Broadcasting Steps
- Is Subforsub Effective for Boosting YouTube Followers?
- 2024 Approved A Vlogger's Dream Exploring the Best 12 Video Capture Devices
- In 2024, Economical Audio Devices for Vloggers on a Budget
- [Updated] A Comprehensive Guide to Creating Viral YouTube Shorts Videos
- [Updated] Daily Dose of Joy Selecting the Best Anime Web Vids on Youtube
- Engaging Video Audiences Choosing Impactful YouTube Images
- Essential MP4 Software Elevate Your Mac Productions
- [Updated] Enhance Youtubes' Conversations with Emojis
- Eliminate Cacophony Perfecting Sound Quality for YouTube
- [Updated] BriefVideo Creator
- [Updated] Chart a Course for Success Top 5 Effective Video Marketing Strategies on YouTube
- In 2024, Beyond the Home Page Top 27 Competitors to YouTube's Dominance
- [New] Channel Success Metrics Subscriber & Play Buttons
- Essential Video Equipment for Successful YouTube Channels for 2024
- Restoring Visibility in Your YouTube Screens
- [New] Curbing Common Mishaps YouTube Short Edition
- Avoiding Illegal Content YouTube to MP4 Transfer Safely for 2024
- Path to Profitability Enrolling in the YouTube Partner Program
- 2024 Approved Digital Converters Showcase Optimal YTVideo Text Extraction
- Aim for Affluence Enroll Now in YouTube's Partner Programme
- 2024 Approved Elevate Content Discovery The TubeBuddy Way
- Capture, Create, Curate Mobiles in Action for YouTube Thumbnails
- [Updated] 2024 Approved Leading GB Emulators for Android Gamers
- In 2024, How To Fix Apple ID Verification Code Not Working On iPhone SE
- In 2024, 5 Easy Ways to Copy Contacts from Nokia C02 to iPhone 14 and 15 | Dr.fone
- Top 10 Best Spy Watches For your Nokia C300 | Dr.fone
- In 2024, How to Remove an AirTag from Your Apple ID Account From Apple iPhone 8?
- Still Using Pattern Locks with Samsung Galaxy A24? Tips, Tricks and Helpful Advice
- Read This Guide to Find a Reliable Alternative to Fake GPS On Samsung Galaxy S24 Ultra | Dr.fone
- [Updated] Enhance Interaction Essential Bot Selections for 2024
- Transitioning Audio Realms in Reaper's Bouncing Beats
- New 2024 Approved How to Make an Intro Video Easy Solution
- [New] Fine-Tuning Your Videos for Viral Instagram Moments
- [Updated] Discover Unmissable Adventures in Sandbox Gaming for 2024
- New 10 Essential Considerations for Selecting the Best Video to Audio Converter for 2024
- In 2024, The Top 5 Android Apps That Use Fingerprint Sensor to Lock Your Apps On Xiaomi Mix Fold 3
- Updated The Leading Sources for Easy Access to Whoosh Soundscapes and Their Uses
- In 2024, The Best iSpoofer Alternative to Try On Motorola Moto G24 | Dr.fone
- Replace VSDC with These Top-Notch Video Editors on Mac for 2024
- The Ultimate Guide to Oppo Reno 11F 5G Pattern Lock Screen Everything You Need to Know
- [Updated] 2024 Approved Elevating Your Visuals Mastering Instagram Edits in FCPX
- [New] 2024 Approved Lore Legends Top 10 Roguelike Experiences
- Essential Gaming Gear Keyboards for Less Than $100 for 2024
- New 2024 Approved The Ultimate Selection 8 Premium DAWs Shaping the Future of Hip-Hop Beats
- Final Cut Pros Audio Mastery Unlocking Potential Through Waveform Graphics and Animated Soundscapes
- [Updated] The Ultimate Collection Top 10 Trends in TikTok Reaction Videos
- [Updated] How to Avoid Common Mistakes in Nighttime Photography for 2024
- In 2024, How to Transfer Data After Switching From Vivo S17 Pro to Latest Samsung | Dr.fone
- Title: In 2024, Constructing YouTube Playlists Made Simple
- Author: Kevin
- Created at : 2024-06-10 00:24:46
- Updated at : 2024-06-11 00:24:46
- Link: https://youtube-videos.techidaily.com/in-2024-constructing-youtube-playlists-made-simple/
- License: This work is licensed under CC BY-NC-SA 4.0.
