
"In 2024, Clear, Distraction-Free Viewing of Old YouTube Content"
Clear, Distraction-Free Viewing of Old YouTube Content
How to Remove Black Bars from YouTube Videos

Richard Bennett
Mar 27, 2024• Proven solutions
The black bars appear because the video uploaded by the users may include horizontal black bars at the bottom and top of the video player to fit an aspect ratio of 4:3. The YouTube video player has an aspect ratio of 16:9, so it adds vertical black bars to fit according to the dimension. And in this guide, we will help you get rid of this trouble and remove annoying black bars from YouTube videos.
- Part 1: Removing the black bars before uploading
- Part 2: Removing the black bars from uploaded YouTube videos
Remove the black bars before uploading
You can make use of the following software to remove the black bars from your videos.
1. Wondershare Filmora
Filmora supports a large format of videos hence one of the widely used. Follow these steps to remove the black bars:
- Import the video or drag and drop it in Wondershare Flimora.
- Select the video with black bars and right click on it.
- Click on “crop and zoom” which will open the crop window.
- Set your desired frameset (16:9, 4:3 or customized aspect ratio) and see your video in the preview pane.
- Save the new video without the black bars by clicking on “Export”.
 Download Mac Version ](https://tools.techidaily.com/wondershare/filmora/download/ )
2. Sony Vegas Pro
One of the most popular and sought after video editing tool, Sony Vegas Pro can help removing the black bars very simply:
- Open the video.
- You will see the video in preview and a timeline beneath, right click on the video clip on the timeline.
- Click on properties, a new window will pop-up, click on disable resample and make sure that “maintain aspect ratio” is unchecked.
- Your video will be without the black bars. Save the video.
3. Windows Live Movie Maker
This inbuilt tool in Windows for video editing can be used to remove the black bars from your YouTube videos.
- Drop and drag the video to windows live movie maker.
- Select the video and you will see a couple of options to set aspect ratio.
- Click on the desired one and the black bars will be removed.
- You can save the video in different formats.
4. Final Cut Pro
Final Cut pro offers you a whole lot of video editing options that includes removal of black bars. Right aspect ratio ensures there are no unpleasant black bars on either side of the video. To get them removed with the help of Final Cut Pro:
- Import the video with black bars.
- Select the video and change its aspect ratio. (Either stretch it or crop it).
- Save the video after it has been corrected.
Removing the black bars from uploaded YouTube videos
It is very simple to remove black bars from existing YouTube videos or while uploading a video. Click on the Edit button next to the video, and add the most suited instruction in the Tag bar below:

yt:crop=16:9
This tag zooms in on the video because of which the contents at the borders (black bars in this case) do not appear anymore.
yt:stretch=16:9
This tag stretches the video in the aspect ratio of 16:9. It is used to view the video in wide-screen format.
yt:stretch=4:3
if your video is appearing in wide-screen format, but you want it to display in 720 x 480 pixels, apply this tag. It scales down the video 4:3 aspect.
Try any of the above software to remove black bars from existing YouTube videos or the new videos and make it pleasant to viewers.
Richard Bennett
Richard Bennett is a writer and a lover of all things video.
Follow @Richard Bennett
Richard Bennett
Mar 27, 2024• Proven solutions
The black bars appear because the video uploaded by the users may include horizontal black bars at the bottom and top of the video player to fit an aspect ratio of 4:3. The YouTube video player has an aspect ratio of 16:9, so it adds vertical black bars to fit according to the dimension. And in this guide, we will help you get rid of this trouble and remove annoying black bars from YouTube videos.
- Part 1: Removing the black bars before uploading
- Part 2: Removing the black bars from uploaded YouTube videos
Remove the black bars before uploading
You can make use of the following software to remove the black bars from your videos.
1. Wondershare Filmora
Filmora supports a large format of videos hence one of the widely used. Follow these steps to remove the black bars:
- Import the video or drag and drop it in Wondershare Flimora.
- Select the video with black bars and right click on it.
- Click on “crop and zoom” which will open the crop window.
- Set your desired frameset (16:9, 4:3 or customized aspect ratio) and see your video in the preview pane.
- Save the new video without the black bars by clicking on “Export”.
Download Mac Version ](https://tools.techidaily.com/wondershare/filmora/download/ )
2. Sony Vegas Pro
One of the most popular and sought after video editing tool, Sony Vegas Pro can help removing the black bars very simply:
- Open the video.
- You will see the video in preview and a timeline beneath, right click on the video clip on the timeline.
- Click on properties, a new window will pop-up, click on disable resample and make sure that “maintain aspect ratio” is unchecked.
- Your video will be without the black bars. Save the video.
3. Windows Live Movie Maker
This inbuilt tool in Windows for video editing can be used to remove the black bars from your YouTube videos.
- Drop and drag the video to windows live movie maker.
- Select the video and you will see a couple of options to set aspect ratio.
- Click on the desired one and the black bars will be removed.
- You can save the video in different formats.
4. Final Cut Pro
Final Cut pro offers you a whole lot of video editing options that includes removal of black bars. Right aspect ratio ensures there are no unpleasant black bars on either side of the video. To get them removed with the help of Final Cut Pro:
- Import the video with black bars.
- Select the video and change its aspect ratio. (Either stretch it or crop it).
- Save the video after it has been corrected.
Removing the black bars from uploaded YouTube videos
It is very simple to remove black bars from existing YouTube videos or while uploading a video. Click on the Edit button next to the video, and add the most suited instruction in the Tag bar below:
yt:crop=16:9
This tag zooms in on the video because of which the contents at the borders (black bars in this case) do not appear anymore.
yt:stretch=16:9
This tag stretches the video in the aspect ratio of 16:9. It is used to view the video in wide-screen format.
yt:stretch=4:3
if your video is appearing in wide-screen format, but you want it to display in 720 x 480 pixels, apply this tag. It scales down the video 4:3 aspect.
Try any of the above software to remove black bars from existing YouTube videos or the new videos and make it pleasant to viewers.
Richard Bennett
Richard Bennett is a writer and a lover of all things video.
Follow @Richard Bennett
Slash Length, Amplify Impact: YouTube Video Editing
How to Edit the Length of a Video on YouTube
Richard Bennett
Mar 27, 2024• Proven solutions
Apart from providing video hosting and sharing features, the YouTube platform also has an online editor which is going to provide you with the possibility to make changes and additions online without having to download any particular program. In this guide, we are going to show you how to make your video shorter or longer with YouTube online video editor.
A Better Alternative on How to Edit YouTube Video Length - Wondershare Filmora is a perfect alternative to edit every single clip frame by frame. Not just to shorten or lengthen the video. It offers quite a lot of opportunities. Watch the video below to know more:
Download Mac Version ](https://tools.techidaily.com/wondershare/filmora/download/ )
For instance, the application is offering non-linear ripple video editing. This is going to allow you to combine multiple video clips and pin them together conveniently. What is more, you can also apply PIP and Green Screen professional effects with just a few clicks. Sure, the YouTube video editor is a perfect solution for those who don’t want to achieve professional quality, but if you do, Wondershare Filmora is without a doubt the far better alternative. This is something that’s going to enable you to edit and re-touch your videos as well as to size them appropriately. Instead of dragging two bars together, you will be able to touch every single frame and size it according to your own particular needs. This is going to result in flawless videos.
How to Edit YouTube Video Length Using the built-in Video Editor
The YouTube video editor is easy to use, and you can easily learn how to do all sorts of changes to your video. Let’s see the things that you need to go through in order to edit the length.
Note: From 20th September 2017 users will no longer be able to use the complimentary editing suite. Check the best YouTube video editor alternatives from this complete guide.
Step 1 Get to the video editor

In order to do so, you would have to go ahead and login into your account. Then, go to the “My Channel” panel and select the video that you want to cut. Once you’ve done this, click on the “Video manager” option and click on the “create” tab which should be located on the right side for the page. There, you will be able to find the “Video Editor”. Of course, you can also add “/editor” to YouTube’s URL, and you would be good to go.
Step 2 Import Your Video
Once you’ve done all of the above, you would have to drag your video in order to cut it’s time. Keep in mind that the videos are made out of a maximum of 50 clips. The site is going to save every single video that you upload as a particular clip which could be properly combined with the rest in order to make one larger video. This is important.
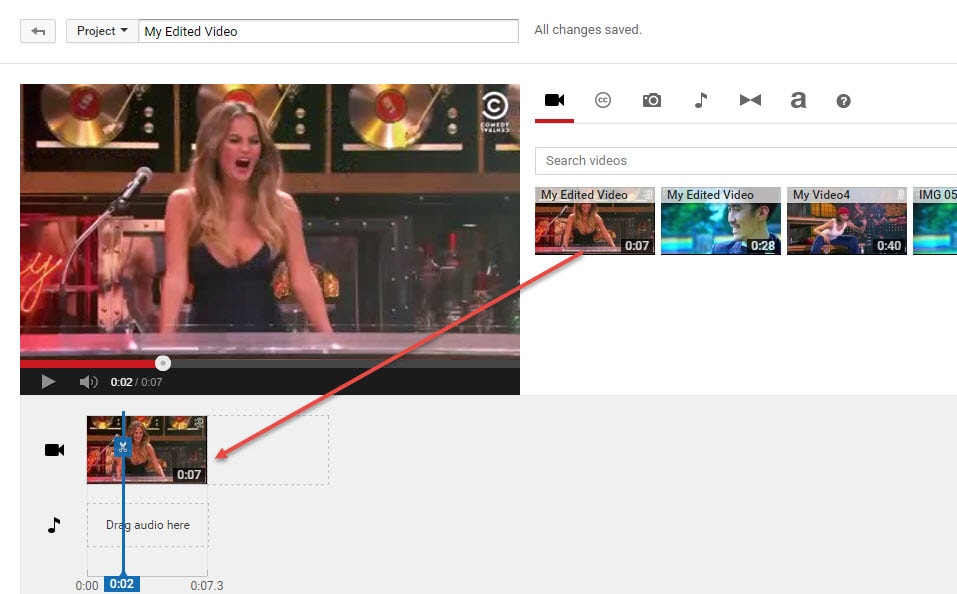
Step 3 Edit the Length
This is the part where you actually get to edit the length of your video. In order to do so effectively, you have to drag the bar at either end of your clip towards the other end in order to shorten the clip conveniently.
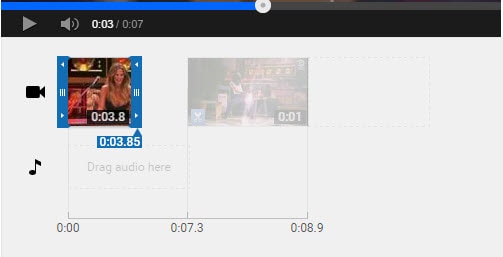
What is more, if you want to increase the length, you have to drag the bar to the opposite end – outwards. There is going to be an indicator which is going to appear at the bottom of the clip, and it’s going to show you the overall duration of the file, and it’s going to adjust itself as you slide the bars accordingly.
Step 4 Save the Clip
Of course, you would have to save the clip in order for the changes to reflect. Even though this might seem like a particularly obvious thing to do, you would be surprise to find out that a lot of people get everything done and then discard the changes by forgetting to save them and their effort goes to waste.
Richard Bennett
Richard Bennett is a writer and a lover of all things video.
Follow @Richard Bennett
Richard Bennett
Mar 27, 2024• Proven solutions
Apart from providing video hosting and sharing features, the YouTube platform also has an online editor which is going to provide you with the possibility to make changes and additions online without having to download any particular program. In this guide, we are going to show you how to make your video shorter or longer with YouTube online video editor.
A Better Alternative on How to Edit YouTube Video Length - Wondershare Filmora is a perfect alternative to edit every single clip frame by frame. Not just to shorten or lengthen the video. It offers quite a lot of opportunities. Watch the video below to know more:
Download Mac Version ](https://tools.techidaily.com/wondershare/filmora/download/ )
For instance, the application is offering non-linear ripple video editing. This is going to allow you to combine multiple video clips and pin them together conveniently. What is more, you can also apply PIP and Green Screen professional effects with just a few clicks. Sure, the YouTube video editor is a perfect solution for those who don’t want to achieve professional quality, but if you do, Wondershare Filmora is without a doubt the far better alternative. This is something that’s going to enable you to edit and re-touch your videos as well as to size them appropriately. Instead of dragging two bars together, you will be able to touch every single frame and size it according to your own particular needs. This is going to result in flawless videos.
How to Edit YouTube Video Length Using the built-in Video Editor
The YouTube video editor is easy to use, and you can easily learn how to do all sorts of changes to your video. Let’s see the things that you need to go through in order to edit the length.
Note: From 20th September 2017 users will no longer be able to use the complimentary editing suite. Check the best YouTube video editor alternatives from this complete guide.
Step 1 Get to the video editor
In order to do so, you would have to go ahead and login into your account. Then, go to the “My Channel” panel and select the video that you want to cut. Once you’ve done this, click on the “Video manager” option and click on the “create” tab which should be located on the right side for the page. There, you will be able to find the “Video Editor”. Of course, you can also add “/editor” to YouTube’s URL, and you would be good to go.
Step 2 Import Your Video
Once you’ve done all of the above, you would have to drag your video in order to cut it’s time. Keep in mind that the videos are made out of a maximum of 50 clips. The site is going to save every single video that you upload as a particular clip which could be properly combined with the rest in order to make one larger video. This is important.
Step 3 Edit the Length
This is the part where you actually get to edit the length of your video. In order to do so effectively, you have to drag the bar at either end of your clip towards the other end in order to shorten the clip conveniently.
What is more, if you want to increase the length, you have to drag the bar to the opposite end – outwards. There is going to be an indicator which is going to appear at the bottom of the clip, and it’s going to show you the overall duration of the file, and it’s going to adjust itself as you slide the bars accordingly.
Step 4 Save the Clip
Of course, you would have to save the clip in order for the changes to reflect. Even though this might seem like a particularly obvious thing to do, you would be surprise to find out that a lot of people get everything done and then discard the changes by forgetting to save them and their effort goes to waste.
Richard Bennett
Richard Bennett is a writer and a lover of all things video.
Follow @Richard Bennett
Also read:
- 2024 Approved Achieving Virality on YouTube Essential Steps Demystified
- 2024 Approved Unlocking the Full Potential of Apple TV with FB Video Streams
- 2024 Approved Video Blur Made Easy Free Online Method
- Android Safe Mode - How to Turn off Safe Mode on Samsung Galaxy S23 Tactical Edition? | Dr.fone
- Boost Your Content Reach The Expert Guide to Youtube's Featured Channels
- Elevate Your Cinematography Mastering Transitions in Kinemaster
- Elevating Engagement Strategic Use of Youtube Titles for 2024
- How to retrieve lost files from Honor 90 Lite?
- In 2024, Building Your Brand Making Money with Vids
- Jumpstart to Partner Elevation Secure 10K Views in Minutes!
- Numbers that Shook! YouTube Facts in Visual Form (2017)
- Revamping BDR for Win Versions 11 to 7
- Updated In 2024, Reversing Video Clips in Final Cut Pro Tips and Tricks
- Title: In 2024, Clear, Distraction-Free Viewing of Old YouTube Content
- Author: Kevin
- Created at : 2025-01-09 18:12:28
- Updated at : 2025-01-10 19:00:15
- Link: https://youtube-videos.techidaily.com/in-2024-clear-distraction-free-viewing-of-old-youtube-content/
- License: This work is licensed under CC BY-NC-SA 4.0.