
:max_bytes(150000):strip_icc()/Bananaplug2-58dadbd83df78c5162067ddf.jpg)
"In 2024, Bringing Video Life YouTube Slide Insertion"
Bringing Video Life: YouTube Slide Insertion
Create High-Quality Video - Wondershare Filmora
An easy and powerful YouTube video editor
Numerous video and audio effects to choose from
Detailed tutorials provided by the official channel
Google Slide presentation is a powerful tool for creators to keep their audience engaged. This online platform lets you create and demonstrate your ideas. It will capture your viewers’ attention from the very beginning. It also doesn’t matter whatever learning style you engage. Adding YouTube videos to Google Slide will appeal to all levels of individuals.
More so, it is the best way to provide a break for both the audience and the creator. You can break Google Slide presentations with videos to offer some break. Viewers and the presenter get a breather in the process. The presenter can take a short break from speaking while the video plays. Let’s now dive into how to embed a YouTube video in Google Slides.

In this article
01 Why should we add a video to Google Slides?
02 How to add a YouTube video to Google Slide
03 How to choose the right video for your Slides?
Why should we add a video to Google Slides?
There is a great impact of adding video to Google Slides.
For attention
Videos will automatically awaken you, especially if your thoughts have started to sway during a presentation. A video has a direct way of showing creativity. The audience automatically connects the dots between the video and the presentation lines alike.
To stimulate discussion
A picture is worth a thousand words. There is a way that an added video will help the audience connect to the day’s topic. It will bring up several ideas and stir up discussion with the presenter.
Easy following
With videos embedded in Google Slide, viewers will find it easy to understand and digest. Videos automatically eliminate boredom and make any topic interesting.
How to add a YouTube video to Google Slide
Use these two methods to add a YouTube video to Google Slides. Via the Search and Direct link.
Method 1. Embed YouTube video to Google Slide by search and selection
Google has owned YouTube since the year 2006. You can, therefore, integrate Google’s products with YouTube easily.
Step 1. First, go to the slide where you want to embed your video.
Step 2. Then choose the “Insert” option from the menu bar and hit the “Video” option.

Step 3. It would be best if you now viewed the “YouTube” search bar to type in the video you want to embed. You can use keywords to search for the video in question and view instant search results.
Step 4. Then select the video you want to embed, and you’ll see it appear on the “Slide.”

Step 5. Format your video. Remember that the entire video will be embedded. You don’t necessarily need the whole video. It is time to select just a brief but relevant clip from the video to use. Then position your video to the right point using the axes from the exact starting point to the finished part you want the video to appear in.
Method 2. Embed YouTube video to Google Slide by direct link
You can engage this method if you want to include the entire video.
Step 1. Get the URL of the specific YouTube video that you want to use.

Step 2. Then go to your browser’s “Address bar” to copy the YouTube link.
Step 3. Next, open the “Presentation” slide to put your video to.
Step 4. Choose the “Insert” tab from the menu bar.
Step 5. Then hit on the “Video” option from the drop-down menu that appears.
Step 6. A new window will open automatically. Choose the “By URL” tab.
Step 7. Then paste the YouTube video URL in the “Paste YouTube URL Here” bar section.

Step 8. Wait for the video file to load and press the “Select” option. The video will immediately appear in the presentation slide. Just drag and drop the video in your preferred position.
Note: You can do a few edits inside the application. Set the timer when your video should start and when to stop. You can also adjust the video player size.
How to choose the right video for your Slides?
Not all videos will make an impact on your Google Slide. You need to use the best shot that adds value to your presentation. These guidelines will help you to settle on the best video.
Be Professional – choose the best video for your presentation. Remember that the video is part of the presentation and carries more weight. Settling for quality video will bring out the professionalism in you.
Relevant – how do you know that what you are showing your audience corresponds to the presentation piece? Ensure that the video you add has something to do with the Google Slide presentation topic. The two should naturally flow to make it easy to understand the whole concept.
Precise – your presentation is not about the video. The ideal length should not exceed 60 seconds. The longer the video, the greater the chance for your audience to lose track along the way.
Know every footage you are working with – this will help you pick the best shots for your presentation. So, learn every aspect of the video before settling down to use it.
Add new content – even though one content may suit several presentations, don’t rely on the same piece each time. Your audience will want to feel something fresh each time you are presenting. So, compose different videos for different scenarios to make that big impact.
Create an eye-catching video for your Slides with Filmora
The video quality matters when it comes to creating your Slides. The best video creator – Filmora – works in simple steps to give you an eye-catching video. It will create videos for all scenarios like marketing, tutorial, gaming, etc.
Key features of Filmora
- It offers you advanced video effects like filters, motion elements, etc
- You can multiply your fun with multiple screens with the Split Screen feature
- Easily change backgrounds using the Green Screen feature
- The speed control lets you fast forward or slow down a special moment
- Import your video clips to social media platforms
- You can also adjust the audio of your tracks using the Audio Mixer feature
Follow this guide to create a video for your slide with Filmora
Step 1. Launch Filmora
First, begin by downloading and installing Filmora on your computer device. Once installed, launch it and allow it to run. You can either create a new project or open an existing project to work on.
Step 2. Create a new project
Here, click on the “New Project” tab on the app’s welcome screen. The editor should load immediately. Then proceed to register the product. Just hit on the “Register” tab.
Step 3. Import video
Check the upper left corner of your screen to see the “Import” tab. Click on it and choose the “Import Media Files” option. Next, navigate to the location of your computer’s local list to select the clip or video you want to edit. Then, hit the “Import” button to add the video to the timeline for editing.
Step 4. Edit video
Drag and drop the raw footage to Filmora’s timeline to begin editing. Here, you can trim, add other video clips, merge, and add effects as you wish. Likewise, you can add opening titles, subtitles, and end credits to your video. More so, this tool offers different templates to use. Just drag and drop the templates you wish to use to a specific location on the timeline.
Step 5. Preview your file
Last but not least, you can preview your files. Click on the “Play” tab to start previewing your video clips. The main essence of this part is to allow you to make the necessary changes to your clips if there is a need.
Step 6. Export and Share
With Filmora, you can export your file to various social media platforms. But first, go to the “Output window” and select the video file format to use. This software supports several output formats to apply to any platform and device. Just click on the “Format” tab and choose the file format to use. Then also change the resolution and other parameters like frame rate and channel of your video in the “Settings” section. Finally, share your video to your YouTube channel and get ready to add the video to the Google Slide presentation.
For Win 7 or later (64-bit)
For macOS 10.12 or later
Conclusion
● You now know how to put a YouTube video in Google Slides the simple way. You can search for your YouTube videos or directly use the URL link. Whatever the case, remember that it’s the quality of your video that carries more weight. Thanks to the availability of third-party apps that you can use to create and improve the quality of your videos.
● Filmora is at your service to create high-resolution videos that you can export in any format to your YouTube channel. The tool is intuitive, and it won’t matter whether you haven’t tried it before. It is a perfect choice for both professionals and first-time users.
Google Slide presentation is a powerful tool for creators to keep their audience engaged. This online platform lets you create and demonstrate your ideas. It will capture your viewers’ attention from the very beginning. It also doesn’t matter whatever learning style you engage. Adding YouTube videos to Google Slide will appeal to all levels of individuals.
More so, it is the best way to provide a break for both the audience and the creator. You can break Google Slide presentations with videos to offer some break. Viewers and the presenter get a breather in the process. The presenter can take a short break from speaking while the video plays. Let’s now dive into how to embed a YouTube video in Google Slides.
In this article
01 Why should we add a video to Google Slides?
02 How to add a YouTube video to Google Slide
03 How to choose the right video for your Slides?
Why should we add a video to Google Slides?
There is a great impact of adding video to Google Slides.
For attention
Videos will automatically awaken you, especially if your thoughts have started to sway during a presentation. A video has a direct way of showing creativity. The audience automatically connects the dots between the video and the presentation lines alike.
To stimulate discussion
A picture is worth a thousand words. There is a way that an added video will help the audience connect to the day’s topic. It will bring up several ideas and stir up discussion with the presenter.
Easy following
With videos embedded in Google Slide, viewers will find it easy to understand and digest. Videos automatically eliminate boredom and make any topic interesting.
How to add a YouTube video to Google Slide
Use these two methods to add a YouTube video to Google Slides. Via the Search and Direct link.
Method 1. Embed YouTube video to Google Slide by search and selection
Google has owned YouTube since the year 2006. You can, therefore, integrate Google’s products with YouTube easily.
Step 1. First, go to the slide where you want to embed your video.
Step 2. Then choose the “Insert” option from the menu bar and hit the “Video” option.
Step 3. It would be best if you now viewed the “YouTube” search bar to type in the video you want to embed. You can use keywords to search for the video in question and view instant search results.
Step 4. Then select the video you want to embed, and you’ll see it appear on the “Slide.”
Step 5. Format your video. Remember that the entire video will be embedded. You don’t necessarily need the whole video. It is time to select just a brief but relevant clip from the video to use. Then position your video to the right point using the axes from the exact starting point to the finished part you want the video to appear in.
Method 2. Embed YouTube video to Google Slide by direct link
You can engage this method if you want to include the entire video.
Step 1. Get the URL of the specific YouTube video that you want to use.
Step 2. Then go to your browser’s “Address bar” to copy the YouTube link.
Step 3. Next, open the “Presentation” slide to put your video to.
Step 4. Choose the “Insert” tab from the menu bar.
Step 5. Then hit on the “Video” option from the drop-down menu that appears.
Step 6. A new window will open automatically. Choose the “By URL” tab.
Step 7. Then paste the YouTube video URL in the “Paste YouTube URL Here” bar section.
Step 8. Wait for the video file to load and press the “Select” option. The video will immediately appear in the presentation slide. Just drag and drop the video in your preferred position.
Note: You can do a few edits inside the application. Set the timer when your video should start and when to stop. You can also adjust the video player size.
How to choose the right video for your Slides?
Not all videos will make an impact on your Google Slide. You need to use the best shot that adds value to your presentation. These guidelines will help you to settle on the best video.
Be Professional – choose the best video for your presentation. Remember that the video is part of the presentation and carries more weight. Settling for quality video will bring out the professionalism in you.
Relevant – how do you know that what you are showing your audience corresponds to the presentation piece? Ensure that the video you add has something to do with the Google Slide presentation topic. The two should naturally flow to make it easy to understand the whole concept.
Precise – your presentation is not about the video. The ideal length should not exceed 60 seconds. The longer the video, the greater the chance for your audience to lose track along the way.
Know every footage you are working with – this will help you pick the best shots for your presentation. So, learn every aspect of the video before settling down to use it.
Add new content – even though one content may suit several presentations, don’t rely on the same piece each time. Your audience will want to feel something fresh each time you are presenting. So, compose different videos for different scenarios to make that big impact.
Create an eye-catching video for your Slides with Filmora
The video quality matters when it comes to creating your Slides. The best video creator – Filmora – works in simple steps to give you an eye-catching video. It will create videos for all scenarios like marketing, tutorial, gaming, etc.
Key features of Filmora
- It offers you advanced video effects like filters, motion elements, etc
- You can multiply your fun with multiple screens with the Split Screen feature
- Easily change backgrounds using the Green Screen feature
- The speed control lets you fast forward or slow down a special moment
- Import your video clips to social media platforms
- You can also adjust the audio of your tracks using the Audio Mixer feature
Follow this guide to create a video for your slide with Filmora
Step 1. Launch Filmora
First, begin by downloading and installing Filmora on your computer device. Once installed, launch it and allow it to run. You can either create a new project or open an existing project to work on.
Step 2. Create a new project
Here, click on the “New Project” tab on the app’s welcome screen. The editor should load immediately. Then proceed to register the product. Just hit on the “Register” tab.
Step 3. Import video
Check the upper left corner of your screen to see the “Import” tab. Click on it and choose the “Import Media Files” option. Next, navigate to the location of your computer’s local list to select the clip or video you want to edit. Then, hit the “Import” button to add the video to the timeline for editing.
Step 4. Edit video
Drag and drop the raw footage to Filmora’s timeline to begin editing. Here, you can trim, add other video clips, merge, and add effects as you wish. Likewise, you can add opening titles, subtitles, and end credits to your video. More so, this tool offers different templates to use. Just drag and drop the templates you wish to use to a specific location on the timeline.
Step 5. Preview your file
Last but not least, you can preview your files. Click on the “Play” tab to start previewing your video clips. The main essence of this part is to allow you to make the necessary changes to your clips if there is a need.
Step 6. Export and Share
With Filmora, you can export your file to various social media platforms. But first, go to the “Output window” and select the video file format to use. This software supports several output formats to apply to any platform and device. Just click on the “Format” tab and choose the file format to use. Then also change the resolution and other parameters like frame rate and channel of your video in the “Settings” section. Finally, share your video to your YouTube channel and get ready to add the video to the Google Slide presentation.
For Win 7 or later (64-bit)
For macOS 10.12 or later
Conclusion
● You now know how to put a YouTube video in Google Slides the simple way. You can search for your YouTube videos or directly use the URL link. Whatever the case, remember that it’s the quality of your video that carries more weight. Thanks to the availability of third-party apps that you can use to create and improve the quality of your videos.
● Filmora is at your service to create high-resolution videos that you can export in any format to your YouTube channel. The tool is intuitive, and it won’t matter whether you haven’t tried it before. It is a perfect choice for both professionals and first-time users.
Pinpointing YouTube Comments
How to Search Comments on YouTube Quickly?

Richard Bennett
Mar 27, 2024• Proven solutions
Are you trying to search for something on a document or a web page? You know how to do that. You use the combination ‘Ctrl + F’ for Windows or ‘Command + F’ for Mac. But searching comments from the YouTube comments section can be tricky because –
- There are many comments on the video, most of which do not load immediately. You can keep scrolling and still not find the desired comment.
- Managing and analyzing the vast number of comments can be difficult for as busy a platform as YouTube.
So, if you want to search YouTube comments quickly, what can you do? We will show you in this blog.
Part 1: Using the Built-in YouTube Studio Feature to Search Comments
How does the built-in YouTube Studio Feature make searching comments on YouTube easier?
Comments are the best way to interact with subscribers on YouTube. YouTube’s Studio is a new addition to help creators filter and respond to comments and create a healthy community . Sometimes, YouTubers also receive hateful and inappropriate comments. You can use the Studio Feature to report or delete those comments as well.
If you have a channel, you can use this feature in some simple steps.
- Visit YouTubewebsite on your desktop and sign in to your YouTube account.
- Go to the top right corner of your homepage, and you will find your profile icon. Click on it and from the drop-down menu, select the YouTube Studio option.
- This will take you to the YouTube Studio home page. On the left side, find and click on the Comments option, and then you will see all comments your YouTube channel has received.
- You can now click on the Filter icon from the comments section and type in the search term directly. Or, you can click the Search from the options, and type in the words you are looking for.
- Click on Apply, and you will see the comments with the keywords you chose.
Besides the comment search feature, the YouTube Studio also has some in-built search filter categories, such as –
Search: Search for comments with particular search terms. You can also search comments posted by a specific channel by using their username as the search term.
Contains questions: Filter the comments which have questions.
Channel member status: Search for comments from the channel members. YouTube channel membership is only available to channels joined YouTube Partner Program.
Subscriber count: Filter comments with the channel subscriber count, you can search for comments from channels with a minimum number of subscribers (from 100-10M).
Response status: Filter the comments to which you have responded or haven’t responded to.
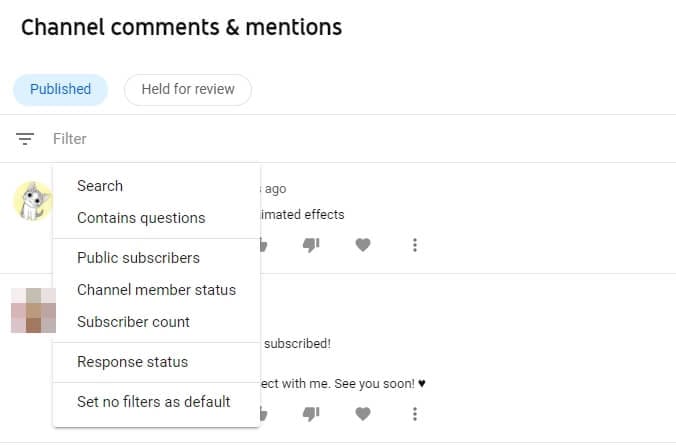
You can combine these additional filters to narrow your comments search for YouTube.
Part 2: Using YCS – YouTube Comment Search Extension
You can use the YouTube Comment Search browser extension supported by Google Chrome to help you search YouTube comments effortlessly. To use it, follow these steps below.
- First, you need to install this extension. You can click this URL https://chrome.google.com/webstore/detail/ycs-youtube-comment-searc/pmfhcilikeembgbiadjiojgfgcfbcoaa?hl=en Or, you can open the Chrome Extensions page, and in the search bar at the top, type in YCS – YouTube Comment Search and press Enter.
- Click on the result that appears and then tap on the Add to Chrome button. This will add the extension to your browser.
- Once you add the extension, openYouTube on your browser. Click on the video where you want to search the comments. You will find the YouTube Comment Search extension below it.
- Tap on ‘Load comments’ and wait till the extension loads all the comments on the video.
- Now type your keywords, press Enter, and YCS will show all comments having the keyword you typed.

Part 3: Using Comments Search for YouTube Extension
If you are looking for an easy method to search YouTube comments, you can use the Comments Search for YouTube extension. Google Chrome supports this extension that allows you to search comments on YouTube without leaving the website.
How can you use this extension to search YouTube comments? Here is a simple step-by-step tutorial.
- First, you need to download the extension fromGithub . Then, locate the file on your computer and unzip it.
- Next, you need to install it in the browser. Open your Chrome browser, and from the top right corner, click on the three vertical dots. You will find the Settings option towards the end of the drop-down menu, and then click on it.
- When the Settings page opens, select Extensions from the panel on the left side of the webpage. This will take you to a new tab.
- On the top right corner of the page, there will be a toggle switch called Developer Mode. Turn it on if it is off.
- Once the Developer Mode is on, you will see three options now. Click on Load unpacked. Locate the downloaded extension file and click on it. Finally, disable Developer Mode.
When you complete these steps, you click on the extension icon to search comments on YouTube. You can also do this by using the combination ‘Ctrl + S’ on the target YouTube page. The extension also includes some advanced features like –
1. Global Mode
In this mode, you can type ‘global: your parameter’ to search all comments on the channel that fit your parameter.
2. Advanced Mode
This mode allows you to enter special commands to carry out an advanced search. Some including typing –
- ‘:’ to look for comments with timestamps
- ‘:all’ to see all comments
- ‘:creator’ to get comments made by the creator
Part 4: How Do You Search Comments You Have Posted on YouTube?
Did you post a comment on your favorite celebrity’s video? Do you think it may be embarrassing and want to delete it now but cannot find it now amidst so many comments? It is where you can make use of YouTube’s Comment History feature.
YouTube has now added this feature which you can see all the comments you ever posted on YouTube in one place.
How to Use the Comment History feature to Search Comments?
You can see all the comments you have posted in the Comment History in a few quick steps.
- You have to visit YouTube on your desktop and sign in using your Google account.
- Once you sign in, click on the three horizontal lines at the top left corner of your YouTube page.
- Click on the History option and then you will find the option called Comments on the right side of your YouTube History page. Click on it to see all your YouTube comments.

You can also access the Comments History page directly fromhere .
Part 5: How to Find Out Who Posts the Most Comments on Your YouTube Videos?
If you are a creator on YouTube, the comments section becomes very important. Subscribers comment words of praise, encouragement, and feedback which help you grow. You may want to keep track of your most loyal followers. The best way to know that is by knowing who comments most on your videos.
Here is how you can figure out who is your channel super fan on the YouTube mobile app.
- Open YouTube app on your mobile device, and then sign in.
- From your public videos, select one from where you want to gather insights about your subscribers. Click on the video and scroll down to see the comments section.
- Choose a comment by someone whose engagement with your channel you want to check.
- On the left side of the comment, you will see the icon of the person’s channel. Click on it and you will see a pop-up menu with insights about the person. Here, you can learn about the number of comments they have posted on your channel.
This feature is helpful as it lists more than the number of comments made by someone. You can see insights like when they joined YouTube, how many subscribers they have, when someone subscribed to your channel, how many comments anyone posted on your videos, and how many responses they got from you. You can even see glimpses of all their comments. Clicking on them will take you to the whole conversation.
You can also see their channel’s banner from this section, which should tell you their channel’s niche.
Final Thoughts
YouTube is a global platform to share helpful and entertaining videos. The comments section of each video contains informative comments, feedback, and essential timestamps. Searching YouTube comments can help someone understand if the video is valuable or not. For many creators, the comments become the only way to engage with their supporters and create a tight-knit community.
Find feedback or questions. Report offensive comments. If you are a regular YouTube user, use our tips and tricks to search comments quickly and grow your channel.
Richard Bennett
Richard Bennett is a writer and a lover of all things video.
Follow @Richard Bennett
Richard Bennett
Mar 27, 2024• Proven solutions
Are you trying to search for something on a document or a web page? You know how to do that. You use the combination ‘Ctrl + F’ for Windows or ‘Command + F’ for Mac. But searching comments from the YouTube comments section can be tricky because –
- There are many comments on the video, most of which do not load immediately. You can keep scrolling and still not find the desired comment.
- Managing and analyzing the vast number of comments can be difficult for as busy a platform as YouTube.
So, if you want to search YouTube comments quickly, what can you do? We will show you in this blog.
Part 1: Using the Built-in YouTube Studio Feature to Search Comments
How does the built-in YouTube Studio Feature make searching comments on YouTube easier?
Comments are the best way to interact with subscribers on YouTube. YouTube’s Studio is a new addition to help creators filter and respond to comments and create a healthy community . Sometimes, YouTubers also receive hateful and inappropriate comments. You can use the Studio Feature to report or delete those comments as well.
If you have a channel, you can use this feature in some simple steps.
- Visit YouTubewebsite on your desktop and sign in to your YouTube account.
- Go to the top right corner of your homepage, and you will find your profile icon. Click on it and from the drop-down menu, select the YouTube Studio option.
- This will take you to the YouTube Studio home page. On the left side, find and click on the Comments option, and then you will see all comments your YouTube channel has received.
- You can now click on the Filter icon from the comments section and type in the search term directly. Or, you can click the Search from the options, and type in the words you are looking for.
- Click on Apply, and you will see the comments with the keywords you chose.
Besides the comment search feature, the YouTube Studio also has some in-built search filter categories, such as –
Search: Search for comments with particular search terms. You can also search comments posted by a specific channel by using their username as the search term.
Contains questions: Filter the comments which have questions.
Channel member status: Search for comments from the channel members. YouTube channel membership is only available to channels joined YouTube Partner Program.
Subscriber count: Filter comments with the channel subscriber count, you can search for comments from channels with a minimum number of subscribers (from 100-10M).
Response status: Filter the comments to which you have responded or haven’t responded to.
You can combine these additional filters to narrow your comments search for YouTube.
Part 2: Using YCS – YouTube Comment Search Extension
You can use the YouTube Comment Search browser extension supported by Google Chrome to help you search YouTube comments effortlessly. To use it, follow these steps below.
- First, you need to install this extension. You can click this URL https://chrome.google.com/webstore/detail/ycs-youtube-comment-searc/pmfhcilikeembgbiadjiojgfgcfbcoaa?hl=en Or, you can open the Chrome Extensions page, and in the search bar at the top, type in YCS – YouTube Comment Search and press Enter.
- Click on the result that appears and then tap on the Add to Chrome button. This will add the extension to your browser.
- Once you add the extension, openYouTube on your browser. Click on the video where you want to search the comments. You will find the YouTube Comment Search extension below it.
- Tap on ‘Load comments’ and wait till the extension loads all the comments on the video.
- Now type your keywords, press Enter, and YCS will show all comments having the keyword you typed.
Part 3: Using Comments Search for YouTube Extension
If you are looking for an easy method to search YouTube comments, you can use the Comments Search for YouTube extension. Google Chrome supports this extension that allows you to search comments on YouTube without leaving the website.
How can you use this extension to search YouTube comments? Here is a simple step-by-step tutorial.
- First, you need to download the extension fromGithub . Then, locate the file on your computer and unzip it.
- Next, you need to install it in the browser. Open your Chrome browser, and from the top right corner, click on the three vertical dots. You will find the Settings option towards the end of the drop-down menu, and then click on it.
- When the Settings page opens, select Extensions from the panel on the left side of the webpage. This will take you to a new tab.
- On the top right corner of the page, there will be a toggle switch called Developer Mode. Turn it on if it is off.
- Once the Developer Mode is on, you will see three options now. Click on Load unpacked. Locate the downloaded extension file and click on it. Finally, disable Developer Mode.
When you complete these steps, you click on the extension icon to search comments on YouTube. You can also do this by using the combination ‘Ctrl + S’ on the target YouTube page. The extension also includes some advanced features like –
1. Global Mode
In this mode, you can type ‘global: your parameter’ to search all comments on the channel that fit your parameter.
2. Advanced Mode
This mode allows you to enter special commands to carry out an advanced search. Some including typing –
- ‘:’ to look for comments with timestamps
- ‘:all’ to see all comments
- ‘:creator’ to get comments made by the creator
Part 4: How Do You Search Comments You Have Posted on YouTube?
Did you post a comment on your favorite celebrity’s video? Do you think it may be embarrassing and want to delete it now but cannot find it now amidst so many comments? It is where you can make use of YouTube’s Comment History feature.
YouTube has now added this feature which you can see all the comments you ever posted on YouTube in one place.
How to Use the Comment History feature to Search Comments?
You can see all the comments you have posted in the Comment History in a few quick steps.
- You have to visit YouTube on your desktop and sign in using your Google account.
- Once you sign in, click on the three horizontal lines at the top left corner of your YouTube page.
- Click on the History option and then you will find the option called Comments on the right side of your YouTube History page. Click on it to see all your YouTube comments.
You can also access the Comments History page directly fromhere .
Part 5: How to Find Out Who Posts the Most Comments on Your YouTube Videos?
If you are a creator on YouTube, the comments section becomes very important. Subscribers comment words of praise, encouragement, and feedback which help you grow. You may want to keep track of your most loyal followers. The best way to know that is by knowing who comments most on your videos.
Here is how you can figure out who is your channel super fan on the YouTube mobile app.
- Open YouTube app on your mobile device, and then sign in.
- From your public videos, select one from where you want to gather insights about your subscribers. Click on the video and scroll down to see the comments section.
- Choose a comment by someone whose engagement with your channel you want to check.
- On the left side of the comment, you will see the icon of the person’s channel. Click on it and you will see a pop-up menu with insights about the person. Here, you can learn about the number of comments they have posted on your channel.
This feature is helpful as it lists more than the number of comments made by someone. You can see insights like when they joined YouTube, how many subscribers they have, when someone subscribed to your channel, how many comments anyone posted on your videos, and how many responses they got from you. You can even see glimpses of all their comments. Clicking on them will take you to the whole conversation.
You can also see their channel’s banner from this section, which should tell you their channel’s niche.
Final Thoughts
YouTube is a global platform to share helpful and entertaining videos. The comments section of each video contains informative comments, feedback, and essential timestamps. Searching YouTube comments can help someone understand if the video is valuable or not. For many creators, the comments become the only way to engage with their supporters and create a tight-knit community.
Find feedback or questions. Report offensive comments. If you are a regular YouTube user, use our tips and tricks to search comments quickly and grow your channel.
Richard Bennett
Richard Bennett is a writer and a lover of all things video.
Follow @Richard Bennett
Also read:
- 10 Tips to Make Your YouTube Shorts Channels Stand Out
- 2024 Approved Chuckle Trail Your Guide to Hilarious Online Stars
- How to Embed A YouTube Playlist On a Website
- In 2024, Cutting-Edge Video Tools Opt for Studio or Latest Beta Version
- 2024 Approved Boost Views via Strategic Tagging Tactics
- [Updated] EditEssence System
- PremierPC Sync Visuals & Vibrant Tunes Unite
- Key to Discovery Perfecting Your YouTube Tags Game
- [New] 10 Best Travel Youtube Channels to Follow
- Maximize Impact with Professional 360° Video Uploads for YouTube
- [New] Designing Direct URLs for Automatic Content Subscription
- Framing the Perfect Waterway Narrative
- Digital Dollars Earn From YouTubers in 8 Ways for 2024
- 2024 Approved Essential Low-Cost Footage Source Directory
- 2024 Approved Cut Expenses, Create Wow - Download High-Quality Templates for Videos
- Transforming Viewership Engaging End Screens Tutorials
- 2024 Approved Elevate Presentations - Add YouTube in Google Slides
- Hitting High Notes Enhance Your YouTube Content with Music Edits
- [Updated] Copycat Chronicles The Science of Satire
- Free Tools for Effortless Video Image Retrieval
- Navigating Through the World of Cosmetics YouTube's Top Artists
- [Updated] Efficient Content Curation Steps Towards a Well-Organized 'Watch Later' Playlist
- In 2024, Addressed Discrepancy in Shorts Showcase
- In 2024, 12 Best Vlogging Cameras with a Flip Screen
- In 2024, Bite-Size Beats Characters in Soundscape
- YouTube Equipment for Beginners [Ultimate Guide]
- [New] Engage in Enlightening YouTube Exchanges
- [New] Best Practices for Designing Compelling YouTube Video Thumbnails
- High-Quality Hurdles Navigating YouTube's Policies for 4K Submissions
- [Updated] Earning on YouTube A Step-by-Step Guide for Newbies
- Locked Out of iPhone 13? 5 Ways to get into a Locked iPhone 13 | Dr.fone
- [New] A Step-by-Step Approach for Using Zoom in Email Apps Like Gmail
- Elevating Visual Experience Big Is Better
- How to Remove a Previously Synced Google Account from Your Nokia C110
- [New] 2024 Approved Top Trends in Social Media Imagery Animated Symbols
- How to Flash Dead Xiaomi Redmi Note 12 5G Safely | Dr.fone
- [Updated] In 2024, Chuckle-Laugh Moments & Tears From These Top Ten IG Feeds
- [New] 2024 Approved Audio Capturing in Android - Without Rooting [Guide]
- 2024 Approved IGTV Content Size Requirements
- Skill Up on the Fly with Top 10 Freeware Art Apps for Mac
- [New] 2024 Approved OBS or Streamlabs? Determining the Superior Livestream Software
- Updated Top 7 Audio Recording Apps Beyond Audacity for Android Users
- [Updated] In 2024, Navigating the Maze Choosing the Right Vimeo Membership Plan
- [New] In 2024, Professional Approaches to Preserving PS3 Games On Screen
- New 2024 Approved What Is AI Generated Text?
- 2024 Approved Bring Your Vision to Life 7 Best Movie Intro Design Software
- [Updated] LightningLapse DelayDox Video for 2024
- 10 Fake GPS Location Apps on Android Of your Samsung Galaxy F15 5G | Dr.fone
- 2024 Approved Epicurean Escapades Top TikTok Chefs & Cooks
- [Updated] Invisible Riches The Online Auction Exclusive to the Elusive, 2023 Edition for 2024
- In 2024, Unlocking Content Easy Downloads of Vimeo HD Videos (MP4)
- In 2024, Top 5 AI Music Video Examples and Makers to Make Them
- [New] Proactive Copyright Verification for Your TikTok Videos for 2024
- New 2024 Approved Transform Your Videos Top Mobile Editing Apps for iPhone and Android Users
- [Updated] Utilizing Twitter's Videos in Your Instagram Content Strategy for 2024
- [New] Essential Tools for Documenting Computer Speakers & Mics
- Video Editing Essentials How to Resize and Crop Videos for 2024
- Shade Portraits with Orbital Illumination Technique CS
- The Best 8 VPN Hardware Devices Reviewed On Apple iPhone 6s | Dr.fone
- How To Update or Downgrade Apple iPhone 13 Without Losing Anything? | Dr.fone
- Title: "In 2024, Bringing Video Life YouTube Slide Insertion"
- Author: Kevin
- Created at : 2024-05-25 15:27:35
- Updated at : 2024-05-26 15:27:35
- Link: https://youtube-videos.techidaily.com/in-2024-bringing-video-life-youtube-slide-insertion/
- License: This work is licensed under CC BY-NC-SA 4.0.
