
:max_bytes(150000):strip_icc()/DemetriusGray-370f2f60b93b4808b029f80359cc8244.jpg)
"In 2024, Brighten Up Your Image Previews Introducing Luminous Frames"
Brighten Up Your Image Previews: Introducing Luminous Frames
Your YouTube video, or any other clip published on any forum, gets a larger number of hits if it has an attractive thumbnail. And, the fact is, a thumbnail becomes 10x more attractive when the main character that the image has have a neon border around it.
With that said, in the following sections, you will learn a couple of methods on how to add a YouTube thumbnail border around the main characters and/or objects that are significant to the clip.
In this article
01 Add Glowing Neon Border to YouTube Thumbnail with Filmora
02 Add a Glowing Neon Border in YouTube Thumbnail with Canva
03 Outline a Person in a YouTube Thumbnail with Photoshop
Part 1: How to Add Neon Border to YouTube Thumbnail for Free with Filmora
Being one of the most versatile and intuitive post-production tools available in the market today, Wondershare Filmora X allows you to add a neon border to a YouTube thumbnail quite conveniently. You can learn how to get this done on Windows or Mac by following the steps given below.
For Win 7 or later (64-bit)
For macOS 10.12 or later
Step 1: Define Project Settings and Add Image to the Timeline
Launch Wondershare Filmora X on your PC (a MacBook Pro M1 is used here), ensure that the project aspect ratio is set to 16:9 (Widescreen) on the splash screen, and click New Project. On the main interface, click the Preview quality and display settings icon from the upper-right area of the Timeline, click Change Project Aspect Ratio, click to select 1280 x 720 (HD) from the Resolution menu of the Project Settings box, and click OK to save the custom project settings.

Then select My Media from the menu bar if not already selected, click Project Media from the navigation pane, and click Import from the Media box to select and import the image of the main character or object that you want to use in the thumbnail.

Now, drag the image from the Media box to the Timeline at the bottom.

Step 2: Clear Image Background, Add Border, and Add Custom Background
Go to Effects from the menu bar, click to select the Default tab and then AI Portrait from the navigation pane, and click and drag the Human Segmentation preset from the right box, and place it over the image track in the Timeline.

Double-click the image layer, scroll down the upper-left box to the Video Effects section, and use the Edge Thickness and Edge Feather sliders to adjust the character’s edges to make them as realistic as possible. Click OK when done.

Next, click and drag the Human Border preset over the image track in the Timeline, and follow the same procedure to customize the border. This will give the character a neon border effect.

Now, use the method explained earlier to import a custom image for the background, and drag and place it under the previous track in the Timeline.

If you are running the latest version of Filmora, you will find there are some neon light effects available under AI Portrait as well.

Step 3: Add Titles to Thumbnail
Go to Titles from the menu bar, click to select the Default tab and then Lower 3rds from the navigation pane, and click and drag your preferred lower-third preset from the right window to a separate layer in the Timeline. Double-click the lower-third layer, and use the available options in the upper-left window to change the text, its color, etc., and drag the textbox to place it to your preferred position on the image as well. Click OK to save the changes.
Next, click to select Titles from the navigation pane, and drag your preferred title from the right window to the upper-most track in the Timeline. Now use the method explained earlier to edit the text, its color, position, etc. to make it look professional.

For more tips and tricks for creating YouTube thumbnail, you can check this You Tube thumbnail creating guide.
Step 4: Get the Neon Border Thumbnail
Click the Snapshot (Camera) icon from the upper-right area of the Timeline, go to My Media from the menu bar, right-click the thumbnail of the screenshot you captured, and click Reveal in Finder (on Mac) or Reveal in Explorer (on Windows) to get to the folder the YouTube thumbnail border is saved in.

Part 2: How to Add a Glowing Neon Border in Your YouTube Thumbnail with Canva
Canva is another intuitive editing program that works on the web interface rather than having you download and install an app on your PC. You can add a neon border for YouTube thumbnails using Canva by following the instructions given below:
Step 1: Define Project Settings and Add a Background
After signing in to your Canva account, click Create a design from the top-right corner of the page, click Custom size from the bottom, define 1280 and 720 in the Width and Height fields on the box that appears respectively, and click Create new design.

Now, click to select Background from the navigation bar on the left (if the Background tool is not visible, click More and then choose Background from the expanded list), and click to select a background from the images available in the center pane.

Step 2: Upload an Image and Add Effects
Click Uploads from the navigation bar, click the More icon from the right of the Upload media button present at the top of the center pane, choose your preferred method to upload the image (with the transparent background) that you want to use, upload the image, and drag it from the center pane to the Canvas.
Note: You can use any of the tools available online to remove the background from your image for free.

To add a YouTube thumbnail border, make sure that the image that you added to the Canvas is selected, click the Duplicate icon from the upper-right area, and use the scaling handles of the copy of the image to increase its size a bit. Reposition the image back to its original location as well.
Then, click Edit image from the upper-left corner of the Canvas, click Duotone from the Edit image pane at the center, if need be, click See all, choose your preferred duotone effect to apply on the image, choose your preferred highlight and shadow colors from the box that appears next, and click Back from the top of the pane.

Next, click See all next to the Adjust section from the center pane, and drag the Blur slider to the right to increase the blur effect on the image.

Step 3: Position the Layers
While keeping the duplicate image selected, click the Position button from the upper-right area of the Canvas, and click Background to send the second image behind the first one to get the neon border effect for the photo.

Part 3: How to Outline a Person in a YouTube Thumbnail with Photoshop
Because YouTube thumbnails are nothing but static images, creating YouTube thumbnail border with Adobe Photoshop is comparatively easier. The process of doing this is given below:
Step 1: Define Document Preferences and Import an Image
Launch Adobe Photoshop on your PC, click Create new, and on the New Document customization box, define the width and height values to 1280 and 720 pixels respectively. Select Transparent from the Background Contents menu as well if not already selected. Click Create from the bottom to create a new Photoshop document with the specified document settings. Next, open the folder that contains the source image, drag the photo to Photoshop, and press Enter to place the photo.

Step 2: Remove Background from the Image
Make sure that the image layer is selected in the Layers panel on the right, go to Select from the menu bar at the top, and click Subject. From the bottom of the Layers panel, click the Add a mask icon to get rid of the background, leaving only the human on the Canvas.

Step 3: Add a Custom Background and an Outline Around the Subject
Use the method explained earlier to import a background image of your choice to Photoshop. Drag the background image layer to the bottom in the Layers panel. Double-click the masked layer, click to select Stroke from the left pane of the Layer Style box, and use the options available on the right to manage the size, color, position, etc. of the stroke that has been added around the human subject. Click OK when done, and then export the image normally to use it as a YouTube thumbnail border.

Summary
It is important to know that the default resolution of a YouTube thumbnail is 1280 x 720 pixels that is usually written and referred to as 720p. While adding a YouTube thumbnail border, it is also imperative to have a good sense of color combination and fonts. Furthermore, a decent tool like Wondershare Filmora X must be used to add an appealing neon border around the main subject in the thumbnail image easily and quickly.
02 Add a Glowing Neon Border in YouTube Thumbnail with Canva
03 Outline a Person in a YouTube Thumbnail with Photoshop
Part 1: How to Add Neon Border to YouTube Thumbnail for Free with Filmora
Being one of the most versatile and intuitive post-production tools available in the market today, Wondershare Filmora X allows you to add a neon border to a YouTube thumbnail quite conveniently. You can learn how to get this done on Windows or Mac by following the steps given below.
For Win 7 or later (64-bit)
For macOS 10.12 or later
Step 1: Define Project Settings and Add Image to the Timeline
Launch Wondershare Filmora X on your PC (a MacBook Pro M1 is used here), ensure that the project aspect ratio is set to 16:9 (Widescreen) on the splash screen, and click New Project. On the main interface, click the Preview quality and display settings icon from the upper-right area of the Timeline, click Change Project Aspect Ratio, click to select 1280 x 720 (HD) from the Resolution menu of the Project Settings box, and click OK to save the custom project settings.
Then select My Media from the menu bar if not already selected, click Project Media from the navigation pane, and click Import from the Media box to select and import the image of the main character or object that you want to use in the thumbnail.
Now, drag the image from the Media box to the Timeline at the bottom.
Step 2: Clear Image Background, Add Border, and Add Custom Background
Go to Effects from the menu bar, click to select the Default tab and then AI Portrait from the navigation pane, and click and drag the Human Segmentation preset from the right box, and place it over the image track in the Timeline.
Double-click the image layer, scroll down the upper-left box to the Video Effects section, and use the Edge Thickness and Edge Feather sliders to adjust the character’s edges to make them as realistic as possible. Click OK when done.
Next, click and drag the Human Border preset over the image track in the Timeline, and follow the same procedure to customize the border. This will give the character a neon border effect.
Now, use the method explained earlier to import a custom image for the background, and drag and place it under the previous track in the Timeline.
If you are running the latest version of Filmora, you will find there are some neon light effects available under AI Portrait as well.
Step 3: Add Titles to Thumbnail
Go to Titles from the menu bar, click to select the Default tab and then Lower 3rds from the navigation pane, and click and drag your preferred lower-third preset from the right window to a separate layer in the Timeline. Double-click the lower-third layer, and use the available options in the upper-left window to change the text, its color, etc., and drag the textbox to place it to your preferred position on the image as well. Click OK to save the changes.
Next, click to select Titles from the navigation pane, and drag your preferred title from the right window to the upper-most track in the Timeline. Now use the method explained earlier to edit the text, its color, position, etc. to make it look professional.
For more tips and tricks for creating YouTube thumbnail, you can check this You Tube thumbnail creating guide.
Step 4: Get the Neon Border Thumbnail
Click the Snapshot (Camera) icon from the upper-right area of the Timeline, go to My Media from the menu bar, right-click the thumbnail of the screenshot you captured, and click Reveal in Finder (on Mac) or Reveal in Explorer (on Windows) to get to the folder the YouTube thumbnail border is saved in.
Part 2: How to Add a Glowing Neon Border in Your YouTube Thumbnail with Canva
Canva is another intuitive editing program that works on the web interface rather than having you download and install an app on your PC. You can add a neon border for YouTube thumbnails using Canva by following the instructions given below:
Step 1: Define Project Settings and Add a Background
After signing in to your Canva account, click Create a design from the top-right corner of the page, click Custom size from the bottom, define 1280 and 720 in the Width and Height fields on the box that appears respectively, and click Create new design.
Now, click to select Background from the navigation bar on the left (if the Background tool is not visible, click More and then choose Background from the expanded list), and click to select a background from the images available in the center pane.
Step 2: Upload an Image and Add Effects
Click Uploads from the navigation bar, click the More icon from the right of the Upload media button present at the top of the center pane, choose your preferred method to upload the image (with the transparent background) that you want to use, upload the image, and drag it from the center pane to the Canvas.
Note: You can use any of the tools available online to remove the background from your image for free.
To add a YouTube thumbnail border, make sure that the image that you added to the Canvas is selected, click the Duplicate icon from the upper-right area, and use the scaling handles of the copy of the image to increase its size a bit. Reposition the image back to its original location as well.
Then, click Edit image from the upper-left corner of the Canvas, click Duotone from the Edit image pane at the center, if need be, click See all, choose your preferred duotone effect to apply on the image, choose your preferred highlight and shadow colors from the box that appears next, and click Back from the top of the pane.
Next, click See all next to the Adjust section from the center pane, and drag the Blur slider to the right to increase the blur effect on the image.
Step 3: Position the Layers
While keeping the duplicate image selected, click the Position button from the upper-right area of the Canvas, and click Background to send the second image behind the first one to get the neon border effect for the photo.
Part 3: How to Outline a Person in a YouTube Thumbnail with Photoshop
Because YouTube thumbnails are nothing but static images, creating YouTube thumbnail border with Adobe Photoshop is comparatively easier. The process of doing this is given below:
Step 1: Define Document Preferences and Import an Image
Launch Adobe Photoshop on your PC, click Create new, and on the New Document customization box, define the width and height values to 1280 and 720 pixels respectively. Select Transparent from the Background Contents menu as well if not already selected. Click Create from the bottom to create a new Photoshop document with the specified document settings. Next, open the folder that contains the source image, drag the photo to Photoshop, and press Enter to place the photo.
Step 2: Remove Background from the Image
Make sure that the image layer is selected in the Layers panel on the right, go to Select from the menu bar at the top, and click Subject. From the bottom of the Layers panel, click the Add a mask icon to get rid of the background, leaving only the human on the Canvas.
Step 3: Add a Custom Background and an Outline Around the Subject
Use the method explained earlier to import a background image of your choice to Photoshop. Drag the background image layer to the bottom in the Layers panel. Double-click the masked layer, click to select Stroke from the left pane of the Layer Style box, and use the options available on the right to manage the size, color, position, etc. of the stroke that has been added around the human subject. Click OK when done, and then export the image normally to use it as a YouTube thumbnail border.
Summary
It is important to know that the default resolution of a YouTube thumbnail is 1280 x 720 pixels that is usually written and referred to as 720p. While adding a YouTube thumbnail border, it is also imperative to have a good sense of color combination and fonts. Furthermore, a decent tool like Wondershare Filmora X must be used to add an appealing neon border around the main subject in the thumbnail image easily and quickly.
YouTube SEO Guide: How to Improve YouTube Videos Rankings
YouTube SEO Guide: How to Improve Search Rankings For Your YouTube Videos

Richard Bennett
Mar 27, 2024• Proven solutions
If there exists searches, there exists SEO. YouTube now is the second largest search engine which processes more than 3 billion searches in a single month. Besides making sure that each video you upload to YouTube offers thought-provoking content, you can also optimize the video in accordance with the rules of SEO to stand out from the 500 hours of videos uploaded per minutes.
If you are trying to learn more about the SEO optimization of YouTube videos, you’ve landed on the right page, because in this guide we are going to take you through the process of improving the search rankings for each video you upload to YouTube.
YouTube SEO Guide
Quick Jump Menu:
The guide covers these five aspects of YouTube SEO optimization:
- The Basics - Five Main Traffic Sources
- How to Come Up With SEO Topics?
- The Metadata Process
- Promoting Videos Using Off-Channel Marketing
- How to Monitor a Video’s Data?
The Basics - Five Main Traffic Sources
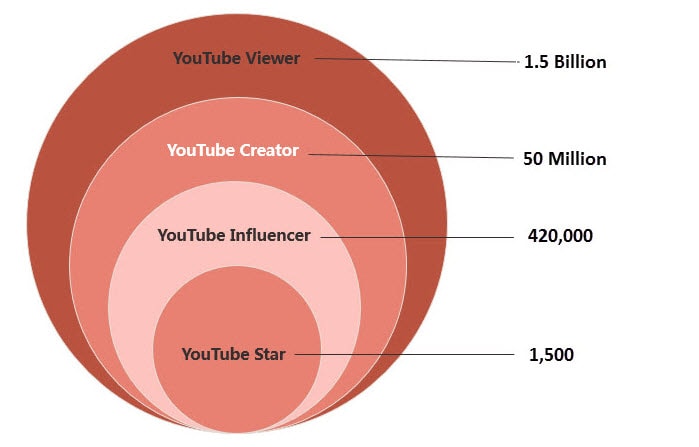
Producing a video and posting it on your YouTube channel is simply not enough to guarantee its success. You have to know where the video’s traffic will come from, because over 500 hours of video content are being uploaded each minute, and there are over 50 million content creators on the platform.
That’s the reason why you have to develop a strategy that will attract the traffic to your videos and place them high in the YouTube’s search rankings. Let’s have a look at five traffic sources that will boost the number of views and comments videos are getting.
YouTube Search
A great deal of traffic for your videos can come from the search results, which makes the title of a video one of the most important aspects of SEO optimization on YouTube.
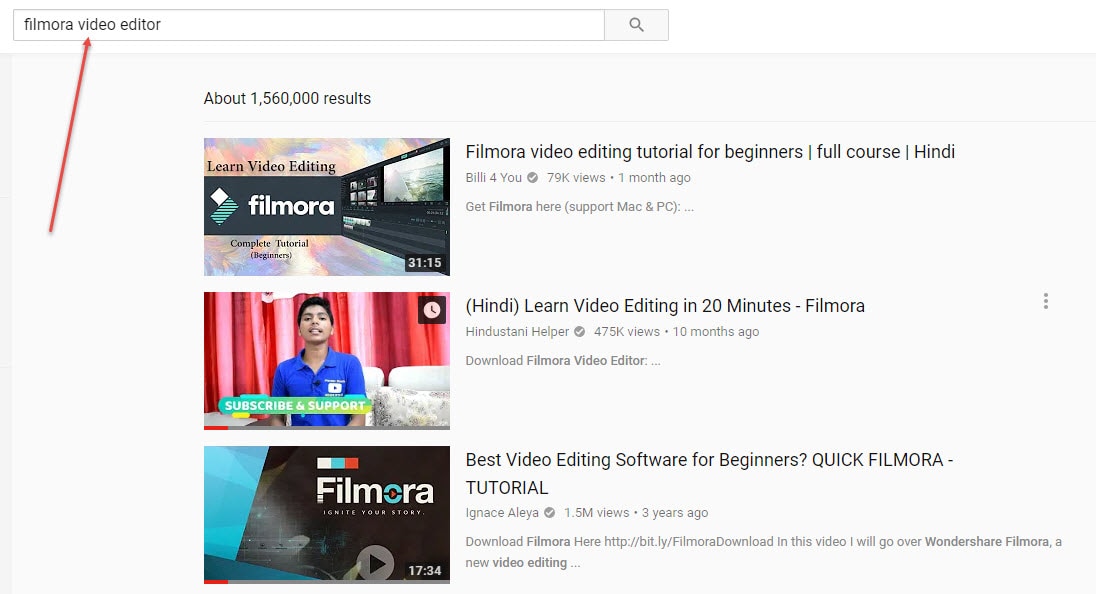
Don’t use long titles, strive to use short and catchy titles that also contain keywords which accurately describe the contents of the video in order to appear higher in the YouTube’s search results.
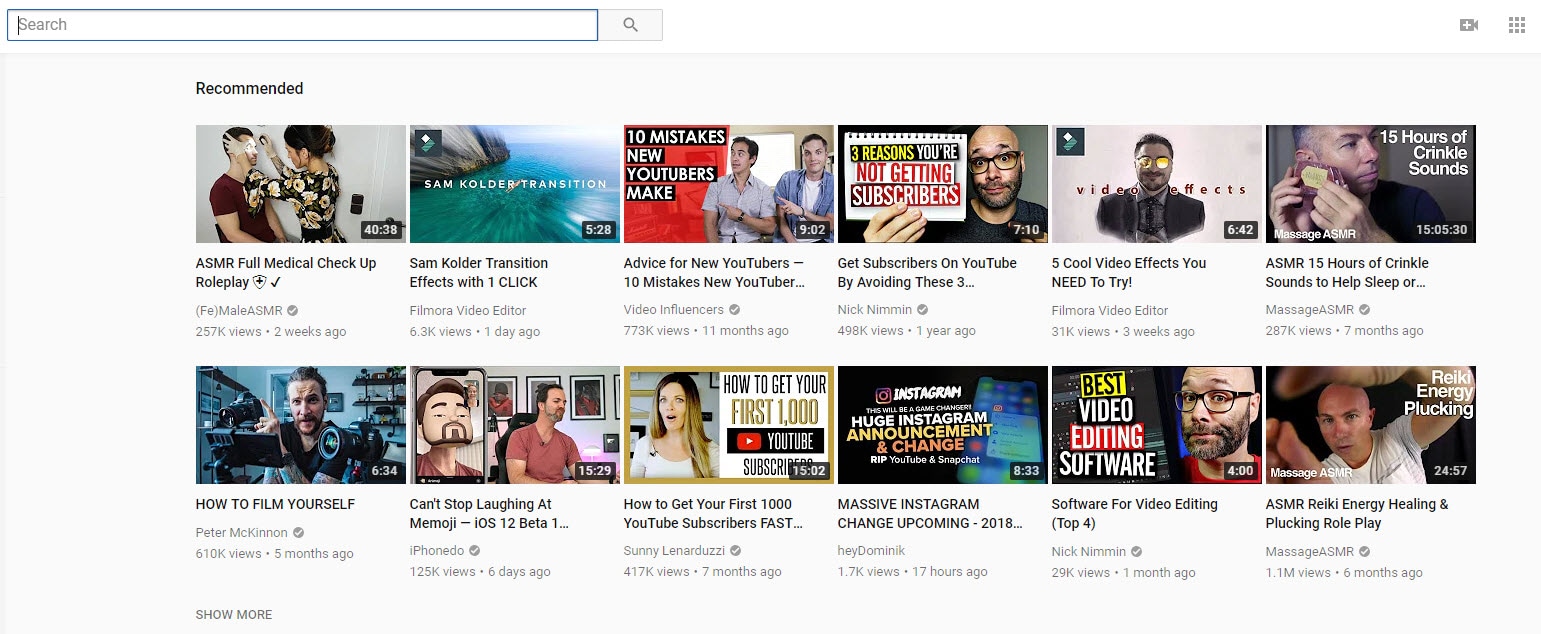
Suggested Videos
The platform offers video suggestions that cover topics similar to those of the videos you already watched. Once more, the title and the description you provided will play a crucial role in driving more traffic to your videos, so make sure that each video you post on YouTube has an effective title that will spark interest in a potential viewer to take action and actually watch the video.

Suggested videos that appear next to the video
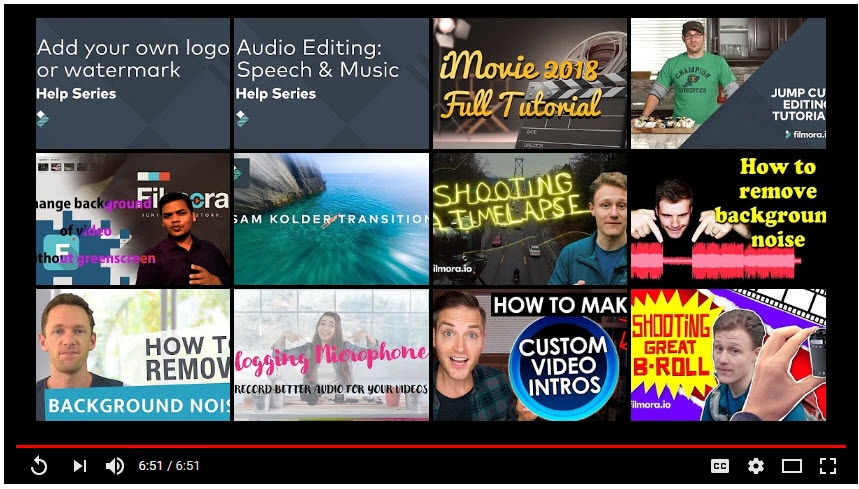
Suggested videos that appear after the video
Suggested videos that appear from links in a video description.
YouTube Advertising
Investing in the promotion of the content you’re posting on your channel can help you to generate more views, but different types of YouTube ads produce different results. Non-skippable ads never count as a view, while a skippable ad that lasts more than ten seconds must be viewed for at least thirty seconds in order to qualify as a view. All other types of YouTube ads require the viewer to click on them and play them so the YouTube Analytics can recognize the action as a view.
Channel Pages, Browse Features, Playlists
Channel Pages - This method of generating traffic includes views created by other channel owners as well as Topic Channels that are automatically created using the platform’s video discovery system. In either case, your videos are discovered through search results or video suggestions.
Browse Features - The homepage of your YouTube channel as well as the subscription feed and all other browse features can be a potential source of views for your videos. The YouTube users who watch a video on your channel can be either signed-in or signed-out, but the YouTube Analytics tool will still recognize their action as a view.
Playlists - Producing content other YouTubers will want to include in their playlists is one of the best ways to attract more traffic and increase the amount of views videos you upload to your YouTube channel are getting.
External Traffic Sources
Even though YouTube is the second largest search engine in the world, sharing a link to a video on social media such as Twitter or Facebook or embedding it on your website can significantly increase the number of views the video is getting.
Sources of traffic mentioned above are not equally effective, because the intent to actually watch the video varies greatly for each source. That’s why you’ll be able to achieve the best results if you combine several, if not all sources of traffic described in this guide.
How to Come Up With SEO Topics
Videos are a form of communication, and like with all forms of communication, you must know who you are addressing in order to know what to say. Defining the target audience before you start creating a video will make the SEO optimization process much simpler and much faster.
Let’s say that you want to become a successful beauty vlogger and your aim is to produce makeup tutorials. Your first step should be to determine which market is the most relevant for you. Assuming you’d like to target the Asian market, it becomes obvious that the audience you’ll be addressing will consist of women in need of practical makeup advice and your colleagues who offer similar types of tutorials.
Now that you’ve defined your target audience you can proceed to develop the content strategy. People search videos for many different reasons, but their motivation can be approximately divided into four micro-moments. These are:
I want to know, I want to go, I want to do and I want to buy moments and some or all can be applied to all types of YouTube videos.
I want to know moments refer to YouTube users who want to learn more about a certain topic and often ask how to perform a certain action. In the beauty niche, the search terms may include questions like ‘Is makeup bad for your skin?’ or ‘What is contouring?’.
I want to do moments reflect a certain need the potential viewer of your videos has, and your video should provide a straightforward answer. Most common I want to do search patterns for beauty vloggers are ‘How to apply mascara, eyeliner, etc..’
If you know quite a bit about beauty products, then producing videos that rely on I want to buy moments is a sure way to attract a lot of traffic to your videos. These include product reviews, top ten videos or comparison videos that offer the reasons for and against buying a certain product.
Furthermore, you should try to think of a way to create a makeup video that makes the viewer feel involved, so even if you are just explaining the basic terms or tools in the video, viewers should have the feeling that they are learning something.
After defining your target audience and determining what you have to offer, you can choose the topic based on keywords. Here’s how you can easily come up with keyword ideas for your YouTube videos.
How to find the right keywords ideas?
YouTube Search Suggestions:
This is by far the easiest and fastest way to come up with an SEO friendly topic for a video. The best part is that the keywords you come up with will work without a doubt since all suggestions are based on search terms actual people have already used.
Copy the Keywords From a Video in Your Niche that Already Has a Lot of Views:
Study the competition and find a few channels with hundreds of thousands of subscribers that cover the same topics as you. These channels probably have a significant number of videos so just sort them out using the ‘Most Popular’ option.
Click on a video that has the most views and that also has a topic that isn’t far removed from what you want to do. When the video is open, look for the keyword around which it is centered, in the title, description or tags and just find a creative way to incorporate it into your video.
Use YouTube’s Traffic Sources and Search Report:
If you would like to find out which keywords YouTubers have used to find your videos this is your best option. Even though the chances are you’ll know most keywords in the report since you already used them for SEO optimization of your videos, you might come up with a few unexpected entries that might be useful.
Look for low-competition keywords, because frequently used keywords are already used by videos featured on channels that have a lot of followers. Low-competition keywords can be particularly helpful if you are trying to grow your channel since they might attract more viewers than the most obvious keyword choices.
YouTube keyword tools:
https://filmora.wondershare.com/vlogger/youtube-keyword-tools.html
The Metadata Process
Now that you’ve found the best keywords for a video you’d like to upload to your YouTube channel, you should do everything in your power to maximize its SEO value. The following YouTube Ranking factors all play a part in the success your video will enjoy:
- On Video (Metadata)
- Recommendations
- Channel
- User Action
As you can see, metadata is directly related to the search rankings performance of your videos. So what is metadata exactly?
Video file name: The SEO optimization of a YouTube video starts even before you upload the file to your channel. When naming a video file, make sure that the name contains a keyword, because the platform’s algorithm will analyze it and use it to determine how high it should be ranked in the search results.
Video title: The title of a YouTube video is added after the upload is complete. So, in order to increase the video’s chances of appearing high in the search results, you should place the keyword at its begging and avoid using titles longer than 70 characters as much as you can.
Description: The more words you use to describe a video, the better. YouTube descriptions can have up to 5000 characters, which gives you quite a lot of room to use the keywords you’ve selected.
Tags: You can hardly use too many tags, as a matter of fact, you should use as many tags as you can think of. Channel name, brand name, related keywords are all great choices for tags, just keep in mind that they can’t be longer than 127 characters.
YouTube tag generator:
http://www.betterwaytoweb.com/tag-generator-for-youtube
Transcript: Chances are that the keyword around which your video is based appears quite a lot in the narration and dialogue. YouTube lets you create transcripts of all your videos in just a few simple clicks, which enables you to take the SEO optimization a step further.
Promoting Videos Using Off-Channel Marketing
One of the greatest advantages YouTube offers is how easy it is to share the links to your videos on social media or anywhere else on the Internet. These off-channel marketing methods can help you drive more traffic to the videos you upload to YouTube:
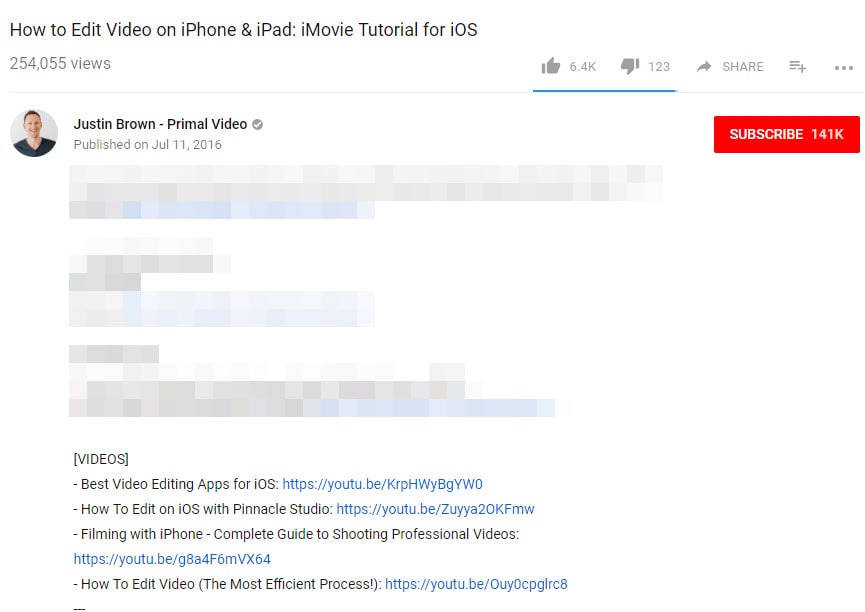
Embedding the Link: Articles covering topics similar to the topic your video is covering are a perfect place to embed a link to the video featured on your channel. What’s more, you can embed a link in your blog posts, on your website, or on a website of a partner company.
Backlinks: A backlink is a link from some other website to the particular web resource, in this case, your video. You can insert links that offer additional information about the topic and by doing so increase the traffic.
Third-party Website Promotion: Share links to videos you upload to YouTube on websites like Quora or forums such as Filmora.io.
Team up with Other YouTube Creators: Looking for cooperation on Fiverr, or just send them private messages to ask for recommendation/follow. Add your video in their playlist, or in Related Channel, End-screen card, etc.
How to Monitor a Video’s Data?
YouTube Analytics is a tool that will enable you to find out more about the people who are watching your videos. How many of your subscribers have watched a video you added to your channel? How many viewers found a video you uploaded through search results? The answer to these questions can be easily found with this tool.
YouTube Analytics also provides insight into subscriber conversion rates, so you can know exactly which videos attracted the most subscribers. This feature is particularly important if you are still developing your channel since it can help you understand which type of videos inspired a viewer to take action and hit the Subscribe button
Combining the information supplied by the YouTube Analytics with the data Google Analytics can offer will allow you to get to know the viewers of your videos better, which can be useful when planning the topics of the videos you’d like to upload to your YouTube channel in the future. If you’d like to gain access to more advanced statistics, there are a lot of free and paid YouTube analytics tools that enable you to keep track of the number of video comments, rankings, dislikes, likes, video replies or favorites.
Each of these metrics serves as a building block of a successful YouTube channel because uploading a video during a weekend or during the working days may not produce the same results. The YouTube analytics tools can assist you in staying one step ahead of your competition and increasing the number of subscribers to your YouTube channel.
A Few Final Thoughts
Just keep these fundamental things into your mind when you’re doing YouTube SEO:
YouTube will do anything they can to keep viewer watch longer
So what’s relevant to the content? YouTube
Always suggest videos from the same creator (so you should use brand, channel name tags)
Evaluated what people watch next and which video they ignore.
Displays video with the similar titles and keywords/tags
So what’s relevant to the viewers? YouTube
Learns your preferences, style, tasted
Considers what content might be interesting to an individual viewer: analyze viewing history, channel subscriptions, search history, viewing choices.
Richard Bennett
Richard Bennett is a writer and a lover of all things video.
Follow @Richard Bennett
Richard Bennett
Mar 27, 2024• Proven solutions
If there exists searches, there exists SEO. YouTube now is the second largest search engine which processes more than 3 billion searches in a single month. Besides making sure that each video you upload to YouTube offers thought-provoking content, you can also optimize the video in accordance with the rules of SEO to stand out from the 500 hours of videos uploaded per minutes.
If you are trying to learn more about the SEO optimization of YouTube videos, you’ve landed on the right page, because in this guide we are going to take you through the process of improving the search rankings for each video you upload to YouTube.
YouTube SEO Guide
Quick Jump Menu:
The guide covers these five aspects of YouTube SEO optimization:
- The Basics - Five Main Traffic Sources
- How to Come Up With SEO Topics?
- The Metadata Process
- Promoting Videos Using Off-Channel Marketing
- How to Monitor a Video’s Data?
The Basics - Five Main Traffic Sources
Producing a video and posting it on your YouTube channel is simply not enough to guarantee its success. You have to know where the video’s traffic will come from, because over 500 hours of video content are being uploaded each minute, and there are over 50 million content creators on the platform.
That’s the reason why you have to develop a strategy that will attract the traffic to your videos and place them high in the YouTube’s search rankings. Let’s have a look at five traffic sources that will boost the number of views and comments videos are getting.
YouTube Search
A great deal of traffic for your videos can come from the search results, which makes the title of a video one of the most important aspects of SEO optimization on YouTube.
Don’t use long titles, strive to use short and catchy titles that also contain keywords which accurately describe the contents of the video in order to appear higher in the YouTube’s search results.
Suggested Videos
The platform offers video suggestions that cover topics similar to those of the videos you already watched. Once more, the title and the description you provided will play a crucial role in driving more traffic to your videos, so make sure that each video you post on YouTube has an effective title that will spark interest in a potential viewer to take action and actually watch the video.
Suggested videos that appear next to the video
Suggested videos that appear after the video
Suggested videos that appear from links in a video description.
YouTube Advertising
Investing in the promotion of the content you’re posting on your channel can help you to generate more views, but different types of YouTube ads produce different results. Non-skippable ads never count as a view, while a skippable ad that lasts more than ten seconds must be viewed for at least thirty seconds in order to qualify as a view. All other types of YouTube ads require the viewer to click on them and play them so the YouTube Analytics can recognize the action as a view.
Channel Pages, Browse Features, Playlists
Channel Pages - This method of generating traffic includes views created by other channel owners as well as Topic Channels that are automatically created using the platform’s video discovery system. In either case, your videos are discovered through search results or video suggestions.
Browse Features - The homepage of your YouTube channel as well as the subscription feed and all other browse features can be a potential source of views for your videos. The YouTube users who watch a video on your channel can be either signed-in or signed-out, but the YouTube Analytics tool will still recognize their action as a view.
Playlists - Producing content other YouTubers will want to include in their playlists is one of the best ways to attract more traffic and increase the amount of views videos you upload to your YouTube channel are getting.
External Traffic Sources
Even though YouTube is the second largest search engine in the world, sharing a link to a video on social media such as Twitter or Facebook or embedding it on your website can significantly increase the number of views the video is getting.
Sources of traffic mentioned above are not equally effective, because the intent to actually watch the video varies greatly for each source. That’s why you’ll be able to achieve the best results if you combine several, if not all sources of traffic described in this guide.
How to Come Up With SEO Topics
Videos are a form of communication, and like with all forms of communication, you must know who you are addressing in order to know what to say. Defining the target audience before you start creating a video will make the SEO optimization process much simpler and much faster.
Let’s say that you want to become a successful beauty vlogger and your aim is to produce makeup tutorials. Your first step should be to determine which market is the most relevant for you. Assuming you’d like to target the Asian market, it becomes obvious that the audience you’ll be addressing will consist of women in need of practical makeup advice and your colleagues who offer similar types of tutorials.
Now that you’ve defined your target audience you can proceed to develop the content strategy. People search videos for many different reasons, but their motivation can be approximately divided into four micro-moments. These are:
I want to know, I want to go, I want to do and I want to buy moments and some or all can be applied to all types of YouTube videos.
I want to know moments refer to YouTube users who want to learn more about a certain topic and often ask how to perform a certain action. In the beauty niche, the search terms may include questions like ‘Is makeup bad for your skin?’ or ‘What is contouring?’.
I want to do moments reflect a certain need the potential viewer of your videos has, and your video should provide a straightforward answer. Most common I want to do search patterns for beauty vloggers are ‘How to apply mascara, eyeliner, etc..’
If you know quite a bit about beauty products, then producing videos that rely on I want to buy moments is a sure way to attract a lot of traffic to your videos. These include product reviews, top ten videos or comparison videos that offer the reasons for and against buying a certain product.
Furthermore, you should try to think of a way to create a makeup video that makes the viewer feel involved, so even if you are just explaining the basic terms or tools in the video, viewers should have the feeling that they are learning something.
After defining your target audience and determining what you have to offer, you can choose the topic based on keywords. Here’s how you can easily come up with keyword ideas for your YouTube videos.
How to find the right keywords ideas?
YouTube Search Suggestions:
This is by far the easiest and fastest way to come up with an SEO friendly topic for a video. The best part is that the keywords you come up with will work without a doubt since all suggestions are based on search terms actual people have already used.
Copy the Keywords From a Video in Your Niche that Already Has a Lot of Views:
Study the competition and find a few channels with hundreds of thousands of subscribers that cover the same topics as you. These channels probably have a significant number of videos so just sort them out using the ‘Most Popular’ option.
Click on a video that has the most views and that also has a topic that isn’t far removed from what you want to do. When the video is open, look for the keyword around which it is centered, in the title, description or tags and just find a creative way to incorporate it into your video.
Use YouTube’s Traffic Sources and Search Report:
If you would like to find out which keywords YouTubers have used to find your videos this is your best option. Even though the chances are you’ll know most keywords in the report since you already used them for SEO optimization of your videos, you might come up with a few unexpected entries that might be useful.
Look for low-competition keywords, because frequently used keywords are already used by videos featured on channels that have a lot of followers. Low-competition keywords can be particularly helpful if you are trying to grow your channel since they might attract more viewers than the most obvious keyword choices.
YouTube keyword tools:
https://filmora.wondershare.com/vlogger/youtube-keyword-tools.html
The Metadata Process
Now that you’ve found the best keywords for a video you’d like to upload to your YouTube channel, you should do everything in your power to maximize its SEO value. The following YouTube Ranking factors all play a part in the success your video will enjoy:
- On Video (Metadata)
- Recommendations
- Channel
- User Action
As you can see, metadata is directly related to the search rankings performance of your videos. So what is metadata exactly?
Video file name: The SEO optimization of a YouTube video starts even before you upload the file to your channel. When naming a video file, make sure that the name contains a keyword, because the platform’s algorithm will analyze it and use it to determine how high it should be ranked in the search results.
Video title: The title of a YouTube video is added after the upload is complete. So, in order to increase the video’s chances of appearing high in the search results, you should place the keyword at its begging and avoid using titles longer than 70 characters as much as you can.
Description: The more words you use to describe a video, the better. YouTube descriptions can have up to 5000 characters, which gives you quite a lot of room to use the keywords you’ve selected.
Tags: You can hardly use too many tags, as a matter of fact, you should use as many tags as you can think of. Channel name, brand name, related keywords are all great choices for tags, just keep in mind that they can’t be longer than 127 characters.
YouTube tag generator:
http://www.betterwaytoweb.com/tag-generator-for-youtube
Transcript: Chances are that the keyword around which your video is based appears quite a lot in the narration and dialogue. YouTube lets you create transcripts of all your videos in just a few simple clicks, which enables you to take the SEO optimization a step further.
Promoting Videos Using Off-Channel Marketing
One of the greatest advantages YouTube offers is how easy it is to share the links to your videos on social media or anywhere else on the Internet. These off-channel marketing methods can help you drive more traffic to the videos you upload to YouTube:
Embedding the Link: Articles covering topics similar to the topic your video is covering are a perfect place to embed a link to the video featured on your channel. What’s more, you can embed a link in your blog posts, on your website, or on a website of a partner company.
Backlinks: A backlink is a link from some other website to the particular web resource, in this case, your video. You can insert links that offer additional information about the topic and by doing so increase the traffic.
Third-party Website Promotion: Share links to videos you upload to YouTube on websites like Quora or forums such as Filmora.io.
Team up with Other YouTube Creators: Looking for cooperation on Fiverr, or just send them private messages to ask for recommendation/follow. Add your video in their playlist, or in Related Channel, End-screen card, etc.
How to Monitor a Video’s Data?
YouTube Analytics is a tool that will enable you to find out more about the people who are watching your videos. How many of your subscribers have watched a video you added to your channel? How many viewers found a video you uploaded through search results? The answer to these questions can be easily found with this tool.
YouTube Analytics also provides insight into subscriber conversion rates, so you can know exactly which videos attracted the most subscribers. This feature is particularly important if you are still developing your channel since it can help you understand which type of videos inspired a viewer to take action and hit the Subscribe button
Combining the information supplied by the YouTube Analytics with the data Google Analytics can offer will allow you to get to know the viewers of your videos better, which can be useful when planning the topics of the videos you’d like to upload to your YouTube channel in the future. If you’d like to gain access to more advanced statistics, there are a lot of free and paid YouTube analytics tools that enable you to keep track of the number of video comments, rankings, dislikes, likes, video replies or favorites.
Each of these metrics serves as a building block of a successful YouTube channel because uploading a video during a weekend or during the working days may not produce the same results. The YouTube analytics tools can assist you in staying one step ahead of your competition and increasing the number of subscribers to your YouTube channel.
A Few Final Thoughts
Just keep these fundamental things into your mind when you’re doing YouTube SEO:
YouTube will do anything they can to keep viewer watch longer
So what’s relevant to the content? YouTube
Always suggest videos from the same creator (so you should use brand, channel name tags)
Evaluated what people watch next and which video they ignore.
Displays video with the similar titles and keywords/tags
So what’s relevant to the viewers? YouTube
Learns your preferences, style, tasted
Considers what content might be interesting to an individual viewer: analyze viewing history, channel subscriptions, search history, viewing choices.
Richard Bennett
Richard Bennett is a writer and a lover of all things video.
Follow @Richard Bennett
Also read:
- [New] Elevate Your Content with These 10 Reaction Wonders
- In 2024, Channel Confidence Tips for Trending on YouTube
- FIFA Visuals Key YouTube Video Trends
- Your Device, Uninterrupted Revealing the Top 7 Android AdBlockers
- Guide to Share YouTube Video on Facebook
- In 2024, Boost Your Channel Top 14 Gaming Vids for YouTube Success
- 10 User-Friendly Free Tools to Create Professional Video Thumbnails for 2024
- 2024 Approved Chart Your Course Navigating the Waters of YouTube Subscription Surges
- Enlightenment in Education Top 10 History YouTube Channels
- Monetizing Your YouTube Channels Strategies for Success
- [Updated] Eco-Filmmaking Simplified YouTube's Green Screen Wonders
- Mastering Video Production Essential Lessons for Beginners
- DJ Beats Unleashed High-Fidelity Templates Downloaded Easily
- [New] Engaging YouTube Summaries with Tailored Templates
- Spark Your Audience with Best Video Content Ideas
- Boosting Visibility The Art of Crafting YouTube Channel Backlinks for 2024
- [New] Best 10 YouTube Volume Boosters for Windows, macOS, Android, and iPhone
- [Updated] Busting the Top 10 Vloggers' Fears Strategies for Success
- Mastering the Art of Locating Concealed YouTube Media
- 2024 Approved Direct From Device to Digital World Recording Your Apple Gadgets
- In 2024, Cut Down, Catch More The Best URL Reducers for YouTube
- Avoid YouTube? Here Are Top 10 Indie Video Apps for Phones
- 2024 Approved 10 Best Fitness Channels for Yogis
- Seamless Integration Share Confidential YouTube Videos on Gmail
- The Pros' Playbook for Top 10 Music Videos That Define Genres
- Effortless Fusion of YouTube Audio with iMovie Masterpieces for 2024
- [Updated] Cutting-Edge Design Top 5 3D Intro Makers
- 2024 Approved Achieve YouTube Stardom Top Strategies for Recognition and Growth
- From Basic to Exceptional A Step-by-Step Thumbnail Guide
- Neon Borders on YouTube Thumbnails Step by Step Guide
- [New] Accelerate Keyword Acquisition The Finest 7 Free Taggification Apps for YouTube Videos
- Efficacy of Monetized YouTube Engagement for Content Creators, In 2024
- 2024 Approved Economical Mic Options for YouTube Vloggers
- Unleashing YouTube Potential The Best Shortcuts to Higher Views
- In 2024, Deciphering Ad Revenue and Affiliate Opportunities on YouTube
- 2024 Approved Enhancing Video Tracking Adding Timestamps in YouTube
- Navigating the Undisclosed Terrain of YouTube Archives
- [New] Beyond YouTube Elite Video Sharing Hubs Revealed
- Free Themes for Dynamic YouTuber Profiles
- Mac Basics for Creating Attractive First Youtube Videos
- Enhancing Video Visibility with Optimal Thumbnails
- Crafting Video Magic with iMovie, Directed to YouTube
- New The Art of Flawless Conversion Video to MP3 without Quality Drop
- 4 Feasible Ways to Fake Location on Facebook For your Vivo T2x 5G | Dr.fone
- Top 7 Skype Hacker to Hack Any Skype Account On your Realme 12+ 5G | Dr.fone
- Top 7 Phone Number Locators To Track Realme C53 Location | Dr.fone
- Issues playing MKV video on Xiaomi Redmi Note 12R
- New 2024 Approved From Studio to Screen The Definitive Stop Motion Animation Guide
- How To Recover Data from iPhone 15 Plus? | Dr.fone
- In-Depth Skype Audio Capture Guide with OBS Software for 2024
- [Updated] Video Perfection Crafting Squares for Facebook Popularity for 2024
- Updated 2024 Approved FREE Top 10 Best Online Video Editors without Watermark
- [Updated] Peering Into Popularity Instagram Analytics for You
- [Updated] Open-Source Recorder Showdown Best Tools Ranked for 2024
- [New] Amplify Your Windows Photos Viewing Incorporating Artistic Filters and Music
- Updated 2024 Approved Take Your Videos to the Next Level Adding 3D Effects in Windows
- Read This Guide to Find a Reliable Alternative to Fake GPS On Honor X9a | Dr.fone
- Title: "In 2024, Brighten Up Your Image Previews Introducing Luminous Frames"
- Author: Kevin
- Created at : 2024-05-25 15:27:31
- Updated at : 2024-05-26 15:27:31
- Link: https://youtube-videos.techidaily.com/in-2024-brighten-up-your-image-previews-introducing-luminous-frames/
- License: This work is licensed under CC BY-NC-SA 4.0.
