
:max_bytes(150000):strip_icc()/psvr2-headset-controllers-45d5e11f5c364b2faff3a67d9e13861c.jpg)
"In 2024, Boosting Engagement A Guide to More YouTube Shorts Success"
Boosting Engagement: A Guide to More YouTube Shorts Success
How to Get More Views with YouTube Shorts

Richard Bennett
Mar 27, 2024• Proven solutions
One of the biggest challenges that people face while using YouTube Shorts is how to get more views. Many new users wonder what and how should they prepare a video that is both 15-to-60 seconds long, and at the same time, it is engaging enough to make the audience view them with excitement.
With that said, the following sections discuss some best practices, and share a couple of tips to increase views on your YouTube Shorts videos.
- Part 1: Get More Views by Adding Shorts Video to the ‘Featured’ Section
- Part 2: Create Attractive Thumbnail for YouTube Shorts to Get More Views
- Part 3: Optimize YouTube Shorts to Get More Views
- Part 4: How to Analyze YouTube Shorts Performance
Part 1: Get More Views by Adding Shorts Video to the ‘Featured’ Section
Comparatively different from other videos, the ones that are added under the ‘Featured’ section are recommended to the audience throughout the YouTube platform on the basis of the algorithms that automatically determine which clips should be liked beach viewer individually.
![]()
A cross-platform for making videos anywhere for all creators

Why your video editing isn’t good enough? How about some creative inspo?
- 100 Million+ Users
- 150+ Countries and Regions
- 4 Million+ Social Media Followers
- 5 Million+ Stock Media for Use
* Secure Download

To elaborate, generally, YouTube suggests you a video as per your viewing history, browsing statistics, and other such information that the streaming media giant collects over time. On the other hand, the ‘Featured’ videos are suggested according to what YouTube ‘thinks’ might be of your interest, or could be somehow useful to you.
Therefore, when any clip is added as a ‘Featured’ video, YouTube suggests it to more viewers as compared to those that are published under the ‘Recommended’ category.
Note: Although there is a lot more to cover under the ‘Featured’ videos and channels section such as branding, advertisements, etc., such topics are beyond the scope of this piece.
Adding YouTube Shorts videos to the ‘Featured’ section is fairly simple, and the instructions given below explain how this can be done:
Note: It is assumed that you already have a couple of shorts video published on YouTube.
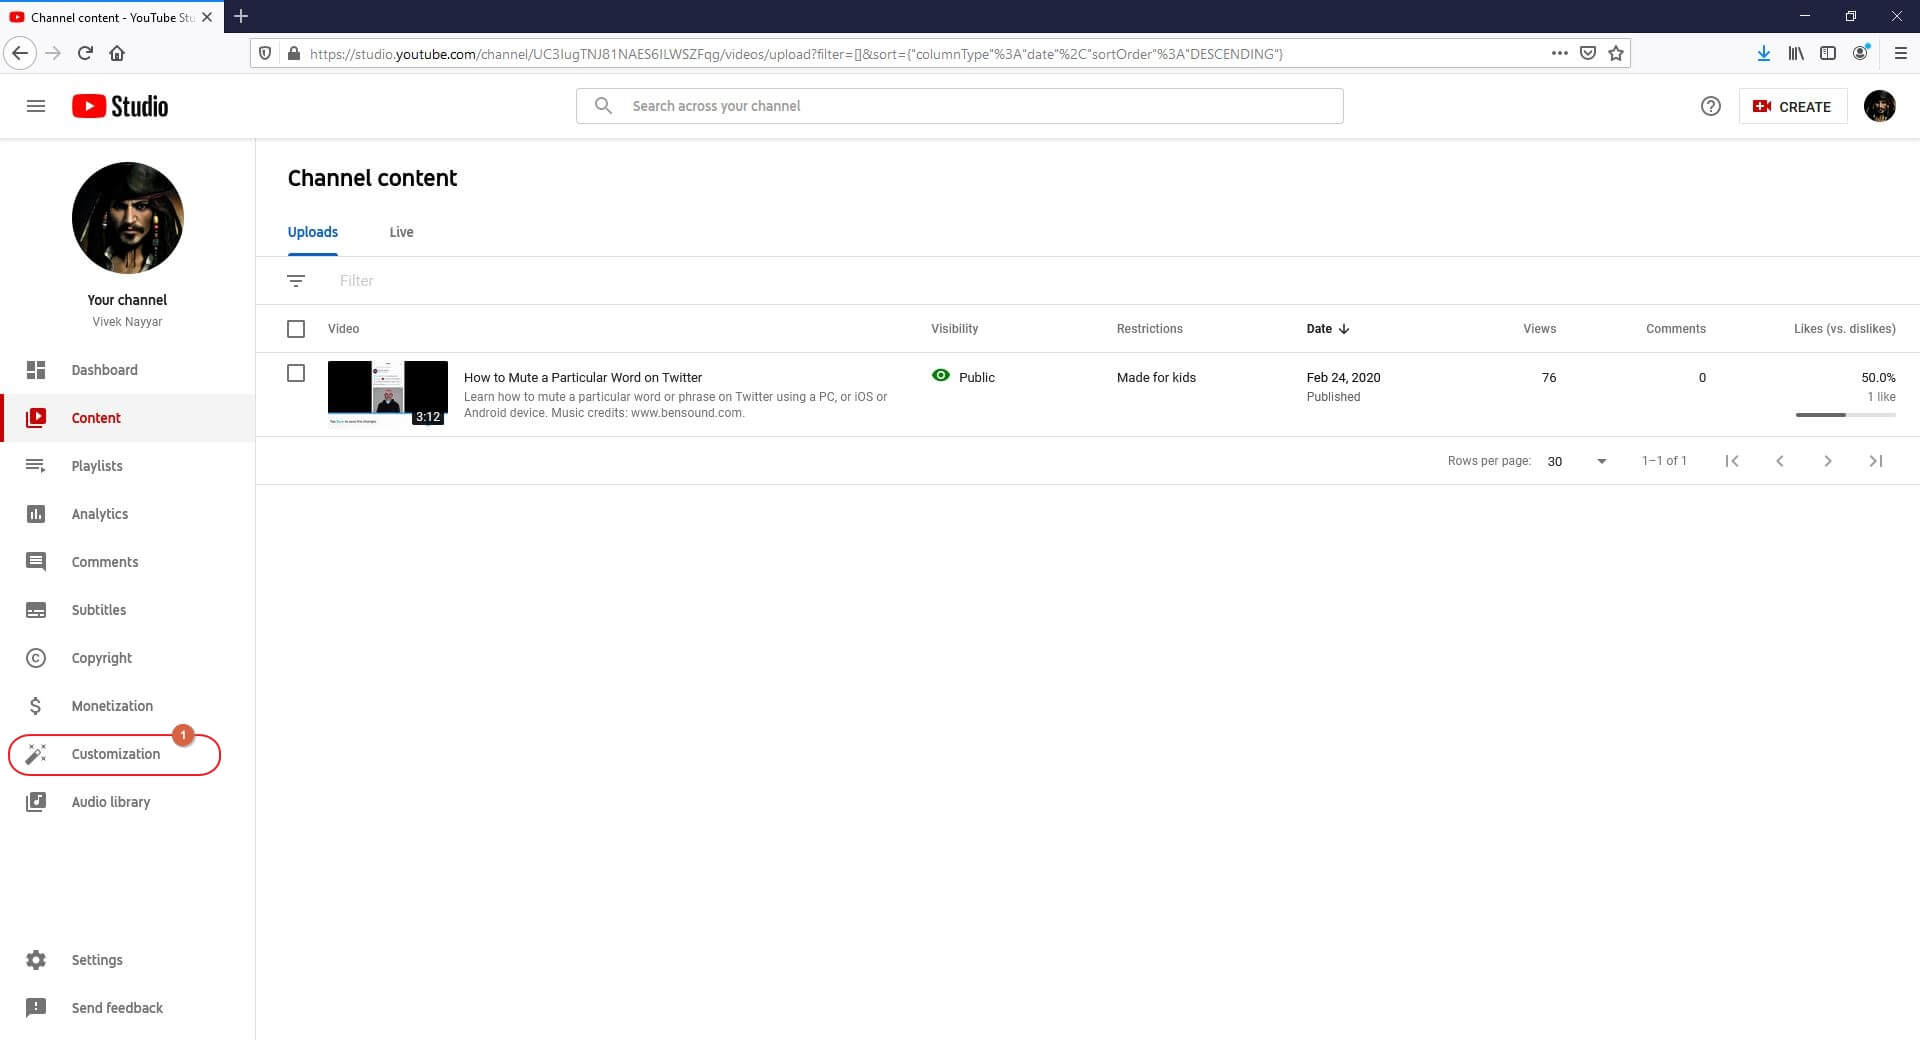
Step 1: Get to YouTube Studio Customization Section
Go to YouTube on your PC’s web browser, sign in to your Google account, click Your videos from the navigation bar in the left, and click Customization from the left bar when the Studio page opens up.
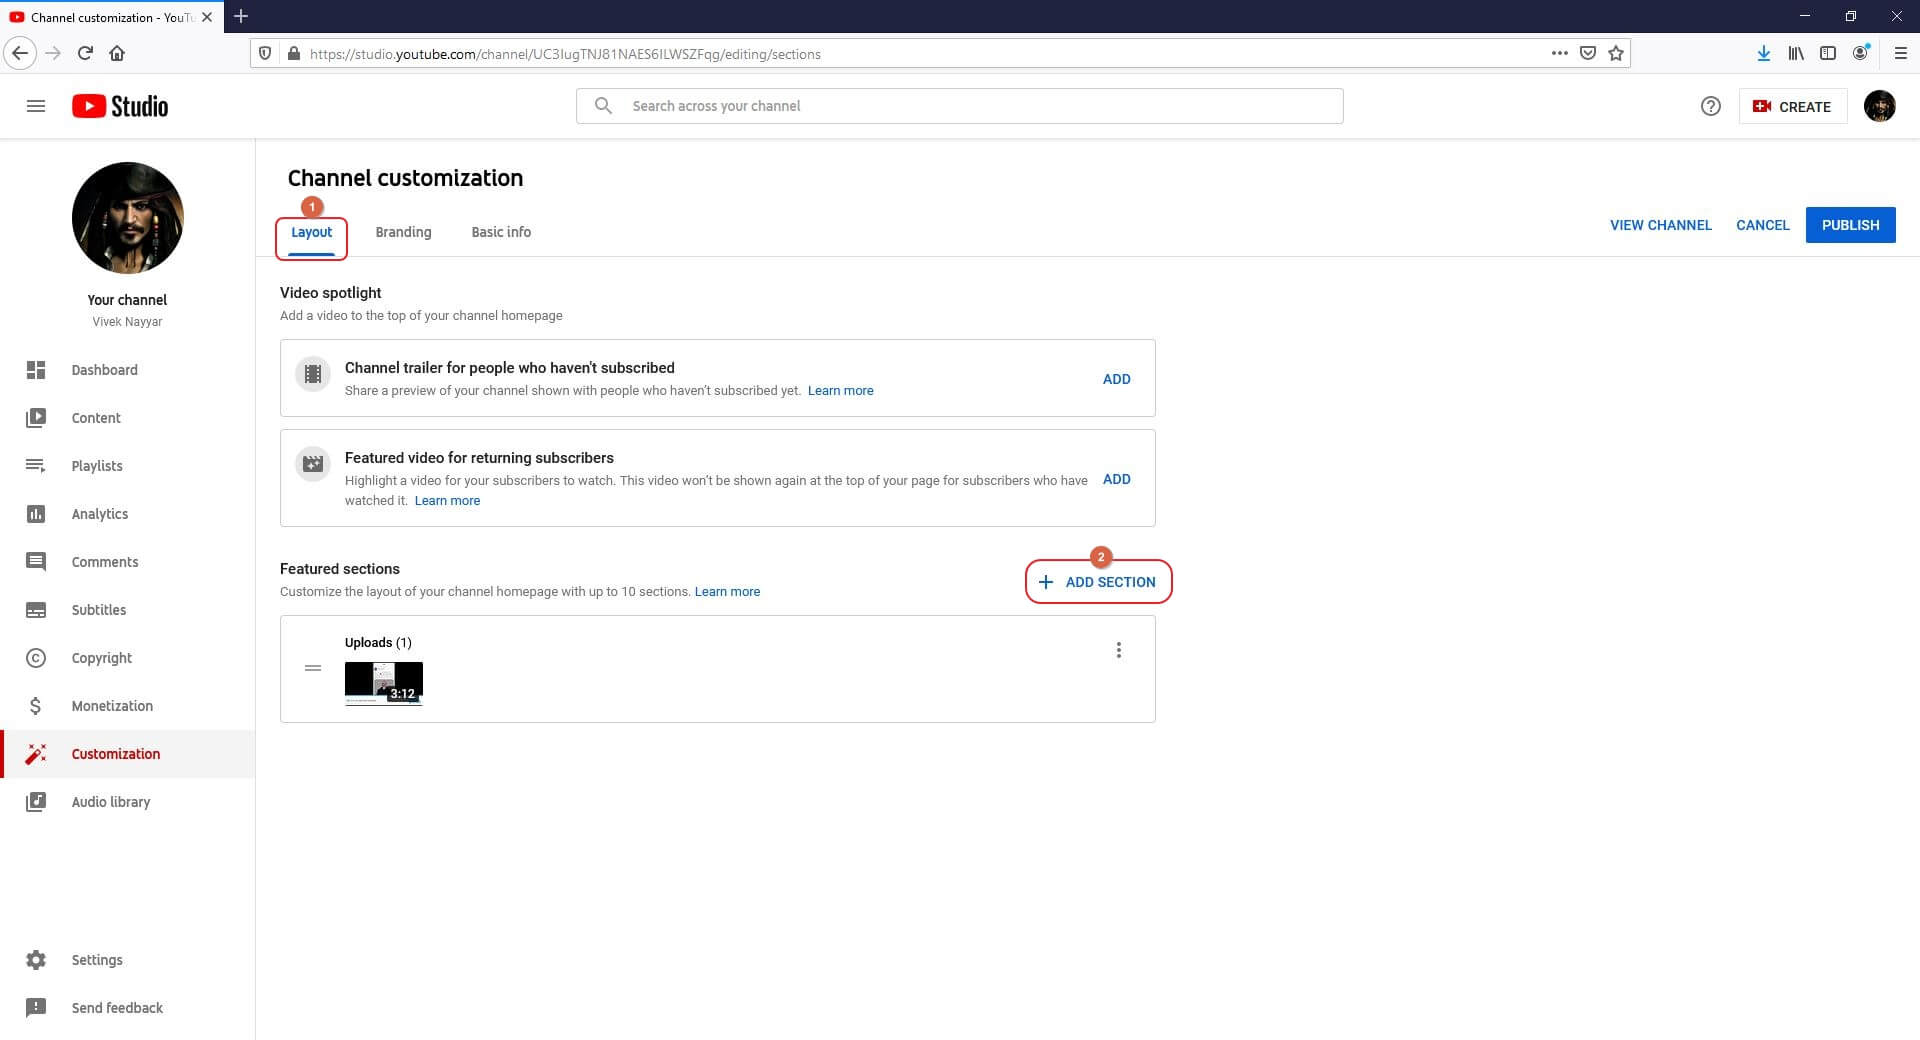
Step 2: Add YouTube Shorts
Click ADD SECTION from the Layout tab in the right window, and click Short videos from the list that appears next to add the YouTube Shorts category.
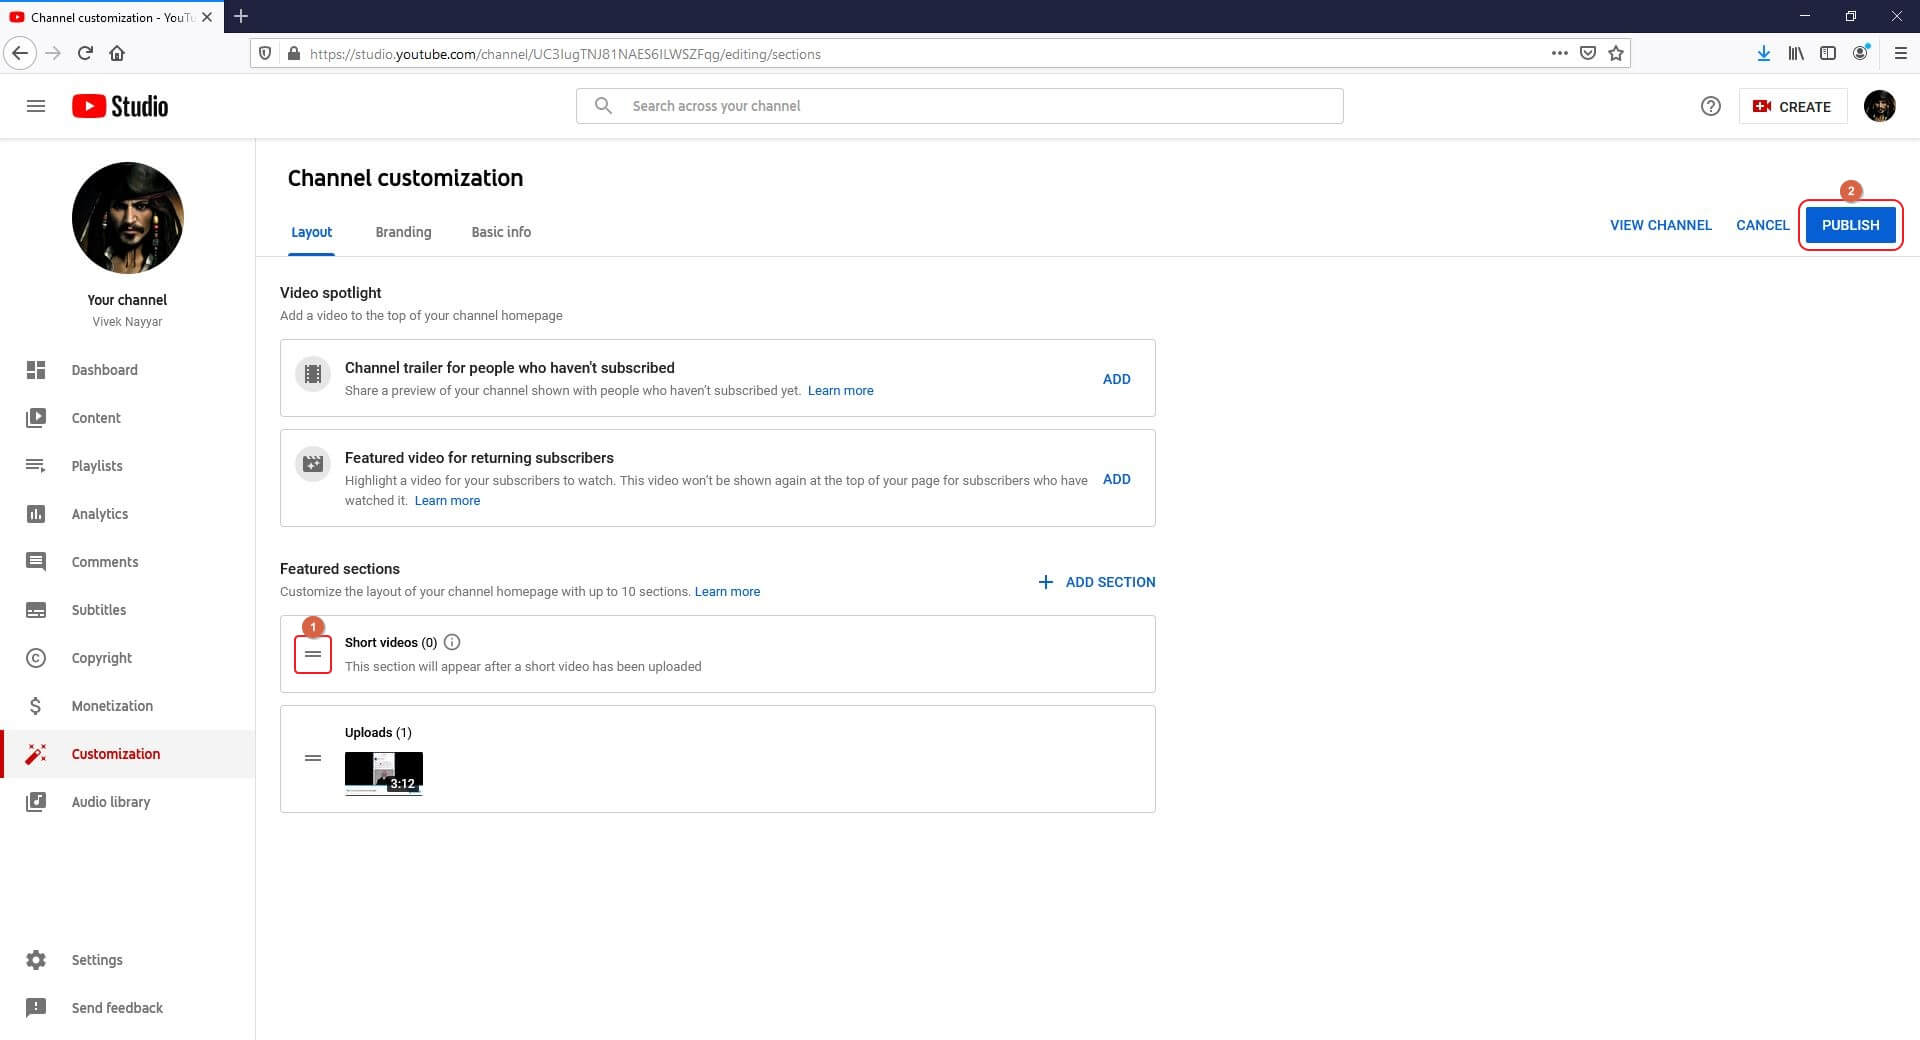
Step 3: Add Short videos to Featured sections and Save the Changes
Hold the Short videos bar from the moving handle at the left, and move it right below the Featured sections segment. Once the Short videos category is in the right place, click PUBLISH from the top-right corner of the page to save the changes. From this point onward, any YouTube Shorts video that you publish on your channel will be automatically added as ‘Featured’ after its approval.
Part 2: Create Attractive Thumbnail for YouTube Shorts to Get More Views
The thumbnails are the face of the videos that you publish anywhere online. Therefore, it is imperative to take down the default one that is automatically added by YouTube, and add your own, custom image instead.
To have your own thumbnail, you can either pick any frame from within the video itself, or you can upload a separate photo from your PC, and replace the existing one with it.
Things to Consider for creating attractive thumbnail
While using your custom image as a thumbnail for your YouTube Shots videos, a few things that you should keep in mind include:
- Relevance
Make sure that the new photo that you are planning to use as a thumbnail is relevant to the short video. Any image that is out of context might confuse the viewers, and you may lose your audience and the subscribers forever and for good.
- Clarity
Always use an image with clear content and large text (if any). This lets the viewers easily determine whether the video is of their interest.
- Correctness
You should avoid using misleading images as thumbnails. While such photos would attract more viewers initially, people will gradually lose trust in your channel if they do not find what they expect by the glimpse of the thumbnail.
Part 3: Optimize YouTube Shorts to Get More Views
The fact of the matter is, YouTube Shorts videos aren’t much different that any other video that you publish on the platform. Therefore, the process of optimizing both short and regular videos is identical.
A few things that are extremely important, and play a vital role in optimizing YouTube Shorts videos include:
- Attractive Thumbnail
As mentioned above, the thumbnail of a video is its face, and the prettier and appealing the face is the more audience will it attract, and the more hits your video will get. Therefore, ensure to make the thumbnail of your short videos as attractive as you possibly can.
- Compelling Title
The title says it all. Your short videos will have good chances of getting noticed and hits if they have an impulsive and compelling title that can give the viewers a summary of what they can expect from the clip.
- Detailed Description
The description of your short videos should be complete, and must explain the theme, genre, and nature of the clip. With the detailed description, the viewers will be able to assess if the video would be helpful to them in some manner.
- Tags
Make sure to add relevant tags to your short videos. For instance, adding ‘#Shorts’ in the title or description of the video tells YouTube that the clip is created for YouTube Shorts. Likewise, other tags that are related to the genre and/or theme of the short videos help YouTube suggest your media to the relevant audiences across the website.
![]()

Filmora - Best YouTube Shorts Video Editor for PC
- Easily record a video on PC and Mac.
- Edit videos quickly with a wide range of gaming effects.
- Rich video tempaltes and resources for YouTube videos.
- Export to MP4, MOV, MKV, GIF and multiple formats.
For Win 7 or later (64-bit)
For macOS 10.12 or later
 Secure Download


Part 4: How to Analyze YouTube Shorts Performance
YouTube Shorts are videos that are no more than 60 seconds long in length. When added under the ‘Featured’ category, you can see a significant amount of increment in the hits, and therefore the view count and the playback duration of your YouTube channel gets directly affected.
However, because these short videos cannot be monetized, at times you may notice that even though the total playback duration and view counts of your YouTube channel are high, your earnings may not be as much as what you would receive if those clips were published as regular videos.
FAQ: Will YouTube Shorts Performance Impact Other YouTube Stats?
Yes. As mentioned above, the view counts and playback durations of YouTube Shorts videos are added to your channel’s statistics. Therefore, with the number of views your short videos get, the overall performance of your YouTube stats is affected accordingly.
Richard Bennett
Richard Bennett is a writer and a lover of all things video.
Follow @Richard Bennett
Richard Bennett
Mar 27, 2024• Proven solutions
One of the biggest challenges that people face while using YouTube Shorts is how to get more views. Many new users wonder what and how should they prepare a video that is both 15-to-60 seconds long, and at the same time, it is engaging enough to make the audience view them with excitement.
With that said, the following sections discuss some best practices, and share a couple of tips to increase views on your YouTube Shorts videos.
- Part 1: Get More Views by Adding Shorts Video to the ‘Featured’ Section
- Part 2: Create Attractive Thumbnail for YouTube Shorts to Get More Views
- Part 3: Optimize YouTube Shorts to Get More Views
- Part 4: How to Analyze YouTube Shorts Performance
Part 1: Get More Views by Adding Shorts Video to the ‘Featured’ Section
Comparatively different from other videos, the ones that are added under the ‘Featured’ section are recommended to the audience throughout the YouTube platform on the basis of the algorithms that automatically determine which clips should be liked beach viewer individually.
![]()
A cross-platform for making videos anywhere for all creators
Why your video editing isn’t good enough? How about some creative inspo?
- 100 Million+ Users
- 150+ Countries and Regions
- 4 Million+ Social Media Followers
- 5 Million+ Stock Media for Use
* Secure Download
To elaborate, generally, YouTube suggests you a video as per your viewing history, browsing statistics, and other such information that the streaming media giant collects over time. On the other hand, the ‘Featured’ videos are suggested according to what YouTube ‘thinks’ might be of your interest, or could be somehow useful to you.
Therefore, when any clip is added as a ‘Featured’ video, YouTube suggests it to more viewers as compared to those that are published under the ‘Recommended’ category.
Note: Although there is a lot more to cover under the ‘Featured’ videos and channels section such as branding, advertisements, etc., such topics are beyond the scope of this piece.
Adding YouTube Shorts videos to the ‘Featured’ section is fairly simple, and the instructions given below explain how this can be done:
Note: It is assumed that you already have a couple of shorts video published on YouTube.
Step 1: Get to YouTube Studio Customization Section
Go to YouTube on your PC’s web browser, sign in to your Google account, click Your videos from the navigation bar in the left, and click Customization from the left bar when the Studio page opens up.
Step 2: Add YouTube Shorts
Click ADD SECTION from the Layout tab in the right window, and click Short videos from the list that appears next to add the YouTube Shorts category.
Step 3: Add Short videos to Featured sections and Save the Changes
Hold the Short videos bar from the moving handle at the left, and move it right below the Featured sections segment. Once the Short videos category is in the right place, click PUBLISH from the top-right corner of the page to save the changes. From this point onward, any YouTube Shorts video that you publish on your channel will be automatically added as ‘Featured’ after its approval.
Part 2: Create Attractive Thumbnail for YouTube Shorts to Get More Views
The thumbnails are the face of the videos that you publish anywhere online. Therefore, it is imperative to take down the default one that is automatically added by YouTube, and add your own, custom image instead.
To have your own thumbnail, you can either pick any frame from within the video itself, or you can upload a separate photo from your PC, and replace the existing one with it.
Things to Consider for creating attractive thumbnail
While using your custom image as a thumbnail for your YouTube Shots videos, a few things that you should keep in mind include:
- Relevance
Make sure that the new photo that you are planning to use as a thumbnail is relevant to the short video. Any image that is out of context might confuse the viewers, and you may lose your audience and the subscribers forever and for good.
- Clarity
Always use an image with clear content and large text (if any). This lets the viewers easily determine whether the video is of their interest.
- Correctness
You should avoid using misleading images as thumbnails. While such photos would attract more viewers initially, people will gradually lose trust in your channel if they do not find what they expect by the glimpse of the thumbnail.
Part 3: Optimize YouTube Shorts to Get More Views
The fact of the matter is, YouTube Shorts videos aren’t much different that any other video that you publish on the platform. Therefore, the process of optimizing both short and regular videos is identical.
A few things that are extremely important, and play a vital role in optimizing YouTube Shorts videos include:
- Attractive Thumbnail
As mentioned above, the thumbnail of a video is its face, and the prettier and appealing the face is the more audience will it attract, and the more hits your video will get. Therefore, ensure to make the thumbnail of your short videos as attractive as you possibly can.
- Compelling Title
The title says it all. Your short videos will have good chances of getting noticed and hits if they have an impulsive and compelling title that can give the viewers a summary of what they can expect from the clip.
- Detailed Description
The description of your short videos should be complete, and must explain the theme, genre, and nature of the clip. With the detailed description, the viewers will be able to assess if the video would be helpful to them in some manner.
- Tags
Make sure to add relevant tags to your short videos. For instance, adding ‘#Shorts’ in the title or description of the video tells YouTube that the clip is created for YouTube Shorts. Likewise, other tags that are related to the genre and/or theme of the short videos help YouTube suggest your media to the relevant audiences across the website.
![]()
Filmora - Best YouTube Shorts Video Editor for PC
- Easily record a video on PC and Mac.
- Edit videos quickly with a wide range of gaming effects.
- Rich video tempaltes and resources for YouTube videos.
- Export to MP4, MOV, MKV, GIF and multiple formats.
For Win 7 or later (64-bit)
For macOS 10.12 or later
Secure Download
Part 4: How to Analyze YouTube Shorts Performance
YouTube Shorts are videos that are no more than 60 seconds long in length. When added under the ‘Featured’ category, you can see a significant amount of increment in the hits, and therefore the view count and the playback duration of your YouTube channel gets directly affected.
However, because these short videos cannot be monetized, at times you may notice that even though the total playback duration and view counts of your YouTube channel are high, your earnings may not be as much as what you would receive if those clips were published as regular videos.
FAQ: Will YouTube Shorts Performance Impact Other YouTube Stats?
Yes. As mentioned above, the view counts and playback durations of YouTube Shorts videos are added to your channel’s statistics. Therefore, with the number of views your short videos get, the overall performance of your YouTube stats is affected accordingly.
Richard Bennett
Richard Bennett is a writer and a lover of all things video.
Follow @Richard Bennett
Quick-Witness YouTube Techniques for Rapid Rendering
How to Render and Upload YouTube Videos Faster?
Richard Bennett
Oct 26, 2023• Proven solutions
You’ve shot a video you’re proud of and you can’t wait to post it! But, slow down, you have to edit all your clips together first. And then you have to export your video from the editing program, which can take a while. Then you have to wait for it to upload to YouTube, and once it’s up you have to write your description, add cards, and do a handful of other things.
The period between finishing a video and actually posting it for your subscribers to see can be long and tiresome. A lot of videos have probably died in these stages because their creators ran out of energy and patience.
Don’t let this happen to your videos! Here are 4 ways you can save time and avoid headaches during post-production:
3. Use default descriptions and tags
4. TubeBuddy’s bulk features and tagging tools
1. Create mini-projects
When you have alarge editing project with lots of different titles, animations, clip sequences, and PIP tracks it can get hard to keep track of everything. That’s especially true if you need to go back and make changes. A change to one part of your video could affect other parts of it.
Also, the more complex your video is the longer it will take to render/export.
There is a way you can keep your project more organized, save time making minor adjustments, and speed up rendering: create sub-projects of different segments of your video and import them into your main project as their own clips.
This helps you in 3 ways:
1. If there are a lot of effects it’ll be faster to render a shorter video.
2. If you import your sequence as its own clip you won’t have to worry about adjusting little parts of it whenever you change earlier sections of your video.
3. If you do want to make adjustments to your sequence you can open up your mini-project and change it without affecting anything in your main project.
2. Optimize your upload speed
At home, your videos will upload fastest if all of your internet resources are devoted to the upload. That means you should not have any other windows open on your computer while you are uploading. You should also make sure there aren’t other devices competing for wifi like smart tvs, cell phones, or really fancy coffee makers.
If you have neighbors on the same wifi signal as you and they are online at the same time, this will slow you down too.
Because there is so much that can interfere with wifi, you might want to consider a wired Ethernet cable. Ethernet connections are faster in general, and you won’t have any problems with other devices competing for resources like you get with wifi.
If you’re doing everything you can to optimize your upload speed at home and still find that it takes an unreasonable amount of time to upload videos to YouTube, go somewhere with a better connection. Save your video to a USB drive and take it to a library or college to upload. Connections in these kinds of places tend to be very strong.
3. Use default descriptions and tags
In your Creator Studio, go to Channel > Upload defaults. Here you can write in titles, descriptions, and tags which will automatically be applied to every video you upload.

Note: in the latest YouTube Studio, the upload interface is changed but the main process is similar.

You probably have tags you use for almost every video you post. For example, if your channel is about vegan cooking then every one of your videos is probably tagged ‘vegan’, ‘food’, and ‘cooking’. If you type those tags in here then you don’t have to keep adding them to every new video, and you can still add or remove tags from individual uploads so you aren’t stuck using the exact same set of tags every time.
Similarly, you probably have some default text that goes in the description of every one of your videos (i.e. a link to your personal website or a brief introduction of yourself). If you type in a default description then that text will appear automatically in every new video description and you can just add to it when you need to for individual videos.
Using defaults might only save you a couple of minutes per video, but those minutes add up.
4. TubeBuddy’s bulk features and tagging tools
TubeBuddy is a channel management tool for YouTube. Most of its features are more geared towards very large channels or companies with a YouTube presence, but there are also features that can help small or mid-sized YouTubers save time and stay organized.
Some of these tools include templates for things like cards and end screens and bulk processing tools for when you want to change a lot of things at once. For example, if you wanted to update the links in every card in every one of your videos at once then TubeBuddy could help with that.
Some of TubeBuddy’s best features for growing channels are the tagging features. TubeBuddy will help you discover tags, suggest new tags, and even copy whole lists of tags from rival videos.
There are different levels of pricing for TubeBuddy (including a free version, although it’s very limited) and you get a discount on the Pro version if you have less than 50,000 lifetime views on your channel. It ends up being $4.50USD a month (or $3.60 USD a month if you pay for a year in advance). It’s a good investment for someone who’s starting to see some growth on YouTube, but probably not if you’re still trying to reach milestones like 500 subs or 10,000 views.
You have to work hard to get anywhere on YouTube, but that doesn’t mean you should be toiling away at tedious stuff like typing in the same tags over and over. If you have any time-saving tips then make sure to share them with everyone in the comments!
Remember that your time is valuable =)

If you are using Filmora to edit YouTube videos, you can upload the video to YouTube directly from Filmora without download it again first, which can save you time. Besides, if you don’t want the video to be public, you can change Privacy to unlisted or private in Filmora.


Richard Bennett
Richard Bennett is a writer and a lover of all things video.
Follow @Richard Bennett
Richard Bennett
Oct 26, 2023• Proven solutions
You’ve shot a video you’re proud of and you can’t wait to post it! But, slow down, you have to edit all your clips together first. And then you have to export your video from the editing program, which can take a while. Then you have to wait for it to upload to YouTube, and once it’s up you have to write your description, add cards, and do a handful of other things.
The period between finishing a video and actually posting it for your subscribers to see can be long and tiresome. A lot of videos have probably died in these stages because their creators ran out of energy and patience.
Don’t let this happen to your videos! Here are 4 ways you can save time and avoid headaches during post-production:
3. Use default descriptions and tags
4. TubeBuddy’s bulk features and tagging tools
1. Create mini-projects
When you have alarge editing project with lots of different titles, animations, clip sequences, and PIP tracks it can get hard to keep track of everything. That’s especially true if you need to go back and make changes. A change to one part of your video could affect other parts of it.
Also, the more complex your video is the longer it will take to render/export.
There is a way you can keep your project more organized, save time making minor adjustments, and speed up rendering: create sub-projects of different segments of your video and import them into your main project as their own clips.
This helps you in 3 ways:
1. If there are a lot of effects it’ll be faster to render a shorter video.
2. If you import your sequence as its own clip you won’t have to worry about adjusting little parts of it whenever you change earlier sections of your video.
3. If you do want to make adjustments to your sequence you can open up your mini-project and change it without affecting anything in your main project.
2. Optimize your upload speed
At home, your videos will upload fastest if all of your internet resources are devoted to the upload. That means you should not have any other windows open on your computer while you are uploading. You should also make sure there aren’t other devices competing for wifi like smart tvs, cell phones, or really fancy coffee makers.
If you have neighbors on the same wifi signal as you and they are online at the same time, this will slow you down too.
Because there is so much that can interfere with wifi, you might want to consider a wired Ethernet cable. Ethernet connections are faster in general, and you won’t have any problems with other devices competing for resources like you get with wifi.
If you’re doing everything you can to optimize your upload speed at home and still find that it takes an unreasonable amount of time to upload videos to YouTube, go somewhere with a better connection. Save your video to a USB drive and take it to a library or college to upload. Connections in these kinds of places tend to be very strong.
3. Use default descriptions and tags
In your Creator Studio, go to Channel > Upload defaults. Here you can write in titles, descriptions, and tags which will automatically be applied to every video you upload.
Note: in the latest YouTube Studio, the upload interface is changed but the main process is similar.
You probably have tags you use for almost every video you post. For example, if your channel is about vegan cooking then every one of your videos is probably tagged ‘vegan’, ‘food’, and ‘cooking’. If you type those tags in here then you don’t have to keep adding them to every new video, and you can still add or remove tags from individual uploads so you aren’t stuck using the exact same set of tags every time.
Similarly, you probably have some default text that goes in the description of every one of your videos (i.e. a link to your personal website or a brief introduction of yourself). If you type in a default description then that text will appear automatically in every new video description and you can just add to it when you need to for individual videos.
Using defaults might only save you a couple of minutes per video, but those minutes add up.
4. TubeBuddy’s bulk features and tagging tools
TubeBuddy is a channel management tool for YouTube. Most of its features are more geared towards very large channels or companies with a YouTube presence, but there are also features that can help small or mid-sized YouTubers save time and stay organized.
Some of these tools include templates for things like cards and end screens and bulk processing tools for when you want to change a lot of things at once. For example, if you wanted to update the links in every card in every one of your videos at once then TubeBuddy could help with that.
Some of TubeBuddy’s best features for growing channels are the tagging features. TubeBuddy will help you discover tags, suggest new tags, and even copy whole lists of tags from rival videos.
There are different levels of pricing for TubeBuddy (including a free version, although it’s very limited) and you get a discount on the Pro version if you have less than 50,000 lifetime views on your channel. It ends up being $4.50USD a month (or $3.60 USD a month if you pay for a year in advance). It’s a good investment for someone who’s starting to see some growth on YouTube, but probably not if you’re still trying to reach milestones like 500 subs or 10,000 views.
You have to work hard to get anywhere on YouTube, but that doesn’t mean you should be toiling away at tedious stuff like typing in the same tags over and over. If you have any time-saving tips then make sure to share them with everyone in the comments!
Remember that your time is valuable =)
If you are using Filmora to edit YouTube videos, you can upload the video to YouTube directly from Filmora without download it again first, which can save you time. Besides, if you don’t want the video to be public, you can change Privacy to unlisted or private in Filmora.
Richard Bennett
Richard Bennett is a writer and a lover of all things video.
Follow @Richard Bennett
Also read:
- [New] Cost-Effective Strategies to Combine Videos with Text
- In 2024, Breaking Into the Digital Realm The WireCast Approach for YouTube Streamers
- Ultimate Selection of Free YouTube Introduction Makers
- [Updated] 15 Essential Gaming Capture Programs
- Navigating Through YouTube's Content ID System Issues
- Upgrade Your Youtube Bio with Pro Templates
- Boosting Revenue with YouTube Short Videos – A Complete Plan
- Are There Natural Methods for Boosting Channels, In 2024
- How to Turn Video Soundtracks Into Audible Files
- [New] Best 10 YouTube Channels for Industry Insights
- [New] YouTube Comment Finder You Should Try
- Unleashing Creativity Essential Lenses for YouTube Vloggers
- 2024 Approved Crafting an Impactful Waterway Teaser
- [Updated] Effortless Steps to Obtain Free Audio for Videos
- 7 Ultimate Live Streaming Apps for iPhone and Android Users on YouTube for 2024
- [New] Controlling Comment Visibility on YouTube Videos
- 2024 Approved Audio Visual Caption Builder
- [Updated] Achieving Visual Excellence ASPECT RATIO Mastery on YOUTUBE
- Step-by-Step Guide to Efficient and Effective Tag Usage on YouTube
- Cheap Yet Good Quality Cameras Reviewed Here
- [Updated] Balancing Creativity and Logic in Gaming Videos
- [Updated] Blur the Borders Enhancing Your Video's Appeal on YT
- Skyrocketing Earnings Through Video Affiliates
- [Updated] Access the Archived Unique Methods for Viewing Old YouTube
- In 2024, Compare & Contrast Leading Online & Desktop GIF Tools
- Streamline Vlogging Titles - Top 11 Affordable Generators
- Breaking Down the Most Influential YouTube Personalities for 2024
- Songbird Scribes Writing the Script for YouTube
- In 2024, Audiophiles' Choice Premium ASMR Recording Mics
- 2024 Approved Cutting-Edge Unboxing Strategies to Boost Viewership and Engagement
- 2024 Approved Confirming Correct YouTube Ad Revenue Allocation
- [Updated] Enhancing Viewers' Interest with Innovative Valorant Thumbnail Ideas
- [Updated] Behind the Sequence Celebrating YouTube's Top Cosmetics Artists
- Quick Guide YouTube Videos for Your Instagram Story
- In 2024, 24 Hour Heavyweights Top 10 Most Watched on YT
- Turbocharge Your YouTube Videos Swift Render & Transfer Strategies
- In 2024, Effortless Tutorial for Top-Notch YT Video Thumbnails
- Content Creator's Den for 2024
- Why AV1? – Improving Streams and Videos on YouTube
- Discover the Ultimate Blend of Mind, Body, and Spirit in Yoga for 2024
- In 2024, A Comprehenensive Guide to YouTube Studio's Editing Features
- [New] A Compreranstive Approach to High-Fidelity Recording, No Mic Necessary
- Cut Costs, Boost Creativity Learn the Secrets of Green Screen Artistry From 4 Leading Educators
- 2024 Approved Avoiding the Blank Thumbnail Scenario in Shorts
- Boost Your Content Reach The Expert Guide to Youtube's Featured Channels
- [Updated] A Step-by-Step Strategy for Merging Your YouTube & TikTok Presence
- [Updated] Elevate Your Content with These 10 Reaction Wonders
- From Shortcuts to Sharing Merging YouTube & TikTok Pathways
- In 2024, Download Free Sound Effects for YouTubers
- Updated In 2024, Create Video With PPT
- [New] In 2024, A Comparative Analysis of Top 10 Budget-Friendly Video Calls
- In 2024, How To Unlock Stolen Apple iPhone 15 In Different Conditionsin | Dr.fone
- [Updated] In 2024, Elevate Your Brand A Comprehensive Guide to Instagram Video Marketing Plans
- [Updated] In 2024, Live Streaming Made Easy Expert Reviews of Top OBS Tools
- In 2024, 3 Things You Must Know about Fake Snapchat Location On Lava Blaze Curve 5G | Dr.fone
- [New] The Ultimate Selection of Mac Clipping Tools
- 2024 Approved Digging Deep Into Facebook's Short Video Shift The 2023 Scenario
- In 2024, Perfecting Synchronized Recording Webcam + Display Techniques
- 2024 Approved Master Methods Chronicling Your PS3 Gameplay
- New 2024 Approved Transform Your Footage Pro-Quality Movies Made Easy
- Elevating Posts How to Trend on Social Media for 2024
- How to use Snapchat Location Spoofer to Protect Your Privacy On Itel P40? | Dr.fone
- [Updated] In 2024, Instagram TV Deactivation Made Easy
- Reasons for Nokia G42 5G Stuck on Boot Screen and Ways To Fix Them | Dr.fone
- Updated Video Editing Tips to Know Before Editing First Draft
- How to Flash Dead Infinix Smart 7 HD Safely | Dr.fone
- Title: "In 2024, Boosting Engagement A Guide to More YouTube Shorts Success"
- Author: Kevin
- Created at : 2024-05-25 15:26:51
- Updated at : 2024-05-26 15:26:51
- Link: https://youtube-videos.techidaily.com/in-2024-boosting-engagement-a-guide-to-more-youtube-shorts-success/
- License: This work is licensed under CC BY-NC-SA 4.0.
