
:max_bytes(150000):strip_icc()/55a66c62-7dd6-4b7c-b176-5942ad8b77a1-9693aedc51a242109ed21be18d9c340c.jpeg)
In 2024, Android Users, Discover the Top YouTube Video Clips
Android Users, Discover the Top YouTube Video Clips
9 Powerful YouTube Video Downloader for Android

Ollie Mattison
Mar 27, 2024• Proven solutions
Streaming online videos on YouTube has become a lifestyle for almost all of us now. But time and data usage are huge constraints. Isn’t it annoying when you find free Wi-Fi but lack a suitable video downloader or you have a downloader but no Wi-Fi access at the moment to stream the videos. You may already know how to download mp3 on Android , to solve your dilemma and let you download YouTube videos on your Android phone, we have collected the most popular YouTube video downloader for Android in this article.
Note: We resolutely oppose all forms of copyright-infringing downloads. This tutorial is only for downloading YouTube videos/audio materials from your own channel.
Part 1: Online Video Downloader App Only Supporting YouTube video
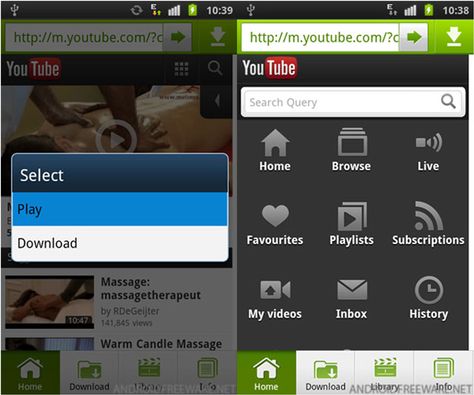
1. TubeMate
Using TubeMate, you can now save your favorite YouTube videos directly on your phone and cherish them anywhere offline. You can choose the quality of the video as this tool supports different resolutions. If you are a novice user this App is simple as one two three, you need to search the video on YouTube and tap the green arrow at the bottom of the screen to download it.

Pros:
- Multiple download options are available, along with the background download option to carry on with other routine work on your phone.
- It can download the video as well as audio.
- Videos can be converted to MP3 format.
Cons:
- It cannot download in 4K format.
- TubeMate doesn’t download the original YouTube video, but rather a video encoded video by YouTube. Hence, the video sometimes fails to play, and downloading a low-resolution video to save YouTube videos on Android might help.
![]()
A cross-platform for making videos anywhere for all creators

Why your video editing isn’t good enough? How about some creative inspo?
- 100 Million+ Users
- 150+ Countries and Regions
- 4 Million+ Social Media Followers
- 5 Million+ Stock Media for Use
* Secure Download

2. Dentex YouTube Downloader
Dentex is a YouTube video downloader for Android that allows you to download YouTube videos within seconds. The interface is divided into 3 parts. In the first part, you can search the YouTube video and see the results, the second part shows the quality and format options, whereas the third part lists the previously downloaded videos.

Pros:
- You can change the format of any video even after downloading.
- You can extract audio files from the videos and later convert them to MP3 format.
- You can remote download through SSH.
Cons:
- An additional plug-in is required to change the format of the video.
- The app is not compatible with lower Android versions such as Gingerbread, Froyo and Éclair.
- The downloading process might sometimes stop, requiring you to resume the process.
3. InsTube Free Video & Music Downloader
InsTube Free Video & Music Downloader allows you to download YouTube videos at high speed supporting MP3, MP4, 3GP, as well as M4A formats. With this tool, downloading YouTube videos in HD, Full HD, or 4K is at your fingertips. You can download videos from more than 40 websites apart from YouTube and enjoy them offline.
Pros:
- It has an inbuilt locker to protect videos and keep them private.
- The hassle-free and neat interface allows easy operation.
- Faster downloading options across 40 plus websites and free YouTube video download is also possible.
Cons:
- Unwanted Ads popup on the screen forcing you to install updates.
- You see the clipboard identifier icon only for few seconds on the screen.
4. WonTube
With WonTube, you can stock and save YouTube videos on Android. Its high conversion speed saves your time. The simple interface of the App makes it user friendly. The App can merge videos and convert the result to any format is a very unique feature.
Pros:
- It supports AVI, WMV, MP4, MKV, FLV, 3GP, and MPG.
- It works well with poor internet connectivity compared to other video downloaders.
- It can convert videos into 20+ formats.
Cons:
- Even though multiple videos can be downloaded simultaneously, the same batch of videos can be converted only to one output format.
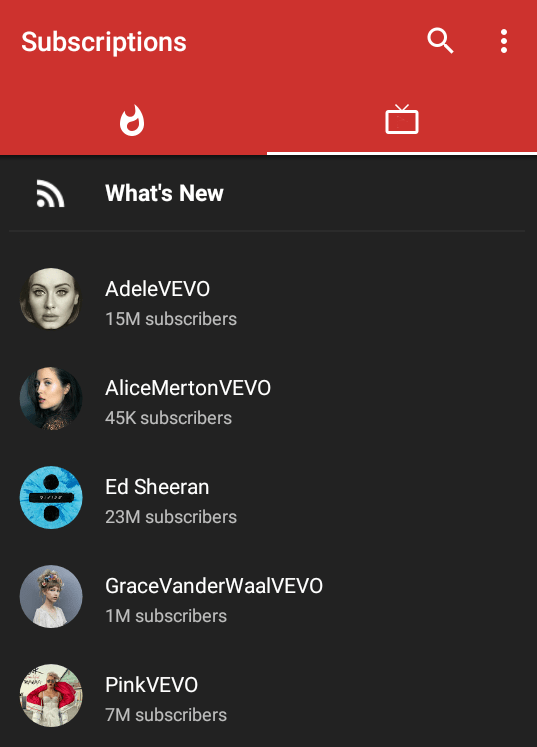
5. NewPipe
NewPipe analyses YouTube videos by itself to obtain the necessary information for downloading the videos. This downloader can thus work with phones that do not have Google Services installed in them. In addition, the app allows you to download audio and video with different formats and resolutions. NewPipe also keeps you updated about your favorite YouTube channels while you save YouTube videos on Android.
Pros:
- It is merely 2MB.
- It has a pop-up mode that is movable and resizable, using which you can watch the videos while carrying out other activities on your mobile.
- There are no Ads.
Cons:
- It doesn’t have a log in option, so you cannot view your history.
- It requires additional settings.
![]()

Best YouTube Video Editor for PC - Filmora
- Cut, Trim, Split and Deatch audio from YouTube videos
- Edit Videos with key frame, motion track, green screen ect.
- Built-in plentiful YouTube templates and effects
- Export to MP4, MOV, MKV, GIF and multiple formats
For Win 7 or later (64-bit)
For macOS 10.12 or later
 Secure Download


Part 2: YouTube Video Downloader App Supporting multiple video site
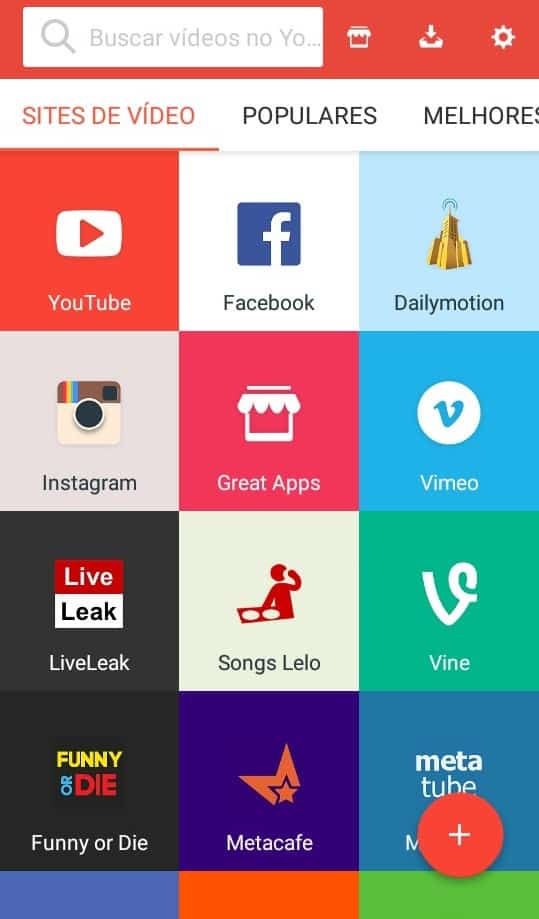
1. SnapTube
SnapTube is yet another amazing video and audio downloading app to download audio in MP3 format and video in MP4 format. The app is organized in itself, carrying a section of popular videos, most viewed videos and a daily recommendation section. The app also allows video downloading option from popular social media sites such as Instagram and Facebook.
Pros:
- It does not require an additional plug-in.
- It does not have malware and Ads.
Cons:
- YouTube multimedia download is restricted in India and China.
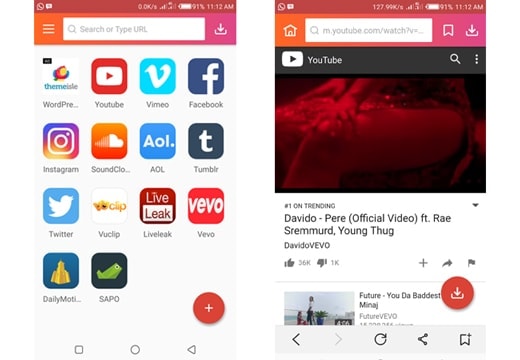
2. Videoder
Videoder is the app for you when you want to broaden your horizon and download videos from Facebook, Instagram, YouTube, Hotstar etc. in MP3 or MP4 format. It comes with an inbuilt feature to convert videos to MP3 format. You can personalize the app by using themes, setting cover art, and tag editor to organize your playlist in a visually attractive way.

Pros:
- Looking for HD quality viewing? You have 4K quality videos with Videoder.
- Multiple downloading is possible with a single tap.
- Downloading speed is accelerated by the number of network connections and utilizing it to the maximum.
Cons:
- Because of the numerous features, it may take time to learn all the functionalities.
- An audio encoding pop-up may sometimes appear asking to install a plug-in.
- It doesn’t support files other than MP3 and MP4 format.
3. KeepVid
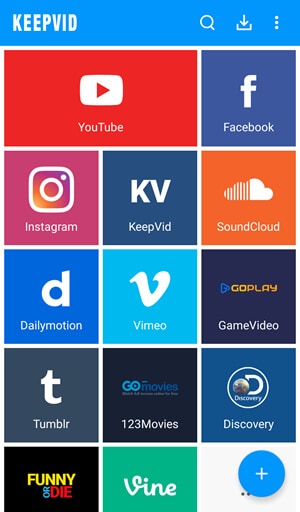
KeepVid is a handy YouTube downloader that can download videos from YouTube and 27 other sites. It is a fantastic downloading tool that comes with a user-friendly interface and allows you to download videos from many sites, including YouTube, Vimeo, and Dailymotion. KeepVid also allows you to download multiple videos simultaneously with the option of selecting the quality of the videos.
Pros:
- The app does not have any size limit to the video.
- It does not have any Ads.
- It can download videos as good as 4K.
Cons:
- The only disadvantage is that you must download the app from the official site KeepVid.com.
Conclusion
In the end, we would like to say that as time passes by and with the tight schedules a YouTube video downloader on your phone frees you from your computer. For all those offline viewing needs of yours, the above-mentioned downloaders are excellent alternatives and help you save YouTube videos on Android.
Ollie Mattison
Ollie Mattison is a writer and a lover of all things video.
Follow @Ollie Mattison
Ollie Mattison
Mar 27, 2024• Proven solutions
Streaming online videos on YouTube has become a lifestyle for almost all of us now. But time and data usage are huge constraints. Isn’t it annoying when you find free Wi-Fi but lack a suitable video downloader or you have a downloader but no Wi-Fi access at the moment to stream the videos. You may already know how to download mp3 on Android , to solve your dilemma and let you download YouTube videos on your Android phone, we have collected the most popular YouTube video downloader for Android in this article.
Note: We resolutely oppose all forms of copyright-infringing downloads. This tutorial is only for downloading YouTube videos/audio materials from your own channel.
Part 1: Online Video Downloader App Only Supporting YouTube video
1. TubeMate
Using TubeMate, you can now save your favorite YouTube videos directly on your phone and cherish them anywhere offline. You can choose the quality of the video as this tool supports different resolutions. If you are a novice user this App is simple as one two three, you need to search the video on YouTube and tap the green arrow at the bottom of the screen to download it.
Pros:
- Multiple download options are available, along with the background download option to carry on with other routine work on your phone.
- It can download the video as well as audio.
- Videos can be converted to MP3 format.
Cons:
- It cannot download in 4K format.
- TubeMate doesn’t download the original YouTube video, but rather a video encoded video by YouTube. Hence, the video sometimes fails to play, and downloading a low-resolution video to save YouTube videos on Android might help.
![]()
A cross-platform for making videos anywhere for all creators
Why your video editing isn’t good enough? How about some creative inspo?
- 100 Million+ Users
- 150+ Countries and Regions
- 4 Million+ Social Media Followers
- 5 Million+ Stock Media for Use
* Secure Download
2. Dentex YouTube Downloader
Dentex is a YouTube video downloader for Android that allows you to download YouTube videos within seconds. The interface is divided into 3 parts. In the first part, you can search the YouTube video and see the results, the second part shows the quality and format options, whereas the third part lists the previously downloaded videos.
Pros:
- You can change the format of any video even after downloading.
- You can extract audio files from the videos and later convert them to MP3 format.
- You can remote download through SSH.
Cons:
- An additional plug-in is required to change the format of the video.
- The app is not compatible with lower Android versions such as Gingerbread, Froyo and Éclair.
- The downloading process might sometimes stop, requiring you to resume the process.
3. InsTube Free Video & Music Downloader
InsTube Free Video & Music Downloader allows you to download YouTube videos at high speed supporting MP3, MP4, 3GP, as well as M4A formats. With this tool, downloading YouTube videos in HD, Full HD, or 4K is at your fingertips. You can download videos from more than 40 websites apart from YouTube and enjoy them offline.
Pros:
- It has an inbuilt locker to protect videos and keep them private.
- The hassle-free and neat interface allows easy operation.
- Faster downloading options across 40 plus websites and free YouTube video download is also possible.
Cons:
- Unwanted Ads popup on the screen forcing you to install updates.
- You see the clipboard identifier icon only for few seconds on the screen.
4. WonTube
With WonTube, you can stock and save YouTube videos on Android. Its high conversion speed saves your time. The simple interface of the App makes it user friendly. The App can merge videos and convert the result to any format is a very unique feature.
Pros:
- It supports AVI, WMV, MP4, MKV, FLV, 3GP, and MPG.
- It works well with poor internet connectivity compared to other video downloaders.
- It can convert videos into 20+ formats.
Cons:
- Even though multiple videos can be downloaded simultaneously, the same batch of videos can be converted only to one output format.
5. NewPipe
NewPipe analyses YouTube videos by itself to obtain the necessary information for downloading the videos. This downloader can thus work with phones that do not have Google Services installed in them. In addition, the app allows you to download audio and video with different formats and resolutions. NewPipe also keeps you updated about your favorite YouTube channels while you save YouTube videos on Android.
Pros:
- It is merely 2MB.
- It has a pop-up mode that is movable and resizable, using which you can watch the videos while carrying out other activities on your mobile.
- There are no Ads.
Cons:
- It doesn’t have a log in option, so you cannot view your history.
- It requires additional settings.
![]()
Best YouTube Video Editor for PC - Filmora
- Cut, Trim, Split and Deatch audio from YouTube videos
- Edit Videos with key frame, motion track, green screen ect.
- Built-in plentiful YouTube templates and effects
- Export to MP4, MOV, MKV, GIF and multiple formats
For Win 7 or later (64-bit)
For macOS 10.12 or later
Secure Download
Part 2: YouTube Video Downloader App Supporting multiple video site
1. SnapTube
SnapTube is yet another amazing video and audio downloading app to download audio in MP3 format and video in MP4 format. The app is organized in itself, carrying a section of popular videos, most viewed videos and a daily recommendation section. The app also allows video downloading option from popular social media sites such as Instagram and Facebook.
Pros:
- It does not require an additional plug-in.
- It does not have malware and Ads.
Cons:
- YouTube multimedia download is restricted in India and China.
2. Videoder
Videoder is the app for you when you want to broaden your horizon and download videos from Facebook, Instagram, YouTube, Hotstar etc. in MP3 or MP4 format. It comes with an inbuilt feature to convert videos to MP3 format. You can personalize the app by using themes, setting cover art, and tag editor to organize your playlist in a visually attractive way.
Pros:
- Looking for HD quality viewing? You have 4K quality videos with Videoder.
- Multiple downloading is possible with a single tap.
- Downloading speed is accelerated by the number of network connections and utilizing it to the maximum.
Cons:
- Because of the numerous features, it may take time to learn all the functionalities.
- An audio encoding pop-up may sometimes appear asking to install a plug-in.
- It doesn’t support files other than MP3 and MP4 format.
3. KeepVid
KeepVid is a handy YouTube downloader that can download videos from YouTube and 27 other sites. It is a fantastic downloading tool that comes with a user-friendly interface and allows you to download videos from many sites, including YouTube, Vimeo, and Dailymotion. KeepVid also allows you to download multiple videos simultaneously with the option of selecting the quality of the videos.
Pros:
- The app does not have any size limit to the video.
- It does not have any Ads.
- It can download videos as good as 4K.
Cons:
- The only disadvantage is that you must download the app from the official site KeepVid.com.
Conclusion
In the end, we would like to say that as time passes by and with the tight schedules a YouTube video downloader on your phone frees you from your computer. For all those offline viewing needs of yours, the above-mentioned downloaders are excellent alternatives and help you save YouTube videos on Android.
Ollie Mattison
Ollie Mattison is a writer and a lover of all things video.
Follow @Ollie Mattison
Capturing Emotion: Ensuring Authenticity in Your YouTube Videos
10 Tips For Shooting Profesional YouTube Videos

Richard Bennett
Mar 27, 2024• Proven solutions
We have mentioned before about the equipment you should have to start your YouTube video shooting , however, being methodical in your approach to the video making process and knowing exactly what and where you are going to stage and record will increase the quality of the content. Focus on the technical aspects of your YouTube video before you actually start shooting and strive to be well prepared for all the challenges a day on the set may bring.
These and other useful tips may help you make better videos for your YouTube channel, so let’s explore different ways of improving your video making skills.
10 Tips for Shooting Better YouTube Videos
All videographers agree that you shouldn’t come to the set unprepared. Everything has to be in its place, no matter how insignificant it may seem, because a tiny detail can completely ruin the shot or even an entire day of work. These tips are going to help you avoid common mistakes, inexperienced video producers often make.
1. Write the Script
Everything starts with a script, at least in the cinematography world. You don’t have to write long, detailed descriptions of all scenes, just make a short note of every scene, what is being said in the shot, on-screen actions, camera positions, and so on. By doing this, you’ll save yourself a lot of valuable time, you can then dedicate to other burning issues on the set. Besides, knowing what you are going to say throughout the video so you don’t have to improvise all the time is going to help you feel more relaxed in front of a camera.
2. Build the Set (Lighting included)
Don’t leave anything to chance. You should control everything that is going to be in the shot, so avoid working at locations you can’t at least partially control. Shooting in studio-like conditions will enable you to carefully select the scenography and to design light so it matches the scene perfectly. The actors must always be clearly visible to the audience, which is why you need to pay attention to where they are located in the shot and how much light you have in that part of the shot.
3. Keep Your Batteries Charged
There is nothing more frustrating than arriving at the set anxious to start shooting just to find out that the batteries are empty. Charge the batteries at the end of each day on the set, because the chances are that you are going to need them early in the morning. Always have several spare batteries with you, so even if one battery is empty you have the replacement ready. You can also prolong the battery life by switching the camera off when you are not recording.
4. Do a Microphone Check
Capturing audio with an external microphone drastically increases the quality of the sound in your videos. That’s why making absolutely sure that all cables are connected and that the microphone is perfectly placed is paramount if you want to get the sound right. The host or the hosts of the video must be at the right distance from the microphone, usually, the length of their fist with the thumb and pinky finger extended, but this can vary a few inches to either side.
Check out the best microphone for YouTuber in 2018
5. Pay Attention to The Shot Composition
The rule of thirds is a common composition principle used by videographers to create balanced and unified images. The rule suggests that the subjects in a shot should be placed at the intersections of the lines that divide the screen. Most digital cameras have a grid that makes using the rule of thirds quite simple because you can easily see when the subjects in the shot are not positioned correctly.
This is just one of many shot composition techniques you have at your disposal, and as you gain more experience you’ll learn how to combine them and get aesthetically pleasing results.
6. Always Record Videos in Landscape Mode


Posting vertically oriented videos to your YouTube channel will make you look unprofessional because portrait mode is never used for capturing videos. YouTubers who record their videos with Smartphones are more likely to fall into this trap, but all you need to do to avoid this is remember to hold the device horizontally.
By switching to portrait mode, you’ll be cropping the frame in a way, so you might unknowingly end up removing parts of the shot you wanted to record.
In case that you want to convert your portrait video to landscape, do not miss this article about How to Convert A Portrait Video to Landscape.
7. Eliminate The Background Noises
Professional microphones can pick up even the softest sounds, that might prove difficult to remove in the post-production. You can reduce the noise levels in your videos by using shotgun microphones that only capture sounds that come directly into the microphone, or by using the omnidirectional mic to eliminate the wind if you’re shooting on an outdoor location.
Background noises can be particularly unpleasant when recording narration, because the viewers of the video may not want to watch it until the end if they can’t hear what the person in the video is saying.
If it is hard for you to record your YouTube video in quite environment, you can remove the background noise by using some video editing software. For YouTubers, we recommend you to try Wondershare Filmora to de-noise. Check the video below about how to remove background noise with one click.
8. Keep The Shot in Focus
You can always keep the shot in focus by simply enabling the autofocus feature, but if you do so you won’t be able to control where the focus is going to be. Pulling focus manually is an art that takes years to master, and you have to keep practicing it as much as you can in order to become good at it.
The best way to deal with out of focus shots is to avoid shooting scenes that include a lot of action because you won’t have to pull focus that often.
9. Put The Camera on a Tripod

The footage you produce should be smooth and free of camera shakes. All video cameras pick up vibrations easily, so even the slightest movement or impact can ruin a shot. Putting the camera on a tripod is one of the best ways to stabilize the shot and avoid camera shaking.
In addition, a tripod enables you to maintain image stability even when shooting form lower or upper angles, something that cannot be achieved by simply holding the camera.
We have chosen some of the best tripods that you can use for starting a YouTube vlogging Video shooting . If you are using a 4K camera, here are some tripods that you can use for your 4K Cameras .
10. Find The Best Angle
Every scene has its perfect angle, you just have to find it. This job is much easier if you have already built the set and adjusted the lighting before approaching the shot selection process because it will allow you to know exactly where the camera should be.
The camera position depends on a number of factors, including the video’s aesthetics or the action that takes place in the shot, and you have to go through this process for each shot in your video.
Read More to Get : How to Download YouTube Videos without Any Software Easily >>
Conclusion
Hopefully, the tips we provided in this article are going to help you create better YouTube videos. There are hundreds of tricks you’ll have to learn as your skills become more polished, but sometimes just paying attention to the basic rules of videography is more than enough to create a stunning video.
Leave a comment and let us know which tips helped you the most or tell us which useful tips we failed to mention in this article.
Richard Bennett
Richard Bennett is a writer and a lover of all things video.
Follow @Richard Bennett
Richard Bennett
Mar 27, 2024• Proven solutions
We have mentioned before about the equipment you should have to start your YouTube video shooting , however, being methodical in your approach to the video making process and knowing exactly what and where you are going to stage and record will increase the quality of the content. Focus on the technical aspects of your YouTube video before you actually start shooting and strive to be well prepared for all the challenges a day on the set may bring.
These and other useful tips may help you make better videos for your YouTube channel, so let’s explore different ways of improving your video making skills.
10 Tips for Shooting Better YouTube Videos
All videographers agree that you shouldn’t come to the set unprepared. Everything has to be in its place, no matter how insignificant it may seem, because a tiny detail can completely ruin the shot or even an entire day of work. These tips are going to help you avoid common mistakes, inexperienced video producers often make.
1. Write the Script
Everything starts with a script, at least in the cinematography world. You don’t have to write long, detailed descriptions of all scenes, just make a short note of every scene, what is being said in the shot, on-screen actions, camera positions, and so on. By doing this, you’ll save yourself a lot of valuable time, you can then dedicate to other burning issues on the set. Besides, knowing what you are going to say throughout the video so you don’t have to improvise all the time is going to help you feel more relaxed in front of a camera.
2. Build the Set (Lighting included)
Don’t leave anything to chance. You should control everything that is going to be in the shot, so avoid working at locations you can’t at least partially control. Shooting in studio-like conditions will enable you to carefully select the scenography and to design light so it matches the scene perfectly. The actors must always be clearly visible to the audience, which is why you need to pay attention to where they are located in the shot and how much light you have in that part of the shot.
3. Keep Your Batteries Charged
There is nothing more frustrating than arriving at the set anxious to start shooting just to find out that the batteries are empty. Charge the batteries at the end of each day on the set, because the chances are that you are going to need them early in the morning. Always have several spare batteries with you, so even if one battery is empty you have the replacement ready. You can also prolong the battery life by switching the camera off when you are not recording.
4. Do a Microphone Check
Capturing audio with an external microphone drastically increases the quality of the sound in your videos. That’s why making absolutely sure that all cables are connected and that the microphone is perfectly placed is paramount if you want to get the sound right. The host or the hosts of the video must be at the right distance from the microphone, usually, the length of their fist with the thumb and pinky finger extended, but this can vary a few inches to either side.
Check out the best microphone for YouTuber in 2018
5. Pay Attention to The Shot Composition
The rule of thirds is a common composition principle used by videographers to create balanced and unified images. The rule suggests that the subjects in a shot should be placed at the intersections of the lines that divide the screen. Most digital cameras have a grid that makes using the rule of thirds quite simple because you can easily see when the subjects in the shot are not positioned correctly.
This is just one of many shot composition techniques you have at your disposal, and as you gain more experience you’ll learn how to combine them and get aesthetically pleasing results.
6. Always Record Videos in Landscape Mode
Posting vertically oriented videos to your YouTube channel will make you look unprofessional because portrait mode is never used for capturing videos. YouTubers who record their videos with Smartphones are more likely to fall into this trap, but all you need to do to avoid this is remember to hold the device horizontally.
By switching to portrait mode, you’ll be cropping the frame in a way, so you might unknowingly end up removing parts of the shot you wanted to record.
In case that you want to convert your portrait video to landscape, do not miss this article about How to Convert A Portrait Video to Landscape.
7. Eliminate The Background Noises
Professional microphones can pick up even the softest sounds, that might prove difficult to remove in the post-production. You can reduce the noise levels in your videos by using shotgun microphones that only capture sounds that come directly into the microphone, or by using the omnidirectional mic to eliminate the wind if you’re shooting on an outdoor location.
Background noises can be particularly unpleasant when recording narration, because the viewers of the video may not want to watch it until the end if they can’t hear what the person in the video is saying.
If it is hard for you to record your YouTube video in quite environment, you can remove the background noise by using some video editing software. For YouTubers, we recommend you to try Wondershare Filmora to de-noise. Check the video below about how to remove background noise with one click.
8. Keep The Shot in Focus
You can always keep the shot in focus by simply enabling the autofocus feature, but if you do so you won’t be able to control where the focus is going to be. Pulling focus manually is an art that takes years to master, and you have to keep practicing it as much as you can in order to become good at it.
The best way to deal with out of focus shots is to avoid shooting scenes that include a lot of action because you won’t have to pull focus that often.
9. Put The Camera on a Tripod
The footage you produce should be smooth and free of camera shakes. All video cameras pick up vibrations easily, so even the slightest movement or impact can ruin a shot. Putting the camera on a tripod is one of the best ways to stabilize the shot and avoid camera shaking.
In addition, a tripod enables you to maintain image stability even when shooting form lower or upper angles, something that cannot be achieved by simply holding the camera.
We have chosen some of the best tripods that you can use for starting a YouTube vlogging Video shooting . If you are using a 4K camera, here are some tripods that you can use for your 4K Cameras .
10. Find The Best Angle
Every scene has its perfect angle, you just have to find it. This job is much easier if you have already built the set and adjusted the lighting before approaching the shot selection process because it will allow you to know exactly where the camera should be.
The camera position depends on a number of factors, including the video’s aesthetics or the action that takes place in the shot, and you have to go through this process for each shot in your video.
Read More to Get : How to Download YouTube Videos without Any Software Easily >>
Conclusion
Hopefully, the tips we provided in this article are going to help you create better YouTube videos. There are hundreds of tricks you’ll have to learn as your skills become more polished, but sometimes just paying attention to the basic rules of videography is more than enough to create a stunning video.
Leave a comment and let us know which tips helped you the most or tell us which useful tips we failed to mention in this article.
Richard Bennett
Richard Bennett is a writer and a lover of all things video.
Follow @Richard Bennett
Also read:
- In 2024, Cinematic Composer Software
- Craft Memorable Content Explore YouTube's Top 10 Creative Responses
- Streaming Success with Top-Tier Tech
- [New] Behind the Scenes Unveiling the Best 9 Camera Additions for Mobile Films
- [Updated] Best Cameras to Amplify Your YT Presence
- The Quintet at the Pinnacle YouTube Subscribers
- In 2024, Commanding YouTube Realm Through Strategic Creator Studio Utilization
- [Updated] Compare and Contrast The Crème De La Crème of Free Edits
- [New] Blur the Borders Enhancing Your Video's Appeal on YT
- [Updated] Endless Viewing Loop Your iPhone Videos Today
- [Updated] Enhance Your Videos Effective Titles and Keywords on YouTube
- [Updated] Crafting Content Step by Step Guide to YouTube Video Editing
- Navigating and Maximizing YouTube's Livestream Features
- [Updated] Efficient Keyword Utilization Discover the Best 7 Online Video Tag Extractors Reviewed
- [New] Discover Essential List of 7 High-Performance Mobile Video Streaming Tools (iPhone/Android)
- Elevate Your Visibility with YouTube Branding Techniques for 2024
- Leading 8 Software for Linux Video Editors
- Sculpting a Specialized Niche for YouTube Content
- Creative Reactors The 10 Premier Video Responses
- Decode Your YouTube Preferences with These 6 Fan-Favorite Questionnaires
- Apex Artists Among Online Video Titans
- In 2024, Boost Visibility with These 20 Best Thumbnail Fonts
- [New] Elevate Meta Descriptions Top Template Strategies
- In 2024, Buy YouTube Likes? Does It Really Help Boost Your Channel?
- Craft Engaging Videos Insights Into YouTube Movie Maker
- [New] A Deep Dive Into YouTube App Features on Smartphones
- [New] Automating Your Channel's YouTube Subscription Link
- [Updated] Demystifying the Powerhouse Behind YouTube Creator Hub
- Compreeved Guide to Creating Stellar YouTube Outros for 2024
- In 2024, Audience Allure Powerful Hashtags That Transform YouTube Shorts
- In 2024, Elevate Your Content Strategy - Premier Ranks Apps Explored
- In 2024, Breakthrough Strategies for YouTube Short Problem-Solving
- Craft Engaging Videos Insights Into YouTube Movie Maker for 2024
- Guide on How To Change Your Apple ID Email Address On Apple iPhone 11 | Dr.fone
- How does the stardust trade cost In pokemon go On ZTE Blade A73 5G? | Dr.fone
- New The Leading Lineup Best No-Charges Music Transformation Apps for iPhone/Android Enthusiasts
- In 2024, Mac Studios for Top-Quality Recordings
- [New] In 2024, Spotlight on Top 6 TikTok to MP3 Converters - Free and Online Edition
- [New] Selecting the Best Mac Sniping Solutions for 2024
- 2024 Approved Guiding Principles of Track Matte and Tracking in Adobe After Effects
- A Quick Guide to OnePlus Ace 2V FRP Bypass Instantly
- Harmonious Horizon Exploring the Top 8 Websites Where Your Sound Effect Quest Meets Free Resources (Current Year Focus)
- SDR to HD, Now HDR The Next Leap in Editing Workflows
- Low-Cost Hardware OBS Optimization Tips
- [New] In 2024, ListenGuide Examination
- How to Display Apple iPhone 15 Screen on PC Easily? | Dr.fone
- Title: In 2024, Android Users, Discover the Top YouTube Video Clips
- Author: Kevin
- Created at : 2024-05-25 15:24:14
- Updated at : 2024-05-26 15:24:14
- Link: https://youtube-videos.techidaily.com/in-2024-android-users-discover-the-top-youtube-video-clips/
- License: This work is licensed under CC BY-NC-SA 4.0.
