
:max_bytes(150000):strip_icc()/unnamed3-811dc04ac827434a8a7e6390258c8ae1.png)
"In 2024, Advanced Presentation Techniques YouTube in Slides"
Advanced Presentation Techniques: YouTube in Slides
Create High-Quality Video - Wondershare Filmora
An easy and powerful YouTube video editor
Numerous video and audio effects to choose from
Detailed tutorials provided by the official channel
Google Slide presentation is a powerful tool for creators to keep their audience engaged. This online platform lets you create and demonstrate your ideas. It will capture your viewers’ attention from the very beginning. It also doesn’t matter whatever learning style you engage. Adding YouTube videos to Google Slide will appeal to all levels of individuals.
More so, it is the best way to provide a break for both the audience and the creator. You can break Google Slide presentations with videos to offer some break. Viewers and the presenter get a breather in the process. The presenter can take a short break from speaking while the video plays. Let’s now dive into how to embed a YouTube video in Google Slides.

In this article
01 Why should we add a video to Google Slides?
02 How to add a YouTube video to Google Slide
03 How to choose the right video for your Slides?
Why should we add a video to Google Slides?
There is a great impact of adding video to Google Slides.
For attention
Videos will automatically awaken you, especially if your thoughts have started to sway during a presentation. A video has a direct way of showing creativity. The audience automatically connects the dots between the video and the presentation lines alike.
To stimulate discussion
A picture is worth a thousand words. There is a way that an added video will help the audience connect to the day’s topic. It will bring up several ideas and stir up discussion with the presenter.
Easy following
With videos embedded in Google Slide, viewers will find it easy to understand and digest. Videos automatically eliminate boredom and make any topic interesting.
How to add a YouTube video to Google Slide
Use these two methods to add a YouTube video to Google Slides. Via the Search and Direct link.
Method 1. Embed YouTube video to Google Slide by search and selection
Google has owned YouTube since the year 2006. You can, therefore, integrate Google’s products with YouTube easily.
Step 1. First, go to the slide where you want to embed your video.
Step 2. Then choose the “Insert” option from the menu bar and hit the “Video” option.

Step 3. It would be best if you now viewed the “YouTube” search bar to type in the video you want to embed. You can use keywords to search for the video in question and view instant search results.
Step 4. Then select the video you want to embed, and you’ll see it appear on the “Slide.”

Step 5. Format your video. Remember that the entire video will be embedded. You don’t necessarily need the whole video. It is time to select just a brief but relevant clip from the video to use. Then position your video to the right point using the axes from the exact starting point to the finished part you want the video to appear in.
Method 2. Embed YouTube video to Google Slide by direct link
You can engage this method if you want to include the entire video.
Step 1. Get the URL of the specific YouTube video that you want to use.

Step 2. Then go to your browser’s “Address bar” to copy the YouTube link.
Step 3. Next, open the “Presentation” slide to put your video to.
Step 4. Choose the “Insert” tab from the menu bar.
Step 5. Then hit on the “Video” option from the drop-down menu that appears.
Step 6. A new window will open automatically. Choose the “By URL” tab.
Step 7. Then paste the YouTube video URL in the “Paste YouTube URL Here” bar section.

Step 8. Wait for the video file to load and press the “Select” option. The video will immediately appear in the presentation slide. Just drag and drop the video in your preferred position.
Note: You can do a few edits inside the application. Set the timer when your video should start and when to stop. You can also adjust the video player size.
How to choose the right video for your Slides?
Not all videos will make an impact on your Google Slide. You need to use the best shot that adds value to your presentation. These guidelines will help you to settle on the best video.
Be Professional – choose the best video for your presentation. Remember that the video is part of the presentation and carries more weight. Settling for quality video will bring out the professionalism in you.
Relevant – how do you know that what you are showing your audience corresponds to the presentation piece? Ensure that the video you add has something to do with the Google Slide presentation topic. The two should naturally flow to make it easy to understand the whole concept.
Precise – your presentation is not about the video. The ideal length should not exceed 60 seconds. The longer the video, the greater the chance for your audience to lose track along the way.
Know every footage you are working with – this will help you pick the best shots for your presentation. So, learn every aspect of the video before settling down to use it.
Add new content – even though one content may suit several presentations, don’t rely on the same piece each time. Your audience will want to feel something fresh each time you are presenting. So, compose different videos for different scenarios to make that big impact.
Create an eye-catching video for your Slides with Filmora
The video quality matters when it comes to creating your Slides. The best video creator – Filmora – works in simple steps to give you an eye-catching video. It will create videos for all scenarios like marketing, tutorial, gaming, etc.
Key features of Filmora
- It offers you advanced video effects like filters, motion elements, etc
- You can multiply your fun with multiple screens with the Split Screen feature
- Easily change backgrounds using the Green Screen feature
- The speed control lets you fast forward or slow down a special moment
- Import your video clips to social media platforms
- You can also adjust the audio of your tracks using the Audio Mixer feature
Follow this guide to create a video for your slide with Filmora
Step 1. Launch Filmora
First, begin by downloading and installing Filmora on your computer device. Once installed, launch it and allow it to run. You can either create a new project or open an existing project to work on.
Step 2. Create a new project
Here, click on the “New Project” tab on the app’s welcome screen. The editor should load immediately. Then proceed to register the product. Just hit on the “Register” tab.
Step 3. Import video
Check the upper left corner of your screen to see the “Import” tab. Click on it and choose the “Import Media Files” option. Next, navigate to the location of your computer’s local list to select the clip or video you want to edit. Then, hit the “Import” button to add the video to the timeline for editing.
Step 4. Edit video
Drag and drop the raw footage to Filmora’s timeline to begin editing. Here, you can trim, add other video clips, merge, and add effects as you wish. Likewise, you can add opening titles, subtitles, and end credits to your video. More so, this tool offers different templates to use. Just drag and drop the templates you wish to use to a specific location on the timeline.
Step 5. Preview your file
Last but not least, you can preview your files. Click on the “Play” tab to start previewing your video clips. The main essence of this part is to allow you to make the necessary changes to your clips if there is a need.
Step 6. Export and Share
With Filmora, you can export your file to various social media platforms. But first, go to the “Output window” and select the video file format to use. This software supports several output formats to apply to any platform and device. Just click on the “Format” tab and choose the file format to use. Then also change the resolution and other parameters like frame rate and channel of your video in the “Settings” section. Finally, share your video to your YouTube channel and get ready to add the video to the Google Slide presentation.
For Win 7 or later (64-bit)
For macOS 10.12 or later
Conclusion
● You now know how to put a YouTube video in Google Slides the simple way. You can search for your YouTube videos or directly use the URL link. Whatever the case, remember that it’s the quality of your video that carries more weight. Thanks to the availability of third-party apps that you can use to create and improve the quality of your videos.
● Filmora is at your service to create high-resolution videos that you can export in any format to your YouTube channel. The tool is intuitive, and it won’t matter whether you haven’t tried it before. It is a perfect choice for both professionals and first-time users.
Google Slide presentation is a powerful tool for creators to keep their audience engaged. This online platform lets you create and demonstrate your ideas. It will capture your viewers’ attention from the very beginning. It also doesn’t matter whatever learning style you engage. Adding YouTube videos to Google Slide will appeal to all levels of individuals.
More so, it is the best way to provide a break for both the audience and the creator. You can break Google Slide presentations with videos to offer some break. Viewers and the presenter get a breather in the process. The presenter can take a short break from speaking while the video plays. Let’s now dive into how to embed a YouTube video in Google Slides.
In this article
01 Why should we add a video to Google Slides?
02 How to add a YouTube video to Google Slide
03 How to choose the right video for your Slides?
Why should we add a video to Google Slides?
There is a great impact of adding video to Google Slides.
For attention
Videos will automatically awaken you, especially if your thoughts have started to sway during a presentation. A video has a direct way of showing creativity. The audience automatically connects the dots between the video and the presentation lines alike.
To stimulate discussion
A picture is worth a thousand words. There is a way that an added video will help the audience connect to the day’s topic. It will bring up several ideas and stir up discussion with the presenter.
Easy following
With videos embedded in Google Slide, viewers will find it easy to understand and digest. Videos automatically eliminate boredom and make any topic interesting.
How to add a YouTube video to Google Slide
Use these two methods to add a YouTube video to Google Slides. Via the Search and Direct link.
Method 1. Embed YouTube video to Google Slide by search and selection
Google has owned YouTube since the year 2006. You can, therefore, integrate Google’s products with YouTube easily.
Step 1. First, go to the slide where you want to embed your video.
Step 2. Then choose the “Insert” option from the menu bar and hit the “Video” option.
Step 3. It would be best if you now viewed the “YouTube” search bar to type in the video you want to embed. You can use keywords to search for the video in question and view instant search results.
Step 4. Then select the video you want to embed, and you’ll see it appear on the “Slide.”
Step 5. Format your video. Remember that the entire video will be embedded. You don’t necessarily need the whole video. It is time to select just a brief but relevant clip from the video to use. Then position your video to the right point using the axes from the exact starting point to the finished part you want the video to appear in.
Method 2. Embed YouTube video to Google Slide by direct link
You can engage this method if you want to include the entire video.
Step 1. Get the URL of the specific YouTube video that you want to use.
Step 2. Then go to your browser’s “Address bar” to copy the YouTube link.
Step 3. Next, open the “Presentation” slide to put your video to.
Step 4. Choose the “Insert” tab from the menu bar.
Step 5. Then hit on the “Video” option from the drop-down menu that appears.
Step 6. A new window will open automatically. Choose the “By URL” tab.
Step 7. Then paste the YouTube video URL in the “Paste YouTube URL Here” bar section.
Step 8. Wait for the video file to load and press the “Select” option. The video will immediately appear in the presentation slide. Just drag and drop the video in your preferred position.
Note: You can do a few edits inside the application. Set the timer when your video should start and when to stop. You can also adjust the video player size.
How to choose the right video for your Slides?
Not all videos will make an impact on your Google Slide. You need to use the best shot that adds value to your presentation. These guidelines will help you to settle on the best video.
Be Professional – choose the best video for your presentation. Remember that the video is part of the presentation and carries more weight. Settling for quality video will bring out the professionalism in you.
Relevant – how do you know that what you are showing your audience corresponds to the presentation piece? Ensure that the video you add has something to do with the Google Slide presentation topic. The two should naturally flow to make it easy to understand the whole concept.
Precise – your presentation is not about the video. The ideal length should not exceed 60 seconds. The longer the video, the greater the chance for your audience to lose track along the way.
Know every footage you are working with – this will help you pick the best shots for your presentation. So, learn every aspect of the video before settling down to use it.
Add new content – even though one content may suit several presentations, don’t rely on the same piece each time. Your audience will want to feel something fresh each time you are presenting. So, compose different videos for different scenarios to make that big impact.
Create an eye-catching video for your Slides with Filmora
The video quality matters when it comes to creating your Slides. The best video creator – Filmora – works in simple steps to give you an eye-catching video. It will create videos for all scenarios like marketing, tutorial, gaming, etc.
Key features of Filmora
- It offers you advanced video effects like filters, motion elements, etc
- You can multiply your fun with multiple screens with the Split Screen feature
- Easily change backgrounds using the Green Screen feature
- The speed control lets you fast forward or slow down a special moment
- Import your video clips to social media platforms
- You can also adjust the audio of your tracks using the Audio Mixer feature
Follow this guide to create a video for your slide with Filmora
Step 1. Launch Filmora
First, begin by downloading and installing Filmora on your computer device. Once installed, launch it and allow it to run. You can either create a new project or open an existing project to work on.
Step 2. Create a new project
Here, click on the “New Project” tab on the app’s welcome screen. The editor should load immediately. Then proceed to register the product. Just hit on the “Register” tab.
Step 3. Import video
Check the upper left corner of your screen to see the “Import” tab. Click on it and choose the “Import Media Files” option. Next, navigate to the location of your computer’s local list to select the clip or video you want to edit. Then, hit the “Import” button to add the video to the timeline for editing.
Step 4. Edit video
Drag and drop the raw footage to Filmora’s timeline to begin editing. Here, you can trim, add other video clips, merge, and add effects as you wish. Likewise, you can add opening titles, subtitles, and end credits to your video. More so, this tool offers different templates to use. Just drag and drop the templates you wish to use to a specific location on the timeline.
Step 5. Preview your file
Last but not least, you can preview your files. Click on the “Play” tab to start previewing your video clips. The main essence of this part is to allow you to make the necessary changes to your clips if there is a need.
Step 6. Export and Share
With Filmora, you can export your file to various social media platforms. But first, go to the “Output window” and select the video file format to use. This software supports several output formats to apply to any platform and device. Just click on the “Format” tab and choose the file format to use. Then also change the resolution and other parameters like frame rate and channel of your video in the “Settings” section. Finally, share your video to your YouTube channel and get ready to add the video to the Google Slide presentation.
For Win 7 or later (64-bit)
For macOS 10.12 or later
Conclusion
● You now know how to put a YouTube video in Google Slides the simple way. You can search for your YouTube videos or directly use the URL link. Whatever the case, remember that it’s the quality of your video that carries more weight. Thanks to the availability of third-party apps that you can use to create and improve the quality of your videos.
● Filmora is at your service to create high-resolution videos that you can export in any format to your YouTube channel. The tool is intuitive, and it won’t matter whether you haven’t tried it before. It is a perfect choice for both professionals and first-time users.
Transition Tactics: Setting Up Personal/Business YouTube Channels on Smartphones
Versatile YouTube Video Editor - Filmora
An easy yet powerful editor
Numerous effects to choose from
Detailed tutorials provided by the official channel
The relevance of YouTube and the need to have a channel are visible with the rise in viewership. Having launched on February 14th, 2005, YouTube has become the 2nd most visited social media website according to Google statistics having a whopping over 2 billion users on the platform monthly.
As an entrepreneur or a company, one of the easiest and fastest ways of selling your brand or skill is via the YouTube platform. Thus, you must know how to make a YouTube channel on iPhone and how to make a YouTube channel on Android. Having overwhelming subscribers becomes an added advantage as not only will you and your business be known or recognized, YouTube has a way of appreciating and paying some of their influencers as well.
At this point, I know how hungry you are to kick-start your YouTube. This article will help guide you through creating a YouTube channel on your mobile, whether for personal or business purposes. Rather than scanning through, you should peruse through attentively.
In this article
01 How to Make a Personal YouTube Channel on Mobile
02 How to Create a Business YouTube on Mobile
03 Five Tips to Start a YouTube channel
Part 1: How to Make a Personal YouTube Channel on Mobile
Creating a YouTube channel on mobile is not a cumbersome one. It is as easy as ABC, and within split seconds you’ve created your own YouTube channel. The guideline entails the following steps:
- The first step to setting up your personal YouTube channel starts with creating a Google account for those who don’t have any yet.
- Whether you open your YouTube app or via the web browser of your phone, open the YouTube website.
- On the top right-hand side of your mobile, tap on your profile image
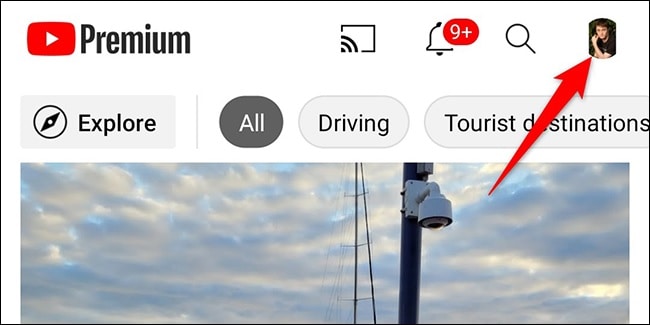
Source: howtogeek.com
- A drop-down menu will pop up. Click on your channel icon.
- An option to create a new channel comes up. (For those who have a channel already, an alternative to manage your channel or video will show.)
- An option to input your name pops up on the screen. Carefully insert your desired name and tap on Create.
- If you would love to halt and resume later in the setting up, you can scroll down to click on the ‘set up later.’
Part 2: How to Create a Business YouTube on Mobile
The clarity on the relevance of YouTube in this dispensation when it comes to branding or business-boosting is immense. Many savvy entrepreneurs and business companies have come to the known for their beautiful advantages. With over 2 billion people trooping into the site monthly, making your brand come to the limelight in this social media implies reaching one-tenth of the users,i.e., if you play by the rules of strategically planning your business growth, the top. However, this article may not reveal the different strategies to adopt so you can become an influencer in your line of business; instead, it will start from scratch on how to get your YouTube business page started. How then can one create his own business YouTube account?
1. Signing into a Google account
To successfully start using the YouTube app, there is a need to sign officially into Google. If you’ve it in mind to have a separate Google account for your business account, you kick-start it at this stage.
However, you can still use your name to open a Google account and create a business YouTube account for subsequent use. The truth is that YouTube gives room for you still to make a business account with a business name thus, eliminating the need to use a business name in creating your Google account.
2. Creating a business name
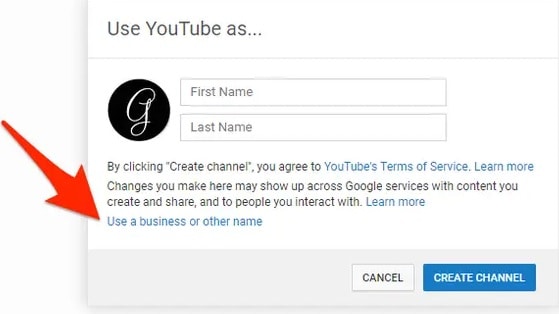
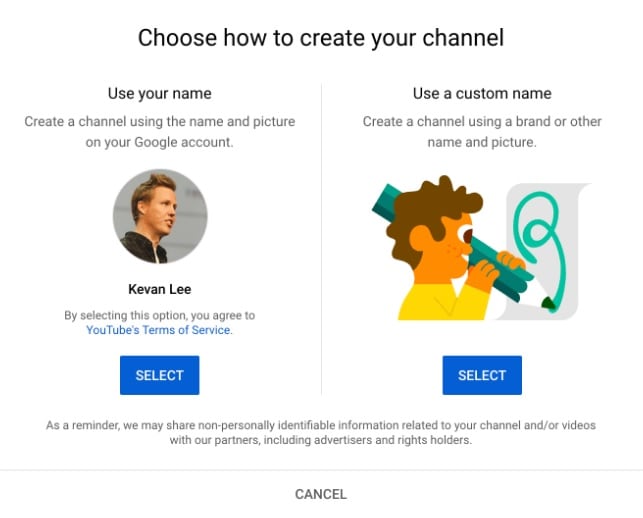
Once you create a Google account, the next step is to make your business a YouTube account. This you do by either signing into your YouTube app or via the YouTube website in your mobile browser. Once logged in to the app interface, you will see the profile photo you used in creating your Google account or the initial letter of the first name you used on the top right-hand side of your mobile. Tap on it, and a drop-down menu will come up, tap on the ‘create a channel’ icon, which will lead you to another interface where you have the option to select ‘Get started’ or ‘No thanks.’ A tap on the get started will reveal an option to either create your channel using the name and image of your Google account or use a customized name.
Source: buffer.com
Selecting the custom name gives you the autonomy to use the brand or business name of your choice, after which you tap on the create option.
3. Customize your business page
At this point, you can design the layout by utilizing the appealing icon and banner of your choice, just as provided by the likes of Facebook or Twitter. The customized templates in Canva are there for you to design your page to your state.
I know you would be wondering how to go about this; YouTube can directly upload your artwork with a preview option available. You can crop your artwork to fit your page, making it look more professional.
To be emphatic, creating a business account is still simple but with professionalism. Remember you are selling yourself and your brand, and it is expedient to give your best on your page. Do well to describe your page as excellent as you can, let your activity in terms of photo and video uploads be of the best. This way, subscribers will not hesitate to hit the like and subscribe button. Good luck as you kick-start your business page.
Part 3: Five Tips to Start a YouTube channel
Carefully observe how YouTube channels function and possibly how entrepreneurs and business owners make waves in the YouTube industry. Then, sit down and watch either your mobile phone or computer and think about making a YouTube Channel on iPhone or understand how to create a YouTube Channel on mobile and earn money, especially to beginners. This way, you can make it envy to all becomes a significant challenge—however, the crucial tips in starting your own YT channel.
Identify Goal of Channel
What are you trying to achieve? Customer education, testimonials or do you want people to subscribe? Be clear on what you want your YouTube channel to do for your brand and how it fits into your overall marketing strategy.
Gather Content Ideas
Gather content, even before you make a YouTube channel on mobile. You can start with a series of videos talking about your company, products, or industry and then launch the channel once they are all done. If you can’t think of any content on your own, try searching around online to see if others have already created videos of this sort and have posted them online. Then, use those videos as examples when you make your content.
Logo and Thumbnail Design
How to make a logo for YouTube on mobile?
Once you are up with content creation, you will have to create a thumbnail for your video. Attractive and catchy thumbnails that persuade searchers to click on your video are critical. Here we will see how to create a logo for a YouTube video on mobile. For this purpose, Canva.com can create attractive thumbnails and a Catchy logo. Using this tool, you can create, edit and customize graphics for your YouTube videos.
Quality of Video is Important
Don’t just put up videos willy-nilly. Think about what content would work for your brand and audience. The content needs to be engaging, relevant, and inspiring so people will keep coming back for more videos. You don’t have to have the latest video equipment either – think about the type of content that would work best.
Choose Video Editing Software
Wondershare Filmora
Get started easily with Filmora’s powerful performance, intuitive interface, and countless effects!
Try It Free Try It Free Try It Free Learn More >

Lastly, you must use high-quality producing software. So we recommend Filmora Video Editor that offers a wide range of effects, themes, and titles. It lets you create professional-looking videos with various presets for quick editing. It incorporates support for most common video formats. If you’re looking for a straightforward but potent video editor, Filmora is your best option.
Conclusion
I firmly believe that at this point, understanding how to create a YouTube channel in mobile will be an easy one. We discussed ways of not just developing your YT channel but also how to give your page the best of professional work. This article is truly an eye-opener and contains from scratch the step-wise order of growing and learning how to make a logo for YouTube Channel in mobile and creating personal and business accounts to earn some money.
The relevance of YouTube and the need to have a channel are visible with the rise in viewership. Having launched on February 14th, 2005, YouTube has become the 2nd most visited social media website according to Google statistics having a whopping over 2 billion users on the platform monthly.
As an entrepreneur or a company, one of the easiest and fastest ways of selling your brand or skill is via the YouTube platform. Thus, you must know how to make a YouTube channel on iPhone and how to make a YouTube channel on Android. Having overwhelming subscribers becomes an added advantage as not only will you and your business be known or recognized, YouTube has a way of appreciating and paying some of their influencers as well.
At this point, I know how hungry you are to kick-start your YouTube. This article will help guide you through creating a YouTube channel on your mobile, whether for personal or business purposes. Rather than scanning through, you should peruse through attentively.
In this article
01 How to Make a Personal YouTube Channel on Mobile
02 How to Create a Business YouTube on Mobile
03 Five Tips to Start a YouTube channel
Part 1: How to Make a Personal YouTube Channel on Mobile
Creating a YouTube channel on mobile is not a cumbersome one. It is as easy as ABC, and within split seconds you’ve created your own YouTube channel. The guideline entails the following steps:
- The first step to setting up your personal YouTube channel starts with creating a Google account for those who don’t have any yet.
- Whether you open your YouTube app or via the web browser of your phone, open the YouTube website.
- On the top right-hand side of your mobile, tap on your profile image
Source: howtogeek.com
- A drop-down menu will pop up. Click on your channel icon.
- An option to create a new channel comes up. (For those who have a channel already, an alternative to manage your channel or video will show.)
- An option to input your name pops up on the screen. Carefully insert your desired name and tap on Create.
- If you would love to halt and resume later in the setting up, you can scroll down to click on the ‘set up later.’
Part 2: How to Create a Business YouTube on Mobile
The clarity on the relevance of YouTube in this dispensation when it comes to branding or business-boosting is immense. Many savvy entrepreneurs and business companies have come to the known for their beautiful advantages. With over 2 billion people trooping into the site monthly, making your brand come to the limelight in this social media implies reaching one-tenth of the users,i.e., if you play by the rules of strategically planning your business growth, the top. However, this article may not reveal the different strategies to adopt so you can become an influencer in your line of business; instead, it will start from scratch on how to get your YouTube business page started. How then can one create his own business YouTube account?
1. Signing into a Google account
To successfully start using the YouTube app, there is a need to sign officially into Google. If you’ve it in mind to have a separate Google account for your business account, you kick-start it at this stage.
However, you can still use your name to open a Google account and create a business YouTube account for subsequent use. The truth is that YouTube gives room for you still to make a business account with a business name thus, eliminating the need to use a business name in creating your Google account.
2. Creating a business name
Once you create a Google account, the next step is to make your business a YouTube account. This you do by either signing into your YouTube app or via the YouTube website in your mobile browser. Once logged in to the app interface, you will see the profile photo you used in creating your Google account or the initial letter of the first name you used on the top right-hand side of your mobile. Tap on it, and a drop-down menu will come up, tap on the ‘create a channel’ icon, which will lead you to another interface where you have the option to select ‘Get started’ or ‘No thanks.’ A tap on the get started will reveal an option to either create your channel using the name and image of your Google account or use a customized name.
Source: buffer.com
Selecting the custom name gives you the autonomy to use the brand or business name of your choice, after which you tap on the create option.
3. Customize your business page
At this point, you can design the layout by utilizing the appealing icon and banner of your choice, just as provided by the likes of Facebook or Twitter. The customized templates in Canva are there for you to design your page to your state.
I know you would be wondering how to go about this; YouTube can directly upload your artwork with a preview option available. You can crop your artwork to fit your page, making it look more professional.
To be emphatic, creating a business account is still simple but with professionalism. Remember you are selling yourself and your brand, and it is expedient to give your best on your page. Do well to describe your page as excellent as you can, let your activity in terms of photo and video uploads be of the best. This way, subscribers will not hesitate to hit the like and subscribe button. Good luck as you kick-start your business page.
Part 3: Five Tips to Start a YouTube channel
Carefully observe how YouTube channels function and possibly how entrepreneurs and business owners make waves in the YouTube industry. Then, sit down and watch either your mobile phone or computer and think about making a YouTube Channel on iPhone or understand how to create a YouTube Channel on mobile and earn money, especially to beginners. This way, you can make it envy to all becomes a significant challenge—however, the crucial tips in starting your own YT channel.
Identify Goal of Channel
What are you trying to achieve? Customer education, testimonials or do you want people to subscribe? Be clear on what you want your YouTube channel to do for your brand and how it fits into your overall marketing strategy.
Gather Content Ideas
Gather content, even before you make a YouTube channel on mobile. You can start with a series of videos talking about your company, products, or industry and then launch the channel once they are all done. If you can’t think of any content on your own, try searching around online to see if others have already created videos of this sort and have posted them online. Then, use those videos as examples when you make your content.
Logo and Thumbnail Design
How to make a logo for YouTube on mobile?
Once you are up with content creation, you will have to create a thumbnail for your video. Attractive and catchy thumbnails that persuade searchers to click on your video are critical. Here we will see how to create a logo for a YouTube video on mobile. For this purpose, Canva.com can create attractive thumbnails and a Catchy logo. Using this tool, you can create, edit and customize graphics for your YouTube videos.
Quality of Video is Important
Don’t just put up videos willy-nilly. Think about what content would work for your brand and audience. The content needs to be engaging, relevant, and inspiring so people will keep coming back for more videos. You don’t have to have the latest video equipment either – think about the type of content that would work best.
Choose Video Editing Software
Wondershare Filmora
Get started easily with Filmora’s powerful performance, intuitive interface, and countless effects!
Try It Free Try It Free Try It Free Learn More >
Lastly, you must use high-quality producing software. So we recommend Filmora Video Editor that offers a wide range of effects, themes, and titles. It lets you create professional-looking videos with various presets for quick editing. It incorporates support for most common video formats. If you’re looking for a straightforward but potent video editor, Filmora is your best option.
Conclusion
I firmly believe that at this point, understanding how to create a YouTube channel in mobile will be an easy one. We discussed ways of not just developing your YT channel but also how to give your page the best of professional work. This article is truly an eye-opener and contains from scratch the step-wise order of growing and learning how to make a logo for YouTube Channel in mobile and creating personal and business accounts to earn some money.
Also read:
- In 2024, Choosing the Right Platform A Look at Vimeo, YouTube & DailyMotion
- Explore Top 12 Gear Best On-the-Go Flip-Screen Cameras
- [New] Elevate Your Content with These 10 Reaction Wonders
- 2024 Approved Affiliate Acquaintanceships Elevating Budget Channels with Ease
- 2024 Approved 10 Most Popular Beauty Gurus on YouTube
- Enhancing Video Visibility with Optimal Thumbnails
- From Novice to Pro Simplified YouTube Live Streaming with OBS
- 2024 Approved Advanced Tips for YouTube Commercial Making
- In 2024, Easy Replay on iPhone Set Videos Cycling
- Advanced Editing for Published YouTube Videos for 2024
- 2024 Approved Enlightenment Streams Foremost Ed Resources Online
- In 2024, A Beginner's Tutorial How to Insert On-Screen Dialogue in Video Formats
- Learn the Art of Green Screen Without Costs Top 4 YouTube Techniques for Aspiring VFX Artists
- Ensuring Authenticity as You Aspire for One Million Video Watches for 2024
- High-Income Content Makers
- Making Sense of Mukbangs Crafting Foodie Streams
- Discover the Most Reliable Royalty-Free Audio Libraries for 2024
- In 2024, Channel Alchemy Turning Viewers Into Believers
- Top-Rated DJ Templates Free Access for Music Makers
- Are There Legal Constraints in Capturing Online Video Screenshots, In 2024
- Youtube Shorts Profitability Secrets
- 2024 Approved Crafting Quick-Cut Channel Sequences
- Unveiling the Secrets to Escaping the Zero Views Quagmire
- How to Link YouTube to TikTok? [Complete Guide]
- [New] Editing Essentials Your Go-To Guide for Beginner Vloggers
- Scrutinizing TSeries’ Earnings From Digital Viewership on YouTube
- In 2024, Content Creators' Dilemma Which Site Reigns - Vimeo, YouTube?
- [Updated] Enhancing Clicks YouTube Thumbnail Sizes Explored
- [New] Crafting Content Dimensions for App Aggregates
- Enhancing YouTube Videos for Superior Quality
- Visionaries Shaping Marvel Online Experience
- Experience Engaged YouTube Exchanges
- [New] 16 Best Kickstart Videos on YouTube for Visibility Boost
- Sneak Peeks Into Instagram's Latest Hacks
- New 2024 Approved Video Vibes How Aspect Ratio Influences Your YouTube Contents Style
- Fix Sony Xperia 1 V Android System Webview Crash 2024 Issue | Dr.fone
- How to find lost iPhone 11 Pro Max Backup files on Windows PC? | Stellar
- In 2024, Key Techniques for Storing LOL Matches
- How to Transfer Data After Switching From Vivo X Flip to Latest Samsung | Dr.fone
- Sleeper Coupons in Instagram The Underrated Tips and Tricks
- New In 2024, EchoTalk Innovative Methods to Modify Voices for Enhanced Skype Interactions
- Innovative AI Pixel Perfect Editor
- [New] Methods for Making Meetings Memorable for 2024
- [New] 2024 Approved Live Transmission via OBS to Instagram
- Updated In 2024, FCPX XML Essentials From Basics to Advanced Techniques
- With This Article, We Will Be Looking at Steps to Rotate a Video in Cyberlink PowerDirector to Help You when Required. We Have Also Mentioned the Steps You Will Need to Follow in Wondershare Filmora
- [New] Pro-Level Insights for Perfectly Crafted Snaps
- Step-by-Step Walkthrough of Instagram Story Screening for 2024
- How to Fix Android App Not Installed Error on Nubia Z50S Pro Quickly? | Dr.fone
- In 2024, 4 Ways to Unlock iPhone SE to Use USB Accessories Without Passcode | Dr.fone
- [New] In 2024, Streamlining Post-Editing The Art of Vimeo's Final Screens
- Updated EchoShift Elite Revolutionary Sound Design and Pitch Adjustment App for 2024
- In 2024, A Complete Breakdown of LG’s Premium 4K Screen Experience
- Title: "In 2024, Advanced Presentation Techniques YouTube in Slides"
- Author: Kevin
- Created at : 2024-05-25 15:23:35
- Updated at : 2024-05-26 15:23:35
- Link: https://youtube-videos.techidaily.com/in-2024-advanced-presentation-techniques-youtube-in-slides/
- License: This work is licensed under CC BY-NC-SA 4.0.
