
:max_bytes(150000):strip_icc()/TravelTech_GettyImages-1410662282_CROPPED_d3sign-03c2cdf5be314894b99757426813be51.jpg)
"In 2024, Achieve Financial Success on YouTube Start at 500 Views"
Achieve Financial Success on YouTube: Start at 500 Views
For small creators on YouTube, getting monetized seemed like an uphill task. You had to accumulate over 1,000 subscribers and over 4,000 public watch hours. This can be difficult to attain, especially on a platform where creators are publishing new content every day. However, the 2023 update on the YouTube Partner Program (YPP) provided an easier way to start making money on YouTube. In this article, we look at how the YPP is changing and the beauty of the YouTube monetization 500 subscribers’ policy update.
YouTube Shorts Monetization A cross-platform for helping you present your content in the best way possible!
Free Download Free Download Learn More

Part 1. YouTube Monetization Revamp: 500 Subscribers Minimum Threshold Unveiled
The recent update in YouTube monetization requirements has made it easier than ever for small creators to make money on the platform. The YPP program changed and reduced the number of subscribers needed to be eligible. It has also reduced the amount of watch time needed. Let’s have a look at what the new eligibility criteria look like:

The eligibility criteria for the YPP program are now easier and more achievable than before. To apply, you now need:
- At least 500 subscribers
- Three Shorts or Video uploads in the last 90 days
- At least 3,000 public watch hours in the last 12 months or
- At least 3 million public Short videos in the last 90 days
The new requirements are lower than the old ones. Previously, you were required to have at least 1,000 subscribers with over 4,000 public watch hours. By lowering the threshold, YouTube makes it easier for all creators to monetize their content.
Part 2. YouTube Monetization with 500 Subscribers: A Brief Guide
YouTube announced in 2022 that they were evolving the YPP to continue rewarding more creators. Starting mid-June 2023, the program was expanded to allow more creators to access monetization benefits.
Know If You are Eligible
As a creator, you will want to know if you are eligible for the YouTube monetization 500 subscribers’ plan. Make sure that the notify feature on your channel is active to receive a notification. Go to the Earn area of the YouTube channel, and select Get Notified. Once selected, YouTube will send you an email when reach above the eligibility threshold.

What You Need to Join Expanded YPP
Joining the expanded YouTube Partner Program has the same requirements as the earlier version. These include:
- Being compliant with the YouTube channel monetization policies
- Active 2-Step verification on the Google Account
- Channel is based in any of the available regions or countries
- An active AdSense account linked to the channel
- No Community Guidelines strikes on your Channel
- Have advanced features access on YouTube
Where to Apply for Monetization
After meeting the eligibility criteria, you will need to apply to be enrolled in the YPP. Remember that being eligible does not automatically translate to instant income. You need to apply for the program and wait for the approval. Here are the steps to follow:
On Computer/Desktop
Step 1Sign in to YouTube Studio on your computer or desktop

Step 2Click Earn in the left menu

Step 3Click Apply Now to review and Accept the base terms

Step 4Click Start to set up an AdSense account

On Android, iPhone and iPad
Applying for YouTube monetization on your mobile devices follows the same process as the computer. Only in this case you will using the YouTube Studio app instead of the website. Follow these steps as outlined.
- Open the YouTube Studio mobile app on your Android device.
- Tap Earn from the bottom men
- Tap Apply now to review and accept the base terms.
- Set up an AdSense account as requested, or link an existing active one.
Once you complete these steps on your computer or mobile, In Progress status will surface in the Get Reviewed step. This means that YouTube will review your channel and provide feedback within a month.
What Monetization Review Entails
Once you submit your application, YouTube’s automated systems and human reviewers will look at your channel for a while. They will review it to make sure it follows all the platform’s policies and guidelines. As the reviews are in progress, creators are encouraged to back to the Earn section of YouTube Studio regularly. Typically, you will get the results within a month, but this may be affected by several factors:
- Application Volumes
- Resource Limitations
- System Issues
- Channel requiring several reviewers to determine suitability for YPP
Sometimes the first application may not be successful for some reason. In this case, creators are encouraged to continue uploading original content and try again after 30 days. For second or other rejections, you are allowed to try again after 90 days. During this period, make sure that your channel follows YouTube policies and guidelines to increase your chances of being accepted.
Choose How to Earn
The major way of earning money on YouTube is through ads that show in your videos. In the case of Shorts, the ad-sharing revenue involves YouTube sharing the revenue generated from the ads with creators. However, getting accepted to YPP also allows you to start earning with fan funding and Shopping features. This means that creators can earn money directly from their views using these unique features
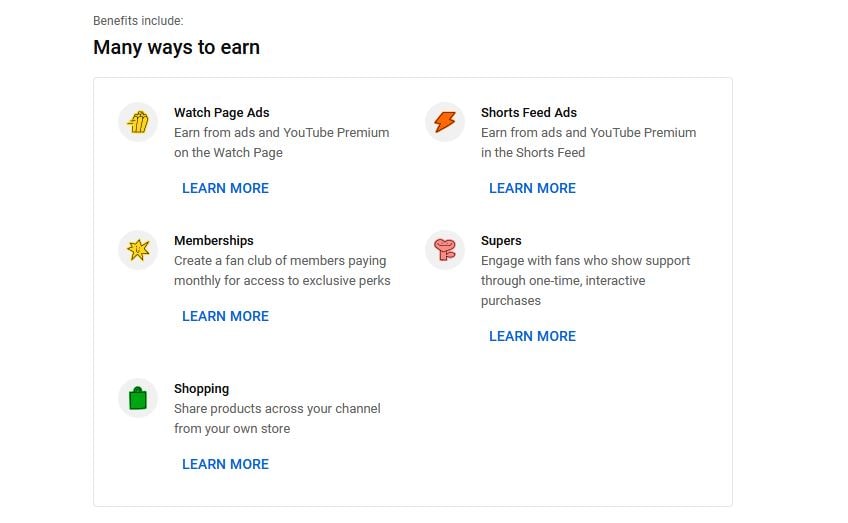
YouTube monetization 500 subscribers update allows you to earn money through monetization features that were not there before. This allows creators to interact more with their viewer while generating income. The main fan funding features include:
- Channel Membership: Offer a membership plan to your viewer through monthly payments in exchange for perks like emojis and badges.
- Super Thanks: Earn revenue from viewers who show extra gratitude for your videos.
- Super Stickers and Super Chat: Allows your fans to buy Super Chats that highlight their messages or add fun animated images in the live chat.
- Shopping: Allows you to connect your official merchandise story to YouTube to showcase your products.
Part 3. Edit Your Shorts for Monetization with WonderShare Filmora
The quality of your Shorts plays an essential role in determining whether your channel will be monetized. This is why you need good video editing software to help you present your content in the best way possible. Wondershare Filmora is a great choice when you want your YouTube Shorts to stand out. From cool green screen tricks to auto-reframing your videos for Shorts, Filmora gives you the whole editing package.
Free Download For Win 7 or later(64-bit)
Free Download For macOS 10.14 or later
Filmora offers creators fantastic editing features to create better Shorts. Let’s have a look at some of the features you may find helpful:
1. AI Copywriting
YouTube Shorts require quick content that covers everything within 60 seconds. With the Filmora AI Copywriting feature, you can get inspiration and add text to your videos. Express your thoughts more clearly and generate text that makes the video more engaging.
2. Split Screen Video Editor
YouTube Shorts are limited to a length of 1 minute only. Since 60 seconds is quite a short time, you may want to showcase your content on multiple screens. The Split Screen Video Editor on Filmora allows you to make a split screen instantly. Choose from the readily available templates and show your audience what you want from multiple perspectives in the same video.
3. Motion Tracking
With YouTube Shorts, you need to be more creative. Adding objects to your videos makes them fun and engaging. The motion tracking feature on Filmora allows you to track the movement of an object in the video. You can then pin graphics on the object, making the video more exciting. You can also add specific text and align it to an object, allowing your audience to follow through the story.
4. Speed Ramping
The way you present your video means a lot to the audience. No one wants a boring or a really slow-moving video. With the Speed Ramping feature on Filmora, you can adjust the speed of your Shorts with better control of your keyframes. This allows you to create unique cinematic effects that keep the audience wanting more of the content.
Conclusion
The introduction of the YouTube monetization 500 subscribers’ policy update was a special moment for small YouTubers. It meant that the platform was extending its YPP program to more creators, allowing them to earn money from their content. Lowering the monetization requirement gives more people a chance to make money faster. However, it is important to make sure that your videos are offering value to your audience. We recommend using Wondershare Filmora to edit your videos and make sure they stand out from the competition. The better your videos will be, the more views you will get, and the more money you will make.
Free Download Free Download Learn More
Part 1. YouTube Monetization Revamp: 500 Subscribers Minimum Threshold Unveiled
The recent update in YouTube monetization requirements has made it easier than ever for small creators to make money on the platform. The YPP program changed and reduced the number of subscribers needed to be eligible. It has also reduced the amount of watch time needed. Let’s have a look at what the new eligibility criteria look like:
The eligibility criteria for the YPP program are now easier and more achievable than before. To apply, you now need:
- At least 500 subscribers
- Three Shorts or Video uploads in the last 90 days
- At least 3,000 public watch hours in the last 12 months or
- At least 3 million public Short videos in the last 90 days
The new requirements are lower than the old ones. Previously, you were required to have at least 1,000 subscribers with over 4,000 public watch hours. By lowering the threshold, YouTube makes it easier for all creators to monetize their content.
Part 2. YouTube Monetization with 500 Subscribers: A Brief Guide
YouTube announced in 2022 that they were evolving the YPP to continue rewarding more creators. Starting mid-June 2023, the program was expanded to allow more creators to access monetization benefits.
Know If You are Eligible
As a creator, you will want to know if you are eligible for the YouTube monetization 500 subscribers’ plan. Make sure that the notify feature on your channel is active to receive a notification. Go to the Earn area of the YouTube channel, and select Get Notified. Once selected, YouTube will send you an email when reach above the eligibility threshold.
What You Need to Join Expanded YPP
Joining the expanded YouTube Partner Program has the same requirements as the earlier version. These include:
- Being compliant with the YouTube channel monetization policies
- Active 2-Step verification on the Google Account
- Channel is based in any of the available regions or countries
- An active AdSense account linked to the channel
- No Community Guidelines strikes on your Channel
- Have advanced features access on YouTube
Where to Apply for Monetization
After meeting the eligibility criteria, you will need to apply to be enrolled in the YPP. Remember that being eligible does not automatically translate to instant income. You need to apply for the program and wait for the approval. Here are the steps to follow:
On Computer/Desktop
Step 1Sign in to YouTube Studio on your computer or desktop
Step 2Click Earn in the left menu
Step 3Click Apply Now to review and Accept the base terms
Step 4Click Start to set up an AdSense account
On Android, iPhone and iPad
Applying for YouTube monetization on your mobile devices follows the same process as the computer. Only in this case you will using the YouTube Studio app instead of the website. Follow these steps as outlined.
- Open the YouTube Studio mobile app on your Android device.
- Tap Earn from the bottom men
- Tap Apply now to review and accept the base terms.
- Set up an AdSense account as requested, or link an existing active one.
Once you complete these steps on your computer or mobile, In Progress status will surface in the Get Reviewed step. This means that YouTube will review your channel and provide feedback within a month.
What Monetization Review Entails
Once you submit your application, YouTube’s automated systems and human reviewers will look at your channel for a while. They will review it to make sure it follows all the platform’s policies and guidelines. As the reviews are in progress, creators are encouraged to back to the Earn section of YouTube Studio regularly. Typically, you will get the results within a month, but this may be affected by several factors:
- Application Volumes
- Resource Limitations
- System Issues
- Channel requiring several reviewers to determine suitability for YPP
Sometimes the first application may not be successful for some reason. In this case, creators are encouraged to continue uploading original content and try again after 30 days. For second or other rejections, you are allowed to try again after 90 days. During this period, make sure that your channel follows YouTube policies and guidelines to increase your chances of being accepted.
Choose How to Earn
The major way of earning money on YouTube is through ads that show in your videos. In the case of Shorts, the ad-sharing revenue involves YouTube sharing the revenue generated from the ads with creators. However, getting accepted to YPP also allows you to start earning with fan funding and Shopping features. This means that creators can earn money directly from their views using these unique features
YouTube monetization 500 subscribers update allows you to earn money through monetization features that were not there before. This allows creators to interact more with their viewer while generating income. The main fan funding features include:
- Channel Membership: Offer a membership plan to your viewer through monthly payments in exchange for perks like emojis and badges.
- Super Thanks: Earn revenue from viewers who show extra gratitude for your videos.
- Super Stickers and Super Chat: Allows your fans to buy Super Chats that highlight their messages or add fun animated images in the live chat.
- Shopping: Allows you to connect your official merchandise story to YouTube to showcase your products.
Part 3. Edit Your Shorts for Monetization with WonderShare Filmora
The quality of your Shorts plays an essential role in determining whether your channel will be monetized. This is why you need good video editing software to help you present your content in the best way possible. Wondershare Filmora is a great choice when you want your YouTube Shorts to stand out. From cool green screen tricks to auto-reframing your videos for Shorts, Filmora gives you the whole editing package.
Free Download For Win 7 or later(64-bit)
Free Download For macOS 10.14 or later
Filmora offers creators fantastic editing features to create better Shorts. Let’s have a look at some of the features you may find helpful:
1. AI Copywriting
YouTube Shorts require quick content that covers everything within 60 seconds. With the Filmora AI Copywriting feature, you can get inspiration and add text to your videos. Express your thoughts more clearly and generate text that makes the video more engaging.
2. Split Screen Video Editor
YouTube Shorts are limited to a length of 1 minute only. Since 60 seconds is quite a short time, you may want to showcase your content on multiple screens. The Split Screen Video Editor on Filmora allows you to make a split screen instantly. Choose from the readily available templates and show your audience what you want from multiple perspectives in the same video.
3. Motion Tracking
With YouTube Shorts, you need to be more creative. Adding objects to your videos makes them fun and engaging. The motion tracking feature on Filmora allows you to track the movement of an object in the video. You can then pin graphics on the object, making the video more exciting. You can also add specific text and align it to an object, allowing your audience to follow through the story.
4. Speed Ramping
The way you present your video means a lot to the audience. No one wants a boring or a really slow-moving video. With the Speed Ramping feature on Filmora, you can adjust the speed of your Shorts with better control of your keyframes. This allows you to create unique cinematic effects that keep the audience wanting more of the content.
Conclusion
The introduction of the YouTube monetization 500 subscribers’ policy update was a special moment for small YouTubers. It meant that the platform was extending its YPP program to more creators, allowing them to earn money from their content. Lowering the monetization requirement gives more people a chance to make money faster. However, it is important to make sure that your videos are offering value to your audience. We recommend using Wondershare Filmora to edit your videos and make sure they stand out from the competition. The better your videos will be, the more views you will get, and the more money you will make.
Transform Your Twitch Broadcasts for YouTube Viewers
Create High-Quality Video - Wondershare Filmora
An easy and powerful YouTube video editor
Numerous video and audio effects to choose from
Detailed tutorials provided by the official channel
Amidst many online applications is Twitch. This live streaming platform takes your experience to another level. You can use it to make crafts, play games, attract broadcasters, and many more. Twitch was launched in 2011, and since then, it has attracted millions of users, managing a database of about 4 million broadcasters by early 2020. With it, users can stream their activities as others watch in real-time. Just browse a category to find a stream.
You can also follow streamers that you like on the platform and get updates and notifications immediately after they are posted. But how do you start a career on a platform like Twitch? You need to broadcast and gather a large following. You can use built-in audiences from other platforms like Facebook. Let’s dive into the core of the matter and look at how to upload Twitch streams to YouTube and build your platform.

In this article
02 What is the benefit of uploading your Twitch Streams to YouTube
03 How to upload your Twitch Streams to YouTube
What is Twitch VOD?
Twitch Video on Demand (VOD) is a recording of previously streamed content. It provides briefings if you missed catching the Twitch live stream. Just watch the VOD from your favorite streamer and be engaged the best way possible. However, VODs don’t last forever. They are removed after two weeks of broadcast. But streamers with Partner Status can have their VODs last up to 60 days.
- How to enable Twitch VOD?
VODs are the best form to archive streams that your fans missed. Even though they are not enabled by default, you can manually enable them and not let your fans miss any important event from your channel. They’ll find it under the “Videos” tab on any Twitch channel. Follow these steps to enable VOD on your channel.
Step 1. Go to your profile icon in the top right corner of Twitch
Check in the “Channel & Video” section and locate the “Stream Key & Preferences” menu.

Step 2. Click on “Creator Dashboard”
Remember, you can enable VODs from your creator dashboard. Just go under the “Settings” tab and click on the “Stream section” of the creator dashboard. Check under the subtitle “VOD Settings” and get the option to store past broadcasts. You can also toggle the slider to store your past broadcasts.

Step 3 Click on the “Settings” tab on the left-hand side and go to Stream
You’ll get various drop-down menu options. Click on the “Settings” tab and choose the “Stream” option. The system will navigate to a new page, thus setting your preferences for VODs and clips.
Step 4. Go to “VOD Settings” and toggle on the “Store Past Broadcast.”
Ensure you have the toggle option turned ON under the “VOD Settings.” If it’s “ON,” you’ll realize the toggle will be purple, with a checkmark in it. Twitch will be confirmed to be enabled if it’s purple.

- Frequently Asked Question about Twitch VOD
These are some questions frequently asked by Twitch users.
1. How long will Twitch store my VOD
Your Twitch can either be stored for 14 or 60 days, depending on your level. For Twitch Prime, Twitch Partner or a Twitch Turbo user has their past broadcasts automatically saved for 60 days before deletion. But if you are not connected to these three options, your past broadcasts will be saved for only 14 days before deletion.
Since your past broadcasts cannot be live for more than 60 days, you have the option to download the video to your computer before the validity days expire and Twitch deletes it. You can use an External Hard drive to save the past broadcast content. Likewise, it is possible to turn your past broadcast content into Highlight and, in turn, permanently store them on Twitch.
2. What is the difference between Twitch VOD, Highlights, and Clips
Twitch VOD is a previously saved video of your live stream content. You choose to save either part or the entire content of your previously streamed content. More so, you don’t need any additional requirements to use VOD.
Highlights are short videos that have been edited from your past broadcast content. You can save them on Twitch permanently. Streamers majorly use highlights to save video game achievements. Unlike VOD Twitch that can be saved up to 60 days, Highlights usually lasts no more than 3 minutes.
- To make Highlights on Twitch, first, navigate to your Dashboard.
- Then scroll down and click on “Content” > “Video Producer.
- Next, press on “All Videos” to change them to “Past Broadcasts.”
- Now press the “Highlight” button, and Twitch will immediately open a new tab for “Twitch Highlighter Tool.”
- Then select the video part to include as “Highlight” and press the “Create Highlights” button.
- Wait a while for the process to be completed, and Voila! You have your Highlights created.
When it comes to Twitch Clip, you can capture special moments in a stream you are currently watching. On the same note, you can share clips with friends and other users on social media platforms. Such shared clips contain a link where others view the source or video from.
The clips you create will automatically be saved on the streamer’s channel on the “Clips” page, where other viewers can see them too. Nonetheless, you can download “clips” to your computer and, in turn, upload them whenever you want to. And note that you can help your stream grow via “Clips” by letting your viewers clip and share your stream moments.
- To create “Clips” on Twitch, identify which Streamers channel you wish to create a clip from.
- Then click on the “Clapper board” icon. Next, edit your clip between 5 and 60 seconds long.
- Finally, create a title and publish your Clip. You’ll also enjoy the privilege to share your clip’s link to other social media networks.
What is the benefit of uploading your Twitch Streams to YouTube
You stand to gain a lot when you upload your Twitch Streams to YouTube.
1) To enlighten your followers
Your followers will see your streams and make the best decisions. Viewers can check out your recordings and other highlights from past streams. It will help them decide whether they like what they see and probably join your live streams.
2) Twitch provides content for you to share and monetize on YouTube
Since Twitch streaming is more popular nowadays, many people throng it for content. It is not wise to rely entirely on Twitch to discover as a Twitch Streamer. Posting to YouTube will make it known within a short time. You would have announced your streams most nobly and kept your followers up to date, attracting new ones as well.
3) To keep your followers engaged even when you are offline
Even though live streaming is important, some viewers may not attend the live sessions due to different time zones or other commitments. In this regard, when uploaded to YouTube, Twitch will give them a chance to watch your content just whenever they log in. They, therefore, have the option to watch a Twitch VOD of the live stream they missed.
How to upload your Twitch Streams to YouTube
Check how to upload Twitch streams to YouTube from the Twitch website.
Step 1. Identify the little arrow next to your name on the Twitch website and click on it. Then click on the “Video Producer” to take you to a list of your Twitch videos.

Step 2. Check out and click on the “three-dots” on the video you wish to upload to YouTube. Click on the “Export” tab.
Step 3. A menu will then pop up. Here, you can fill in the description, title, and tags that you would like to appear on the YouTube video. There is an option for Twitch to split your video automatically. If you wish so, then tick the “Checkbox” to enable it. Then click on the “Start Export” option to export your Twitch streams to YouTube.

Bouns! Edit Your Twitch Video with Filmora
The quality of your video matters when it comes to uploading Twitch Streams to YouTube. Using a third-party tool to edit your video is the first step in ensuring your videos communicate meaningful content. Filmora comes in handy to bring your imaginations to life. Use it for simple creation without limits, even for beginners.
- Use it to track moving objects in video clips
- Easily match any image of the selected clip
- Its powerful tools let you edit your video by cropping, splitting, adjusting speed, etc
- The video keyframe easily indicates the beginning and end of the parameters
For Win 7 or later (64-bit)
For macOS 10.12 or later
Conclusion
● Don’t just focus on how to upload Twitch streams to YouTube but also consider the quality of video you are posting to YouTube. Remember, your video quality will speak much more of you than any other description. So, strive to produce quality videos using the best tool, Filmora. The app is easy to use and will elevate your views and imaginations through your video in the most impactful way.
Amidst many online applications is Twitch. This live streaming platform takes your experience to another level. You can use it to make crafts, play games, attract broadcasters, and many more. Twitch was launched in 2011, and since then, it has attracted millions of users, managing a database of about 4 million broadcasters by early 2020. With it, users can stream their activities as others watch in real-time. Just browse a category to find a stream.
You can also follow streamers that you like on the platform and get updates and notifications immediately after they are posted. But how do you start a career on a platform like Twitch? You need to broadcast and gather a large following. You can use built-in audiences from other platforms like Facebook. Let’s dive into the core of the matter and look at how to upload Twitch streams to YouTube and build your platform.
In this article
02 What is the benefit of uploading your Twitch Streams to YouTube
03 How to upload your Twitch Streams to YouTube
What is Twitch VOD?
Twitch Video on Demand (VOD) is a recording of previously streamed content. It provides briefings if you missed catching the Twitch live stream. Just watch the VOD from your favorite streamer and be engaged the best way possible. However, VODs don’t last forever. They are removed after two weeks of broadcast. But streamers with Partner Status can have their VODs last up to 60 days.
- How to enable Twitch VOD?
VODs are the best form to archive streams that your fans missed. Even though they are not enabled by default, you can manually enable them and not let your fans miss any important event from your channel. They’ll find it under the “Videos” tab on any Twitch channel. Follow these steps to enable VOD on your channel.
Step 1. Go to your profile icon in the top right corner of Twitch
Check in the “Channel & Video” section and locate the “Stream Key & Preferences” menu.
Step 2. Click on “Creator Dashboard”
Remember, you can enable VODs from your creator dashboard. Just go under the “Settings” tab and click on the “Stream section” of the creator dashboard. Check under the subtitle “VOD Settings” and get the option to store past broadcasts. You can also toggle the slider to store your past broadcasts.
Step 3 Click on the “Settings” tab on the left-hand side and go to Stream
You’ll get various drop-down menu options. Click on the “Settings” tab and choose the “Stream” option. The system will navigate to a new page, thus setting your preferences for VODs and clips.
Step 4. Go to “VOD Settings” and toggle on the “Store Past Broadcast.”
Ensure you have the toggle option turned ON under the “VOD Settings.” If it’s “ON,” you’ll realize the toggle will be purple, with a checkmark in it. Twitch will be confirmed to be enabled if it’s purple.
- Frequently Asked Question about Twitch VOD
These are some questions frequently asked by Twitch users.
1. How long will Twitch store my VOD
Your Twitch can either be stored for 14 or 60 days, depending on your level. For Twitch Prime, Twitch Partner or a Twitch Turbo user has their past broadcasts automatically saved for 60 days before deletion. But if you are not connected to these three options, your past broadcasts will be saved for only 14 days before deletion.
Since your past broadcasts cannot be live for more than 60 days, you have the option to download the video to your computer before the validity days expire and Twitch deletes it. You can use an External Hard drive to save the past broadcast content. Likewise, it is possible to turn your past broadcast content into Highlight and, in turn, permanently store them on Twitch.
2. What is the difference between Twitch VOD, Highlights, and Clips
Twitch VOD is a previously saved video of your live stream content. You choose to save either part or the entire content of your previously streamed content. More so, you don’t need any additional requirements to use VOD.
Highlights are short videos that have been edited from your past broadcast content. You can save them on Twitch permanently. Streamers majorly use highlights to save video game achievements. Unlike VOD Twitch that can be saved up to 60 days, Highlights usually lasts no more than 3 minutes.
- To make Highlights on Twitch, first, navigate to your Dashboard.
- Then scroll down and click on “Content” > “Video Producer.
- Next, press on “All Videos” to change them to “Past Broadcasts.”
- Now press the “Highlight” button, and Twitch will immediately open a new tab for “Twitch Highlighter Tool.”
- Then select the video part to include as “Highlight” and press the “Create Highlights” button.
- Wait a while for the process to be completed, and Voila! You have your Highlights created.
When it comes to Twitch Clip, you can capture special moments in a stream you are currently watching. On the same note, you can share clips with friends and other users on social media platforms. Such shared clips contain a link where others view the source or video from.
The clips you create will automatically be saved on the streamer’s channel on the “Clips” page, where other viewers can see them too. Nonetheless, you can download “clips” to your computer and, in turn, upload them whenever you want to. And note that you can help your stream grow via “Clips” by letting your viewers clip and share your stream moments.
- To create “Clips” on Twitch, identify which Streamers channel you wish to create a clip from.
- Then click on the “Clapper board” icon. Next, edit your clip between 5 and 60 seconds long.
- Finally, create a title and publish your Clip. You’ll also enjoy the privilege to share your clip’s link to other social media networks.
What is the benefit of uploading your Twitch Streams to YouTube
You stand to gain a lot when you upload your Twitch Streams to YouTube.
1) To enlighten your followers
Your followers will see your streams and make the best decisions. Viewers can check out your recordings and other highlights from past streams. It will help them decide whether they like what they see and probably join your live streams.
2) Twitch provides content for you to share and monetize on YouTube
Since Twitch streaming is more popular nowadays, many people throng it for content. It is not wise to rely entirely on Twitch to discover as a Twitch Streamer. Posting to YouTube will make it known within a short time. You would have announced your streams most nobly and kept your followers up to date, attracting new ones as well.
3) To keep your followers engaged even when you are offline
Even though live streaming is important, some viewers may not attend the live sessions due to different time zones or other commitments. In this regard, when uploaded to YouTube, Twitch will give them a chance to watch your content just whenever they log in. They, therefore, have the option to watch a Twitch VOD of the live stream they missed.
How to upload your Twitch Streams to YouTube
Check how to upload Twitch streams to YouTube from the Twitch website.
Step 1. Identify the little arrow next to your name on the Twitch website and click on it. Then click on the “Video Producer” to take you to a list of your Twitch videos.
Step 2. Check out and click on the “three-dots” on the video you wish to upload to YouTube. Click on the “Export” tab.
Step 3. A menu will then pop up. Here, you can fill in the description, title, and tags that you would like to appear on the YouTube video. There is an option for Twitch to split your video automatically. If you wish so, then tick the “Checkbox” to enable it. Then click on the “Start Export” option to export your Twitch streams to YouTube.
Bouns! Edit Your Twitch Video with Filmora
The quality of your video matters when it comes to uploading Twitch Streams to YouTube. Using a third-party tool to edit your video is the first step in ensuring your videos communicate meaningful content. Filmora comes in handy to bring your imaginations to life. Use it for simple creation without limits, even for beginners.
- Use it to track moving objects in video clips
- Easily match any image of the selected clip
- Its powerful tools let you edit your video by cropping, splitting, adjusting speed, etc
- The video keyframe easily indicates the beginning and end of the parameters
For Win 7 or later (64-bit)
For macOS 10.12 or later
Conclusion
● Don’t just focus on how to upload Twitch streams to YouTube but also consider the quality of video you are posting to YouTube. Remember, your video quality will speak much more of you than any other description. So, strive to produce quality videos using the best tool, Filmora. The app is easy to use and will elevate your views and imaginations through your video in the most impactful way.
Also read:
- [New] Digital Recorder Snap Your Screen, Upload to YouTube Online/PC/Mac
- Cultivate Creativity 10+ Channel-Driven Video Suggestions for 2024
- [New] Beginner's Blueprint for Online Content Simple, Straightforward Video Projects
- 2024 Approved Chart-Toppers on Screen Uploading Songs Methodically
- How to Convert YouTube Videos to GIFs [No Download]
- [New] Earning Edge Reached for Subscribers Above 500
- In 2024, Are There Benefits to Purchasing YouTube Engagement?
- [New] Boosting Views with Customized Thumbnail Sizes on YouTube
- Redefine Small Screen Experience Explore These Top 6 Freely Available YouTube Shorts Downloader Tools
- Transforming View Counts with Strategic Video Tagging Techniques
- [New] Efficiently Shifting Videos YouTube to Dailymotion Strategy
- What’s the Best Voice Changer for YouTubers?
- [New] Beware The Risk in Fake Followers on YouTube
- The Powerhouses Unveiling Top 10 Most Subscribed YouTube Stars
- Video Integration YouTube Images in Slide Decks
- [Updated] Beats & Banners Discovering Premium DJ Templates
- Mastering Content Sharing on YouTube Without Breaching Copyright
- Demystifying Income Flow to Creators Within the Short Video Model
- Step-by-Step Guide Embedding Company Imagery in Video Posts
- Saved the Day! Downloading YouTube Playlists Made Easy
- In 2024, Combat Common YouTube Short Obstacles
- Revolutionize Your Video Presence with Personalized Shorts Thumbnails
- Guide Deleting Items From Your YouTube'umbers List
- 2024 Approved Breaking the Cycle of Zero Video Views on YouTube
- [Updated] 10 Comprehensible & Cost-Free Subtitle Downloader Sites
- Ignite Conversations Top 10 Creative Reaction Insights for Videos
- Unleashing YouTube Potential with Effective SEO Methods (1-11)
- In 2024, Beginner's Blueprint for YouTube Income Growth
- The Formula for YouTube Money Decoding Revenue and CPM Rates
- [Updated] Apple's Mobile Posting Playbook for YouTube Success
- Win11's Leading Free Screen Capture Software Ranked #1-5
- In 2024, Forgot iPhone Passcode Again? Unlock iPhone 6s Plus Without Passcode Now | Dr.fone
- Updated Audiophiles Handbook Advanced iMovie Audio Editing Mastery for 2024
- The Ultimate Guide to Free Video Playback VLC or MPC?
- Updated 2024 Approved Efficient Techniques for Transferring Audacity Tracks Into MP3 Files
- [New] In 2024, Unleash Your Fun with Today's Favorite TikToks
- [Updated] In 2024, Ballot Battlegrounds Prime Political Games Guide
- How To Transfer Data From iPhone X To Other iPhone devices? | Dr.fone
- Breaking Down the Mechanics of Meme Dominance for 2024
- [Updated] 2024 Approved Essential Pick for Retro Gaming Top 5 Android Tools for PS2 Titles
- Why Is My Vivo Y200 Offline? Troubleshooting Guide | Dr.fone
- Excellence Squad Selecting Top 7 FPS Games for 2024
- Unlocking Lenovo's Full Potential with Screen Recordings for 2024
- 2024 Approved Join in Fun This Week's Top 10 Challenges
- [Updated] In 2024, Windows Snapshot Mastery (3 Easy Approaches)
- New 2024 Approved How to Add Text in Adobe Rush
- [Updated] 2024 Approved Navigating Insta’s Archive Maze for Optimal Results
- [New] In 2024, Essential Tools for Documenting Computer Speakers & Mics
- Title: "In 2024, Achieve Financial Success on YouTube Start at 500 Views"
- Author: Kevin
- Created at : 2024-05-25 15:23:10
- Updated at : 2024-05-26 15:23:10
- Link: https://youtube-videos.techidaily.com/in-2024-achieve-financial-success-on-youtube-start-at-500-views/
- License: This work is licensed under CC BY-NC-SA 4.0.
