
:max_bytes(150000):strip_icc()/duetinslides-fd2c11f1a91a4d7388cc25f2f4719cca.jpg)
"In 2024, A Step-by-Step Guide to Embedding Timestamp Metadata"
A Step-by-Step Guide to Embedding Timestamp Metadata
How to Add Timestamps on YouTube Video Link?

Richard Bennett
Mar 27, 2024• Proven solutions
It is a well-known fact that internet users have a short interest span, about just eight seconds. This attention span applies to all internet platforms including YouTube. YouTube is the second largest and most visited search engine after Google. It provides users with information through engaging and eye-catchy videos. However, certain videos are longer where only a particular section of the video holds the important information. Viewers tend to skip the long videos and if you do not want this to happen to you, you can link to that specific part on your video adding value for your channel viewers with a link known as the YouTube Timestamp link.
When you have a Timestamp link on your video, you can help your viewers directly reach the specific time in the video. This helps avoid the viewers from losing interest or to search for the key part in your video themselves.
Here in this article, we will explain Timestamp links, how to add Timestamp to YouTube video links, and what are the benefits of Timestamp.
- Part 1: YouTube Timestamp Links Introduction
- Part 2: Adding a Timestamp to YouTube Video Link on Desktop
- Part 3: How to Share Specific Parts of YouTube Video
- part 4: Getting YouTube Timestamp Link on Mobile
- Part 5: FAQ About YouTube Timestamps
Part 1: What is YouTube Timestamp Links
In this fast-paced world where viewers have limited time at hand, YouTube Timestamp links are extremely helpful. These links are anchor text or video hyperlinks found either in the description beneath the video or at the video link end.

The Timestamps links allow you to put a link to a key moment in your YouTube video allowing the viewers and subscribers to view the video at the precise time specified. Your YouTube video maybe half an hour long or maybe your users do not have the time now or forget to later watch your video, but when you add Timestamp to the YouTube link, you provide them ways to get to the content quickly enhancing the user experience.
In addition to this, you can even provide a reference in minutes and hours where necessary. The YouTube Timestamp link acts as a guide that directs viewers to the part of the video, which is most relevant to them without having to watch the entire video.
Part 2: How to Add a Timestamp to YouTube Video Link on Desktop?
In the following section, I will show you how to add timestamp to YouTube video link in several ways.
Use YouTube’s Share Feature
Using YouTube’s share feature is the simplest way to add Timestamp to YouTube videos. Here are easy steps to follow to do this.
- Open the YouTube video on your desktop that you want to share.
- Play the video or navigate the timeline and stop at the key moment you wish to apply the timestamp to.
- Now click on the Share button, a pop-up will appear. Under the URL, you will see a small box indicating Start at. The Timestamp is generated automatically, but you can adjust it.

- Copy the updated URL with Timestamp to share the video or click on the social sharing icons to do so.
- When your viewers click on this URL, the video will begin at the specified Timestamp.
Use the Browser URL to add Timestamp manually
You can add Timestamp manually as well. Follow the step-by-step guide below to add a Timestamp manually.
- Open your YouTube video in a browser on your desktop and then find the URL in the browser’s address bar.
- Enter the specific time you want the viewers to watch the video from at the end of the video URL.
You can add time manually in two ways depending on the URL.
?t=As or
&t=As
“youtu.be/” Format
If your YouTube video link is a youtu.be format, then just add ?t=As at the end of the video link. The A denotes the seconds at which you want the viewer to watch your video. The time can also be specified in minutes and seconds and when you want to do that just add ?t=AmBs. For instance, ?t=2m40s.
“youtube.com/” Format
When your YouTube video link has a youtube.com format, the adjustment starts with an ampersand. &t=As or &t=AmBs is what you can use. If you are looking to add the Timestamp at 2m40s, just add “&t=2m40s at the end of the video URL.
Whenever anybody uses the URL with Timestamp, the video will start from the specified time.
However, when adding a Timestamp manually, always leave include whole numbers. For example, if the time starts at 4m, use 4 and not 04.
Copy video URL at current time
You can use YouTube’s built-in feature to share the key parts of your YouTube video. Follow the steps here.
- Visit YouTube and open the video you want to add Timestamp link to.
- Play the video or navigate the timeline to reach the specific part you like to use in Timestamp.
- Now either press Ctrl + click or right-click anywhere on the video. A pop-up opens where you can see various texts, click on the Copy video URL at current time and share the link.

- Anyone who clicks on this link will be instantly transported to the exact segment of your YouTube video.
Part 3: How to Share Specific Parts of Videos with Vibby and Get YouTube Link with Timestamp
The above-mentioned methods to add and send YouTube link with timestamp are quick and easy, but they have a few limitations. If you need more control and share highlighted parts of YouTube video without cutting the video, you need to use a third-party tool known as Vibby.
Vibby allows you to not only share specific parts of videos from YouTube but other platforms as well like Vimeo and Twitch. With the tool, you can clip multiple sections of the video and share them with others.
- To get started, signup either with mail, Google, Twitter, Facebook, or Twitch account.
- Once signed in, go to Create vib at the top left corner and then paste the URL of the YouTube video you would like to share and then click on the Start button.

- Your video will load in the Vibby editor, now click on Highlight the parts to share.
- Here you will see the Start highlight button, jump 5-sec option, option to switch between HD and SD video quality, and volume control button. Navigate to the part you want to share and click on Start highlight.

- When you reach the end of the part, click on Finish highlight. Repeat the process to highlight multiple parts of the video. All the highlighted parts will appear in a list on the right side of the screen.
- Add a description to each part and format it, you have the option to preview before hitting the Save vib button.
- Name the vib and assign a category and then publish it to Vibby or make it a private vib.
- You get a dedicated link to your vib with the ability to embed it on your website or blog.
In this way, you can share the highlights of the YouTube video or Vimeo video easily.
Part 4: How to Get YouTube Timestamp Link on iPhone and Android?
Linking to specific YouTube Timestamp Link is straightforward on both iPhone and Android.
- Go to YouTube and select the video you want to share.
- Move through the progress bar of the video to reach the key part and click on the Share button.
- A pop-up menu appears, highlight the URL and click on the Copy button.
- Paste the URL and manually add the Timestamp using the steps mentioned in add a Timestamp manually.
Part 5: Is Timestamp Beneficial for your Video?
Timestamping your YouTube videos may decrease the watch time, but it enhances the user experience, and they want to see more of your videos. Apart from this, adding Timestamps to your videos make your videos discoverable through Google search. YouTube and Google will reward you for the videos in form of a high search engine ranking.
Bonus: How to Add YouTube Timestamp Link in YouTube Video Description
Adding a YouTube Timestamp link in your video description is easy. Here are the steps to do so.
- Go to your YouTube channel and select the video you want to add Timestamp to and then navigate to the description below it.
- Edit the description by clicking on the Edit Video button.
- You are redirected to the Video Details page. Here write 0:00 at the first part of the timecode, and then continue with the time of the key part of the video you want to add the Timestamp to in 2:40 format. You can add more Timestamp as well and then click on the Save button.

- Reload the video page and you will see auto-generated Timestamp Links at the specific time you provided in the description.
Note: You need to add at least three timestamps which are 10 seconds or longer in order to add timestamps successfully.
Conclusion
As much as possible YouTubers want to make videos short and to the point. However, if a video needs to be longer, you can still help users navigate through to find what is important to them by adding Timestamp to YouTube link or Timestamp the YouTube descriptions. This can help your viewers jump straight to the interesting part in the video, rather than viewing the entire video saving their time and boost user experience.
Richard Bennett
Richard Bennett is a writer and a lover of all things video.
Follow @Richard Bennett
Richard Bennett
Mar 27, 2024• Proven solutions
It is a well-known fact that internet users have a short interest span, about just eight seconds. This attention span applies to all internet platforms including YouTube. YouTube is the second largest and most visited search engine after Google. It provides users with information through engaging and eye-catchy videos. However, certain videos are longer where only a particular section of the video holds the important information. Viewers tend to skip the long videos and if you do not want this to happen to you, you can link to that specific part on your video adding value for your channel viewers with a link known as the YouTube Timestamp link.
When you have a Timestamp link on your video, you can help your viewers directly reach the specific time in the video. This helps avoid the viewers from losing interest or to search for the key part in your video themselves.
Here in this article, we will explain Timestamp links, how to add Timestamp to YouTube video links, and what are the benefits of Timestamp.
- Part 1: YouTube Timestamp Links Introduction
- Part 2: Adding a Timestamp to YouTube Video Link on Desktop
- Part 3: How to Share Specific Parts of YouTube Video
- part 4: Getting YouTube Timestamp Link on Mobile
- Part 5: FAQ About YouTube Timestamps
Part 1: What is YouTube Timestamp Links
In this fast-paced world where viewers have limited time at hand, YouTube Timestamp links are extremely helpful. These links are anchor text or video hyperlinks found either in the description beneath the video or at the video link end.
The Timestamps links allow you to put a link to a key moment in your YouTube video allowing the viewers and subscribers to view the video at the precise time specified. Your YouTube video maybe half an hour long or maybe your users do not have the time now or forget to later watch your video, but when you add Timestamp to the YouTube link, you provide them ways to get to the content quickly enhancing the user experience.
In addition to this, you can even provide a reference in minutes and hours where necessary. The YouTube Timestamp link acts as a guide that directs viewers to the part of the video, which is most relevant to them without having to watch the entire video.
Part 2: How to Add a Timestamp to YouTube Video Link on Desktop?
In the following section, I will show you how to add timestamp to YouTube video link in several ways.
Use YouTube’s Share Feature
Using YouTube’s share feature is the simplest way to add Timestamp to YouTube videos. Here are easy steps to follow to do this.
- Open the YouTube video on your desktop that you want to share.
- Play the video or navigate the timeline and stop at the key moment you wish to apply the timestamp to.
- Now click on the Share button, a pop-up will appear. Under the URL, you will see a small box indicating Start at. The Timestamp is generated automatically, but you can adjust it.
- Copy the updated URL with Timestamp to share the video or click on the social sharing icons to do so.
- When your viewers click on this URL, the video will begin at the specified Timestamp.
Use the Browser URL to add Timestamp manually
You can add Timestamp manually as well. Follow the step-by-step guide below to add a Timestamp manually.
- Open your YouTube video in a browser on your desktop and then find the URL in the browser’s address bar.
- Enter the specific time you want the viewers to watch the video from at the end of the video URL.
You can add time manually in two ways depending on the URL.
?t=As or
&t=As
“youtu.be/” Format
If your YouTube video link is a youtu.be format, then just add ?t=As at the end of the video link. The A denotes the seconds at which you want the viewer to watch your video. The time can also be specified in minutes and seconds and when you want to do that just add ?t=AmBs. For instance, ?t=2m40s.
“youtube.com/” Format
When your YouTube video link has a youtube.com format, the adjustment starts with an ampersand. &t=As or &t=AmBs is what you can use. If you are looking to add the Timestamp at 2m40s, just add “&t=2m40s at the end of the video URL.
Whenever anybody uses the URL with Timestamp, the video will start from the specified time.
However, when adding a Timestamp manually, always leave include whole numbers. For example, if the time starts at 4m, use 4 and not 04.
Copy video URL at current time
You can use YouTube’s built-in feature to share the key parts of your YouTube video. Follow the steps here.
- Visit YouTube and open the video you want to add Timestamp link to.
- Play the video or navigate the timeline to reach the specific part you like to use in Timestamp.
- Now either press Ctrl + click or right-click anywhere on the video. A pop-up opens where you can see various texts, click on the Copy video URL at current time and share the link.
- Anyone who clicks on this link will be instantly transported to the exact segment of your YouTube video.
Part 3: How to Share Specific Parts of Videos with Vibby and Get YouTube Link with Timestamp
The above-mentioned methods to add and send YouTube link with timestamp are quick and easy, but they have a few limitations. If you need more control and share highlighted parts of YouTube video without cutting the video, you need to use a third-party tool known as Vibby.
Vibby allows you to not only share specific parts of videos from YouTube but other platforms as well like Vimeo and Twitch. With the tool, you can clip multiple sections of the video and share them with others.
- To get started, signup either with mail, Google, Twitter, Facebook, or Twitch account.
- Once signed in, go to Create vib at the top left corner and then paste the URL of the YouTube video you would like to share and then click on the Start button.
- Your video will load in the Vibby editor, now click on Highlight the parts to share.
- Here you will see the Start highlight button, jump 5-sec option, option to switch between HD and SD video quality, and volume control button. Navigate to the part you want to share and click on Start highlight.
- When you reach the end of the part, click on Finish highlight. Repeat the process to highlight multiple parts of the video. All the highlighted parts will appear in a list on the right side of the screen.
- Add a description to each part and format it, you have the option to preview before hitting the Save vib button.
- Name the vib and assign a category and then publish it to Vibby or make it a private vib.
- You get a dedicated link to your vib with the ability to embed it on your website or blog.
In this way, you can share the highlights of the YouTube video or Vimeo video easily.
Part 4: How to Get YouTube Timestamp Link on iPhone and Android?
Linking to specific YouTube Timestamp Link is straightforward on both iPhone and Android.
- Go to YouTube and select the video you want to share.
- Move through the progress bar of the video to reach the key part and click on the Share button.
- A pop-up menu appears, highlight the URL and click on the Copy button.
- Paste the URL and manually add the Timestamp using the steps mentioned in add a Timestamp manually.
Part 5: Is Timestamp Beneficial for your Video?
Timestamping your YouTube videos may decrease the watch time, but it enhances the user experience, and they want to see more of your videos. Apart from this, adding Timestamps to your videos make your videos discoverable through Google search. YouTube and Google will reward you for the videos in form of a high search engine ranking.
Bonus: How to Add YouTube Timestamp Link in YouTube Video Description
Adding a YouTube Timestamp link in your video description is easy. Here are the steps to do so.
- Go to your YouTube channel and select the video you want to add Timestamp to and then navigate to the description below it.
- Edit the description by clicking on the Edit Video button.
- You are redirected to the Video Details page. Here write 0:00 at the first part of the timecode, and then continue with the time of the key part of the video you want to add the Timestamp to in 2:40 format. You can add more Timestamp as well and then click on the Save button.
- Reload the video page and you will see auto-generated Timestamp Links at the specific time you provided in the description.
Note: You need to add at least three timestamps which are 10 seconds or longer in order to add timestamps successfully.
Conclusion
As much as possible YouTubers want to make videos short and to the point. However, if a video needs to be longer, you can still help users navigate through to find what is important to them by adding Timestamp to YouTube link or Timestamp the YouTube descriptions. This can help your viewers jump straight to the interesting part in the video, rather than viewing the entire video saving their time and boost user experience.
Richard Bennett
Richard Bennett is a writer and a lover of all things video.
Follow @Richard Bennett
Monetization Strategies for Gamers
Gone is when playing video games was strictly for entertainment. These days, you can record and share your gaming skills on YouTube and earn a fortune. A good example is Techno Gamerz. This YouTube channel has over 29 million subscribers, and it’s believed to be among the fastest-growing channels in India. In fact, the channel recently crossed the 1 billion views mark.

Now, this begs the query; what is the Techno Gamerz income on YouTube? This article discusses everything you need to know about the young YouTube gamer, from his monthly and yearly payments to his net worth.
Meta Description: This article discusses the brains behind the popular Techno Gamerz YouTube channel. You’ll learn about the Techno Gamerz income, age, gender, nationality, and more.
Part 1: Summary Box on Techno Gamerz
| Name | Ujjwal Chaurasia |
|---|---|
| Net worth in USD (2022) | $2 million |
| Monthly income and salary | RS.15 Lakh+ |
| Yearly income and salary | 1.5 Crore |
| Age | 20 years (born January 12, 2002) |
| Gender | Male |
| Nationality | Indian |
| Height | 5.5 inches |
| Profession | YouTuber |
| YouTube channel | Techno Gamerz |
| Awards and recognition | Diamond, Gold, and Silver play buttons |
Up to this point, you should have a brief overview of who Techno Gamerz is and what he does to earn such staggering figures on YouTube. So, the next section discusses his income in detail and what makes this YouTuber so famous. Keep reading!
Part 2: Techno Gamerz YouTube Earning and Stats
Ujjwal Chaurasia, alias Techno Gamerz, was born and grew up in New Delhi, India. The charismatic vlogger first joined YouTube on August 13, 2017, and uploaded his first gaming video on January 2018. Initially, Ujjwal used his elder brother’s phone to post gaming tutorial videos. This obviously limited his input on YouTube as he also had to set aside time for studying.

But after seeing potential in what Techno Gamerz was doing, his brother encouraged him to post more often. His first viral video was for Dragon Ball Z, a downloading tutorial. This video garnered a massive 250K views, boosting his channel’s profile. The young YouTube star has never looked back since then.
Meantime, you must be asking yourself how YouTube generates income in India. It’s simple; via AdSense! YouTube’s RPM (Revenue Per Mile) metric per 1,000 views varies between countries. In India, the video-sharing platform pays $0.50 per 1,000 views. This means that Indian YouTube teachers and influencers can earn $500 after garnering 1 million views.
But nothing is cast in stone on YouTube. Most Indian channels can earn between $800 and $2,500 after reaching 1 million views. However, this depends on where you get the most views from. For example, if at least half of your views are from the US, you’ll earn at least $1,500. Techno Gamerz YouTube income per 1,000 views is approximately $1.21.
Remember that there are some conditions to meet before you start earning money on YouTube. First, the channel must be active for at least a year and have a minimum of 1,000 subscribers. That’s not all; you’ll need nothing less than 4,000 watch hours to be on YouTube’s payroll.
With that said, below are some YouTube stats about the Techno Gamerz monthly income, number of views, and more:
| Estimated Monthly earnings in USD/Indian rupees | $167K |
|---|---|
| Estimated Yearly earnings in USD/Indian rupees | $8.6 million |
| Total video uploads | 858 |
| Type of videos | Gaming tutorials |
| Subscribers | 29 million |
| Video views | 7.5 billion |
| Last 30 days’ views | 7 million |
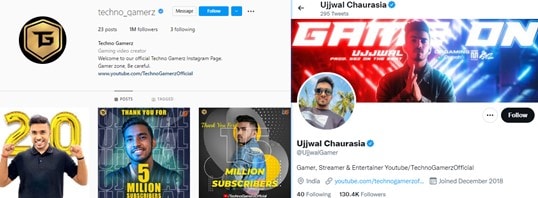
As expected, Ujjwal Chaurasia has a massive following on other social media platforms, especially on Instagram. Here, the 20-year-old has more than 2 million followers and over 250K likes on “ujjwalgamer.” He usually posts selfies, pictures, and a few gaming contents on Instagram. Ujjwal’s engagement rate on Instagram is around 12.5%.

He also has another Instagram account called “Techno_Gamerz ,” which has over 1M followers and over 120K likes. Ujjwal uses this account to keep his followers abreast of what’s happening on his YouTube channel and give hints of future releases. He also posts subscriber milestones. His Twitter account is “Ujjwal Chaurasia ,” with over 116K followers and around 290 posts.
Ujjwal is also venturing into music lately, specifically Hip Hop. He partnered with one of India’s most prominent producers, Sez on the Beat, to release Game On. This music tells a tale of how Chaurasia started from zero subscribers to more than 10 million. Currently, this single boasts over 62 million views.
Part 3: Why Is Techno Gamerz Trending on YouTube?
The Techno Gamerz earnings are certainly no fluke. Many YouTube careers come crashing down before they even start. You’ll even need to congratulate yourself for earning just $100 on YouTube. So, what makes Techno Gamers a darling to many YouTubers?
1. Engaging and interactive videos
YouTube is a very competitive video-sharing platform, and Techno Gamerz knows this fact quite well. Techno Gamerz adds funny and interactive commentary to his YouTube gaming videos to make them more interactive. Many YouTubers also love his confidence and composure in front of the camera.
2. Captivating story and continuity
One major thing you’ll see about all of Techno Gamerz’s videos is continuity. The YouTuber churns out new content every couple of days, keeping his fans entertained at all times. Also, Techno Gamerz always does a recap on his previous episodes to ensure that viewers can keep up with the pace. He even admitted in an interview that it’s critical for his audience to follow the storyline, making watching series like GTA V more interesting.
3. Single and multiplayer tutorials
Techno Gamerz’s tutorials consist of single and multiplayer games. He says that single-player games bring out his character’s awesomely powerful and superior side. He also admitted that he loves multiplayer games’ unpredictable and challenging nature.
Something about Techno Gamerz’s most loved videos
As said before, Dragon Ball Z was the YouTuber’s first upload on the platform. Then in January 2018, he went ahead to upload PUBG videos, but his breakthrough came when he switched to GTA. Up to now, he has posted 140+ GTA 5 episodes, which are famous for their unique storylines. Interestingly, each of his GTA videos has 5+ million views.
But to be one of the most popular YouTubers, you’ll need diversity. Techno Gamerz has this in abundance. His “Grandpa and Granny Two Hunters” video has 10+ million views. It’s a horror game where Techno Gamerz plays the scary granny with insane tricks.
His other videos, “BeamNG” and “Just Draw,” have more than 12 million and 13 million views, respectively. GTA V is the most loved by his audience, with over 30 million views.
Bonus Tip: How To Be a YouTuber and Make Videos Like Techno Gamerz
Evidently, you need to create compelling videos to increase your chances of getting over 1 million views and matching the Techno Gamerz salary. So, what makes a great YouTube video? The perfect YouTube videos should have a catchy intro, voice overlays, picture-in-picture effects, background audio, and more. You can also include elements like timers, subtitles, and effect overlays.
Thankfully, Wondershare Filmora comes with all these features and many more. It’s a macOS/iPadOS/Windows program that allows you to record Techno Gamerz-like videos with a live microphone commentary. After recording the video, add it to the editing timeline to customize it with stunning plugin effects, texts, transitions, subtitles, background music, and more. You also can explore features like motion tracking, key framing, speed ramping, and split screen if it’s a fast-paced video like GTA.
Let’s learn how to create and edit a YouTube video on Filmora 11:
Free Download For Win 7 or later(64-bit)
Free Download For macOS 10.14 or later
Step1 Start a new video project
Install and run Filmora 11 on your computer and choose the 16:9 aspect ratio for YouTube videos. Then, start a New Project.
Step2 Import the YouTube video tutorial
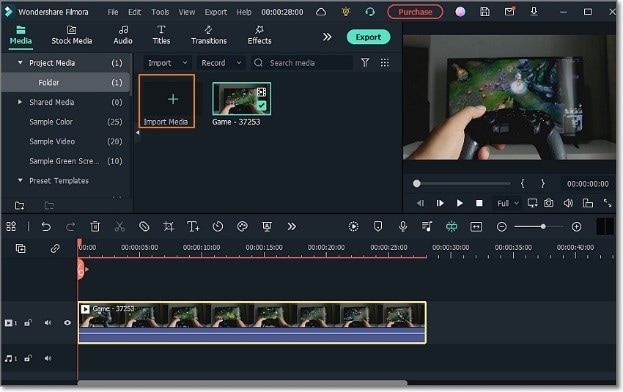
Now click the Import Media button to open a video file from your local storage. You can add multiple media files before moving them to the storyboard.
Step3 Edit your gaming video
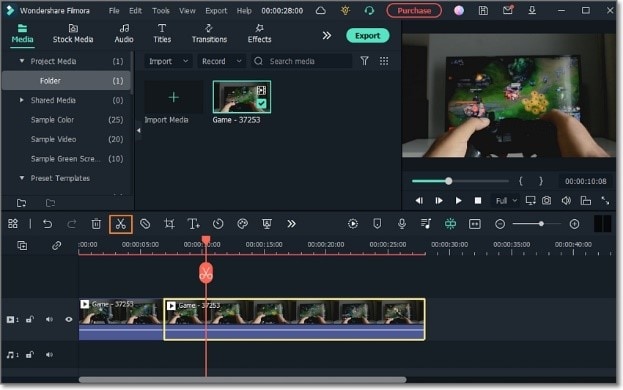
Start by trimming your video to remove the noisy or unwanted parts. To trim and split a video, place the playhead where you want to cut and press the Split button. Repeat the same procedure to cut out a clip and delete it.
Your YouTube gaming tutorial also needs subtitles to stand out from the crowd. Select the YouTube video clip and click the Speech-to-Text button. Once the Speech-to-Text feature is active, select the translation language to start creating subtitles. Remember, you can edit and download the subtitle tracks as a .txt or .srt file.
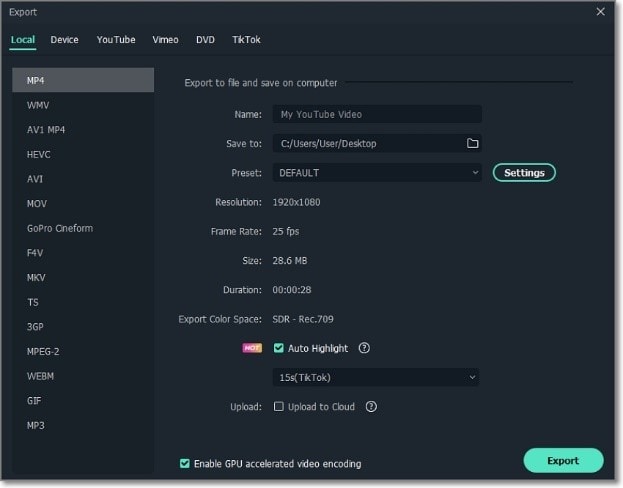
Step4 Convert the video and upload it on YouTube
If you’re satisfied with the edited video, click the Export button, then select MP4, WebM, or MP4 AV1 as the target format. Now name your video, choose a folder path, and export it. Remember that you can also directly upload videos on YouTube by clicking the YouTube tab.
Hot FAQs on Techno Gamerz
1. Who earns more between Techno Gamerz and Carry Minati?
Techno Gamerz is not alone in Indian YouTube vlogging. CarryMinati is another top YouTuber in India, with 36.90 million followers. This YouTuber earns more than 25 Lakhs per month with annual revenue of at least 3 Crore Rupees. According to reports, Carry Minati (Ajey Nagar) has over $5 million in net worth.
2. How much does Techno Gamerz earn from one video?
It depends on the number of views. According to reports, this popular Indian YouTuber earns over $1.21 per 1,000 views. He has over 7.5 billion views currently.
3. What does Techno Gamerz do for a living?
Techno Gamerz’s primary source of income is YouTubing. This is where the 20-year-old earns most of his dollars.
Final Words
YouTubing can pay top money as long as you do it professionally. But it may need a lot of hard work and patience to start earning on YouTube. Also, invest in a powerful, all-in-one video editor for vloggers like Filmora 11. So, are you ready to start making the Techno Gamerz monthly income from YouTube? Give it a try!
Free Download For Win 7 or later(64-bit)
Free Download For macOS 10.14 or later
Up to this point, you should have a brief overview of who Techno Gamerz is and what he does to earn such staggering figures on YouTube. So, the next section discusses his income in detail and what makes this YouTuber so famous. Keep reading!
Part 2: Techno Gamerz YouTube Earning and Stats
Ujjwal Chaurasia, alias Techno Gamerz, was born and grew up in New Delhi, India. The charismatic vlogger first joined YouTube on August 13, 2017, and uploaded his first gaming video on January 2018. Initially, Ujjwal used his elder brother’s phone to post gaming tutorial videos. This obviously limited his input on YouTube as he also had to set aside time for studying.
But after seeing potential in what Techno Gamerz was doing, his brother encouraged him to post more often. His first viral video was for Dragon Ball Z, a downloading tutorial. This video garnered a massive 250K views, boosting his channel’s profile. The young YouTube star has never looked back since then.
Meantime, you must be asking yourself how YouTube generates income in India. It’s simple; via AdSense! YouTube’s RPM (Revenue Per Mile) metric per 1,000 views varies between countries. In India, the video-sharing platform pays $0.50 per 1,000 views. This means that Indian YouTube teachers and influencers can earn $500 after garnering 1 million views.
But nothing is cast in stone on YouTube. Most Indian channels can earn between $800 and $2,500 after reaching 1 million views. However, this depends on where you get the most views from. For example, if at least half of your views are from the US, you’ll earn at least $1,500. Techno Gamerz YouTube income per 1,000 views is approximately $1.21.
Remember that there are some conditions to meet before you start earning money on YouTube. First, the channel must be active for at least a year and have a minimum of 1,000 subscribers. That’s not all; you’ll need nothing less than 4,000 watch hours to be on YouTube’s payroll.
With that said, below are some YouTube stats about the Techno Gamerz monthly income, number of views, and more:
| Estimated Monthly earnings in USD/Indian rupees | $167K |
|---|---|
| Estimated Yearly earnings in USD/Indian rupees | $8.6 million |
| Total video uploads | 858 |
| Type of videos | Gaming tutorials |
| Subscribers | 29 million |
| Video views | 7.5 billion |
| Last 30 days’ views | 7 million |
As expected, Ujjwal Chaurasia has a massive following on other social media platforms, especially on Instagram. Here, the 20-year-old has more than 2 million followers and over 250K likes on “ujjwalgamer.” He usually posts selfies, pictures, and a few gaming contents on Instagram. Ujjwal’s engagement rate on Instagram is around 12.5%.
He also has another Instagram account called “Techno_Gamerz ,” which has over 1M followers and over 120K likes. Ujjwal uses this account to keep his followers abreast of what’s happening on his YouTube channel and give hints of future releases. He also posts subscriber milestones. His Twitter account is “Ujjwal Chaurasia ,” with over 116K followers and around 290 posts.
Ujjwal is also venturing into music lately, specifically Hip Hop. He partnered with one of India’s most prominent producers, Sez on the Beat, to release Game On. This music tells a tale of how Chaurasia started from zero subscribers to more than 10 million. Currently, this single boasts over 62 million views.
Part 3: Why Is Techno Gamerz Trending on YouTube?
The Techno Gamerz earnings are certainly no fluke. Many YouTube careers come crashing down before they even start. You’ll even need to congratulate yourself for earning just $100 on YouTube. So, what makes Techno Gamers a darling to many YouTubers?
1. Engaging and interactive videos
YouTube is a very competitive video-sharing platform, and Techno Gamerz knows this fact quite well. Techno Gamerz adds funny and interactive commentary to his YouTube gaming videos to make them more interactive. Many YouTubers also love his confidence and composure in front of the camera.
2. Captivating story and continuity
One major thing you’ll see about all of Techno Gamerz’s videos is continuity. The YouTuber churns out new content every couple of days, keeping his fans entertained at all times. Also, Techno Gamerz always does a recap on his previous episodes to ensure that viewers can keep up with the pace. He even admitted in an interview that it’s critical for his audience to follow the storyline, making watching series like GTA V more interesting.
3. Single and multiplayer tutorials
Techno Gamerz’s tutorials consist of single and multiplayer games. He says that single-player games bring out his character’s awesomely powerful and superior side. He also admitted that he loves multiplayer games’ unpredictable and challenging nature.
Something about Techno Gamerz’s most loved videos
As said before, Dragon Ball Z was the YouTuber’s first upload on the platform. Then in January 2018, he went ahead to upload PUBG videos, but his breakthrough came when he switched to GTA. Up to now, he has posted 140+ GTA 5 episodes, which are famous for their unique storylines. Interestingly, each of his GTA videos has 5+ million views.
But to be one of the most popular YouTubers, you’ll need diversity. Techno Gamerz has this in abundance. His “Grandpa and Granny Two Hunters” video has 10+ million views. It’s a horror game where Techno Gamerz plays the scary granny with insane tricks.
His other videos, “BeamNG” and “Just Draw,” have more than 12 million and 13 million views, respectively. GTA V is the most loved by his audience, with over 30 million views.
Bonus Tip: How To Be a YouTuber and Make Videos Like Techno Gamerz
Evidently, you need to create compelling videos to increase your chances of getting over 1 million views and matching the Techno Gamerz salary. So, what makes a great YouTube video? The perfect YouTube videos should have a catchy intro, voice overlays, picture-in-picture effects, background audio, and more. You can also include elements like timers, subtitles, and effect overlays.
Thankfully, Wondershare Filmora comes with all these features and many more. It’s a macOS/iPadOS/Windows program that allows you to record Techno Gamerz-like videos with a live microphone commentary. After recording the video, add it to the editing timeline to customize it with stunning plugin effects, texts, transitions, subtitles, background music, and more. You also can explore features like motion tracking, key framing, speed ramping, and split screen if it’s a fast-paced video like GTA.
Let’s learn how to create and edit a YouTube video on Filmora 11:
Free Download For Win 7 or later(64-bit)
Free Download For macOS 10.14 or later
Step1 Start a new video project
Install and run Filmora 11 on your computer and choose the 16:9 aspect ratio for YouTube videos. Then, start a New Project.
Step2 Import the YouTube video tutorial
Now click the Import Media button to open a video file from your local storage. You can add multiple media files before moving them to the storyboard.
Step3 Edit your gaming video
Start by trimming your video to remove the noisy or unwanted parts. To trim and split a video, place the playhead where you want to cut and press the Split button. Repeat the same procedure to cut out a clip and delete it.
Your YouTube gaming tutorial also needs subtitles to stand out from the crowd. Select the YouTube video clip and click the Speech-to-Text button. Once the Speech-to-Text feature is active, select the translation language to start creating subtitles. Remember, you can edit and download the subtitle tracks as a .txt or .srt file.
Step4 Convert the video and upload it on YouTube
If you’re satisfied with the edited video, click the Export button, then select MP4, WebM, or MP4 AV1 as the target format. Now name your video, choose a folder path, and export it. Remember that you can also directly upload videos on YouTube by clicking the YouTube tab.
Hot FAQs on Techno Gamerz
1. Who earns more between Techno Gamerz and Carry Minati?
Techno Gamerz is not alone in Indian YouTube vlogging. CarryMinati is another top YouTuber in India, with 36.90 million followers. This YouTuber earns more than 25 Lakhs per month with annual revenue of at least 3 Crore Rupees. According to reports, Carry Minati (Ajey Nagar) has over $5 million in net worth.
2. How much does Techno Gamerz earn from one video?
It depends on the number of views. According to reports, this popular Indian YouTuber earns over $1.21 per 1,000 views. He has over 7.5 billion views currently.
3. What does Techno Gamerz do for a living?
Techno Gamerz’s primary source of income is YouTubing. This is where the 20-year-old earns most of his dollars.
Final Words
YouTubing can pay top money as long as you do it professionally. But it may need a lot of hard work and patience to start earning on YouTube. Also, invest in a powerful, all-in-one video editor for vloggers like Filmora 11. So, are you ready to start making the Techno Gamerz monthly income from YouTube? Give it a try!
Free Download For Win 7 or later(64-bit)
Free Download For macOS 10.14 or later
Also read:
- Guide to Swiftly Eliminate Unwanted YouTube Comments
- [Updated] Converting In-Meeting Google Meet to YouTube Broadcasts Your Guide
- [Updated] Apex Creators Video Giants in the Making
- Demystifying the World of YouTube and Its Keywords
- Push Past a Thousand Views in Minimal Time
- [New] Channel Flair Free Download Templates
- Ace Search Engine Rankings on YouTube 11 Proven SEO Methods for 2024
- Unlocking Monetization Success A 3-Step System to Determine Your YouTube Earnings
- [New] Boost Your Engagement Now! - Discover These Key YouTube Shortcuts
- [Updated] Evaluating Mr. Beast's Financial Heft
- 2024 Approved Amplify Your Content Two Approaches to Skyrocket Traffic
- 2024 Approved Best YouTube to MP3 Converters Free Download [Online/Win/Mac]
- In 2024, YouTube Alternatives 3 Best Video Sharing Sites
- [New] Beyond Audience Counting The Intricacies of YouTube’s Metrics
- 10 Best Travel Youtube Channels to Follow for 2024
- Aural Adventures Discovering the Top 15 Instructional Music Videos
- Channel Name Inspiration Strategies for Success
- Dive Into iOS Screenshots A Comprehensive YouTube Guide for 2024
- Collaborative Listening Made Simple on YouTube
- In 2024, Average Earnings Per View What's the Income for YouTubers per Ad Playback?
- In 2024, Essential Vids Summary Uncovered
- [Updated] Channel Expansion Sharing Your Show Across 30 Platforms
- In 2024, Can Genuine Interests Lead to Natural Channel Growth?
- Download Playback Streaming Youtube Videos on iOS Securely and Smoothly for 2024
- 2024 Approved Comprehensive Strategies for Tracking YT Traffic and Gains
- In 2024, Essential YouTube Movie Binge Guides
- Crafting Comfortable Cinematography Amidst the Chill for 2024
- Top Vlog Concepts for Daily Engagement
- Subscriber Threshold Raised for Profits
- In 2024, How to Rotate AVI in Vertical/Portrait Orientation Windows, Mac,Andro
- [New] 2024 Approved Leveraging TeamSnap for Dynamic Virtual Presentations
- [Updated] In 2024, Is Integrating ITop Into Your Toolkit Advisable?
- [Updated] In 2024, Mastering the Craft of Digital Cinematography with iPad
- 2024 Approved How To Change Text In Premiere Pro
- Fixing Persistent Pandora Crashes on Nubia Z50 Ultra | Dr.fone
- [Updated] In 2024, Legacy HDMI Linkup
- How to Track Samsung Galaxy A24 Location without Installing Software? | Dr.fone
- In 2024, Multi Object Tracking The Ultimate Guide
- Updated In 2024, Best SolarMovie Alternatives-Watch Movies Free Online
- 2024 Approved Effective Methods to Document FaceTime Calls
- How To Fix Auto Lock Greyed Out on iPhone 12 Pro | Dr.fone
- A Step-by-Step Approach to Discord Messaging for 2024
- [New] In 2024, Which Online Platform Stands Out? Discord & Skype Compared
- How to get the dragon scale and evolution-enabled pokemon On Lava Yuva 2 Pro? | Dr.fone
- In 2024, How To Unlock a Xiaomi Redmi Note 12T Pro Easily?
- 10 Best Free Video Conference App for Android and iPhone for 2024
- New 2024 Approved Crafting a Comprehensive Guide to Choosing Superior Sound Editors of the Current Decade
- Title: "In 2024, A Step-by-Step Guide to Embedding Timestamp Metadata"
- Author: Kevin
- Created at : 2024-05-25 15:22:42
- Updated at : 2024-05-26 15:22:42
- Link: https://youtube-videos.techidaily.com/in-2024-a-step-by-step-guide-to-embedding-timestamp-metadata/
- License: This work is licensed under CC BY-NC-SA 4.0.
