
:max_bytes(150000):strip_icc()/iphone15lineup-080b15f63bef43619af7c3b660d00ff1.jpg)
In 2024, 10 Steps to Perfect YouTube Reactions – A Trio Guide
10 Steps to Perfect YouTube Reactions – A Trio Guide
How to Make a YouTube Reaction Video?

Richard Bennett
Mar 27, 2024• Proven solutions
Sharing ideas and opinions on virtually any topic you can think of with millions of people around the world is arguably one of the greatest benefits YouTube gives to content creators. Even so, building your channel exclusively around reaction videos may prove to be difficult, but this doesn’t mean that you can’t use this type of video to comment on what other YouTubers are saying.
The process of making a YouTube reaction video is not overly technical, although you will have to decide which video editing technique you are going to use to make a reaction video. That is why in this article we are going to take a look at different ways to make a YouTube reaction video.
- Method 1: Making Reaction Videos with PIP feature in Filmora
- Method 2: Create YouTube Reaction Video with Split Screen Templates
- Method 3: Make A Reaction Video for YouTube with AI Portrait
How to Make a Reaction Video for Your YouTube Channel? [3 Ways]
Using the footage without the consent of the copyright owner is punishable by the law, which means that you can only include the footage in a reaction video if you have the owner’s consent. Consequently, the selection of videos you can comment on is going to be limited, since it is entirely up to the creator of the video if they are going to give you permission to use their footage in your reaction video.
You can use the following video editing techniques, once you have access to the video you would like to comment on.
Method 1: Making a reaction video with the Picture-in-Picture feature in Filmora
Video editing software, like Filmora , can also be used to create YouTube reaction videos, but you must have all the footage you would like to include in that video before you can start putting it together.
The first step is to create a new project in Filmora and then import the media assets into the editor. Besides video clips, you can also add music, pictures, or create opening titles and end credits for your reaction video.


Place the video you’re reacting to on a video track on the timeline and then add the video of your reaction to the timeline that is directly above the one to which you added the first video clip. Click on the top video in the preview window and use the handles that are positioned around the edges of the video to adjust its size.
If you would like to change the on-screen position of the overlay clip, you should simply click on it and drag it to the new location within the preview window.

Filmora offers more than sixty motion effects, hundreds of transitions, and visual effects that can make your reaction video more visually appealing to the audience.

Moreover, Filmora video editing software offers a variety of blending modes, and it lets you control the opacity of the overlay video so that you can make it more transparent. Whether or not you are going to use these options depends on the footage you’re working with and the demands of a particular project.
Pros of using the Picture in Picture feature to make reaction videos in Filmora: You can place and adjust the videos with more customizable options. Get more tips about Making a PIP video in Filmora .
Method 2: Create several reaction windows with the Split Screen feature
Besides the Picture-in-Picture option, Filmora also enables you to play two or more videos simultaneously with Split Screen templates. Drag and drop the template you want to use in your reaction video to the timeline and click on the Enable Split Screen Animation tick box if you want to use the template without animations.

Afterward, you should drag the video clips from the Media tab and drop them onto the section of the preview window where you want them to be located. Keep in mind that you cannot add more than six videos to a split-screen template.

All videos you add to a split-screen template can be edited, and you just have to click on them if you want to adjust their sizes, enhance colors, mute their audio tracks or add a new audio file to the template.
Check the details about How to make a split-screen video step by step.
Pros of using Split-screen template to make reaction video in Filmora: various templates for creating stylish video side by side easily.
Method 3: Create A YouTube Reaction Video with AI Portrait
With the human segmentation effect in AI Portrait, you can now blend the reaction video in a more natural way. The human segmentation effect will isolate people from the background, you can use any background in the video.
Note: You can use this feature after version after V 10.5 for Windows, and V 10.4 for Mac. Click the button below to get the latest version of Filmora on your desktop.
Step 1: Import the videos to the media library, and then drag the background video to the first video track, and the reaction video to the track above.

Step 2: Go to the Effects tab at the top, and click the AI Portrait category, and then you will see many effects such as Human Segmentation, Human Pixelate, Human Noise, and lighting flash. Here, drag and drop the Human segmentation effect to the reaction video.

Step 3: Select the reaction video in the timeline, and then adjust its size and position by dragging it on the preview window. See, the reaction video is fine blended with the background video.

Step 4: That’s the basic editing of making a reaction video. You can also add the neon or flashing effect to the video. If everything goes well, click Export and save the video.

You can find out more details about using the AI Portrait effect to make a reaction video .
How to Avoid Copyright Infringements While Making a YouTube Reaction Video
All videos you can find on YouTube are protected by intellectual property regulations, and you can’t use them without the copyright owner’s permission. The only way to avoid being absolutely sure that your reaction video isn’t violating the law is to contact the video creator and ask for permission to use their intellectual property. However, most YouTubers are reluctant to let others download and edit their videos unless they already have a large fan base.
In case you’re granted permission to comment on a video, you have nothing to worry about. However, if you don’t get the permission you’re all the money the reaction video generates will go to the copyright owner or you will be forced to delete the video from your channel. There are still a few things you can do, even if you don’t get permission to use the video you would like to comment on.
Muting the video’s audio or altering its pitch will make it more difficult for YouTube’s bots to detect copyright infringement, although this method may not always work. In addition, you can play a video for up to thirty seconds, then comment on that segment, and then play another segment of that video.
There is no way of saying whether any of these editing tricks are going to help you avoid a copyright claim, and you should only use them if you have no other option.
Conclusion
Anyone can master the technical aspects of making a reaction video, but the topics you react to need to be related to the general topic your channel covers. What’s more, the idea of your reaction video has to be relevant for your audience if you want to attract their attention. Which video editing techniques are you using to make a YouTube reaction video?
Download Mac Version ](https://tools.techidaily.com/wondershare/filmora/download/ )
Richard Bennett
Richard Bennett is a writer and a lover of all things video.
Follow @Richard Bennett
Richard Bennett
Mar 27, 2024• Proven solutions
Sharing ideas and opinions on virtually any topic you can think of with millions of people around the world is arguably one of the greatest benefits YouTube gives to content creators. Even so, building your channel exclusively around reaction videos may prove to be difficult, but this doesn’t mean that you can’t use this type of video to comment on what other YouTubers are saying.
The process of making a YouTube reaction video is not overly technical, although you will have to decide which video editing technique you are going to use to make a reaction video. That is why in this article we are going to take a look at different ways to make a YouTube reaction video.
- Method 1: Making Reaction Videos with PIP feature in Filmora
- Method 2: Create YouTube Reaction Video with Split Screen Templates
- Method 3: Make A Reaction Video for YouTube with AI Portrait
How to Make a Reaction Video for Your YouTube Channel? [3 Ways]
Using the footage without the consent of the copyright owner is punishable by the law, which means that you can only include the footage in a reaction video if you have the owner’s consent. Consequently, the selection of videos you can comment on is going to be limited, since it is entirely up to the creator of the video if they are going to give you permission to use their footage in your reaction video.
You can use the following video editing techniques, once you have access to the video you would like to comment on.
Method 1: Making a reaction video with the Picture-in-Picture feature in Filmora
Video editing software, like Filmora , can also be used to create YouTube reaction videos, but you must have all the footage you would like to include in that video before you can start putting it together.
The first step is to create a new project in Filmora and then import the media assets into the editor. Besides video clips, you can also add music, pictures, or create opening titles and end credits for your reaction video.
Place the video you’re reacting to on a video track on the timeline and then add the video of your reaction to the timeline that is directly above the one to which you added the first video clip. Click on the top video in the preview window and use the handles that are positioned around the edges of the video to adjust its size.
If you would like to change the on-screen position of the overlay clip, you should simply click on it and drag it to the new location within the preview window.
Filmora offers more than sixty motion effects, hundreds of transitions, and visual effects that can make your reaction video more visually appealing to the audience.
Moreover, Filmora video editing software offers a variety of blending modes, and it lets you control the opacity of the overlay video so that you can make it more transparent. Whether or not you are going to use these options depends on the footage you’re working with and the demands of a particular project.
Pros of using the Picture in Picture feature to make reaction videos in Filmora: You can place and adjust the videos with more customizable options. Get more tips about Making a PIP video in Filmora .
Method 2: Create several reaction windows with the Split Screen feature
Besides the Picture-in-Picture option, Filmora also enables you to play two or more videos simultaneously with Split Screen templates. Drag and drop the template you want to use in your reaction video to the timeline and click on the Enable Split Screen Animation tick box if you want to use the template without animations.
Afterward, you should drag the video clips from the Media tab and drop them onto the section of the preview window where you want them to be located. Keep in mind that you cannot add more than six videos to a split-screen template.
All videos you add to a split-screen template can be edited, and you just have to click on them if you want to adjust their sizes, enhance colors, mute their audio tracks or add a new audio file to the template.
Check the details about How to make a split-screen video step by step.
Pros of using Split-screen template to make reaction video in Filmora: various templates for creating stylish video side by side easily.
Method 3: Create A YouTube Reaction Video with AI Portrait
With the human segmentation effect in AI Portrait, you can now blend the reaction video in a more natural way. The human segmentation effect will isolate people from the background, you can use any background in the video.
Note: You can use this feature after version after V 10.5 for Windows, and V 10.4 for Mac. Click the button below to get the latest version of Filmora on your desktop.
Step 1: Import the videos to the media library, and then drag the background video to the first video track, and the reaction video to the track above.
Step 2: Go to the Effects tab at the top, and click the AI Portrait category, and then you will see many effects such as Human Segmentation, Human Pixelate, Human Noise, and lighting flash. Here, drag and drop the Human segmentation effect to the reaction video.
Step 3: Select the reaction video in the timeline, and then adjust its size and position by dragging it on the preview window. See, the reaction video is fine blended with the background video.
Step 4: That’s the basic editing of making a reaction video. You can also add the neon or flashing effect to the video. If everything goes well, click Export and save the video.
You can find out more details about using the AI Portrait effect to make a reaction video .
How to Avoid Copyright Infringements While Making a YouTube Reaction Video
All videos you can find on YouTube are protected by intellectual property regulations, and you can’t use them without the copyright owner’s permission. The only way to avoid being absolutely sure that your reaction video isn’t violating the law is to contact the video creator and ask for permission to use their intellectual property. However, most YouTubers are reluctant to let others download and edit their videos unless they already have a large fan base.
In case you’re granted permission to comment on a video, you have nothing to worry about. However, if you don’t get the permission you’re all the money the reaction video generates will go to the copyright owner or you will be forced to delete the video from your channel. There are still a few things you can do, even if you don’t get permission to use the video you would like to comment on.
Muting the video’s audio or altering its pitch will make it more difficult for YouTube’s bots to detect copyright infringement, although this method may not always work. In addition, you can play a video for up to thirty seconds, then comment on that segment, and then play another segment of that video.
There is no way of saying whether any of these editing tricks are going to help you avoid a copyright claim, and you should only use them if you have no other option.
Conclusion
Anyone can master the technical aspects of making a reaction video, but the topics you react to need to be related to the general topic your channel covers. What’s more, the idea of your reaction video has to be relevant for your audience if you want to attract their attention. Which video editing techniques are you using to make a YouTube reaction video?
Download Mac Version ](https://tools.techidaily.com/wondershare/filmora/download/ )
Richard Bennett
Richard Bennett is a writer and a lover of all things video.
Follow @Richard Bennett
Seamless Integration of Smartphone Tech in Creating YouTube Channels
Versatile YouTube Video Editor - Filmora
An easy yet powerful editor
Numerous effects to choose from
Detailed tutorials provided by the official channel
The relevance of YouTube and the need to have a channel are visible with the rise in viewership. Having launched on February 14th, 2005, YouTube has become the 2nd most visited social media website according to Google statistics having a whopping over 2 billion users on the platform monthly.
As an entrepreneur or a company, one of the easiest and fastest ways of selling your brand or skill is via the YouTube platform. Thus, you must know how to make a YouTube channel on iPhone and how to make a YouTube channel on Android. Having overwhelming subscribers becomes an added advantage as not only will you and your business be known or recognized, YouTube has a way of appreciating and paying some of their influencers as well.
At this point, I know how hungry you are to kick-start your YouTube. This article will help guide you through creating a YouTube channel on your mobile, whether for personal or business purposes. Rather than scanning through, you should peruse through attentively.
In this article
01 How to Make a Personal YouTube Channel on Mobile
02 How to Create a Business YouTube on Mobile
03 Five Tips to Start a YouTube channel
Part 1: How to Make a Personal YouTube Channel on Mobile
Creating a YouTube channel on mobile is not a cumbersome one. It is as easy as ABC, and within split seconds you’ve created your own YouTube channel. The guideline entails the following steps:
- The first step to setting up your personal YouTube channel starts with creating a Google account for those who don’t have any yet.
- Whether you open your YouTube app or via the web browser of your phone, open the YouTube website.
- On the top right-hand side of your mobile, tap on your profile image
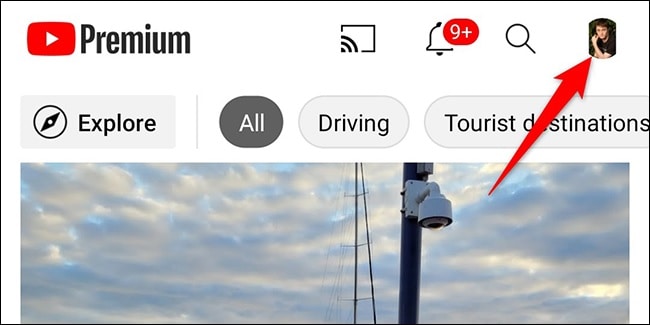
Source: howtogeek.com
- A drop-down menu will pop up. Click on your channel icon.
- An option to create a new channel comes up. (For those who have a channel already, an alternative to manage your channel or video will show.)
- An option to input your name pops up on the screen. Carefully insert your desired name and tap on Create.
- If you would love to halt and resume later in the setting up, you can scroll down to click on the ‘set up later.’
Part 2: How to Create a Business YouTube on Mobile
The clarity on the relevance of YouTube in this dispensation when it comes to branding or business-boosting is immense. Many savvy entrepreneurs and business companies have come to the known for their beautiful advantages. With over 2 billion people trooping into the site monthly, making your brand come to the limelight in this social media implies reaching one-tenth of the users,i.e., if you play by the rules of strategically planning your business growth, the top. However, this article may not reveal the different strategies to adopt so you can become an influencer in your line of business; instead, it will start from scratch on how to get your YouTube business page started. How then can one create his own business YouTube account?
1. Signing into a Google account
To successfully start using the YouTube app, there is a need to sign officially into Google. If you’ve it in mind to have a separate Google account for your business account, you kick-start it at this stage.
However, you can still use your name to open a Google account and create a business YouTube account for subsequent use. The truth is that YouTube gives room for you still to make a business account with a business name thus, eliminating the need to use a business name in creating your Google account.
2. Creating a business name
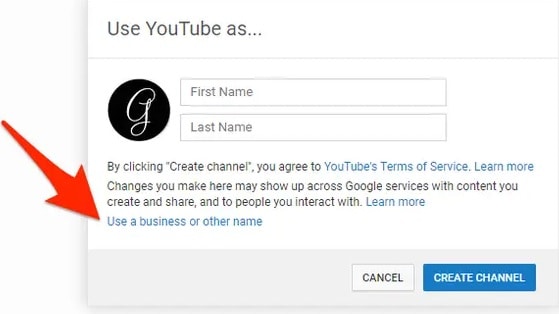
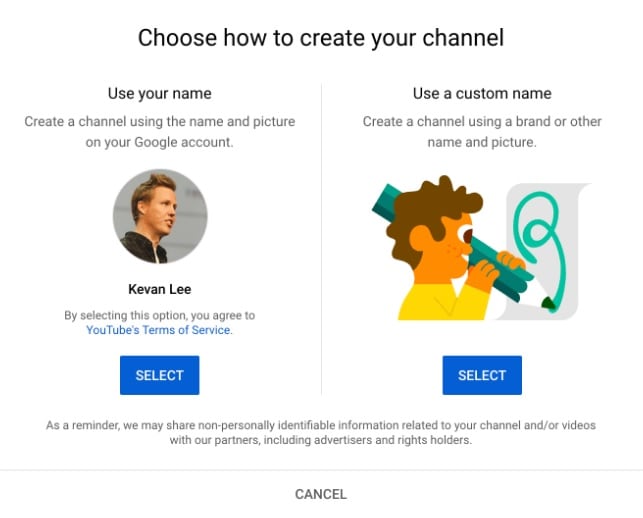
Once you create a Google account, the next step is to make your business a YouTube account. This you do by either signing into your YouTube app or via the YouTube website in your mobile browser. Once logged in to the app interface, you will see the profile photo you used in creating your Google account or the initial letter of the first name you used on the top right-hand side of your mobile. Tap on it, and a drop-down menu will come up, tap on the ‘create a channel’ icon, which will lead you to another interface where you have the option to select ‘Get started’ or ‘No thanks.’ A tap on the get started will reveal an option to either create your channel using the name and image of your Google account or use a customized name.
Source: buffer.com
Selecting the custom name gives you the autonomy to use the brand or business name of your choice, after which you tap on the create option.
3. Customize your business page
At this point, you can design the layout by utilizing the appealing icon and banner of your choice, just as provided by the likes of Facebook or Twitter. The customized templates in Canva are there for you to design your page to your state.
I know you would be wondering how to go about this; YouTube can directly upload your artwork with a preview option available. You can crop your artwork to fit your page, making it look more professional.
To be emphatic, creating a business account is still simple but with professionalism. Remember you are selling yourself and your brand, and it is expedient to give your best on your page. Do well to describe your page as excellent as you can, let your activity in terms of photo and video uploads be of the best. This way, subscribers will not hesitate to hit the like and subscribe button. Good luck as you kick-start your business page.
Part 3: Five Tips to Start a YouTube channel
Carefully observe how YouTube channels function and possibly how entrepreneurs and business owners make waves in the YouTube industry. Then, sit down and watch either your mobile phone or computer and think about making a YouTube Channel on iPhone or understand how to create a YouTube Channel on mobile and earn money, especially to beginners. This way, you can make it envy to all becomes a significant challenge—however, the crucial tips in starting your own YT channel.
Identify Goal of Channel
What are you trying to achieve? Customer education, testimonials or do you want people to subscribe? Be clear on what you want your YouTube channel to do for your brand and how it fits into your overall marketing strategy.
Gather Content Ideas
Gather content, even before you make a YouTube channel on mobile. You can start with a series of videos talking about your company, products, or industry and then launch the channel once they are all done. If you can’t think of any content on your own, try searching around online to see if others have already created videos of this sort and have posted them online. Then, use those videos as examples when you make your content.
Logo and Thumbnail Design
How to make a logo for YouTube on mobile?
Once you are up with content creation, you will have to create a thumbnail for your video. Attractive and catchy thumbnails that persuade searchers to click on your video are critical. Here we will see how to create a logo for a YouTube video on mobile. For this purpose, Canva.com can create attractive thumbnails and a Catchy logo. Using this tool, you can create, edit and customize graphics for your YouTube videos.
Quality of Video is Important
Don’t just put up videos willy-nilly. Think about what content would work for your brand and audience. The content needs to be engaging, relevant, and inspiring so people will keep coming back for more videos. You don’t have to have the latest video equipment either – think about the type of content that would work best.
Choose Video Editing Software
Wondershare Filmora
Get started easily with Filmora’s powerful performance, intuitive interface, and countless effects!
Try It Free Try It Free Try It Free Learn More >

Lastly, you must use high-quality producing software. So we recommend Filmora Video Editor that offers a wide range of effects, themes, and titles. It lets you create professional-looking videos with various presets for quick editing. It incorporates support for most common video formats. If you’re looking for a straightforward but potent video editor, Filmora is your best option.
Conclusion
I firmly believe that at this point, understanding how to create a YouTube channel in mobile will be an easy one. We discussed ways of not just developing your YT channel but also how to give your page the best of professional work. This article is truly an eye-opener and contains from scratch the step-wise order of growing and learning how to make a logo for YouTube Channel in mobile and creating personal and business accounts to earn some money.
The relevance of YouTube and the need to have a channel are visible with the rise in viewership. Having launched on February 14th, 2005, YouTube has become the 2nd most visited social media website according to Google statistics having a whopping over 2 billion users on the platform monthly.
As an entrepreneur or a company, one of the easiest and fastest ways of selling your brand or skill is via the YouTube platform. Thus, you must know how to make a YouTube channel on iPhone and how to make a YouTube channel on Android. Having overwhelming subscribers becomes an added advantage as not only will you and your business be known or recognized, YouTube has a way of appreciating and paying some of their influencers as well.
At this point, I know how hungry you are to kick-start your YouTube. This article will help guide you through creating a YouTube channel on your mobile, whether for personal or business purposes. Rather than scanning through, you should peruse through attentively.
In this article
01 How to Make a Personal YouTube Channel on Mobile
02 How to Create a Business YouTube on Mobile
03 Five Tips to Start a YouTube channel
Part 1: How to Make a Personal YouTube Channel on Mobile
Creating a YouTube channel on mobile is not a cumbersome one. It is as easy as ABC, and within split seconds you’ve created your own YouTube channel. The guideline entails the following steps:
- The first step to setting up your personal YouTube channel starts with creating a Google account for those who don’t have any yet.
- Whether you open your YouTube app or via the web browser of your phone, open the YouTube website.
- On the top right-hand side of your mobile, tap on your profile image
Source: howtogeek.com
- A drop-down menu will pop up. Click on your channel icon.
- An option to create a new channel comes up. (For those who have a channel already, an alternative to manage your channel or video will show.)
- An option to input your name pops up on the screen. Carefully insert your desired name and tap on Create.
- If you would love to halt and resume later in the setting up, you can scroll down to click on the ‘set up later.’
Part 2: How to Create a Business YouTube on Mobile
The clarity on the relevance of YouTube in this dispensation when it comes to branding or business-boosting is immense. Many savvy entrepreneurs and business companies have come to the known for their beautiful advantages. With over 2 billion people trooping into the site monthly, making your brand come to the limelight in this social media implies reaching one-tenth of the users,i.e., if you play by the rules of strategically planning your business growth, the top. However, this article may not reveal the different strategies to adopt so you can become an influencer in your line of business; instead, it will start from scratch on how to get your YouTube business page started. How then can one create his own business YouTube account?
1. Signing into a Google account
To successfully start using the YouTube app, there is a need to sign officially into Google. If you’ve it in mind to have a separate Google account for your business account, you kick-start it at this stage.
However, you can still use your name to open a Google account and create a business YouTube account for subsequent use. The truth is that YouTube gives room for you still to make a business account with a business name thus, eliminating the need to use a business name in creating your Google account.
2. Creating a business name
Once you create a Google account, the next step is to make your business a YouTube account. This you do by either signing into your YouTube app or via the YouTube website in your mobile browser. Once logged in to the app interface, you will see the profile photo you used in creating your Google account or the initial letter of the first name you used on the top right-hand side of your mobile. Tap on it, and a drop-down menu will come up, tap on the ‘create a channel’ icon, which will lead you to another interface where you have the option to select ‘Get started’ or ‘No thanks.’ A tap on the get started will reveal an option to either create your channel using the name and image of your Google account or use a customized name.
Source: buffer.com
Selecting the custom name gives you the autonomy to use the brand or business name of your choice, after which you tap on the create option.
3. Customize your business page
At this point, you can design the layout by utilizing the appealing icon and banner of your choice, just as provided by the likes of Facebook or Twitter. The customized templates in Canva are there for you to design your page to your state.
I know you would be wondering how to go about this; YouTube can directly upload your artwork with a preview option available. You can crop your artwork to fit your page, making it look more professional.
To be emphatic, creating a business account is still simple but with professionalism. Remember you are selling yourself and your brand, and it is expedient to give your best on your page. Do well to describe your page as excellent as you can, let your activity in terms of photo and video uploads be of the best. This way, subscribers will not hesitate to hit the like and subscribe button. Good luck as you kick-start your business page.
Part 3: Five Tips to Start a YouTube channel
Carefully observe how YouTube channels function and possibly how entrepreneurs and business owners make waves in the YouTube industry. Then, sit down and watch either your mobile phone or computer and think about making a YouTube Channel on iPhone or understand how to create a YouTube Channel on mobile and earn money, especially to beginners. This way, you can make it envy to all becomes a significant challenge—however, the crucial tips in starting your own YT channel.
Identify Goal of Channel
What are you trying to achieve? Customer education, testimonials or do you want people to subscribe? Be clear on what you want your YouTube channel to do for your brand and how it fits into your overall marketing strategy.
Gather Content Ideas
Gather content, even before you make a YouTube channel on mobile. You can start with a series of videos talking about your company, products, or industry and then launch the channel once they are all done. If you can’t think of any content on your own, try searching around online to see if others have already created videos of this sort and have posted them online. Then, use those videos as examples when you make your content.
Logo and Thumbnail Design
How to make a logo for YouTube on mobile?
Once you are up with content creation, you will have to create a thumbnail for your video. Attractive and catchy thumbnails that persuade searchers to click on your video are critical. Here we will see how to create a logo for a YouTube video on mobile. For this purpose, Canva.com can create attractive thumbnails and a Catchy logo. Using this tool, you can create, edit and customize graphics for your YouTube videos.
Quality of Video is Important
Don’t just put up videos willy-nilly. Think about what content would work for your brand and audience. The content needs to be engaging, relevant, and inspiring so people will keep coming back for more videos. You don’t have to have the latest video equipment either – think about the type of content that would work best.
Choose Video Editing Software
Wondershare Filmora
Get started easily with Filmora’s powerful performance, intuitive interface, and countless effects!
Try It Free Try It Free Try It Free Learn More >
Lastly, you must use high-quality producing software. So we recommend Filmora Video Editor that offers a wide range of effects, themes, and titles. It lets you create professional-looking videos with various presets for quick editing. It incorporates support for most common video formats. If you’re looking for a straightforward but potent video editor, Filmora is your best option.
Conclusion
I firmly believe that at this point, understanding how to create a YouTube channel in mobile will be an easy one. We discussed ways of not just developing your YT channel but also how to give your page the best of professional work. This article is truly an eye-opener and contains from scratch the step-wise order of growing and learning how to make a logo for YouTube Channel in mobile and creating personal and business accounts to earn some money.
Also read:
- [New] Avoid Blandness - Optimize Your Thumbnail with 20 Fonts
- [New] Elevate Engagement on YouTube Fending Off Automated Audiences
- Precision Cinematography Ideal Lenses for Digital Storytellers
- In 2024, Crafting a Pro Sports YouTube Feed on MacOS
- In 2024, Charting Innovative Territory with Youtubers’ Best Ad Work
- 2024 Approved Discover a World of Videos - The 27 Superior Platforms
- 2024 Approved Elevate Your Channel Game - TubeBuddy Insights
- Bite-Sized Content Explanation The Lowdown
- [New] Deciphering Digital Marketing The Power of YouTube Keywords
- Optimizing YouTube Thumbnails for Better Clickthrough Rates
- Techniques for Crafting Encouraging Personal Growth Vids
- [Updated] 8 Best Mirrorless Cameras for Vlogging
- Best 8 Platforms for Professional Linux Editing for 2024
- From Screenplays to Screens YouTube's Filmmaker Training
- ASMR Production 101 Essential Strategies for Cutting-Edge Video Making
- 2024 Approved Are There Natural Methods for Boosting Channels?
- 10 Tips to Make Your YouTube Shorts Channels Stand Out
- [New] Elevate Your YouTube Content SEO Methods Revealed
- [Updated] Ethical Practices for Accumulating Over A Million Video Engagements
- Android & iOS The Best Sound Distortion Tools for 2024
- [Updated] Disrupt Unbidden YouTube Content Feeds
- [Updated] Conquering Camera Angst The Ultimate List of Video Blogging Phobias
- In 2024, Engaging Listeners Respectfully for Increased Sign-Ups
- 2024 Approved Beginner's Blueprint for Online Content Simple, Straightforward Video Projects
- [Updated] Discover the Leading Online Video Cutter for YouTube
- [Updated] Dish on Titles Crafting Captivating Cookery Channel Names
- 2024 Approved Elevating the Cold with Five Cozy Cinematic Elements
- Unlock Creativity Top 8 Online Resources for Beginners
- [New] Cyber Sovereigns YouTube’s Number One Tens
- Achieving Financial Gain with Youtube Shorts Essentials, Opportunities & Earning Prospects
- The Complete WM Maker Playbook for YouTube Clips Perfection
- Elevate Your Watchlist Experience with YouTube's AV1 Settings for 2024
- Building Business via Beauty Vlogs for 2024
- Updated In 2024, The Ultimate M4R Conversion Guide Tips and Tricks to Begin With
- [New] 2024 Approved Effortless OBS and Zoom Stream Merge Steps
- [New] 2024 Approved 10 Gaming Wonders – Offline iOS Masterpieces Without Internet
- [Updated] Comprehensive Techniques PC & Mobile Recording Meets
- Mastering Lock Screen Settings How to Enable and Disable on Nokia C32
- In 2024, Unlock Samsung Galaxy S23+ Phone Password Without Factory Reset Full Guide Here
- [New] Origami-Inspired, Miniature Asian Abodes in MC for 2024
- 2024 Approved Gaming Without Limits Screen Recorder Alternatives Explained
- [Updated] 2024 Approved How to Make a Video Call in WhatsApp Web in Laptop
- How To Repair iOS of iPhone 6? | Dr.fone
- Discovering the Best in WebCam Videography Tech for 2024
- Unova Stone Pokémon Go Evolution List and How Catch Them For Nubia Red Magic 8S Pro+ | Dr.fone
- Fake Android Location without Rooting For Your Honor 100 Pro | Dr.fone
- Professional-Grade HD Video Editing Software Top 5 Recommendations
- In 2024, 3 Facts You Need to Know about Screen Mirroring Realme GT 5 (240W) | Dr.fone
- How to Reset Oppo A78 without Losing Data | Dr.fone
- 2024 Approved SplitScreen Viewer Insights
- In 2024, Advanced GoPro Editing Straightening Fisheye Lens
- [New] Crafting Visual Magic The Essentials of Snapchat Photo Editing for 2024
- In 2024, 8 Best Apps for Screen Mirroring Vivo Y200e 5G PC | Dr.fone
- [Updated] In 2024, Comprehensively Reviewed Best UbuNo Screen Recording Tools
- New Create Stunning Invites Top 10 Free Video Makers for 2024
- Title: In 2024, 10 Steps to Perfect YouTube Reactions – A Trio Guide
- Author: Kevin
- Created at : 2024-05-25 15:21:19
- Updated at : 2024-05-26 15:21:19
- Link: https://youtube-videos.techidaily.com/in-2024-10-steps-to-perfect-youtube-reactions-a-trio-guide/
- License: This work is licensed under CC BY-NC-SA 4.0.
