
:max_bytes(150000):strip_icc()/savescreenshotonxboxseriesxs-4f0cc19fdaa4472a9f607b07a85e75f9.jpg)
"Ideal Editors Perfect for High-Quality YouTube Videos"
Ideal Editors: Perfect for High-Quality YouTube Videos
The Best Video Editors for YouTube

Richard Bennett
Oct 26, 2023• Proven solutions
Check out our most updated post on this topic: Top 10 Video Editors for YouTube in 2018.
Part 1: Filmora

Filmora ’s intuitive interface was designed to make video editing a fast and simple process. The less effort you have to put into the technical side of editing, the more energy you can devote to being creative.
In the main screen of Filmora, you are never more than a couple clicks away from any basic, advanced, or creative feature you want to use. The built-in music library, a wide selection of text and title options, filters, overlays, animated elements, and split-screen options can all be accessed from a clearly labeled toolbar above the timeline.
Besides fun things like filters, Filmora also has powerful tools like advanced color grading and an audio equalizer. Either of these features can be accessed in two clicks from the main editing screen. With your audio or video clip selected, simply click the editing icon and then either Advanced (for expanded color editing options) or Customize (for the audio equalizer).
Even features like picture-in-picture (PIP) and green screen are easy to use in Filmora. The PIP tracks are right under the main video track in your timeline. Although there is only one when you start a project, you can have up to ten. These PIP tracks can be used to layer photos and videos over top of each other. One of the most popular uses for the PIP track is facecam videos. After you drag your facecam footage into the PIP track, you can easily shrink it and move it to the corner of your main video.
The green screen has its own designated icon on the main toolbar. Simply select a clip or image in one of your PIP tracks and click it to access the feature.
Filmora is always adding new features to make editing even easier for online video creators. A few of the other tools included in Filmora are speed control, text customization, tilt-shift, ripple delete, and an audio mixer.


Part 2: Video Editing Software Comparisons
Here is a ‘top 4’ list of other popular video editors. The list will discuss their best features and how they measure up to Filmora.
Section 1: PC Video Editors
Here are two of the most popular editing programs for Windows computers:
Windows Movie Maker

Image source: intowindows
PC users can download Windows Movie Maker for free, which has made it a popular choice among video creators that are just starting out. Movie Maker has different timeline tracks for things like videos and music, and it is very easy to trim or cut up all of your media clips. The ability to sharpen some of your blurrier images, speed control, and a simple title generator, and some basic transitions are some of the program’s more noteworthy features.
Movie Maker does not come close to matching Filmora’s range of features, but it is easy to use. It could be a good option for video creators who have no room in their budget for paid software. Videos made in Movie Maker will be simple, but that is all some people need.
Vegas Movie Studio
Vegas Movie Studio, which used to be Sony Vegas, is a big step up from Movie Maker. While editing your clips, you can adjust their brightness, contrast, and color balance. On the audio side of things, Vegas has a great audio restoration tool you can use to get rid of unwanted background noises.
Although it does not have filters, overlays, and animated elements like Filmora, Vegas does have some very modern-looking titles and transition effects.
The biggest advantage that Filmora has over Vegas is that it is a lot easier to use. Vegas has some great features, but accessing and using them is not something you can just jump into doing. Filmora is so intuitive that most users can just open it up and start applying effects.
Vegas is very reasonably priced at $49.95 USD, but it is only $10 more for the ease and effect variety of Filmora.
Section 2: Mac Video Editors
Here are two of the most popular video editors for the Mac OS:
iMovie
iMovie comes free with Mac computers, and it is a huge step up from Windows Movie Maker. It has some really nice audio editing tools, like an equalizer and the ability to set fade in and fade out times (which Filmora also has). When you are editing video clips, iMovie provides you with a stabilization tool, speed controls, and even some filters and overlays. There are text and title options available as well, although they are very basic.
The main difference between Filmora and iMovie is variety. Filmora has a huge range of titles in different styles; iMovie has everyday fonts with all the traditional credit/title animations. iMovie has close to the same amount of features as Filmora, but there is always less variety in those features, and they tend to feel dated.
The main difference between iMovie and every other editor on this list is the layout. The timeline is located in the top left portion of the screen, not stretched across the bottom, and the clips/sounds do not sit in different tracks. The iMovie interface is not actually very complicated, but it will be an adjustment for anybody used to a more traditional editing experience.
Final Cut Pro X
Final Cut Pro is Apple’s attempt at a professional-grade editing program. It is much more advanced than iMovie and offers 64-bit architecture and background rendering. Background rendering means that your imported clips are prepared for playback before you actually move them into your timeline, making the editing process a lot faster.
Final Cut Pro also boasts a huge selection of editing tools.
Like iMovie, Final Cut Pro does not use a traditional timeline. This will make it easier to learn for users upgrading from iMovie, but potentially more difficult for users coming from any other program. Final Cut Pro would be competition for Adobe Premiere if it were available on anything except the latest Mac OS.
Final Cut Pro X costs $300, making it a significant investment.
Section 3: Online Video Editors
WeVideo
WeVideo is a fairly simple cloud-based video editor. Its most useful feature is that it gives your team the ability to edit collaboratively. Multiple editors can upload footage and create their own edits of the project.
WeVideo has all of the most basic editing features – the abilities to trim clips, add transitions, and give your project a soundtrack. Other than the potential for collaboration, though, it has nothing that free programs like iMovie, and even Windows Movie Maker, do not have.
There are a few different pricing options for WeVideo. You can use it for free, but your storage space and the number of features you have access to will be very limited. Your videos will also be watermarked. Also, both the free and $19 packages limit your video resolution to 720p. You will need to pay at least $39 for 1080p, and it will cost you $69 to get rid of all the storage limits.
If you are going to pay $69 for video editing software, you are much better off using Filmora.
Section 4: The Pro-Choice
Adobe Premiere
Adobe Premiere is a professional editing software. In terms of functionality, it has every program on this list, including Filmora, beat. It has very powerful video and audio editing tools, and the program can be customized to suit the needs of particular projects.
Because it is designed for professionals and veteran editors, Premiere is far from a simple program. If you have not edited a video before, or are used to a simpler program, it will take you a long time to become good at using Premiere (it might be a good idea to find an online course).
It does have a few features designed to save time, such as an automatic audio syncing tool and the ability to apply changes you have made to one clip across multiple other clips. The Premiere is probably the best program for professional video editors, but Filmora’s ease of use gives it an edge with amateur video creators.
Conclusion
Filmora is the best video editing software for YouTubers and other online video creators. Windows Movie Maker and iMovie are decent basic programs for creators on a budget, and Premiere is an excellent program for professionals, but if your goal is to create awesome videos for YouTube, then Filmora is the best tool for the job.
If you want to find a video editing solution that empowers your imagination and creativity yet takes less effort, please try this robust and user-friendly video editing software Wondershare Filmora. It provides special effects, stock photo & video, sound library, etc., which will definitely enhance your productivity and helps to make money by making videos much accessible.
Richard Bennett
Richard Bennett is a writer and a lover of all things video.
Follow @Richard Bennett
Richard Bennett
Oct 26, 2023• Proven solutions
Check out our most updated post on this topic: Top 10 Video Editors for YouTube in 2018.
Part 1: Filmora
Filmora ’s intuitive interface was designed to make video editing a fast and simple process. The less effort you have to put into the technical side of editing, the more energy you can devote to being creative.
In the main screen of Filmora, you are never more than a couple clicks away from any basic, advanced, or creative feature you want to use. The built-in music library, a wide selection of text and title options, filters, overlays, animated elements, and split-screen options can all be accessed from a clearly labeled toolbar above the timeline.
Besides fun things like filters, Filmora also has powerful tools like advanced color grading and an audio equalizer. Either of these features can be accessed in two clicks from the main editing screen. With your audio or video clip selected, simply click the editing icon and then either Advanced (for expanded color editing options) or Customize (for the audio equalizer).
Even features like picture-in-picture (PIP) and green screen are easy to use in Filmora. The PIP tracks are right under the main video track in your timeline. Although there is only one when you start a project, you can have up to ten. These PIP tracks can be used to layer photos and videos over top of each other. One of the most popular uses for the PIP track is facecam videos. After you drag your facecam footage into the PIP track, you can easily shrink it and move it to the corner of your main video.
The green screen has its own designated icon on the main toolbar. Simply select a clip or image in one of your PIP tracks and click it to access the feature.
Filmora is always adding new features to make editing even easier for online video creators. A few of the other tools included in Filmora are speed control, text customization, tilt-shift, ripple delete, and an audio mixer.
Part 2: Video Editing Software Comparisons
Here is a ‘top 4’ list of other popular video editors. The list will discuss their best features and how they measure up to Filmora.
Section 1: PC Video Editors
Here are two of the most popular editing programs for Windows computers:
Windows Movie Maker
Image source: intowindows
PC users can download Windows Movie Maker for free, which has made it a popular choice among video creators that are just starting out. Movie Maker has different timeline tracks for things like videos and music, and it is very easy to trim or cut up all of your media clips. The ability to sharpen some of your blurrier images, speed control, and a simple title generator, and some basic transitions are some of the program’s more noteworthy features.
Movie Maker does not come close to matching Filmora’s range of features, but it is easy to use. It could be a good option for video creators who have no room in their budget for paid software. Videos made in Movie Maker will be simple, but that is all some people need.
Vegas Movie Studio
Vegas Movie Studio, which used to be Sony Vegas, is a big step up from Movie Maker. While editing your clips, you can adjust their brightness, contrast, and color balance. On the audio side of things, Vegas has a great audio restoration tool you can use to get rid of unwanted background noises.
Although it does not have filters, overlays, and animated elements like Filmora, Vegas does have some very modern-looking titles and transition effects.
The biggest advantage that Filmora has over Vegas is that it is a lot easier to use. Vegas has some great features, but accessing and using them is not something you can just jump into doing. Filmora is so intuitive that most users can just open it up and start applying effects.
Vegas is very reasonably priced at $49.95 USD, but it is only $10 more for the ease and effect variety of Filmora.
Section 2: Mac Video Editors
Here are two of the most popular video editors for the Mac OS:
iMovie
iMovie comes free with Mac computers, and it is a huge step up from Windows Movie Maker. It has some really nice audio editing tools, like an equalizer and the ability to set fade in and fade out times (which Filmora also has). When you are editing video clips, iMovie provides you with a stabilization tool, speed controls, and even some filters and overlays. There are text and title options available as well, although they are very basic.
The main difference between Filmora and iMovie is variety. Filmora has a huge range of titles in different styles; iMovie has everyday fonts with all the traditional credit/title animations. iMovie has close to the same amount of features as Filmora, but there is always less variety in those features, and they tend to feel dated.
The main difference between iMovie and every other editor on this list is the layout. The timeline is located in the top left portion of the screen, not stretched across the bottom, and the clips/sounds do not sit in different tracks. The iMovie interface is not actually very complicated, but it will be an adjustment for anybody used to a more traditional editing experience.
Final Cut Pro X
Final Cut Pro is Apple’s attempt at a professional-grade editing program. It is much more advanced than iMovie and offers 64-bit architecture and background rendering. Background rendering means that your imported clips are prepared for playback before you actually move them into your timeline, making the editing process a lot faster.
Final Cut Pro also boasts a huge selection of editing tools.
Like iMovie, Final Cut Pro does not use a traditional timeline. This will make it easier to learn for users upgrading from iMovie, but potentially more difficult for users coming from any other program. Final Cut Pro would be competition for Adobe Premiere if it were available on anything except the latest Mac OS.
Final Cut Pro X costs $300, making it a significant investment.
Section 3: Online Video Editors
WeVideo
WeVideo is a fairly simple cloud-based video editor. Its most useful feature is that it gives your team the ability to edit collaboratively. Multiple editors can upload footage and create their own edits of the project.
WeVideo has all of the most basic editing features – the abilities to trim clips, add transitions, and give your project a soundtrack. Other than the potential for collaboration, though, it has nothing that free programs like iMovie, and even Windows Movie Maker, do not have.
There are a few different pricing options for WeVideo. You can use it for free, but your storage space and the number of features you have access to will be very limited. Your videos will also be watermarked. Also, both the free and $19 packages limit your video resolution to 720p. You will need to pay at least $39 for 1080p, and it will cost you $69 to get rid of all the storage limits.
If you are going to pay $69 for video editing software, you are much better off using Filmora.
Section 4: The Pro-Choice
Adobe Premiere
Adobe Premiere is a professional editing software. In terms of functionality, it has every program on this list, including Filmora, beat. It has very powerful video and audio editing tools, and the program can be customized to suit the needs of particular projects.
Because it is designed for professionals and veteran editors, Premiere is far from a simple program. If you have not edited a video before, or are used to a simpler program, it will take you a long time to become good at using Premiere (it might be a good idea to find an online course).
It does have a few features designed to save time, such as an automatic audio syncing tool and the ability to apply changes you have made to one clip across multiple other clips. The Premiere is probably the best program for professional video editors, but Filmora’s ease of use gives it an edge with amateur video creators.
Conclusion
Filmora is the best video editing software for YouTubers and other online video creators. Windows Movie Maker and iMovie are decent basic programs for creators on a budget, and Premiere is an excellent program for professionals, but if your goal is to create awesome videos for YouTube, then Filmora is the best tool for the job.
If you want to find a video editing solution that empowers your imagination and creativity yet takes less effort, please try this robust and user-friendly video editing software Wondershare Filmora. It provides special effects, stock photo & video, sound library, etc., which will definitely enhance your productivity and helps to make money by making videos much accessible.
Richard Bennett
Richard Bennett is a writer and a lover of all things video.
Follow @Richard Bennett
Youtube Essentials for Successful Channel Creation
Hello, I’m looking to start my journey as a YouTuber, but I do not know how the process works. Please, can you share with me how I can create a YouTube channel and make money from it? Kindly, help.
Starting a successful YouTube channel is very tricky. So, if you’re wondering how to create a YouTube channel and make money, worry less, we understand your struggle, and that is why we’ve created this YouTube beginners guide.
Regardless of whether you’re looking to start a tech YouTube channel, a money-making online YouTube channel, a lifestyle YouTube channel, or other topics, this guide will walk you through the simple process of how to create a YouTube channel and make money from it.
Part 1: Why choose YouTube to make money?
Boasting over 2 billion active users globally, YouTube remains the most used video-playing platform on the internet with all kinds of videos.
Today, many folks use YouTube as a means of generating income because it offers users more opportunities to reach a wide range of audiences, and the means of generating income via YouTube easily. As of when this article is written, research shows that an average YouTuber could earn up to $10,000 yearly.
Also, YouTube is a free marketing platform. So, if you have a website, you can add links to your website in the video description, thus enabling you to boost your website traffic via the platform. And it’ll allow you to advertise your product or services 100% free.
Part 2: 5-Step Formula to Start a YouTube Channel
Now you understand why you should choose YouTube to make money, the following steps will teach you how to create a YouTube channel within a few clicks. So, read on.
Step1 Create a google account
To get started, you need to create a google account. But if you already have a Google account you can skip this step.
Head to Google Account and click Create Account at the top right corner.

On the new screen, enter the necessary details and click Next.

Provide your phone number and other required details. Then, click Next.

On the new page, click I Agree to accept Google’s terms and conditions. Then finish the Google Account setup.

Step2 Create a YouTube account
Once you’ve successfully created a Google account, the next thing is to create your YouTube account. You just have to do the following to carry out the operation;
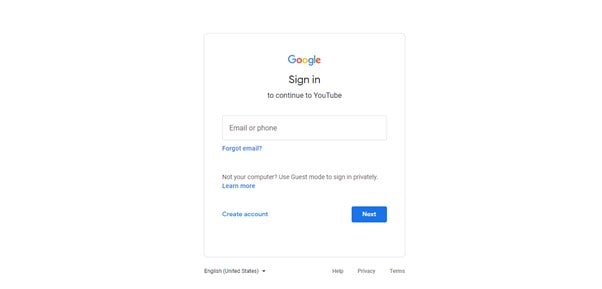
Open YouTube’s official website in your browser and click Sign in from the top right corner.

On the new page, sign in to the Google account that you want to use in creating your YouTube channel.
After you sign in to your Google account, you’ll be prompted back to the YouTube home interface. Click on your profile icon from the top right corner and select Create A Channel from the drop-down list.

Choose the Name you want to appear on your YouTube channel profile and upload a preferred Picture. Then, click Create Channel to proceed.

Step3 Customize your YouTube channel
After you’ve successfully created the channel, the next thing is to customize the channel as per requirement. Click Customise Channel from the left-hand side.

You’ll be prompted to the YouTube creator studio. There, you’ll find Layout, Branding, and Basic Info options displayed at the top of the page.
In the Layout section, you’ll be allowed to apply customization of how you want your YouTube channel homepage to look.

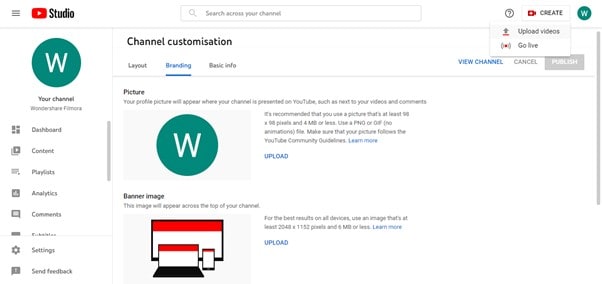
Under Branding, you can upload your brand logo as a profile photo, upload a banner image, and add the video watermark that you want to appear on all videos you upload on YouTube.

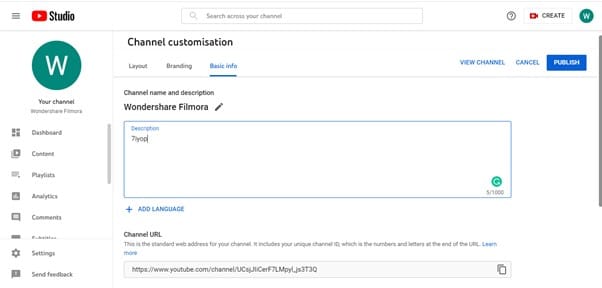
Under Basic Info, you’ll be able to enter a description for your YouTube channel, edit your channel URL, and do lots more. However, remember to always use the PUBLISH button to save customization.
Step4 Upload your first YouTube video
Now, it’s to upload your first YouTube video. To do so, navigate to the top-right corner of the page and click Create New. Select Upload Video.
If you have a video ready, click Select Files and upload the video you want to post.

Complete the required editing/settings after the video is uploaded.

Speaking of videos, you upload on YouTube, there are certain types of videos that can make you popular within a short time. Such YouTube video category includes;
- Singing
- Teaching
- Fashion Advice
- Cooking Tutorial
- Make-Up Tutorial
Step5 Make your YouTube channel discoverable
It’s time to start making your YouTube channel discoverable online. You need the subscribers, views, and all that a creator like you is worth having. However, to make this possible, you need to do the following;
Optimize Video Titles
Using Google-friendly titles for your videos is vital to allow them to rank well on Google search ranking. It should be catchy and compelling that users will be prompted to want to know what the video is about. Make sure it contains keywords too.

Optimize Video Description
Adding descriptions to your video is as important as the title. This will help search engines understand what your video is all about. So, make sure you add rich keywords to your video description and keep it concise.

Promote Your Channel on Other Social Media Platforms
You shouldn’t limit yourself to just creating videos and uploading them on YouTube. Make sure you always make it a priority to promote your YouTube videos on other platforms like Facebook, Twitter, or Instagram. This will help you give your existing fans a heads-up that you’re starting a YouTube channel.

Add Tags to your videos
When we say add tags to your videos, it does not mean you should add any tag to any video you upload on YouTube. Only add tags that’s relating to the theme of your video.
Tags will help YouTube understand the kind of video you’re uploading, and it’ll help you maintain the quality of not just your videos but your YouTube channel.

Use Keywords in Your Videos
Using rich keywords in your YouTube videos is a great way to increase the chances of your videos being seen online. Make sure you use the right keyword in the video title, as it’ll help guide viewers to your video when they search for similar words or phrases online.

Part 3: YouTube Must-Have Tools: What Are They?
Congratulations on creating your YouTube channel. But, before you get over-excited, there are essential tools you need as a YouTuber to help you stand out in the industry. These tools include the following;
1. Video Editor – Wondershare Filmora
As a YouTuber, regardless of your niche of expertise, you need an efficient video editing tool like Wondershare Filmora to create quality videos. Filmora is different from the regular video editor you find online, and it offers a plethora of video editing features that you can rely on to edit your videos and spice them up without requiring any kind of video editing knowledge.
See how you can use Filmora video editor on your YouTube videos;
Free Download For Win 7 or later(64-bit)
Free Download For macOS 10.14 or later
Step1 Go to the official website and install the Filmora video editing software on your computer. Then, launch the tool and import the video you want to edit using the Import button.

Drag-n-drop the video to the timeline.

Step2 Click Effects from the top of the screen. Select AI Portrait from the left-hand side and find a preferred AI Portrait effect. Then, click on it and drag-n-drop the effect to the Timeline.

Adjust the effect starting and ending point of where you want the AI Portrait effect to be displayed.
Step3 Again, adjust the AI Portrait effect settings by double-clicking on it, then, from the pop-up, apply the preferred settings.

Step4 You can also add a “Subscribe” watermark to your YouTube video. To do so, just click the >> icon next to Export at the top of the screen, then select Element.

Select the ‘Social Media Show Element 07’ Effects. Then, drag-n-drop it to the Timeline.

Step5 Lastly, preview the edited video, and if you’re okay with it, click Export from the top bar and select Burn DVD from the drop-down list.
From the pop-up window that appears on your PC screen, select the Folder Path and give the video file a preferred name. Then, click Export to complete the operation.

2. Google Keyword Planner
The Google keyword planner is vital to help you do keyword research and see the trends of how a particular keyword is searched in a particular month, within a given year, or more. It’ll help you understand how people are searching for a particular keyword and what time of the year it usually has more searches from folks.
By using Google Keyword planner, you’ll put yourself ahead of your competitors by using the right keyword that you need for your SEO and PPC strategies at the right time. From search volume to trends, CPC, competition scores, and more, it’s crucial you have this tool at your fingertips. Besides, it’s 100% free to use.
3. YouTube Studio
YouTube Studio is a crucial analytic tool that can come in handy to help you improve your video as you grow your YouTube channel. It is like Google Analytics in a way. It’ll allow you to track the analytics of how people view your videos, comment on your video, and more. YouTube Studio is available for free. You can use it through the Android App, on your PC or online from YouTube itself.

4. VidIQ
Are you looking for a tool to grow your YouTube channel efficiently? Then VidIQ is the ideal tool for you. Yes, with VidIQ, you’ll get access to essential tools to grow your YouTube audience faster than you can think. It’s just a scorecard that offers you in-depth analytics of how your YouTube videos are performing compared to your competitors, thus allowing you to get helpful info on how you can get ahead of them and stand out in the industry.
With VidIQ, you’ll get access to a checklist that will highlight titles, descriptions, cards, end screens, closed captions, and lots more in your videos. And of all, it’ll suggest tags that you can use in your videos to get more traffic and improve SEO.

Part 4: Tips & Tricks to Make your YouTube Grow Faster
Stay Consistent
There’s no doubt that the key to succeeding in whatever you do is to stay consistent. It can be quite hard for anyone, especially newbies to keep up with different difficulties encountered in the pursuit to create a successful YouTube channel.
So, for you to achieve your dreams of being a popular YouTuber, you must keep up with the consistency of creating quality videos, promoting your videos, and doing the right thing that’s needed for your YouTube channel to stand out online.
Collaborate With Other YouTubers
Don’t be shy to reach out to your fellow YouTubers for collaboration. Yes, by collaborating with popular YouTubers, you get to enhance your online presence, thereby increasing your subscriber base and increasing your video views.
YouTube SEO Is Crucial
You might have heard of SEO (Search Engine Optimization) being crucial for websites to rank well, but the truth is it also applies to YouTube channels. YouTube SEO is a great way to optimize your YouTube channel and video to make it rank well on online search results.
It’s important you understand how YouTube SEO works and implement it in your YouTube channel, as it’ll increase your chances of more viewers visiting your channel and watching your videos.
Final Words
That’s all you need to know about creating a successful YouTube channel. If you fancy creating videos, the above tips will teach you how to create a YouTube channel and make money. Also, if you read the article to this point, we believe you’ve understood different ways you can make your YouTube channel stand out and enhance your chances of making more money on YouTube. Don’t hesitate to start your journey now!
Free Download For Win 7 or later(64-bit)
Free Download For macOS 10.14 or later
Part 1: Why choose YouTube to make money?
Boasting over 2 billion active users globally, YouTube remains the most used video-playing platform on the internet with all kinds of videos.
Today, many folks use YouTube as a means of generating income because it offers users more opportunities to reach a wide range of audiences, and the means of generating income via YouTube easily. As of when this article is written, research shows that an average YouTuber could earn up to $10,000 yearly.
Also, YouTube is a free marketing platform. So, if you have a website, you can add links to your website in the video description, thus enabling you to boost your website traffic via the platform. And it’ll allow you to advertise your product or services 100% free.
Part 2: 5-Step Formula to Start a YouTube Channel
Now you understand why you should choose YouTube to make money, the following steps will teach you how to create a YouTube channel within a few clicks. So, read on.
Step1 Create a google account
To get started, you need to create a google account. But if you already have a Google account you can skip this step.
Head to Google Account and click Create Account at the top right corner.
On the new screen, enter the necessary details and click Next.
Provide your phone number and other required details. Then, click Next.
On the new page, click I Agree to accept Google’s terms and conditions. Then finish the Google Account setup.
Step2 Create a YouTube account
Once you’ve successfully created a Google account, the next thing is to create your YouTube account. You just have to do the following to carry out the operation;
Open YouTube’s official website in your browser and click Sign in from the top right corner.
On the new page, sign in to the Google account that you want to use in creating your YouTube channel.
After you sign in to your Google account, you’ll be prompted back to the YouTube home interface. Click on your profile icon from the top right corner and select Create A Channel from the drop-down list.
Choose the Name you want to appear on your YouTube channel profile and upload a preferred Picture. Then, click Create Channel to proceed.
Step3 Customize your YouTube channel
After you’ve successfully created the channel, the next thing is to customize the channel as per requirement. Click Customise Channel from the left-hand side.
You’ll be prompted to the YouTube creator studio. There, you’ll find Layout, Branding, and Basic Info options displayed at the top of the page.
In the Layout section, you’ll be allowed to apply customization of how you want your YouTube channel homepage to look.
Under Branding, you can upload your brand logo as a profile photo, upload a banner image, and add the video watermark that you want to appear on all videos you upload on YouTube.
Under Basic Info, you’ll be able to enter a description for your YouTube channel, edit your channel URL, and do lots more. However, remember to always use the PUBLISH button to save customization.
Step4 Upload your first YouTube video
Now, it’s to upload your first YouTube video. To do so, navigate to the top-right corner of the page and click Create New. Select Upload Video.
If you have a video ready, click Select Files and upload the video you want to post.
Complete the required editing/settings after the video is uploaded.
Speaking of videos, you upload on YouTube, there are certain types of videos that can make you popular within a short time. Such YouTube video category includes;
- Singing
- Teaching
- Fashion Advice
- Cooking Tutorial
- Make-Up Tutorial
Step5 Make your YouTube channel discoverable
It’s time to start making your YouTube channel discoverable online. You need the subscribers, views, and all that a creator like you is worth having. However, to make this possible, you need to do the following;
Optimize Video Titles
Using Google-friendly titles for your videos is vital to allow them to rank well on Google search ranking. It should be catchy and compelling that users will be prompted to want to know what the video is about. Make sure it contains keywords too.
Optimize Video Description
Adding descriptions to your video is as important as the title. This will help search engines understand what your video is all about. So, make sure you add rich keywords to your video description and keep it concise.
Promote Your Channel on Other Social Media Platforms
You shouldn’t limit yourself to just creating videos and uploading them on YouTube. Make sure you always make it a priority to promote your YouTube videos on other platforms like Facebook, Twitter, or Instagram. This will help you give your existing fans a heads-up that you’re starting a YouTube channel.
Add Tags to your videos
When we say add tags to your videos, it does not mean you should add any tag to any video you upload on YouTube. Only add tags that’s relating to the theme of your video.
Tags will help YouTube understand the kind of video you’re uploading, and it’ll help you maintain the quality of not just your videos but your YouTube channel.
Use Keywords in Your Videos
Using rich keywords in your YouTube videos is a great way to increase the chances of your videos being seen online. Make sure you use the right keyword in the video title, as it’ll help guide viewers to your video when they search for similar words or phrases online.
Part 3: YouTube Must-Have Tools: What Are They?
Congratulations on creating your YouTube channel. But, before you get over-excited, there are essential tools you need as a YouTuber to help you stand out in the industry. These tools include the following;
1. Video Editor – Wondershare Filmora
As a YouTuber, regardless of your niche of expertise, you need an efficient video editing tool like Wondershare Filmora to create quality videos. Filmora is different from the regular video editor you find online, and it offers a plethora of video editing features that you can rely on to edit your videos and spice them up without requiring any kind of video editing knowledge.
See how you can use Filmora video editor on your YouTube videos;
Free Download For Win 7 or later(64-bit)
Free Download For macOS 10.14 or later
Step1 Go to the official website and install the Filmora video editing software on your computer. Then, launch the tool and import the video you want to edit using the Import button.
Drag-n-drop the video to the timeline.
Step2 Click Effects from the top of the screen. Select AI Portrait from the left-hand side and find a preferred AI Portrait effect. Then, click on it and drag-n-drop the effect to the Timeline.
Adjust the effect starting and ending point of where you want the AI Portrait effect to be displayed.
Step3 Again, adjust the AI Portrait effect settings by double-clicking on it, then, from the pop-up, apply the preferred settings.
Step4 You can also add a “Subscribe” watermark to your YouTube video. To do so, just click the >> icon next to Export at the top of the screen, then select Element.
Select the ‘Social Media Show Element 07’ Effects. Then, drag-n-drop it to the Timeline.
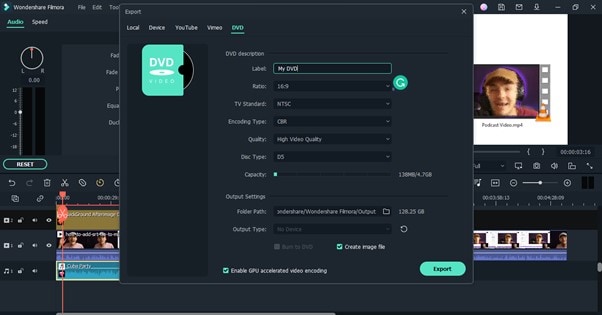
Step5 Lastly, preview the edited video, and if you’re okay with it, click Export from the top bar and select Burn DVD from the drop-down list.
From the pop-up window that appears on your PC screen, select the Folder Path and give the video file a preferred name. Then, click Export to complete the operation.
2. Google Keyword Planner
The Google keyword planner is vital to help you do keyword research and see the trends of how a particular keyword is searched in a particular month, within a given year, or more. It’ll help you understand how people are searching for a particular keyword and what time of the year it usually has more searches from folks.
By using Google Keyword planner, you’ll put yourself ahead of your competitors by using the right keyword that you need for your SEO and PPC strategies at the right time. From search volume to trends, CPC, competition scores, and more, it’s crucial you have this tool at your fingertips. Besides, it’s 100% free to use.
3. YouTube Studio
YouTube Studio is a crucial analytic tool that can come in handy to help you improve your video as you grow your YouTube channel. It is like Google Analytics in a way. It’ll allow you to track the analytics of how people view your videos, comment on your video, and more. YouTube Studio is available for free. You can use it through the Android App, on your PC or online from YouTube itself.
4. VidIQ
Are you looking for a tool to grow your YouTube channel efficiently? Then VidIQ is the ideal tool for you. Yes, with VidIQ, you’ll get access to essential tools to grow your YouTube audience faster than you can think. It’s just a scorecard that offers you in-depth analytics of how your YouTube videos are performing compared to your competitors, thus allowing you to get helpful info on how you can get ahead of them and stand out in the industry.
With VidIQ, you’ll get access to a checklist that will highlight titles, descriptions, cards, end screens, closed captions, and lots more in your videos. And of all, it’ll suggest tags that you can use in your videos to get more traffic and improve SEO.
Part 4: Tips & Tricks to Make your YouTube Grow Faster
Stay Consistent
There’s no doubt that the key to succeeding in whatever you do is to stay consistent. It can be quite hard for anyone, especially newbies to keep up with different difficulties encountered in the pursuit to create a successful YouTube channel.
So, for you to achieve your dreams of being a popular YouTuber, you must keep up with the consistency of creating quality videos, promoting your videos, and doing the right thing that’s needed for your YouTube channel to stand out online.
Collaborate With Other YouTubers
Don’t be shy to reach out to your fellow YouTubers for collaboration. Yes, by collaborating with popular YouTubers, you get to enhance your online presence, thereby increasing your subscriber base and increasing your video views.
YouTube SEO Is Crucial
You might have heard of SEO (Search Engine Optimization) being crucial for websites to rank well, but the truth is it also applies to YouTube channels. YouTube SEO is a great way to optimize your YouTube channel and video to make it rank well on online search results.
It’s important you understand how YouTube SEO works and implement it in your YouTube channel, as it’ll increase your chances of more viewers visiting your channel and watching your videos.
Final Words
That’s all you need to know about creating a successful YouTube channel. If you fancy creating videos, the above tips will teach you how to create a YouTube channel and make money. Also, if you read the article to this point, we believe you’ve understood different ways you can make your YouTube channel stand out and enhance your chances of making more money on YouTube. Don’t hesitate to start your journey now!
Free Download For Win 7 or later(64-bit)
Free Download For macOS 10.14 or later
Also read:
- Pinnacle Creator The Duo of Media Elements
- Trustworthy Approaches for Securely Amassing A Million Views on YouTube
- Stream Like Never Before Turning On YouTube's AV1
- The Visionary Viewers' Verdict Your Channel Vs. Contenders’ Content
- The Ultimate Guide To Using Hashtags For YouTube Gaming Videos
- 2024 Approved Android, iOS & PC-Friendly YouTube Downloader Apps Reviewed
- [New] A Step-by-Step Guide How To Record, Save & Share YouTube Video for No Cost
- YouTube’s Creative Commons A Guide for Videographers
- Academic History Lovers' Guide to Top YT Content
- Unraveling Video Dimensions A Complete Approach for YT Content
- Boost Your Channels A Guide to Best YouTube SEO Resources
- Cutting-Edge Computers Optimal Machines for Media Creation for 2024
- Unveiling the Art of Choosing High-Impact Youtube Channels
- 5 Best Sites for Quick Templates on YouTube for 2024
- [New] Building Your Own YouTube Auto-Subscribe URL
- Enhancing Follows Into Genuine Subscriptions
- Your Guide to Iconic Fonts Boosting Video Engagement
- Transforming Ordinary Videos Into Viral Hits with Innovative Thumbnails
- Strategies for Overcoming 8 Typical Newbie YouTube Errors
- Discovering the Best Music Playback on YouTube, 2023 for 2024
- [Updated] Achieving Cohesion in Content with FlV Video Integration
- How to Harness YouTube's Creative Commons in Video Making
- Essential Guide for YouTube Video Clips
- [Updated] Boldly Step Up Claim Your Set of 50 Exquisite, Cost-Free YouTube Promo Materials
- [New] Elevate Your Brand - Discover the Riches in Our Gallery of 50 Free YouTube Banners
- 5-Star Channel Cutting Long URLs Down for YouTube Videos
- [Updated] Cutting-Edge Computers Optimal Machines for Media Creation
- Premier Top Selections Affordable SBD Applications
- 2024 Approved Boost Your Budget A Straightforward Triple-Step Method to Monitor YouTube Revenue
- Virtual Reality Streaming Who to Watch
- Addressed Hidden Shorters, Now Visible for 2024
- Achieve Perfect YouTube Broadcasts with Superior Webcams
- [New] Closing Powerhouses Free Top 6 Video Closers
- Cultivating a Brand Identity YouTube Visibility without Spending for 2024
- Breaking Through YouTube's Walls Using Advanced Creator Studio Skills
- [New] Easy Ways to Add Music to iMovie From YouTube
- Churning Up Channels Top Gear List for 2024
- Hassle-Free Ways to Remove FRP Lock from Honor X50i Phones with/without a PC
- 5 Ways to Track ZTE Axon 40 Lite without App | Dr.fone
- How to Factory Reset Google Pixel 8 Pro without Losing Data | Dr.fone
- How to Fix Android.Process.Media Has Stopped on Infinix Note 30 Pro | Dr.fone
- [New] Insta Authenticity Selfie Verification Insights
- New 15 Best Apps to Turn Photos Into Cartoons and Sketches
- [New] Surrender to Serenity Top 10 Game Guides for 2024
- [Updated] In 2024, Step Into 2023 A Comprehensive Guide to TikTok Elements
- Updated This Review Post Introduces You to EasyHDR to Review and Customize Your HDR Photos. Youll Also Learn the Best Desktop Application to Edit Your HDR Videos Effortlessly for 2024
- In 2024, Top 11 Free Apps to Check IMEI on Lava Phones
- The Best iSpoofer Alternative to Try On Honor X50i+ | Dr.fone
- New Wondering About How to Easily Create a Slideshow on Your iPhone? Well, Take Note of some of the Finest Apps to Turn Your Vision Into Reality
- [Updated] Enhancing Mac Webcam Recordings Effectively
- [Updated] In 2024, Boosting Discord Servers with These Innovative Bots
- Life360 Circle Everything You Need to Know On Motorola G54 5G | Dr.fone
- In 2024, Step-by-Step Tutorial for Capturing Calls Using Google Voice
- [New] 2024 Approved Boundless Banter Discovering the Top TikTok Zany Games
- [Updated] Pixelated Pastures Celebrating Rural Games
- 2024 Approved Ensuring Clear Sound with Proper OBS Configurations
- In 2024, 5 Ways to Track Vivo Y56 5G without App | Dr.fone
- In 2024, How to Intercept Text Messages on Vivo X100 | Dr.fone
- Updated 2024 Approved Transform Photos Into Videos Top Maker Software and Apps
- [Updated] 2024 Approved Become a TikTok Phenomenon with Self-Cloning Insights
- [Updated] Complete Audio Solution for Incomplete YouTube and FB Sounds for 2024
- Title: "Ideal Editors Perfect for High-Quality YouTube Videos"
- Author: Kevin
- Created at : 2024-05-25 15:20:39
- Updated at : 2024-05-26 15:20:39
- Link: https://youtube-videos.techidaily.com/ideal-editors-perfect-for-high-quality-youtube-videos/
- License: This work is licensed under CC BY-NC-SA 4.0.
