

How to Upload Shorts Video on YouTube?
How to Upload Shorts Video on YouTube?
How to Upload Shorts Video on YouTube? [2024]

Richard Bennett
Mar 27, 2024• Proven solutions


Quite recently, YouTube launched Shorts to compete with Tik Tok. At the time of this writing, the users in India have access to the fully functional version of the app. Although YouTube Shorts is available for both Android and iOS platforms, its functions are limited as the application is still in its Beta phase for the remaining part of the globe.
With that said, the following sections explain the step-by-step process on how to upload a short video on YouTube Shorts both from your smartphone and a PC.
Part 1: How to Upload Short Video on YouTube from PC?
The fact is, if you are using a computer to upload short videos to YouTube, the process is identical to publishing your other, regular footage. However, there are a few guidelines that your clips must comply with so that the streaming platform could specifically identify them as YouTube Shorts. These norms include:
- Your videos must not be more than 60 seconds long in duration
- They must be shot in portrait orientation, ideally in the 9:16 aspect ratio
- The title or the description must contain ‘#Shorts’ (without quotes) in it
Once you have a video recorded using the first two guidelines from the above list, you can use the instructions given below to upload the media on YouTube:
Step 1: Select a Short Video to Upload 
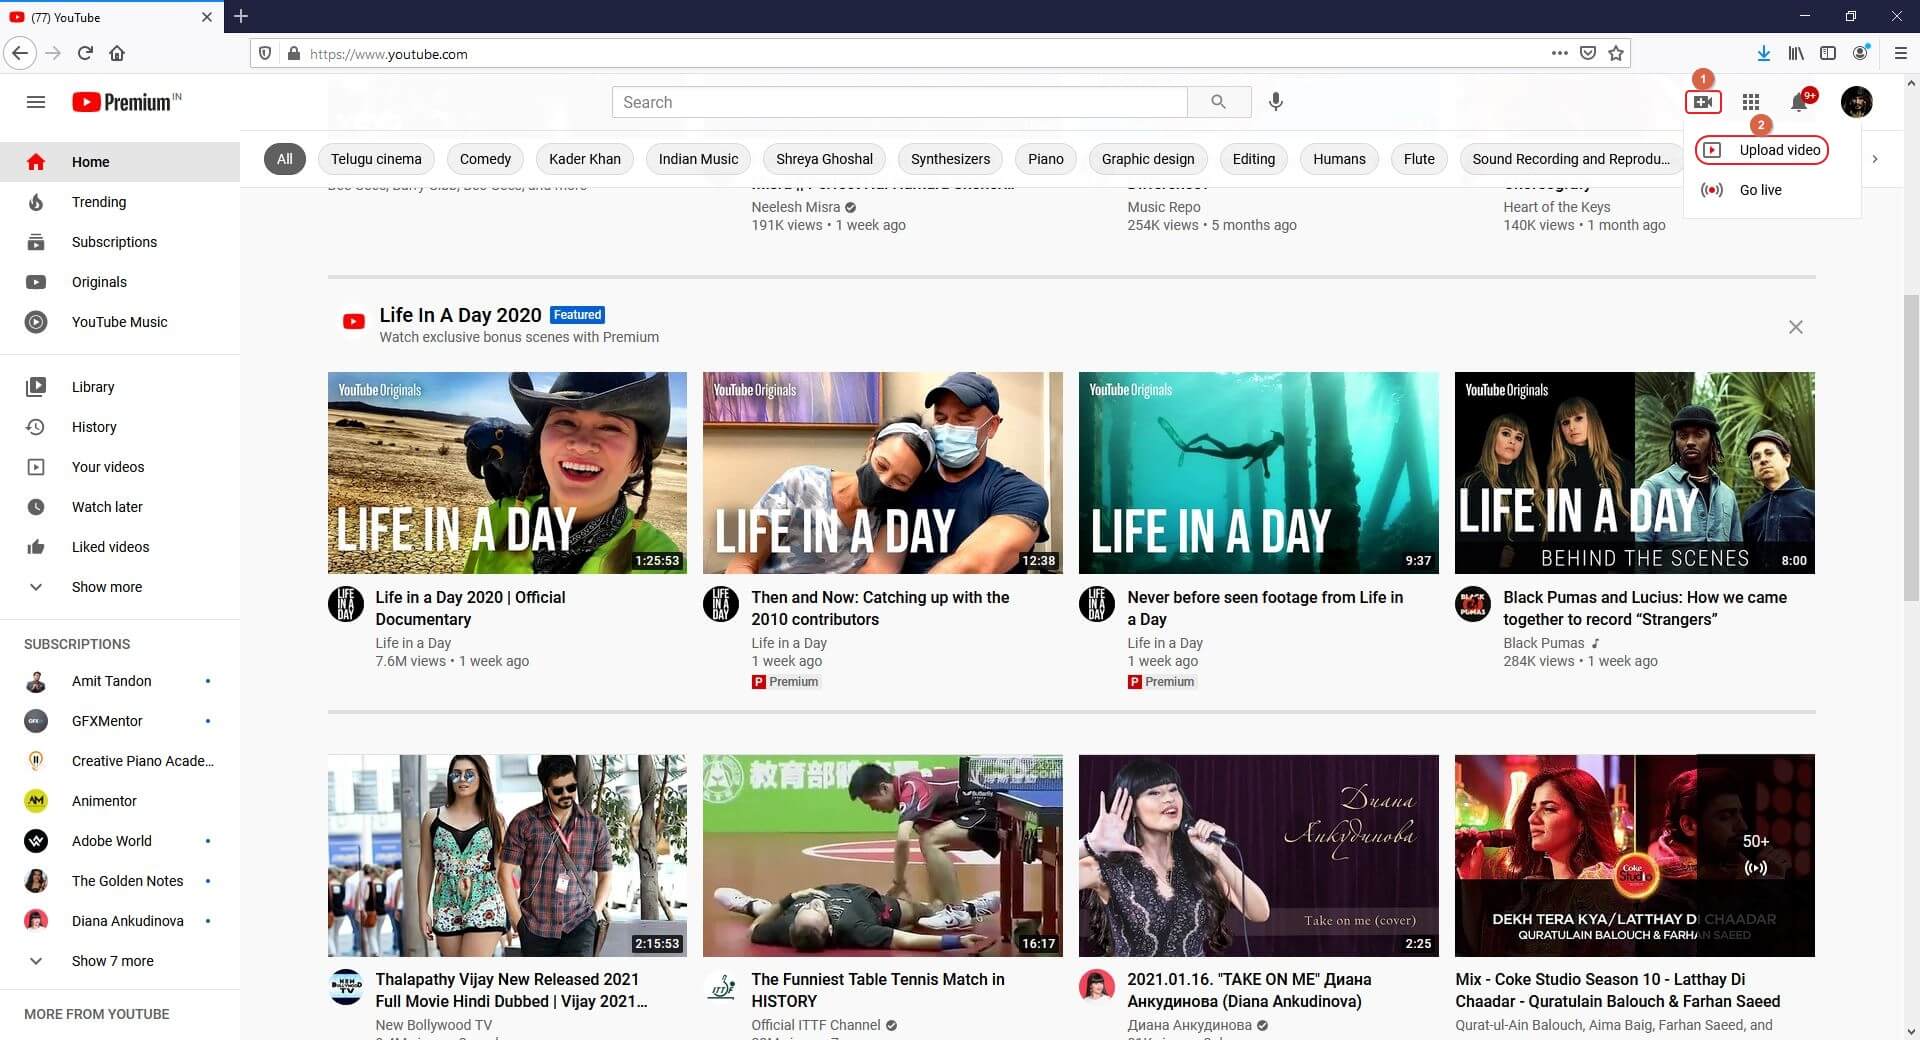
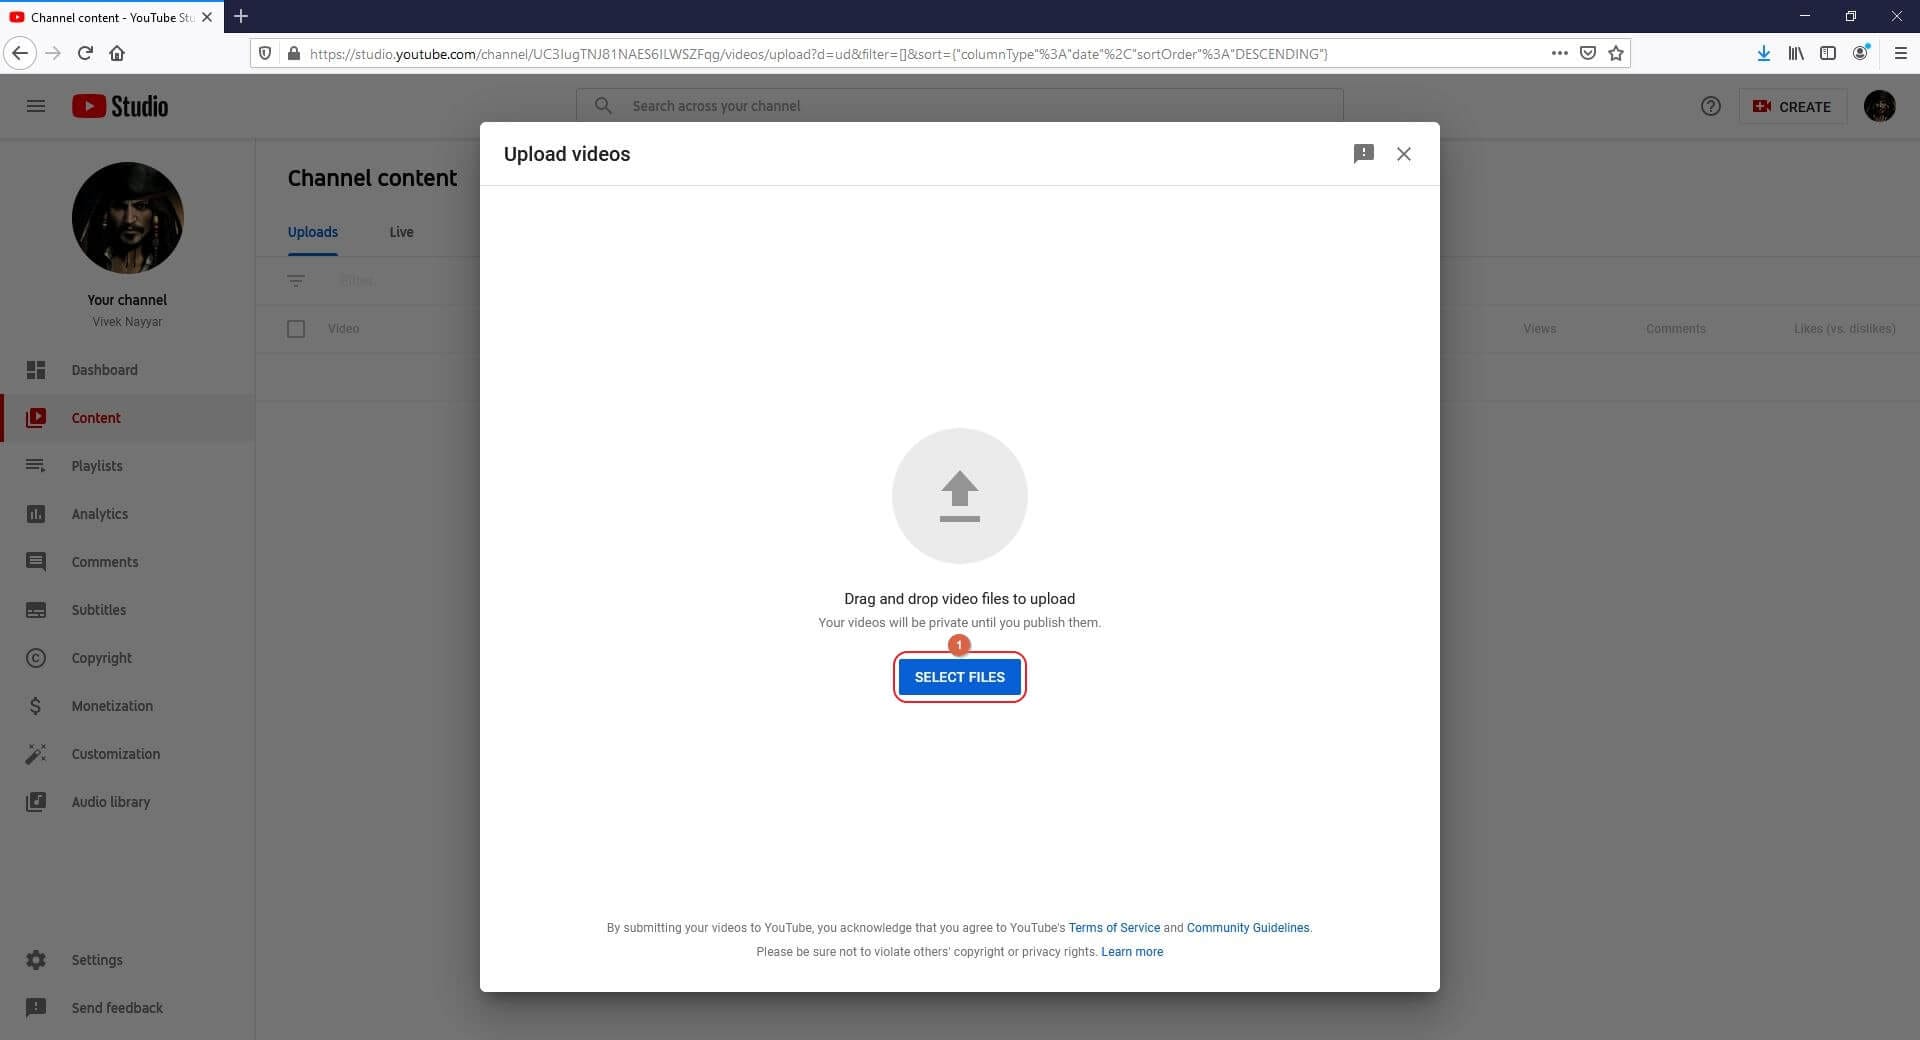
Launch your favorite web browser on your PC, go to YouTube, make sure to sign in to your YouTube account, click the Create (Camera) icon from the top-right corner of the web page, click SELECT FILES on the Upload videos window, and locate, select, and upload a short video from your PC to the portal.
Step 2: Mark the Video as Short
On the Details window that appears, add #Shorts in the Title or Description field, optionally pick a thumbnail from the suggested images present under the Thumbnail section (or upload a custom picture from your PC), select your preferred radio button from under the Audience section, make the other necessary changes if need be, and click NEXT. When the Video elements window comes up, choose your preferred options and elements, click NEXT.

Step 3: Publish the Short Video
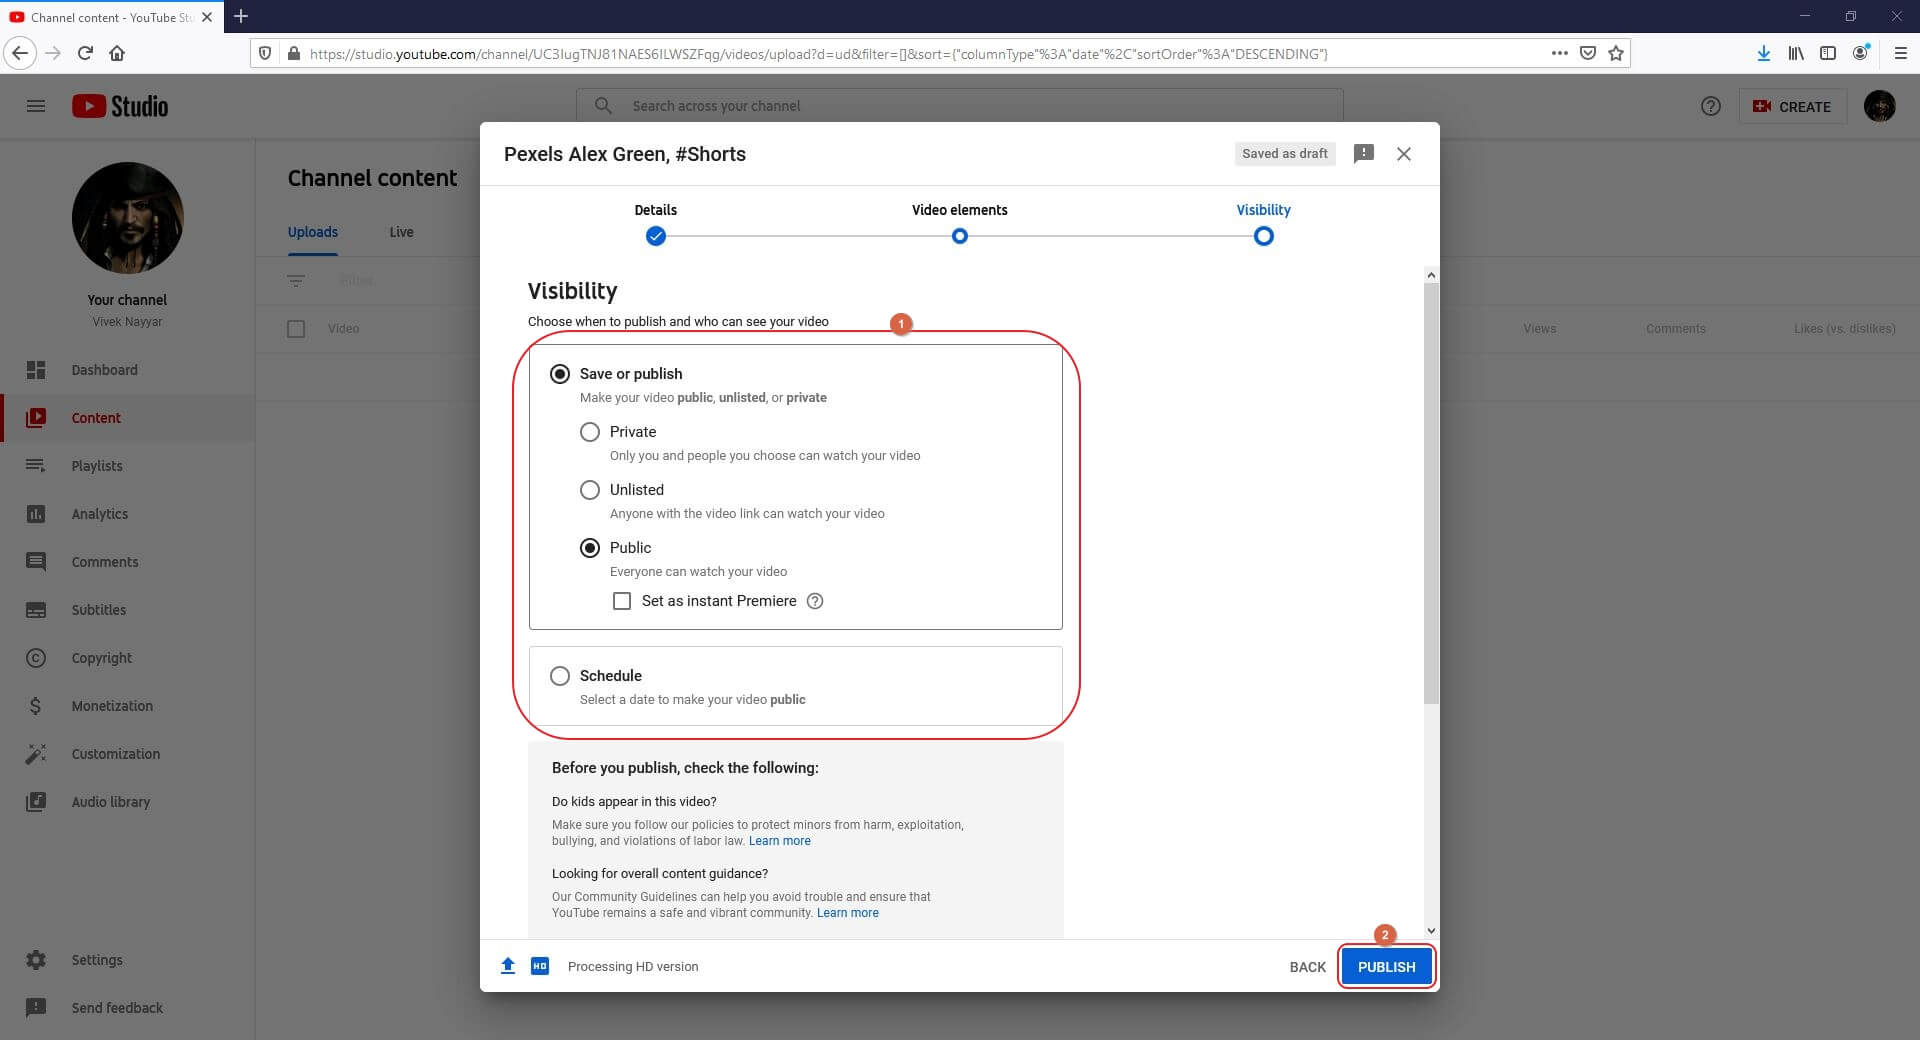
On the Visibility window, choose your preferred radio button from under the Save or publish section or select Schedule to set a different time when the short video should be published automatically. Finally, click SAVE to publish the clip as a short video on YouTube from your computer.
To sum up, uploading YouTube Shorts video from desktop has nothing different from uploading regular YouTube video besides the requirements listed at the beginning of this article. If you prefer to edit videos for YouTube Shortson a computer, I recommend you to try our video editor Filmora , which is an ideal solution for YouTubers. Download the free trial version below and get started.
For Win 7 or later (64-bit)
 Secure Download
For macOS 10.12 or later Secure Download
Part 2: How to Upload Short Video on YouTube Mobile App?
The process of uploading YouTube Shorts from the mobile app is fairly simple compared to the method used on a computer. While using the app, you can either upload an existing video or shoot a new one from within the program itself then and there, add music and text, and upload it right away. Both these methods are explained below in detail:
Note: The guidelines for creating and uploading short videos to YouTube remain the same, regardless of the platform or device you use.
Method 1: Upload an Existing Short Video
Note: Make sure to have the target video on the smartphone and that you have downloaded, installed, and signed in to the YouTube app before proceeding.
Step 1: Select a Video to Upload

On your Android or iOS smartphone, launch the YouTube app, tap the + (Create) icon from the bottom, tap Create a Short from the Create box that pops up from the bottom, tap Upload from the bottom-right corner of the next screen, and select and upload a short, 60 seconds video recorded in portrait orientation from your device’s storage to the app.
Step 2: Add Details
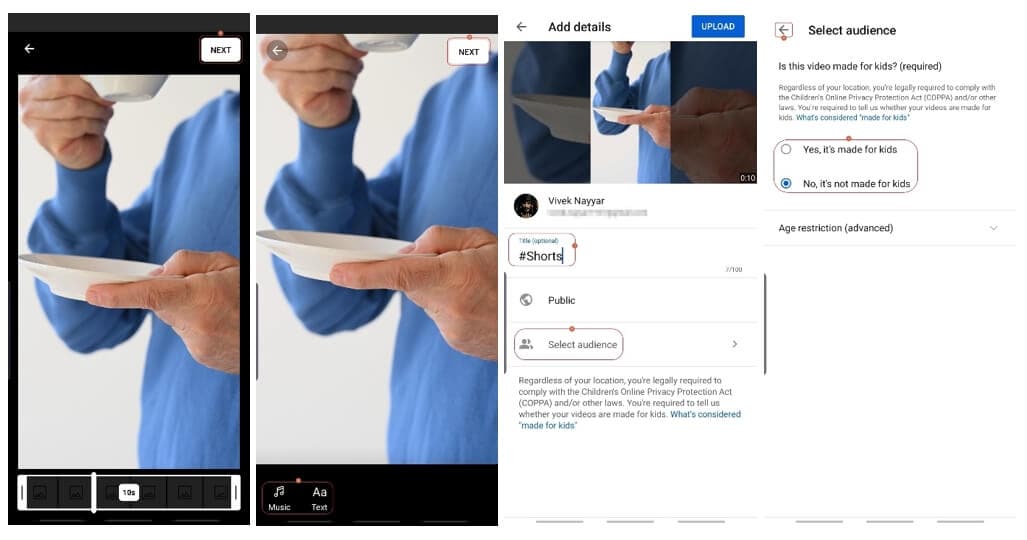
On the next screen, tap NEXT, user the Music and Text icons at the bottom-left corner to add a background music and caption to the video respectively, and tap NEXT from the top-right corner. On the next screen, enter a name for the video in the Title field along with the #Shorts tag, and tap Select audience to choose your preferred audience.
Step 3: Upload the Video
Finally tap UPLOAD from the top-right corner to upload the short video on YouTube.
Method 2: Record a Short Video and Upload
Step 1: Record Shorts Video
Previously, I have introduced how to record and upload YouTube Shorts videos , so I will keep the content concise here.
Please note you will not see the Create a Short option if you are outsides of India.

In the YouTube app, tap the + (Add) button and select Create a Short. Please note you will not see the Create a Short option if you are outsides of India.
Next, use the Speed and Timer icons to set the speed of the video and the countdown timer duration before the app starts recording the video when you press the Record button respectively.
Now tap the Record button from the bottom to start recording a video and stop to stop the recording. Make sure to shoot the footage in the portrait mode (ideally in the 9:16 aspect ratio). Tap NEXT from the bottom-right corner to proceed to the next step.
Step 2: Add Text and Music to the Short Video
On the next window, use the Music and Text buttons from the bottom-left corner to add a background music and caption to the video, and tap NEXT from the top-right corner.
Step 3: Upload and Post the Short Video
On the Add details window, enter a name for the video along with the #Shorts tag in the Create a title field, tap Select audience to select the target audience, and tap UPLOAD from the top-right corner to upload the short video on YouTube.
Conclusion
Learning the process of how to post short videos on YouTube is fairly simple as long as you have the video recorded in the portrait orientation, it is up to 60 seconds long, and contains the ‘#Shorts’ tag (without quotes) in the title or description. The good thing is, if you don’t have access to the YouTube app on your smartphone, the method for how to upload short video on YouTube explained in the first section can be followed while using your desktop computer.
Richard Bennett
Richard Bennett is a writer and a lover of all things video.
Follow @Richard Bennett
Richard Bennett
Mar 27, 2024• Proven solutions
Quite recently, YouTube launched Shorts to compete with Tik Tok. At the time of this writing, the users in India have access to the fully functional version of the app. Although YouTube Shorts is available for both Android and iOS platforms, its functions are limited as the application is still in its Beta phase for the remaining part of the globe.
With that said, the following sections explain the step-by-step process on how to upload a short video on YouTube Shorts both from your smartphone and a PC.
Part 1: How to Upload Short Video on YouTube from PC?
The fact is, if you are using a computer to upload short videos to YouTube, the process is identical to publishing your other, regular footage. However, there are a few guidelines that your clips must comply with so that the streaming platform could specifically identify them as YouTube Shorts. These norms include:
- Your videos must not be more than 60 seconds long in duration
- They must be shot in portrait orientation, ideally in the 9:16 aspect ratio
- The title or the description must contain ‘#Shorts’ (without quotes) in it
Once you have a video recorded using the first two guidelines from the above list, you can use the instructions given below to upload the media on YouTube:
Step 1: Select a Short Video to Upload
Launch your favorite web browser on your PC, go to YouTube, make sure to sign in to your YouTube account, click the Create (Camera) icon from the top-right corner of the web page, click SELECT FILES on the Upload videos window, and locate, select, and upload a short video from your PC to the portal.
Step 2: Mark the Video as Short
On the Details window that appears, add #Shorts in the Title or Description field, optionally pick a thumbnail from the suggested images present under the Thumbnail section (or upload a custom picture from your PC), select your preferred radio button from under the Audience section, make the other necessary changes if need be, and click NEXT. When the Video elements window comes up, choose your preferred options and elements, click NEXT.
Step 3: Publish the Short Video
On the Visibility window, choose your preferred radio button from under the Save or publish section or select Schedule to set a different time when the short video should be published automatically. Finally, click SAVE to publish the clip as a short video on YouTube from your computer.
To sum up, uploading YouTube Shorts video from desktop has nothing different from uploading regular YouTube video besides the requirements listed at the beginning of this article. If you prefer to edit videos for YouTube Shortson a computer, I recommend you to try our video editor Filmora , which is an ideal solution for YouTubers. Download the free trial version below and get started.
For Win 7 or later (64-bit)
Secure Download
For macOS 10.12 or later Secure Download
Part 2: How to Upload Short Video on YouTube Mobile App?
The process of uploading YouTube Shorts from the mobile app is fairly simple compared to the method used on a computer. While using the app, you can either upload an existing video or shoot a new one from within the program itself then and there, add music and text, and upload it right away. Both these methods are explained below in detail:
Note: The guidelines for creating and uploading short videos to YouTube remain the same, regardless of the platform or device you use.
Method 1: Upload an Existing Short Video
Note: Make sure to have the target video on the smartphone and that you have downloaded, installed, and signed in to the YouTube app before proceeding.
Step 1: Select a Video to Upload
On your Android or iOS smartphone, launch the YouTube app, tap the + (Create) icon from the bottom, tap Create a Short from the Create box that pops up from the bottom, tap Upload from the bottom-right corner of the next screen, and select and upload a short, 60 seconds video recorded in portrait orientation from your device’s storage to the app.
Step 2: Add Details
On the next screen, tap NEXT, user the Music and Text icons at the bottom-left corner to add a background music and caption to the video respectively, and tap NEXT from the top-right corner. On the next screen, enter a name for the video in the Title field along with the #Shorts tag, and tap Select audience to choose your preferred audience.
Step 3: Upload the Video
Finally tap UPLOAD from the top-right corner to upload the short video on YouTube.
Method 2: Record a Short Video and Upload
Step 1: Record Shorts Video
Previously, I have introduced how to record and upload YouTube Shorts videos , so I will keep the content concise here.
Please note you will not see the Create a Short option if you are outsides of India.
In the YouTube app, tap the + (Add) button and select Create a Short. Please note you will not see the Create a Short option if you are outsides of India.
Next, use the Speed and Timer icons to set the speed of the video and the countdown timer duration before the app starts recording the video when you press the Record button respectively.
Now tap the Record button from the bottom to start recording a video and stop to stop the recording. Make sure to shoot the footage in the portrait mode (ideally in the 9:16 aspect ratio). Tap NEXT from the bottom-right corner to proceed to the next step.
Step 2: Add Text and Music to the Short Video
On the next window, use the Music and Text buttons from the bottom-left corner to add a background music and caption to the video, and tap NEXT from the top-right corner.
Step 3: Upload and Post the Short Video
On the Add details window, enter a name for the video along with the #Shorts tag in the Create a title field, tap Select audience to select the target audience, and tap UPLOAD from the top-right corner to upload the short video on YouTube.
Conclusion
Learning the process of how to post short videos on YouTube is fairly simple as long as you have the video recorded in the portrait orientation, it is up to 60 seconds long, and contains the ‘#Shorts’ tag (without quotes) in the title or description. The good thing is, if you don’t have access to the YouTube app on your smartphone, the method for how to upload short video on YouTube explained in the first section can be followed while using your desktop computer.
Richard Bennett
Richard Bennett is a writer and a lover of all things video.
Follow @Richard Bennett
Maximizing Reach: Uploading Twitch Videos on YouTube
Create High-Quality Video - Wondershare Filmora
An easy and powerful YouTube video editor
Numerous video and audio effects to choose from
Detailed tutorials provided by the official channel
Amidst many online applications is Twitch. This live streaming platform takes your experience to another level. You can use it to make crafts, play games, attract broadcasters, and many more. Twitch was launched in 2011, and since then, it has attracted millions of users, managing a database of about 4 million broadcasters by early 2020. With it, users can stream their activities as others watch in real-time. Just browse a category to find a stream.
You can also follow streamers that you like on the platform and get updates and notifications immediately after they are posted. But how do you start a career on a platform like Twitch? You need to broadcast and gather a large following. You can use built-in audiences from other platforms like Facebook. Let’s dive into the core of the matter and look at how to upload Twitch streams to YouTube and build your platform.

In this article
02 What is the benefit of uploading your Twitch Streams to YouTube
03 How to upload your Twitch Streams to YouTube
What is Twitch VOD?
Twitch Video on Demand (VOD) is a recording of previously streamed content. It provides briefings if you missed catching the Twitch live stream. Just watch the VOD from your favorite streamer and be engaged the best way possible. However, VODs don’t last forever. They are removed after two weeks of broadcast. But streamers with Partner Status can have their VODs last up to 60 days.
- How to enable Twitch VOD?
VODs are the best form to archive streams that your fans missed. Even though they are not enabled by default, you can manually enable them and not let your fans miss any important event from your channel. They’ll find it under the “Videos” tab on any Twitch channel. Follow these steps to enable VOD on your channel.
Step 1. Go to your profile icon in the top right corner of Twitch
Check in the “Channel & Video” section and locate the “Stream Key & Preferences” menu.

Step 2. Click on “Creator Dashboard”
Remember, you can enable VODs from your creator dashboard. Just go under the “Settings” tab and click on the “Stream section” of the creator dashboard. Check under the subtitle “VOD Settings” and get the option to store past broadcasts. You can also toggle the slider to store your past broadcasts.

Step 3 Click on the “Settings” tab on the left-hand side and go to Stream
You’ll get various drop-down menu options. Click on the “Settings” tab and choose the “Stream” option. The system will navigate to a new page, thus setting your preferences for VODs and clips.
Step 4. Go to “VOD Settings” and toggle on the “Store Past Broadcast.”
Ensure you have the toggle option turned ON under the “VOD Settings.” If it’s “ON,” you’ll realize the toggle will be purple, with a checkmark in it. Twitch will be confirmed to be enabled if it’s purple.

- Frequently Asked Question about Twitch VOD
These are some questions frequently asked by Twitch users.
1. How long will Twitch store my VOD
Your Twitch can either be stored for 14 or 60 days, depending on your level. For Twitch Prime, Twitch Partner or a Twitch Turbo user has their past broadcasts automatically saved for 60 days before deletion. But if you are not connected to these three options, your past broadcasts will be saved for only 14 days before deletion.
Since your past broadcasts cannot be live for more than 60 days, you have the option to download the video to your computer before the validity days expire and Twitch deletes it. You can use an External Hard drive to save the past broadcast content. Likewise, it is possible to turn your past broadcast content into Highlight and, in turn, permanently store them on Twitch.
2. What is the difference between Twitch VOD, Highlights, and Clips
Twitch VOD is a previously saved video of your live stream content. You choose to save either part or the entire content of your previously streamed content. More so, you don’t need any additional requirements to use VOD.
Highlights are short videos that have been edited from your past broadcast content. You can save them on Twitch permanently. Streamers majorly use highlights to save video game achievements. Unlike VOD Twitch that can be saved up to 60 days, Highlights usually lasts no more than 3 minutes.
- To make Highlights on Twitch, first, navigate to your Dashboard.
- Then scroll down and click on “Content” > “Video Producer.
- Next, press on “All Videos” to change them to “Past Broadcasts.”
- Now press the “Highlight” button, and Twitch will immediately open a new tab for “Twitch Highlighter Tool.”
- Then select the video part to include as “Highlight” and press the “Create Highlights” button.
- Wait a while for the process to be completed, and Voila! You have your Highlights created.
When it comes to Twitch Clip, you can capture special moments in a stream you are currently watching. On the same note, you can share clips with friends and other users on social media platforms. Such shared clips contain a link where others view the source or video from.
The clips you create will automatically be saved on the streamer’s channel on the “Clips” page, where other viewers can see them too. Nonetheless, you can download “clips” to your computer and, in turn, upload them whenever you want to. And note that you can help your stream grow via “Clips” by letting your viewers clip and share your stream moments.
- To create “Clips” on Twitch, identify which Streamers channel you wish to create a clip from.
- Then click on the “Clapper board” icon. Next, edit your clip between 5 and 60 seconds long.
- Finally, create a title and publish your Clip. You’ll also enjoy the privilege to share your clip’s link to other social media networks.
What is the benefit of uploading your Twitch Streams to YouTube
You stand to gain a lot when you upload your Twitch Streams to YouTube.
1) To enlighten your followers
Your followers will see your streams and make the best decisions. Viewers can check out your recordings and other highlights from past streams. It will help them decide whether they like what they see and probably join your live streams.
2) Twitch provides content for you to share and monetize on YouTube
Since Twitch streaming is more popular nowadays, many people throng it for content. It is not wise to rely entirely on Twitch to discover as a Twitch Streamer. Posting to YouTube will make it known within a short time. You would have announced your streams most nobly and kept your followers up to date, attracting new ones as well.
3) To keep your followers engaged even when you are offline
Even though live streaming is important, some viewers may not attend the live sessions due to different time zones or other commitments. In this regard, when uploaded to YouTube, Twitch will give them a chance to watch your content just whenever they log in. They, therefore, have the option to watch a Twitch VOD of the live stream they missed.
How to upload your Twitch Streams to YouTube
Check how to upload Twitch streams to YouTube from the Twitch website.
Step 1. Identify the little arrow next to your name on the Twitch website and click on it. Then click on the “Video Producer” to take you to a list of your Twitch videos.

Step 2. Check out and click on the “three-dots” on the video you wish to upload to YouTube. Click on the “Export” tab.
Step 3. A menu will then pop up. Here, you can fill in the description, title, and tags that you would like to appear on the YouTube video. There is an option for Twitch to split your video automatically. If you wish so, then tick the “Checkbox” to enable it. Then click on the “Start Export” option to export your Twitch streams to YouTube.

Bouns! Edit Your Twitch Video with Filmora
The quality of your video matters when it comes to uploading Twitch Streams to YouTube. Using a third-party tool to edit your video is the first step in ensuring your videos communicate meaningful content. Filmora comes in handy to bring your imaginations to life. Use it for simple creation without limits, even for beginners.
- Use it to track moving objects in video clips
- Easily match any image of the selected clip
- Its powerful tools let you edit your video by cropping, splitting, adjusting speed, etc
- The video keyframe easily indicates the beginning and end of the parameters
For Win 7 or later (64-bit)
For macOS 10.12 or later
Conclusion
● Don’t just focus on how to upload Twitch streams to YouTube but also consider the quality of video you are posting to YouTube. Remember, your video quality will speak much more of you than any other description. So, strive to produce quality videos using the best tool, Filmora. The app is easy to use and will elevate your views and imaginations through your video in the most impactful way.
Amidst many online applications is Twitch. This live streaming platform takes your experience to another level. You can use it to make crafts, play games, attract broadcasters, and many more. Twitch was launched in 2011, and since then, it has attracted millions of users, managing a database of about 4 million broadcasters by early 2020. With it, users can stream their activities as others watch in real-time. Just browse a category to find a stream.
You can also follow streamers that you like on the platform and get updates and notifications immediately after they are posted. But how do you start a career on a platform like Twitch? You need to broadcast and gather a large following. You can use built-in audiences from other platforms like Facebook. Let’s dive into the core of the matter and look at how to upload Twitch streams to YouTube and build your platform.
In this article
02 What is the benefit of uploading your Twitch Streams to YouTube
03 How to upload your Twitch Streams to YouTube
What is Twitch VOD?
Twitch Video on Demand (VOD) is a recording of previously streamed content. It provides briefings if you missed catching the Twitch live stream. Just watch the VOD from your favorite streamer and be engaged the best way possible. However, VODs don’t last forever. They are removed after two weeks of broadcast. But streamers with Partner Status can have their VODs last up to 60 days.
- How to enable Twitch VOD?
VODs are the best form to archive streams that your fans missed. Even though they are not enabled by default, you can manually enable them and not let your fans miss any important event from your channel. They’ll find it under the “Videos” tab on any Twitch channel. Follow these steps to enable VOD on your channel.
Step 1. Go to your profile icon in the top right corner of Twitch
Check in the “Channel & Video” section and locate the “Stream Key & Preferences” menu.
Step 2. Click on “Creator Dashboard”
Remember, you can enable VODs from your creator dashboard. Just go under the “Settings” tab and click on the “Stream section” of the creator dashboard. Check under the subtitle “VOD Settings” and get the option to store past broadcasts. You can also toggle the slider to store your past broadcasts.
Step 3 Click on the “Settings” tab on the left-hand side and go to Stream
You’ll get various drop-down menu options. Click on the “Settings” tab and choose the “Stream” option. The system will navigate to a new page, thus setting your preferences for VODs and clips.
Step 4. Go to “VOD Settings” and toggle on the “Store Past Broadcast.”
Ensure you have the toggle option turned ON under the “VOD Settings.” If it’s “ON,” you’ll realize the toggle will be purple, with a checkmark in it. Twitch will be confirmed to be enabled if it’s purple.
- Frequently Asked Question about Twitch VOD
These are some questions frequently asked by Twitch users.
1. How long will Twitch store my VOD
Your Twitch can either be stored for 14 or 60 days, depending on your level. For Twitch Prime, Twitch Partner or a Twitch Turbo user has their past broadcasts automatically saved for 60 days before deletion. But if you are not connected to these three options, your past broadcasts will be saved for only 14 days before deletion.
Since your past broadcasts cannot be live for more than 60 days, you have the option to download the video to your computer before the validity days expire and Twitch deletes it. You can use an External Hard drive to save the past broadcast content. Likewise, it is possible to turn your past broadcast content into Highlight and, in turn, permanently store them on Twitch.
2. What is the difference between Twitch VOD, Highlights, and Clips
Twitch VOD is a previously saved video of your live stream content. You choose to save either part or the entire content of your previously streamed content. More so, you don’t need any additional requirements to use VOD.
Highlights are short videos that have been edited from your past broadcast content. You can save them on Twitch permanently. Streamers majorly use highlights to save video game achievements. Unlike VOD Twitch that can be saved up to 60 days, Highlights usually lasts no more than 3 minutes.
- To make Highlights on Twitch, first, navigate to your Dashboard.
- Then scroll down and click on “Content” > “Video Producer.
- Next, press on “All Videos” to change them to “Past Broadcasts.”
- Now press the “Highlight” button, and Twitch will immediately open a new tab for “Twitch Highlighter Tool.”
- Then select the video part to include as “Highlight” and press the “Create Highlights” button.
- Wait a while for the process to be completed, and Voila! You have your Highlights created.
When it comes to Twitch Clip, you can capture special moments in a stream you are currently watching. On the same note, you can share clips with friends and other users on social media platforms. Such shared clips contain a link where others view the source or video from.
The clips you create will automatically be saved on the streamer’s channel on the “Clips” page, where other viewers can see them too. Nonetheless, you can download “clips” to your computer and, in turn, upload them whenever you want to. And note that you can help your stream grow via “Clips” by letting your viewers clip and share your stream moments.
- To create “Clips” on Twitch, identify which Streamers channel you wish to create a clip from.
- Then click on the “Clapper board” icon. Next, edit your clip between 5 and 60 seconds long.
- Finally, create a title and publish your Clip. You’ll also enjoy the privilege to share your clip’s link to other social media networks.
What is the benefit of uploading your Twitch Streams to YouTube
You stand to gain a lot when you upload your Twitch Streams to YouTube.
1) To enlighten your followers
Your followers will see your streams and make the best decisions. Viewers can check out your recordings and other highlights from past streams. It will help them decide whether they like what they see and probably join your live streams.
2) Twitch provides content for you to share and monetize on YouTube
Since Twitch streaming is more popular nowadays, many people throng it for content. It is not wise to rely entirely on Twitch to discover as a Twitch Streamer. Posting to YouTube will make it known within a short time. You would have announced your streams most nobly and kept your followers up to date, attracting new ones as well.
3) To keep your followers engaged even when you are offline
Even though live streaming is important, some viewers may not attend the live sessions due to different time zones or other commitments. In this regard, when uploaded to YouTube, Twitch will give them a chance to watch your content just whenever they log in. They, therefore, have the option to watch a Twitch VOD of the live stream they missed.
How to upload your Twitch Streams to YouTube
Check how to upload Twitch streams to YouTube from the Twitch website.
Step 1. Identify the little arrow next to your name on the Twitch website and click on it. Then click on the “Video Producer” to take you to a list of your Twitch videos.
Step 2. Check out and click on the “three-dots” on the video you wish to upload to YouTube. Click on the “Export” tab.
Step 3. A menu will then pop up. Here, you can fill in the description, title, and tags that you would like to appear on the YouTube video. There is an option for Twitch to split your video automatically. If you wish so, then tick the “Checkbox” to enable it. Then click on the “Start Export” option to export your Twitch streams to YouTube.
Bouns! Edit Your Twitch Video with Filmora
The quality of your video matters when it comes to uploading Twitch Streams to YouTube. Using a third-party tool to edit your video is the first step in ensuring your videos communicate meaningful content. Filmora comes in handy to bring your imaginations to life. Use it for simple creation without limits, even for beginners.
- Use it to track moving objects in video clips
- Easily match any image of the selected clip
- Its powerful tools let you edit your video by cropping, splitting, adjusting speed, etc
- The video keyframe easily indicates the beginning and end of the parameters
For Win 7 or later (64-bit)
For macOS 10.12 or later
Conclusion
● Don’t just focus on how to upload Twitch streams to YouTube but also consider the quality of video you are posting to YouTube. Remember, your video quality will speak much more of you than any other description. So, strive to produce quality videos using the best tool, Filmora. The app is easy to use and will elevate your views and imaginations through your video in the most impactful way.
Also read:
- Ultimate Leaderboard Locator YouTube's Most Pop Videos
- Adaptive Content Strategies for Optimal YouTube Performance for 2024
- Creative Components FREE YouTube Visual Resources
- [New] Enjoy YouTube Music Anytime with These 23 Essential, No-Cost Audio Extractors
- Efficiently Downloading YouTube Sections in Minutes
- 2024 Approved 5 Winter YouTube Background Ideas to Warm Up Your Videos
- [New] Conceptualists Engineering Marvel Online Worlds
- Elevate the Visual Appeal of Your Video Credits
- [New] Adding YouTube Captions/Subtitles Made Simple and Fast
- Streaming Showdown Summary FB LIVE, YT Live & Twitter Spaces
- [New] A Step-by-Step Guide How To Record, Save & Share YouTube Video for No Cost
- Finding the Ideal Format for Your YouTube Videos
- Master Your Online Presence The Ultimate Guide to Effective FreeFire Tags
- 2024 Approved Ascend Video Rankings – Top SEO Gadgets Revealed
- In 2024, Crafting Captivating ASMR Scenes Techniques for Successful Recording
- Essential Choices Top 10 Best Video Editing Software (Free, 2023) for 2024
- [New] Beauty Brilliance Masterclasses and Product Explorations
- [New] Brand Makeover Made Easy Revel in Our Array of over 50 Free Online Promotional Artwork
- 2024 Approved Channel Buying Made Simple A Beginner’s Toolkit
- 2024 Approved Demystifying the World of YouTube and Its Keywords
- Hasty Instruction Saving Your Photos as YouTube Channel Thumbnails
- In 2024, Crafting Compelling Thumbnails to Captivate YouTube Viewers and Encourage Clicks
- [New] Edu-Stream 100 Cutting-Edge Learning YT
- Instant Tactics to Unpredictably Organize YouTube Songs
- 2024 Approved Creating User-Friendly YouTube Subscribe Icons
- Charting the Course of Creative Conquests Self Vs. Competitors on YouTube
- [New] Affordable, Quality Cameras The Ultimate Buyer's Guide
- Mr. Beast's Economic Impact Analysis
- [Updated] Deciphering How To Find My YouTube Comments Posts
- In 2024, A Blur in the Timeline YouTube Videos Racing to 100 Million by Year's End
- [Updated] Charting a Course for YouTube Success Viewer Numbers and Income
- Unlocking YouTube Mastery of Video Segmentation
- Designing Memorable Try-On Videos for Online Audiences for 2024
- [New] Beyond Views A Triadic Approach to Analyzing YouTube Income
- Skyrocket Your YouTube Rankings with These Insider Moves
- The Ultimate Guide for Effortless YouTube Shorts Design
- In 2024, Capturing Attention From Content Creation to Commerce
- [New] 16 Best Kickstart Videos on YouTube for Visibility Boost
- Quick IG Update on Today's Compelling Podcast
- Fix for Silent Audio on OBS
- Expert Tips for Efficient Instagram to MP4 Transformation for 2024
- 2024 Approved Accurate and Efficient Video Frame Grabber
- How to Screen Mirroring Realme 11 Pro+? | Dr.fone
- 2024 Approved Mastering Instagram’s Latest Trends Reels & Stories
- The Top Tools for Converting Slides to Digital - 2024 Review
- In 2024, Easy-to-Use Zoom Camera for Instant Sharing
- How to Factory Reset Lava Blaze 2 5G If I Forgot Security Code or Password? | Dr.fone
- [Updated] In 2024, Streamlined Recording of Academic Sessions on Macs
- Detailed guide of ispoofer for pogo installation On Honor X9a | Dr.fone
- How to Detect and Stop mSpy from Spying on Your Realme V30 | Dr.fone
- 5 Easy Ways to Change Location on YouTube TV On Vivo S17 Pro | Dr.fone
- [New] 11 Ranked Audio Recorders of the Year for 2024
- [Updated] 2024 Approved The Blueprint for Creating Stellar TikTok Promotional Content
- In 2024, How to Reset a Infinix Smart 7 HD Phone that is Locked?
- Masterful Instagram Storytelling with Templates & Hacks for 2024
- New Best Facebook to MP3 Conversion Tools for 2024
- Updated In 2024, Best 8 Facebook MP3 Converter Online
- [Updated] In 2024, Capturing Life, One Click at a Time The Ultimate Guide for Documenting Your Sim's Journey in Sims 4
- [New] Insta Gurus Guide The Essential Hashtags You Need Today
- In 2024, Two Ways to Track My Boyfriends Vivo S17 Pro without Him Knowing | Dr.fone
- Your Account Has Been Disabled in the App Store and iTunes From Apple iPhone 6s Plus?
- New Discover the Top Online Waveform Generators You Need to Know for 2024
- In 2024, Essential Auditory Backtracking Applications The Best Software Selection
- How to Soft Reset Xiaomi Mix Fold 3 phone? | Dr.fone
- In 2024, Why is iPogo not working On Samsung Galaxy Z Flip 5? Fixed | Dr.fone
- Elevate Your Photography Top Vignette Apps for iPhone, iPad, and Android
- Title: How to Upload Shorts Video on YouTube?
- Author: Kevin
- Created at : 2024-06-26 14:16:58
- Updated at : 2024-06-27 14:16:58
- Link: https://youtube-videos.techidaily.com/how-to-upload-shorts-video-on-youtube/
- License: This work is licensed under CC BY-NC-SA 4.0.
