
:max_bytes(150000):strip_icc():format(webp)/GettyImages-664800650-4349941504c24712b81975694798236b.jpg)
"How to Make Money From YouTube Shorts Requirements and Earning Potential"
How to Make Money From YouTube Shorts: Requirements and Earning Potential
YouTube Shorts have grown in popularity since the launch of the platform in 2021. At first, they offered a way for creators to share their content in a vertical format. However, YouTube Shorts monetization is also a great way for creators to earn money. When you monetize YouTube shorts, you increase the potential of earning more income on the platform. In this article, we explore what entails monetized YouTube shorts and how to increase your YT shorts earnings.
YouTube Shorts Monetization A cross-platform offers useful features for making your YouTube videos stand out to earn more revenue!
Free Download Free Download Learn More

Part 1. YouTube Shorts Monetization: Eligibility Criteria
With short monetization options, you can monetize your short-firm content by joining the YouTube Partner Program (YPP). Being a member of this program gives you access to all tools for making money on YouTube. This includes the ability to place ads on your videos or make money directly from your audience through fan funding.
Eligibility Requirements for Monetizing Shorts
The easiest way to monetize Shorts on YouTube is to access the fan-funding program. This program gives you access to special tools that you can use to generate revenue by interacting with views. This is a great option for creators who primarily make short-form videos. The requirements for this option are as follows:
- At least 500 subscribers to your channels
- At least 3 public video uploads in the last 90 days
- At least 3,000 public watch hours in the last 365 days, or
- At least 3 million public Shorts views in the last 90 days

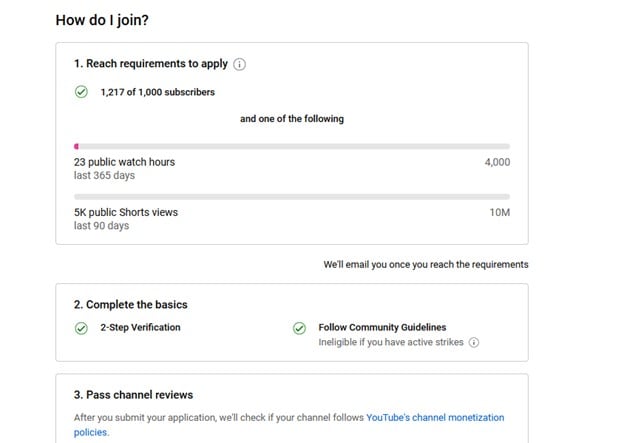
Eligibility for Monetizing Shorts and Videos
The other way you can monetize shorts is by accessing ad revenue and fan-funding. With this option, you will generate income from ads that appear between Shorts in addition to interacting with viewers. This is a great option for creators who make long and short videos. The requirements for this include:
- At least 1,000 subscribers to your channels
- At least 4,000 public watch hours in the last 365 days, or
- At least 10 million valid public Shorts views in the last 90 days
Additional Guidelines for Creators
Once you meet the eligibility criteria, you will be required to follow certain guidelines or policies to continue earning. The additional guidelines include:
- Follow YouTube’s Advertiser-Friendly Content Guidelines
- Make sure your channel does not have active Community Guidelines Strikes
- Live in a region where the program is available
- Avoid uploading another creator’s content by transforming the content or adding a new perspective to it
- Avoid using unedited clips from TV shows or movies that you don’t have rights to
- Don’t pay for fake or automated views
- Turn on 2-Step verification for your Google Account
- Have an active AdSense account
- Have access to advanced YouTube features by verifying your identity
Part 2. Monetizing YouTube Shorts: Step-by-Step Guide
Can you monetize YouTube shorts? Yes, in more than one way. The easiest is through the ad-revenue sharing model. Follow these steps to become part of the YPP and start monetizing your Shorts on YouTube:
Step 1Sign in to YouTube

Step 2Select YouTube Studio
In the top right of the YouTube page, click on your profile picture. From the pop-up menu that appears, select YouTube Studio.

Step 3In the left menu, Click on Earn

Step 4
If you are eligible for the YPP, you will see an Apply Click on it to go to the next step. If you are not yet eligible, click the Get Notified button to be notified once your channel becomes eligible. That’s when you will have the opportunity to finish the application process.
Step 5
Click Start to review and accept YouTube’s Base terms.

Step 6
Link your existing AdSense account if you have one. If not. Click Start to set up a new one.

Step 7
Wait for YouTube to review and approve your application. The process will normally take a month. Once you are approved for the YPP, go to the Earn section in YouTube Studio. Then accept the Shorts Monetization Module. This will allow you to access ads and other money-making tools on YouTube.

The instructions shared above are for applying for the YPP using a computer or desktop. You will still follow the same steps when using a mobile device, but you will do so using the YouTube Studio app.
The money-making feature monetizes Shorts in exciting ways. To start monetizing with Super Thanks fan funding, click Supers on the Earn tab in YouTube Studio. Then click Get Started, and follow the presented prompts. The same process is applicable for Channel Memberships, and other fan-funding options.
Part 3. YouTube Shorts Monetization: A Realistic Look at Earnings Potential
Monetizing YouTube Shorts has the potential to make decent earnings. Although the amount is not as much as a long-form videos, it is a great way of making money on YouTube quickly. Most YouTube Shorts creators agree that the revenue per thousand views (RPM) for short-form content is currently around $0.05 - $0.07. This means that for a million Shorts views, you will make $50 - $70.
Factors That Influence Earnings
The amount of money you make on YouTube Shorts is not fixed. It will depend on several factors, including the revenue channel and your interactions with viewers
- Ad revenue: A higher view count on Shorts increases ad revenue from the ads that are between Shorts on the platform.
- Viewer engagement: Viewer engagement brings in additional revenue through features like Super Thanks.
- Number of monetized Shorts: Monetizing most of your short-form videos will increase the revenue generated.
- Shopping Revenue: How well you promote your products and the set price point of the products will determine the shopping revenue generated.
Examples of Creators Who Have Earned from Shorts
The revenue-sharing program is the easiest way for creators to earn money on YouTube. Since monetizing their Shorts, these creators earned some decent bonus amounts:
- Hassan Khadair (2.1 million subscribers) - Earned $872.14 in ads from 22 million Shorts views
- Riley Lemon (84,000 subscribers) - Earned $76.23 in ads from 1.9 million Shorts views
- James Seo (573,000 subscribers) - Earned $445.09 in ads from 10.3 million Shorts views
- Matthew King (212,000 subscribers) - Earned $163.73 in ads from 4.2 million Shorts views
Part 4. Editing YouTube Shorts with WonderShare to Boost Revenue Potential
The best way to reap big from Shorts YouTube monetization is to make quality videos that will go viral easily. Videos that generate more views will earn you more revenue and increase the number of subscribers within a short time. With Wondershare Filmora, making such videos is easy. The video editing software offers useful features for making your videos stand out. From jaw-dropping sports videos to cinema-like production, the choice of options is endless.
Free Download For Win 7 or later(64-bit)
Free Download For macOS 10.14 or later
The choice of Filmora features you use on your editing projects will depend on your goals. Here are a few favorites to get you started:
1. Auto Reframe
Before uploading a short-form video on YouTube, you want to make sure it is of the right resolution. The Auto Reframe feature on Filmora allows you to instantly resize your videos while keeping all the important details. You only need to record one video for all platforms, and edit to fit with auto reframe.
2. Text to Speech
Narration is an important aspect of YouTube Shorts. You can tell what is happening in the clip in the simplest way for your audience to understand. The Text to Speech (TTS) feature on Filmora allows you to convert your text files to voice-over. This makes your Shorts video more entertaining and enriched with more elements.
3. AI Portrait
Just like other vertical social media videos, Shorts require some bit of personalization. You may want to add a bit of elements or filters. The AI Portrait feature automatically removes background with high accuracy to further enhance your videos. It also comes with over 70 portrait and sticker effects to bring out the mood you are going after. Automatically recognize the faces of your subjects and add AR stickers on the go.
Conclusion
YouTube Shorts have become immensely popular. They tend to have a higher ROI and receive more engagement compared to long-form video content. This makes vertical short-form videos more important and lucrative for content creators. When it comes to YouTube short video monetization, posting quality videos is the key ingredient. We recommend using Wondershare FIlmora to edit your videos. This will make sure they are more entertaining and keep more people engaged.
Free Download Free Download Learn More
Part 1. YouTube Shorts Monetization: Eligibility Criteria
With short monetization options, you can monetize your short-firm content by joining the YouTube Partner Program (YPP). Being a member of this program gives you access to all tools for making money on YouTube. This includes the ability to place ads on your videos or make money directly from your audience through fan funding.
Eligibility Requirements for Monetizing Shorts
The easiest way to monetize Shorts on YouTube is to access the fan-funding program. This program gives you access to special tools that you can use to generate revenue by interacting with views. This is a great option for creators who primarily make short-form videos. The requirements for this option are as follows:
- At least 500 subscribers to your channels
- At least 3 public video uploads in the last 90 days
- At least 3,000 public watch hours in the last 365 days, or
- At least 3 million public Shorts views in the last 90 days
Eligibility for Monetizing Shorts and Videos
The other way you can monetize shorts is by accessing ad revenue and fan-funding. With this option, you will generate income from ads that appear between Shorts in addition to interacting with viewers. This is a great option for creators who make long and short videos. The requirements for this include:
- At least 1,000 subscribers to your channels
- At least 4,000 public watch hours in the last 365 days, or
- At least 10 million valid public Shorts views in the last 90 days
Additional Guidelines for Creators
Once you meet the eligibility criteria, you will be required to follow certain guidelines or policies to continue earning. The additional guidelines include:
- Follow YouTube’s Advertiser-Friendly Content Guidelines
- Make sure your channel does not have active Community Guidelines Strikes
- Live in a region where the program is available
- Avoid uploading another creator’s content by transforming the content or adding a new perspective to it
- Avoid using unedited clips from TV shows or movies that you don’t have rights to
- Don’t pay for fake or automated views
- Turn on 2-Step verification for your Google Account
- Have an active AdSense account
- Have access to advanced YouTube features by verifying your identity
Part 2. Monetizing YouTube Shorts: Step-by-Step Guide
Can you monetize YouTube shorts? Yes, in more than one way. The easiest is through the ad-revenue sharing model. Follow these steps to become part of the YPP and start monetizing your Shorts on YouTube:
Step 1Sign in to YouTube
Step 2Select YouTube Studio
In the top right of the YouTube page, click on your profile picture. From the pop-up menu that appears, select YouTube Studio.
Step 3In the left menu, Click on Earn
Step 4
If you are eligible for the YPP, you will see an Apply Click on it to go to the next step. If you are not yet eligible, click the Get Notified button to be notified once your channel becomes eligible. That’s when you will have the opportunity to finish the application process.
Step 5
Click Start to review and accept YouTube’s Base terms.
Step 6
Link your existing AdSense account if you have one. If not. Click Start to set up a new one.
Step 7
Wait for YouTube to review and approve your application. The process will normally take a month. Once you are approved for the YPP, go to the Earn section in YouTube Studio. Then accept the Shorts Monetization Module. This will allow you to access ads and other money-making tools on YouTube.
The instructions shared above are for applying for the YPP using a computer or desktop. You will still follow the same steps when using a mobile device, but you will do so using the YouTube Studio app.
The money-making feature monetizes Shorts in exciting ways. To start monetizing with Super Thanks fan funding, click Supers on the Earn tab in YouTube Studio. Then click Get Started, and follow the presented prompts. The same process is applicable for Channel Memberships, and other fan-funding options.
Part 3. YouTube Shorts Monetization: A Realistic Look at Earnings Potential
Monetizing YouTube Shorts has the potential to make decent earnings. Although the amount is not as much as a long-form videos, it is a great way of making money on YouTube quickly. Most YouTube Shorts creators agree that the revenue per thousand views (RPM) for short-form content is currently around $0.05 - $0.07. This means that for a million Shorts views, you will make $50 - $70.
Factors That Influence Earnings
The amount of money you make on YouTube Shorts is not fixed. It will depend on several factors, including the revenue channel and your interactions with viewers
- Ad revenue: A higher view count on Shorts increases ad revenue from the ads that are between Shorts on the platform.
- Viewer engagement: Viewer engagement brings in additional revenue through features like Super Thanks.
- Number of monetized Shorts: Monetizing most of your short-form videos will increase the revenue generated.
- Shopping Revenue: How well you promote your products and the set price point of the products will determine the shopping revenue generated.
Examples of Creators Who Have Earned from Shorts
The revenue-sharing program is the easiest way for creators to earn money on YouTube. Since monetizing their Shorts, these creators earned some decent bonus amounts:
- Hassan Khadair (2.1 million subscribers) - Earned $872.14 in ads from 22 million Shorts views
- Riley Lemon (84,000 subscribers) - Earned $76.23 in ads from 1.9 million Shorts views
- James Seo (573,000 subscribers) - Earned $445.09 in ads from 10.3 million Shorts views
- Matthew King (212,000 subscribers) - Earned $163.73 in ads from 4.2 million Shorts views
Part 4. Editing YouTube Shorts with WonderShare to Boost Revenue Potential
The best way to reap big from Shorts YouTube monetization is to make quality videos that will go viral easily. Videos that generate more views will earn you more revenue and increase the number of subscribers within a short time. With Wondershare Filmora, making such videos is easy. The video editing software offers useful features for making your videos stand out. From jaw-dropping sports videos to cinema-like production, the choice of options is endless.
Free Download For Win 7 or later(64-bit)
Free Download For macOS 10.14 or later
The choice of Filmora features you use on your editing projects will depend on your goals. Here are a few favorites to get you started:
1. Auto Reframe
Before uploading a short-form video on YouTube, you want to make sure it is of the right resolution. The Auto Reframe feature on Filmora allows you to instantly resize your videos while keeping all the important details. You only need to record one video for all platforms, and edit to fit with auto reframe.
2. Text to Speech
Narration is an important aspect of YouTube Shorts. You can tell what is happening in the clip in the simplest way for your audience to understand. The Text to Speech (TTS) feature on Filmora allows you to convert your text files to voice-over. This makes your Shorts video more entertaining and enriched with more elements.
3. AI Portrait
Just like other vertical social media videos, Shorts require some bit of personalization. You may want to add a bit of elements or filters. The AI Portrait feature automatically removes background with high accuracy to further enhance your videos. It also comes with over 70 portrait and sticker effects to bring out the mood you are going after. Automatically recognize the faces of your subjects and add AR stickers on the go.
Conclusion
YouTube Shorts have become immensely popular. They tend to have a higher ROI and receive more engagement compared to long-form video content. This makes vertical short-form videos more important and lucrative for content creators. When it comes to YouTube short video monetization, posting quality videos is the key ingredient. We recommend using Wondershare FIlmora to edit your videos. This will make sure they are more entertaining and keep more people engaged.
Building Your First Channel: Essential Video Gear List
Essential YouTube Equipment For Starting Your Channel - What Do You Really Need?

Richard Bennett
Oct 26, 2023• Proven solutions
Check out our most updated guide on this topic: YouTube Equipment Starter Guide For Beginners .
The first thing to make sure of before starting a YouTube channel is having all that you need to record and upload high-quality videos regularly. That doesn’t mean you have to take out a loan and spend thousands to purchase a brand new camera and all other gadgets that professional filmmakers use.
The smartest way to get started is to go through a list of necessary equipment for YouTube and check whether or not you already own some of it. Once your channel starts growing, you can then start thinking about whether you want to invest in upgraded equipment. Here is a quick overview of all items that you need to start entertaining your online audience and gaining subscribers to your YouTube channel:
- Your YouTube Camera
- Microphones and Audio
- Lighting Gear for YouTube
- Tripods and Camera Stands
- Smartphone Camera Gear
YouTube Cameras
The short version: Use whatever you already have, even if it’s your phone or webcam. It’s nice to have sharp, fine-tuned, 4K footage, but viewers will forgive lower visual quality if your content is good.
The long version: You will need a camera, but there are a lot of different devices you can use including DSLRs, point and shoots, webcams, and your smartphone.
Your choice of camera will have a tremendous impact on the visual quality of your content and might drive your decisions regarding other pieces of equipment. However, you shouldn’t feel obliged to work with a top-notch camera from day one, especially since cheaper options can produce great results if used the right way.
On one end of the spectrum, you have basic smartphone cameras and web cameras, which are easy to come by and simple to operate. These days, high-end phones come equipped with quite powerful cameras that are more than sufficient for the needs of the average YouTuber. Better webcams can also do the job, although high-performance webcam models can get pretty expensive too. It is probably wise to resist the urge to start broadcasting with the built-in camera in your laptop and at least get a webcam or use your phone, but your computer’s camera is still always an option. Not having a better camera should never stop you from making YouTube videos.
If you already have a DSLR camera then it’s a good idea to familiarize yourself with it. You have far more freedom to adjust the settings and achieve a professional look for your videos with a DSLR, but that does mean it’ll take some time to become an expert at using it. Ultra-high resolution is not required for YouTube, but it certainly won’t hurt to have additional sharpness and more detail in the scene. If you’re shopping for a DSLR, look for one with a flip screen that allows you to quickly check what your viewers see.
YouTube Microphone and Audio
The short version: Audio quality is extremely important. If you can buy either a new camera or an external microphone, but not both, it might be better to go for the microphone. Click here for advice on upping your audio quality without an external microphone.
The long version: Sound capturing is every bit as important for your success as your video feed. In fact, poor audio can be even more damaging to your subscriber count than grainy video, since people won’t spend their time listening to something they have to put effort into understanding.
Again, most YouTube video makers have a limited budget at their disposal, so professional microphones are mostly off the table. However, investing in a directional microphone (‘shotgun mic’) that can pick up your voice clearly and without background noise is certainly a smart move. Such microphones can be pointed towards you while you speak, and since most YouTubers sit still while doing their shows there won’t be too much need for in-session adjustments.
If you’re not ready to invest in a shotgun mic, you can also find very inexpensive (often under $20) LAV mics. These small microphones can be pinned to your shirt, which allows them to record very clear dialogue because they’re so close to your mouth.
Lights for YouTube
The short version: You need as much light as you can get. Lighting kits can be affordable on Amazon, but you can also achieve a great look using daylight/windows and ‘daylight’ lightbulbs.
The long version: If you’ve ever tried to make a video indoors, you already know that it’s necessary to have additional light. Often just filming with the normal lights in a room will cause your footage to look dark and grainy, and possibly be tinted orange. To overcome these problems you need to increase the amount of light you have available.
Sometimes, it is enough to film near windows and/or bring more household lamps into your filming area. For any household lamps or lighting fixtures you use, make sure to put in white or ‘daylight’ lightbulbs instead of using the orange/tungsten bulbs that you might have for everyday use (this is how you avoid tinting things orange).
If you have the budget available to get some lighting equipment, you can find softbox lights or LED panel lights available fairly inexpensively online. Softbox lights are great because they provide even, diffused, light.
Another useful piece of lighting equipment to have is a reflector. A reflector is usually a piece of white, silver, or gold fabric stretched over a frame. You can use it to bounce light from one light source back towards yourself (this is a great way to fill shadows cast by your main light). Reflectors tend to be inexpensive, but you can also use white cardboard or tinfoil in place of purchasing a reflector.
Tripods and Camera Stands
The short version: You need something to hold your camera. If you mostly film in your own home that can be a desk or a stack of books, but if you make a lot of videos while you’re on the go you probably need a tripod or gimbal. Heavier cameras need heavier tripods.
The long version: While handheld cameras can deliver solid results for vloggers and casual streamers, viewers do expect reasonably stable footage. For many types of videos, the camera needs to be completely still and flatly positioned on a horizontal plane. Tripods and camera stands can cost very little, so it’s a good idea to look into getting some kind of stabilizer.
When you are choosing a tripod, pay attention to how much it weighs. If the camera that needs to be mounted on it is very heavy (like some DSLR models), you want to ensure that the structure itself weighs enough not to be easily tipped over. Too thin tripods can put your camera at risk, and that’s the last thing you want. Smaller cameras such as GoPros are more flexible in this regard and can be placed on a wider range of tripods.
Even if you are using a phone or a webcam to record YouTube videos, you should consider mounting the device on a stable stand. It is possible to find mini tripods ideal for smartphones for as little as $10. These tripods are small enough to carry in your pocket, so you will be prepared to start making a video no matter where your adventures take you. If you are using a web camera, you should attach it to the stand so that it won’t move accidentally after you touch the surface it is placed on.
Smartphone Camera Gear
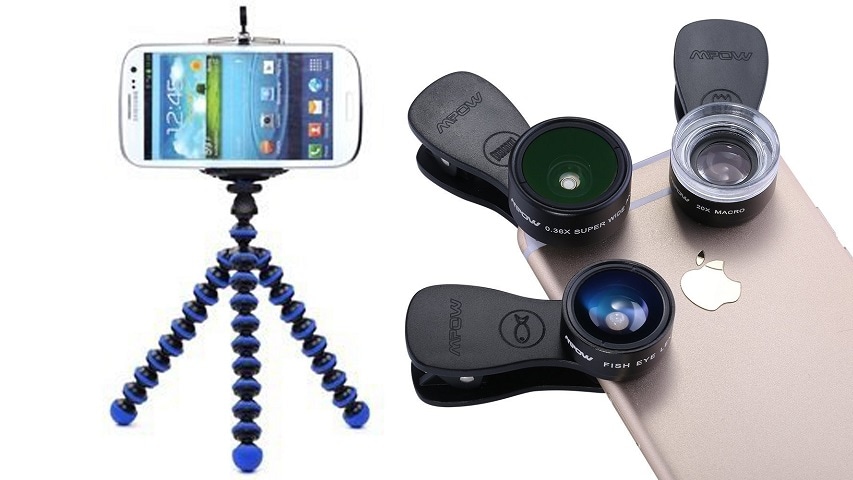
The short version: There’s a lot of gear out there designed with smartphone photos and videos in mind, including clip-on lenses, tripod mounts, phone-mounted LED lights, and inexpensive microphones that plug into the audio jack.
The long version: Recording your videos with a mobile phone can be a good decision. It all depends on the phone you have and the range of add-ons and apps that you complement it with. Almost every high-end model released in the past five years can shoot videos in 1080p or higher. Some can even produce 4K footage. If you perfect your smartphone filming technique, your YouTube videos could look as if they were made with pro equipment.
On the flip side, smartphone cameras typically perform poorly in low light. It is possible to download an app that lets you play around with settings to overcome this, but a phone-mounted LED light is probably a better solution. An external microphone might also be a necessity, but there are some good (inexpensive) options that can simply be plugged in through the headphone jack.
Another common downside of smartphone cameras is that most of them use digital zoom, which is vastly inferior to optical zoom. If you intend to shoot anything that’s further away than a few feet, you need a clip-on lens that goes on top of the built-in camera. This inexpensive device will give you a lot of freedom to work in space, and allow you to make spectacular shots even without high-end YouTube equipment.
Equipment with Easy-to-Use Video Editor


Richard Bennett
Richard Bennett is a writer and a lover of all things video.
Follow @Richard Bennett
Richard Bennett
Oct 26, 2023• Proven solutions
Check out our most updated guide on this topic: YouTube Equipment Starter Guide For Beginners .
The first thing to make sure of before starting a YouTube channel is having all that you need to record and upload high-quality videos regularly. That doesn’t mean you have to take out a loan and spend thousands to purchase a brand new camera and all other gadgets that professional filmmakers use.
The smartest way to get started is to go through a list of necessary equipment for YouTube and check whether or not you already own some of it. Once your channel starts growing, you can then start thinking about whether you want to invest in upgraded equipment. Here is a quick overview of all items that you need to start entertaining your online audience and gaining subscribers to your YouTube channel:
- Your YouTube Camera
- Microphones and Audio
- Lighting Gear for YouTube
- Tripods and Camera Stands
- Smartphone Camera Gear
YouTube Cameras
The short version: Use whatever you already have, even if it’s your phone or webcam. It’s nice to have sharp, fine-tuned, 4K footage, but viewers will forgive lower visual quality if your content is good.
The long version: You will need a camera, but there are a lot of different devices you can use including DSLRs, point and shoots, webcams, and your smartphone.
Your choice of camera will have a tremendous impact on the visual quality of your content and might drive your decisions regarding other pieces of equipment. However, you shouldn’t feel obliged to work with a top-notch camera from day one, especially since cheaper options can produce great results if used the right way.
On one end of the spectrum, you have basic smartphone cameras and web cameras, which are easy to come by and simple to operate. These days, high-end phones come equipped with quite powerful cameras that are more than sufficient for the needs of the average YouTuber. Better webcams can also do the job, although high-performance webcam models can get pretty expensive too. It is probably wise to resist the urge to start broadcasting with the built-in camera in your laptop and at least get a webcam or use your phone, but your computer’s camera is still always an option. Not having a better camera should never stop you from making YouTube videos.
If you already have a DSLR camera then it’s a good idea to familiarize yourself with it. You have far more freedom to adjust the settings and achieve a professional look for your videos with a DSLR, but that does mean it’ll take some time to become an expert at using it. Ultra-high resolution is not required for YouTube, but it certainly won’t hurt to have additional sharpness and more detail in the scene. If you’re shopping for a DSLR, look for one with a flip screen that allows you to quickly check what your viewers see.
YouTube Microphone and Audio
The short version: Audio quality is extremely important. If you can buy either a new camera or an external microphone, but not both, it might be better to go for the microphone. Click here for advice on upping your audio quality without an external microphone.
The long version: Sound capturing is every bit as important for your success as your video feed. In fact, poor audio can be even more damaging to your subscriber count than grainy video, since people won’t spend their time listening to something they have to put effort into understanding.
Again, most YouTube video makers have a limited budget at their disposal, so professional microphones are mostly off the table. However, investing in a directional microphone (‘shotgun mic’) that can pick up your voice clearly and without background noise is certainly a smart move. Such microphones can be pointed towards you while you speak, and since most YouTubers sit still while doing their shows there won’t be too much need for in-session adjustments.
If you’re not ready to invest in a shotgun mic, you can also find very inexpensive (often under $20) LAV mics. These small microphones can be pinned to your shirt, which allows them to record very clear dialogue because they’re so close to your mouth.
Lights for YouTube
The short version: You need as much light as you can get. Lighting kits can be affordable on Amazon, but you can also achieve a great look using daylight/windows and ‘daylight’ lightbulbs.
The long version: If you’ve ever tried to make a video indoors, you already know that it’s necessary to have additional light. Often just filming with the normal lights in a room will cause your footage to look dark and grainy, and possibly be tinted orange. To overcome these problems you need to increase the amount of light you have available.
Sometimes, it is enough to film near windows and/or bring more household lamps into your filming area. For any household lamps or lighting fixtures you use, make sure to put in white or ‘daylight’ lightbulbs instead of using the orange/tungsten bulbs that you might have for everyday use (this is how you avoid tinting things orange).
If you have the budget available to get some lighting equipment, you can find softbox lights or LED panel lights available fairly inexpensively online. Softbox lights are great because they provide even, diffused, light.
Another useful piece of lighting equipment to have is a reflector. A reflector is usually a piece of white, silver, or gold fabric stretched over a frame. You can use it to bounce light from one light source back towards yourself (this is a great way to fill shadows cast by your main light). Reflectors tend to be inexpensive, but you can also use white cardboard or tinfoil in place of purchasing a reflector.
Tripods and Camera Stands
The short version: You need something to hold your camera. If you mostly film in your own home that can be a desk or a stack of books, but if you make a lot of videos while you’re on the go you probably need a tripod or gimbal. Heavier cameras need heavier tripods.
The long version: While handheld cameras can deliver solid results for vloggers and casual streamers, viewers do expect reasonably stable footage. For many types of videos, the camera needs to be completely still and flatly positioned on a horizontal plane. Tripods and camera stands can cost very little, so it’s a good idea to look into getting some kind of stabilizer.
When you are choosing a tripod, pay attention to how much it weighs. If the camera that needs to be mounted on it is very heavy (like some DSLR models), you want to ensure that the structure itself weighs enough not to be easily tipped over. Too thin tripods can put your camera at risk, and that’s the last thing you want. Smaller cameras such as GoPros are more flexible in this regard and can be placed on a wider range of tripods.
Even if you are using a phone or a webcam to record YouTube videos, you should consider mounting the device on a stable stand. It is possible to find mini tripods ideal for smartphones for as little as $10. These tripods are small enough to carry in your pocket, so you will be prepared to start making a video no matter where your adventures take you. If you are using a web camera, you should attach it to the stand so that it won’t move accidentally after you touch the surface it is placed on.
Smartphone Camera Gear
The short version: There’s a lot of gear out there designed with smartphone photos and videos in mind, including clip-on lenses, tripod mounts, phone-mounted LED lights, and inexpensive microphones that plug into the audio jack.
The long version: Recording your videos with a mobile phone can be a good decision. It all depends on the phone you have and the range of add-ons and apps that you complement it with. Almost every high-end model released in the past five years can shoot videos in 1080p or higher. Some can even produce 4K footage. If you perfect your smartphone filming technique, your YouTube videos could look as if they were made with pro equipment.
On the flip side, smartphone cameras typically perform poorly in low light. It is possible to download an app that lets you play around with settings to overcome this, but a phone-mounted LED light is probably a better solution. An external microphone might also be a necessity, but there are some good (inexpensive) options that can simply be plugged in through the headphone jack.
Another common downside of smartphone cameras is that most of them use digital zoom, which is vastly inferior to optical zoom. If you intend to shoot anything that’s further away than a few feet, you need a clip-on lens that goes on top of the built-in camera. This inexpensive device will give you a lot of freedom to work in space, and allow you to make spectacular shots even without high-end YouTube equipment.
Equipment with Easy-to-Use Video Editor
Richard Bennett
Richard Bennett is a writer and a lover of all things video.
Follow @Richard Bennett
Also read:
- [New] Charting Your Course in YouTubing Dodge These Top 8 Common Missteps
- Building a Cross-Platform Social Media Presence
- Rank 8 Real-World Video Promoters for Success
- Discerning T-Series' Profit Mechanisms From Youtube Views for 2024
- [New] Digital Riches Unleashed Measuring Your Success on YouTube's Platform
- Editing Excellence Identifying 10 Superior Online Trimmer Apps for 2024
- Principles of Crafting Compelling YouTube Introduction Vids
- Creating Dynamic Content with YouTube Playlist Embedding
- From Twitch Live to YouTube Watchability A Comprehensive Tutorial
- 2024 Approved Creating Dynamic Content with YouTube Playlist Embedding
- Quick and Clean Video Extraction for All Screens
- [New] 2023'S Premier Movie Options Beyond The Top Selections
- Essential Mobile Privacy The Best 7 AdBlocker Apps for Android
- Customize and Upload Longer YouTube Content
- Must-Have Filmmaking Tools for Aspiring YouTubers
- Demystifying Income Flow to Creators Within the Short Video Model
- 2024 Approved Earnings Estimation A Trifecta of Tips and Strategies for Tracking Your YouTube Earnings
- Streamline Your Videography Journey Choose From the Top 8 Free Tools
- Bring Out the Vibes of Your Channel Top 10 Online Artists Unite
- [Updated] Carminati (Ajay) Mastering the Art and Science of Online Income
- Top 15 ASMR Channels to Follow
- Step by Step Guide to Crafting Striking YouTube Thumbnails - Mac Edition
- Essential Free Apps for YouTube to WAV Transformation for 2024
- [Updated] Crafting Viral Videos on YouTube A Strategic Plan
- [Updated] Create Magic Download Premium Soundscapes Now
- Showcasing the Most Swiftly Advancing YouTube Sites
- [Updated] Cutting-Edge Techniques to Upgrade Channel Descriptions
- The Ultimate Guide to YouTube Thumbnail Sizes
- [Updated] Detailed Analysis of YouTubes Versus DailyMentions
- Harmonious Hub Choosing the Best Free Apps for Your YouTube Music Streams
- How to Convert YouTube Videos to GIFs
- Tailoring Your Twitch Experience with YouTube Integration
- Best Cameras for Quality YouTube Content for 2024
- Proven YouTube Intra Creation Strategies, Free Edition
- Effortless Shuffle of Your YouTube Playlists
- Mastering FFmpeg How to Merge Audio and Video with Ease for 2024
- In 2024, Tips for Making Facebook Ad Videos Memorable
- For People Wanting to Mock GPS on Oppo Reno 8T Devices | Dr.fone
- How to Transfer Data from Sony Xperia 10 V to Samsung Phone | Dr.fone
- [New] Integrating Seamlessly Into TikTok Lives A Blueprint for 2024
- [Updated] The Ultimate Review Top 10 Screenshot & Recorder Software for Mac
- [Updated] 2024 Approved Clear Cuts for Chilling YouTube Content – No More Silent Lapses
- Full Solutions to Fix Error Code 920 In Google Play on Sony Xperia 5 V | Dr.fone
- [New] 2024 Approved Overcoming Stalled Transmission of Videos Tips for Successful Sharing in Messenger App
- In 2024, How to get the dragon scale and evolution-enabled pokemon On Nokia G310? | Dr.fone
- 2024 Approved The Complete Guide to Live Streaming on Instagram via OBS
- In 2024, 8 Solutions to Fix Find My Friends Location Not Available On Lava Yuva 3 Pro | Dr.fone
- 2024 Approved Is Watching Facebook on the Television Set a Future Possibility?
- Quick Fixes for Why Is My Xiaomi Mix Fold 3 Black and White | Dr.fone
- Your Complete Guide To Reset Oppo A1x 5G | Dr.fone
- New 2024 Approved How You Can Turn Yourself Into Anime Character Using Anime Filter
- [New] Ensuring Your Zoom Appointments Match iPhone/Android/PC Calendars for 2024
- In 2024, Resize Your Images Online Quick and Simple Ratio Changers
- Ultimate Guide to Catch the Regional-Located Pokemon For Motorola Moto G23 | Dr.fone
- [Updated] 2024 Approved Raising Livestock A Guide to Ginger Island Farm
- Unveiling the Most Powerful Alternatives to Vimeo Cameo Editor
- [New] Free/Paid Audio-Cleanup Tools for Higher Video Quality
- In 2024, How To Use Special Features - Virtual Location On OnePlus Ace 3? | Dr.fone
- In 2024, Pattern Locks Are Unsafe Secure Your Itel Phone Now with These Tips
- 2024 Approved Unseen Pathways to Friend Finder Excellence
- Discover the Best Free Online Video Editors for Your Needs
- Updated 2024 Approved Of the Incredible Tools Hidden Under Final Cut Pro X, We Bring Final Cut Pro L-Cuts and J-Cuts in Todays Article. Learn What Is a J-Cut in Final Cut Pro Along with an L-Cut and How to Do Them in FCPX
- In 2024, Dueling Masters Topping 10 Royale Clashes
- Title: "How to Make Money From YouTube Shorts Requirements and Earning Potential"
- Author: Kevin
- Created at : 2024-05-25 15:19:58
- Updated at : 2024-05-26 15:19:58
- Link: https://youtube-videos.techidaily.com/how-to-make-money-from-youtube-shorts-requirements-and-earning-potential/
- License: This work is licensed under CC BY-NC-SA 4.0.
