
How to Easily Add Subtitles and Closed Captions to YouTube Video for 2024
Unlocking Your Videos: The Pathway to Streamlined CC & Subtitling on YouTube
How to Easily Add Subtitles and Closed Captions to YouTube Video

Richard Bennett
Mar 27, 2024• Proven solutions
In this article, we are going to show you how important it is to add subtitle and closed captions in your YouTube video, and how to add them.
The best video editor for YouTubers - Wondershare Filmora , not only allows you to cut, crop, rotate, reverse videos, but also offers your advanced features like PIP, Green Screen, or audio mixing. What’s more, you can find lots of effects for Fashion, gaming, education, tutorial, sports, etc. Check this article to know more.


Why subtitle and closed captions are important for YouTube videos?
- Forced closed captions and subtitles actually help the viewers to understand the content in your video if the audio quality of your video is bad, muffled or barely audible. Reading makes it easier for them to understand.
- This also helps people with hearing impairments. People with troubled ears can still watch and understand your content.
- It’s a great aid to such videos which have been recorded in other foreign languages that you don’t understand. Hence it will increase the number of viewers all around the world.
- They both are generally added for easy accessibility to the viewers who wish to watch in sound sensitive environments.
So, here we are going to show you two ways to add subtittles to video: directly or uploading caption or transcript files
Adding subtitles and closed captions manually
To add subtitles and closed captions to your YouTube video, fisrt, you should sign in to your YouTube account. On left right below ‘Home’ you will find ‘My Channel’. It will direct you to your personal YouTube page. On the top, right next to your subscribers lays the ‘Video manager’, giving you the list of your uploaded videos.
Select the video and click on edit to get a drop down menu. Click on subtitles and CC. This will take you to the subtitling interface. To the right of video select ‘add new subtitles’ and then ‘create new subtitles’. Select the subtitle language. Play the video to listen to the content and type down in the box. Click on ‘+’ button once you are done.
This will create a subtitle timeline right beneath the video. You can manage by dragging and expanding the subtitle duration according to the audio of the video. The subtitle will appear at the bottom of the video screen. Click ‘publish’ once done.
An interruption might occur with appearing of subtitles in accordance with video. Hence a lot precision is required while doing so.
Uploading Caption or Transcript Files automatically
To upload Caption or Transcript Files to YouTube Videos you first need to create a format on a text editor. For windows use Notepad and for Mac you may use TextEdit. Create a format of putting the number of subtitle first, time stamp and then text of the subtitle. For example
1\
00:02:34:12 using a format of (hour : minute : second : millisecond)
2. *text*
This is the sample text for first subtitle at zero hours, two minutes, thirty four seconds and twelve milliseconds. Once done with this. Go to file, select ‘save as’. Write the file name with an extension of .srt and select ‘All files’ for type of file. Click encoding menu and select UTF-8. Once saved, sign in to your YouTube account.
On left right below ‘Home’ you will find ‘My Channel’. It will direct you to your personal YouTube page. On the top, right next to your subscribers lays the ‘Video manager’, giving you the list of your uploaded videos.
Select the video and click on edit to get a drop down menu. Click on subtitles and CC. Go to ‘add subtitles’ and then ‘upload a file’. A pop-up menu will appear select ‘subtitles file’. Click upload. The file will send subtitles to your video.
This will create a subtitle timeline right beneath the video. You can manage by dragging and expanding the subtitle duration according to the audio of the video. The subtitle will appear at the bottom of the video screen. Click ‘publish’ once done.
3 Best Tools for add/managing video Subtitles/CC
1. Amara
Amara is a smart video editor which helps insert captions and subtitles to videos. It also helps in transcribing the videos. It takes help of crowd sourcing to subtitle any YouTube video. They take help from viewers to subtitle the videos. By making crowd subtitling available for any YouTube creator, they are allowing them to reach more viewers in more languages
2. DIY Captions
DIY captions help you to transcribe the YouTube videos, if not in most accurate manner, then in a little easier way. All you have to do is just paste the URL of the YouTube video and it will provide you all the subtitles. These may not be accurate but will provide you major base material which can be tweaked a bit here and there and is far better than making all the subtitles starting from scratch.
3 Subtitles for YouTube
Subtitles for YouTube is a Google Chrome extension which provides subtitles for YouTube videos. For this you will have to provide a subtitle file with .srt extension. The attractive feature of this is that you won’t have to download the video and still run the subtitles on it. This is very much helpful for people who work on YouTube or watch movies without subtitles.
Richard Bennett
Richard Bennett is a writer and a lover of all things video.
Follow @Richard Bennett
Richard Bennett
Mar 27, 2024• Proven solutions
In this article, we are going to show you how important it is to add subtitle and closed captions in your YouTube video, and how to add them.
The best video editor for YouTubers - Wondershare Filmora , not only allows you to cut, crop, rotate, reverse videos, but also offers your advanced features like PIP, Green Screen, or audio mixing. What’s more, you can find lots of effects for Fashion, gaming, education, tutorial, sports, etc. Check this article to know more.
Why subtitle and closed captions are important for YouTube videos?
- Forced closed captions and subtitles actually help the viewers to understand the content in your video if the audio quality of your video is bad, muffled or barely audible. Reading makes it easier for them to understand.
- This also helps people with hearing impairments. People with troubled ears can still watch and understand your content.
- It’s a great aid to such videos which have been recorded in other foreign languages that you don’t understand. Hence it will increase the number of viewers all around the world.
- They both are generally added for easy accessibility to the viewers who wish to watch in sound sensitive environments.
So, here we are going to show you two ways to add subtittles to video: directly or uploading caption or transcript files
Adding subtitles and closed captions manually
To add subtitles and closed captions to your YouTube video, fisrt, you should sign in to your YouTube account. On left right below ‘Home’ you will find ‘My Channel’. It will direct you to your personal YouTube page. On the top, right next to your subscribers lays the ‘Video manager’, giving you the list of your uploaded videos.
Select the video and click on edit to get a drop down menu. Click on subtitles and CC. This will take you to the subtitling interface. To the right of video select ‘add new subtitles’ and then ‘create new subtitles’. Select the subtitle language. Play the video to listen to the content and type down in the box. Click on ‘+’ button once you are done.
This will create a subtitle timeline right beneath the video. You can manage by dragging and expanding the subtitle duration according to the audio of the video. The subtitle will appear at the bottom of the video screen. Click ‘publish’ once done.
An interruption might occur with appearing of subtitles in accordance with video. Hence a lot precision is required while doing so.
Uploading Caption or Transcript Files automatically
To upload Caption or Transcript Files to YouTube Videos you first need to create a format on a text editor. For windows use Notepad and for Mac you may use TextEdit. Create a format of putting the number of subtitle first, time stamp and then text of the subtitle. For example
1\
00:02:34:12 using a format of (hour : minute : second : millisecond)
2. *text*
This is the sample text for first subtitle at zero hours, two minutes, thirty four seconds and twelve milliseconds. Once done with this. Go to file, select ‘save as’. Write the file name with an extension of .srt and select ‘All files’ for type of file. Click encoding menu and select UTF-8. Once saved, sign in to your YouTube account.
On left right below ‘Home’ you will find ‘My Channel’. It will direct you to your personal YouTube page. On the top, right next to your subscribers lays the ‘Video manager’, giving you the list of your uploaded videos.
Select the video and click on edit to get a drop down menu. Click on subtitles and CC. Go to ‘add subtitles’ and then ‘upload a file’. A pop-up menu will appear select ‘subtitles file’. Click upload. The file will send subtitles to your video.
This will create a subtitle timeline right beneath the video. You can manage by dragging and expanding the subtitle duration according to the audio of the video. The subtitle will appear at the bottom of the video screen. Click ‘publish’ once done.
3 Best Tools for add/managing video Subtitles/CC
1. Amara
Amara is a smart video editor which helps insert captions and subtitles to videos. It also helps in transcribing the videos. It takes help of crowd sourcing to subtitle any YouTube video. They take help from viewers to subtitle the videos. By making crowd subtitling available for any YouTube creator, they are allowing them to reach more viewers in more languages
2. DIY Captions
DIY captions help you to transcribe the YouTube videos, if not in most accurate manner, then in a little easier way. All you have to do is just paste the URL of the YouTube video and it will provide you all the subtitles. These may not be accurate but will provide you major base material which can be tweaked a bit here and there and is far better than making all the subtitles starting from scratch.
3 Subtitles for YouTube
Subtitles for YouTube is a Google Chrome extension which provides subtitles for YouTube videos. For this you will have to provide a subtitle file with .srt extension. The attractive feature of this is that you won’t have to download the video and still run the subtitles on it. This is very much helpful for people who work on YouTube or watch movies without subtitles.
Richard Bennett
Richard Bennett is a writer and a lover of all things video.
Follow @Richard Bennett
Insights Into YouTube’s Creative Commons Licensing System
What’s YouTube Creative Commons and How to Use it to Make Video
Richard Bennett
Mar 27, 2024• Proven solutions
Creative Commons is a non-profit organization internationally active in providing free licenses that creators can use in order to make their work available to the public. With the creative commons (CC) licenses, the creator has basically given others permission in order to use their work but under specific conditions.
Whenever a work is created, an article or a photograph was taken, there is a copyright that protects it so that it cannot be used in certain ways. On the other hand, the CC licenses allow the creator to choose how they would want others to use their creativity.
If you are new to the video editing world, and want to make your YouTube videos more beautiful, here I recommend an easy-to-use video editing software - Wondershare Filmora which not only allows you cut, crop, rotate, and split your videos in minutes, but also simplify the advanced video editing like green screen effect and PIP. You can also find over 300 video effects
Download Mac Version ](https://tools.techidaily.com/wondershare/filmora/download/ )
- Part 1: What is YouTube Commons
- Part 2: How to Find Creative Commons (CC) Licensed Videos
- Part 3: Can You Download Creative Commons-licensed YouTube videos to Edit
- Part 4: How to Use YouTube Creative Commons to Make Videos
Part 1: What is YouTube Creative Commons
YouTube utilizes CC licenses in its content. With it, the content creators can grant others to use their work as sort of a standard. YouTube users can use the Creative Commons CC BY license in marking their videos. When they use the CC By license, the system will generate a signature to the video automatically. This indicates that you are using Creative Commons content and will show the source video’s titles below the video player. The creator retains the copyright of the video while others can reuse your video but under the terms of the license.
You May Also Like: Standard YouTube License vs. Creative Commons>>
Part 2: How to Find Creative Commons (CC) Licensed Videos
If you are looking for Creative Commons licensed videos, there are different ways or rather, different websites you can go to. These websites are the best place you can find CC-licensed videos and ensure that what you are sharing is legal.
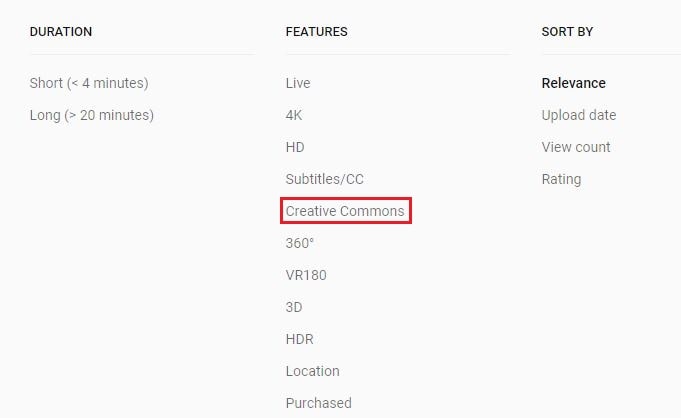
- **YouTube **– YouTube is one of the most common websites you can find CC licensed videos. The easy way to search for CC licensed videos on YouTube is simply to search ‘creative commons’ to the end of the search term you are going for.
- Vimeo – This site offers different licenses complete with an explanation for each in the right side of the main page. Underneath each license, you can find a link to browse all the videos of the specific type of license you chose. You can also search using the Advance Option to find the right video you are looking for.
- SpinXpress – Lets you search for CC licensed videos using just a search term and the kind of Creative Commons license you are looking for. As long as it’s one of the sources they use, you can also specify the media source of the video.
Part 3: Can You Download Creative Commons-licensed YouTube videos to Edit
Many people are asking that can I edit creative commons videos? Well, this is a tricky question because it really depends on what creative commons license is used. If the video is CC-BY, it is no doubt that you can download and edit it. CC-BY-SA means you can edit video under the condition of you also allow others to edit it after you upload it to YouTube. If it is non-commercial, you are definitely not allowed to edit it.
Part 4: How to Use YouTube Creative Commons to Make Videos
YouTube Creative Commons provides you a simple way of using creative works to make your own videos. All you simply need is the YouTube Video Editor and the expanded library of Creative Commons videos o YouTube. There you can choose what videos to edit and then incorporate in your own projects. To find what videos to use, you simply have to search in the YouTube search bar from YouTube Video Editor.
Visit youtube.com/editor and then select CC tab to get started. In order to mark your video with CC license, select the ‘Creative Commons Attribution license’ on the Video Description page or upload page. When using a Creative Commons content to incorporate in your video, you will see the source title of the videos underneath your video player. With that a well, any or all of the videos you used with Creative Commons license, others will be able to share and remix your own creation as long as they give credit for your work.
Richard Bennett
Richard Bennett is a writer and a lover of all things video.
Follow @Richard Bennett
Richard Bennett
Mar 27, 2024• Proven solutions
Creative Commons is a non-profit organization internationally active in providing free licenses that creators can use in order to make their work available to the public. With the creative commons (CC) licenses, the creator has basically given others permission in order to use their work but under specific conditions.
Whenever a work is created, an article or a photograph was taken, there is a copyright that protects it so that it cannot be used in certain ways. On the other hand, the CC licenses allow the creator to choose how they would want others to use their creativity.
If you are new to the video editing world, and want to make your YouTube videos more beautiful, here I recommend an easy-to-use video editing software - Wondershare Filmora which not only allows you cut, crop, rotate, and split your videos in minutes, but also simplify the advanced video editing like green screen effect and PIP. You can also find over 300 video effects
Download Mac Version ](https://tools.techidaily.com/wondershare/filmora/download/ )
- Part 1: What is YouTube Commons
- Part 2: How to Find Creative Commons (CC) Licensed Videos
- Part 3: Can You Download Creative Commons-licensed YouTube videos to Edit
- Part 4: How to Use YouTube Creative Commons to Make Videos
Part 1: What is YouTube Creative Commons
YouTube utilizes CC licenses in its content. With it, the content creators can grant others to use their work as sort of a standard. YouTube users can use the Creative Commons CC BY license in marking their videos. When they use the CC By license, the system will generate a signature to the video automatically. This indicates that you are using Creative Commons content and will show the source video’s titles below the video player. The creator retains the copyright of the video while others can reuse your video but under the terms of the license.
You May Also Like: Standard YouTube License vs. Creative Commons>>
Part 2: How to Find Creative Commons (CC) Licensed Videos
If you are looking for Creative Commons licensed videos, there are different ways or rather, different websites you can go to. These websites are the best place you can find CC-licensed videos and ensure that what you are sharing is legal.
- **YouTube **– YouTube is one of the most common websites you can find CC licensed videos. The easy way to search for CC licensed videos on YouTube is simply to search ‘creative commons’ to the end of the search term you are going for.
- Vimeo – This site offers different licenses complete with an explanation for each in the right side of the main page. Underneath each license, you can find a link to browse all the videos of the specific type of license you chose. You can also search using the Advance Option to find the right video you are looking for.
- SpinXpress – Lets you search for CC licensed videos using just a search term and the kind of Creative Commons license you are looking for. As long as it’s one of the sources they use, you can also specify the media source of the video.
Part 3: Can You Download Creative Commons-licensed YouTube videos to Edit
Many people are asking that can I edit creative commons videos? Well, this is a tricky question because it really depends on what creative commons license is used. If the video is CC-BY, it is no doubt that you can download and edit it. CC-BY-SA means you can edit video under the condition of you also allow others to edit it after you upload it to YouTube. If it is non-commercial, you are definitely not allowed to edit it.
Part 4: How to Use YouTube Creative Commons to Make Videos
YouTube Creative Commons provides you a simple way of using creative works to make your own videos. All you simply need is the YouTube Video Editor and the expanded library of Creative Commons videos o YouTube. There you can choose what videos to edit and then incorporate in your own projects. To find what videos to use, you simply have to search in the YouTube search bar from YouTube Video Editor.
Visit youtube.com/editor and then select CC tab to get started. In order to mark your video with CC license, select the ‘Creative Commons Attribution license’ on the Video Description page or upload page. When using a Creative Commons content to incorporate in your video, you will see the source title of the videos underneath your video player. With that a well, any or all of the videos you used with Creative Commons license, others will be able to share and remix your own creation as long as they give credit for your work.
Richard Bennett
Richard Bennett is a writer and a lover of all things video.
Follow @Richard Bennett
Also read:
- [New] A Quick Dive Into Video Ratios The Aspect Ratio Essentials for YouTubers
- [Updated] 2024 Approved Stream Wars Evaluating Streamers' Top Contenders, OBS & Wirecast
- [Updated] Boosting Profitability in the World of Youtube Shorts
- [Updated] Comedic Content Concepts 7 Hilarious Vlog Ideas for Laughter Lovers
- [Updated] Essential 7 Android Apps to Eliminate Intrusive Ads
- [Updated] In 2024, Alpine Adventure 2022'S Spectacular Snowboard Cross Olympic Moments
- [Updated] In-Depth Examination The Working of Google's Podcast Application
- Creating Compelling Youtube Live Content with WireCast
- Dose Life360 Notify Me When Someone Checks My Location On Realme GT Neo 5 SE? | Dr.fone
- Elite Stabilization Solutions for Video Creators for 2024
- How to Change Vivo S18e Location on Skout | Dr.fone
- How to Check Distance and Radius on Google Maps For your Realme GT 5 Pro | Dr.fone
- In 2024, How to Use Life360 on Windows PC For Honor 80 Pro Straight Screen Edition? | Dr.fone
- In 2024, Three Ways to Sim Unlock OnePlus Ace 2
- Mastering FreeFire The 30 Best Tag Strategies to Increase Views
- Reasons for Motorola Moto G23 Stuck on Boot Screen and Ways To Fix Them | Dr.fone
- Title: How to Easily Add Subtitles and Closed Captions to YouTube Video for 2024
- Author: Kevin
- Created at : 2025-01-14 19:34:05
- Updated at : 2025-01-16 06:39:33
- Link: https://youtube-videos.techidaily.com/how-to-easily-add-subtitles-and-closed-captions-to-youtube-video-for-2024/
- License: This work is licensed under CC BY-NC-SA 4.0.