
How to Add Video to Text for Free
How to Add Video to Text for Free
How to Add Video to Text

Liza Brown
Mar 27, 2024• Proven solutions
It may be challenging to capture the attention of your audience if the video openings or PowerPoint presentations contain too much text. Striking a perfect balance between the visual and textual elements isn’t always easy, especially if the text is the only way to convey essential information to the audience.
Luckily, video editing and presentation software products offer the tools you will need to combine video and text. In this article, we are going to show you how to add a video to text in PowerPoint and Filmora.
Part 1: How to Add Video to Text for Free with PowerPoint?
An effective PowerPoint presentation should contain proportionate amounts of textual and visual elements. Using too many images, videos or animations can make following a presentation difficult, just as too much text can render a presentation too static.
Adding videos to titles or subtitles you include in a slideshow you’re creating in PowerPoint can help you create a presentation that is both informative and visually entertaining. The process of combining videos with text in PowerPoint isn’t overly complicated, but you will still need to go through it several times in order to become familiar with it.
You should start by creating a new slide and adding a textbox to it. Proceed to type the word or phrase into the textbox and go on to format the text. Pick the font that matches the style of your presentation and make sure that the text size is large enough for the video to be visible.
Head over to the Insert tab, select Rectangle from the Shapes menu, and create a rectangular shape over the entire slide. Right-click on the slide and choose the Send to Back option from the menu. In this manner, you will position the rectangle you created behind the textbox.

The next step you will have to take is to create the cut-out of the text within the rectangle. Select both the text and shape you placed in the background before clicking on the Format tab that is located near the end of PowerPoint’s ribbon.
Find the Insert Shape option and choose Subtract from the Merge Shapes drop-down menu. The shape of the text in the textbox will be applied to the object in the background, which enables you to add a video to that text.

Click on the Insert tab, and then choose the Video option from the Media menu. You can insert a video that is stored on a local hard drive or the Internet to PowerPoint. The video will cover the entire slide, so you must right-click on it and select the Send to Back option.
You can then fine-tune the video playback settings from the Playback tab. Preview the results before you move on to the next slide in your presentation, and make necessary adjustments if you don’t like how the video merged with the text.
Part 2: Adding Video to Text in Filmora
Besides presentation software, you can also use video editing software products to add a video to text. Filmora lets you add a video to text in just a few simple steps. You can first make a text video with animation first, and then use the picture in picture feature to add the video to text. Here are the detailed information about how to add a video to text in Filmora.


You should start by creating a new project in Filmora and importing the video you want to add to the text into the project. Click on the Titles tab, and choose the title that matches the visual style of your project.

Set the preferred duration of the title by dragging one of its ends to the left or right after you place it on the timeline, and then double-click on it to customize it. Click on the Advanced button once the Text tab opens and insert the text into the Input Text box.

Proceed to select a font and adjust the text size before deciding if you want to animate the text . When done, you should export the title as a video file, and then import it back into your project.
Now it’s time to add the text video and the background video to the project media library, and then place the two videos one above the other. Since we’re adding video to text, the text video should be placed above the background video.

Click on the video that contains text to gain access to the Video tab of the Editor panel and then expand the Compositing menu. Change the Blending Mode to Multiply, and the text in the overlaying video should be filled with the parts of the footage from the video below it.
Optionally you can enhance the colors in the background video or adjust the size of the text before exporting your project from Filmora.
Conclusion
There are so many different ways to create visually striking content, and adding videos to text is just one among numerous techniques that enable you to make a PowerPoint presentation or an opening of a video more interesting to watch.
Merging text with video is equally easy in PowerPoint and Filmora, so you just have to choose which software better suits your needs and select the materials that fit the style of your project. Learning how to add a video to text won’t take too much of your time, as this process can be completed in just a few quick steps. Which software are you using to add a video to text? Leave a comment below and let us know.
Liza Brown
Liza Brown is a writer and a lover of all things video.
Follow @Liza Brown
Liza Brown
Mar 27, 2024• Proven solutions
It may be challenging to capture the attention of your audience if the video openings or PowerPoint presentations contain too much text. Striking a perfect balance between the visual and textual elements isn’t always easy, especially if the text is the only way to convey essential information to the audience.
Luckily, video editing and presentation software products offer the tools you will need to combine video and text. In this article, we are going to show you how to add a video to text in PowerPoint and Filmora.
Part 1: How to Add Video to Text for Free with PowerPoint?
An effective PowerPoint presentation should contain proportionate amounts of textual and visual elements. Using too many images, videos or animations can make following a presentation difficult, just as too much text can render a presentation too static.
Adding videos to titles or subtitles you include in a slideshow you’re creating in PowerPoint can help you create a presentation that is both informative and visually entertaining. The process of combining videos with text in PowerPoint isn’t overly complicated, but you will still need to go through it several times in order to become familiar with it.
You should start by creating a new slide and adding a textbox to it. Proceed to type the word or phrase into the textbox and go on to format the text. Pick the font that matches the style of your presentation and make sure that the text size is large enough for the video to be visible.
Head over to the Insert tab, select Rectangle from the Shapes menu, and create a rectangular shape over the entire slide. Right-click on the slide and choose the Send to Back option from the menu. In this manner, you will position the rectangle you created behind the textbox.
The next step you will have to take is to create the cut-out of the text within the rectangle. Select both the text and shape you placed in the background before clicking on the Format tab that is located near the end of PowerPoint’s ribbon.
Find the Insert Shape option and choose Subtract from the Merge Shapes drop-down menu. The shape of the text in the textbox will be applied to the object in the background, which enables you to add a video to that text.
Click on the Insert tab, and then choose the Video option from the Media menu. You can insert a video that is stored on a local hard drive or the Internet to PowerPoint. The video will cover the entire slide, so you must right-click on it and select the Send to Back option.
You can then fine-tune the video playback settings from the Playback tab. Preview the results before you move on to the next slide in your presentation, and make necessary adjustments if you don’t like how the video merged with the text.
Part 2: Adding Video to Text in Filmora
Besides presentation software, you can also use video editing software products to add a video to text. Filmora lets you add a video to text in just a few simple steps. You can first make a text video with animation first, and then use the picture in picture feature to add the video to text. Here are the detailed information about how to add a video to text in Filmora.
You should start by creating a new project in Filmora and importing the video you want to add to the text into the project. Click on the Titles tab, and choose the title that matches the visual style of your project.
Set the preferred duration of the title by dragging one of its ends to the left or right after you place it on the timeline, and then double-click on it to customize it. Click on the Advanced button once the Text tab opens and insert the text into the Input Text box.
Proceed to select a font and adjust the text size before deciding if you want to animate the text . When done, you should export the title as a video file, and then import it back into your project.
Now it’s time to add the text video and the background video to the project media library, and then place the two videos one above the other. Since we’re adding video to text, the text video should be placed above the background video.
Click on the video that contains text to gain access to the Video tab of the Editor panel and then expand the Compositing menu. Change the Blending Mode to Multiply, and the text in the overlaying video should be filled with the parts of the footage from the video below it.
Optionally you can enhance the colors in the background video or adjust the size of the text before exporting your project from Filmora.
Conclusion
There are so many different ways to create visually striking content, and adding videos to text is just one among numerous techniques that enable you to make a PowerPoint presentation or an opening of a video more interesting to watch.
Merging text with video is equally easy in PowerPoint and Filmora, so you just have to choose which software better suits your needs and select the materials that fit the style of your project. Learning how to add a video to text won’t take too much of your time, as this process can be completed in just a few quick steps. Which software are you using to add a video to text? Leave a comment below and let us know.
Liza Brown
Liza Brown is a writer and a lover of all things video.
Follow @Liza Brown
Elevating Online Presence: How to Flawlessly Transmit Upside-Down Videos on Youtube
How to live streaming 360 video to youtube

Richard Bennett
Mar 27, 2024• Proven solutions
- Part1.Stream 360 to Youtube via Ricoh Theta S and OBS on PC
- Part2.Live Stream from Allie 360 Camera to YouTube on Mobile
1. Stream 360 to Youtube via Ricoh Theta S and OBS on PC
Step 1: First of all you need to get ready with your Ricoh Theta S 360 camera unit.
Step 2: Now visit the official website of Theta 360 in order to download your dedicated live streaming application.
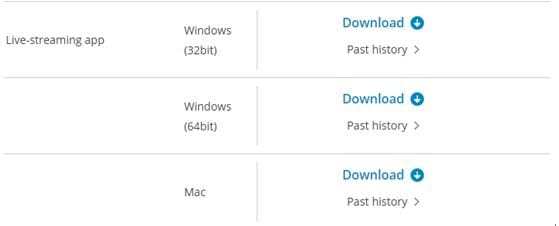
Step 3: Get your application and install it on your Mac or PC as per need.
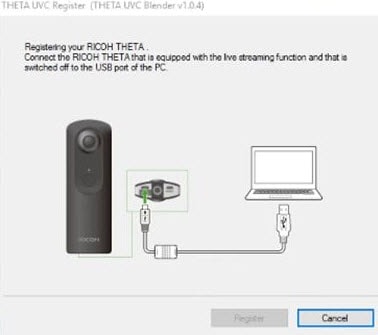
Step 4: It is time to plug in to your Ricoh Theta S 360 camera using your PC.
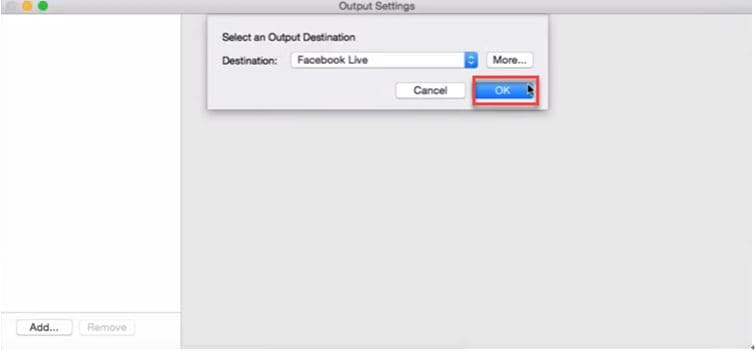
Step 5: Now select your device ‘Ricoh Theta S’ and then hit Okay.
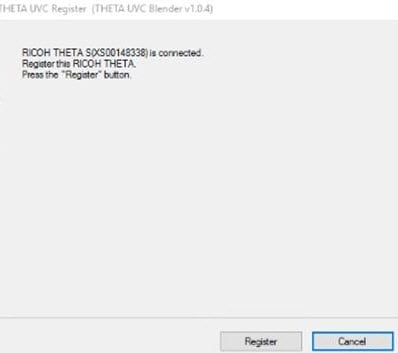
Step 6: You will find option to register to application with your respective device. Select and hit register.
Step 7: As soon as your registration process is complete then un-plug your USB cable.
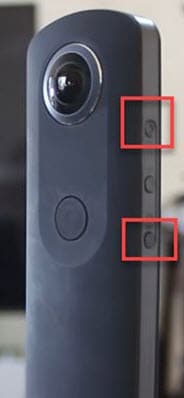
Step 8: It is time to turn the Ricoh Theta device to Live Mode; you simple need to press the top power and lower video button simultaneously to directly switch to the live mode.
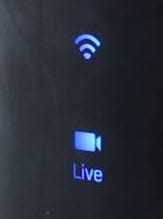
Step 9: Once your device enters into Live Stream mode then a Led will start blinking on your device that represents your device is live at this moment.
Step 10: Now you need to plug in the USB cable again with your computer.
Step 11: Visit the official site of OBS and download your software; install it on your system.
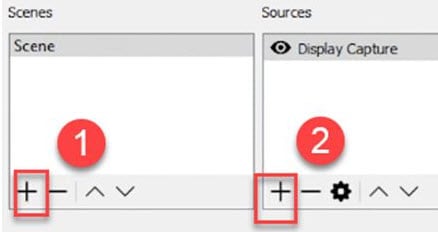
Step 12: Go to create scene option and then switch to create sources.
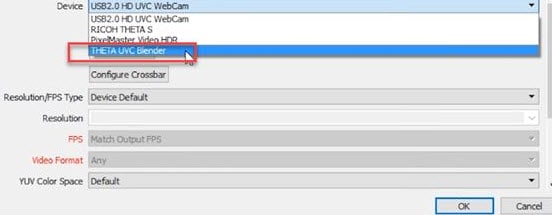
Step 13: Select video capture device as your source from drop down menu.
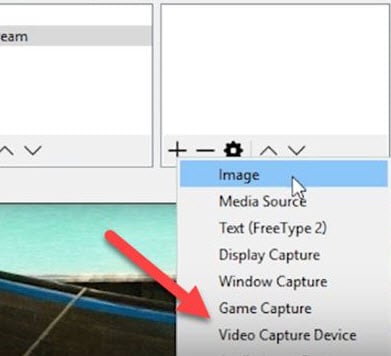
Step 14: Now from available list select Theta UVC as your active video capture source.
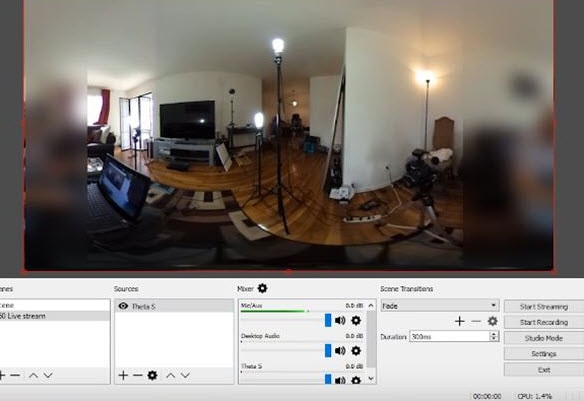
Step 15: You need to adjust screen as per your requirements.
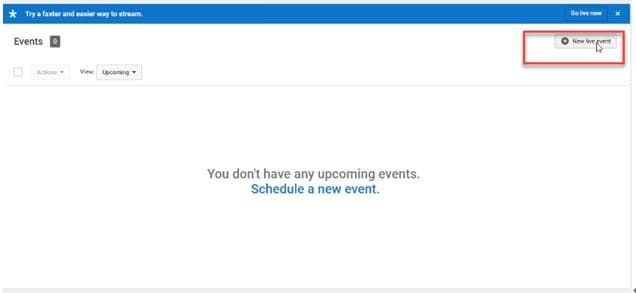
Step 16: Now move to YouTube and then hit New Live Events option.
Step 17: Complete the basic information.
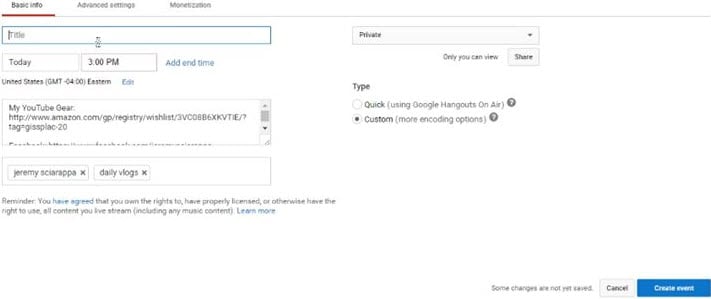
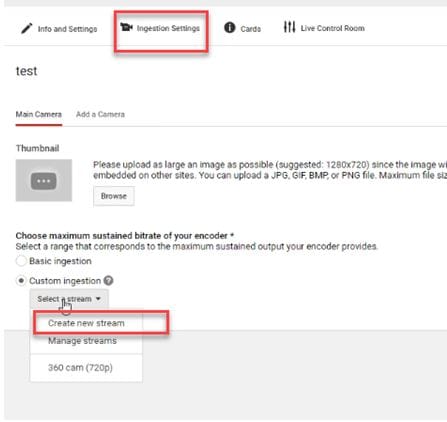
Step 18: You need to move to advanced settings now; select 360 live stream option and then create event.
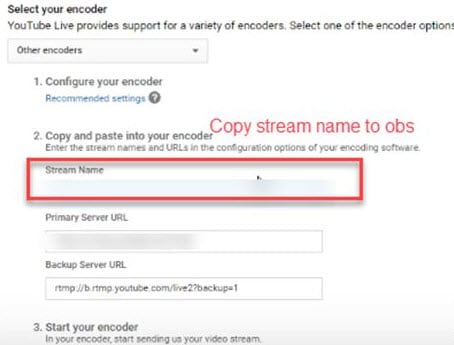
Step 19: Now complete the ingesting settings and finally select create new stream option.

Step 20: As soon as your event is created then you will be able to find your stream name on screen, copy it and simply paste it on OBS window.
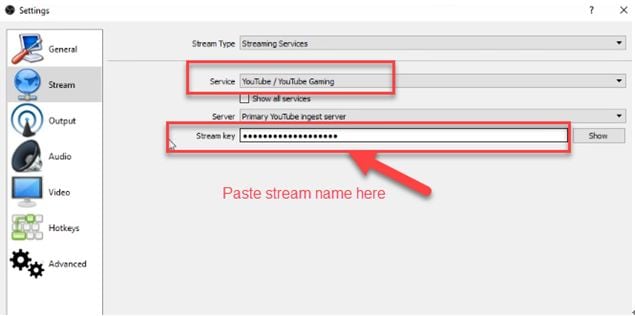
Step 21: It is time to return to OBS settings and then you need to paste that copied name on stream key option.
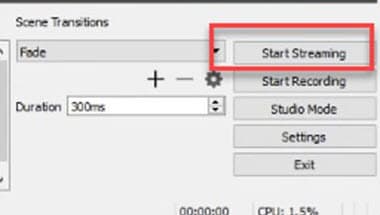
Step 22: Once all above settings are complete then click start stream option from your OBS window and you will soon be able to find your 360 live on YouTube.
2.Live Stream from Allie 360 Camera to YouTube on Mobile
Step 1: Get ready with your Allie 360 camera unit.
Step 2: Visit YouTube and then hit the option to create your live event.
Step 3: It is time to download your Allie Application and then get it installed on your device.
- Prefer to use this link if you are working on iOS: https://itunes.apple.com/app/allie-home/id1063986074
- Android users need to visit: https://play.google.com/store/apps/details?id=com.icrealtime.allie
Step 4: As soon as you have downloaded your app then simply turn on the Bluetooth, Wi-Fi and air plane mode on your device.
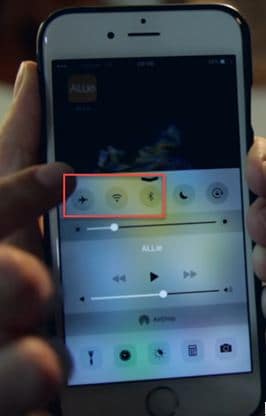
Step 5: Simply open your Allie application and then connect your camera.

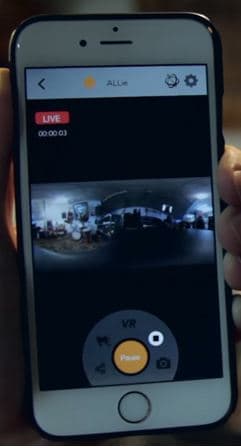
Step 6: Now users need to hit stream icon on screen.
![]()
Step 7: You will be asked to fill the necessary information about your video. It is also possible to make adjustments regarding video quality. Once you are done with all required settings then hit Submit option.

Step 8: Soon your video will become live; note that you can also share your live video via SNS platform with other viewers.
Richard Bennett
Richard Bennett is a writer and a lover of all things video.
Follow @Richard Bennett
Richard Bennett
Mar 27, 2024• Proven solutions
- Part1.Stream 360 to Youtube via Ricoh Theta S and OBS on PC
- Part2.Live Stream from Allie 360 Camera to YouTube on Mobile
1. Stream 360 to Youtube via Ricoh Theta S and OBS on PC
Step 1: First of all you need to get ready with your Ricoh Theta S 360 camera unit.
Step 2: Now visit the official website of Theta 360 in order to download your dedicated live streaming application.
Step 3: Get your application and install it on your Mac or PC as per need.
Step 4: It is time to plug in to your Ricoh Theta S 360 camera using your PC.
Step 5: Now select your device ‘Ricoh Theta S’ and then hit Okay.
Step 6: You will find option to register to application with your respective device. Select and hit register.
Step 7: As soon as your registration process is complete then un-plug your USB cable.
Step 8: It is time to turn the Ricoh Theta device to Live Mode; you simple need to press the top power and lower video button simultaneously to directly switch to the live mode.
Step 9: Once your device enters into Live Stream mode then a Led will start blinking on your device that represents your device is live at this moment.
Step 10: Now you need to plug in the USB cable again with your computer.
Step 11: Visit the official site of OBS and download your software; install it on your system.
Step 12: Go to create scene option and then switch to create sources.
Step 13: Select video capture device as your source from drop down menu.
Step 14: Now from available list select Theta UVC as your active video capture source.
Step 15: You need to adjust screen as per your requirements.
Step 16: Now move to YouTube and then hit New Live Events option.
Step 17: Complete the basic information.
Step 18: You need to move to advanced settings now; select 360 live stream option and then create event.
Step 19: Now complete the ingesting settings and finally select create new stream option.
Step 20: As soon as your event is created then you will be able to find your stream name on screen, copy it and simply paste it on OBS window.
Step 21: It is time to return to OBS settings and then you need to paste that copied name on stream key option.
Step 22: Once all above settings are complete then click start stream option from your OBS window and you will soon be able to find your 360 live on YouTube.
2.Live Stream from Allie 360 Camera to YouTube on Mobile
Step 1: Get ready with your Allie 360 camera unit.
Step 2: Visit YouTube and then hit the option to create your live event.
Step 3: It is time to download your Allie Application and then get it installed on your device.
- Prefer to use this link if you are working on iOS: https://itunes.apple.com/app/allie-home/id1063986074
- Android users need to visit: https://play.google.com/store/apps/details?id=com.icrealtime.allie
Step 4: As soon as you have downloaded your app then simply turn on the Bluetooth, Wi-Fi and air plane mode on your device.
Step 5: Simply open your Allie application and then connect your camera.
Step 6: Now users need to hit stream icon on screen.
![]()
Step 7: You will be asked to fill the necessary information about your video. It is also possible to make adjustments regarding video quality. Once you are done with all required settings then hit Submit option.
Step 8: Soon your video will become live; note that you can also share your live video via SNS platform with other viewers.
Richard Bennett
Richard Bennett is a writer and a lover of all things video.
Follow @Richard Bennett
Also read:
- [New] 5 Leading 3D Video Entrance Design Tools
- [New] Breakdown of Profit From a Million Youtube Watches
- [New] Crafting Captivating Edu-Videos Essential Techniques and Tips for YouTube Success
- [New] Creating a Prime Business Channel Top Picks & Simple Steps
- [Updated] Debugging Techniques Identifying and Resolving Common JavaScript Errors
- [Updated] VLC Utility Guide for MP4 to Multiple File Types Transformation
- 2024 Approved Elevating User Experience with Personalized YouTube Card Implementation
- 2024 Approved From Blank Page to Airwaves Writing Engaging Podcast Episodes
- 2024 Approved Step-Up Content Creation Standard Studio Vs. Beta Access
- A Review of YouTube's Integration with iPhone & Android Devices
- Achieving Greatness: An In-Depth Analysis of Why FIFA 19 Reigns Supreme in the World of Soccer Games
- Easy Entrance to Follow Creating a User-Friendly Subscribe Link for 2024
- File Recovery Solutions for Windows: Integrating Third-Party Tools & Expertise From YL Software
- In 2024, Achieving Professional-Level Youtube Streams Using WireCast
- In 2024, How to Use Phone Clone to Migrate Your Motorola Moto G84 5G Data? | Dr.fone
- In 2024, Iconic Imagery Stories A Peek Inside
- The Sound of Success Audio Recording Guide for 2024
- Transforming Images with the Best Color Adjustment Guides for 2024
- WAV in Movien Kostenloos Online Verwerpen Met Movavi - Gratis Digitale Movie Conversion Voorprofessionals
- Title: How to Add Video to Text for Free
- Author: Kevin
- Created at : 2025-01-14 18:36:46
- Updated at : 2025-01-16 09:10:27
- Link: https://youtube-videos.techidaily.com/how-to-add-video-to-text-for-free/
- License: This work is licensed under CC BY-NC-SA 4.0.