"Guide to Rapid or Slowdown YouTube's Playback Adjustments"

Guide to Rapid or Slowdown: YouTube’s Playback Adjustments
YouTube is one of the top online learning platforms that ever existed. You could learn almost anything on YouTube just by ardently following through the videos with rapt attention, intent, and understanding. However, the degree to which you know effectively can hamper if the video you watch is too fast.
More so, you could want to save time while playing your choice YouTube video and yet wish to get all the information. You can eat your muffin and have it by speeding up or slowing down the YouTube playback speed. This article will show you how to speed up YouTube videos or slow them down.
In this article
01 How to Change YouTube’s Playback Speed on Computer
02 How to Change Video Speed with Keyboard Shortcuts on YouTube
03 How to Change YouTube’s Video Playback Speed on Mobile
04 How YouTube’s Playback Speed Controls Work?
05 How to Change a YouTube Video’s Speed Online
Part 1: How to Change YouTube’s Playback Speed on Computer
To fast-forward YouTube playback videos or slow it down on the computer, you must follow the proper steps. Changing YouTube’s playback speed on a computer is not a complex thing to do. You can achieve it if you follow the steps we will show you.
On the website, you can manually alter the YouTube video’s playback speed with your computer while watching it.
To start, at the bottom right corner of your YouTube video, click the gear wheel icon there. You’ll see a list of other settings like quality, subtitles, and playback speed.
Select playback speed, and you will see a list of speeds from 0.25x, 0.5x, 0.75x, normal, 1.25x, 1.5x, 1.75 x to 2.0x.
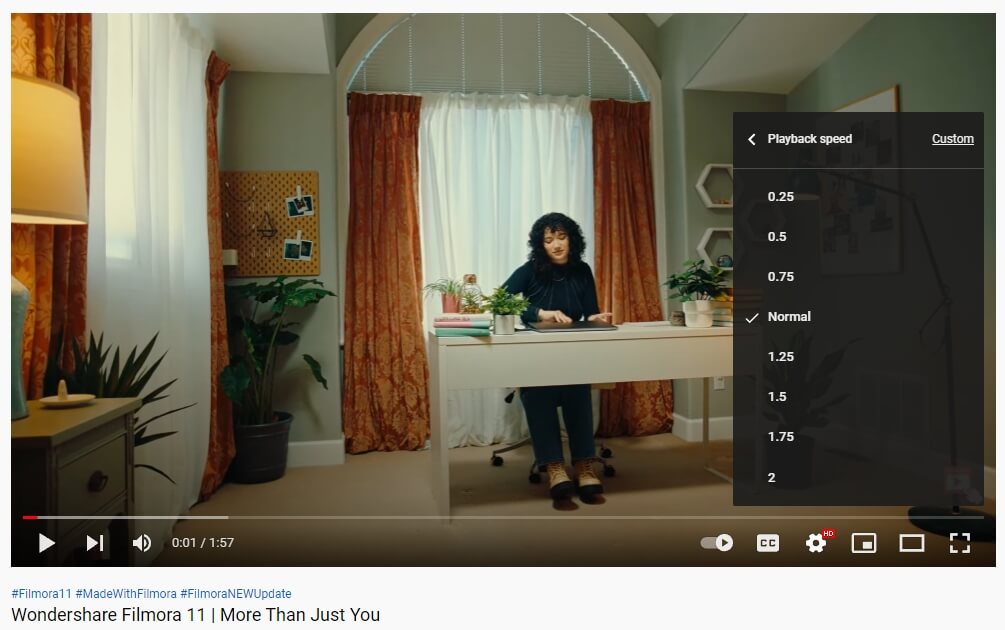
These are preset speeds. If they are not suitable for you, you will have to select a custom speed, but they must be in the same range of 0.25x to 2.0x.
To do this, go back to playback speed. Select custom in the top-right side of the pop-up menu**,** then adjust the speed using a slider that you will see there.
Related: How to Make a YouTube Video .
Part 2: How to Change Video Speed with Keyboard Shortcuts on YouTube
If you are watching a YouTube Video on your computer and want to adjust the playback speed, you can change the speed with keyboard shortcuts.
Here’s another way to adjust the playback speed of YouTube videos more quickly.
To fast-forward the YouTube video, press your shift button and hold down, then tap your greater than(>) symbol on your keyboard. Your YouTube playback speed will increase by 0.25 as you keep tapping.
To reduce the playback speed YouTube videos, the reverse is the case. Press and hold down the shift tab, then tap less than the (<) symbol.
Changing the playback speed using these keyboard shortcuts increases by 0.25 increments. You have to use custom if you want other values, as earlier mentioned.
The best thing about this method of changing the speed is that you can do it while watching the movie or while paused.
Part 3: How to Change YouTube’s Video Playback Speed on Mobile
If you’d like to know how to speed up YouTube videos on your Android, iPhone, or iPad, here’s it.
First, you must open your YouTube App on your device and play the video you want to watch.
Then tap the video once, and it will bring up the toolbar.
At the top right corner, select the vertically aligned three dots. This will bring out a menu for you—select playback speed.
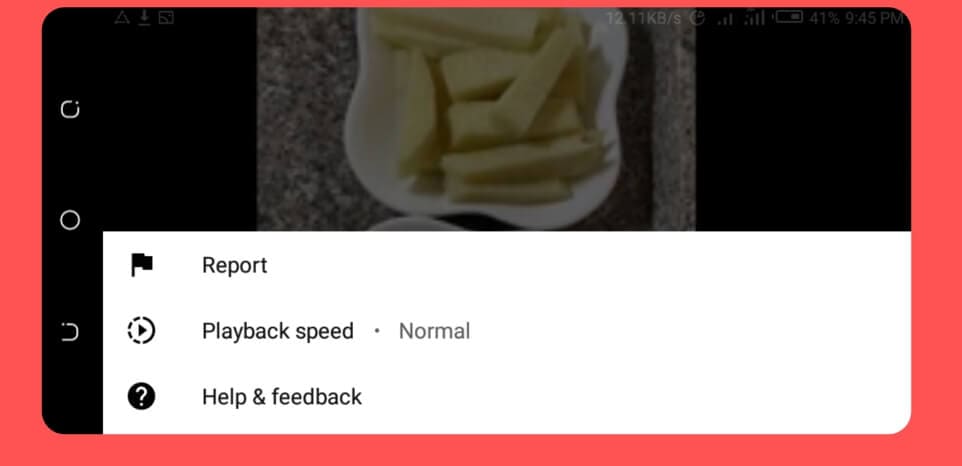
Then you will see a list containing the preset speed provided by YouTube.
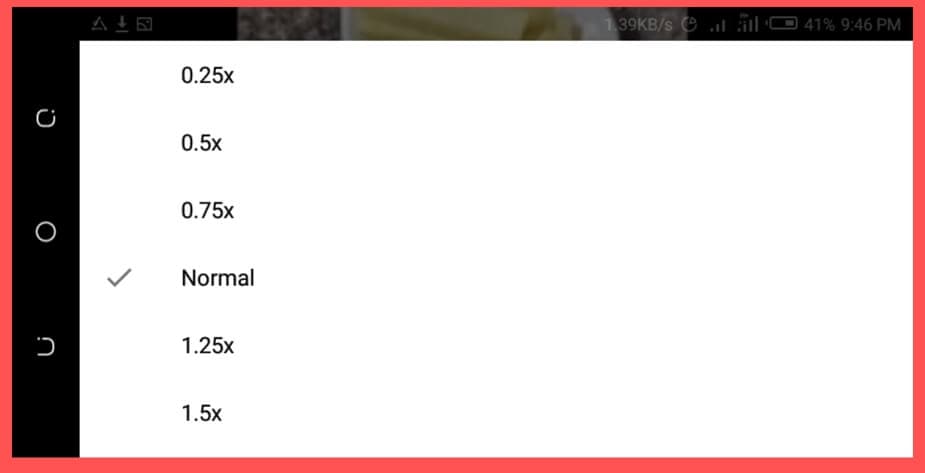
1 is the average speed. Any value below than 1 will slow down the video, while any value above it will increase it.
Once done, close the menu, and the video will resume from where it stopped.
Part 4: How YouTube’s Playback Speed Controls Work?
YouTube has an added feature known as ‘playback speed.’ This feature allows you to select a speed from 0.25x to 2x the normal speed. With this YouTube’s speed control, 1 is the normal speed, with 0.25 being one-quarter (1/4th) of the actual speed and slowing the video. In the same vein, 2x is twice the average speed, increasing the video speed.
However, in as much as YouTube speed control slows or speeds up the video, it does not change the pitch of the video. All it does is either expand or compress the video samples while still maintaining the video or audio pitch. It would still sound like the podcaster or video blogger is just talking faster or slower.
Music would still maintain the same musical key and pitch while playing faster or slower.
If you are watching a presentation or interview that seems like everyone is talking like they have all the time in the world, you can fast forward YouTube video by using the feature.
Also, you can slow down a tutorial or the video you are watching if you feel they are too fast using this YouTube speed control.
Conclusion
YouTube speed control has made it easier to change YouTube playback speed to either speed up or slow down the video. This enables you to capture important moments or information you may miss if the video was fast. Also, you can save time and get to the information you are searching for as soon as possible by speeding the YouTube video.
02 How to Change Video Speed with Keyboard Shortcuts on YouTube
03 How to Change YouTube’s Video Playback Speed on Mobile
04 How YouTube’s Playback Speed Controls Work?
05 How to Change a YouTube Video’s Speed Online
Part 1: How to Change YouTube’s Playback Speed on Computer
To fast-forward YouTube playback videos or slow it down on the computer, you must follow the proper steps. Changing YouTube’s playback speed on a computer is not a complex thing to do. You can achieve it if you follow the steps we will show you.
On the website, you can manually alter the YouTube video’s playback speed with your computer while watching it.
To start, at the bottom right corner of your YouTube video, click the gear wheel icon there. You’ll see a list of other settings like quality, subtitles, and playback speed.
Select playback speed, and you will see a list of speeds from 0.25x, 0.5x, 0.75x, normal, 1.25x, 1.5x, 1.75 x to 2.0x.

These are preset speeds. If they are not suitable for you, you will have to select a custom speed, but they must be in the same range of 0.25x to 2.0x.
To do this, go back to playback speed. Select custom in the top-right side of the pop-up menu**,** then adjust the speed using a slider that you will see there.
Related: How to Make a YouTube Video .
Part 2: How to Change Video Speed with Keyboard Shortcuts on YouTube
If you are watching a YouTube Video on your computer and want to adjust the playback speed, you can change the speed with keyboard shortcuts.
Here’s another way to adjust the playback speed of YouTube videos more quickly.
To fast-forward the YouTube video, press your shift button and hold down, then tap your greater than(>) symbol on your keyboard. Your YouTube playback speed will increase by 0.25 as you keep tapping.
To reduce the playback speed YouTube videos, the reverse is the case. Press and hold down the shift tab, then tap less than the (<) symbol.
Changing the playback speed using these keyboard shortcuts increases by 0.25 increments. You have to use custom if you want other values, as earlier mentioned.
The best thing about this method of changing the speed is that you can do it while watching the movie or while paused.
Part 3: How to Change YouTube’s Video Playback Speed on Mobile
If you’d like to know how to speed up YouTube videos on your Android, iPhone, or iPad, here’s it.
First, you must open your YouTube App on your device and play the video you want to watch.
Then tap the video once, and it will bring up the toolbar.
At the top right corner, select the vertically aligned three dots. This will bring out a menu for you—select playback speed.

Then you will see a list containing the preset speed provided by YouTube.

1 is the average speed. Any value below than 1 will slow down the video, while any value above it will increase it.
Once done, close the menu, and the video will resume from where it stopped.
Part 4: How YouTube’s Playback Speed Controls Work?
YouTube has an added feature known as ‘playback speed.’ This feature allows you to select a speed from 0.25x to 2x the normal speed. With this YouTube’s speed control, 1 is the normal speed, with 0.25 being one-quarter (1/4th) of the actual speed and slowing the video. In the same vein, 2x is twice the average speed, increasing the video speed.
However, in as much as YouTube speed control slows or speeds up the video, it does not change the pitch of the video. All it does is either expand or compress the video samples while still maintaining the video or audio pitch. It would still sound like the podcaster or video blogger is just talking faster or slower.
Music would still maintain the same musical key and pitch while playing faster or slower.
If you are watching a presentation or interview that seems like everyone is talking like they have all the time in the world, you can fast forward YouTube video by using the feature.
Also, you can slow down a tutorial or the video you are watching if you feel they are too fast using this YouTube speed control.
Conclusion
YouTube speed control has made it easier to change YouTube playback speed to either speed up or slow down the video. This enables you to capture important moments or information you may miss if the video was fast. Also, you can save time and get to the information you are searching for as soon as possible by speeding the YouTube video.
02 How to Change Video Speed with Keyboard Shortcuts on YouTube
03 How to Change YouTube’s Video Playback Speed on Mobile
04 How YouTube’s Playback Speed Controls Work?
05 How to Change a YouTube Video’s Speed Online
Part 1: How to Change YouTube’s Playback Speed on Computer
To fast-forward YouTube playback videos or slow it down on the computer, you must follow the proper steps. Changing YouTube’s playback speed on a computer is not a complex thing to do. You can achieve it if you follow the steps we will show you.
On the website, you can manually alter the YouTube video’s playback speed with your computer while watching it.
To start, at the bottom right corner of your YouTube video, click the gear wheel icon there. You’ll see a list of other settings like quality, subtitles, and playback speed.
Select playback speed, and you will see a list of speeds from 0.25x, 0.5x, 0.75x, normal, 1.25x, 1.5x, 1.75 x to 2.0x.

These are preset speeds. If they are not suitable for you, you will have to select a custom speed, but they must be in the same range of 0.25x to 2.0x.
To do this, go back to playback speed. Select custom in the top-right side of the pop-up menu**,** then adjust the speed using a slider that you will see there.
Related: How to Make a YouTube Video .
Part 2: How to Change Video Speed with Keyboard Shortcuts on YouTube
If you are watching a YouTube Video on your computer and want to adjust the playback speed, you can change the speed with keyboard shortcuts.
Here’s another way to adjust the playback speed of YouTube videos more quickly.
To fast-forward the YouTube video, press your shift button and hold down, then tap your greater than(>) symbol on your keyboard. Your YouTube playback speed will increase by 0.25 as you keep tapping.
To reduce the playback speed YouTube videos, the reverse is the case. Press and hold down the shift tab, then tap less than the (<) symbol.
Changing the playback speed using these keyboard shortcuts increases by 0.25 increments. You have to use custom if you want other values, as earlier mentioned.
The best thing about this method of changing the speed is that you can do it while watching the movie or while paused.
Part 3: How to Change YouTube’s Video Playback Speed on Mobile
If you’d like to know how to speed up YouTube videos on your Android, iPhone, or iPad, here’s it.
First, you must open your YouTube App on your device and play the video you want to watch.
Then tap the video once, and it will bring up the toolbar.
At the top right corner, select the vertically aligned three dots. This will bring out a menu for you—select playback speed.

Then you will see a list containing the preset speed provided by YouTube.

1 is the average speed. Any value below than 1 will slow down the video, while any value above it will increase it.
Once done, close the menu, and the video will resume from where it stopped.
Part 4: How YouTube’s Playback Speed Controls Work?
YouTube has an added feature known as ‘playback speed.’ This feature allows you to select a speed from 0.25x to 2x the normal speed. With this YouTube’s speed control, 1 is the normal speed, with 0.25 being one-quarter (1/4th) of the actual speed and slowing the video. In the same vein, 2x is twice the average speed, increasing the video speed.
However, in as much as YouTube speed control slows or speeds up the video, it does not change the pitch of the video. All it does is either expand or compress the video samples while still maintaining the video or audio pitch. It would still sound like the podcaster or video blogger is just talking faster or slower.
Music would still maintain the same musical key and pitch while playing faster or slower.
If you are watching a presentation or interview that seems like everyone is talking like they have all the time in the world, you can fast forward YouTube video by using the feature.
Also, you can slow down a tutorial or the video you are watching if you feel they are too fast using this YouTube speed control.
Conclusion
YouTube speed control has made it easier to change YouTube playback speed to either speed up or slow down the video. This enables you to capture important moments or information you may miss if the video was fast. Also, you can save time and get to the information you are searching for as soon as possible by speeding the YouTube video.
02 How to Change Video Speed with Keyboard Shortcuts on YouTube
03 How to Change YouTube’s Video Playback Speed on Mobile
04 How YouTube’s Playback Speed Controls Work?
05 How to Change a YouTube Video’s Speed Online
Part 1: How to Change YouTube’s Playback Speed on Computer
To fast-forward YouTube playback videos or slow it down on the computer, you must follow the proper steps. Changing YouTube’s playback speed on a computer is not a complex thing to do. You can achieve it if you follow the steps we will show you.
On the website, you can manually alter the YouTube video’s playback speed with your computer while watching it.
To start, at the bottom right corner of your YouTube video, click the gear wheel icon there. You’ll see a list of other settings like quality, subtitles, and playback speed.
Select playback speed, and you will see a list of speeds from 0.25x, 0.5x, 0.75x, normal, 1.25x, 1.5x, 1.75 x to 2.0x.

These are preset speeds. If they are not suitable for you, you will have to select a custom speed, but they must be in the same range of 0.25x to 2.0x.
To do this, go back to playback speed. Select custom in the top-right side of the pop-up menu**,** then adjust the speed using a slider that you will see there.
Related: How to Make a YouTube Video .
Part 2: How to Change Video Speed with Keyboard Shortcuts on YouTube
If you are watching a YouTube Video on your computer and want to adjust the playback speed, you can change the speed with keyboard shortcuts.
Here’s another way to adjust the playback speed of YouTube videos more quickly.
To fast-forward the YouTube video, press your shift button and hold down, then tap your greater than(>) symbol on your keyboard. Your YouTube playback speed will increase by 0.25 as you keep tapping.
To reduce the playback speed YouTube videos, the reverse is the case. Press and hold down the shift tab, then tap less than the (<) symbol.
Changing the playback speed using these keyboard shortcuts increases by 0.25 increments. You have to use custom if you want other values, as earlier mentioned.
The best thing about this method of changing the speed is that you can do it while watching the movie or while paused.
Part 3: How to Change YouTube’s Video Playback Speed on Mobile
If you’d like to know how to speed up YouTube videos on your Android, iPhone, or iPad, here’s it.
First, you must open your YouTube App on your device and play the video you want to watch.
Then tap the video once, and it will bring up the toolbar.
At the top right corner, select the vertically aligned three dots. This will bring out a menu for you—select playback speed.

Then you will see a list containing the preset speed provided by YouTube.

1 is the average speed. Any value below than 1 will slow down the video, while any value above it will increase it.
Once done, close the menu, and the video will resume from where it stopped.
Part 4: How YouTube’s Playback Speed Controls Work?
YouTube has an added feature known as ‘playback speed.’ This feature allows you to select a speed from 0.25x to 2x the normal speed. With this YouTube’s speed control, 1 is the normal speed, with 0.25 being one-quarter (1/4th) of the actual speed and slowing the video. In the same vein, 2x is twice the average speed, increasing the video speed.
However, in as much as YouTube speed control slows or speeds up the video, it does not change the pitch of the video. All it does is either expand or compress the video samples while still maintaining the video or audio pitch. It would still sound like the podcaster or video blogger is just talking faster or slower.
Music would still maintain the same musical key and pitch while playing faster or slower.
If you are watching a presentation or interview that seems like everyone is talking like they have all the time in the world, you can fast forward YouTube video by using the feature.
Also, you can slow down a tutorial or the video you are watching if you feel they are too fast using this YouTube speed control.
Conclusion
YouTube speed control has made it easier to change YouTube playback speed to either speed up or slow down the video. This enables you to capture important moments or information you may miss if the video was fast. Also, you can save time and get to the information you are searching for as soon as possible by speeding the YouTube video.
Configure YouTube’s Audience Options with Ease
How to Change the Privacy Setting on Your YouTube Videos

Richard Bennett
Mar 27, 2024• Proven solutions
Privacy settings on YouTube allow you to control who can see your videos. There are three settings — Public, unlisted, and private. This article will give you a brief introduction of what those three settings mean, and how to use them.
- Part1: Public VS Unlisted VS Private
- Part2: How to Change Privacy Settings
- Part2: Sharing Private Videos
Want to make your YouTube videos more beautiful within minutes? Here we recommend an easy-to-use video editing software for beginner for your reference - Wondershare Filmora .
 Download Mac Version ](https://tools.techidaily.com/wondershare/filmora/download/ )
Part 1: Public VS Unlisted VS Private
Let’s figure out some terms before runing into the how-to part.
Public Videos
These are videos that everyone can view. This is the majority of YouTube videos, and just about every one you’ve ever watched will have been public. You’ll want this if you want lots of people to watch your video.
Unlisted
Unlisted videos are ones that anybody can view so long as they have the link. The video won’t show up on search results or in “related” or “suggested” videos.
This is a great setting for sharing a video amongst small groups. You might have a rough edit you want to show a few people, or you might have a show reel that you only want certain people to see.
Private
Completely private videos cannot be watched by anyone who doesn’t have permission. You grant people permission by allowing their Google accounts to access the video. Nobody else can see the video, regardless of whether they have the link.
It won’t show up on searches, as related or suggested videos, or even when imbedded in other sites. This is the best setting for a video you need to share with only very specific people, if anyone. Below is a comparison table to know more about privacy settings .
Part 2: How to Change Privacy Settings
There are two ways to change the privacy settings: firstly, when you upload the video, and secondly through Creator Studio.
Method 1:
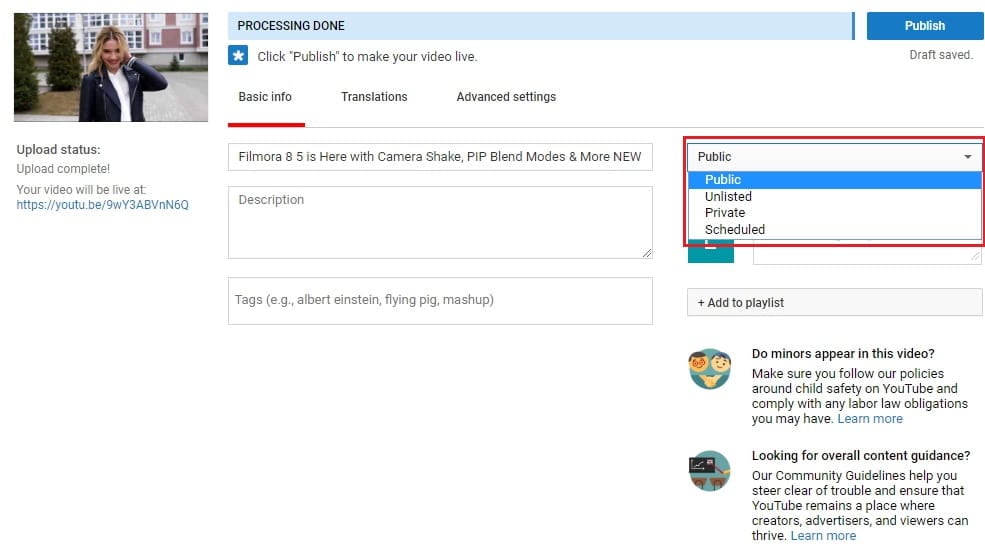
When you upload a video to YouTube you’ll see on the right hand side an option that says “privacy”. This is defaulted to “public”, but you can use the drop-down menu on the button to change the setting. This will apply your privacy setting the second the video finishes uploading and processing.
Method 2:
To change the privacy setting later, go to Creator Studio, then Video Manager. On the right-hand side you’ll see one of three icons: a world, a chain, and a lock. The world means “public”, the chain means “unlisted”, and the lock is for “private”.
To change the privacy, click the icon. You’ll be taken to the video’s info and settings page. Down below where you see the thumbnails you’ll see the selected privacy setting. Click this to open a drop down menu, and select your desired privacy level.
Part 3: Sharing Private Videos
If a video is set to “private’, you’ll have the option to share it with specific people. Below where it says “private” on the info and settings page you’ll see a button labeled “share”. Click this and type in the email addresses of the people you want to be able to watch the video. You’ll also have the option of notifying the people via email that you’ve shared the video with them.
Conclusion
And that’s all there is to it! Changing the privacy setting on YouTube videos is a simple, helpful tool to allow you to control the audience of you work. Enjoy!

Richard Bennett
Richard Bennett is a writer and a lover of all things video.
Follow @Richard Bennett
Richard Bennett
Mar 27, 2024• Proven solutions
Privacy settings on YouTube allow you to control who can see your videos. There are three settings — Public, unlisted, and private. This article will give you a brief introduction of what those three settings mean, and how to use them.
- Part1: Public VS Unlisted VS Private
- Part2: How to Change Privacy Settings
- Part2: Sharing Private Videos
Want to make your YouTube videos more beautiful within minutes? Here we recommend an easy-to-use video editing software for beginner for your reference - Wondershare Filmora .
 Download Mac Version ](https://tools.techidaily.com/wondershare/filmora/download/ )
Part 1: Public VS Unlisted VS Private
Let’s figure out some terms before runing into the how-to part.
Public Videos
These are videos that everyone can view. This is the majority of YouTube videos, and just about every one you’ve ever watched will have been public. You’ll want this if you want lots of people to watch your video.
Unlisted
Unlisted videos are ones that anybody can view so long as they have the link. The video won’t show up on search results or in “related” or “suggested” videos.
This is a great setting for sharing a video amongst small groups. You might have a rough edit you want to show a few people, or you might have a show reel that you only want certain people to see.
Private
Completely private videos cannot be watched by anyone who doesn’t have permission. You grant people permission by allowing their Google accounts to access the video. Nobody else can see the video, regardless of whether they have the link.
It won’t show up on searches, as related or suggested videos, or even when imbedded in other sites. This is the best setting for a video you need to share with only very specific people, if anyone. Below is a comparison table to know more about privacy settings .
Part 2: How to Change Privacy Settings
There are two ways to change the privacy settings: firstly, when you upload the video, and secondly through Creator Studio.
Method 1:
When you upload a video to YouTube you’ll see on the right hand side an option that says “privacy”. This is defaulted to “public”, but you can use the drop-down menu on the button to change the setting. This will apply your privacy setting the second the video finishes uploading and processing.

Method 2:
To change the privacy setting later, go to Creator Studio, then Video Manager. On the right-hand side you’ll see one of three icons: a world, a chain, and a lock. The world means “public”, the chain means “unlisted”, and the lock is for “private”.
To change the privacy, click the icon. You’ll be taken to the video’s info and settings page. Down below where you see the thumbnails you’ll see the selected privacy setting. Click this to open a drop down menu, and select your desired privacy level.
Part 3: Sharing Private Videos
If a video is set to “private’, you’ll have the option to share it with specific people. Below where it says “private” on the info and settings page you’ll see a button labeled “share”. Click this and type in the email addresses of the people you want to be able to watch the video. You’ll also have the option of notifying the people via email that you’ve shared the video with them.
Conclusion
And that’s all there is to it! Changing the privacy setting on YouTube videos is a simple, helpful tool to allow you to control the audience of you work. Enjoy!

Richard Bennett
Richard Bennett is a writer and a lover of all things video.
Follow @Richard Bennett
Richard Bennett
Mar 27, 2024• Proven solutions
Privacy settings on YouTube allow you to control who can see your videos. There are three settings — Public, unlisted, and private. This article will give you a brief introduction of what those three settings mean, and how to use them.
- Part1: Public VS Unlisted VS Private
- Part2: How to Change Privacy Settings
- Part2: Sharing Private Videos
Want to make your YouTube videos more beautiful within minutes? Here we recommend an easy-to-use video editing software for beginner for your reference - Wondershare Filmora .
 Download Mac Version ](https://tools.techidaily.com/wondershare/filmora/download/ )
Part 1: Public VS Unlisted VS Private
Let’s figure out some terms before runing into the how-to part.
Public Videos
These are videos that everyone can view. This is the majority of YouTube videos, and just about every one you’ve ever watched will have been public. You’ll want this if you want lots of people to watch your video.
Unlisted
Unlisted videos are ones that anybody can view so long as they have the link. The video won’t show up on search results or in “related” or “suggested” videos.
This is a great setting for sharing a video amongst small groups. You might have a rough edit you want to show a few people, or you might have a show reel that you only want certain people to see.
Private
Completely private videos cannot be watched by anyone who doesn’t have permission. You grant people permission by allowing their Google accounts to access the video. Nobody else can see the video, regardless of whether they have the link.
It won’t show up on searches, as related or suggested videos, or even when imbedded in other sites. This is the best setting for a video you need to share with only very specific people, if anyone. Below is a comparison table to know more about privacy settings .
Part 2: How to Change Privacy Settings
There are two ways to change the privacy settings: firstly, when you upload the video, and secondly through Creator Studio.
Method 1:
When you upload a video to YouTube you’ll see on the right hand side an option that says “privacy”. This is defaulted to “public”, but you can use the drop-down menu on the button to change the setting. This will apply your privacy setting the second the video finishes uploading and processing.

Method 2:
To change the privacy setting later, go to Creator Studio, then Video Manager. On the right-hand side you’ll see one of three icons: a world, a chain, and a lock. The world means “public”, the chain means “unlisted”, and the lock is for “private”.
To change the privacy, click the icon. You’ll be taken to the video’s info and settings page. Down below where you see the thumbnails you’ll see the selected privacy setting. Click this to open a drop down menu, and select your desired privacy level.
Part 3: Sharing Private Videos
If a video is set to “private’, you’ll have the option to share it with specific people. Below where it says “private” on the info and settings page you’ll see a button labeled “share”. Click this and type in the email addresses of the people you want to be able to watch the video. You’ll also have the option of notifying the people via email that you’ve shared the video with them.
Conclusion
And that’s all there is to it! Changing the privacy setting on YouTube videos is a simple, helpful tool to allow you to control the audience of you work. Enjoy!

Richard Bennett
Richard Bennett is a writer and a lover of all things video.
Follow @Richard Bennett
Richard Bennett
Mar 27, 2024• Proven solutions
Privacy settings on YouTube allow you to control who can see your videos. There are three settings — Public, unlisted, and private. This article will give you a brief introduction of what those three settings mean, and how to use them.
- Part1: Public VS Unlisted VS Private
- Part2: How to Change Privacy Settings
- Part2: Sharing Private Videos
Want to make your YouTube videos more beautiful within minutes? Here we recommend an easy-to-use video editing software for beginner for your reference - Wondershare Filmora .
 Download Mac Version ](https://tools.techidaily.com/wondershare/filmora/download/ )
Part 1: Public VS Unlisted VS Private
Let’s figure out some terms before runing into the how-to part.
Public Videos
These are videos that everyone can view. This is the majority of YouTube videos, and just about every one you’ve ever watched will have been public. You’ll want this if you want lots of people to watch your video.
Unlisted
Unlisted videos are ones that anybody can view so long as they have the link. The video won’t show up on search results or in “related” or “suggested” videos.
This is a great setting for sharing a video amongst small groups. You might have a rough edit you want to show a few people, or you might have a show reel that you only want certain people to see.
Private
Completely private videos cannot be watched by anyone who doesn’t have permission. You grant people permission by allowing their Google accounts to access the video. Nobody else can see the video, regardless of whether they have the link.
It won’t show up on searches, as related or suggested videos, or even when imbedded in other sites. This is the best setting for a video you need to share with only very specific people, if anyone. Below is a comparison table to know more about privacy settings .
Part 2: How to Change Privacy Settings
There are two ways to change the privacy settings: firstly, when you upload the video, and secondly through Creator Studio.
Method 1:
When you upload a video to YouTube you’ll see on the right hand side an option that says “privacy”. This is defaulted to “public”, but you can use the drop-down menu on the button to change the setting. This will apply your privacy setting the second the video finishes uploading and processing.

Method 2:
To change the privacy setting later, go to Creator Studio, then Video Manager. On the right-hand side you’ll see one of three icons: a world, a chain, and a lock. The world means “public”, the chain means “unlisted”, and the lock is for “private”.
To change the privacy, click the icon. You’ll be taken to the video’s info and settings page. Down below where you see the thumbnails you’ll see the selected privacy setting. Click this to open a drop down menu, and select your desired privacy level.
Part 3: Sharing Private Videos
If a video is set to “private’, you’ll have the option to share it with specific people. Below where it says “private” on the info and settings page you’ll see a button labeled “share”. Click this and type in the email addresses of the people you want to be able to watch the video. You’ll also have the option of notifying the people via email that you’ve shared the video with them.
Conclusion
And that’s all there is to it! Changing the privacy setting on YouTube videos is a simple, helpful tool to allow you to control the audience of you work. Enjoy!

Richard Bennett
Richard Bennett is a writer and a lover of all things video.
Follow @Richard Bennett
Also read:
- [New] Elevate Your Content A Guide to Engaging Live Thumbnails for 2024
- [New] In 2024, Maximize Your Relaxation with ASMR Apps
- [Updated] Quick-Start Video Chatting Technique for Snapchat Pros
- [Updated] Tailored Visual Representation Free Logo Base for Personal Touches for 2024
- 2024 Approved Boosting YouTube Videos Activating AV1 Support
- 2024 Approved Discerning T-Series' Profit Mechanisms From Youtube Views
- 2024 Approved Enjoy 9 Complete, Uncut Holiday Cine Classics for No Cost
- DIY Tips for Affordable YouTube Intro/End Videos for 2024
- Everything You Need to Know About the YouTube Shorts Fund for 2024
- How to Fix It Poco M6 Pro 4G Wont Turn On | Dr.fone
- Mastering the Art of Using CC Copyrights Wisely
- New 2024 Approved What Is Talking Avatar?
- Non-Youtube Havens for Unparalleled Video Streaming for 2024
- Perfecting Your Phone's Capability for YouTube Thumbnail Creation
- The Ultimate Guide How to Bypass Swipe Screen to Unlock on Honor Play 7T Device
- Title: Guide to Rapid or Slowdown YouTube's Playback Adjustments
- Author: Kevin
- Created at : 2025-01-10 20:37:41
- Updated at : 2025-01-16 06:09:35
- Link: https://youtube-videos.techidaily.com/guide-to-rapid-or-slowdown-youtubes-playback-adjustments/
- License: This work is licensed under CC BY-NC-SA 4.0.


