
:max_bytes(150000):strip_icc()/google-play-1bde744425134868ba33def6d47150a7.png)
"Gourmet Guide Producing Culinary Content"
Gourmet Guide: Producing Culinary Content
How to Make a Cooking Video in Steps - an Ultimate Guide

Richard Bennett
Mar 27, 2024• Proven solutions
Cooking and food-oriented videos are among the most outreaching and popular categories of content to publish online, notably, on YouTube, Facebook, or Instagram. So if you are a cooking aficionado, you have excellent potential to gain positive attention and a loyal audience. But to create engaging videos, you’d need a lot more than excellent culinary skills. This article aims to enlighten aspiring food and recipe vloggers about the essentials of video making straight out of the oven, to create enriched content that’s professional, neat, and viral-worthy.
- Part 1: What to Prepare Before Making a Recipe Video?
- Part 2: Make a Cooking Video with Filmora: a Step-by-Step Guide
- Part 3: Tips to Make Your Cooking Videos Stand Out
- Part 4: How to Promote Your Cooking Channel on YouTube?
What to Prepare Before Making a Recipe Video
While you would know best about the prep work needed for the recipes, the prep work for making a video starts with a plan. What goes into the plan?
Brainstorm this equation - Main Content + Duration + Light + Sound + Camera + Camera Angle, Shots & Transition.
The main content is how you picture the finished video. Ask yourself - Do you want an intro gig? Are you going to talk in the video or show only hands and the cooking with a piece of background music? How do you wish to present the ingredients? Would there be additional tips? At what platform are you going to publish your content? How long should be your clippings? Consider all these questions to chalk out a basic framework of your video
The camera is a pivotal element. Whether it is a smartphone or a hi-fidelity digital camera, it is worthwhile to familiarise the best positions and light orientations and the capacity of the device to produce the best quality picture.
How is your sound going to be like? If you are going to talk in the video, it is recommended that you use a microphone. Or else, you can also use background sound. But to mix sound with the video, you’d need an excellent sound editing tool.
Finally, comes the editing and finishing part. Eventually, you’ll need purposive video-editing software to help you work out the video transitions, sound, and visual effects.Choose a toolkit that is easy to learn and that you can get comfortable with so that the job of video editing doesn’t take the focus away from the main task of cooking.

Now, once you have all the essential ingredients to create your video, start practicing. Remember that it is the most natural thing for the first videos to appear amateurish or inept. And that is part of the plan. Don’t be disheartened and keep going.
Make a Cooking Video with Filmora: a Step-by-Step Guide
As one of the easiest-to-use video editing tools, the full-featured Filmora is the right choice considering it can fit most of your needs. Moreover, you’d be delighted to know that the software also has a series of features and functions and even tutorial videos dedicated to cooking videos.


Step 1: Filming the Video
Whether you are going to present a traditional cook-with-me style video or feature the contemporary “jump-cut” style focusing on speedy short videos, you need to prepare all the equipment and ingredients to suit the frame by frame shots. Consider spills, drops, overcooking, etc. as part of the process, so keep adequate substitutes to continue with your project unwaveringly. If you are using a phone, keep it fully charged up. And have a plan beforehand about what you should do when you get an urgent call while shooting. Also, consider doing a site investigation of the shooting spot for any fragile items, pointy corners, slippery areas, curious pets, etc. to avoid trips and falls in the middle of the filming, especially when working with a cameraman who’s following your movement. If you are using a tripod, and floor-standing lights, remember to secure the equipment with plenty of adhesive tapes, lest they bump into an expensive trip or fall.
Step 2: mport Your Video In Filmora
You need to sync the device that you used to film the video with the computer that has Filmora installed. It may be a phone or a camcorder. Once the devices are synced, you should launch the Filmora software and go the “Media” button at the top right toolbar. There you will find the “Import” button. You will get a pop-up message asking you to choose the type of device. Select the right one, and your video will be imported in the Filmora interface.
Step 3: Edit Video Pace: Time-Lapse, Jump Cut, Slow Motion
To create crisp, fast-paced videos, you don’t have to gobble up the content eyeing at the duration. Think smart when you have the resources of a tool like Filmora. Here are the three best features that help you create fast-paced yet well-defined recipes.
Time-Lapse: The time-lapse feature allows you to adjust the speed of the video from slow-motion to 10x faster. To use this, double click on a specific clip in your imported video and open the custom speed settings. Use the adjusting meter beside speed to make your clip as fast or slow as you want. You may use the same feature to introduce the slow-motion effects in certain areas of the video.
Now, when you are using either the fast-forward or slow-motion effects, it is best to have stable video footage with consistent lighting and a static background. There are also the options of Reverse Speed that can play the clip backward, as in flash-back. The Ripple edit feature allows you to cut short a long clip seamlessly.
Jump Cut: The Jump Cut is about snipping unwanted areas in the clip. It may sound like the Ripple edit mentioned above, but the ripple edit is more functional for cutting short a continuous video so that the viewer won’t realize the snip. For the Jump Cut, it doesn’t have to be a constant clip. You can get to the next frame or scene with an abracadabra move.
To use Jump Cut, place the cursor over the starting of the clip that you want to cut, and right-click on it and select “Split” (the “scissors” feature on the toolbar does the same thing). To make this look neat, preview the portion of the clip once again and delete the cuts between two clips with the same right-click.
Step 4: Understanding Transitions on Filmora
Transitions make your video more interactive and help you segregate the video from frame-to-frame with effects like dissolve, fade, flash, etc. there are numerous transition options available within the Filmora suit.
The best way to do this drag and drop the clips on the timeline is to trim parts of the clip to shorten it. Once you have all the clips in place, go to the “Transitions” options at the top toolbar to apply it on the end or start of each clip.
Step 5: Audio, Playback & Sound Edits
There are plenty of options that you can remove background noise, add voiceover, add music, and detach audio from video. Refer to the Audios section from your toolbar.
Step 6: Save to Drive/ Emport/ Publish
Once you are satisfied with your content, then go to Export. Choose the format of the video, MOV, MP4, MPG, etc. and whether you wish to publish directly or save to drive.
Tips to Make Your Cooking Videos Stand Out
- Lighting is your best friend. Invest in some quality spotlights or use the best of daylight.
- Mind your video duration. Short and Simple videos get the most views, but your content should not look incomplete. It is not a fact that long and elaborate videos do not get a place on the table; it is all about the relevance of your content. So don’t stop till you get enough.
- If you appear in the video, keep yourself always look good.
- Keep your video titles relevant and prominent, so that people looking for it can readily find it.
- Have a scrumptious custom thumbnail.
How to Promote Your Cooking Channel on YouTube
- Create an inventory before publishing videos. YouTube vlogging is valued for consistency. If you have a list of 10, 15, 20 videos, then you can have enough time in hand to film your next videos.
- Have a consistent style to create brand recognition. Do you think branding is not for Vlogs? Well, I suppose you might be wrong. Branding is for anyone who uses it.
- Share the link of your YouTube videos on other platforms like Twitter and Facebook.
- Encourage your viewers to comment on the video.
- Explore the different YouTube SEO strategies and use the accurate keywords in your video descriptions with hashtags.
With prior planning and practicing, you are bent on developing more confident moves and camera angles. Once you have that, follow this step by step guide to gain speed and prowess and also enjoy the whole adventure.
Richard Bennett
Richard Bennett is a writer and a lover of all things video.
Follow @Richard Bennett
Richard Bennett
Mar 27, 2024• Proven solutions
Cooking and food-oriented videos are among the most outreaching and popular categories of content to publish online, notably, on YouTube, Facebook, or Instagram. So if you are a cooking aficionado, you have excellent potential to gain positive attention and a loyal audience. But to create engaging videos, you’d need a lot more than excellent culinary skills. This article aims to enlighten aspiring food and recipe vloggers about the essentials of video making straight out of the oven, to create enriched content that’s professional, neat, and viral-worthy.
- Part 1: What to Prepare Before Making a Recipe Video?
- Part 2: Make a Cooking Video with Filmora: a Step-by-Step Guide
- Part 3: Tips to Make Your Cooking Videos Stand Out
- Part 4: How to Promote Your Cooking Channel on YouTube?
What to Prepare Before Making a Recipe Video
While you would know best about the prep work needed for the recipes, the prep work for making a video starts with a plan. What goes into the plan?
Brainstorm this equation - Main Content + Duration + Light + Sound + Camera + Camera Angle, Shots & Transition.
The main content is how you picture the finished video. Ask yourself - Do you want an intro gig? Are you going to talk in the video or show only hands and the cooking with a piece of background music? How do you wish to present the ingredients? Would there be additional tips? At what platform are you going to publish your content? How long should be your clippings? Consider all these questions to chalk out a basic framework of your video
The camera is a pivotal element. Whether it is a smartphone or a hi-fidelity digital camera, it is worthwhile to familiarise the best positions and light orientations and the capacity of the device to produce the best quality picture.
How is your sound going to be like? If you are going to talk in the video, it is recommended that you use a microphone. Or else, you can also use background sound. But to mix sound with the video, you’d need an excellent sound editing tool.
Finally, comes the editing and finishing part. Eventually, you’ll need purposive video-editing software to help you work out the video transitions, sound, and visual effects.Choose a toolkit that is easy to learn and that you can get comfortable with so that the job of video editing doesn’t take the focus away from the main task of cooking.
Now, once you have all the essential ingredients to create your video, start practicing. Remember that it is the most natural thing for the first videos to appear amateurish or inept. And that is part of the plan. Don’t be disheartened and keep going.
Make a Cooking Video with Filmora: a Step-by-Step Guide
As one of the easiest-to-use video editing tools, the full-featured Filmora is the right choice considering it can fit most of your needs. Moreover, you’d be delighted to know that the software also has a series of features and functions and even tutorial videos dedicated to cooking videos.
Step 1: Filming the Video
Whether you are going to present a traditional cook-with-me style video or feature the contemporary “jump-cut” style focusing on speedy short videos, you need to prepare all the equipment and ingredients to suit the frame by frame shots. Consider spills, drops, overcooking, etc. as part of the process, so keep adequate substitutes to continue with your project unwaveringly. If you are using a phone, keep it fully charged up. And have a plan beforehand about what you should do when you get an urgent call while shooting. Also, consider doing a site investigation of the shooting spot for any fragile items, pointy corners, slippery areas, curious pets, etc. to avoid trips and falls in the middle of the filming, especially when working with a cameraman who’s following your movement. If you are using a tripod, and floor-standing lights, remember to secure the equipment with plenty of adhesive tapes, lest they bump into an expensive trip or fall.
Step 2: mport Your Video In Filmora
You need to sync the device that you used to film the video with the computer that has Filmora installed. It may be a phone or a camcorder. Once the devices are synced, you should launch the Filmora software and go the “Media” button at the top right toolbar. There you will find the “Import” button. You will get a pop-up message asking you to choose the type of device. Select the right one, and your video will be imported in the Filmora interface.
Step 3: Edit Video Pace: Time-Lapse, Jump Cut, Slow Motion
To create crisp, fast-paced videos, you don’t have to gobble up the content eyeing at the duration. Think smart when you have the resources of a tool like Filmora. Here are the three best features that help you create fast-paced yet well-defined recipes.
Time-Lapse: The time-lapse feature allows you to adjust the speed of the video from slow-motion to 10x faster. To use this, double click on a specific clip in your imported video and open the custom speed settings. Use the adjusting meter beside speed to make your clip as fast or slow as you want. You may use the same feature to introduce the slow-motion effects in certain areas of the video.
Now, when you are using either the fast-forward or slow-motion effects, it is best to have stable video footage with consistent lighting and a static background. There are also the options of Reverse Speed that can play the clip backward, as in flash-back. The Ripple edit feature allows you to cut short a long clip seamlessly.
Jump Cut: The Jump Cut is about snipping unwanted areas in the clip. It may sound like the Ripple edit mentioned above, but the ripple edit is more functional for cutting short a continuous video so that the viewer won’t realize the snip. For the Jump Cut, it doesn’t have to be a constant clip. You can get to the next frame or scene with an abracadabra move.
To use Jump Cut, place the cursor over the starting of the clip that you want to cut, and right-click on it and select “Split” (the “scissors” feature on the toolbar does the same thing). To make this look neat, preview the portion of the clip once again and delete the cuts between two clips with the same right-click.
Step 4: Understanding Transitions on Filmora
Transitions make your video more interactive and help you segregate the video from frame-to-frame with effects like dissolve, fade, flash, etc. there are numerous transition options available within the Filmora suit.
The best way to do this drag and drop the clips on the timeline is to trim parts of the clip to shorten it. Once you have all the clips in place, go to the “Transitions” options at the top toolbar to apply it on the end or start of each clip.
Step 5: Audio, Playback & Sound Edits
There are plenty of options that you can remove background noise, add voiceover, add music, and detach audio from video. Refer to the Audios section from your toolbar.
Step 6: Save to Drive/ Emport/ Publish
Once you are satisfied with your content, then go to Export. Choose the format of the video, MOV, MP4, MPG, etc. and whether you wish to publish directly or save to drive.
Tips to Make Your Cooking Videos Stand Out
- Lighting is your best friend. Invest in some quality spotlights or use the best of daylight.
- Mind your video duration. Short and Simple videos get the most views, but your content should not look incomplete. It is not a fact that long and elaborate videos do not get a place on the table; it is all about the relevance of your content. So don’t stop till you get enough.
- If you appear in the video, keep yourself always look good.
- Keep your video titles relevant and prominent, so that people looking for it can readily find it.
- Have a scrumptious custom thumbnail.
How to Promote Your Cooking Channel on YouTube
- Create an inventory before publishing videos. YouTube vlogging is valued for consistency. If you have a list of 10, 15, 20 videos, then you can have enough time in hand to film your next videos.
- Have a consistent style to create brand recognition. Do you think branding is not for Vlogs? Well, I suppose you might be wrong. Branding is for anyone who uses it.
- Share the link of your YouTube videos on other platforms like Twitter and Facebook.
- Encourage your viewers to comment on the video.
- Explore the different YouTube SEO strategies and use the accurate keywords in your video descriptions with hashtags.
With prior planning and practicing, you are bent on developing more confident moves and camera angles. Once you have that, follow this step by step guide to gain speed and prowess and also enjoy the whole adventure.
Richard Bennett
Richard Bennett is a writer and a lover of all things video.
Follow @Richard Bennett
Create Professional Valorant Thumbnails in No Time
As a content creator on YouTube, you know how important it is to have a strong thumbnail that stands out from the competition. Not only does a thumbnail help attract viewers to your video, but it’s also the first thing people see when they come across your content on the platform. That’s why it’s crucial to put effort into designing an eye-catching thumbnail that accurately represents your video.
When creating a thumbnail for your Valorant video, it’s important to remember that the recommended size is 1280 x 720 pixels. This will ensure that your thumbnail looks clear and professional on all devices. In addition to size, it’s also essential to consider the composition of your thumbnail. In this article, we’ll provide tips and tricks for creating professional Valorant thumbnails that will help boost your views and engagement.

What Is Valorant?
Valorant is a free-to-play tactical first-person shooter video game developed and published by Riot Games. The game was released in June 2020 and has quickly gained popularity due to its high-stakes, team-based gameplay and unique characters.
In Valorant, players choose from a roster of agents, each with their abilities and playstyle, and compete in 5v5 objective-based matches. The game has a variety of game modes, including the popular “Spike Rush” mode, which features a shorter round time and special abilities for all players. Valorant is available on Microsoft Windows and will soon be available on other platforms.

Why Create Thumbnails for Your Valorant YouTube Videos?
Creating a thumbnail for your Valorant YouTube video is an important step in the video creation process. A thumbnail is a visual representation of your video and can help attract viewers to your content.
When someone comes across your video in their feed, the thumbnail is often the first thing they see, so it’s crucial to make it as eye-catching and compelling as possible. A strong thumbnail can help increase your views and engagement and establish your brand as a content creator. By putting effort into designing a professional and relevant thumbnail, you can set your video apart from the competition and entice viewers to click and watch.
How To Make a Valorant Thumbnail for Free?
If you want to create a Valorant thumbnail for your YouTube videos but don’t want to spend any money, you still have plenty of options. One way to create a thumbnail for free is by using a free online design tool or thumbnail maker. Or, you can try Wondershare Filmora .
Free Download For Win 7 or later(64-bit)
Free Download For macOS 10.14 or later
Not only is Filmora a powerful video editing software, and it has a range of features and tools that make it easy to design and create custom thumbnails. Even better, you can use the trial version of Filmora to create a thumbnail for free. You need to download the trial version and start experimenting with the various design tools and templates to create a thumbnail that reflects your style and brand.
Creating a Valorant thumbnail for YouTube using Filmora can be very easy. Just follow these steps:
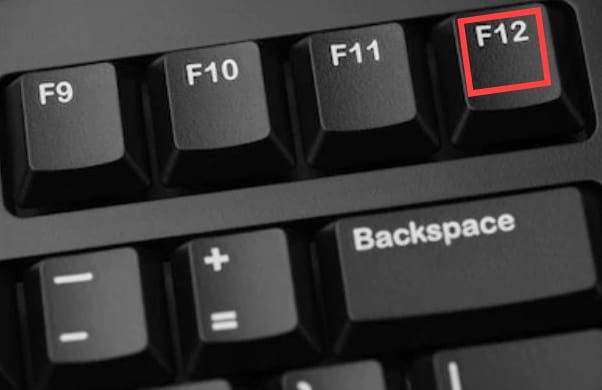
Step1 Take a screenshot of your gameplay by pressing the “F12“ key on your keyboard while in the game. This will save the screenshot to your computer.
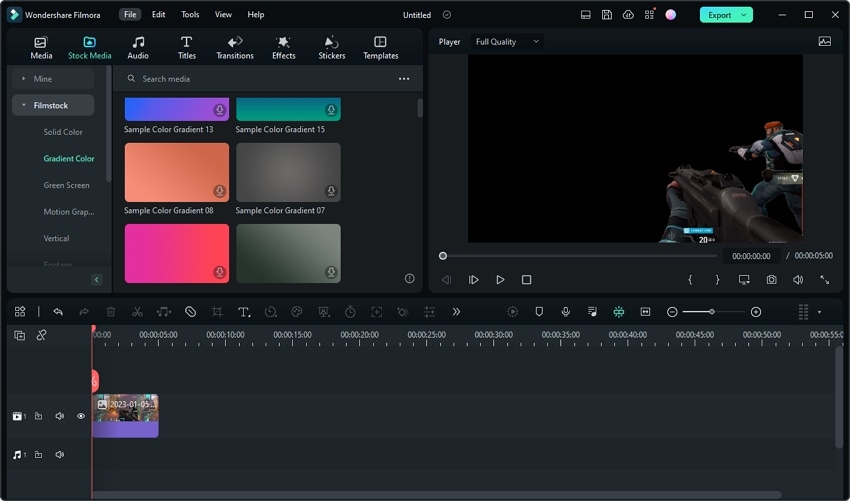
Step2 Launch Filmora and create a new project.

Step3 Import the screenshot into the media library by clicking the “Import“ button.

Step4 Drag the screenshot from the media library into the timeline.

Step5 Use the “Smart Cutout“ feature to select and cut out specific elements from the screenshot.

Step6 Choose the elements of the screenshot that you want to keep.

Step7 Remove any parts of the screenshot that you do not want to include in the thumbnail.

Step8 Extract the selected elements from the screenshot. You can resize the elements as desired.
Step9 Add a background to the track below the screenshot by dragging a background image from the media library into the timeline. Alternatively, you can import your image as a background by clicking the “Import“ button and selecting the image file from your computer.

Step10 Add an effect, such as a gun effect, by searching for the desired effect in the “Effects“ tab and dragging it into the timeline.

Step11 Adjust the opacity of the effect as desired.

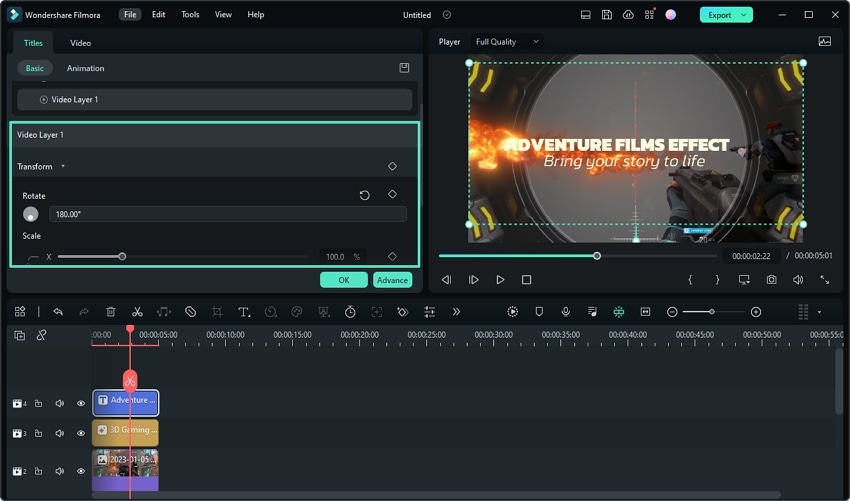
Step12 Add some titles and texts for your thumbnail.

Step13 Customize the appearance and rotation of the fire effect as desired.
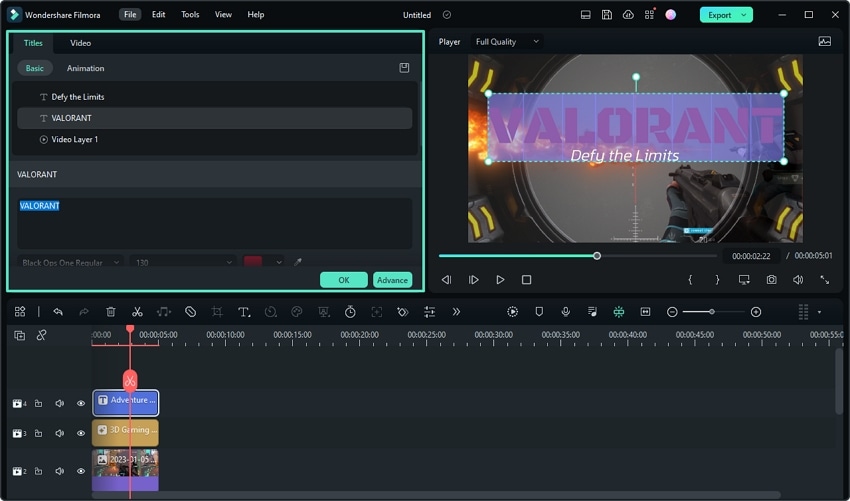
Step14 Edit the texts and adjust the appearance of the texts in the Titles window.
Step15 Choose a still frame that you like and take a snapshot of it.

Step16 Select the snapshot format and storage path. The snapshot will appear in the media library.

Step17 Right-click on the snapshot and select “Reveal in Explorer“ to find the file on your computer. You can now use it as your Valorant thumbnail.

Please note that while using the trial version of Filmora, a watermark will be added to the exported video. However, the watermark will not be added to the snapshot, so you can use the snapshot as your Valorant thumbnail without any issues.

Tips for Making Awesome Thumbnails for Your YouTube Valorant Videos
By following these tips, you can create an eye-catching and effective thumbnail for your Valorant YouTube videos that will help boost your views and engagement.
- Use high-quality images and graphics: A thumbnail with low-quality or pixelated images will not be as effective as a thumbnail with clear, high-resolution graphics.
- Use bold, eye-catching colors: Bright colors can help your thumbnail stand out in a crowded feed.
- Include relevant text: Use text to give viewers an idea of what to expect from your video and to entice them to click.
- Use clear, legible fonts: Make sure the text on your thumbnail is easy to read and doesn’t distract from the overall design.
- Keep it simple: Avoid overcrowding your thumbnail with too many elements or text. A clean, simple design is often more effective.
- Make it relevant: Your thumbnail should accurately represent the content of your video.
- Test different designs: Be bold and experiment with design elements and layouts to find what works best for your brand.
Want To Be a Valorant YouTuber? Learn From These 5 Ones
If you’re interested in becoming a Valorant YouTuber, there are many successful content creators in the Valorant community whom you can learn from. Here are five Valorant YouTubers that are worth checking out:
1. Shroud – Well-Known Valorant YouTuber With 6.8M Subscribers
Shroud is a well-known and respected content creator and player in the Valorant community. He has a strong background in professional CS:GO and has continued to thrive in the competitive Valorant scene despite being older than many other eSports players.
He is known for his gameplay videos and relaxed, easygoing personality, contributing to his widespread popularity and admiration among fans. In addition to his professional gameplay, Shroud is highly skilled and continues to compete at a high level, further solidifying his reputation as a top Valorant player.

2. TenZ – Popular Valorant Player With 1.6M Subscribers
TenZ is a highly skilled and popular Valorant player and content creator known for his exceptional ability in the game. He has achieved a high level of success and has been recognized as one of the best Valorant players in the world.
In addition to his full matches and 1v1 videos, TenZ also produces educational content, providing tips and tricks to his viewers. Despite facing some challenges and setbacks, TenZ has remained a prominent figure in the Valorant community and continues to be highly respected for his skills and contributions.

3. n0ted – Prolific Valorant YouTuber With 614k Subscribers
n0ted is a dedicated and prolific Valorant content creator, consistently uploading new videos to his YouTube channel daily. He offers a wide range of content, including gameplay highlights, funny moments, helpful tips, and updates on the latest happenings in the Valorant community.
His channel is a reliable source for those looking for consistently fresh and diverse Valorant content on YouTube. Whether you’re interested in learning new strategies, having a few laughs, or staying up to date with the latest developments in the game, n0ted’s channel has something for everyone.

4. Hiko - Valorant Content Creator With 382k YouTube Subscrbers
Hiko is a well-known Valorant content creator and former player of Counter-Strike: Global Offensive (CS:GO). He is known for his skill in first-person shooter games and his expertise in Valorant, which he shares through tips and gameplay videos on his channels on Twitch and YouTube.
Hiko is currently a content creator for 100 Thieves, a gaming organization he represents in various tournaments and competitions. He is a reliable source of high-quality Valorant content and regularly uploads new videos for his followers.

5. C9 meL – Professional Valorant Player With 33.6K YouTube Subscribers
C9 meL is a highly respected professional Valorant player and leader of the team Cloud 9 White. She is known for her sense of humor, helpful tips, and Agent tutorials and montages. As the in-game leader for her team, MeL has developed exceptional game sense and strategic skills, making her a valuable teacher and resource for other players.
In addition to her instructional content, MeL’s videos often feature a mix of comedy and skill, making them enjoyable for entertainment and improvement purposes. Overall, MeL is a talented and well-respected member of the Valorant community.

Conclusion
Creating a Valorant thumbnail for your YouTube videos can be important for promoting and attracting views to your content. Using Filmora, you can easily create a thumbnail for free by following the steps outlined in this article.
Additionally, there are many successful Valorant YouTubers who offer a range of content and can serve as inspiration for those interested in starting their channel. Creating visually appealing and engaging thumbnails ensures that your videos stand out and draw in viewers.
Free Download For macOS 10.14 or later
Not only is Filmora a powerful video editing software, and it has a range of features and tools that make it easy to design and create custom thumbnails. Even better, you can use the trial version of Filmora to create a thumbnail for free. You need to download the trial version and start experimenting with the various design tools and templates to create a thumbnail that reflects your style and brand.
Creating a Valorant thumbnail for YouTube using Filmora can be very easy. Just follow these steps:
Step1 Take a screenshot of your gameplay by pressing the “F12“ key on your keyboard while in the game. This will save the screenshot to your computer.
Step2 Launch Filmora and create a new project.
Step3 Import the screenshot into the media library by clicking the “Import“ button.
Step4 Drag the screenshot from the media library into the timeline.
Step5 Use the “Smart Cutout“ feature to select and cut out specific elements from the screenshot.
Step6 Choose the elements of the screenshot that you want to keep.
Step7 Remove any parts of the screenshot that you do not want to include in the thumbnail.
Step8 Extract the selected elements from the screenshot. You can resize the elements as desired.
Step9 Add a background to the track below the screenshot by dragging a background image from the media library into the timeline. Alternatively, you can import your image as a background by clicking the “Import“ button and selecting the image file from your computer.
Step10 Add an effect, such as a gun effect, by searching for the desired effect in the “Effects“ tab and dragging it into the timeline.
Step11 Adjust the opacity of the effect as desired.
Step12 Add some titles and texts for your thumbnail.
Step13 Customize the appearance and rotation of the fire effect as desired.
Step14 Edit the texts and adjust the appearance of the texts in the Titles window.
Step15 Choose a still frame that you like and take a snapshot of it.
Step16 Select the snapshot format and storage path. The snapshot will appear in the media library.
Step17 Right-click on the snapshot and select “Reveal in Explorer“ to find the file on your computer. You can now use it as your Valorant thumbnail.
Please note that while using the trial version of Filmora, a watermark will be added to the exported video. However, the watermark will not be added to the snapshot, so you can use the snapshot as your Valorant thumbnail without any issues.
Tips for Making Awesome Thumbnails for Your YouTube Valorant Videos
By following these tips, you can create an eye-catching and effective thumbnail for your Valorant YouTube videos that will help boost your views and engagement.
- Use high-quality images and graphics: A thumbnail with low-quality or pixelated images will not be as effective as a thumbnail with clear, high-resolution graphics.
- Use bold, eye-catching colors: Bright colors can help your thumbnail stand out in a crowded feed.
- Include relevant text: Use text to give viewers an idea of what to expect from your video and to entice them to click.
- Use clear, legible fonts: Make sure the text on your thumbnail is easy to read and doesn’t distract from the overall design.
- Keep it simple: Avoid overcrowding your thumbnail with too many elements or text. A clean, simple design is often more effective.
- Make it relevant: Your thumbnail should accurately represent the content of your video.
- Test different designs: Be bold and experiment with design elements and layouts to find what works best for your brand.
Want To Be a Valorant YouTuber? Learn From These 5 Ones
If you’re interested in becoming a Valorant YouTuber, there are many successful content creators in the Valorant community whom you can learn from. Here are five Valorant YouTubers that are worth checking out:
1. Shroud – Well-Known Valorant YouTuber With 6.8M Subscribers
Shroud is a well-known and respected content creator and player in the Valorant community. He has a strong background in professional CS:GO and has continued to thrive in the competitive Valorant scene despite being older than many other eSports players.
He is known for his gameplay videos and relaxed, easygoing personality, contributing to his widespread popularity and admiration among fans. In addition to his professional gameplay, Shroud is highly skilled and continues to compete at a high level, further solidifying his reputation as a top Valorant player.
2. TenZ – Popular Valorant Player With 1.6M Subscribers
TenZ is a highly skilled and popular Valorant player and content creator known for his exceptional ability in the game. He has achieved a high level of success and has been recognized as one of the best Valorant players in the world.
In addition to his full matches and 1v1 videos, TenZ also produces educational content, providing tips and tricks to his viewers. Despite facing some challenges and setbacks, TenZ has remained a prominent figure in the Valorant community and continues to be highly respected for his skills and contributions.
3. n0ted – Prolific Valorant YouTuber With 614k Subscribers
n0ted is a dedicated and prolific Valorant content creator, consistently uploading new videos to his YouTube channel daily. He offers a wide range of content, including gameplay highlights, funny moments, helpful tips, and updates on the latest happenings in the Valorant community.
His channel is a reliable source for those looking for consistently fresh and diverse Valorant content on YouTube. Whether you’re interested in learning new strategies, having a few laughs, or staying up to date with the latest developments in the game, n0ted’s channel has something for everyone.
4. Hiko - Valorant Content Creator With 382k YouTube Subscrbers
Hiko is a well-known Valorant content creator and former player of Counter-Strike: Global Offensive (CS:GO). He is known for his skill in first-person shooter games and his expertise in Valorant, which he shares through tips and gameplay videos on his channels on Twitch and YouTube.
Hiko is currently a content creator for 100 Thieves, a gaming organization he represents in various tournaments and competitions. He is a reliable source of high-quality Valorant content and regularly uploads new videos for his followers.
5. C9 meL – Professional Valorant Player With 33.6K YouTube Subscribers
C9 meL is a highly respected professional Valorant player and leader of the team Cloud 9 White. She is known for her sense of humor, helpful tips, and Agent tutorials and montages. As the in-game leader for her team, MeL has developed exceptional game sense and strategic skills, making her a valuable teacher and resource for other players.
In addition to her instructional content, MeL’s videos often feature a mix of comedy and skill, making them enjoyable for entertainment and improvement purposes. Overall, MeL is a talented and well-respected member of the Valorant community.
Conclusion
Creating a Valorant thumbnail for your YouTube videos can be important for promoting and attracting views to your content. Using Filmora, you can easily create a thumbnail for free by following the steps outlined in this article.
Additionally, there are many successful Valorant YouTubers who offer a range of content and can serve as inspiration for those interested in starting their channel. Creating visually appealing and engaging thumbnails ensures that your videos stand out and draw in viewers.
Also read:
- [New] Conceptualists Engineering Marvel Online Worlds
- [New] Driving Revenue with Well-Crafted YouTube Channel Trailers
- Driving Income Through YouTube Shorts Crucial Elements and Earnings Potential for 2024
- In 2024, Erase Unwanted Black Fringes on YouTube Tracks
- In 2024, Elevate YouTube Content Advanced Editing Using WM Maker
- Unlocking Income Insights Google's Simplified Three-Step Strategy for Monetizing YouTube
- Discovering Youtube's Green Magic for Effective Filming for 2024
- In 2024, Ace Your Youtube Finances Secrets for Profits at the 500-Subscriber Milestone
- Epic Video Journeys The Fastest Hits Reaching 100M Views by '24 for 2024
- Efficiently Engaging with Numerous YouTube Lectures for 2024
- In 2024, 24/7 Real-Time Follower Analysis
- [Updated] Captivating Clicks The Top 8 YT Thumbnails to Use
- [New] Crafting Memorable Valorant Thumbnails A Practical Guide for YouTube Creators
- In 2024, A Deep Dive Into Creating Compelling Unboxing Sequences
- In 2024, Epicurean Escapades Crafting Kitchen Films
- [Updated] Clearing Up that Persistent Green Tint in YouTube Videos on Mac
- Elevating Positivity in a Constructive Space for 2024
- Chart-Topping Content YouTube's Top 5
- 2024 Approved Achieving Excellent Illumination on YouTube Videos
- Captivate Viewers Social Media Strategies for YouTube
- 2024 Approved Earnings Epicenter Tech Gaming on YouTube
- How to Edit YouTube Videos in Adobe Premiere
- Ditch YouTube on Your Phone Top 10 Free Video App Alternatives
- In 2024, Breakthrough Strategies for YouTube Short Problem-Solving
- [New] Demystifying the Math of YouTube Ratio Perfection
- [New] Direct to YouTube Stepwise Process of Mobile & Desktop Video Posting
- In 2024, Discovering the Secrets of ASMR Media
- Advanced Facecam Recording Techniques Unveiled for 2024
- [Updated] 2024 Approved Essential Hash Monitors for Facebook, Twitter, Instagram
- In 2024, How to Bypass Google FRP Lock on Samsung Galaxy S24+ Devices
- Pattern Locks Are Unsafe Secure Your Vivo Y02T Phone Now with These Tips
- 2024 Approved Make Your WhatsApp Status Stand Out with These Video Maker Tools
- 2024 Approved Mastering Video Capture on Hangouts
- How To Simulate GPS Movement With Location Spoofer On Apple iPhone 14? | Dr.fone
- Crystal Clear Playback Top 5 Ultra HD Gaming Displays with HDMI 2.1 [PS5]
- [Updated] Saving Instagram's Finest in Your Photo Gallery for 2024
- Fixing Foneazy MockGo Not Working On Infinix GT 10 Pro | Dr.fone
- [Updated] In 2024, Gain Popularity Power Secrets to Staff-Picked Videos on Vimeo
- Apple iPhone 13 mini Backup Password Never Set But Still Asking? Heres the Fix
- 2024 Approved The Ultimate Guide to Splitting the Action Multiscreen Strategies on Social Media
- Quick Windows Data Evaluation Guide
- How to Fix Android App Not Installed Error on Itel A60s Quickly? | Dr.fone
- In 2024, Two Ways to Track My Boyfriends OnePlus Nord CE 3 Lite 5G without Him Knowing | Dr.fone
- New 2024 Approved Resize with Confidence The Up-to-Date Aspect Ratio Guide for Social Media
- New Essential Guide to Apowersoft Audio Capturing Techniques & 3 Substitutes
- Play Store Not Working On Lava Yuva 3 Pro? 8 Solutions Inside | Dr.fone
- In 2024, Accelerate Vimeo Videos The Guide
- [Updated] In 2024, Top 10 Stress Relieving Games You Should Try
- New Best Voice Recording Apps for Android Free Options Included for 2024
- 5 Easy Ways to Change Location on YouTube TV On Apple iPhone 12 mini | Dr.fone
- In 2024, Hacks to do pokemon go trainer battles For Realme 12+ 5G | Dr.fone
- Title: "Gourmet Guide Producing Culinary Content"
- Author: Kevin
- Created at : 2024-05-25 15:17:36
- Updated at : 2024-05-26 15:17:36
- Link: https://youtube-videos.techidaily.com/gourmet-guide-producing-culinary-content/
- License: This work is licensed under CC BY-NC-SA 4.0.
