

"Frontier Makers of Harmonized Audio-Visual Experiences"
Frontier Makers of Harmonized Audio-Visual Experiences
People capture loads of photos of the places they visit and the events they attend for social media and future memories. If you check the online trend, users are shifting from static photos to short videos for a better visual experience. That is why you can consider creating videos out of the photos you have captured and adding suitable music in the background to make your memories visually pleasing.
All you need is a video maker with music and pictures. There is no dearth of video makers, but not all live up to the expectation. There are online video markers as well as video maker software applications available. In this article, we have picked the best video maker with photos and music and illustrated how to make a video with music and photos. We have also listed the popular video makers for your consideration.
Part 1. Best Video maker with music and pictures
We recommend Wondershare Filmora as the best video maker with photos and music. Filmora is considered one of the best video makers and editors in the world. Filmora allows you to import photos of different file formats so that you can make slideshow-like video. There are loads of transitions as well as effects available that you can place in between the photos so that the transition becomes eye-pleasing.
Similarly, you can import any audio or music file. Besides, there are stock music files available that you can apply to your slideshow video. You can even add colourful titles and graphical elements to enhance the video content. Here are the steps on how to make a video with your photos and music.
For Win 7 or later (64-bit)
For macOS 10.12 or later
Step 1: Install Filmora and Start Your Project
Download and install Wondershare Filmora as per your operating system. Filmora is available for Windows and Mac. Launch Filmora and click on New Project. Drag and drop your photos on Project Media folder.
Step 2: Import Photos and Arrange Them in Order
Drag and drop the photos on the timeline as per your sequence you want in your slideshow video. You can change the order of the photos as well as stretch durations of photos in the video from the timeline. You have to arrange the photos side by side without any gap so that there is no black screen in between the transition.

Step 3: Add Transition Effects
After arranging the photos side by side, you have to apply transition effects so that the change from one photo to another is eye-soothing. There are loads of transitions available and you can get them from Transition option located at the top bar.
Go through the different categories of transitions. Drag and drop the transition you want on to the photo after which you want the transition effect to play. Do the same for all photos except the last one. You can apply different transitions effects for different photos as per your preference.

Step 4: Add Background Music
Now it is time to add a background music to the entire video. You can drag and drop any music file from your hard drive to Filmora Project Media. Thereafter, you can drag and drop the audio file on the audio timeline below the photo timeline. You can also add audio effects from the top bar if required.

Step 5: Export Your Video
Once you are done adding photos, transitions, and music, you should play the video on Filmora and make adjustments wherever required. Thereafter, click on Export button and save the video file on your hard drive in your desired file format.

Part 2. Popular video makers with photos and music
Here is the list of the popular premium and free video maker with music and pictures that you can consider for making slideshow videos.
1. Invideo
Invideo is a popular online video maker with music and pictures along with 5000 customizable templates. These templates help users to transform photos into videos with background music in a few minutes. Besides, the platform offers a wide range of stock media files. You can create videos in more than 70 languages, and the editor is user-friendly for users of all ages.
All you need to do is select a template and customize it if required. Thereafter, you need to import the photos, add text effects, and finally add music. There are options for trimming, cropping, and adding stickers, texts and transitions. The free version lets you export 60 videos per month but with a watermark. Here are the top features of Invideo.
- 5000+ customizable templates for all video types.
- 9+ million stocks videos, photos, and audio files.
- Add transitions, stickers, animations, and texts to videos.
- Trim and crop videos and audio files.
- Add voiceover as well as fade-in and fade-out effects.
- Work in collaboration with team members.

2. Icecream slideshow maker
Icecream slideshow maker is a free video maker with music and pictures for Windows users only. The software is compatible with Windows 10, 8, 7 and XP. You can create a high-quality video from your photos with music instantly. There is no need for any prior experience to use the video maker. There are beautiful transitions available that will enhance the video quality and make your presentation stand out. The free version allows up to 10 slides per video and saving the video in Webm file format. You can upgrade to Pro version to get rid of the limitations.
You can change photo and transition duration as per requirements. The software supports various audio file formats that you can import for your video. You can also add animations to texts so that they can shine in your video. The software allows sharing the video directly to YouTube. Besides, you can save it on Google Drive and Dropbox. Here are all the features of Icecream slideshow maker that you should be aware of.
- Super intuitive user interface for all users.
- Add colourful text, transitions, and animations.
- Save and resume project work as per time availability.
- Pro version allows saving video in 4K resolution.
- Video output in MP4, AVI, MOV and WEBM formats.
- Suitable for low-end computers.

3. PhotoStage Slideshow
PhotoStage Slideshow by NCH Software is another video maker software for Windows users. The software comes with an easy and automated wizard for users to transform photos with a video instantly. There is also an image editor available to adjust different parameters of your photos before making a video out of them.
Besides, there are various transitions available to apply and you can add captions and narration as per your requirements. In fact, along with photos, you can add video clips to create the ultimate video. Moreover, there are tools available to edit your audio and music file and add different effects. Here are the top features of PhotoStage Slideshow Software.
- Supports Full HD and 4K video resolution.
- Edit and fine-tune photos and add captions.
- Wide range of eye-catching and popular transitions.
- Edit audio and music file and add different effects.
- Save video file in MOV, MP4, GIF, AVI, 3GP and more.
- Directly share on YouTube, Vimeo, Flickr, HTML5.

4. Clideo video maker
Clideo Video Maker is a free online video maker with song. All you need to do is upload photos from your hard drive and choose a preset depending on the online platform where you want to upload the video. Thereafter, add audio and trim it as per video length. Then add smooth transitions and the video will be ready to export on your hard drive or cloud storage.
The online video maker supports different video and audio file format for importing and exporting. You can use the editor on any device starting from Windows and Mac to Android and iPhone. The user interface is very simple to use and it does not store video files for more than a day. Here are all the features of Clideo video maker.
- Upload photos from hard drive, and cloud storage.
- Presets for Instagram, Stories, YouTube, and Facebook videos.
- Add different photos, audio, and video clips to make videos.
- Zoom & crop option along with image duration elongation.
- Suitable for computer and mobile phone users.

5. Movavi Slideshow Maker
Movavi Slideshow Maker is available for both Windows and Mac users. The software comes with a wizard to allow users to create video from photos. However, advanced users can create video from photos manually as well. You get to add photos, audio files and video clips of different file formats. Most importantly, there are various templates available to create professional-quality videos.
There are loads of effects, filters, titles, and stickers available to apply on your video. The free version is limited to seven days usage. The output video will have watermark on it and you can purchase the premium version to avoid all limitations. Here are the top features of Movavi Slideshow Maker.
- Slideshow wizard for fast and easy video creation.
- Manual mode for advanced users to create customized video.
- Supports different types of media file formats.
- Different types of templates for instant video making.
- Wide ranges of transitions, filters, titles, and stickers.

Conclusion
If you are making a video from your photos, you can use an online video maker with photos and music free. If you are someone who wants to make professional-quality videos from photos, a premium video maker is best for you. If you are going to upload your slideshow videos on social media and video streaming platforms, we recommend Wondershare Filmora as the best video maker with music and pictures.
For macOS 10.12 or later
Step 1: Install Filmora and Start Your Project
Download and install Wondershare Filmora as per your operating system. Filmora is available for Windows and Mac. Launch Filmora and click on New Project. Drag and drop your photos on Project Media folder.
Step 2: Import Photos and Arrange Them in Order
Drag and drop the photos on the timeline as per your sequence you want in your slideshow video. You can change the order of the photos as well as stretch durations of photos in the video from the timeline. You have to arrange the photos side by side without any gap so that there is no black screen in between the transition.
Step 3: Add Transition Effects
After arranging the photos side by side, you have to apply transition effects so that the change from one photo to another is eye-soothing. There are loads of transitions available and you can get them from Transition option located at the top bar.
Go through the different categories of transitions. Drag and drop the transition you want on to the photo after which you want the transition effect to play. Do the same for all photos except the last one. You can apply different transitions effects for different photos as per your preference.
Step 4: Add Background Music
Now it is time to add a background music to the entire video. You can drag and drop any music file from your hard drive to Filmora Project Media. Thereafter, you can drag and drop the audio file on the audio timeline below the photo timeline. You can also add audio effects from the top bar if required.
Step 5: Export Your Video
Once you are done adding photos, transitions, and music, you should play the video on Filmora and make adjustments wherever required. Thereafter, click on Export button and save the video file on your hard drive in your desired file format.
Part 2. Popular video makers with photos and music
Here is the list of the popular premium and free video maker with music and pictures that you can consider for making slideshow videos.
1. Invideo
Invideo is a popular online video maker with music and pictures along with 5000 customizable templates. These templates help users to transform photos into videos with background music in a few minutes. Besides, the platform offers a wide range of stock media files. You can create videos in more than 70 languages, and the editor is user-friendly for users of all ages.
All you need to do is select a template and customize it if required. Thereafter, you need to import the photos, add text effects, and finally add music. There are options for trimming, cropping, and adding stickers, texts and transitions. The free version lets you export 60 videos per month but with a watermark. Here are the top features of Invideo.
- 5000+ customizable templates for all video types.
- 9+ million stocks videos, photos, and audio files.
- Add transitions, stickers, animations, and texts to videos.
- Trim and crop videos and audio files.
- Add voiceover as well as fade-in and fade-out effects.
- Work in collaboration with team members.
2. Icecream slideshow maker
Icecream slideshow maker is a free video maker with music and pictures for Windows users only. The software is compatible with Windows 10, 8, 7 and XP. You can create a high-quality video from your photos with music instantly. There is no need for any prior experience to use the video maker. There are beautiful transitions available that will enhance the video quality and make your presentation stand out. The free version allows up to 10 slides per video and saving the video in Webm file format. You can upgrade to Pro version to get rid of the limitations.
You can change photo and transition duration as per requirements. The software supports various audio file formats that you can import for your video. You can also add animations to texts so that they can shine in your video. The software allows sharing the video directly to YouTube. Besides, you can save it on Google Drive and Dropbox. Here are all the features of Icecream slideshow maker that you should be aware of.
- Super intuitive user interface for all users.
- Add colourful text, transitions, and animations.
- Save and resume project work as per time availability.
- Pro version allows saving video in 4K resolution.
- Video output in MP4, AVI, MOV and WEBM formats.
- Suitable for low-end computers.
3. PhotoStage Slideshow
PhotoStage Slideshow by NCH Software is another video maker software for Windows users. The software comes with an easy and automated wizard for users to transform photos with a video instantly. There is also an image editor available to adjust different parameters of your photos before making a video out of them.
Besides, there are various transitions available to apply and you can add captions and narration as per your requirements. In fact, along with photos, you can add video clips to create the ultimate video. Moreover, there are tools available to edit your audio and music file and add different effects. Here are the top features of PhotoStage Slideshow Software.
- Supports Full HD and 4K video resolution.
- Edit and fine-tune photos and add captions.
- Wide range of eye-catching and popular transitions.
- Edit audio and music file and add different effects.
- Save video file in MOV, MP4, GIF, AVI, 3GP and more.
- Directly share on YouTube, Vimeo, Flickr, HTML5.
4. Clideo video maker
Clideo Video Maker is a free online video maker with song. All you need to do is upload photos from your hard drive and choose a preset depending on the online platform where you want to upload the video. Thereafter, add audio and trim it as per video length. Then add smooth transitions and the video will be ready to export on your hard drive or cloud storage.
The online video maker supports different video and audio file format for importing and exporting. You can use the editor on any device starting from Windows and Mac to Android and iPhone. The user interface is very simple to use and it does not store video files for more than a day. Here are all the features of Clideo video maker.
- Upload photos from hard drive, and cloud storage.
- Presets for Instagram, Stories, YouTube, and Facebook videos.
- Add different photos, audio, and video clips to make videos.
- Zoom & crop option along with image duration elongation.
- Suitable for computer and mobile phone users.
5. Movavi Slideshow Maker
Movavi Slideshow Maker is available for both Windows and Mac users. The software comes with a wizard to allow users to create video from photos. However, advanced users can create video from photos manually as well. You get to add photos, audio files and video clips of different file formats. Most importantly, there are various templates available to create professional-quality videos.
There are loads of effects, filters, titles, and stickers available to apply on your video. The free version is limited to seven days usage. The output video will have watermark on it and you can purchase the premium version to avoid all limitations. Here are the top features of Movavi Slideshow Maker.
- Slideshow wizard for fast and easy video creation.
- Manual mode for advanced users to create customized video.
- Supports different types of media file formats.
- Different types of templates for instant video making.
- Wide ranges of transitions, filters, titles, and stickers.
Conclusion
If you are making a video from your photos, you can use an online video maker with photos and music free. If you are someone who wants to make professional-quality videos from photos, a premium video maker is best for you. If you are going to upload your slideshow videos on social media and video streaming platforms, we recommend Wondershare Filmora as the best video maker with music and pictures.
From Ordinary to Extraordinary: Your Path to Awesome Unboxings
Versatile Video Editor - Wondershare Filmora
An easy yet powerful editor
Numerous effects to choose from
Detailed tutorials provided by the official channel
Unboxing videos are a bizarre trend. However, these videos are getting the highest traction, and more videos are getting onboard about various products.
And, if you haven’t already checked one, an unboxing video is what it sounds like. At its core, “unboxing” is the procedure of recording the moment when a particular product is removed and opened from the packaging sold in.
Again, you’re probably thinking:
‘Why would anybody gaze at other folks opening their product packaging?’
More than 90,000 people type ‘unboxing’ into YouTube each month, and that’s quite interesting as well as strange. Also, these are just a few of the insane statistics about the eCommerce trend of unboxing videos.
In this article, you’ll see the science behind such unboxing videos and learn how to create an attractive one by taking inspiration from others.
So whether you’re not sure why we admire unboxing videos or you wish to know how to use them to your benefit, you’re in the right place!
In this article
02 5 Best YouTube Unboxing Channels
03 How to Create a Killer Unboxing Video
Part 1: What is an Unboxing Video?
Within the unboxing videos, people open boxes and narrate their actions. Unboxing videos are incredibly famous with kids, grabbing up tons of millions of subscribers as well as millions of views. Such videos are also usually great for kids to watch (with a few caveats). But the matter of the subject of some unboxing videos is not age-appropriate. And, there are niche-specific videos as well on different channels.
Are unboxers paid by the companies whose services or products they consider opening on YouTube? Companies don’t generally pay the YouTuber directly for featuring their products in a video. When an unboxer becomes super popular (with subscribers and tens of millions of views), companies may send the products for free, but not always. Sometimes hosts disclose this, sometimes not. However, companies do sponsor highly famous and influential YouTubers in other areas. For instance, they may pay the YouTuber to make a personal appearance at a toy store or convention.
Part 2: 5 Best YouTube Unboxing Channels
There are considerable merits to offering your customers a branded and personalized unboxing experience.
Even if you decide to get your products featured in a YouTuber’s unboxing videos, you can help promote your brand and improve brand awareness. So which is the perfect or ideal YouTube channel for unboxing videos for you to try to get featured on? The answer is: “It depends!”
Not every YouTuber is the best for every eCommerce business—and a YouTube channel simply being huge and influential doesn’t make it relevant for your brand. So it’s essential to consider brand suitability while trying looking for a YouTuber to create unboxing videos.
This means considering whether they use harsh language or if their target audience has some overlap with your target audience.
Keeping it in mind, here are some of the top YouTube unboxing channels for inspiration:
1. Unbox Therapy
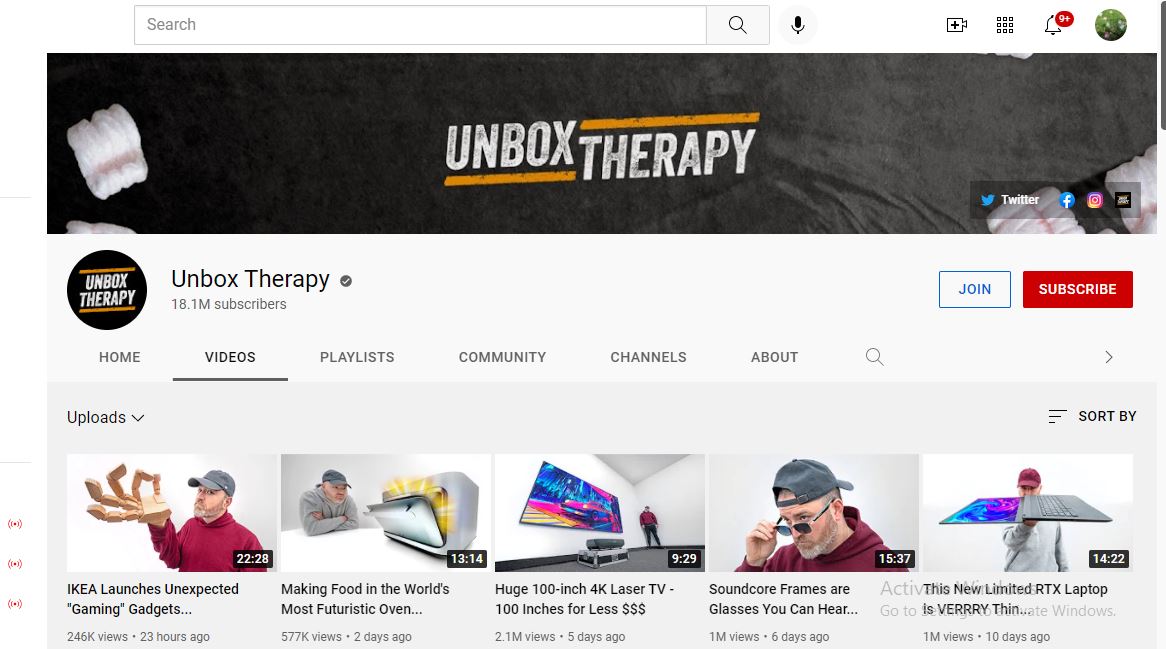
With around 17 million-plus subscribers, Unbox Therapy is a great channel with a ten-year history of sharing various videos presenting the hottest and most excellent products on the planet. According to their YouTube stats, tech gadgets are a regular feature on the channel, and they have amassed four billion-plus views.
2. Ryan’s World
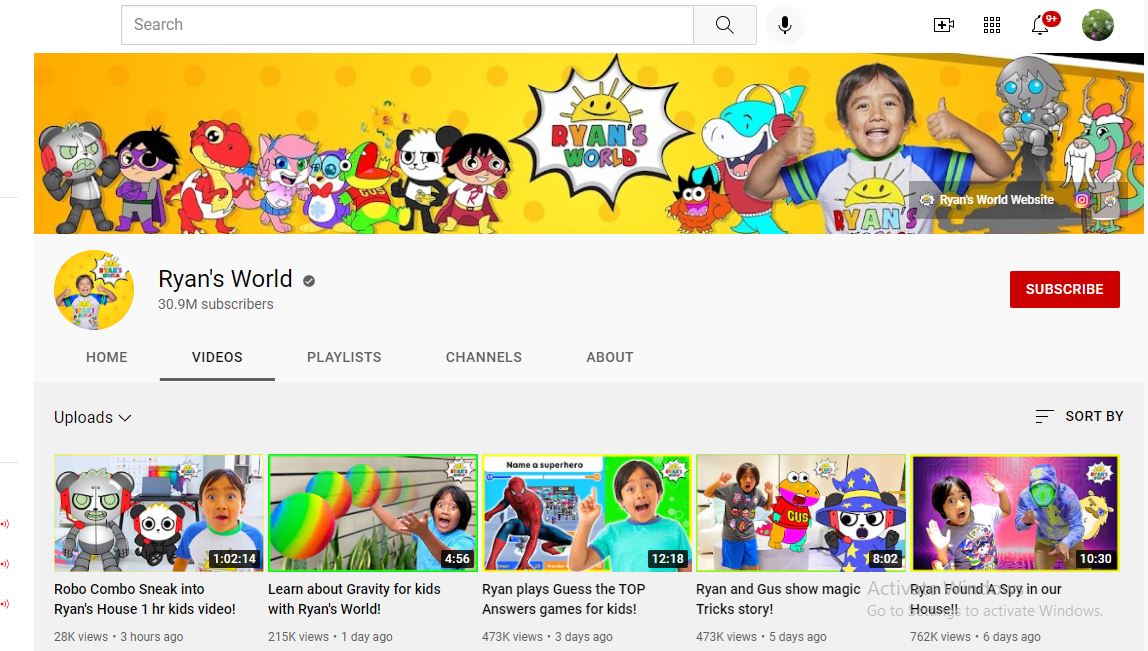
This titan of teeny the unboxing video world is one of the immensely paid YouTubers for a reason. This channel features fun animation and unboxing videos, simple science experiments for kids, and other educational content. Those interested in doing the best unboxing videos for a younger audience could learn a lot from this platform.
3. Tech Unboxing
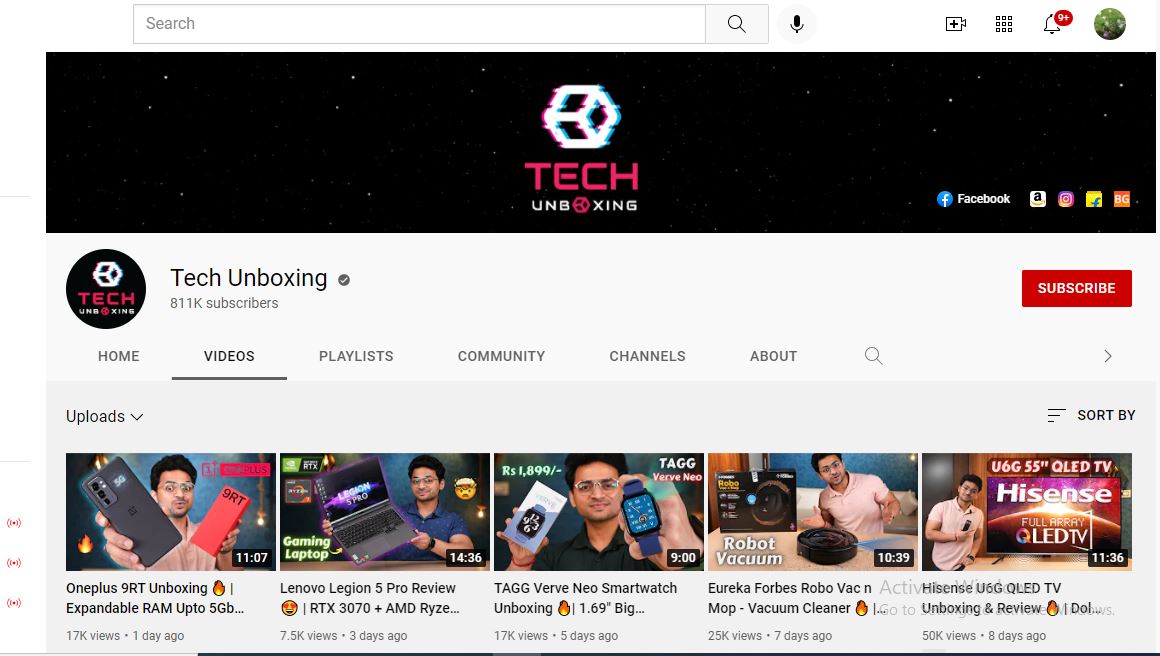
At 700k plus subscribers, Tech Unboxing may not be the most significant content creator on this list, but it’s no slouch. The channel mentions everything about the high-tech gadgets and isn’t afraid to brag about the products reviewed. The track also hosts frequent giveaways of tech products and unboxing videos that the host likes that other tech enthusiasts may look at it with fun.
4. Dr. DeBox
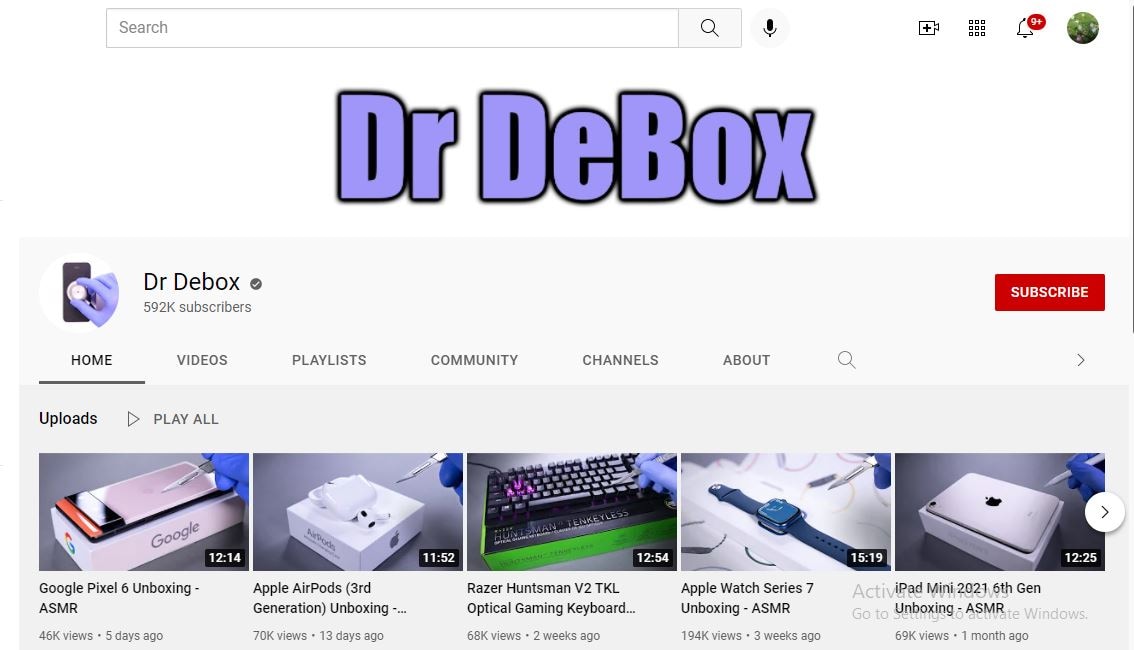
DrDebox looks at tech, gadgets, and other products ordered from online sites and offers viewers rundowns of their functions and how they operate. With 590k plus subscribers and billions of video views, DrDebox has a prominent audience and presence on YouTube that can help improve awareness for the products he reviews.
5. UNBOXING Fashion & Sports
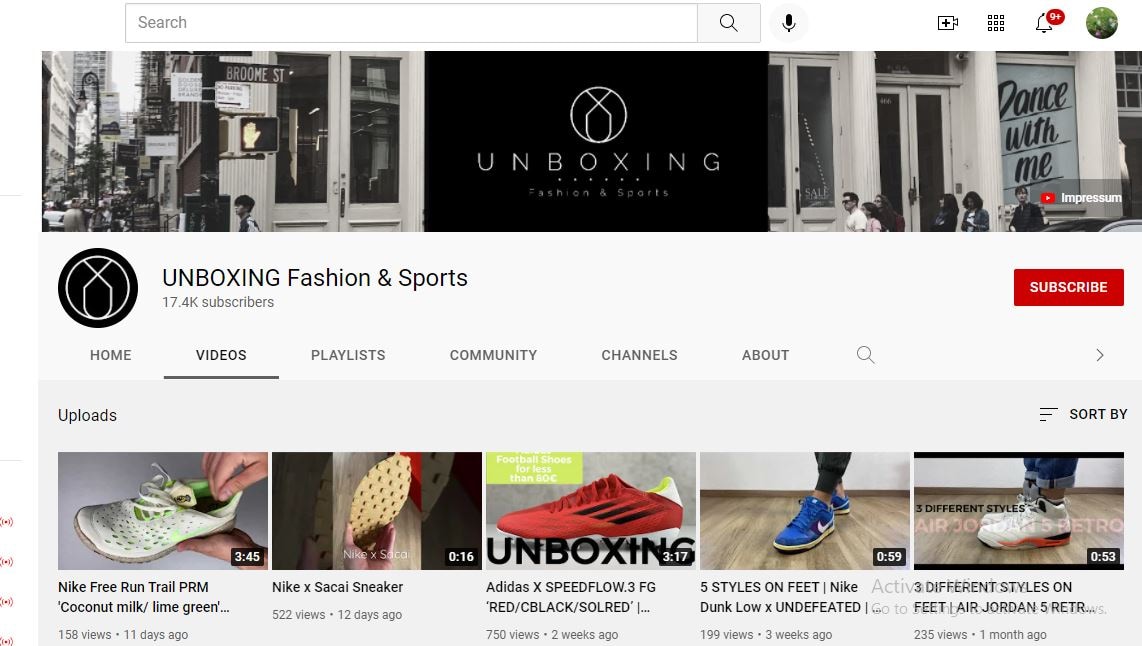
Unboxing Fashion & Sports is a channel specializing in well unboxing videos for a range of sports and fashion apparel (frequently shoe brands like Nike or Adidas). Its content generally features a close-up of the reviewer taking products out of the box and moving them around. At the same time, text highlights relevant product features—all set to catchy music without being disturbing. With 17k plus subscribers and a strong focus on sports apparel, this YouTuber knows how to attract a target market.
Part 3: How to Create a Killer Unboxing Video
Firstly, you have to take note of the following points to create the best unboxing videos.
1. Select an Unboxing Niche
2. Practice Speaking Clearly and Slowly
3. Use the Best Unboxing Set-Up
4. Make Sure to Timely Unbox the Products
5. Don’t Delay the Unboxing in Your Video
6. Show the Product in Use
One of the prominent factors about unboxing videos is that anyone can make them. You don’t need to be uniquely talented but go with the products that have broad appeal. Once you create such videos, you can share them on your social media networks or personal website.
Do you want to create your creative unboxing videos for others to find? Do you like to introduce your customers to your products in your own YouTube Channel, so you have total control over the content and messaging of each video?
Here is a step by step guide to help you revamp the creation of your unboxing video:
1. Use a Good Camera & Video Editing Software
While you probably don’t require that high-tech camera that professional Hollywood filmmakers would consider shooting or filming 8k+ ultra-HD movies, you need a good camera that can capture HD footage (preferably at least 1080p). This allows providing your unboxing videos just enough of a professional look to not deactivate or disable the interest of potential viewers.
In addition to a camera, ensure that you have a stand or a decent tripod for it. This way, you don’t have to hold onto your camera by yourself (or have an assistant hold it) while you’re filming. In addition, this minimizes camera shake, which assists in making easy-to-watch videos.
On the other hand, video editing software is a must for taking all of your video compiling and recording into a cohesive video that will be attractive for viewers to watch. There are tons of accessible video editing tools to choose from and some paid options that may have helpful features. However, our favorite pick is Wondershare Filmora due to its beginner-friendly yet professional editing elements. Let us know what you can’t do with this software! It’s a combination of professionalism and reliability you can consider for all your video editing needs.
The hottest feature of Wondershare Filmora for making attractive unboxing videos is audio ducking. With this feature, you can effectively lower the background vocals while adding your voiceovers. And, that’s extremely valuable in making these kinds of videos.
Wondershare Filmora
Get started easily with Filmora’s powerful performance, intuitive interface, and countless effects!
Try It Free Try It Free Try It Free Learn More >

2. Prepare Your Stage/Photo Lightbox
If you look at some famous unboxing channels listed above, you’ll notice that much of their content is shot in a well-framed space where there isn’t much in the background to disturb them from the product being viewed.
Often, this is a “photo lightbox” or an empty table (a small container with a smooth white backdrop that enhances lighting while reducing shadows for making photos look greater). Lightboxes can also be helpful when you’re taking snapshots of your products to put up on your eCommerce website, so it’s a great idea to make (or buy) one that can fit your products.
3. Practice Making Videos
Before uploading videos to YouTube, take some time to practice making your unboxing videos using random items or already-opened products. This way, you can work upon setting up your stage and camera, keeping the product within an aim, narrating your unboxing video, editing footage to reduce the “dead air” where nothing is being done or said, and more!
When you’re over making your first test video, play it back and look for issues like excessive “ums, ahs,” or things that are out of focus and other sentence fillers. Don’t worry if your first video isn’t that great—that’s what practice (and your video editing software) are for!
4. Don’t Waste Your Viewers’ Time
If you want to make the best unboxing videos, ensure that you get to the “unboxing” section quite instantly! As indicated by the Expert Voice: “remember that you compete for viewers’ attention with lots of other video content. Keep your introductions brief and quickly get to the unboxing.” If you take too much time to get to the section of unboxing video, you risk losing your audience’s interest and them going away from your content before you can introduce your product.
5. Compile Things Up Once in a While
If you unbox your products, you might instantly run out of content ideas to make. You may look up your YouTube channel losing traction without the new content. So, try to compile things up once in a while—as the Ryan’s World channel discussed earlier.
Creating other kinds of content, such as how-to videos and advice videos for specific products, product updates, and simple news, or even short promotional bits, can help keep your publishing frequency top-notch.
Just remember: everything you publish or post should still be related to your brand and your channel’s core content!
6. Promote Your YouTube Video or Channel on Social Media
There are specific odds that your eCommerce business is active on other social media channels, such as LinkedIn, Facebook, Twitter, etc. Taking benefit of your audience on other social media platforms to promote your YouTube channel can assist you promptly earning some easy subscribers and allow you better promote your products for the current followers.
Part 4: FAQs about Unboxing Videos
1 - What should be included in the unboxing video?
As discussed earlier, you can include products related to your channel’s niche in your unboxing videos.
2 - How long should an unboxing video be?
Time will vary depending on the actual unboxing product, but try to keep it below 5 minutes.
3 - Can you monetize unboxing videos?
No. Text-based commentary isn’t acceptable for monetization. It must be vocal, and for you to show your face as well would be even better.
Conclusion
Unboxing videos are a bang on that; hate them or love them, they are here to stay. Whether you’re a brand owner, a consumer, or both, you’ve probably considered one or two while purposelessly browsing.
You can use the above tips or strategies to create a compelling unboxing experience for small brands to get the most out of a best unboxing video.
What are some of your favorite unboxing videos? Comment down below!
Unboxing videos are a bizarre trend. However, these videos are getting the highest traction, and more videos are getting onboard about various products.
And, if you haven’t already checked one, an unboxing video is what it sounds like. At its core, “unboxing” is the procedure of recording the moment when a particular product is removed and opened from the packaging sold in.
Again, you’re probably thinking:
‘Why would anybody gaze at other folks opening their product packaging?’
More than 90,000 people type ‘unboxing’ into YouTube each month, and that’s quite interesting as well as strange. Also, these are just a few of the insane statistics about the eCommerce trend of unboxing videos.
In this article, you’ll see the science behind such unboxing videos and learn how to create an attractive one by taking inspiration from others.
So whether you’re not sure why we admire unboxing videos or you wish to know how to use them to your benefit, you’re in the right place!
In this article
02 5 Best YouTube Unboxing Channels
03 How to Create a Killer Unboxing Video
Part 1: What is an Unboxing Video?
Within the unboxing videos, people open boxes and narrate their actions. Unboxing videos are incredibly famous with kids, grabbing up tons of millions of subscribers as well as millions of views. Such videos are also usually great for kids to watch (with a few caveats). But the matter of the subject of some unboxing videos is not age-appropriate. And, there are niche-specific videos as well on different channels.
Are unboxers paid by the companies whose services or products they consider opening on YouTube? Companies don’t generally pay the YouTuber directly for featuring their products in a video. When an unboxer becomes super popular (with subscribers and tens of millions of views), companies may send the products for free, but not always. Sometimes hosts disclose this, sometimes not. However, companies do sponsor highly famous and influential YouTubers in other areas. For instance, they may pay the YouTuber to make a personal appearance at a toy store or convention.
Part 2: 5 Best YouTube Unboxing Channels
There are considerable merits to offering your customers a branded and personalized unboxing experience.
Even if you decide to get your products featured in a YouTuber’s unboxing videos, you can help promote your brand and improve brand awareness. So which is the perfect or ideal YouTube channel for unboxing videos for you to try to get featured on? The answer is: “It depends!”
Not every YouTuber is the best for every eCommerce business—and a YouTube channel simply being huge and influential doesn’t make it relevant for your brand. So it’s essential to consider brand suitability while trying looking for a YouTuber to create unboxing videos.
This means considering whether they use harsh language or if their target audience has some overlap with your target audience.
Keeping it in mind, here are some of the top YouTube unboxing channels for inspiration:
1. Unbox Therapy
With around 17 million-plus subscribers, Unbox Therapy is a great channel with a ten-year history of sharing various videos presenting the hottest and most excellent products on the planet. According to their YouTube stats, tech gadgets are a regular feature on the channel, and they have amassed four billion-plus views.
2. Ryan’s World
This titan of teeny the unboxing video world is one of the immensely paid YouTubers for a reason. This channel features fun animation and unboxing videos, simple science experiments for kids, and other educational content. Those interested in doing the best unboxing videos for a younger audience could learn a lot from this platform.
3. Tech Unboxing
At 700k plus subscribers, Tech Unboxing may not be the most significant content creator on this list, but it’s no slouch. The channel mentions everything about the high-tech gadgets and isn’t afraid to brag about the products reviewed. The track also hosts frequent giveaways of tech products and unboxing videos that the host likes that other tech enthusiasts may look at it with fun.
4. Dr. DeBox
DrDebox looks at tech, gadgets, and other products ordered from online sites and offers viewers rundowns of their functions and how they operate. With 590k plus subscribers and billions of video views, DrDebox has a prominent audience and presence on YouTube that can help improve awareness for the products he reviews.
5. UNBOXING Fashion & Sports
Unboxing Fashion & Sports is a channel specializing in well unboxing videos for a range of sports and fashion apparel (frequently shoe brands like Nike or Adidas). Its content generally features a close-up of the reviewer taking products out of the box and moving them around. At the same time, text highlights relevant product features—all set to catchy music without being disturbing. With 17k plus subscribers and a strong focus on sports apparel, this YouTuber knows how to attract a target market.
Part 3: How to Create a Killer Unboxing Video
Firstly, you have to take note of the following points to create the best unboxing videos.
1. Select an Unboxing Niche
2. Practice Speaking Clearly and Slowly
3. Use the Best Unboxing Set-Up
4. Make Sure to Timely Unbox the Products
5. Don’t Delay the Unboxing in Your Video
6. Show the Product in Use
One of the prominent factors about unboxing videos is that anyone can make them. You don’t need to be uniquely talented but go with the products that have broad appeal. Once you create such videos, you can share them on your social media networks or personal website.
Do you want to create your creative unboxing videos for others to find? Do you like to introduce your customers to your products in your own YouTube Channel, so you have total control over the content and messaging of each video?
Here is a step by step guide to help you revamp the creation of your unboxing video:
1. Use a Good Camera & Video Editing Software
While you probably don’t require that high-tech camera that professional Hollywood filmmakers would consider shooting or filming 8k+ ultra-HD movies, you need a good camera that can capture HD footage (preferably at least 1080p). This allows providing your unboxing videos just enough of a professional look to not deactivate or disable the interest of potential viewers.
In addition to a camera, ensure that you have a stand or a decent tripod for it. This way, you don’t have to hold onto your camera by yourself (or have an assistant hold it) while you’re filming. In addition, this minimizes camera shake, which assists in making easy-to-watch videos.
On the other hand, video editing software is a must for taking all of your video compiling and recording into a cohesive video that will be attractive for viewers to watch. There are tons of accessible video editing tools to choose from and some paid options that may have helpful features. However, our favorite pick is Wondershare Filmora due to its beginner-friendly yet professional editing elements. Let us know what you can’t do with this software! It’s a combination of professionalism and reliability you can consider for all your video editing needs.
The hottest feature of Wondershare Filmora for making attractive unboxing videos is audio ducking. With this feature, you can effectively lower the background vocals while adding your voiceovers. And, that’s extremely valuable in making these kinds of videos.
Wondershare Filmora
Get started easily with Filmora’s powerful performance, intuitive interface, and countless effects!
Try It Free Try It Free Try It Free Learn More >
2. Prepare Your Stage/Photo Lightbox
If you look at some famous unboxing channels listed above, you’ll notice that much of their content is shot in a well-framed space where there isn’t much in the background to disturb them from the product being viewed.
Often, this is a “photo lightbox” or an empty table (a small container with a smooth white backdrop that enhances lighting while reducing shadows for making photos look greater). Lightboxes can also be helpful when you’re taking snapshots of your products to put up on your eCommerce website, so it’s a great idea to make (or buy) one that can fit your products.
3. Practice Making Videos
Before uploading videos to YouTube, take some time to practice making your unboxing videos using random items or already-opened products. This way, you can work upon setting up your stage and camera, keeping the product within an aim, narrating your unboxing video, editing footage to reduce the “dead air” where nothing is being done or said, and more!
When you’re over making your first test video, play it back and look for issues like excessive “ums, ahs,” or things that are out of focus and other sentence fillers. Don’t worry if your first video isn’t that great—that’s what practice (and your video editing software) are for!
4. Don’t Waste Your Viewers’ Time
If you want to make the best unboxing videos, ensure that you get to the “unboxing” section quite instantly! As indicated by the Expert Voice: “remember that you compete for viewers’ attention with lots of other video content. Keep your introductions brief and quickly get to the unboxing.” If you take too much time to get to the section of unboxing video, you risk losing your audience’s interest and them going away from your content before you can introduce your product.
5. Compile Things Up Once in a While
If you unbox your products, you might instantly run out of content ideas to make. You may look up your YouTube channel losing traction without the new content. So, try to compile things up once in a while—as the Ryan’s World channel discussed earlier.
Creating other kinds of content, such as how-to videos and advice videos for specific products, product updates, and simple news, or even short promotional bits, can help keep your publishing frequency top-notch.
Just remember: everything you publish or post should still be related to your brand and your channel’s core content!
6. Promote Your YouTube Video or Channel on Social Media
There are specific odds that your eCommerce business is active on other social media channels, such as LinkedIn, Facebook, Twitter, etc. Taking benefit of your audience on other social media platforms to promote your YouTube channel can assist you promptly earning some easy subscribers and allow you better promote your products for the current followers.
Part 4: FAQs about Unboxing Videos
1 - What should be included in the unboxing video?
As discussed earlier, you can include products related to your channel’s niche in your unboxing videos.
2 - How long should an unboxing video be?
Time will vary depending on the actual unboxing product, but try to keep it below 5 minutes.
3 - Can you monetize unboxing videos?
No. Text-based commentary isn’t acceptable for monetization. It must be vocal, and for you to show your face as well would be even better.
Conclusion
Unboxing videos are a bang on that; hate them or love them, they are here to stay. Whether you’re a brand owner, a consumer, or both, you’ve probably considered one or two while purposelessly browsing.
You can use the above tips or strategies to create a compelling unboxing experience for small brands to get the most out of a best unboxing video.
What are some of your favorite unboxing videos? Comment down below!
Also read:
- Crafting Engaging, Extended Videos A YouTube Expert's Guide for 2024
- In 2024, Are There Natural Methods for Boosting Channels?
- [Updated] Enhancing Video Reach Tactics Against Bot Visitors
- Sustained Engagement Determining the Ideal Frequency for Your YouTube Channel
- Discovering the Ultimate 10-VR Video Experience on YouTube
- Epic Playlist Over a Hundred Top-Tier Titles
- [Updated] Effortless WebM Creation 10 Best YouTube Video Transformers
- Essential Audio Enhancement Apps for YouTubers' Videos for 2024
- [Updated] Era's Endwatchers Top YouTube Viewership
- YouTube for Educators Maximizing Its Classroom Potential
- Capturing Quality Lens Recommendations for Content Makers
- 2024 Approved Crafting Visibility on YouTube The Ultimate Guide to Featured Channel Placement
- Unleashing the Power of YouTube Short Form Videos
- In 2024, Control YouTube Audio Mobile/Desktop Approach
- Skyrocket Traffic The Ultimate List of Video Growth Techniques
- [Updated] Channel Riches Anywhere Adopting YouTube Analytics & Monetization
- Choosing a Champion DSLR or Mirrorless Camera?
- [Updated] Does Instant Subscription Strategy Improve User Engagement?
- In 2024, Engage & Learn Students' Choice of Best Historical YouTubes
- The Financial Impact of Viewership on Content Makers
- 2024 Approved Becoming a Lyric Video Pro A Lyric Video Maker's Journey
- [New] Captivate Crowds Social Media Growth Hacks for YouTube
- In 2024, Complete Tutorial to Use GPS Joystick to Fake GPS Location On Samsung Galaxy A23 5G | Dr.fone
- Digital Decor Best Platforms & Software for Photo Frameups
- [New] 2024 Approved The Future Is Here Free, Innovative FB Story Enhancers
- 2024 Approved Swipe Right for Music Top 10 FB Vids Today
- In 2024, Is Your iPhone XR in Security Lockout? Proper Ways To Unlock
- 6 Ways to Mimic Professional Filming Gears
- Honor X50i+ ADB Format Tool for PC vs. Other Unlocking Tools Which One is the Best?
- [Updated] Elevate Content with Properly Sized Videos on Instagram
- Will Pokémon Go Ban the Account if You Use PGSharp On Oppo Reno 10 Pro 5G | Dr.fone
- iPhone Transfer Transfer Contact from Apple iPhone 7 to iPhone without iCloud | Dr.fone
- Updated Encompassing Study The Essentials of Nero WaveMixer for 2024
- Updated In 2024, The Ultimate Guide to Animated Photos Top Software
- 2024 Approved The Expert Guide to Swift FB Profiling
- A Step-by-Step Guide on Using ADB and Fastboot to Remove FRP Lock from your Vivo Y100t
- Title: "Frontier Makers of Harmonized Audio-Visual Experiences"
- Author: Kevin
- Created at : 2024-06-10 00:24:40
- Updated at : 2024-06-11 00:24:40
- Link: https://youtube-videos.techidaily.com/frontier-makers-of-harmonized-audio-visual-experiences/
- License: This work is licensed under CC BY-NC-SA 4.0.
