
:max_bytes(150000):strip_icc()/OpenAI-vs-ChatGPT-dc69f067088c4af6b7f0cb16376e94ee.jpg)
"From Twitch Live to YouTube Watchability A Comprehensive Tutorial"
From Twitch Live to YouTube Watchability: A Comprehensive Tutorial
Create High-Quality Video - Wondershare Filmora
An easy and powerful YouTube video editor
Numerous video and audio effects to choose from
Detailed tutorials provided by the official channel
Amidst many online applications is Twitch. This live streaming platform takes your experience to another level. You can use it to make crafts, play games, attract broadcasters, and many more. Twitch was launched in 2011, and since then, it has attracted millions of users, managing a database of about 4 million broadcasters by early 2020. With it, users can stream their activities as others watch in real-time. Just browse a category to find a stream.
You can also follow streamers that you like on the platform and get updates and notifications immediately after they are posted. But how do you start a career on a platform like Twitch? You need to broadcast and gather a large following. You can use built-in audiences from other platforms like Facebook. Let’s dive into the core of the matter and look at how to upload Twitch streams to YouTube and build your platform.

In this article
02 What is the benefit of uploading your Twitch Streams to YouTube
03 How to upload your Twitch Streams to YouTube
What is Twitch VOD?
Twitch Video on Demand (VOD) is a recording of previously streamed content. It provides briefings if you missed catching the Twitch live stream. Just watch the VOD from your favorite streamer and be engaged the best way possible. However, VODs don’t last forever. They are removed after two weeks of broadcast. But streamers with Partner Status can have their VODs last up to 60 days.
- How to enable Twitch VOD?
VODs are the best form to archive streams that your fans missed. Even though they are not enabled by default, you can manually enable them and not let your fans miss any important event from your channel. They’ll find it under the “Videos” tab on any Twitch channel. Follow these steps to enable VOD on your channel.
Step 1. Go to your profile icon in the top right corner of Twitch
Check in the “Channel & Video” section and locate the “Stream Key & Preferences” menu.

Step 2. Click on “Creator Dashboard”
Remember, you can enable VODs from your creator dashboard. Just go under the “Settings” tab and click on the “Stream section” of the creator dashboard. Check under the subtitle “VOD Settings” and get the option to store past broadcasts. You can also toggle the slider to store your past broadcasts.

Step 3 Click on the “Settings” tab on the left-hand side and go to Stream
You’ll get various drop-down menu options. Click on the “Settings” tab and choose the “Stream” option. The system will navigate to a new page, thus setting your preferences for VODs and clips.
Step 4. Go to “VOD Settings” and toggle on the “Store Past Broadcast.”
Ensure you have the toggle option turned ON under the “VOD Settings.” If it’s “ON,” you’ll realize the toggle will be purple, with a checkmark in it. Twitch will be confirmed to be enabled if it’s purple.

- Frequently Asked Question about Twitch VOD
These are some questions frequently asked by Twitch users.
1. How long will Twitch store my VOD
Your Twitch can either be stored for 14 or 60 days, depending on your level. For Twitch Prime, Twitch Partner or a Twitch Turbo user has their past broadcasts automatically saved for 60 days before deletion. But if you are not connected to these three options, your past broadcasts will be saved for only 14 days before deletion.
Since your past broadcasts cannot be live for more than 60 days, you have the option to download the video to your computer before the validity days expire and Twitch deletes it. You can use an External Hard drive to save the past broadcast content. Likewise, it is possible to turn your past broadcast content into Highlight and, in turn, permanently store them on Twitch.
2. What is the difference between Twitch VOD, Highlights, and Clips
Twitch VOD is a previously saved video of your live stream content. You choose to save either part or the entire content of your previously streamed content. More so, you don’t need any additional requirements to use VOD.
Highlights are short videos that have been edited from your past broadcast content. You can save them on Twitch permanently. Streamers majorly use highlights to save video game achievements. Unlike VOD Twitch that can be saved up to 60 days, Highlights usually lasts no more than 3 minutes.
- To make Highlights on Twitch, first, navigate to your Dashboard.
- Then scroll down and click on “Content” > “Video Producer.
- Next, press on “All Videos” to change them to “Past Broadcasts.”
- Now press the “Highlight” button, and Twitch will immediately open a new tab for “Twitch Highlighter Tool.”
- Then select the video part to include as “Highlight” and press the “Create Highlights” button.
- Wait a while for the process to be completed, and Voila! You have your Highlights created.
When it comes to Twitch Clip, you can capture special moments in a stream you are currently watching. On the same note, you can share clips with friends and other users on social media platforms. Such shared clips contain a link where others view the source or video from.
The clips you create will automatically be saved on the streamer’s channel on the “Clips” page, where other viewers can see them too. Nonetheless, you can download “clips” to your computer and, in turn, upload them whenever you want to. And note that you can help your stream grow via “Clips” by letting your viewers clip and share your stream moments.
- To create “Clips” on Twitch, identify which Streamers channel you wish to create a clip from.
- Then click on the “Clapper board” icon. Next, edit your clip between 5 and 60 seconds long.
- Finally, create a title and publish your Clip. You’ll also enjoy the privilege to share your clip’s link to other social media networks.
What is the benefit of uploading your Twitch Streams to YouTube
You stand to gain a lot when you upload your Twitch Streams to YouTube.
1) To enlighten your followers
Your followers will see your streams and make the best decisions. Viewers can check out your recordings and other highlights from past streams. It will help them decide whether they like what they see and probably join your live streams.
2) Twitch provides content for you to share and monetize on YouTube
Since Twitch streaming is more popular nowadays, many people throng it for content. It is not wise to rely entirely on Twitch to discover as a Twitch Streamer. Posting to YouTube will make it known within a short time. You would have announced your streams most nobly and kept your followers up to date, attracting new ones as well.
3) To keep your followers engaged even when you are offline
Even though live streaming is important, some viewers may not attend the live sessions due to different time zones or other commitments. In this regard, when uploaded to YouTube, Twitch will give them a chance to watch your content just whenever they log in. They, therefore, have the option to watch a Twitch VOD of the live stream they missed.
How to upload your Twitch Streams to YouTube
Check how to upload Twitch streams to YouTube from the Twitch website.
Step 1. Identify the little arrow next to your name on the Twitch website and click on it. Then click on the “Video Producer” to take you to a list of your Twitch videos.

Step 2. Check out and click on the “three-dots” on the video you wish to upload to YouTube. Click on the “Export” tab.
Step 3. A menu will then pop up. Here, you can fill in the description, title, and tags that you would like to appear on the YouTube video. There is an option for Twitch to split your video automatically. If you wish so, then tick the “Checkbox” to enable it. Then click on the “Start Export” option to export your Twitch streams to YouTube.

Bouns! Edit Your Twitch Video with Filmora
The quality of your video matters when it comes to uploading Twitch Streams to YouTube. Using a third-party tool to edit your video is the first step in ensuring your videos communicate meaningful content. Filmora comes in handy to bring your imaginations to life. Use it for simple creation without limits, even for beginners.
- Use it to track moving objects in video clips
- Easily match any image of the selected clip
- Its powerful tools let you edit your video by cropping, splitting, adjusting speed, etc
- The video keyframe easily indicates the beginning and end of the parameters
For Win 7 or later (64-bit)
For macOS 10.12 or later
Conclusion
● Don’t just focus on how to upload Twitch streams to YouTube but also consider the quality of video you are posting to YouTube. Remember, your video quality will speak much more of you than any other description. So, strive to produce quality videos using the best tool, Filmora. The app is easy to use and will elevate your views and imaginations through your video in the most impactful way.
Amidst many online applications is Twitch. This live streaming platform takes your experience to another level. You can use it to make crafts, play games, attract broadcasters, and many more. Twitch was launched in 2011, and since then, it has attracted millions of users, managing a database of about 4 million broadcasters by early 2020. With it, users can stream their activities as others watch in real-time. Just browse a category to find a stream.
You can also follow streamers that you like on the platform and get updates and notifications immediately after they are posted. But how do you start a career on a platform like Twitch? You need to broadcast and gather a large following. You can use built-in audiences from other platforms like Facebook. Let’s dive into the core of the matter and look at how to upload Twitch streams to YouTube and build your platform.
In this article
02 What is the benefit of uploading your Twitch Streams to YouTube
03 How to upload your Twitch Streams to YouTube
What is Twitch VOD?
Twitch Video on Demand (VOD) is a recording of previously streamed content. It provides briefings if you missed catching the Twitch live stream. Just watch the VOD from your favorite streamer and be engaged the best way possible. However, VODs don’t last forever. They are removed after two weeks of broadcast. But streamers with Partner Status can have their VODs last up to 60 days.
- How to enable Twitch VOD?
VODs are the best form to archive streams that your fans missed. Even though they are not enabled by default, you can manually enable them and not let your fans miss any important event from your channel. They’ll find it under the “Videos” tab on any Twitch channel. Follow these steps to enable VOD on your channel.
Step 1. Go to your profile icon in the top right corner of Twitch
Check in the “Channel & Video” section and locate the “Stream Key & Preferences” menu.
Step 2. Click on “Creator Dashboard”
Remember, you can enable VODs from your creator dashboard. Just go under the “Settings” tab and click on the “Stream section” of the creator dashboard. Check under the subtitle “VOD Settings” and get the option to store past broadcasts. You can also toggle the slider to store your past broadcasts.
Step 3 Click on the “Settings” tab on the left-hand side and go to Stream
You’ll get various drop-down menu options. Click on the “Settings” tab and choose the “Stream” option. The system will navigate to a new page, thus setting your preferences for VODs and clips.
Step 4. Go to “VOD Settings” and toggle on the “Store Past Broadcast.”
Ensure you have the toggle option turned ON under the “VOD Settings.” If it’s “ON,” you’ll realize the toggle will be purple, with a checkmark in it. Twitch will be confirmed to be enabled if it’s purple.
- Frequently Asked Question about Twitch VOD
These are some questions frequently asked by Twitch users.
1. How long will Twitch store my VOD
Your Twitch can either be stored for 14 or 60 days, depending on your level. For Twitch Prime, Twitch Partner or a Twitch Turbo user has their past broadcasts automatically saved for 60 days before deletion. But if you are not connected to these three options, your past broadcasts will be saved for only 14 days before deletion.
Since your past broadcasts cannot be live for more than 60 days, you have the option to download the video to your computer before the validity days expire and Twitch deletes it. You can use an External Hard drive to save the past broadcast content. Likewise, it is possible to turn your past broadcast content into Highlight and, in turn, permanently store them on Twitch.
2. What is the difference between Twitch VOD, Highlights, and Clips
Twitch VOD is a previously saved video of your live stream content. You choose to save either part or the entire content of your previously streamed content. More so, you don’t need any additional requirements to use VOD.
Highlights are short videos that have been edited from your past broadcast content. You can save them on Twitch permanently. Streamers majorly use highlights to save video game achievements. Unlike VOD Twitch that can be saved up to 60 days, Highlights usually lasts no more than 3 minutes.
- To make Highlights on Twitch, first, navigate to your Dashboard.
- Then scroll down and click on “Content” > “Video Producer.
- Next, press on “All Videos” to change them to “Past Broadcasts.”
- Now press the “Highlight” button, and Twitch will immediately open a new tab for “Twitch Highlighter Tool.”
- Then select the video part to include as “Highlight” and press the “Create Highlights” button.
- Wait a while for the process to be completed, and Voila! You have your Highlights created.
When it comes to Twitch Clip, you can capture special moments in a stream you are currently watching. On the same note, you can share clips with friends and other users on social media platforms. Such shared clips contain a link where others view the source or video from.
The clips you create will automatically be saved on the streamer’s channel on the “Clips” page, where other viewers can see them too. Nonetheless, you can download “clips” to your computer and, in turn, upload them whenever you want to. And note that you can help your stream grow via “Clips” by letting your viewers clip and share your stream moments.
- To create “Clips” on Twitch, identify which Streamers channel you wish to create a clip from.
- Then click on the “Clapper board” icon. Next, edit your clip between 5 and 60 seconds long.
- Finally, create a title and publish your Clip. You’ll also enjoy the privilege to share your clip’s link to other social media networks.
What is the benefit of uploading your Twitch Streams to YouTube
You stand to gain a lot when you upload your Twitch Streams to YouTube.
1) To enlighten your followers
Your followers will see your streams and make the best decisions. Viewers can check out your recordings and other highlights from past streams. It will help them decide whether they like what they see and probably join your live streams.
2) Twitch provides content for you to share and monetize on YouTube
Since Twitch streaming is more popular nowadays, many people throng it for content. It is not wise to rely entirely on Twitch to discover as a Twitch Streamer. Posting to YouTube will make it known within a short time. You would have announced your streams most nobly and kept your followers up to date, attracting new ones as well.
3) To keep your followers engaged even when you are offline
Even though live streaming is important, some viewers may not attend the live sessions due to different time zones or other commitments. In this regard, when uploaded to YouTube, Twitch will give them a chance to watch your content just whenever they log in. They, therefore, have the option to watch a Twitch VOD of the live stream they missed.
How to upload your Twitch Streams to YouTube
Check how to upload Twitch streams to YouTube from the Twitch website.
Step 1. Identify the little arrow next to your name on the Twitch website and click on it. Then click on the “Video Producer” to take you to a list of your Twitch videos.
Step 2. Check out and click on the “three-dots” on the video you wish to upload to YouTube. Click on the “Export” tab.
Step 3. A menu will then pop up. Here, you can fill in the description, title, and tags that you would like to appear on the YouTube video. There is an option for Twitch to split your video automatically. If you wish so, then tick the “Checkbox” to enable it. Then click on the “Start Export” option to export your Twitch streams to YouTube.
Bouns! Edit Your Twitch Video with Filmora
The quality of your video matters when it comes to uploading Twitch Streams to YouTube. Using a third-party tool to edit your video is the first step in ensuring your videos communicate meaningful content. Filmora comes in handy to bring your imaginations to life. Use it for simple creation without limits, even for beginners.
- Use it to track moving objects in video clips
- Easily match any image of the selected clip
- Its powerful tools let you edit your video by cropping, splitting, adjusting speed, etc
- The video keyframe easily indicates the beginning and end of the parameters
For Win 7 or later (64-bit)
For macOS 10.12 or later
Conclusion
● Don’t just focus on how to upload Twitch streams to YouTube but also consider the quality of video you are posting to YouTube. Remember, your video quality will speak much more of you than any other description. So, strive to produce quality videos using the best tool, Filmora. The app is easy to use and will elevate your views and imaginations through your video in the most impactful way.
Essential 11 Zero-Cost YouTube Moniker Makers
11 Best Free YouTube Name Generators You Should Try

Richard Bennett
Oct 26, 2023• Proven solutions
A YouTube name has great importance for a dedicated YouTuber. Whether you want to hold great brand value in the market or trying to come up with a funny, catchy name, here’s a list of name generator software tools to get you the best YouTube channel name.
There are so many options for personalizing a cool YouTube name so you can get ideas for a catchy name. Check out some of the most commonly used YouTube name generator software that has achieved higher ranking from professionals.
- Part 1: Best 7 Free YouTube Name Generators Online
- Part 2: Best 4 Free YouTube Name Generator Quizzes
Best YouTube Video Editor - Filmora
After you have created your YouTube channel, do you want to edit videos and upload your first video? Here we recommend using Filmora to easily edit YouTube videos.
You can use Filmora to make YouTube videos with built-in royalty-free audio. Filmroa9 also can help you make YouTube intros. It includes more than 500 templates, transition, effects, and text resources.
Filmora is the best choice to make a split-screen and green screen video for YouTubers. Download it now to have a try!


Part 1: Best 7 Free YouTube Name Generators Online
1. Spinxo
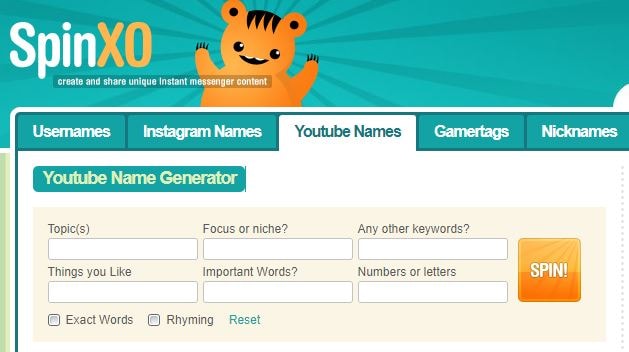
This platform allows users to find cool names as per their descriptions for characters, niche, etc. You can start the search with universal keywords as well as with a specific set of details. Spinxo also allows YouTubers to organize contests online to get the best name suggestions.
- Queries Needed: Queries can be raised on the basis of numbers of things you like such as Keywords, Niche, and Topics.
- Best for: Those who have few specific directions about the name.
- No. of Results: 30 names.
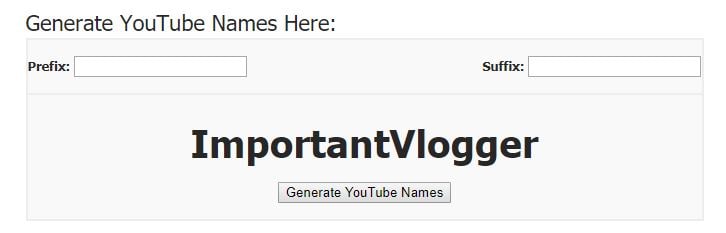
2. Name Generator
This name generator tool allows users to get the best combination of random names where details are more specific to a video related to your works like “vids,” “TV,” “director,” “channel,” etc. Every time you hit the generate button, it will bring out random names for selection.
- Queries Needed: Based on Suffix and Prefix
- Best for: Those who have particular directions with the name.
- No. of Results: 1
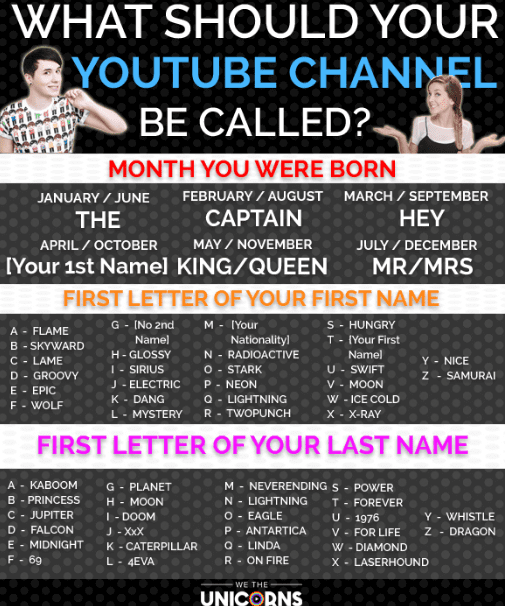
3. We the Unicorns
Here you will get fun-oriented suggestions for your YouTube names and the best part is that they have the ability to attract more audiences towards your platform. It uses details related to your birth, first name, and last name to create funny results.
- Queries Needed: NA
- Best for: Ultimate choice for those who need funny inspirations.
- No. of Results: A lot.
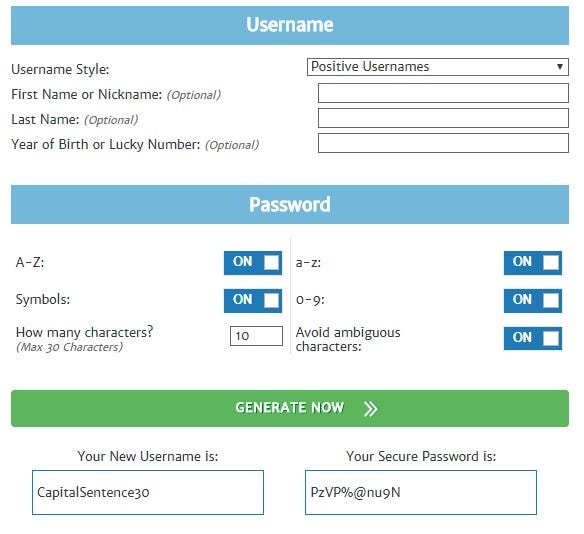
4. Speedy Password
Here you will be able to generate truly random, highly secure, funny passwords along with unique and funny YouTube usernames. Users simply need to update their preferences and it will display the best combinations.
- Queries Needed: Run queries on the basis of Keyword, Lucky Number, and Name Style.
- Best for: Those who follow certain directions for name generations.
- No. of Results: One name and one password.
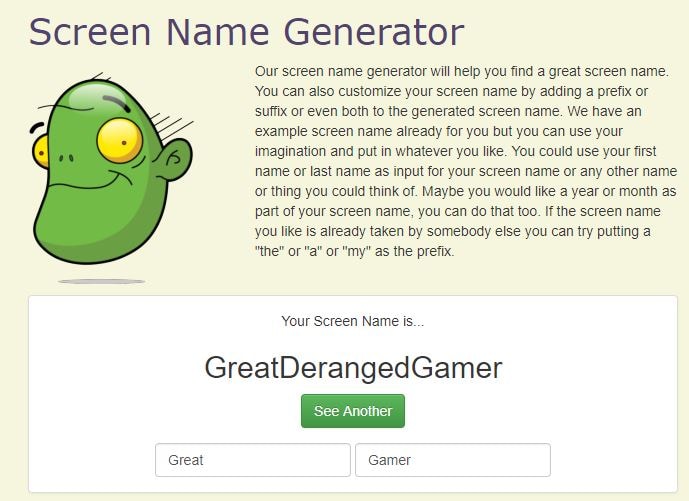
5.Screen Name Generator
Gamers will definitely love this name generator tool that works on the basis of the prefix provided by YouTubers. It has several categories like fantasy name generators, username generators, place name generators, thing name generators, etc.
- Queries Needed: One can enquire with suffix and prefix.
- Best for: Those who have a specific direction and need for the name.
- No. of Results: One name.
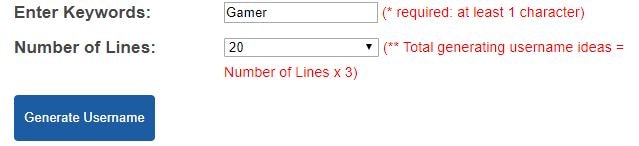
6.Username Generator
Username Generator makes it easier to find game-specific usernames. Users can enter keywords and number of lines as their preferences and soon the software will provide the most appropriate results.
- Queries Needed: Based on the keywords only.
- Best for: those of all genres.
- No. of Results: Hundreds of names.
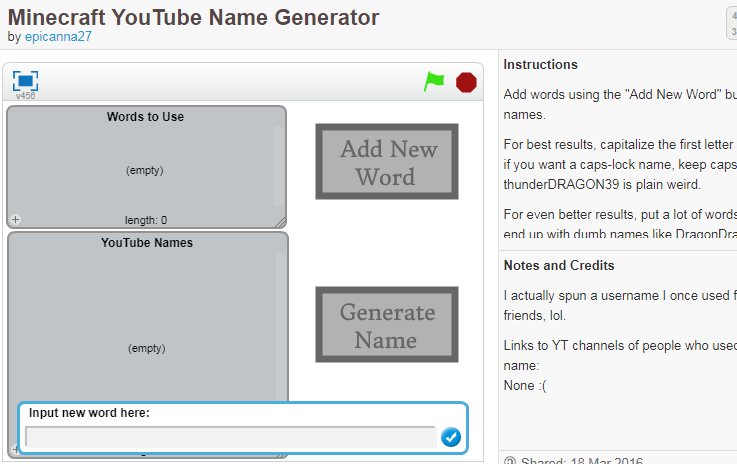
7.Scratch
With this tool, you can get names with caps specifications that look cool. You can pick game highlights for your channel name and in order to get much finer results one can prefer to put several words into the list.
- Queries Needed: Works with keywords only.
- Best for: Those of all genres.
- No. of Results: One name.
Part 2: Best 4 Free YouTube Name Generator Quizzes
8.ProProfs
It will help you get a unique YouTube name that matches your personality and your real name. You will get a kick out of the combination of questions served up in this quiz.
9.Quizony
A set of crazy questions will decide an interesting name for your game channel and it will be definitely loved by viewers.
10.Go to Quiz
If you want to get rid of boring names and want to switch to something effective based on your hobbies, music preferences, grades and personality then Go to Quiz is the best platform for you.
11.QuizBone
This YouTube name generator first asks you about your video content preferences, whether it is related to beauty, rants, giveaways, makeup, humor, or anything in a wide range and then produces relevant name that suits your personality as per quiz answers,
Think you got a funny or cool channel name? Share in the comments, and tell us if you’ve ever used a free YouTube name generator!
Richard Bennett
Richard Bennett is a writer and a lover of all things video.
Follow @Richard Bennett
Richard Bennett
Oct 26, 2023• Proven solutions
A YouTube name has great importance for a dedicated YouTuber. Whether you want to hold great brand value in the market or trying to come up with a funny, catchy name, here’s a list of name generator software tools to get you the best YouTube channel name.
There are so many options for personalizing a cool YouTube name so you can get ideas for a catchy name. Check out some of the most commonly used YouTube name generator software that has achieved higher ranking from professionals.
- Part 1: Best 7 Free YouTube Name Generators Online
- Part 2: Best 4 Free YouTube Name Generator Quizzes
Best YouTube Video Editor - Filmora
After you have created your YouTube channel, do you want to edit videos and upload your first video? Here we recommend using Filmora to easily edit YouTube videos.
You can use Filmora to make YouTube videos with built-in royalty-free audio. Filmroa9 also can help you make YouTube intros. It includes more than 500 templates, transition, effects, and text resources.
Filmora is the best choice to make a split-screen and green screen video for YouTubers. Download it now to have a try!
Part 1: Best 7 Free YouTube Name Generators Online
1. Spinxo
This platform allows users to find cool names as per their descriptions for characters, niche, etc. You can start the search with universal keywords as well as with a specific set of details. Spinxo also allows YouTubers to organize contests online to get the best name suggestions.
- Queries Needed: Queries can be raised on the basis of numbers of things you like such as Keywords, Niche, and Topics.
- Best for: Those who have few specific directions about the name.
- No. of Results: 30 names.
2. Name Generator
This name generator tool allows users to get the best combination of random names where details are more specific to a video related to your works like “vids,” “TV,” “director,” “channel,” etc. Every time you hit the generate button, it will bring out random names for selection.
- Queries Needed: Based on Suffix and Prefix
- Best for: Those who have particular directions with the name.
- No. of Results: 1
3. We the Unicorns
Here you will get fun-oriented suggestions for your YouTube names and the best part is that they have the ability to attract more audiences towards your platform. It uses details related to your birth, first name, and last name to create funny results.
- Queries Needed: NA
- Best for: Ultimate choice for those who need funny inspirations.
- No. of Results: A lot.
4. Speedy Password
Here you will be able to generate truly random, highly secure, funny passwords along with unique and funny YouTube usernames. Users simply need to update their preferences and it will display the best combinations.
- Queries Needed: Run queries on the basis of Keyword, Lucky Number, and Name Style.
- Best for: Those who follow certain directions for name generations.
- No. of Results: One name and one password.
5.Screen Name Generator
Gamers will definitely love this name generator tool that works on the basis of the prefix provided by YouTubers. It has several categories like fantasy name generators, username generators, place name generators, thing name generators, etc.
- Queries Needed: One can enquire with suffix and prefix.
- Best for: Those who have a specific direction and need for the name.
- No. of Results: One name.
6.Username Generator
Username Generator makes it easier to find game-specific usernames. Users can enter keywords and number of lines as their preferences and soon the software will provide the most appropriate results.
- Queries Needed: Based on the keywords only.
- Best for: those of all genres.
- No. of Results: Hundreds of names.
7.Scratch
With this tool, you can get names with caps specifications that look cool. You can pick game highlights for your channel name and in order to get much finer results one can prefer to put several words into the list.
- Queries Needed: Works with keywords only.
- Best for: Those of all genres.
- No. of Results: One name.
Part 2: Best 4 Free YouTube Name Generator Quizzes
8.ProProfs
It will help you get a unique YouTube name that matches your personality and your real name. You will get a kick out of the combination of questions served up in this quiz.
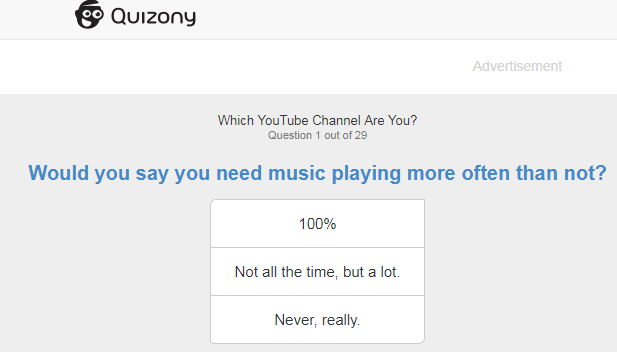
9.Quizony
A set of crazy questions will decide an interesting name for your game channel and it will be definitely loved by viewers.
10.Go to Quiz
If you want to get rid of boring names and want to switch to something effective based on your hobbies, music preferences, grades and personality then Go to Quiz is the best platform for you.
11.QuizBone
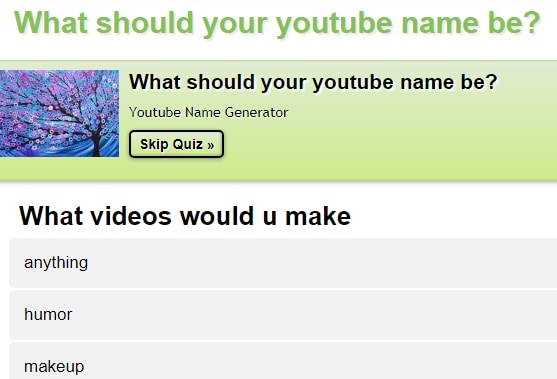
This YouTube name generator first asks you about your video content preferences, whether it is related to beauty, rants, giveaways, makeup, humor, or anything in a wide range and then produces relevant name that suits your personality as per quiz answers,
Think you got a funny or cool channel name? Share in the comments, and tell us if you’ve ever used a free YouTube name generator!
Richard Bennett
Richard Bennett is a writer and a lover of all things video.
Follow @Richard Bennett
Richard Bennett
Oct 26, 2023• Proven solutions
A YouTube name has great importance for a dedicated YouTuber. Whether you want to hold great brand value in the market or trying to come up with a funny, catchy name, here’s a list of name generator software tools to get you the best YouTube channel name.
There are so many options for personalizing a cool YouTube name so you can get ideas for a catchy name. Check out some of the most commonly used YouTube name generator software that has achieved higher ranking from professionals.
- Part 1: Best 7 Free YouTube Name Generators Online
- Part 2: Best 4 Free YouTube Name Generator Quizzes
Best YouTube Video Editor - Filmora
After you have created your YouTube channel, do you want to edit videos and upload your first video? Here we recommend using Filmora to easily edit YouTube videos.
You can use Filmora to make YouTube videos with built-in royalty-free audio. Filmroa9 also can help you make YouTube intros. It includes more than 500 templates, transition, effects, and text resources.
Filmora is the best choice to make a split-screen and green screen video for YouTubers. Download it now to have a try!
Part 1: Best 7 Free YouTube Name Generators Online
1. Spinxo
This platform allows users to find cool names as per their descriptions for characters, niche, etc. You can start the search with universal keywords as well as with a specific set of details. Spinxo also allows YouTubers to organize contests online to get the best name suggestions.
- Queries Needed: Queries can be raised on the basis of numbers of things you like such as Keywords, Niche, and Topics.
- Best for: Those who have few specific directions about the name.
- No. of Results: 30 names.
2. Name Generator
This name generator tool allows users to get the best combination of random names where details are more specific to a video related to your works like “vids,” “TV,” “director,” “channel,” etc. Every time you hit the generate button, it will bring out random names for selection.
- Queries Needed: Based on Suffix and Prefix
- Best for: Those who have particular directions with the name.
- No. of Results: 1
3. We the Unicorns
Here you will get fun-oriented suggestions for your YouTube names and the best part is that they have the ability to attract more audiences towards your platform. It uses details related to your birth, first name, and last name to create funny results.
- Queries Needed: NA
- Best for: Ultimate choice for those who need funny inspirations.
- No. of Results: A lot.
4. Speedy Password
Here you will be able to generate truly random, highly secure, funny passwords along with unique and funny YouTube usernames. Users simply need to update their preferences and it will display the best combinations.
- Queries Needed: Run queries on the basis of Keyword, Lucky Number, and Name Style.
- Best for: Those who follow certain directions for name generations.
- No. of Results: One name and one password.
5.Screen Name Generator
Gamers will definitely love this name generator tool that works on the basis of the prefix provided by YouTubers. It has several categories like fantasy name generators, username generators, place name generators, thing name generators, etc.
- Queries Needed: One can enquire with suffix and prefix.
- Best for: Those who have a specific direction and need for the name.
- No. of Results: One name.
6.Username Generator
Username Generator makes it easier to find game-specific usernames. Users can enter keywords and number of lines as their preferences and soon the software will provide the most appropriate results.
- Queries Needed: Based on the keywords only.
- Best for: those of all genres.
- No. of Results: Hundreds of names.
7.Scratch
With this tool, you can get names with caps specifications that look cool. You can pick game highlights for your channel name and in order to get much finer results one can prefer to put several words into the list.
- Queries Needed: Works with keywords only.
- Best for: Those of all genres.
- No. of Results: One name.
Part 2: Best 4 Free YouTube Name Generator Quizzes
8.ProProfs
It will help you get a unique YouTube name that matches your personality and your real name. You will get a kick out of the combination of questions served up in this quiz.
9.Quizony
A set of crazy questions will decide an interesting name for your game channel and it will be definitely loved by viewers.
10.Go to Quiz
If you want to get rid of boring names and want to switch to something effective based on your hobbies, music preferences, grades and personality then Go to Quiz is the best platform for you.
11.QuizBone
This YouTube name generator first asks you about your video content preferences, whether it is related to beauty, rants, giveaways, makeup, humor, or anything in a wide range and then produces relevant name that suits your personality as per quiz answers,
Think you got a funny or cool channel name? Share in the comments, and tell us if you’ve ever used a free YouTube name generator!
Richard Bennett
Richard Bennett is a writer and a lover of all things video.
Follow @Richard Bennett
Also read:
- [New] Channeling Wealth Through Beauty Online Platforms
- [New] Cerebral Channels Top Educational YT Networks
- In 2024, Audio Editing Wonders for YouTube Filmmakers
- [New] Best Low-Cost Subtitles & Downloader Companion
- Explore the Top 7 Innovative Apps for Effortless YouTube LIVE Broadcasts on iPhone and Android
- 2024 Approved Decoding Chroma Techniques From Raw Footage to Final Cut
- Discover the Magic Behind Effective YouTube Short Videos for 2024
- Enrich Your Viewing Habit with Essential Movie Channels for 2024
- From Zero to YouTube Pros Creating an Account Rightly
- [New] Event Ensemble Curating Best DJ Templates
- In 2024, Boost Visibility with These 20 Best Thumbnail Fonts
- [Updated] 10 Video App Powerhouses That Don't Play by YouTube’s Rules
- Elevating Your Video Brand Tips for Great YouTube Banners
- Earning the Big Bucks as a YouTube Star for 2024
- In 2024, Best Free YouTube Intro Makers
- Building a Billion-Dollar Brand on Youtube (Jake Paul) for 2024
- Mobile's Ultimate List The Top 10 Video Apps Sans YouTube
- 5 Steps to Crafting Engaging, Cost-Effective YouTube Ads
- [New] Dailymotion vs YouTube Who Earns More From Video Content?
- 2024 Approved 1 Choice Easy Online Video Text Conversion
- [New] Converting iMovie Edits for Online Exhibition - YouTube Edition
- What Is the Difference Between YouTube and Dailymotion for 2024
- A Guide to the Best Tools for Shortening Video Content Online
- 2024 Approved Comprehensive Strategies for Tracking YT Traffic and Gains
- [New] Elevate Views Prime SEO Equipment for Videos
- [New] Creating Unique Storytelling in Your Haul Videos
- YouTube Thumbnails Enhanced Aesthetic Landscapes
- Top 15 YouTube Playlists Catering to Musicians
- [New] 10 FREE YouTube Playlist Downloaders [Online/PC/Android/iOS]2
- In 2024, Building Captivating Online Media Summaries
- New In 2024, Free Dailymotion to MP4 Converter - Fast and Easy
- Why Apple Account Disabled On your Apple iPhone 14 Pro Max? How to Fix
- How To Unlock Apple iPhone 11 Without Swiping Up? 6 Ways | Dr.fone
- Reasons for Itel P40 Stuck on Startup Screen and Ways To Fix Them | Dr.fone
- In 2024, The Best Reaction Video Editing Tools You Should Be Using
- New In 2024, How to Extract the Beat From Any Song Using Online Tools
- Taming Unwanted Shake in Drones' Visual Outputs
- In 2024, Acclaimed Editing Software for Virtual Recordings
- In 2024, Tailored Strategies for Recording MOV Files in Win10
- In 2024, A Detailed Pokemon Go PvP Tier List to Make you a Pro Trainer For Apple iPhone XR | Dr.fone
- [New] Preserve Your Pics & Videos Top 15 Tools Reviewed for 2024
- ChromeOS Direct Screens Capture Tool
- Updated In 2024, Efficient Techniques for Transferring Audacity Tracks Into MP3 Files
- In 2024, Three Ways to Sim Unlock Xiaomi Redmi Note 12 5G
- Top 4 Ways for Apple iPhone SE (2022) to Mac Mirroring | Dr.fone
- [Updated] Prime PC Emulators for Gaming on Retro GB Devices
- Title: "From Twitch Live to YouTube Watchability A Comprehensive Tutorial"
- Author: Kevin
- Created at : 2024-05-25 15:16:31
- Updated at : 2024-05-26 15:16:31
- Link: https://youtube-videos.techidaily.com/from-twitch-live-to-youtube-watchability-a-comprehensive-tutorial/
- License: This work is licensed under CC BY-NC-SA 4.0.
