
:max_bytes(150000):strip_icc()/TravelTech_GettyImages-1410662282_CROPPED_d3sign-03c2cdf5be314894b99757426813be51.jpg)
From Dull Scenes to Dynamic Sports Highlights
From Dull Scenes to Dynamic Sports Highlights
How to Create a Sports Highlight Video

Richard Bennett
Mar 27, 2024• Proven solutions
“I want to make a sports highlight video, but I don’t know how to edit it or what kind of tools I need to use. Can someone tell me how to work on a sports video?”
As I read this query posted on a popular online forum, I realized that so many people out there find it hard to create a sports video. Well, unlike a standard video, working on a sports highlight video can be tough. This is because it needs a lot of editing and we need to handpick the right moments from hours of footage. Though, if you use the right tools, then you can easily work on highlight videos like a pro. In this guide, I will let you know how to create sports videos in a step by step manner.
- Part 1: Why is a sports highlight video and why important?
- Part 2: Highlight Video vs. Skills Video
- Part 3: Use Excellent Video Editor to Make a Sports Highlight Video
- Part 4: How to Create a Sports Highlight Video?
- Part 5: Expert Tips for Creating Highlight Videos
Why is a sports highlight video and why important?
As the name suggests, a highlight video basically includes all the vital events of a game in a short duration of time. You can include the details of some players at the start or focus on a particular player as well. Besides that, a sports highlight video would have fast-forward, slow motion, and frozen clips to skip or focus on certain details.
A lot of times, people don’t have the time to watch the entire game, which can span for a couple of hours. Therefore, they can watch a sports highlight video that would include all the major events of the game and will let them enjoy their thrill in a few moments.

Besides that, if you are applying for a college/academy or just want to showcase your skills, then you can consider making a sports video of an impressive game of yours. You can simply showcase a player and try to highlight their skills in the video.
Highlight Videos vs. Skills Videos: the Major Differences
While making a sports video, you might encounter two different types of content – a highlight video and a skills video. As I have mentioned above, a sports highlight video would include the shots of an actual game. You can either focus on the event of a single game or include clips from multiple games that were played in a genuine setup. If you want, you can highlight a particular player while making the video as well.
On the other hand, a skills video is mostly made to demonstrate the skills of a player and is not focused on the game. In fact, most of the skills videos are made outside of a real game setting. For instance, if you have mastered a skill or would like to demonstrate your game-related actions, then you can make a skills video. Some of these videos are also tutorial game-plays to teach others about a particular skill that they can master.
Use Excellent Video Editor to Make a Sports Highlight Video
If you want to come up with engaging and visually appealing highlight videos, then consider using a versatile video editor like Filmora. Equipped with several video editing tools, it will let you create a sports highlight video in no time. Since the tool has so many features, you can save your time in editing and come up with a new sports video in minutes.


- Filmora is extremely easy to use and runs on all the leading Windows and macOS versions without any issue.
- Using its inbuilt tools, you can clip out the most important events from a sports video or include them in your highlights.
- There are also features to change the motion and pace of the video (like fast forward or slow motion).
- You can also focus on any athlete and freeze a frame on a particular skill or action.
- Besides that, you can also add voiceovers in your sports highlight video, add media layers, use its inbuilt transitions, and fine-tune the overall aesthetics of your videos.
- There are also tons of filters and presets in Filmora that you can use to save your time in editing. You can work on videos of almost every format with seamless 4K support.
Why we picked it
- Options to import/export files in different formats
- Tons of features in one place (extremely easy to use)
- Split-screen support to include multiple events in a highlight video
How to Create a Sports Highlight Video with Filmora?
With the help of Filmora , anyone can create a sports video without even prior editing/designing experience. Firstly, you can install Filmora on your Windows or Mac by visiting its website and have the footage you wish to edit. Now, you can just follow these steps to work on your next sports highlight video.
Filmstock Stock Media Library ](https://filmstock.wondershare.com/creative-theme-sports?spm=rs.filmora%5Fweb&source%5Fchannel=seo%5Farticle )
Step 1: Add a video to Filmora
To start with, just launch Filmora on your computer and add the video that you wish to work on. You can just drag and drop the video to its interface or go to its Menu > File > Import Media to browse and load the file.

Step 2: Edit the Sports Video
In order to create a sports highlight video, the first thing that people do is trim any unwanted part. Once the video is loaded, you can view it on the timeline of the interface. Now, go to the timeline and get the trim tool to manually select the part of the video you wish to trim. After selecting the desired fragment, you can trim the clip or just delete it by clicking on their respective icons.

In the same way, you can also split your video and make other changes in it. You can also include multiple videos together and include them in your timeline as well.
If you are including multiple videos, then make sure they have the same dimensions and aspect ratio. For this, you can select the video, right-click on the timeline, and click on the crop icon. Now, select the same aspect ratio for the entire video to keep it uniform.

Most of the game highlights that we see have different speeds for various sections. That is, some actions would be fast-forwarded while some would be in slow motion. To apply this, simply select the section in the timeline, right-click, and go to the Speed and Duration settings. This will open a dedicated interface from where you can change the speed of the sports video.
Apart from manually setting the speed, you can also take the assistance of the custom speed options that are available in the timeline tools.

Step 3: Make Advanced Edits in your Sports Video
With the user-friendly interface of Filmora, you can do some basic edits and make a sports highlight video in minutes. Though, if you want to focus on some parts and make more changes, then you can use its advanced options as well.
For instance, in a highlight video, we often wish to freeze certain frames. To do this, just select a frame and use the “Freeze Frame” option from the timeline tools. You can even set the duration to freeze the selected frame.
If you have included clips from different videos, then you can apply all kinds of transitions from Filmora. In the end, you can go to its edit options and choose to close gaps as well.
To give your video a uniform and aesthetically pleasing appeal, you can also add different overlays and effects on it from Filmora’s library.
Lastly, make sure that you added sound or voiceover to your video. You can add a sound from its library or import any other music file to it. Since highlight videos mostly have voiceovers, you add the same by visiting the Record > Record Voiceover option.

Step 4: Export your video in the desired format
That’s it! Once your sports highlight video is ready, you can export it in different formats. Just go to the Export option and select the location to save the video and a preferred resolution. You can save your video in formats like MP4, WMV, AVI, FLV, MKV, and so on.
Expert Tips for Creating Highlight Videos
As you can see, making a sports highlight video with a tool like Filmora is extremely easy. Although to be a pro and make better videos, you can consider the following tips:
Keep it short
Make sure that you only include the highlights of the game in your video to keep it interesting. Your aim is to have a short and crisp video without any unwanted footage.
Use freeze frames and slow motion
Some games can be pretty fast-paced and the viewers might miss out on a few key details. To showcase them, you can freeze certain frames or apply slow motion.
Include other details
A sports highlight video can also be informative. You can include details about the players or the team at the start. Also, it is recommended to have sound or a voiceover in the background to narrate the events.
Pick the best clips
When you watch a game, make a note of the best moments that you know your viewers would enjoy. You can also focus on different skills that you found impressive and include them in your sports video.
I’m sure that after reading this guide, you would be able to come up with an impressive sports highlight video as well. Since you might need to make a lot of edits on a sports video, I would recommend using a diverse tool like Filmora. With the tons of editing options that it provides, you can easily create all sorts of highlight videos while saving your time and resources.
Richard Bennett
Richard Bennett is a writer and a lover of all things video.
Follow @Richard Bennett
Richard Bennett
Mar 27, 2024• Proven solutions
“I want to make a sports highlight video, but I don’t know how to edit it or what kind of tools I need to use. Can someone tell me how to work on a sports video?”
As I read this query posted on a popular online forum, I realized that so many people out there find it hard to create a sports video. Well, unlike a standard video, working on a sports highlight video can be tough. This is because it needs a lot of editing and we need to handpick the right moments from hours of footage. Though, if you use the right tools, then you can easily work on highlight videos like a pro. In this guide, I will let you know how to create sports videos in a step by step manner.
- Part 1: Why is a sports highlight video and why important?
- Part 2: Highlight Video vs. Skills Video
- Part 3: Use Excellent Video Editor to Make a Sports Highlight Video
- Part 4: How to Create a Sports Highlight Video?
- Part 5: Expert Tips for Creating Highlight Videos
Why is a sports highlight video and why important?
As the name suggests, a highlight video basically includes all the vital events of a game in a short duration of time. You can include the details of some players at the start or focus on a particular player as well. Besides that, a sports highlight video would have fast-forward, slow motion, and frozen clips to skip or focus on certain details.
A lot of times, people don’t have the time to watch the entire game, which can span for a couple of hours. Therefore, they can watch a sports highlight video that would include all the major events of the game and will let them enjoy their thrill in a few moments.
Besides that, if you are applying for a college/academy or just want to showcase your skills, then you can consider making a sports video of an impressive game of yours. You can simply showcase a player and try to highlight their skills in the video.
Highlight Videos vs. Skills Videos: the Major Differences
While making a sports video, you might encounter two different types of content – a highlight video and a skills video. As I have mentioned above, a sports highlight video would include the shots of an actual game. You can either focus on the event of a single game or include clips from multiple games that were played in a genuine setup. If you want, you can highlight a particular player while making the video as well.
On the other hand, a skills video is mostly made to demonstrate the skills of a player and is not focused on the game. In fact, most of the skills videos are made outside of a real game setting. For instance, if you have mastered a skill or would like to demonstrate your game-related actions, then you can make a skills video. Some of these videos are also tutorial game-plays to teach others about a particular skill that they can master.
Use Excellent Video Editor to Make a Sports Highlight Video
If you want to come up with engaging and visually appealing highlight videos, then consider using a versatile video editor like Filmora. Equipped with several video editing tools, it will let you create a sports highlight video in no time. Since the tool has so many features, you can save your time in editing and come up with a new sports video in minutes.
- Filmora is extremely easy to use and runs on all the leading Windows and macOS versions without any issue.
- Using its inbuilt tools, you can clip out the most important events from a sports video or include them in your highlights.
- There are also features to change the motion and pace of the video (like fast forward or slow motion).
- You can also focus on any athlete and freeze a frame on a particular skill or action.
- Besides that, you can also add voiceovers in your sports highlight video, add media layers, use its inbuilt transitions, and fine-tune the overall aesthetics of your videos.
- There are also tons of filters and presets in Filmora that you can use to save your time in editing. You can work on videos of almost every format with seamless 4K support.
Why we picked it
- Options to import/export files in different formats
- Tons of features in one place (extremely easy to use)
- Split-screen support to include multiple events in a highlight video
How to Create a Sports Highlight Video with Filmora?
With the help of Filmora , anyone can create a sports video without even prior editing/designing experience. Firstly, you can install Filmora on your Windows or Mac by visiting its website and have the footage you wish to edit. Now, you can just follow these steps to work on your next sports highlight video.
Filmstock Stock Media Library ](https://filmstock.wondershare.com/creative-theme-sports?spm=rs.filmora%5Fweb&source%5Fchannel=seo%5Farticle )
Step 1: Add a video to Filmora
To start with, just launch Filmora on your computer and add the video that you wish to work on. You can just drag and drop the video to its interface or go to its Menu > File > Import Media to browse and load the file.
Step 2: Edit the Sports Video
In order to create a sports highlight video, the first thing that people do is trim any unwanted part. Once the video is loaded, you can view it on the timeline of the interface. Now, go to the timeline and get the trim tool to manually select the part of the video you wish to trim. After selecting the desired fragment, you can trim the clip or just delete it by clicking on their respective icons.
In the same way, you can also split your video and make other changes in it. You can also include multiple videos together and include them in your timeline as well.
If you are including multiple videos, then make sure they have the same dimensions and aspect ratio. For this, you can select the video, right-click on the timeline, and click on the crop icon. Now, select the same aspect ratio for the entire video to keep it uniform.
Most of the game highlights that we see have different speeds for various sections. That is, some actions would be fast-forwarded while some would be in slow motion. To apply this, simply select the section in the timeline, right-click, and go to the Speed and Duration settings. This will open a dedicated interface from where you can change the speed of the sports video.
Apart from manually setting the speed, you can also take the assistance of the custom speed options that are available in the timeline tools.
Step 3: Make Advanced Edits in your Sports Video
With the user-friendly interface of Filmora, you can do some basic edits and make a sports highlight video in minutes. Though, if you want to focus on some parts and make more changes, then you can use its advanced options as well.
For instance, in a highlight video, we often wish to freeze certain frames. To do this, just select a frame and use the “Freeze Frame” option from the timeline tools. You can even set the duration to freeze the selected frame.
If you have included clips from different videos, then you can apply all kinds of transitions from Filmora. In the end, you can go to its edit options and choose to close gaps as well.
To give your video a uniform and aesthetically pleasing appeal, you can also add different overlays and effects on it from Filmora’s library.
Lastly, make sure that you added sound or voiceover to your video. You can add a sound from its library or import any other music file to it. Since highlight videos mostly have voiceovers, you add the same by visiting the Record > Record Voiceover option.
Step 4: Export your video in the desired format
That’s it! Once your sports highlight video is ready, you can export it in different formats. Just go to the Export option and select the location to save the video and a preferred resolution. You can save your video in formats like MP4, WMV, AVI, FLV, MKV, and so on.
Expert Tips for Creating Highlight Videos
As you can see, making a sports highlight video with a tool like Filmora is extremely easy. Although to be a pro and make better videos, you can consider the following tips:
Keep it short
Make sure that you only include the highlights of the game in your video to keep it interesting. Your aim is to have a short and crisp video without any unwanted footage.
Use freeze frames and slow motion
Some games can be pretty fast-paced and the viewers might miss out on a few key details. To showcase them, you can freeze certain frames or apply slow motion.
Include other details
A sports highlight video can also be informative. You can include details about the players or the team at the start. Also, it is recommended to have sound or a voiceover in the background to narrate the events.
Pick the best clips
When you watch a game, make a note of the best moments that you know your viewers would enjoy. You can also focus on different skills that you found impressive and include them in your sports video.
I’m sure that after reading this guide, you would be able to come up with an impressive sports highlight video as well. Since you might need to make a lot of edits on a sports video, I would recommend using a diverse tool like Filmora. With the tons of editing options that it provides, you can easily create all sorts of highlight videos while saving your time and resources.
Richard Bennett
Richard Bennett is a writer and a lover of all things video.
Follow @Richard Bennett
Making Waves in the Gaming Community on YouTube
How to Live Stream on YouTube Gaming?
Richard Bennett
Mar 27, 2024• Proven solutions
1. Live Stream on YouTube Gaming with OBS
You need to follow these simple Step s to use OBS for YouTube Live Streaming:
**Step 1:**First of all you need to login to your YouTube account. You might be aware of the fact that same YouTube account is used for YouTube gaming needs.
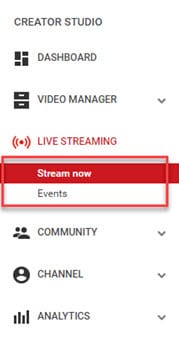
**Step 2:**Once entered inside your account then you need to visit the Go live streaming options and then from drop down menu simply choose Stream Now option.
**Step 3:**It is time to fill the details on screen; put impressive words for your live stream description so that it can grab attention of more viewers. Then select category as ‘Gaming’.

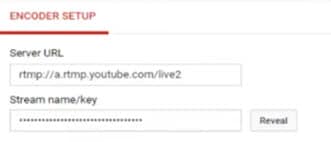
**Step 4:**Now you need to copy the stream key.
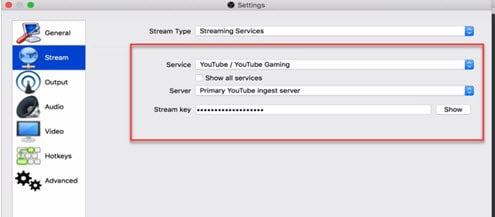
**Step 5:**Now open your OBS tool and then select YouTube as your active game streaming service. Users here need to paste that copied streaming key of Step 5 into the space provided on OBS settings page.
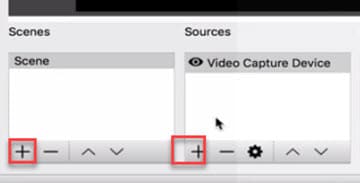
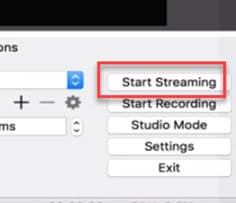
**Step 6:**It is time to make your desktop a video source.
**Step 7:**Once all these settings are completed then you need to hit the start streaming option.
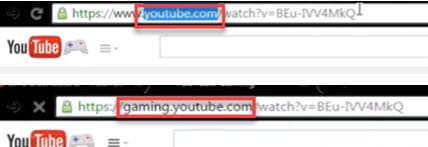
**Step 8:**The service may take few seconds to bring your live on YouTube and after this small duration you will be connected to your channel with your streamed content. Then change your url from youtube.com to gaming.youtube.com
**Step 9:**You are all set to be live on your YouTube gaming profile.
2. Live Stream on YouTube with Elgato Game Capture HD
A: Basic Settings for Elgato Game Capture HD
The Step s below will help you to get ready for streaming with all basic settings that are required by Elgato Game Capture HD tool.
**Step 1:**First of all, you need to open your browser, search for Elgato Game Capture HD software on its official website and then download it for your system. Get it installed.
**Step 2:**Once installation process is complete then launch your software.
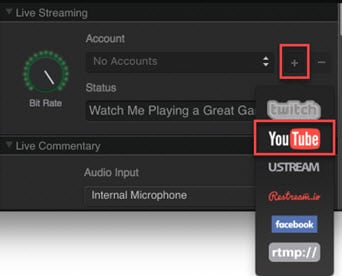
**Step 3:**Now you need to hit the add button on screen and select YouTube from drop down menu.
Step 4: It is time to sign in with your Google Account.

**Step 5:**After sign up process, allow the Elgato Game Capture tool to make connection with your YouTube account.

**Step 6:**Soon you will be able to access you account from Elgato platform.

**Step 7:**It is time to make adjustments for streaming settings.
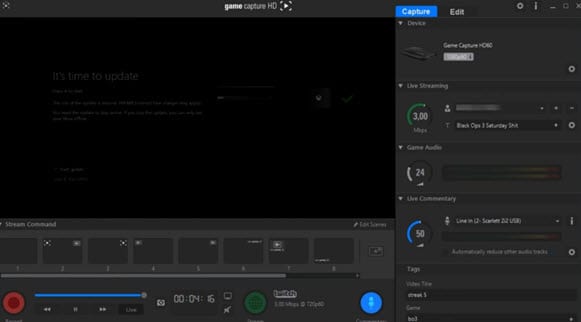
B: Test your Bandwidth and make adjustments for Stream settings
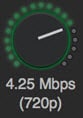
It is essential to check speed of your internet connection during live streaming because if it goes slow then your content will become annoying to viewers and it will decay the reputation of your channel. So prefer to use following Step s to complete the basic settings and to test your internet connection.
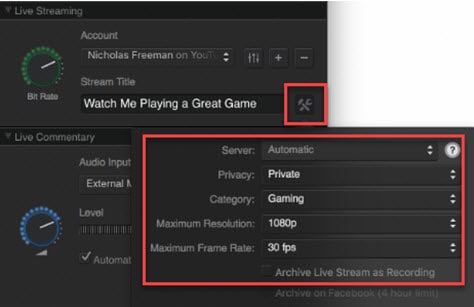
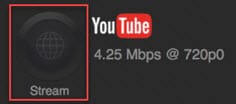
**Step 1:**Open your browser and then visit the speedtest.net platform. You can also use other similar kind of websites to ensure the speed of your internet. Note that you will find a Bit Rate dial in the live streaming section, here you can make adjustments for bit rates to bring it to desired level.
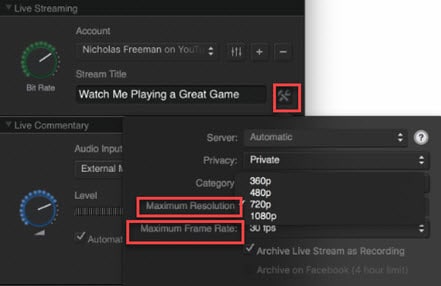
**Step 2:**It is also possible to make customized settings for frame rate and resolution as per need of your stream content.
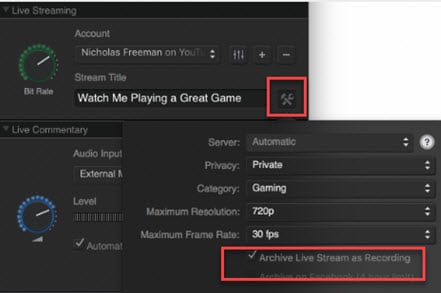
**Step 3:**One can also prefer to archive his streaming.
**Step 4:**As soon as you have completed all above settings then you need to hit the stream button on screen.
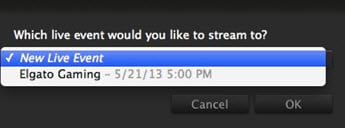
**Step 5:**Soon your software will ask you to select the event that you want to stream, choose your desired event and then press Ok. Soon you will be live on YouTube.
Richard Bennett
Richard Bennett is a writer and a lover of all things video.
Follow @Richard Bennett
Richard Bennett
Mar 27, 2024• Proven solutions
1. Live Stream on YouTube Gaming with OBS
You need to follow these simple Step s to use OBS for YouTube Live Streaming:
**Step 1:**First of all you need to login to your YouTube account. You might be aware of the fact that same YouTube account is used for YouTube gaming needs.
**Step 2:**Once entered inside your account then you need to visit the Go live streaming options and then from drop down menu simply choose Stream Now option.
**Step 3:**It is time to fill the details on screen; put impressive words for your live stream description so that it can grab attention of more viewers. Then select category as ‘Gaming’.
**Step 4:**Now you need to copy the stream key.
**Step 5:**Now open your OBS tool and then select YouTube as your active game streaming service. Users here need to paste that copied streaming key of Step 5 into the space provided on OBS settings page.
**Step 6:**It is time to make your desktop a video source.
**Step 7:**Once all these settings are completed then you need to hit the start streaming option.
**Step 8:**The service may take few seconds to bring your live on YouTube and after this small duration you will be connected to your channel with your streamed content. Then change your url from youtube.com to gaming.youtube.com
**Step 9:**You are all set to be live on your YouTube gaming profile.
2. Live Stream on YouTube with Elgato Game Capture HD
A: Basic Settings for Elgato Game Capture HD
The Step s below will help you to get ready for streaming with all basic settings that are required by Elgato Game Capture HD tool.
**Step 1:**First of all, you need to open your browser, search for Elgato Game Capture HD software on its official website and then download it for your system. Get it installed.
**Step 2:**Once installation process is complete then launch your software.
**Step 3:**Now you need to hit the add button on screen and select YouTube from drop down menu.
Step 4: It is time to sign in with your Google Account.
**Step 5:**After sign up process, allow the Elgato Game Capture tool to make connection with your YouTube account.
**Step 6:**Soon you will be able to access you account from Elgato platform.
**Step 7:**It is time to make adjustments for streaming settings.
B: Test your Bandwidth and make adjustments for Stream settings
It is essential to check speed of your internet connection during live streaming because if it goes slow then your content will become annoying to viewers and it will decay the reputation of your channel. So prefer to use following Step s to complete the basic settings and to test your internet connection.
**Step 1:**Open your browser and then visit the speedtest.net platform. You can also use other similar kind of websites to ensure the speed of your internet. Note that you will find a Bit Rate dial in the live streaming section, here you can make adjustments for bit rates to bring it to desired level.
**Step 2:**It is also possible to make customized settings for frame rate and resolution as per need of your stream content.
**Step 3:**One can also prefer to archive his streaming.
**Step 4:**As soon as you have completed all above settings then you need to hit the stream button on screen.
**Step 5:**Soon your software will ask you to select the event that you want to stream, choose your desired event and then press Ok. Soon you will be live on YouTube.
Richard Bennett
Richard Bennett is a writer and a lover of all things video.
Follow @Richard Bennett
Also read:
- What's In Your Wallet From One Million YouTube Sights?
- Choosing the Best Camera for Filming Mirrorless or DSLR for 2024
- A Treasury of Thought-Provoking YouTube Content
- A Comprehenensive Guide to YouTube Studio's Editing Features for 2024
- In 2024, Effortless Entertainment Looping YouTube Videos for TV Viewers
- A Deep Dive Into Creating Compelling Unboxing Sequences for 2024
- Free Video Credits Pro - The Best Suggestions #1-6
- Direct Transfer Path YouTube Content to Dailymotion Hub for 2024
- Top Vlog Concepts for Daily Engagement
- Illuminate Play Button Imagery Flashing Borders Added
- Mastering Timestamp Placement in YouTube Clips
- [New] Craft the Ultimate Outro with Pro Maker Advice
- [New] Every Creator's Guide to YouTube Revenue
- In 2024, Clear Shots for YouTube Filmmakers
- In 2024, Achieve a Millennium of Subscriber Milestones
- 25 Smart & Proven Tactics to Get Your YouTube Channel Noticed
- [Updated] Earning Potential Unveiled YouTube AdSense Earning per Thousand Video Observations
- Elite Listings Easy Purchases of Startup YouTube Revenue Streams
- Lens Strategy for Stellar Video Creations
- 2024 Approved Detailed Instructions for Embedding and Displaying YouTube Playlists Online
- A Comprehensive Guide to Personalizing Video Images
- [New] Download YouTube Images with Ease Online
- 2024 Approved Elevating Your Vlog Through Proper Lighting
- In 2024, Break Even on Youtube Monetizing with a Minimum of 500 Viewers
- In 2024, Charting YouTube's Course for Video Short Growth with Funding
- In 2024, Discovering Ideal Hashtags for Your YouTube Videos
- 2024 Approved Confirmation Techniques for Youtube Accounts
- Top 11 Video Recorders That Save Money Without Sacrificing Performance
- In 2024, Ergonomic Hold Techniques for Clarity
- Effortless Subscriber Acquisition for Enhanced Viewership for 2024
- Discover the Best Tools & Tips to Accurately Tag Your Videos
- Unlocking Permanent Turn-Off for YouTube Shorts
- Pinnacle 10 Sound Superchargers PC, Mac & Phones
- Amplify Watcher Count Simplified Tactics Exposed for 2024
- Updated 2024 Approved Effortless YouTube to MP3 Conversion Tips, Tricks, and Tool Reviews
- 2024 Approved Read Through This Post to Know What Frame Rate Is, the Different Variations, and Why 60FPS Is Superior. Also, Know the Tools Available to Make the Conversion
- Quickly Remove Google FRP Lock on Vivo X100
- Fixing Non-Functional AirDrop Between iPhones, iPads & Macs
- New The Best Kept Secrets of FLAC Conversion Insider Tips and Tools
- How to Bypass Apple iPhone SE (2022) Passcode Easily Video Inside | Dr.fone
- New Fast and Free WebM Video Compression Online for 2024
- [Updated] In 2024, Streamlined Steps to Share Videos on Twitter & Tumblr
- Different Methods for Resetting Motorola Moto G 5G (2023) Phones with Screen Locked and Not | Dr.fone
- SoundSnatch Aural Replay Analysis for 2024
- [New] 2024 Approved Mastering the Art of Friendly Pins in Snapchat
- 2024 Approved Best Screen Recording Apps for Mac Users - Excluded From Bandicam
- [Updated] TikTok's Best Practices for Engaging Ad Content and Influential Examples for 2024
- How do i sign a .svd file electronically
- Title: From Dull Scenes to Dynamic Sports Highlights
- Author: Kevin
- Created at : 2024-05-25 15:15:49
- Updated at : 2024-05-26 15:15:49
- Link: https://youtube-videos.techidaily.com/from-dull-scenes-to-dynamic-sports-highlights/
- License: This work is licensed under CC BY-NC-SA 4.0.
