
:max_bytes(150000):strip_icc():format(webp)/social-media-text-588a94263df78caebc620f05.jpg)
"Free Yourself with Top 4 Applications for YouTube-to-WAV Conversion"
Free Yourself with Top 4 Applications for YouTube-to-WAV Conversion
YouTube to WAV File: 4 Best Free Convert Solutions

Richard Bennett
Mar 27, 2024• Proven solutions
YouTube to WAV converter is a very common phenomenon. This is done by the users as they want to play the video on selected devices.
In this article, we will help you manage to convert YouTube to WAV file with ease.
You will Learn :
- What is WAV?
- How to Convert YouTube to WAV Format? (4 Options)
- Tips to Convert YouTube to WAV
- Beside WAV Other Popular Formats for YouTube Videos
What is WAV?
WAV, known as Wave Form Audio File Format and is fully supported by Windows, is a common format that was launched back in 1991, which supports most of the older devices as well.
For the users that want uncompressed and lossless quality prefer to use WAV format. It is extended from the RIFF format to the RF64 format.
How to Convert YouTube to WAV Format?
Some many ways and programs can be used as YouTube to WAV converter. All these programs are easy to use and definitive guides are also available online. Some of the best ways are mentioned below.
Option 1: Convert YouTube to WAV by Wondershare Filmora
Filmora is by far the best program that can be used to convert YouTube to WAV format. YouTube to WAV file conversion has never been as easy as it is with this program. The program is easy to use and allows the users to overcome the issues which other programs present.
Features of the Program
- It is one of the very few programs that come with split-screen functionality. It means that the video and audio can be played simultaneously on a single interface.
- The audio equalizer ensures that the tuning is done as per the requirements.
- There is an advanced functionality of text editing which allows the users to mention the text onto the converted video as well.
- The UI of the program is graphical and hence it is easy to use. The independent reviews have granted a score of 9.5 based on this functionality of the program.
- The part selection is available in the program. It means that multiple conversions can be done at the same time without losing quality.
How to Convert YouTube to WAV Using Filmora?
This YouTube WAV converter is easy to use. The best part is that it is compatible with major platforms i.e. Windows and Mac. The processes for both will be explained in detail so that you can understand the program better.
The Process to Convert YouTube to WAV:
Step 1: Download Filmora for Windows or Mac (depends on your operating system).
If you want to download the program for Windows then click below download icon:

For Mac version download click below icon:

Step 2: There are three ways to import media into the program.
Methond 1: Click File > Import Media. Choose the YouTube file that you want to convert to WAV format. If the file is on another device then you can get it from there as well.

Method 2: Click Import Media on the main interface and select the file from the window that pops up.
Method 3: You can also drag and drop the files onto the interface to make sure that they are imported.
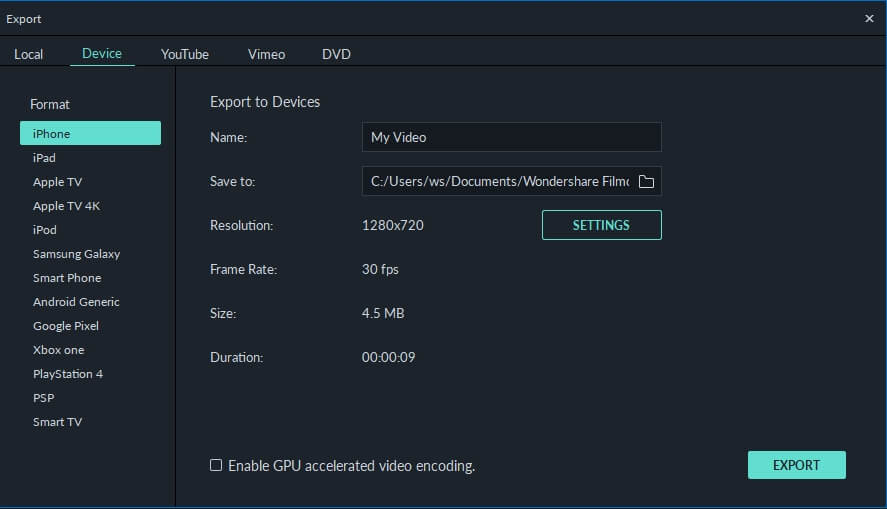
Step 3: You now just need to export the video in the WAV format. Click the Export button and then go for the Local tab. The export formats that are currently supported by the program are WMV, MP4, AVI, MOV, F4V, MKV, TS, 3GP, MPEG-2, WEBM, GIF and MP3.

Step 4: You can then alter the settings within the settings tab. The bit rate is the main thing that defines the quality of the video. Once the settings are done press OK
Step 5: You can also export the video as per the device that you want to play it on.
Step 6: You can also upload the video to social media platforms such as YouTube and Vimeo.
Step 7: You can also burn the converted format onto a DVD. Select the appropriate settings and press Export.
The process is explained as under. For video guides please visit Filmora 101 as it will get you the complete knowledge thoroughly.
You may also like: How to Convert YouTube to MP4 Safely? [Step by Step Guide] >>
Option 2: Other Way to Convert YouTube to WAV on Windows
5K Player is one of the best and the most used players that also work as YouTube to WAV conversion platform as well. The process is very easy to follow and is mentioned as under.
Step 1: Copy and paste the URL of the video on the desired location within the player. Click download and the process starts.

Step 2: Click “To Music” and select the WAV format from the drop-down that appears. You can also choose the bit rate, frame rate, and resolution. Once the conversion is completed you can save the file and the process ends here.
You may also like: >> How to to Convert WMV to MP4 Easily?
Option 3: Other Way to Convert YouTube to WAV on Mac
The Allavsoft is one of the best converters that can be used to convert YouTube to WAV on Mac. The process is simple and has been explained as under.
Step 1: Paste the URL of the YouTube video that you want to convert. You can also select the download quality and can access the file once the download has been completed.

Step 2: You can then select the format and once the conversion has been completed click the download button. The same has been depicted by numbers 2 and 3 in the picture below. WAV lossless quality should be selected from the dropdown to make sure that the work is done without any issue and problem.
Right format selection is important as the conversion is done instantly.
Option 4: YouTube to WAV Conversion Online
The process that you need to follow is explained as under.
Step 1: Visit https.//www.savethevideo.com/convert to access the converter.
Step 2: Paste the URL of the YouTube video that you want to convert and click the “Convert” button:

Step 3: Wait till the converter fetches the information.
Step 4: From the drop-down make sure that you select the WAV format.
Step 5: Click “Convert” once again and the process of conversion starts.
Step 6: The video then starts to download in the desired format.
Step 7: Click “Download” and save the file to the desired location. This concludes the process in full.
Tips to Convert YouTube to WAV
Below are some tips that would be useful for the users that want to convert YouTube to WAV format.
1. Always use the multipurpose software. It will allow you to download and convert the video at the same time-saving time.
2. Lossless quality is always to be selected while you are converting the format. It will make sure that the video is never compressed at all.
3. One of the best ways to convert the video is to disable the background noise. This will lead to awesome results.
4. Converting from YouTube to WAV also requires you to choose the software that is fast and reliable or else you will get the outcome which is not as per your requirements.
5. Free software programs can also get the malware to your system and therefore these are not recommended at all.
6. WAV is a format that is of high quality as the converters have loads of options so it is advised to use these carefully.
7. Make sure that the converters that are used are the ones that are highly rated and have a graphical user interface.
8. The YouTube to WAV downloader should be there on with the converter as it will make the process easy and you don’t need tons of software programs for a single purpose.
9. Always go for the program that supports the containers instead of just the format. If a program supports the containers then it is easy to convert a number of formats.
10. The conversion should be done with converters that do not cause any type of loss to enhance the quality as well.
Beside WAV Other Popular Formats for YouTube Videos
Many other video formats should be used to make sure that the best and the most advanced outcome is generated. Some of the most popular formats are as under.
- Audio Video Interleave Format, AVI
It is one of the oldest formats that are on the market. It was developed by Microsoft as a part of their video processing format for Windows. It was made publically available in 1992.
This one of the oldest formats is used universally. Many people consider it the standard to save videos. The AVI files are simple to use and are supported by almost every video player currently on the market.
It is easy to store as it takes less space than many other formats that are on the market. It will also let you transfer the files relatively faster due to the small size.
- Flash Video Format, FLV
The flash player by Adobe is one of the most common software programs on the system. This has made this video format one of the common ones on the market. The format can be played with ease as the supported plugins are there for other apps as well.
The flash content is supported by all browsers and therefore it is common to play these videos without any additional plugins. The best part of this format is the lossless quality that it provides to its users. Even if you compress these videos they remain HD as the quality remains the same.
- Apple QuickTime Movie, MOV
Among the Mac users, it is one of the most used formats. Developed by Apple it is a format that allows the users to overcome issues such as playback errors. The new version has also been launched which is known as QuickTime X.
The best part of this format is that it is available for Windows users as well. The files of the MOV format are usually of high quality. It is for the same that the size of such files is large as compared to other formats.
- Moving Pictures Expert Group 4, MP4
Introduced in 1998 it is a format that is used by the motion pictures association responsible for setting the standards. The format is widely used and is supported by various platforms as well as devices.
Even after the MP4 file is compressed it remains lossless and the quality remains the same. The HTML5 that has been launched currently also supports this format. It is compatible with almost all of the browsers that are on the market.
- 264
As the name suggests it is one of the best and the most used formats for HD videos. The compression remains lossless and even if the resolution is low the quality is maintained. The MP4 container is the one that is used to contain this format.
Most of the streaming devices, as well as the services, use this format while referring to HD video. The best part is that the format is widely accepted as industry standards for HD videos. Most of the users all over the world use this format to save their HD videos with ease.
- OGG
It is one of the most used video formats. It has been developed by the Xiph.org foundation to maintain the video as well as the audio quality on different platforms. The format is free and the documentation, as well as the configuration, can be downloaded by anyone.
- Advanced Systems Format, .ASF
If you want to stream videos then this is the format that is considered to be the best. It is still being used by the major popular streaming platforms of the world. The .ASF format is one of the best and it allows the users to overcome issues such as quality loss as well as streaming related issues.
You may also like: How to Post/Share a Video From YouTube on Instagram >>
Conclusion
If you require lossless compression then YouTube to WAV conversion is something that is required. Some many ways and means can be used to make sure that the idea is approached. The best way is to use Filmora as it is an easy and efficient operation.
The best way to get around the issue is to always use the service that is embedded with quality.
If you like this article then it is requested to comment and share it on social media. It will not only help others but will also let them have knowledgeable ideas.
Richard Bennett
Richard Bennett is a writer and a lover of all things video.
Follow @Richard Bennett
Richard Bennett
Mar 27, 2024• Proven solutions
YouTube to WAV converter is a very common phenomenon. This is done by the users as they want to play the video on selected devices.
In this article, we will help you manage to convert YouTube to WAV file with ease.
You will Learn :
- What is WAV?
- How to Convert YouTube to WAV Format? (4 Options)
- Tips to Convert YouTube to WAV
- Beside WAV Other Popular Formats for YouTube Videos
What is WAV?
WAV, known as Wave Form Audio File Format and is fully supported by Windows, is a common format that was launched back in 1991, which supports most of the older devices as well.
For the users that want uncompressed and lossless quality prefer to use WAV format. It is extended from the RIFF format to the RF64 format.
How to Convert YouTube to WAV Format?
Some many ways and programs can be used as YouTube to WAV converter. All these programs are easy to use and definitive guides are also available online. Some of the best ways are mentioned below.
Option 1: Convert YouTube to WAV by Wondershare Filmora
Filmora is by far the best program that can be used to convert YouTube to WAV format. YouTube to WAV file conversion has never been as easy as it is with this program. The program is easy to use and allows the users to overcome the issues which other programs present.
Features of the Program
- It is one of the very few programs that come with split-screen functionality. It means that the video and audio can be played simultaneously on a single interface.
- The audio equalizer ensures that the tuning is done as per the requirements.
- There is an advanced functionality of text editing which allows the users to mention the text onto the converted video as well.
- The UI of the program is graphical and hence it is easy to use. The independent reviews have granted a score of 9.5 based on this functionality of the program.
- The part selection is available in the program. It means that multiple conversions can be done at the same time without losing quality.
How to Convert YouTube to WAV Using Filmora?
This YouTube WAV converter is easy to use. The best part is that it is compatible with major platforms i.e. Windows and Mac. The processes for both will be explained in detail so that you can understand the program better.
The Process to Convert YouTube to WAV:
Step 1: Download Filmora for Windows or Mac (depends on your operating system).
If you want to download the program for Windows then click below download icon:
For Mac version download click below icon:
Step 2: There are three ways to import media into the program.
Methond 1: Click File > Import Media. Choose the YouTube file that you want to convert to WAV format. If the file is on another device then you can get it from there as well.
Method 2: Click Import Media on the main interface and select the file from the window that pops up.
Method 3: You can also drag and drop the files onto the interface to make sure that they are imported.
Step 3: You now just need to export the video in the WAV format. Click the Export button and then go for the Local tab. The export formats that are currently supported by the program are WMV, MP4, AVI, MOV, F4V, MKV, TS, 3GP, MPEG-2, WEBM, GIF and MP3.
Step 4: You can then alter the settings within the settings tab. The bit rate is the main thing that defines the quality of the video. Once the settings are done press OK
Step 5: You can also export the video as per the device that you want to play it on.
Step 6: You can also upload the video to social media platforms such as YouTube and Vimeo.
Step 7: You can also burn the converted format onto a DVD. Select the appropriate settings and press Export.
The process is explained as under. For video guides please visit Filmora 101 as it will get you the complete knowledge thoroughly.
You may also like: How to Convert YouTube to MP4 Safely? [Step by Step Guide] >>
Option 2: Other Way to Convert YouTube to WAV on Windows
5K Player is one of the best and the most used players that also work as YouTube to WAV conversion platform as well. The process is very easy to follow and is mentioned as under.
Step 1: Copy and paste the URL of the video on the desired location within the player. Click download and the process starts.
Step 2: Click “To Music” and select the WAV format from the drop-down that appears. You can also choose the bit rate, frame rate, and resolution. Once the conversion is completed you can save the file and the process ends here.
You may also like: >> How to to Convert WMV to MP4 Easily?
Option 3: Other Way to Convert YouTube to WAV on Mac
The Allavsoft is one of the best converters that can be used to convert YouTube to WAV on Mac. The process is simple and has been explained as under.
Step 1: Paste the URL of the YouTube video that you want to convert. You can also select the download quality and can access the file once the download has been completed.
Step 2: You can then select the format and once the conversion has been completed click the download button. The same has been depicted by numbers 2 and 3 in the picture below. WAV lossless quality should be selected from the dropdown to make sure that the work is done without any issue and problem.
Right format selection is important as the conversion is done instantly.
Option 4: YouTube to WAV Conversion Online
The process that you need to follow is explained as under.
Step 1: Visit https.//www.savethevideo.com/convert to access the converter.
Step 2: Paste the URL of the YouTube video that you want to convert and click the “Convert” button:
Step 3: Wait till the converter fetches the information.
Step 4: From the drop-down make sure that you select the WAV format.
Step 5: Click “Convert” once again and the process of conversion starts.
Step 6: The video then starts to download in the desired format.
Step 7: Click “Download” and save the file to the desired location. This concludes the process in full.
Tips to Convert YouTube to WAV
Below are some tips that would be useful for the users that want to convert YouTube to WAV format.
1. Always use the multipurpose software. It will allow you to download and convert the video at the same time-saving time.
2. Lossless quality is always to be selected while you are converting the format. It will make sure that the video is never compressed at all.
3. One of the best ways to convert the video is to disable the background noise. This will lead to awesome results.
4. Converting from YouTube to WAV also requires you to choose the software that is fast and reliable or else you will get the outcome which is not as per your requirements.
5. Free software programs can also get the malware to your system and therefore these are not recommended at all.
6. WAV is a format that is of high quality as the converters have loads of options so it is advised to use these carefully.
7. Make sure that the converters that are used are the ones that are highly rated and have a graphical user interface.
8. The YouTube to WAV downloader should be there on with the converter as it will make the process easy and you don’t need tons of software programs for a single purpose.
9. Always go for the program that supports the containers instead of just the format. If a program supports the containers then it is easy to convert a number of formats.
10. The conversion should be done with converters that do not cause any type of loss to enhance the quality as well.
Beside WAV Other Popular Formats for YouTube Videos
Many other video formats should be used to make sure that the best and the most advanced outcome is generated. Some of the most popular formats are as under.
- Audio Video Interleave Format, AVI
It is one of the oldest formats that are on the market. It was developed by Microsoft as a part of their video processing format for Windows. It was made publically available in 1992.
This one of the oldest formats is used universally. Many people consider it the standard to save videos. The AVI files are simple to use and are supported by almost every video player currently on the market.
It is easy to store as it takes less space than many other formats that are on the market. It will also let you transfer the files relatively faster due to the small size.
- Flash Video Format, FLV
The flash player by Adobe is one of the most common software programs on the system. This has made this video format one of the common ones on the market. The format can be played with ease as the supported plugins are there for other apps as well.
The flash content is supported by all browsers and therefore it is common to play these videos without any additional plugins. The best part of this format is the lossless quality that it provides to its users. Even if you compress these videos they remain HD as the quality remains the same.
- Apple QuickTime Movie, MOV
Among the Mac users, it is one of the most used formats. Developed by Apple it is a format that allows the users to overcome issues such as playback errors. The new version has also been launched which is known as QuickTime X.
The best part of this format is that it is available for Windows users as well. The files of the MOV format are usually of high quality. It is for the same that the size of such files is large as compared to other formats.
- Moving Pictures Expert Group 4, MP4
Introduced in 1998 it is a format that is used by the motion pictures association responsible for setting the standards. The format is widely used and is supported by various platforms as well as devices.
Even after the MP4 file is compressed it remains lossless and the quality remains the same. The HTML5 that has been launched currently also supports this format. It is compatible with almost all of the browsers that are on the market.
- 264
As the name suggests it is one of the best and the most used formats for HD videos. The compression remains lossless and even if the resolution is low the quality is maintained. The MP4 container is the one that is used to contain this format.
Most of the streaming devices, as well as the services, use this format while referring to HD video. The best part is that the format is widely accepted as industry standards for HD videos. Most of the users all over the world use this format to save their HD videos with ease.
- OGG
It is one of the most used video formats. It has been developed by the Xiph.org foundation to maintain the video as well as the audio quality on different platforms. The format is free and the documentation, as well as the configuration, can be downloaded by anyone.
- Advanced Systems Format, .ASF
If you want to stream videos then this is the format that is considered to be the best. It is still being used by the major popular streaming platforms of the world. The .ASF format is one of the best and it allows the users to overcome issues such as quality loss as well as streaming related issues.
You may also like: How to Post/Share a Video From YouTube on Instagram >>
Conclusion
If you require lossless compression then YouTube to WAV conversion is something that is required. Some many ways and means can be used to make sure that the idea is approached. The best way is to use Filmora as it is an easy and efficient operation.
The best way to get around the issue is to always use the service that is embedded with quality.
If you like this article then it is requested to comment and share it on social media. It will not only help others but will also let them have knowledgeable ideas.
Richard Bennett
Richard Bennett is a writer and a lover of all things video.
Follow @Richard Bennett
The Pathway to Creating High-Quality YouTube Ads on a Dime
How to Create Video Ads for Free in YouTube Video Builder
Richard Bennett
Mar 27, 2024• Proven solutions
Many people find it challenging to create compelling video advertisements for their brand promotions. While some of the creative tools might be expensive, the easy ones have a steep learning curve, and engaging a professional designer wouldn’t be something you might be ready for. YouTube Video Builder is a great solution for any such situation.
With that being said, the following sections talk about what YouTube Video Builder is, how is it useful, what advantages does it offer, and how can you create professional video adverts using the tool.
- Part 1: What Is YouTube Video Builder?
- Part 2: How Does YouTube Video Builder Work?
- Part 3: How to Get YouTube Video Builder?
- Part 4: How to Make Video Ads for Free with YouTube Video Builder?
- Part 5: Tips for Making Good Video Ads with YouTube Video Builder
Part 1: What Is YouTube Video Builder?
YouTube recently came up with an online tool, YouTube Video Builder, that, as the name suggests, enables you as an organization to prepare videos for free. These videos could be anywhere from 6 to 15 seconds long and are most appropriate for advertisements. Once created, the films can be used in the campaigns to promote your brand and/or products online.
However, you must keep the following few things handy before starting with YouTube Video Builder to prepare a video advertisement:
- Logo
You must have a good-quality photo of your brand logo that you want to add to the video as a watermark. This gives your organization online recognition.
- HD Images
At the time of this writing, YouTube Video Builder only allows you to add still images. The tool compiles these photos using a theme that you select, and enables you to add background music to make the advert more engaging. Therefore, it is imperative to have high-definition images of your product(s) that you want to create a promotional video for.
- Google Chrome Browser
You must have the latest version of the Google Chrome web browser installed on your computer.
- YouTube Channel
Because YouTube Video Builder will publish your video advertisements on YouTube itself, you must have your own YouTube Channel created , configured, and properly functioning so the posting process remains smooth and seamless.
- Availability of the Tool and Features
YouTube Video Builder is still in the Beta phase, and therefore you may not have access to all the features that the tool has to offer. However, this majorly depends on the region of your residence. As of now, the utility is not even available in some countries of the world.
Part 2: How Does YouTube Video Builder Work?
As explained earlier, YouTube Video Builder is an online tool that works on the latest version of the Google Chrome browser. The web interface of the utility has separate blocks (or placeholders if you want to call them) for different types of images. For instance, there is a placeholder for your logo, and a couple of other blank slots where you can import the photos from your computer.
There are some text input fields that you can populate with the relevant information such as the name of the video, the product’s name that you wish to promote, and many other things. There is a storyboard at the bottom of the interface that helps give your video a theme and the alignment of the ingredients that you have imported from your computer.
Finally, you can add background music to the video from the royalty-free tracks that can be accessed from the built-in library, and you are all set to go.
Part 3: How Can I Get YouTube Video Builder?
Because YouTube Video Builder is in its Beta phase, at the time of this writing you are required to send an access request to Google using your account that you want to use to create the videos from. You can send your requests to: https://services.google.com/fb/forms/videobuilderbeta/ .
Once your request is approved, you can then use the same Google account to sign in to the YouTube Video Builder portal, and start preparing your video advertisements. Here, it is important to understand that the Google account that you use to send an access request and prepare the videos must be the same ID that has your active and functional YouTube Channel.
Part 4: How to Make Video Ads for Free with YouTube Video Builder?
Once you have access to the Beta version of YouTube Video Builder, you can start creating the video ads for free. You can learn the process of how this can be done by following the simple instructions given below:
Step 1: Prepare a Console
After signing in to your YouTube Video Builder account, on the main interface, click Select Layout from the navigation bar at the right if not already selected, pick a layout that best suits your needs, and click Use Layout.

Next, from the Color & Logo section, choose the base (background) and text colors using their corresponding tools from under the Brand colors section.
![]()
After this, insert an image of your brand logo in the block under the Logos category.
![]()
Step 2: Add the Ingredients
When you are on the Images & Text section of the navigation bar, pick the high-definition photos from the Storyboard at the bottom, and add them to the Image 1, Image 2, and Image 3 boxes accordingly.

Now, scroll down to the Text section, and add the relevant content in the available text input fields. Make sure to add a compelling Call to action text to give the viewers a free passage to connect with you.

Step 3: Make Cosmetic Manipulations
From the Pick a Font section of the navigation bar, click the Google Fonts catalog link to search for a unique font, and once found, type its name in the available field to use that font.

Alternatively, you can leave the default one selected. When on the Select Music section, choose your preferred background music from the drop-down list that is present under the section.

Finally, click Create video, and wait while YouTube Video Builder takes you to the Preview, Save, Share section, and generates your video.

Step 4: Save the Video and Begin Promotion
After the video is generated, play to preview the film. If everything looks good, click Save video.

On the next page, click Copy to copy the video link, and share it with your friends, colleagues, and family members for their feedback.

Next, scroll down to get to the Create Campaign section of the navigation bar, and from the left screen, click Create campaign to begin a campaign to promote your brand and/or product(s).

Part 5: Tips for Making Good Video Ads with YouTube Video Builder
The whole point here is to prepare your video adverts with the least investment and almost no effort. The following few tips would help you achieve this with ease:
- Make sure to gather all the ingredients such as the photos of the products, brand logo, etc. before starting with the video creation process
- Set a layout, font, theme color, and background music that compliments the product(s) you wish to promote
- Remain consistent with the theme color, fonts, etc. throughout the video
- Make sure to include a catchy ‘Call for action’ text in your video ad
- Make as many modifications as you want before publishing the ad on your YouTube Channel. Avoid doing any amendments after the ad has been posted
- Share the link of your video with as many people as you possibly can to make your product(s) and brand visible and popular
- Make sure to use the ad in your campaigns to make people aware of your brand/product(s)
Conclusion
The bitter truth is, producing videos, especially for brand promotions requires expert creators, expensive tools, and a good amount of work experience. Although all these can be managed if you have some spare funds, YouTube Video Builder helps you create advertising videos of up to 15 seconds with ease and for free. All you need is access to YouTube Video Builder, your own YouTube Channel, your brand logo, and high-definition photos of your product(s).
Richard Bennett
Richard Bennett is a writer and a lover of all things video.
Follow @Richard Bennett
Richard Bennett
Mar 27, 2024• Proven solutions
Many people find it challenging to create compelling video advertisements for their brand promotions. While some of the creative tools might be expensive, the easy ones have a steep learning curve, and engaging a professional designer wouldn’t be something you might be ready for. YouTube Video Builder is a great solution for any such situation.
With that being said, the following sections talk about what YouTube Video Builder is, how is it useful, what advantages does it offer, and how can you create professional video adverts using the tool.
- Part 1: What Is YouTube Video Builder?
- Part 2: How Does YouTube Video Builder Work?
- Part 3: How to Get YouTube Video Builder?
- Part 4: How to Make Video Ads for Free with YouTube Video Builder?
- Part 5: Tips for Making Good Video Ads with YouTube Video Builder
Part 1: What Is YouTube Video Builder?
YouTube recently came up with an online tool, YouTube Video Builder, that, as the name suggests, enables you as an organization to prepare videos for free. These videos could be anywhere from 6 to 15 seconds long and are most appropriate for advertisements. Once created, the films can be used in the campaigns to promote your brand and/or products online.
However, you must keep the following few things handy before starting with YouTube Video Builder to prepare a video advertisement:
- Logo
You must have a good-quality photo of your brand logo that you want to add to the video as a watermark. This gives your organization online recognition.
- HD Images
At the time of this writing, YouTube Video Builder only allows you to add still images. The tool compiles these photos using a theme that you select, and enables you to add background music to make the advert more engaging. Therefore, it is imperative to have high-definition images of your product(s) that you want to create a promotional video for.
- Google Chrome Browser
You must have the latest version of the Google Chrome web browser installed on your computer.
- YouTube Channel
Because YouTube Video Builder will publish your video advertisements on YouTube itself, you must have your own YouTube Channel created , configured, and properly functioning so the posting process remains smooth and seamless.
- Availability of the Tool and Features
YouTube Video Builder is still in the Beta phase, and therefore you may not have access to all the features that the tool has to offer. However, this majorly depends on the region of your residence. As of now, the utility is not even available in some countries of the world.
Part 2: How Does YouTube Video Builder Work?
As explained earlier, YouTube Video Builder is an online tool that works on the latest version of the Google Chrome browser. The web interface of the utility has separate blocks (or placeholders if you want to call them) for different types of images. For instance, there is a placeholder for your logo, and a couple of other blank slots where you can import the photos from your computer.
There are some text input fields that you can populate with the relevant information such as the name of the video, the product’s name that you wish to promote, and many other things. There is a storyboard at the bottom of the interface that helps give your video a theme and the alignment of the ingredients that you have imported from your computer.
Finally, you can add background music to the video from the royalty-free tracks that can be accessed from the built-in library, and you are all set to go.
Part 3: How Can I Get YouTube Video Builder?
Because YouTube Video Builder is in its Beta phase, at the time of this writing you are required to send an access request to Google using your account that you want to use to create the videos from. You can send your requests to: https://services.google.com/fb/forms/videobuilderbeta/ .
Once your request is approved, you can then use the same Google account to sign in to the YouTube Video Builder portal, and start preparing your video advertisements. Here, it is important to understand that the Google account that you use to send an access request and prepare the videos must be the same ID that has your active and functional YouTube Channel.
Part 4: How to Make Video Ads for Free with YouTube Video Builder?
Once you have access to the Beta version of YouTube Video Builder, you can start creating the video ads for free. You can learn the process of how this can be done by following the simple instructions given below:
Step 1: Prepare a Console
After signing in to your YouTube Video Builder account, on the main interface, click Select Layout from the navigation bar at the right if not already selected, pick a layout that best suits your needs, and click Use Layout.
Next, from the Color & Logo section, choose the base (background) and text colors using their corresponding tools from under the Brand colors section.
![]()
After this, insert an image of your brand logo in the block under the Logos category.
![]()
Step 2: Add the Ingredients
When you are on the Images & Text section of the navigation bar, pick the high-definition photos from the Storyboard at the bottom, and add them to the Image 1, Image 2, and Image 3 boxes accordingly.
Now, scroll down to the Text section, and add the relevant content in the available text input fields. Make sure to add a compelling Call to action text to give the viewers a free passage to connect with you.
Step 3: Make Cosmetic Manipulations
From the Pick a Font section of the navigation bar, click the Google Fonts catalog link to search for a unique font, and once found, type its name in the available field to use that font.
Alternatively, you can leave the default one selected. When on the Select Music section, choose your preferred background music from the drop-down list that is present under the section.
Finally, click Create video, and wait while YouTube Video Builder takes you to the Preview, Save, Share section, and generates your video.
Step 4: Save the Video and Begin Promotion
After the video is generated, play to preview the film. If everything looks good, click Save video.
On the next page, click Copy to copy the video link, and share it with your friends, colleagues, and family members for their feedback.
Next, scroll down to get to the Create Campaign section of the navigation bar, and from the left screen, click Create campaign to begin a campaign to promote your brand and/or product(s).
Part 5: Tips for Making Good Video Ads with YouTube Video Builder
The whole point here is to prepare your video adverts with the least investment and almost no effort. The following few tips would help you achieve this with ease:
- Make sure to gather all the ingredients such as the photos of the products, brand logo, etc. before starting with the video creation process
- Set a layout, font, theme color, and background music that compliments the product(s) you wish to promote
- Remain consistent with the theme color, fonts, etc. throughout the video
- Make sure to include a catchy ‘Call for action’ text in your video ad
- Make as many modifications as you want before publishing the ad on your YouTube Channel. Avoid doing any amendments after the ad has been posted
- Share the link of your video with as many people as you possibly can to make your product(s) and brand visible and popular
- Make sure to use the ad in your campaigns to make people aware of your brand/product(s)
Conclusion
The bitter truth is, producing videos, especially for brand promotions requires expert creators, expensive tools, and a good amount of work experience. Although all these can be managed if you have some spare funds, YouTube Video Builder helps you create advertising videos of up to 15 seconds with ease and for free. All you need is access to YouTube Video Builder, your own YouTube Channel, your brand logo, and high-definition photos of your product(s).
Richard Bennett
Richard Bennett is a writer and a lover of all things video.
Follow @Richard Bennett
Also read:
- [Updated] Boost Your Buzz Factor with These 3 Dynamic Approaches to YouTube Video Reactions
- Ascending with ASMR Top Strategies for Video Creation
- [Updated] Can a Brief Subscribe Boost Your Content Viewing?
- In 2024, Essential Guide The Top 10 Inexpensive YouTube Channels for Visual Creators
- 2024 Approved A Journey Beyond Top 10 Global Explorer Channels
- [New] Discover Variety – 50 Complimentary YouTube Banners Available
- [New] Captivate Audiences Techniques for Livestreaming Video in Spherical Views on YouTube
- Efficient Guide Image Conversion to Professional YouTube Thumbnails for 2024
- In 2024, Amplify Views Effortlessly Discovering the Best 20 YouTube Techniques
- [Updated] Designing Distinctive Denouements
- Discover Your Rhythm Assembling Tailored YouTube Playlists for the Digital Age (Web/Mobile) for 2024
- In 2024, Enhancing Your YouTube Projects A Compreayer of Visual Improvement
- [Updated] Craft Your Story Aspect Ratios for Powerful YT Thumbnails
- Curate Your Learning Best 15 Science YT Experts for 2024
- In 2024, Breaking Down the Elements of a YouTube Shorts Template
- [Updated] Amplify Your Content, Increase Your Subs Quickly
- Blueprint Making Inspiring Lifestyle Broadcasts
- Top-Rated iOS/Android Apps for Crafting Perfect Youtube Shorts
- Bend Reality with Your Own Animated Craftsmanship
- In 2024, Building Buzz Strategies for Shaping Your Unique YouTubing Image
- Optimizing YouTube Audio Speed - Desktop & Mobile Way
- Earning Potential in Beauty Blogging for 2024
- Streamlining Ad Revenue for YouTube Channels Post-Monetization
- Are Influencer Marketing Tactics on YouTube Effective for Long-Term Success?
- Expert Techniques for Professionalizing Mobile-Based YouTube Thumbnails
- [New] Earnings Analysis YouTube Views vs Financial Gain
- Trend Titan Tags The List That Elevates Your YouTube Shorts to Fame
- 2024 Approved Boosting Subscriber Commitment Top Strategies for Keeping Viewers Coming Back on YouTube
- DIY Sports Highlights A Comprehensive Guide for 2024
- In 2024, Building a Thriving Unboxing Content Empire
- Bend the Light Homegrown Animated Innovations
- [New] Elevate Your Streaming Game From Twitch Viewers to YouTube Fans
- MP4 Conversion Guide for YouTube Shorts
- Exploring 8 YouTube Fitness Hacks That Energize Audiences
- [Updated] Elevate Your Content With These 20 Pro Video Shortcuts
- [Updated] Balancing Creativity and Monetization in YouTube Shorts
- [New] Channel Success Across Social Networks YouTube + More
- Behind Closed Doors of YouTube A Discovery Manual
- Craft a Memorable YouTube Channel Brand for More Viewers for 2024
- New 2024 Approved Final Cut Pro Essentials Creating Breathtaking Time Lapses
- In 2024, How to Check Distance and Radius on Google Maps For your OnePlus Nord CE 3 Lite 5G | Dr.fone
- [Updated] 2024 Approved A Comprehensive Tutorial Changing Gender in Social Media Images
- Planning to Use a Pokemon Go Joystick on Vivo V27? | Dr.fone
- [New] 2024 Approved X-Voice Sync Studio, Windows Version
- In 2024, RecordWin11 No-Fuss, Easy Screen Recorder for PCs
- Updated 2024 Approved Translate Videos and Subtitles with Veed.io
- [Updated] In 2024, Boosting Your Brand on Instagram Proven 5 Techniques & Success Stories
- New 2024 Approved 4 Detailed Steps to Flip a Clip in Final Cut Pro
- In 2024, Cooking Craze TikTok's Favorite Food Trends
- 2024 Approved Elevate Brand Recognition Optimizing Facebook with Keywords and Links
- MP4 2 MP3 Best MP4 to MP3 Converters for 2024
- Updated 2024 Approved Find the Suggestions for Sites that Are Alternatives to the Filmora Coupon Code Reddit. These Coupon Sites Offer Different Deals and Discounts
- [New] Affordable Mac Tools Editing Video Creations on TikTok
- Things You Dont Know About Oppo A58 4G Reset Code | Dr.fone
- New In 2024, Final Cut Pro Tutorial Fading In and Out of Audio Like a Pro
- Eliminating Echoes and Interference AI Strategies for Pristine Sound Quality for 2024
- In 2024, How Do I Stop Someone From Tracking My Realme C51? | Dr.fone
- 2024 Approved Unseen Aspects The Hidden Secrets of Instagram Stories Viewers
- In 2024, Chromebook's Voice Alteration Guide The Leading Online Text-to-Speech Apps
- What are Location Permissions Life360 On Vivo Y36? | Dr.fone
- [Updated] Prime 5 Replacements for Twitter Users
- [Updated] Tweeting Tunes Converting Videos Into Melodic GIFs
- Tweeting & Tumbling Sharing Videos Seamlessly for 2024
- Exploring 8 Top-Tier Free Video Communication Tools for Enterprises for 2024
- [New] In 2024, Unlocking the Potential of Recording Google Voice Calls
- Title: "Free Yourself with Top 4 Applications for YouTube-to-WAV Conversion"
- Author: Kevin
- Created at : 2024-05-25 15:15:28
- Updated at : 2024-05-26 15:15:28
- Link: https://youtube-videos.techidaily.com/free-yourself-with-top-4-applications-for-youtube-to-wav-conversion/
- License: This work is licensed under CC BY-NC-SA 4.0.
