"FinalCut Pro Tutorials for Top-Tier YouTube Video Editing"

FinalCut Pro Tutorials for Top-Tier YouTube Video Editing
How to Edit YouTube Videos in Final Cut Pro

Richard Bennett
Mar 27, 2024• Proven solutions
With its user friendly interface and versatile features, Fincal Cut Pro is definitely one of the best choices for making videos for Mac users. Using it isn’t that hard, but it’s definitely not a walk in the park, so we’ve taken the liberty to provide you with a comprehensive yet concise guide on how to edit YouTube videos with Final Cut Pro.
Even though FCP is good software, there’s no denying that it’s pretty pricy and a little bit complicated for most beginners. Wondershare Filmora for Mac is definitely better alternatives for Final Cut Pro. It’s a lot more user-friendly and requires no previous experience in video editing. With Wondershare Filmora, you can ignite your YouTube videos with over 300 effects like Fashion, Beauty, Block Buster, Travel, etc.
How to Edit YouTube Videos in Final Cut Pro
In this section, we are going to take a quick look at the steps that you need to take in order to properly edit YouTube videos in Final Cut Pro. Without any further ado, let’s take a look.
Step 1: Importing the video clip into FCP
This is, of course, the first thing that you need to do. Regardless of whether the original footage was taken by your smart phone, taken from the Internet or you’ve left it over from some past event that’s long overdue, you can easily import it into the FCP in order to edit it. FCP supports a variety of different formats, so it’s a good idea to try and import the video even if you are not quite sure about its extension. In order to do so, open the program, go to the File button, click on Import and select the file or the folder. This is going to get you to a regular finder window which would enable you to pick the clip that you want to do. If it’s not highlighted or you aren’t able to select it, the software doesn’t support it, and it’s not compatible.
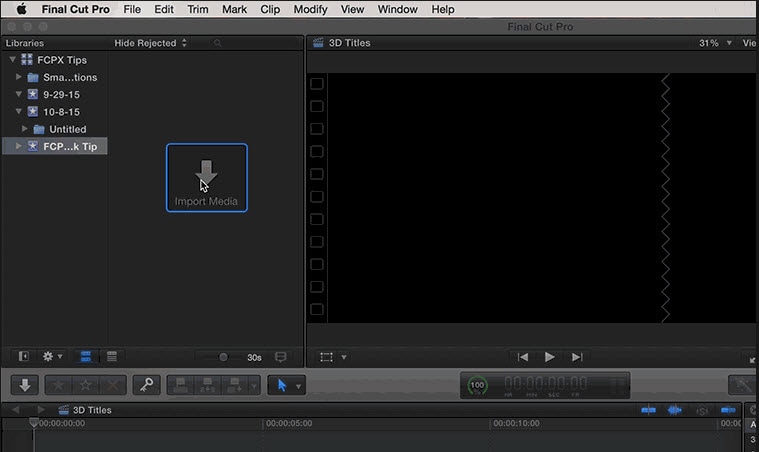
Keep in mind that if you want to import videos which have been published already, you can download them directly from the channel as MP4 files. If you want to store videos from different channels, you can use the Wondershare Video Converter Ultimate in order to get them converted and stored on your computer in a format that is supported by FCP.
Step 2: Edit YouTube Videos in Final Cut Pro
That’s the fun part. There are a few things that you can do with Final Cut Pro, and they are all quite professional.
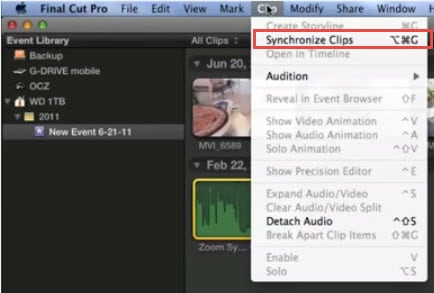
- First, you can sync an audio track with your video as the DSLR cameras usually have terrible quality of the sound. This is why you want to get the audio recorded separately. The only thing you need to do is select the audio clip and click on the Synchronize Clips, and you are good to go.
- Furthermore, you can do proper color balancing with the program quickly and incredibly easy. Go on Modify and then click on Balance Color and the software is going to take care of the rest on its own.

- You can also create previews when the video ends. In order to do so, you need to import your main clip, select a solid background color and place the preview video above it. You will then be able to trim and edit it conveniently. Adjust the scale and the position and you are good to go. Afterwards, you can also apply annotation on top of the preview.
Step 3: Upload to YouTube from the software directly
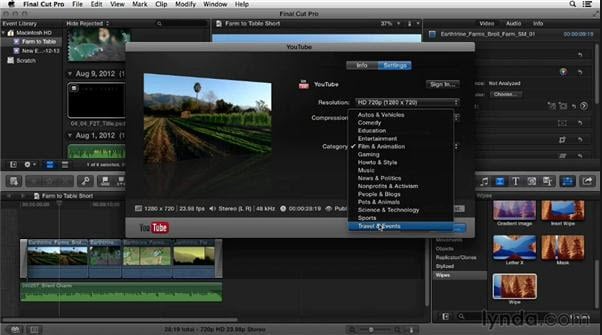
This one is rather easy. Here is the sequence that you need to do. Go to File -> Share -> Master File -> Setting -> File -> Share -> YouTube. That’s basically it. Then you need to sign in to your YouTube account and simply click on Next -> Publish and the entire thing is done. That’s all you need to do in order to quickly and conveniently upload your video to YouTube directly from the FCP.
Check this video tutorial to see how YouTube creators edit their YouTubes videos with Final Cut Pro

Richard Bennett
Richard Bennett is a writer and a lover of all things video.
Follow @Richard Bennett
Richard Bennett
Mar 27, 2024• Proven solutions
With its user friendly interface and versatile features, Fincal Cut Pro is definitely one of the best choices for making videos for Mac users. Using it isn’t that hard, but it’s definitely not a walk in the park, so we’ve taken the liberty to provide you with a comprehensive yet concise guide on how to edit YouTube videos with Final Cut Pro.
Even though FCP is good software, there’s no denying that it’s pretty pricy and a little bit complicated for most beginners. Wondershare Filmora for Mac is definitely better alternatives for Final Cut Pro. It’s a lot more user-friendly and requires no previous experience in video editing. With Wondershare Filmora, you can ignite your YouTube videos with over 300 effects like Fashion, Beauty, Block Buster, Travel, etc.
How to Edit YouTube Videos in Final Cut Pro
In this section, we are going to take a quick look at the steps that you need to take in order to properly edit YouTube videos in Final Cut Pro. Without any further ado, let’s take a look.
Step 1: Importing the video clip into FCP
This is, of course, the first thing that you need to do. Regardless of whether the original footage was taken by your smart phone, taken from the Internet or you’ve left it over from some past event that’s long overdue, you can easily import it into the FCP in order to edit it. FCP supports a variety of different formats, so it’s a good idea to try and import the video even if you are not quite sure about its extension. In order to do so, open the program, go to the File button, click on Import and select the file or the folder. This is going to get you to a regular finder window which would enable you to pick the clip that you want to do. If it’s not highlighted or you aren’t able to select it, the software doesn’t support it, and it’s not compatible.

Keep in mind that if you want to import videos which have been published already, you can download them directly from the channel as MP4 files. If you want to store videos from different channels, you can use the Wondershare Video Converter Ultimate in order to get them converted and stored on your computer in a format that is supported by FCP.
Step 2: Edit YouTube Videos in Final Cut Pro
That’s the fun part. There are a few things that you can do with Final Cut Pro, and they are all quite professional.
- First, you can sync an audio track with your video as the DSLR cameras usually have terrible quality of the sound. This is why you want to get the audio recorded separately. The only thing you need to do is select the audio clip and click on the Synchronize Clips, and you are good to go.

- Furthermore, you can do proper color balancing with the program quickly and incredibly easy. Go on Modify and then click on Balance Color and the software is going to take care of the rest on its own.

- You can also create previews when the video ends. In order to do so, you need to import your main clip, select a solid background color and place the preview video above it. You will then be able to trim and edit it conveniently. Adjust the scale and the position and you are good to go. Afterwards, you can also apply annotation on top of the preview.
Step 3: Upload to YouTube from the software directly

This one is rather easy. Here is the sequence that you need to do. Go to File -> Share -> Master File -> Setting -> File -> Share -> YouTube. That’s basically it. Then you need to sign in to your YouTube account and simply click on Next -> Publish and the entire thing is done. That’s all you need to do in order to quickly and conveniently upload your video to YouTube directly from the FCP.
Check this video tutorial to see how YouTube creators edit their YouTubes videos with Final Cut Pro

Richard Bennett
Richard Bennett is a writer and a lover of all things video.
Follow @Richard Bennett
Richard Bennett
Mar 27, 2024• Proven solutions
With its user friendly interface and versatile features, Fincal Cut Pro is definitely one of the best choices for making videos for Mac users. Using it isn’t that hard, but it’s definitely not a walk in the park, so we’ve taken the liberty to provide you with a comprehensive yet concise guide on how to edit YouTube videos with Final Cut Pro.
Even though FCP is good software, there’s no denying that it’s pretty pricy and a little bit complicated for most beginners. Wondershare Filmora for Mac is definitely better alternatives for Final Cut Pro. It’s a lot more user-friendly and requires no previous experience in video editing. With Wondershare Filmora, you can ignite your YouTube videos with over 300 effects like Fashion, Beauty, Block Buster, Travel, etc.
How to Edit YouTube Videos in Final Cut Pro
In this section, we are going to take a quick look at the steps that you need to take in order to properly edit YouTube videos in Final Cut Pro. Without any further ado, let’s take a look.
Step 1: Importing the video clip into FCP
This is, of course, the first thing that you need to do. Regardless of whether the original footage was taken by your smart phone, taken from the Internet or you’ve left it over from some past event that’s long overdue, you can easily import it into the FCP in order to edit it. FCP supports a variety of different formats, so it’s a good idea to try and import the video even if you are not quite sure about its extension. In order to do so, open the program, go to the File button, click on Import and select the file or the folder. This is going to get you to a regular finder window which would enable you to pick the clip that you want to do. If it’s not highlighted or you aren’t able to select it, the software doesn’t support it, and it’s not compatible.

Keep in mind that if you want to import videos which have been published already, you can download them directly from the channel as MP4 files. If you want to store videos from different channels, you can use the Wondershare Video Converter Ultimate in order to get them converted and stored on your computer in a format that is supported by FCP.
Step 2: Edit YouTube Videos in Final Cut Pro
That’s the fun part. There are a few things that you can do with Final Cut Pro, and they are all quite professional.
- First, you can sync an audio track with your video as the DSLR cameras usually have terrible quality of the sound. This is why you want to get the audio recorded separately. The only thing you need to do is select the audio clip and click on the Synchronize Clips, and you are good to go.

- Furthermore, you can do proper color balancing with the program quickly and incredibly easy. Go on Modify and then click on Balance Color and the software is going to take care of the rest on its own.

- You can also create previews when the video ends. In order to do so, you need to import your main clip, select a solid background color and place the preview video above it. You will then be able to trim and edit it conveniently. Adjust the scale and the position and you are good to go. Afterwards, you can also apply annotation on top of the preview.
Step 3: Upload to YouTube from the software directly

This one is rather easy. Here is the sequence that you need to do. Go to File -> Share -> Master File -> Setting -> File -> Share -> YouTube. That’s basically it. Then you need to sign in to your YouTube account and simply click on Next -> Publish and the entire thing is done. That’s all you need to do in order to quickly and conveniently upload your video to YouTube directly from the FCP.
Check this video tutorial to see how YouTube creators edit their YouTubes videos with Final Cut Pro

Richard Bennett
Richard Bennett is a writer and a lover of all things video.
Follow @Richard Bennett
Richard Bennett
Mar 27, 2024• Proven solutions
With its user friendly interface and versatile features, Fincal Cut Pro is definitely one of the best choices for making videos for Mac users. Using it isn’t that hard, but it’s definitely not a walk in the park, so we’ve taken the liberty to provide you with a comprehensive yet concise guide on how to edit YouTube videos with Final Cut Pro.
Even though FCP is good software, there’s no denying that it’s pretty pricy and a little bit complicated for most beginners. Wondershare Filmora for Mac is definitely better alternatives for Final Cut Pro. It’s a lot more user-friendly and requires no previous experience in video editing. With Wondershare Filmora, you can ignite your YouTube videos with over 300 effects like Fashion, Beauty, Block Buster, Travel, etc.
How to Edit YouTube Videos in Final Cut Pro
In this section, we are going to take a quick look at the steps that you need to take in order to properly edit YouTube videos in Final Cut Pro. Without any further ado, let’s take a look.
Step 1: Importing the video clip into FCP
This is, of course, the first thing that you need to do. Regardless of whether the original footage was taken by your smart phone, taken from the Internet or you’ve left it over from some past event that’s long overdue, you can easily import it into the FCP in order to edit it. FCP supports a variety of different formats, so it’s a good idea to try and import the video even if you are not quite sure about its extension. In order to do so, open the program, go to the File button, click on Import and select the file or the folder. This is going to get you to a regular finder window which would enable you to pick the clip that you want to do. If it’s not highlighted or you aren’t able to select it, the software doesn’t support it, and it’s not compatible.

Keep in mind that if you want to import videos which have been published already, you can download them directly from the channel as MP4 files. If you want to store videos from different channels, you can use the Wondershare Video Converter Ultimate in order to get them converted and stored on your computer in a format that is supported by FCP.
Step 2: Edit YouTube Videos in Final Cut Pro
That’s the fun part. There are a few things that you can do with Final Cut Pro, and they are all quite professional.
- First, you can sync an audio track with your video as the DSLR cameras usually have terrible quality of the sound. This is why you want to get the audio recorded separately. The only thing you need to do is select the audio clip and click on the Synchronize Clips, and you are good to go.

- Furthermore, you can do proper color balancing with the program quickly and incredibly easy. Go on Modify and then click on Balance Color and the software is going to take care of the rest on its own.

- You can also create previews when the video ends. In order to do so, you need to import your main clip, select a solid background color and place the preview video above it. You will then be able to trim and edit it conveniently. Adjust the scale and the position and you are good to go. Afterwards, you can also apply annotation on top of the preview.
Step 3: Upload to YouTube from the software directly

This one is rather easy. Here is the sequence that you need to do. Go to File -> Share -> Master File -> Setting -> File -> Share -> YouTube. That’s basically it. Then you need to sign in to your YouTube account and simply click on Next -> Publish and the entire thing is done. That’s all you need to do in order to quickly and conveniently upload your video to YouTube directly from the FCP.
Check this video tutorial to see how YouTube creators edit their YouTubes videos with Final Cut Pro

Richard Bennett
Richard Bennett is a writer and a lover of all things video.
Follow @Richard Bennett
Efficiently Add YouTube Playlists to Your Website Interface
YouTube is an excellent resource for entertainment, education, and general information, but did you know you can also display a YouTube playlist on your website?
Embedding a YouTube playlist will allow you to showcase a collection of videos on a topic or theme on your website. It’s also a great way to keep your visitors engaged on your site for more extended periods.
To help you with the process, we’ll explore different step-by-step methods to embed a YouTube playlist on a website to add interactivity to your site.
So, if you’re ready to get started, read on!
How To Embed a YouTube Playlist on a Website
If you want to embed and display a YouTube playlist on your website, we’ll give you a complete rundown of the three methods you can try to get this done. But, of course, each method has its pros and cons, so you’ll need to decide which is right for you.
Here’s how to embed a YouTube playlist on a Website:
Embedding a YouTube Playlist on Website Using WordPress Plugin
The plugin is the simplest way to add a YouTube Playlist to your WordPress website. This will help you get this done in no time without having to write any code for the process.
With plugins like YouTube Feed Pro by Smash Balloon , you can extend your website’s functionality and create, customize, or embed a YouTube playlist with just a few clicks of a mouse.
To embed and add a YouTube playlist on your website page/post, do the following steps in sequence:
Step1 Launch a browser on your PC and head to your WordPress website’s login page. Sign in to your dashboard using your username and password.
Step2 Click the “Plugins” option from the left-hand side menu on the WordPress dashboard. Now, click “Add New” and use the search option to find and install the YouTube Feed Pro plugin. Afterward, click the “Activate” option to enable the plugin.
Step3 Click the “YouTube Feed” option from the left menu and open “All Feeds.” On the next page, click “Add New” at the top left of the screen.

You will now be asked what type of feed you want to create. Select “Playlist” and click “Next.”

Step4 You need to create your YouTube API Key , copy it, and paste it into the pop-up. Click “Add” to connect your YouTube account to the plugin.
Step5 Select the Playlist you want to display on your WordPress website and take its ID. Paste that in the next pop-up window and click “Next” to continue the process.

Your YouTube playlist will be connected to your WordPress website. To further customize it, select the template you want and click “Next.” You can also configure the Feed Layout and Color Scheme.

Step6 Once you are done with customization, click the “Embed” option on the top-right side of the screen, and a pop-up window will appear. Next, click “Add to a Page,” and a list of pages on your website will be displayed.
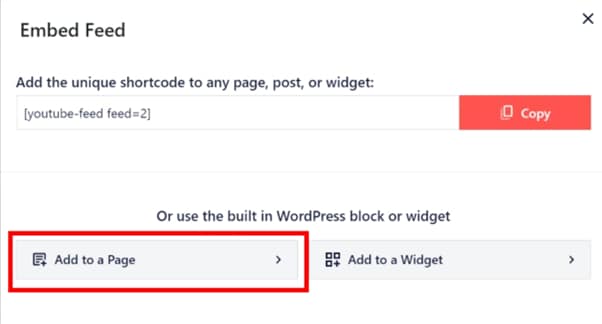
Choose your page and click “Add” at the bottom of the pop-up window. You’ll be directed to a new page where you can embed the feed. Click the “Plus” icon at the top-left of the screen, search for YouTube Feed and choose the Feeds for YouTube block to embed and add your playlist.
That’s about it! You’ve successfully embedded a YouTube playlist on your WordPress website.
Embedding a YouTube Playlist on a Website Using oEmbed Code
Another method to embed a YouTube playlist on your WordPress website is to use oEmbed Code. This method requires basic CSS, HTML, or Java knowledge; otherwise, you won’t be able to customize your playlist.
Moreover, this method is too complicated for beginners, and you will miss the customer support provided by WordPress plugin developers in case of any mishaps.
To use the oEmbed Code method, do the following steps:
Step1 In the first step, head to your YouTube account and access the Playlist you want to embed. Next, click the three dots below it and copy its URL.
Step2 Now, login to your WordPress dashboard and open the post or page editor where you want to add the playlist.
Step3 Paste the URL directly in the editor and click “Update” to save the changes.
WordPress will grab your playlist from YouTube and automatically show it in your post using oEmbed. The outcome is a single video with a menu that your viewers can click to see other videos in the playlist.

