
:max_bytes(150000):strip_icc()/GorillaArmor-6d65059c5c99453d85e9a960592adb9a.jpeg)
"Fast-Paced Artistry Expert Valorant Thumbnails in a Blink"
Fast-Paced Artistry: Expert Valorant Thumbnails in a Blink
As a content creator on YouTube, you know how important it is to have a strong thumbnail that stands out from the competition. Not only does a thumbnail help attract viewers to your video, but it’s also the first thing people see when they come across your content on the platform. That’s why it’s crucial to put effort into designing an eye-catching thumbnail that accurately represents your video.
When creating a thumbnail for your Valorant video, it’s important to remember that the recommended size is 1280 x 720 pixels. This will ensure that your thumbnail looks clear and professional on all devices. In addition to size, it’s also essential to consider the composition of your thumbnail. In this article, we’ll provide tips and tricks for creating professional Valorant thumbnails that will help boost your views and engagement.

What Is Valorant?
Valorant is a free-to-play tactical first-person shooter video game developed and published by Riot Games. The game was released in June 2020 and has quickly gained popularity due to its high-stakes, team-based gameplay and unique characters.
In Valorant, players choose from a roster of agents, each with their abilities and playstyle, and compete in 5v5 objective-based matches. The game has a variety of game modes, including the popular “Spike Rush” mode, which features a shorter round time and special abilities for all players. Valorant is available on Microsoft Windows and will soon be available on other platforms.

Why Create Thumbnails for Your Valorant YouTube Videos?
Creating a thumbnail for your Valorant YouTube video is an important step in the video creation process. A thumbnail is a visual representation of your video and can help attract viewers to your content.
When someone comes across your video in their feed, the thumbnail is often the first thing they see, so it’s crucial to make it as eye-catching and compelling as possible. A strong thumbnail can help increase your views and engagement and establish your brand as a content creator. By putting effort into designing a professional and relevant thumbnail, you can set your video apart from the competition and entice viewers to click and watch.
How To Make a Valorant Thumbnail for Free?
If you want to create a Valorant thumbnail for your YouTube videos but don’t want to spend any money, you still have plenty of options. One way to create a thumbnail for free is by using a free online design tool or thumbnail maker. Or, you can try Wondershare Filmora .
Free Download For Win 7 or later(64-bit)
Free Download For macOS 10.14 or later
Not only is Filmora a powerful video editing software, and it has a range of features and tools that make it easy to design and create custom thumbnails. Even better, you can use the trial version of Filmora to create a thumbnail for free. You need to download the trial version and start experimenting with the various design tools and templates to create a thumbnail that reflects your style and brand.
Creating a Valorant thumbnail for YouTube using Filmora can be very easy. Just follow these steps:
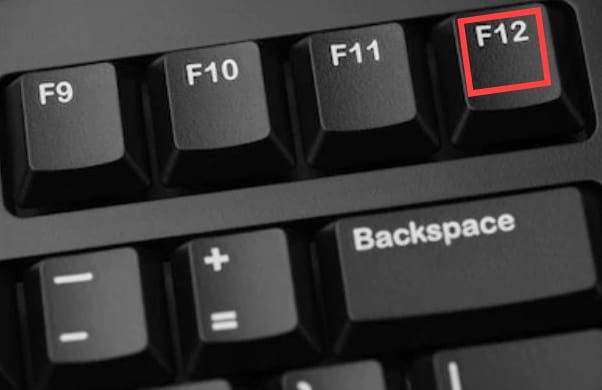
Step1 Take a screenshot of your gameplay by pressing the “F12“ key on your keyboard while in the game. This will save the screenshot to your computer.
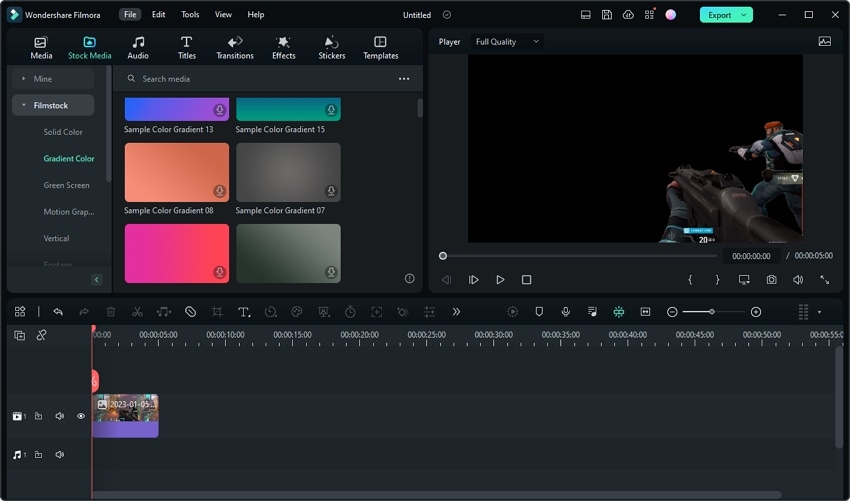
Step2 Launch Filmora and create a new project.

Step3 Import the screenshot into the media library by clicking the “Import“ button.

Step4 Drag the screenshot from the media library into the timeline.

Step5 Use the “Smart Cutout“ feature to select and cut out specific elements from the screenshot.

Step6 Choose the elements of the screenshot that you want to keep.

Step7 Remove any parts of the screenshot that you do not want to include in the thumbnail.

Step8 Extract the selected elements from the screenshot. You can resize the elements as desired.
Step9 Add a background to the track below the screenshot by dragging a background image from the media library into the timeline. Alternatively, you can import your image as a background by clicking the “Import“ button and selecting the image file from your computer.

Step10 Add an effect, such as a gun effect, by searching for the desired effect in the “Effects“ tab and dragging it into the timeline.

Step11 Adjust the opacity of the effect as desired.

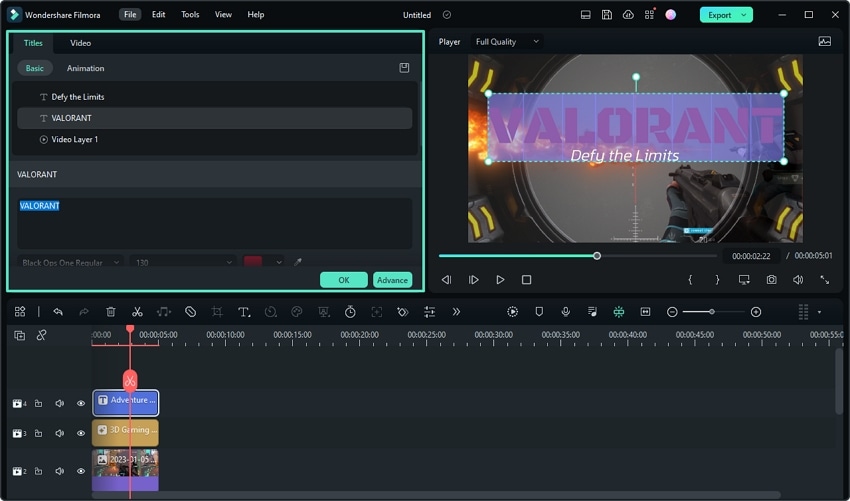
Step12 Add some titles and texts for your thumbnail.

Step13 Customize the appearance and rotation of the fire effect as desired.
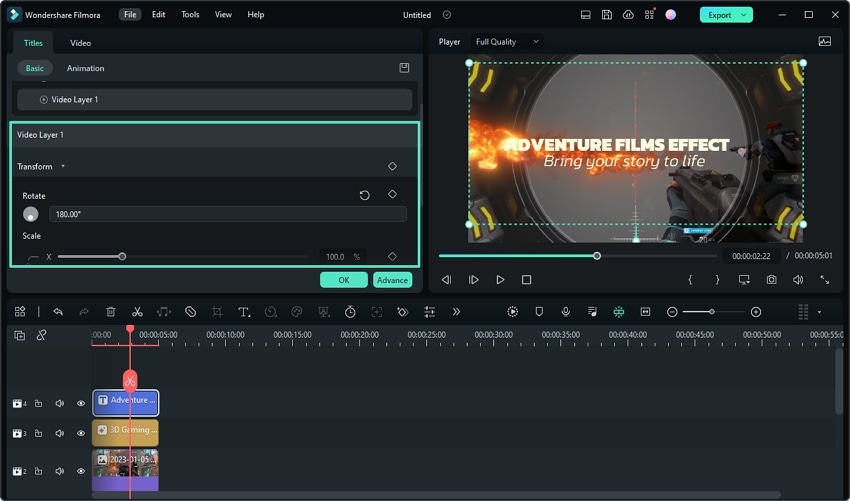
Step14 Edit the texts and adjust the appearance of the texts in the Titles window.
Step15 Choose a still frame that you like and take a snapshot of it.

Step16 Select the snapshot format and storage path. The snapshot will appear in the media library.

Step17 Right-click on the snapshot and select “Reveal in Explorer“ to find the file on your computer. You can now use it as your Valorant thumbnail.

Please note that while using the trial version of Filmora, a watermark will be added to the exported video. However, the watermark will not be added to the snapshot, so you can use the snapshot as your Valorant thumbnail without any issues.

Tips for Making Awesome Thumbnails for Your YouTube Valorant Videos
By following these tips, you can create an eye-catching and effective thumbnail for your Valorant YouTube videos that will help boost your views and engagement.
- Use high-quality images and graphics: A thumbnail with low-quality or pixelated images will not be as effective as a thumbnail with clear, high-resolution graphics.
- Use bold, eye-catching colors: Bright colors can help your thumbnail stand out in a crowded feed.
- Include relevant text: Use text to give viewers an idea of what to expect from your video and to entice them to click.
- Use clear, legible fonts: Make sure the text on your thumbnail is easy to read and doesn’t distract from the overall design.
- Keep it simple: Avoid overcrowding your thumbnail with too many elements or text. A clean, simple design is often more effective.
- Make it relevant: Your thumbnail should accurately represent the content of your video.
- Test different designs: Be bold and experiment with design elements and layouts to find what works best for your brand.
Want To Be a Valorant YouTuber? Learn From These 5 Ones
If you’re interested in becoming a Valorant YouTuber, there are many successful content creators in the Valorant community whom you can learn from. Here are five Valorant YouTubers that are worth checking out:
1. Shroud – Well-Known Valorant YouTuber With 6.8M Subscribers
Shroud is a well-known and respected content creator and player in the Valorant community. He has a strong background in professional CS:GO and has continued to thrive in the competitive Valorant scene despite being older than many other eSports players.
He is known for his gameplay videos and relaxed, easygoing personality, contributing to his widespread popularity and admiration among fans. In addition to his professional gameplay, Shroud is highly skilled and continues to compete at a high level, further solidifying his reputation as a top Valorant player.

2. TenZ – Popular Valorant Player With 1.6M Subscribers
TenZ is a highly skilled and popular Valorant player and content creator known for his exceptional ability in the game. He has achieved a high level of success and has been recognized as one of the best Valorant players in the world.
In addition to his full matches and 1v1 videos, TenZ also produces educational content, providing tips and tricks to his viewers. Despite facing some challenges and setbacks, TenZ has remained a prominent figure in the Valorant community and continues to be highly respected for his skills and contributions.

3. n0ted – Prolific Valorant YouTuber With 614k Subscribers
n0ted is a dedicated and prolific Valorant content creator, consistently uploading new videos to his YouTube channel daily. He offers a wide range of content, including gameplay highlights, funny moments, helpful tips, and updates on the latest happenings in the Valorant community.
His channel is a reliable source for those looking for consistently fresh and diverse Valorant content on YouTube. Whether you’re interested in learning new strategies, having a few laughs, or staying up to date with the latest developments in the game, n0ted’s channel has something for everyone.

4. Hiko - Valorant Content Creator With 382k YouTube Subscrbers
Hiko is a well-known Valorant content creator and former player of Counter-Strike: Global Offensive (CS:GO). He is known for his skill in first-person shooter games and his expertise in Valorant, which he shares through tips and gameplay videos on his channels on Twitch and YouTube.
Hiko is currently a content creator for 100 Thieves, a gaming organization he represents in various tournaments and competitions. He is a reliable source of high-quality Valorant content and regularly uploads new videos for his followers.

5. C9 meL – Professional Valorant Player With 33.6K YouTube Subscribers
C9 meL is a highly respected professional Valorant player and leader of the team Cloud 9 White. She is known for her sense of humor, helpful tips, and Agent tutorials and montages. As the in-game leader for her team, MeL has developed exceptional game sense and strategic skills, making her a valuable teacher and resource for other players.
In addition to her instructional content, MeL’s videos often feature a mix of comedy and skill, making them enjoyable for entertainment and improvement purposes. Overall, MeL is a talented and well-respected member of the Valorant community.

Conclusion
Creating a Valorant thumbnail for your YouTube videos can be important for promoting and attracting views to your content. Using Filmora, you can easily create a thumbnail for free by following the steps outlined in this article.
Additionally, there are many successful Valorant YouTubers who offer a range of content and can serve as inspiration for those interested in starting their channel. Creating visually appealing and engaging thumbnails ensures that your videos stand out and draw in viewers.
Free Download For macOS 10.14 or later
Not only is Filmora a powerful video editing software, and it has a range of features and tools that make it easy to design and create custom thumbnails. Even better, you can use the trial version of Filmora to create a thumbnail for free. You need to download the trial version and start experimenting with the various design tools and templates to create a thumbnail that reflects your style and brand.
Creating a Valorant thumbnail for YouTube using Filmora can be very easy. Just follow these steps:
Step1 Take a screenshot of your gameplay by pressing the “F12“ key on your keyboard while in the game. This will save the screenshot to your computer.
Step2 Launch Filmora and create a new project.
Step3 Import the screenshot into the media library by clicking the “Import“ button.
Step4 Drag the screenshot from the media library into the timeline.
Step5 Use the “Smart Cutout“ feature to select and cut out specific elements from the screenshot.
Step6 Choose the elements of the screenshot that you want to keep.
Step7 Remove any parts of the screenshot that you do not want to include in the thumbnail.
Step8 Extract the selected elements from the screenshot. You can resize the elements as desired.
Step9 Add a background to the track below the screenshot by dragging a background image from the media library into the timeline. Alternatively, you can import your image as a background by clicking the “Import“ button and selecting the image file from your computer.
Step10 Add an effect, such as a gun effect, by searching for the desired effect in the “Effects“ tab and dragging it into the timeline.
Step11 Adjust the opacity of the effect as desired.
Step12 Add some titles and texts for your thumbnail.
Step13 Customize the appearance and rotation of the fire effect as desired.
Step14 Edit the texts and adjust the appearance of the texts in the Titles window.
Step15 Choose a still frame that you like and take a snapshot of it.
Step16 Select the snapshot format and storage path. The snapshot will appear in the media library.
Step17 Right-click on the snapshot and select “Reveal in Explorer“ to find the file on your computer. You can now use it as your Valorant thumbnail.
Please note that while using the trial version of Filmora, a watermark will be added to the exported video. However, the watermark will not be added to the snapshot, so you can use the snapshot as your Valorant thumbnail without any issues.
Tips for Making Awesome Thumbnails for Your YouTube Valorant Videos
By following these tips, you can create an eye-catching and effective thumbnail for your Valorant YouTube videos that will help boost your views and engagement.
- Use high-quality images and graphics: A thumbnail with low-quality or pixelated images will not be as effective as a thumbnail with clear, high-resolution graphics.
- Use bold, eye-catching colors: Bright colors can help your thumbnail stand out in a crowded feed.
- Include relevant text: Use text to give viewers an idea of what to expect from your video and to entice them to click.
- Use clear, legible fonts: Make sure the text on your thumbnail is easy to read and doesn’t distract from the overall design.
- Keep it simple: Avoid overcrowding your thumbnail with too many elements or text. A clean, simple design is often more effective.
- Make it relevant: Your thumbnail should accurately represent the content of your video.
- Test different designs: Be bold and experiment with design elements and layouts to find what works best for your brand.
Want To Be a Valorant YouTuber? Learn From These 5 Ones
If you’re interested in becoming a Valorant YouTuber, there are many successful content creators in the Valorant community whom you can learn from. Here are five Valorant YouTubers that are worth checking out:
1. Shroud – Well-Known Valorant YouTuber With 6.8M Subscribers
Shroud is a well-known and respected content creator and player in the Valorant community. He has a strong background in professional CS:GO and has continued to thrive in the competitive Valorant scene despite being older than many other eSports players.
He is known for his gameplay videos and relaxed, easygoing personality, contributing to his widespread popularity and admiration among fans. In addition to his professional gameplay, Shroud is highly skilled and continues to compete at a high level, further solidifying his reputation as a top Valorant player.
2. TenZ – Popular Valorant Player With 1.6M Subscribers
TenZ is a highly skilled and popular Valorant player and content creator known for his exceptional ability in the game. He has achieved a high level of success and has been recognized as one of the best Valorant players in the world.
In addition to his full matches and 1v1 videos, TenZ also produces educational content, providing tips and tricks to his viewers. Despite facing some challenges and setbacks, TenZ has remained a prominent figure in the Valorant community and continues to be highly respected for his skills and contributions.
3. n0ted – Prolific Valorant YouTuber With 614k Subscribers
n0ted is a dedicated and prolific Valorant content creator, consistently uploading new videos to his YouTube channel daily. He offers a wide range of content, including gameplay highlights, funny moments, helpful tips, and updates on the latest happenings in the Valorant community.
His channel is a reliable source for those looking for consistently fresh and diverse Valorant content on YouTube. Whether you’re interested in learning new strategies, having a few laughs, or staying up to date with the latest developments in the game, n0ted’s channel has something for everyone.
4. Hiko - Valorant Content Creator With 382k YouTube Subscrbers
Hiko is a well-known Valorant content creator and former player of Counter-Strike: Global Offensive (CS:GO). He is known for his skill in first-person shooter games and his expertise in Valorant, which he shares through tips and gameplay videos on his channels on Twitch and YouTube.
Hiko is currently a content creator for 100 Thieves, a gaming organization he represents in various tournaments and competitions. He is a reliable source of high-quality Valorant content and regularly uploads new videos for his followers.
5. C9 meL – Professional Valorant Player With 33.6K YouTube Subscribers
C9 meL is a highly respected professional Valorant player and leader of the team Cloud 9 White. She is known for her sense of humor, helpful tips, and Agent tutorials and montages. As the in-game leader for her team, MeL has developed exceptional game sense and strategic skills, making her a valuable teacher and resource for other players.
In addition to her instructional content, MeL’s videos often feature a mix of comedy and skill, making them enjoyable for entertainment and improvement purposes. Overall, MeL is a talented and well-respected member of the Valorant community.
Conclusion
Creating a Valorant thumbnail for your YouTube videos can be important for promoting and attracting views to your content. Using Filmora, you can easily create a thumbnail for free by following the steps outlined in this article.
Additionally, there are many successful Valorant YouTubers who offer a range of content and can serve as inspiration for those interested in starting their channel. Creating visually appealing and engaging thumbnails ensures that your videos stand out and draw in viewers.
Unleash Your Social Media Potential with Twitch/YouTube Conversion
Create High-Quality Video - Wondershare Filmora
An easy and powerful YouTube video editor
Numerous video and audio effects to choose from
Detailed tutorials provided by the official channel
Amidst many online applications is Twitch. This live streaming platform takes your experience to another level. You can use it to make crafts, play games, attract broadcasters, and many more. Twitch was launched in 2011, and since then, it has attracted millions of users, managing a database of about 4 million broadcasters by early 2020. With it, users can stream their activities as others watch in real-time. Just browse a category to find a stream.
You can also follow streamers that you like on the platform and get updates and notifications immediately after they are posted. But how do you start a career on a platform like Twitch? You need to broadcast and gather a large following. You can use built-in audiences from other platforms like Facebook. Let’s dive into the core of the matter and look at how to upload Twitch streams to YouTube and build your platform.

In this article
02 What is the benefit of uploading your Twitch Streams to YouTube
03 How to upload your Twitch Streams to YouTube
What is Twitch VOD?
Twitch Video on Demand (VOD) is a recording of previously streamed content. It provides briefings if you missed catching the Twitch live stream. Just watch the VOD from your favorite streamer and be engaged the best way possible. However, VODs don’t last forever. They are removed after two weeks of broadcast. But streamers with Partner Status can have their VODs last up to 60 days.
- How to enable Twitch VOD?
VODs are the best form to archive streams that your fans missed. Even though they are not enabled by default, you can manually enable them and not let your fans miss any important event from your channel. They’ll find it under the “Videos” tab on any Twitch channel. Follow these steps to enable VOD on your channel.
Step 1. Go to your profile icon in the top right corner of Twitch
Check in the “Channel & Video” section and locate the “Stream Key & Preferences” menu.

Step 2. Click on “Creator Dashboard”
Remember, you can enable VODs from your creator dashboard. Just go under the “Settings” tab and click on the “Stream section” of the creator dashboard. Check under the subtitle “VOD Settings” and get the option to store past broadcasts. You can also toggle the slider to store your past broadcasts.

Step 3 Click on the “Settings” tab on the left-hand side and go to Stream
You’ll get various drop-down menu options. Click on the “Settings” tab and choose the “Stream” option. The system will navigate to a new page, thus setting your preferences for VODs and clips.
Step 4. Go to “VOD Settings” and toggle on the “Store Past Broadcast.”
Ensure you have the toggle option turned ON under the “VOD Settings.” If it’s “ON,” you’ll realize the toggle will be purple, with a checkmark in it. Twitch will be confirmed to be enabled if it’s purple.

- Frequently Asked Question about Twitch VOD
These are some questions frequently asked by Twitch users.
1. How long will Twitch store my VOD
Your Twitch can either be stored for 14 or 60 days, depending on your level. For Twitch Prime, Twitch Partner or a Twitch Turbo user has their past broadcasts automatically saved for 60 days before deletion. But if you are not connected to these three options, your past broadcasts will be saved for only 14 days before deletion.
Since your past broadcasts cannot be live for more than 60 days, you have the option to download the video to your computer before the validity days expire and Twitch deletes it. You can use an External Hard drive to save the past broadcast content. Likewise, it is possible to turn your past broadcast content into Highlight and, in turn, permanently store them on Twitch.
2. What is the difference between Twitch VOD, Highlights, and Clips
Twitch VOD is a previously saved video of your live stream content. You choose to save either part or the entire content of your previously streamed content. More so, you don’t need any additional requirements to use VOD.
Highlights are short videos that have been edited from your past broadcast content. You can save them on Twitch permanently. Streamers majorly use highlights to save video game achievements. Unlike VOD Twitch that can be saved up to 60 days, Highlights usually lasts no more than 3 minutes.
- To make Highlights on Twitch, first, navigate to your Dashboard.
- Then scroll down and click on “Content” > “Video Producer.
- Next, press on “All Videos” to change them to “Past Broadcasts.”
- Now press the “Highlight” button, and Twitch will immediately open a new tab for “Twitch Highlighter Tool.”
- Then select the video part to include as “Highlight” and press the “Create Highlights” button.
- Wait a while for the process to be completed, and Voila! You have your Highlights created.
When it comes to Twitch Clip, you can capture special moments in a stream you are currently watching. On the same note, you can share clips with friends and other users on social media platforms. Such shared clips contain a link where others view the source or video from.
The clips you create will automatically be saved on the streamer’s channel on the “Clips” page, where other viewers can see them too. Nonetheless, you can download “clips” to your computer and, in turn, upload them whenever you want to. And note that you can help your stream grow via “Clips” by letting your viewers clip and share your stream moments.
- To create “Clips” on Twitch, identify which Streamers channel you wish to create a clip from.
- Then click on the “Clapper board” icon. Next, edit your clip between 5 and 60 seconds long.
- Finally, create a title and publish your Clip. You’ll also enjoy the privilege to share your clip’s link to other social media networks.
What is the benefit of uploading your Twitch Streams to YouTube
You stand to gain a lot when you upload your Twitch Streams to YouTube.
1) To enlighten your followers
Your followers will see your streams and make the best decisions. Viewers can check out your recordings and other highlights from past streams. It will help them decide whether they like what they see and probably join your live streams.
2) Twitch provides content for you to share and monetize on YouTube
Since Twitch streaming is more popular nowadays, many people throng it for content. It is not wise to rely entirely on Twitch to discover as a Twitch Streamer. Posting to YouTube will make it known within a short time. You would have announced your streams most nobly and kept your followers up to date, attracting new ones as well.
3) To keep your followers engaged even when you are offline
Even though live streaming is important, some viewers may not attend the live sessions due to different time zones or other commitments. In this regard, when uploaded to YouTube, Twitch will give them a chance to watch your content just whenever they log in. They, therefore, have the option to watch a Twitch VOD of the live stream they missed.
How to upload your Twitch Streams to YouTube
Check how to upload Twitch streams to YouTube from the Twitch website.
Step 1. Identify the little arrow next to your name on the Twitch website and click on it. Then click on the “Video Producer” to take you to a list of your Twitch videos.

Step 2. Check out and click on the “three-dots” on the video you wish to upload to YouTube. Click on the “Export” tab.
Step 3. A menu will then pop up. Here, you can fill in the description, title, and tags that you would like to appear on the YouTube video. There is an option for Twitch to split your video automatically. If you wish so, then tick the “Checkbox” to enable it. Then click on the “Start Export” option to export your Twitch streams to YouTube.

Bouns! Edit Your Twitch Video with Filmora
The quality of your video matters when it comes to uploading Twitch Streams to YouTube. Using a third-party tool to edit your video is the first step in ensuring your videos communicate meaningful content. Filmora comes in handy to bring your imaginations to life. Use it for simple creation without limits, even for beginners.
- Use it to track moving objects in video clips
- Easily match any image of the selected clip
- Its powerful tools let you edit your video by cropping, splitting, adjusting speed, etc
- The video keyframe easily indicates the beginning and end of the parameters
For Win 7 or later (64-bit)
For macOS 10.12 or later
Conclusion
● Don’t just focus on how to upload Twitch streams to YouTube but also consider the quality of video you are posting to YouTube. Remember, your video quality will speak much more of you than any other description. So, strive to produce quality videos using the best tool, Filmora. The app is easy to use and will elevate your views and imaginations through your video in the most impactful way.
Amidst many online applications is Twitch. This live streaming platform takes your experience to another level. You can use it to make crafts, play games, attract broadcasters, and many more. Twitch was launched in 2011, and since then, it has attracted millions of users, managing a database of about 4 million broadcasters by early 2020. With it, users can stream their activities as others watch in real-time. Just browse a category to find a stream.
You can also follow streamers that you like on the platform and get updates and notifications immediately after they are posted. But how do you start a career on a platform like Twitch? You need to broadcast and gather a large following. You can use built-in audiences from other platforms like Facebook. Let’s dive into the core of the matter and look at how to upload Twitch streams to YouTube and build your platform.
In this article
02 What is the benefit of uploading your Twitch Streams to YouTube
03 How to upload your Twitch Streams to YouTube
What is Twitch VOD?
Twitch Video on Demand (VOD) is a recording of previously streamed content. It provides briefings if you missed catching the Twitch live stream. Just watch the VOD from your favorite streamer and be engaged the best way possible. However, VODs don’t last forever. They are removed after two weeks of broadcast. But streamers with Partner Status can have their VODs last up to 60 days.
- How to enable Twitch VOD?
VODs are the best form to archive streams that your fans missed. Even though they are not enabled by default, you can manually enable them and not let your fans miss any important event from your channel. They’ll find it under the “Videos” tab on any Twitch channel. Follow these steps to enable VOD on your channel.
Step 1. Go to your profile icon in the top right corner of Twitch
Check in the “Channel & Video” section and locate the “Stream Key & Preferences” menu.
Step 2. Click on “Creator Dashboard”
Remember, you can enable VODs from your creator dashboard. Just go under the “Settings” tab and click on the “Stream section” of the creator dashboard. Check under the subtitle “VOD Settings” and get the option to store past broadcasts. You can also toggle the slider to store your past broadcasts.
Step 3 Click on the “Settings” tab on the left-hand side and go to Stream
You’ll get various drop-down menu options. Click on the “Settings” tab and choose the “Stream” option. The system will navigate to a new page, thus setting your preferences for VODs and clips.
Step 4. Go to “VOD Settings” and toggle on the “Store Past Broadcast.”
Ensure you have the toggle option turned ON under the “VOD Settings.” If it’s “ON,” you’ll realize the toggle will be purple, with a checkmark in it. Twitch will be confirmed to be enabled if it’s purple.
- Frequently Asked Question about Twitch VOD
These are some questions frequently asked by Twitch users.
1. How long will Twitch store my VOD
Your Twitch can either be stored for 14 or 60 days, depending on your level. For Twitch Prime, Twitch Partner or a Twitch Turbo user has their past broadcasts automatically saved for 60 days before deletion. But if you are not connected to these three options, your past broadcasts will be saved for only 14 days before deletion.
Since your past broadcasts cannot be live for more than 60 days, you have the option to download the video to your computer before the validity days expire and Twitch deletes it. You can use an External Hard drive to save the past broadcast content. Likewise, it is possible to turn your past broadcast content into Highlight and, in turn, permanently store them on Twitch.
2. What is the difference between Twitch VOD, Highlights, and Clips
Twitch VOD is a previously saved video of your live stream content. You choose to save either part or the entire content of your previously streamed content. More so, you don’t need any additional requirements to use VOD.
Highlights are short videos that have been edited from your past broadcast content. You can save them on Twitch permanently. Streamers majorly use highlights to save video game achievements. Unlike VOD Twitch that can be saved up to 60 days, Highlights usually lasts no more than 3 minutes.
- To make Highlights on Twitch, first, navigate to your Dashboard.
- Then scroll down and click on “Content” > “Video Producer.
- Next, press on “All Videos” to change them to “Past Broadcasts.”
- Now press the “Highlight” button, and Twitch will immediately open a new tab for “Twitch Highlighter Tool.”
- Then select the video part to include as “Highlight” and press the “Create Highlights” button.
- Wait a while for the process to be completed, and Voila! You have your Highlights created.
When it comes to Twitch Clip, you can capture special moments in a stream you are currently watching. On the same note, you can share clips with friends and other users on social media platforms. Such shared clips contain a link where others view the source or video from.
The clips you create will automatically be saved on the streamer’s channel on the “Clips” page, where other viewers can see them too. Nonetheless, you can download “clips” to your computer and, in turn, upload them whenever you want to. And note that you can help your stream grow via “Clips” by letting your viewers clip and share your stream moments.
- To create “Clips” on Twitch, identify which Streamers channel you wish to create a clip from.
- Then click on the “Clapper board” icon. Next, edit your clip between 5 and 60 seconds long.
- Finally, create a title and publish your Clip. You’ll also enjoy the privilege to share your clip’s link to other social media networks.
What is the benefit of uploading your Twitch Streams to YouTube
You stand to gain a lot when you upload your Twitch Streams to YouTube.
1) To enlighten your followers
Your followers will see your streams and make the best decisions. Viewers can check out your recordings and other highlights from past streams. It will help them decide whether they like what they see and probably join your live streams.
2) Twitch provides content for you to share and monetize on YouTube
Since Twitch streaming is more popular nowadays, many people throng it for content. It is not wise to rely entirely on Twitch to discover as a Twitch Streamer. Posting to YouTube will make it known within a short time. You would have announced your streams most nobly and kept your followers up to date, attracting new ones as well.
3) To keep your followers engaged even when you are offline
Even though live streaming is important, some viewers may not attend the live sessions due to different time zones or other commitments. In this regard, when uploaded to YouTube, Twitch will give them a chance to watch your content just whenever they log in. They, therefore, have the option to watch a Twitch VOD of the live stream they missed.
How to upload your Twitch Streams to YouTube
Check how to upload Twitch streams to YouTube from the Twitch website.
Step 1. Identify the little arrow next to your name on the Twitch website and click on it. Then click on the “Video Producer” to take you to a list of your Twitch videos.
Step 2. Check out and click on the “three-dots” on the video you wish to upload to YouTube. Click on the “Export” tab.
Step 3. A menu will then pop up. Here, you can fill in the description, title, and tags that you would like to appear on the YouTube video. There is an option for Twitch to split your video automatically. If you wish so, then tick the “Checkbox” to enable it. Then click on the “Start Export” option to export your Twitch streams to YouTube.
Bouns! Edit Your Twitch Video with Filmora
The quality of your video matters when it comes to uploading Twitch Streams to YouTube. Using a third-party tool to edit your video is the first step in ensuring your videos communicate meaningful content. Filmora comes in handy to bring your imaginations to life. Use it for simple creation without limits, even for beginners.
- Use it to track moving objects in video clips
- Easily match any image of the selected clip
- Its powerful tools let you edit your video by cropping, splitting, adjusting speed, etc
- The video keyframe easily indicates the beginning and end of the parameters
For Win 7 or later (64-bit)
For macOS 10.12 or later
Conclusion
● Don’t just focus on how to upload Twitch streams to YouTube but also consider the quality of video you are posting to YouTube. Remember, your video quality will speak much more of you than any other description. So, strive to produce quality videos using the best tool, Filmora. The app is easy to use and will elevate your views and imaginations through your video in the most impactful way.
Also read:
- Building a Brand, Building Income YouTube Edition
- Youtube Tunes? Here's How to Download Safely & Free
- Prime Channel Themes Igniting Viewer Motivation
- Crafting Visual Narratives with YouTube Studio's Editing Suite for 2024
- [Updated] Beyond YouTube IPhone/Android's Best Viewing App Options
- YouTube Profitability Initial Steps to Earnings
- 2024 Approved Access YT Comments Desktop/iOS/Android Edition Explained
- 2024 Approved Boost Visibility with These 20 Best Thumbnail Fonts
- Digital Footprint and Interactive Iconography Honors for 2024
- Aural and Visual Summary Synthesizer
- Best Free Tools for Converting YouTube Videos
- Elevate Your Hiring Game with the Best Vids in Town for 2024
- In 2024, Affordable MCB Theme Images for Channels
- The Serenity Seeker's Guide to Relaxed YouTube Viewing (52 Chars)
- [Updated] Channel Creation Made Simple YouTube's Top Business Channels Listed
- Perfecting Your Valorant Thumbnails A Comprehensive Tutorial
- The Ultimate Path to Unforgettable Video Engagement
- [Updated] Boosting Your Channel's Viewer Count - 12 Must-Try Approaches
- Creative Video Ends Top 6 Budget-Friendly Options
- [Updated] Analyzing TSeries’ Income via Subscriber Engagement on YouTube
- Effortless Tutorial for Top-Notch YT Video Thumbnails for 2024
- In 2024, Elevate Video Exposure Mastering the Art of Appropriate Tags
- [New] 6 FREE YouTube Outros for Aspiring Filmmakers
- Revenue Calculation for Every Clicked Video
- Engaging Students The Power of YouTube in Education for 2024
- 2024 Approved Elevate Your Traffic Ethically YouTube's Best Practices
- [Updated] Beauty Bliss Essential Tutorials for Ultimate Style
- In 2024, Elevate Audience Reach Through Collaborative YouTube Videos
- Efficient Techniques Sharing Video Content From YouTube FB for 2024
- Exclusive Leaderboard Luminary YouTube Videographer's Guide
- The Art of Edible Media Recipe Tutorials
- In 2024, Boost Your Reach The Quintessential Five Tactics for YouTube Success
- In 2024, Boosting Your Channels' Viewer Loyalty Essential Tactics Unveiled
- 2024 Approved Building Inspiring Lifestyle Content for Viewers
- Exclusive Guide to Top YouTube-to-WebM Conversion Software
- Becoming an Expert at YT Studio Navigation
- 2024 Approved Binge-Watch With Ease Best Playlist Extractors Reviewed & Rated
- [New] Efficiently Removing Youtube Channels A Device-Centric Approach
- In 2024, Discover the Top 7 Free YouTube Tag Extractor Vendors
- Guffaw Generation Generating 7 Hilarious Video Moments Online
- In 2024, Charting Innovative Territory with Youtubers’ Best Ad Work
- 2024 Approved Comprehensive Guide The Triad Technique for Assessing YouTube Revenue Streams
- Free Mobile Downloader The Ultimate Apps for Video Buffs
- [New] Accelerate How To Swiftly Broadcast Playlists
- In-Depth Analysis Ultimate Storage Choices
- MOV to U23 converter-convert .mov files for U23
- Audiophiles Handbook Advanced iMovie Audio Editing Mastery for 2024
- Latest way to get Shiny Meltan Box in Pokémon Go Mystery Box On Motorola Edge 40 Neo | Dr.fone
- Updated Final Cut Pro 2024 The Most In-Depth Tutorial Collection
- New 2024 Approved Animate Like a Pro Top 8 Software Options for Mac and Windows
- 2024 Approved Transform Your Tone Vocal Editing Techniques Using Audacity
- How To Transfer Data From Apple iPhone 6s Plus To Other iPhone 15 Pro devices? | Dr.fone
- [New] Securely Expand Your Insta-Friendship with These Leading Apps for 2024
- 6 Ways to Change Spotify Location On Your Lava Blaze 2 Pro | Dr.fone
- 2024 Approved Seek Out Terrifying Auditory Images
- Top 9 Vivo S18e Monitoring Apps for Parental Controls | Dr.fone
- Prevent Cross-Site Tracking on Apple iPhone 15 Pro and Browser | Dr.fone
- How does the stardust trade cost In pokemon go On Huawei Nova Y91? | Dr.fone
- [Updated] Zero Price, Zero Regrets Top Screen Recorder Tools
- 2024 Approved Mastering Distinctiveness Amidst Top TikTok Stars
- PassFab iPhone 14 Pro Backup Unlocker Top 4 Alternatives | Dr.fone
- Top 10 Telegram Spy Tools On Oppo A1 5G for Parents | Dr.fone
- [Updated] Leverage Social Platforms for Vimeo Video Sharing for 2024
- In 2024, Dynamic Storytelling in Advertising The Snapchat Way
- Updated In 2024, The Best English Voice Generator To Convert Text Into Desired Accent
- Unlocking TikTok Stream Potential 3 Key Steps on Laptops for 2024
- Title: "Fast-Paced Artistry Expert Valorant Thumbnails in a Blink"
- Author: Kevin
- Created at : 2024-05-25 15:14:12
- Updated at : 2024-05-26 15:14:12
- Link: https://youtube-videos.techidaily.com/fast-paced-artistry-expert-valorant-thumbnails-in-a-blink/
- License: This work is licensed under CC BY-NC-SA 4.0.
