
:max_bytes(150000):strip_icc():format(webp)/GettyImages-585151372-a659baf0c7b441b9b7e7896716b12784.jpg)
"Expert Tips Migrating Twitch Videos to YouTube"
Expert Tips: Migrating Twitch Videos to YouTube
Create High-Quality Video - Wondershare Filmora
An easy and powerful YouTube video editor
Numerous video and audio effects to choose from
Detailed tutorials provided by the official channel
Amidst many online applications is Twitch. This live streaming platform takes your experience to another level. You can use it to make crafts, play games, attract broadcasters, and many more. Twitch was launched in 2011, and since then, it has attracted millions of users, managing a database of about 4 million broadcasters by early 2020. With it, users can stream their activities as others watch in real-time. Just browse a category to find a stream.
You can also follow streamers that you like on the platform and get updates and notifications immediately after they are posted. But how do you start a career on a platform like Twitch? You need to broadcast and gather a large following. You can use built-in audiences from other platforms like Facebook. Let’s dive into the core of the matter and look at how to upload Twitch streams to YouTube and build your platform.

In this article
02 What is the benefit of uploading your Twitch Streams to YouTube
03 How to upload your Twitch Streams to YouTube
What is Twitch VOD?
Twitch Video on Demand (VOD) is a recording of previously streamed content. It provides briefings if you missed catching the Twitch live stream. Just watch the VOD from your favorite streamer and be engaged the best way possible. However, VODs don’t last forever. They are removed after two weeks of broadcast. But streamers with Partner Status can have their VODs last up to 60 days.
- How to enable Twitch VOD?
VODs are the best form to archive streams that your fans missed. Even though they are not enabled by default, you can manually enable them and not let your fans miss any important event from your channel. They’ll find it under the “Videos” tab on any Twitch channel. Follow these steps to enable VOD on your channel.
Step 1. Go to your profile icon in the top right corner of Twitch
Check in the “Channel & Video” section and locate the “Stream Key & Preferences” menu.

Step 2. Click on “Creator Dashboard”
Remember, you can enable VODs from your creator dashboard. Just go under the “Settings” tab and click on the “Stream section” of the creator dashboard. Check under the subtitle “VOD Settings” and get the option to store past broadcasts. You can also toggle the slider to store your past broadcasts.

Step 3 Click on the “Settings” tab on the left-hand side and go to Stream
You’ll get various drop-down menu options. Click on the “Settings” tab and choose the “Stream” option. The system will navigate to a new page, thus setting your preferences for VODs and clips.
Step 4. Go to “VOD Settings” and toggle on the “Store Past Broadcast.”
Ensure you have the toggle option turned ON under the “VOD Settings.” If it’s “ON,” you’ll realize the toggle will be purple, with a checkmark in it. Twitch will be confirmed to be enabled if it’s purple.

- Frequently Asked Question about Twitch VOD
These are some questions frequently asked by Twitch users.
1. How long will Twitch store my VOD
Your Twitch can either be stored for 14 or 60 days, depending on your level. For Twitch Prime, Twitch Partner or a Twitch Turbo user has their past broadcasts automatically saved for 60 days before deletion. But if you are not connected to these three options, your past broadcasts will be saved for only 14 days before deletion.
Since your past broadcasts cannot be live for more than 60 days, you have the option to download the video to your computer before the validity days expire and Twitch deletes it. You can use an External Hard drive to save the past broadcast content. Likewise, it is possible to turn your past broadcast content into Highlight and, in turn, permanently store them on Twitch.
2. What is the difference between Twitch VOD, Highlights, and Clips
Twitch VOD is a previously saved video of your live stream content. You choose to save either part or the entire content of your previously streamed content. More so, you don’t need any additional requirements to use VOD.
Highlights are short videos that have been edited from your past broadcast content. You can save them on Twitch permanently. Streamers majorly use highlights to save video game achievements. Unlike VOD Twitch that can be saved up to 60 days, Highlights usually lasts no more than 3 minutes.
- To make Highlights on Twitch, first, navigate to your Dashboard.
- Then scroll down and click on “Content” > “Video Producer.
- Next, press on “All Videos” to change them to “Past Broadcasts.”
- Now press the “Highlight” button, and Twitch will immediately open a new tab for “Twitch Highlighter Tool.”
- Then select the video part to include as “Highlight” and press the “Create Highlights” button.
- Wait a while for the process to be completed, and Voila! You have your Highlights created.
When it comes to Twitch Clip, you can capture special moments in a stream you are currently watching. On the same note, you can share clips with friends and other users on social media platforms. Such shared clips contain a link where others view the source or video from.
The clips you create will automatically be saved on the streamer’s channel on the “Clips” page, where other viewers can see them too. Nonetheless, you can download “clips” to your computer and, in turn, upload them whenever you want to. And note that you can help your stream grow via “Clips” by letting your viewers clip and share your stream moments.
- To create “Clips” on Twitch, identify which Streamers channel you wish to create a clip from.
- Then click on the “Clapper board” icon. Next, edit your clip between 5 and 60 seconds long.
- Finally, create a title and publish your Clip. You’ll also enjoy the privilege to share your clip’s link to other social media networks.
What is the benefit of uploading your Twitch Streams to YouTube
You stand to gain a lot when you upload your Twitch Streams to YouTube.
1) To enlighten your followers
Your followers will see your streams and make the best decisions. Viewers can check out your recordings and other highlights from past streams. It will help them decide whether they like what they see and probably join your live streams.
2) Twitch provides content for you to share and monetize on YouTube
Since Twitch streaming is more popular nowadays, many people throng it for content. It is not wise to rely entirely on Twitch to discover as a Twitch Streamer. Posting to YouTube will make it known within a short time. You would have announced your streams most nobly and kept your followers up to date, attracting new ones as well.
3) To keep your followers engaged even when you are offline
Even though live streaming is important, some viewers may not attend the live sessions due to different time zones or other commitments. In this regard, when uploaded to YouTube, Twitch will give them a chance to watch your content just whenever they log in. They, therefore, have the option to watch a Twitch VOD of the live stream they missed.
How to upload your Twitch Streams to YouTube
Check how to upload Twitch streams to YouTube from the Twitch website.
Step 1. Identify the little arrow next to your name on the Twitch website and click on it. Then click on the “Video Producer” to take you to a list of your Twitch videos.

Step 2. Check out and click on the “three-dots” on the video you wish to upload to YouTube. Click on the “Export” tab.
Step 3. A menu will then pop up. Here, you can fill in the description, title, and tags that you would like to appear on the YouTube video. There is an option for Twitch to split your video automatically. If you wish so, then tick the “Checkbox” to enable it. Then click on the “Start Export” option to export your Twitch streams to YouTube.

Bouns! Edit Your Twitch Video with Filmora
The quality of your video matters when it comes to uploading Twitch Streams to YouTube. Using a third-party tool to edit your video is the first step in ensuring your videos communicate meaningful content. Filmora comes in handy to bring your imaginations to life. Use it for simple creation without limits, even for beginners.
- Use it to track moving objects in video clips
- Easily match any image of the selected clip
- Its powerful tools let you edit your video by cropping, splitting, adjusting speed, etc
- The video keyframe easily indicates the beginning and end of the parameters
For Win 7 or later (64-bit)
For macOS 10.12 or later
Conclusion
● Don’t just focus on how to upload Twitch streams to YouTube but also consider the quality of video you are posting to YouTube. Remember, your video quality will speak much more of you than any other description. So, strive to produce quality videos using the best tool, Filmora. The app is easy to use and will elevate your views and imaginations through your video in the most impactful way.
Amidst many online applications is Twitch. This live streaming platform takes your experience to another level. You can use it to make crafts, play games, attract broadcasters, and many more. Twitch was launched in 2011, and since then, it has attracted millions of users, managing a database of about 4 million broadcasters by early 2020. With it, users can stream their activities as others watch in real-time. Just browse a category to find a stream.
You can also follow streamers that you like on the platform and get updates and notifications immediately after they are posted. But how do you start a career on a platform like Twitch? You need to broadcast and gather a large following. You can use built-in audiences from other platforms like Facebook. Let’s dive into the core of the matter and look at how to upload Twitch streams to YouTube and build your platform.
In this article
02 What is the benefit of uploading your Twitch Streams to YouTube
03 How to upload your Twitch Streams to YouTube
What is Twitch VOD?
Twitch Video on Demand (VOD) is a recording of previously streamed content. It provides briefings if you missed catching the Twitch live stream. Just watch the VOD from your favorite streamer and be engaged the best way possible. However, VODs don’t last forever. They are removed after two weeks of broadcast. But streamers with Partner Status can have their VODs last up to 60 days.
- How to enable Twitch VOD?
VODs are the best form to archive streams that your fans missed. Even though they are not enabled by default, you can manually enable them and not let your fans miss any important event from your channel. They’ll find it under the “Videos” tab on any Twitch channel. Follow these steps to enable VOD on your channel.
Step 1. Go to your profile icon in the top right corner of Twitch
Check in the “Channel & Video” section and locate the “Stream Key & Preferences” menu.
Step 2. Click on “Creator Dashboard”
Remember, you can enable VODs from your creator dashboard. Just go under the “Settings” tab and click on the “Stream section” of the creator dashboard. Check under the subtitle “VOD Settings” and get the option to store past broadcasts. You can also toggle the slider to store your past broadcasts.
Step 3 Click on the “Settings” tab on the left-hand side and go to Stream
You’ll get various drop-down menu options. Click on the “Settings” tab and choose the “Stream” option. The system will navigate to a new page, thus setting your preferences for VODs and clips.
Step 4. Go to “VOD Settings” and toggle on the “Store Past Broadcast.”
Ensure you have the toggle option turned ON under the “VOD Settings.” If it’s “ON,” you’ll realize the toggle will be purple, with a checkmark in it. Twitch will be confirmed to be enabled if it’s purple.
- Frequently Asked Question about Twitch VOD
These are some questions frequently asked by Twitch users.
1. How long will Twitch store my VOD
Your Twitch can either be stored for 14 or 60 days, depending on your level. For Twitch Prime, Twitch Partner or a Twitch Turbo user has their past broadcasts automatically saved for 60 days before deletion. But if you are not connected to these three options, your past broadcasts will be saved for only 14 days before deletion.
Since your past broadcasts cannot be live for more than 60 days, you have the option to download the video to your computer before the validity days expire and Twitch deletes it. You can use an External Hard drive to save the past broadcast content. Likewise, it is possible to turn your past broadcast content into Highlight and, in turn, permanently store them on Twitch.
2. What is the difference between Twitch VOD, Highlights, and Clips
Twitch VOD is a previously saved video of your live stream content. You choose to save either part or the entire content of your previously streamed content. More so, you don’t need any additional requirements to use VOD.
Highlights are short videos that have been edited from your past broadcast content. You can save them on Twitch permanently. Streamers majorly use highlights to save video game achievements. Unlike VOD Twitch that can be saved up to 60 days, Highlights usually lasts no more than 3 minutes.
- To make Highlights on Twitch, first, navigate to your Dashboard.
- Then scroll down and click on “Content” > “Video Producer.
- Next, press on “All Videos” to change them to “Past Broadcasts.”
- Now press the “Highlight” button, and Twitch will immediately open a new tab for “Twitch Highlighter Tool.”
- Then select the video part to include as “Highlight” and press the “Create Highlights” button.
- Wait a while for the process to be completed, and Voila! You have your Highlights created.
When it comes to Twitch Clip, you can capture special moments in a stream you are currently watching. On the same note, you can share clips with friends and other users on social media platforms. Such shared clips contain a link where others view the source or video from.
The clips you create will automatically be saved on the streamer’s channel on the “Clips” page, where other viewers can see them too. Nonetheless, you can download “clips” to your computer and, in turn, upload them whenever you want to. And note that you can help your stream grow via “Clips” by letting your viewers clip and share your stream moments.
- To create “Clips” on Twitch, identify which Streamers channel you wish to create a clip from.
- Then click on the “Clapper board” icon. Next, edit your clip between 5 and 60 seconds long.
- Finally, create a title and publish your Clip. You’ll also enjoy the privilege to share your clip’s link to other social media networks.
What is the benefit of uploading your Twitch Streams to YouTube
You stand to gain a lot when you upload your Twitch Streams to YouTube.
1) To enlighten your followers
Your followers will see your streams and make the best decisions. Viewers can check out your recordings and other highlights from past streams. It will help them decide whether they like what they see and probably join your live streams.
2) Twitch provides content for you to share and monetize on YouTube
Since Twitch streaming is more popular nowadays, many people throng it for content. It is not wise to rely entirely on Twitch to discover as a Twitch Streamer. Posting to YouTube will make it known within a short time. You would have announced your streams most nobly and kept your followers up to date, attracting new ones as well.
3) To keep your followers engaged even when you are offline
Even though live streaming is important, some viewers may not attend the live sessions due to different time zones or other commitments. In this regard, when uploaded to YouTube, Twitch will give them a chance to watch your content just whenever they log in. They, therefore, have the option to watch a Twitch VOD of the live stream they missed.
How to upload your Twitch Streams to YouTube
Check how to upload Twitch streams to YouTube from the Twitch website.
Step 1. Identify the little arrow next to your name on the Twitch website and click on it. Then click on the “Video Producer” to take you to a list of your Twitch videos.
Step 2. Check out and click on the “three-dots” on the video you wish to upload to YouTube. Click on the “Export” tab.
Step 3. A menu will then pop up. Here, you can fill in the description, title, and tags that you would like to appear on the YouTube video. There is an option for Twitch to split your video automatically. If you wish so, then tick the “Checkbox” to enable it. Then click on the “Start Export” option to export your Twitch streams to YouTube.
Bouns! Edit Your Twitch Video with Filmora
The quality of your video matters when it comes to uploading Twitch Streams to YouTube. Using a third-party tool to edit your video is the first step in ensuring your videos communicate meaningful content. Filmora comes in handy to bring your imaginations to life. Use it for simple creation without limits, even for beginners.
- Use it to track moving objects in video clips
- Easily match any image of the selected clip
- Its powerful tools let you edit your video by cropping, splitting, adjusting speed, etc
- The video keyframe easily indicates the beginning and end of the parameters
For Win 7 or later (64-bit)
For macOS 10.12 or later
Conclusion
● Don’t just focus on how to upload Twitch streams to YouTube but also consider the quality of video you are posting to YouTube. Remember, your video quality will speak much more of you than any other description. So, strive to produce quality videos using the best tool, Filmora. The app is easy to use and will elevate your views and imaginations through your video in the most impactful way.
Your Ultimate Roadmap for Optimal YouTube Video Resolution, Width & Height
YouTube Video Dimensions/Size: Guide for Upload Settings

Richard Bennett
Mar 27, 2024• Proven solutions
Every social media offers a distinct range of dimensions and settings for their publication. So does YouTube.
It’s acutely important to be aware of your setting choices and choosing the right video, thumbnail and screen dimensions of a YouTube video to elevate the user experience.
Merely watching the videos on YouTube is much easier but being able to upload a video there using the right size matters a lot more than one thinks of.
But how can one master it all by himself? Here we are to guide you all along the way! So sit back and relax and enjoy your first-rated content!
You will Learn :
- The right YouTube video size for you
- Important guidelines for YouTube Video dimensions
- What’s the best YouTube video size for you?
- What is the right aspect ratio for YouTube videos
- The correct video image and YouTube screen size
- FAQs about Youtube upload settings
- Basic terminologies that you should know
The Best Video Editor for Successful YouTubers - Wondershare Filmora
As a easy-to-use video editor, Filmora is really perfect for successful YouTubers. Filmora not only allows you to cut, crop, rotate, reverse videos, but also offers your advanced features like PIP, Green Screen, or audio mixing. What’s more, you can find lots of effects for Fashion, gaming, education, tutorial, sports, etc.
Check below video to know more and download now to have a try for free.


The right YouTube video size for you
| Resolution | Equivalent Name | Quality |
|---|---|---|
| 3840×2160 | 2160p | 4K |
| 2560×1440 | 1440p | 2K |
| 1920×1080 | 1080p | Highest YouTube HD video resolution |
| 1280×720 | 720p | Least YouTube HD video resolution |
| 854×480 | 480p | Standard definition |
| 640×360 | 360p | Conventional website resolution |
| 426×240 | 240p | Least YouTube video size available |
Important guidelines for YouTube Video dimensions
| Maximum acceptable size of a YouTube video | 426 x 420p |
|---|---|
| Minimum acceptable size of a YouTube video | 3840 x 2160p |
| The right aspect ratio of a YouTube video | 16:9 |
| Maximum size of a YouTube file | 128GB |
| The maximum length of a YouTube video | 12 hours |
| Compatible YouTube video formats | avi mov mp4 (best video format for YouTube) 3GPP webM flv mpeg mpegps wmv |
In order to grasp all of the aforementioned configurations thoroughly, a pictorial depiction is a must. So here it is to give you a vivid vision.
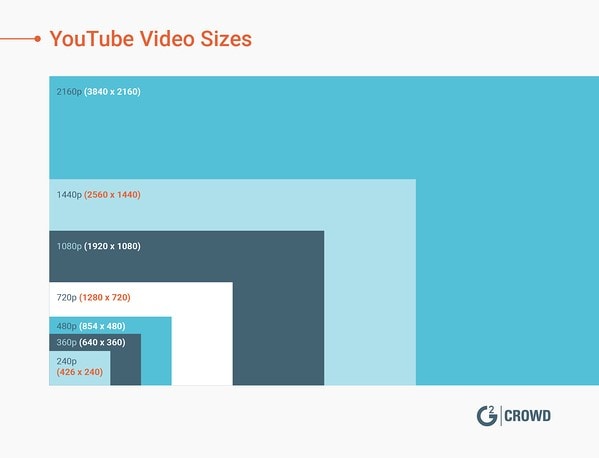
Image from learn.g2
What’s the best YouTube video size for you?
It is recommended by professionals to use the YouTube video dimensions 1080p, or 1920 x 1080.
These ones are the ideal because it will not only facilitate the video with a professional and elite look but also consumes relatively much less data. Moreover, if you use a phone for recording your videos then using the quality higher than the ones mentioned above will cost you with ample memory.
If you are a newbie to the world of YouTube and want to up the device’s storage game then 720p would still do wonders.
What is the video aspect ratio?
This term refers to the proportion of your video. In other words, the video aspect ratio can be defined as the width or breadth (of an image or screen) with respect to its height. Such a ratio can be expressed or represented in the form of “width x height.
That means an aspect ratio of 4x3 refers to an image that is 4 unit wide and 3 units high. Similarly, it can also be expressed with a colon in between the units such as 4:3 or 16:9.
The aspect ratio of a video merely refers to the relationship among the width and height respectively and not the actual physical size of the image.
The most common aspect ratios used in the video are depicted below for sound understanding:
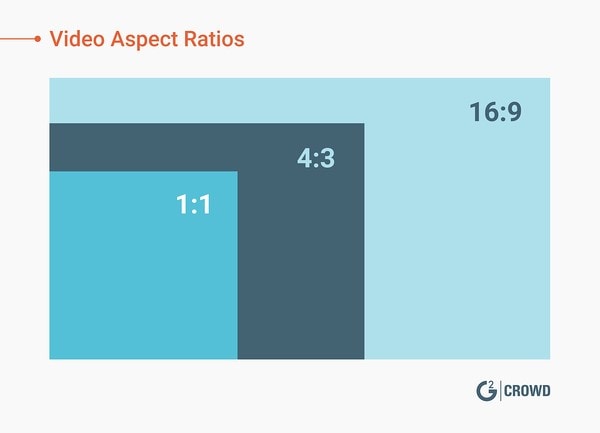
Image from learn.g2
The aspect ratio is the proportion of your video. This image displays the three most common aspect ratios.
Aspect ratio refers to the ratio of height and width although dimensions refer to two separate measurements of height and width rather than a ratio with “pixel” as its unit.
Standard aspect ratios
Below are the most common aspect ratios used for the video. There may be certain amendments to the ones mentioned below but the following formats are used mostly by the film and video makers.
Let’s review the quick breakdown of the available aspect ratio options that you can opt accordingly:
| Aspect ratio | Application |
|---|---|
| 1:1 or 1x1 | This aspect ratio will mostly be seen in the Instagram video. This 1:1 ratio gives a video a perfect square shape. |
| 4:3 or 4x3 | This aspect ratio was mostly seen few ages ago in almost the amidst 20th century on the TV. This was used to be a standard television format back then. So if you are a 90’s kid or an adult then you must be familiar with this format while watching your favorite old schooled sitcoms! |
| 16:9 or 16x9 | The format was enhanced to 16:9 aspect ratio for more HD quality and better viewing experience. This format is widely being used in televisions, theatres, DVD or high definition professional videos. |
| 21:9 or 21x9 | For more than merely an HD video quality and astonishing user experience, the formats have been upgraded to 21:9 aspect ratio. This is dominantly being used in the cinema for movie theatre releases. |
The right aspect ratio for YouTube videos
YouTube recommends using an aspect ratio of 16:9 according to the video player that YouTube uses. You are also given an option to upload your videos vertically but this will amend the aspect ratio respectively.
When you upload a video with an aspect ratio other than the one mention formerly then YouTube will automatically place the black bars on the sides. This is done to display the best quality video with the right resolution otherwise it will be displayed as distorted or cropped.
A vertical ratio with may be 4:3 video aspect ratio will be displayed like the image given below:

Image from learn.g2
The correct video image and YouTube screen size
Videos are undoubtedly the most important asset of YouTube but we cannot ignore the significance of the optimal images there! Using the right channel images will enhance the user experience and will ultimately level up your game!
The appealing and attractive cover photos, banners, thumbnails, channel icons possess equal importance as the video itself.
So don’t forget to tune your images! Just grab a cup of coffee and see how your views increase exponentially by this simple yet most important change!
Just skim through the checklist given below and you will be ready to nail it!
1. Perfect size for your YouTube profile photo
The profile photo of YouTube, often called a YouTube channel icon, is preferably a facial picture when is run by an individual and a respective logo if run by a brand or a business.
The suggested YouTube screen size of your YouTube profile picture or channel icon is 800 x800 pixels.
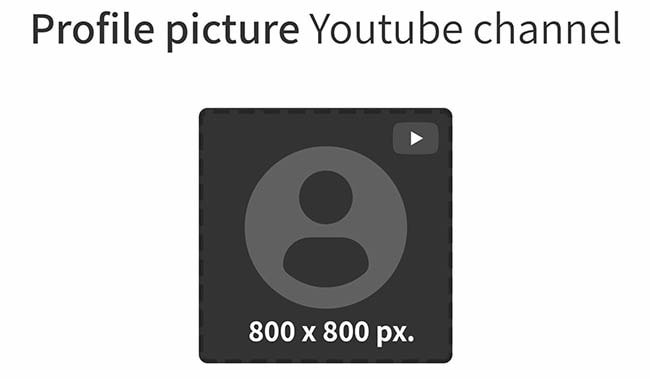
Image from metricool
2. Perfect size for your YouTube thumbnail photo
What is YouTube thumbnail?
A thumbnail photo is the picture of one of the frames of your video that you select to let the viewers see the quick glace or snapshot of your video while they browse YouTube.
You can choose any of the snapshots, technically known as a thumbnail, right after uploading your video on your channel. Either you can let YouTube choose any thumbnail or you choose your own.
Why is it important?
Choosing the appropriate thumbnail is one of the most important factors you cannot neglect. In order to gain views the most on your videos, a wise selection of a perfect YouTube video thumbnail dimensions will attract the viewers. Hence this will can uplift your views to a drastic extent.
A quick tip for the perfect YouTube thumbnail
Take a look at the popular you tubers and see what strategies they use when uploading their thumbnails. Usually, the video content is not as appealing as the thumbnail itself. That’s what you need to understand! Just see by yourself how large text and striking images will do wonders!
YouTube video thumbnail dimension for a perfect thumbnail image
The preferred YouTube screen size of your thumbnail image is 1280 x 720 pixels.
Similar to the YouTube video, the aspect ratio of your thumbnail is 16:9.
For even more clear understanding, look into this illustration:
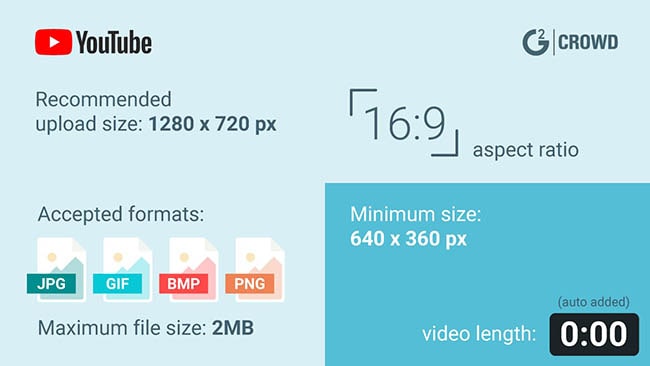
Image from learn.g2
3. Perfect size for your YouTube banner
YouTube offers two main areas for image display of your channel. One is an icon image while other is what YouTube calls “Channel Art”. This is the same as Facebook’s cover photo. People often call it “YouTube banner”. It is a header image displayed at the top of your channel.
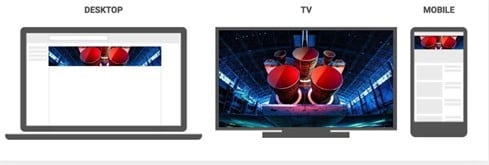
For each kind of display (mobile, desktop, and TV), channel art (or banner) dimension changes accordingly.
Either your cover photo or your YouTube banner is displayed at the top of the channel so it’s highly significant to consider what you are depicting about your channel through these images.
Hence, this being said or realized, selecting the appropriate banner resolution should be among your topmost priorities.
The recommended banner dimensions of a YouTube video as suggested by YouTube are 2560 x 1440 pixels. But the dimensions may slightly vary with the variation in the devices being used by the users.
| Displays | Banner image Dimensions |
|---|---|
| Video display | 2560 x 1440 pixels |
| Desktop display | 2560 x 423 pixels |
| Tablet display | 1855 x 423 pixels |
| Television | 2560 x 1440 pixels |
For a thorough understanding, refer to the image below:
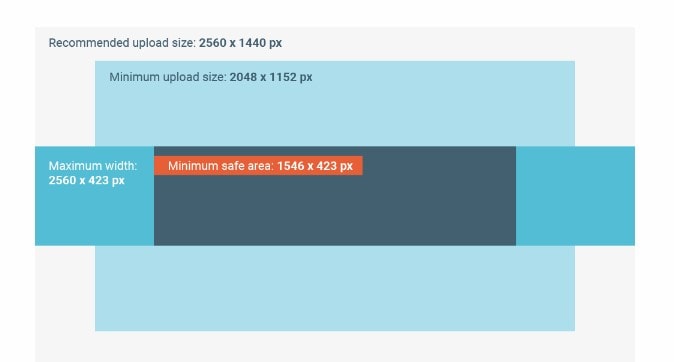
Image from learn.g2
The right cover photo size on TV
The image displayed when accessing YouTube from TV will appear and be uploaded full or maximized. So a wise image size must be opted. So the accurate resolution would be 2560 x 1440 pixels which will cover the entire background of your channel.
The right cover photo size on desktop displays
The image size may vary to some extent as per the browser you are accessing with or the desktop itself. But generally, the suggested cover photo size for desktop displays is 2560 x 423 pixels.
The right cover photo size on Tablet displays
As per the recommendation for uploading the image while specifically considering the table display is 1855 x 423 pixels. This will cover the area appropriately.
FAQs about Youtube upload settings

What is the maximum YouTube upload limit of size?
The allowed maximum video file size for uploading is 128GB at present.
What is the maximum YouTube upload limit of length?
The allowed maximum video length today for uploading is 12 hours.
How the default upload setting is reset on YouTube?
Step 1: Sign In to your YouTube account using a browser.
Step 2: By clicking your profile icon on the top right corner of the pane, you’ll see the YouTube Studio option. Click on it.
Step 3: Go on settings option where a pop-up window will appear.
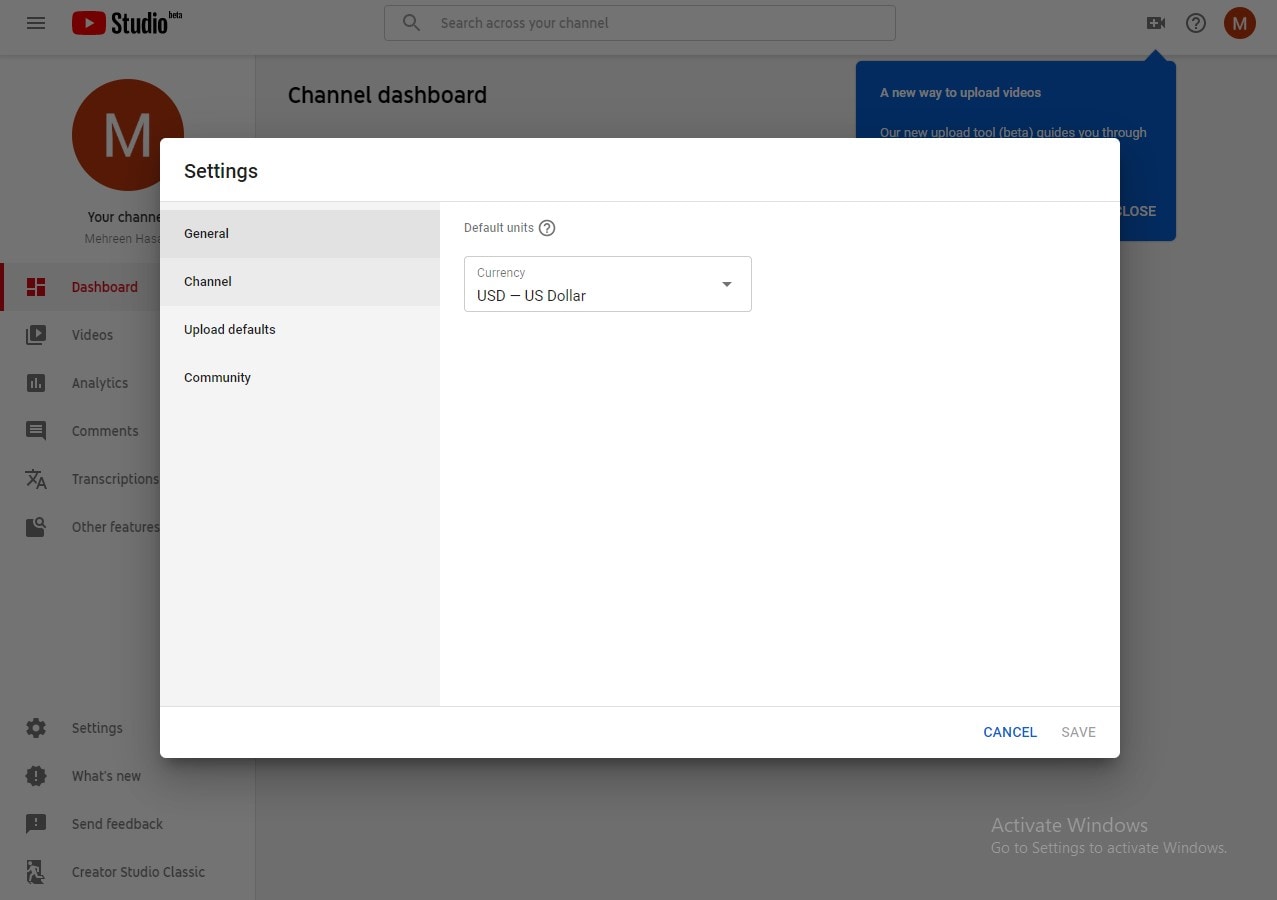
Step 4: Look for upload defaults and change the configurations on 2 tabs.
Step 5: Click on save button.
How is YouTube video uploaded using the mobile application?
Step 1: Sign in to your YouTube channel using your mobile phone.
Step 2: Tap on the video camera icon to upload a video. Grant access to your photo gallery and camera is asked by the app while uploading for the first time.
Step 3: You may “Go Live” or simply drag an already made video file to upload.
Step 4: Click “Next”.
Step 5: Enter the video name, select visibility level and then click upload.
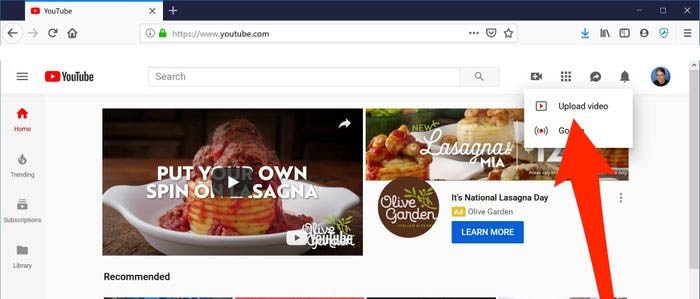
How is YouTube video uploaded using a web browser?
Step 1: Sign in to your YouTube account in a web browser.
Step 2: Click on the video icon appearing on the top of the pane.
Step 3: Click on upload video in the drop-down.
Step 4: You will be redirected to the video upload page. Click “public” under “Select files to upload” option and choose visibility level (public, private or scheduled).
Step 5: Click on a large arrow for video file selection or simply drag the file onto the page.
Step 6: You may enter miscellaneous information related to the video while the video is being uploaded.
Step 7: Click on publish and you are done!
Read More to Get : Best Video Websites Like YouTube >>
Basic terminologies that you should know
Video Format
A file format is a way that is standard for the storage of information in the encoded form within the computer file. It entails how exactly the bits are used while encoding the information in a digital storage medium.
So, a video file format is basically a type of file format in order to store the digital data of a video in the computer system. Mostly, video is often stored using the lossy compression in order to reduce the file size.
Frame Rate
“Frame rate” essentially entails the frequency (rate) at which the simultaneous images display on the screen. These images or called “frames”. Frame rate is expressed in “frames per second or FPS”. The unit or term is applicable for film, cameras, motion capture, video, and computer graphics. This is also known as “frame frequency”, expressed in the unit “hertz”
Resolution
Resolution is a measure to entail the clarity and sharpness of an image and most often used as a metric to judge the quality of cameras, monitors, printers, etc.
It basically refers to the number of different pixels in each dimension which can be viewed in any display device.
File Size
File size refers to the space that a file occupies in a storage medium, like hard drive or USB. The measure of file sizes can be expressed in bytes (B), kilobytes (KB), megabytes (MB), gigabytes (GB), terabytes (TB), and so on.
As shown in the picture below, the files listed in the Windows Explorer assorted as per the file with the largest size first. The file with the name “family-safety.jpg” occupies the largest size of 47 KB and the smallest one with 32 KB size.
Codec
Codec is a device or maybe a computer program that is used to encode or decode a stream of digital data or signal. A codec is a short form of “coder-decoder”.
The basic function of a coder is to encode the stream of data or signal for storage or transmission, usually in an encrypted form.
While, a decoder decodes the encoded (possibly encrypted) data, which is merely a reverse process of a coder. The application of codec are in streaming media, videoconferencing, and video editing applications.
Aspect ratio:
This term refers to the proportion of your video. In other words, the video aspect ratio can be defined as the width or breadth (of an image or screen) with respect to its height. Such a ratio can be expressed or represented in the form of “width x height.
That means an aspect ratio of 4x3 refers to an image that is 4 units wide and 3 units high. Similarly, it can also be expressed with a colon in between the units such as 4:3 or 16:9.
Need a YouTube support?
If you need any support, guidance or may face any queries related to anything regarding your YouTube channel, here’s the link of YouTube support .
Final Verdict
Hopefully, with this detailed guide, you are now ready to make a wise decision regarding customizing your videos and channel as per viewers likeliness. So get ready to see your channel grow drastically!
Richard Bennett
Richard Bennett is a writer and a lover of all things video.
Follow @Richard Bennett
Richard Bennett
Mar 27, 2024• Proven solutions
Every social media offers a distinct range of dimensions and settings for their publication. So does YouTube.
It’s acutely important to be aware of your setting choices and choosing the right video, thumbnail and screen dimensions of a YouTube video to elevate the user experience.
Merely watching the videos on YouTube is much easier but being able to upload a video there using the right size matters a lot more than one thinks of.
But how can one master it all by himself? Here we are to guide you all along the way! So sit back and relax and enjoy your first-rated content!
You will Learn :
- The right YouTube video size for you
- Important guidelines for YouTube Video dimensions
- What’s the best YouTube video size for you?
- What is the right aspect ratio for YouTube videos
- The correct video image and YouTube screen size
- FAQs about Youtube upload settings
- Basic terminologies that you should know
The Best Video Editor for Successful YouTubers - Wondershare Filmora
As a easy-to-use video editor, Filmora is really perfect for successful YouTubers. Filmora not only allows you to cut, crop, rotate, reverse videos, but also offers your advanced features like PIP, Green Screen, or audio mixing. What’s more, you can find lots of effects for Fashion, gaming, education, tutorial, sports, etc.
Check below video to know more and download now to have a try for free.
The right YouTube video size for you
| Resolution | Equivalent Name | Quality |
|---|---|---|
| 3840×2160 | 2160p | 4K |
| 2560×1440 | 1440p | 2K |
| 1920×1080 | 1080p | Highest YouTube HD video resolution |
| 1280×720 | 720p | Least YouTube HD video resolution |
| 854×480 | 480p | Standard definition |
| 640×360 | 360p | Conventional website resolution |
| 426×240 | 240p | Least YouTube video size available |
Important guidelines for YouTube Video dimensions
| Maximum acceptable size of a YouTube video | 426 x 420p |
|---|---|
| Minimum acceptable size of a YouTube video | 3840 x 2160p |
| The right aspect ratio of a YouTube video | 16:9 |
| Maximum size of a YouTube file | 128GB |
| The maximum length of a YouTube video | 12 hours |
| Compatible YouTube video formats | avi mov mp4 (best video format for YouTube) 3GPP webM flv mpeg mpegps wmv |
In order to grasp all of the aforementioned configurations thoroughly, a pictorial depiction is a must. So here it is to give you a vivid vision.
Image from learn.g2
What’s the best YouTube video size for you?
It is recommended by professionals to use the YouTube video dimensions 1080p, or 1920 x 1080.
These ones are the ideal because it will not only facilitate the video with a professional and elite look but also consumes relatively much less data. Moreover, if you use a phone for recording your videos then using the quality higher than the ones mentioned above will cost you with ample memory.
If you are a newbie to the world of YouTube and want to up the device’s storage game then 720p would still do wonders.
What is the video aspect ratio?
This term refers to the proportion of your video. In other words, the video aspect ratio can be defined as the width or breadth (of an image or screen) with respect to its height. Such a ratio can be expressed or represented in the form of “width x height.
That means an aspect ratio of 4x3 refers to an image that is 4 unit wide and 3 units high. Similarly, it can also be expressed with a colon in between the units such as 4:3 or 16:9.
The aspect ratio of a video merely refers to the relationship among the width and height respectively and not the actual physical size of the image.
The most common aspect ratios used in the video are depicted below for sound understanding:
Image from learn.g2
The aspect ratio is the proportion of your video. This image displays the three most common aspect ratios.
Aspect ratio refers to the ratio of height and width although dimensions refer to two separate measurements of height and width rather than a ratio with “pixel” as its unit.
Standard aspect ratios
Below are the most common aspect ratios used for the video. There may be certain amendments to the ones mentioned below but the following formats are used mostly by the film and video makers.
Let’s review the quick breakdown of the available aspect ratio options that you can opt accordingly:
| Aspect ratio | Application |
|---|---|
| 1:1 or 1x1 | This aspect ratio will mostly be seen in the Instagram video. This 1:1 ratio gives a video a perfect square shape. |
| 4:3 or 4x3 | This aspect ratio was mostly seen few ages ago in almost the amidst 20th century on the TV. This was used to be a standard television format back then. So if you are a 90’s kid or an adult then you must be familiar with this format while watching your favorite old schooled sitcoms! |
| 16:9 or 16x9 | The format was enhanced to 16:9 aspect ratio for more HD quality and better viewing experience. This format is widely being used in televisions, theatres, DVD or high definition professional videos. |
| 21:9 or 21x9 | For more than merely an HD video quality and astonishing user experience, the formats have been upgraded to 21:9 aspect ratio. This is dominantly being used in the cinema for movie theatre releases. |
The right aspect ratio for YouTube videos
YouTube recommends using an aspect ratio of 16:9 according to the video player that YouTube uses. You are also given an option to upload your videos vertically but this will amend the aspect ratio respectively.
When you upload a video with an aspect ratio other than the one mention formerly then YouTube will automatically place the black bars on the sides. This is done to display the best quality video with the right resolution otherwise it will be displayed as distorted or cropped.
A vertical ratio with may be 4:3 video aspect ratio will be displayed like the image given below:
Image from learn.g2
The correct video image and YouTube screen size
Videos are undoubtedly the most important asset of YouTube but we cannot ignore the significance of the optimal images there! Using the right channel images will enhance the user experience and will ultimately level up your game!
The appealing and attractive cover photos, banners, thumbnails, channel icons possess equal importance as the video itself.
So don’t forget to tune your images! Just grab a cup of coffee and see how your views increase exponentially by this simple yet most important change!
Just skim through the checklist given below and you will be ready to nail it!
1. Perfect size for your YouTube profile photo
The profile photo of YouTube, often called a YouTube channel icon, is preferably a facial picture when is run by an individual and a respective logo if run by a brand or a business.
The suggested YouTube screen size of your YouTube profile picture or channel icon is 800 x800 pixels.
Image from metricool
2. Perfect size for your YouTube thumbnail photo
What is YouTube thumbnail?
A thumbnail photo is the picture of one of the frames of your video that you select to let the viewers see the quick glace or snapshot of your video while they browse YouTube.
You can choose any of the snapshots, technically known as a thumbnail, right after uploading your video on your channel. Either you can let YouTube choose any thumbnail or you choose your own.
Why is it important?
Choosing the appropriate thumbnail is one of the most important factors you cannot neglect. In order to gain views the most on your videos, a wise selection of a perfect YouTube video thumbnail dimensions will attract the viewers. Hence this will can uplift your views to a drastic extent.
A quick tip for the perfect YouTube thumbnail
Take a look at the popular you tubers and see what strategies they use when uploading their thumbnails. Usually, the video content is not as appealing as the thumbnail itself. That’s what you need to understand! Just see by yourself how large text and striking images will do wonders!
YouTube video thumbnail dimension for a perfect thumbnail image
The preferred YouTube screen size of your thumbnail image is 1280 x 720 pixels.
Similar to the YouTube video, the aspect ratio of your thumbnail is 16:9.
For even more clear understanding, look into this illustration:
Image from learn.g2
3. Perfect size for your YouTube banner
YouTube offers two main areas for image display of your channel. One is an icon image while other is what YouTube calls “Channel Art”. This is the same as Facebook’s cover photo. People often call it “YouTube banner”. It is a header image displayed at the top of your channel.
For each kind of display (mobile, desktop, and TV), channel art (or banner) dimension changes accordingly.
Either your cover photo or your YouTube banner is displayed at the top of the channel so it’s highly significant to consider what you are depicting about your channel through these images.
Hence, this being said or realized, selecting the appropriate banner resolution should be among your topmost priorities.
The recommended banner dimensions of a YouTube video as suggested by YouTube are 2560 x 1440 pixels. But the dimensions may slightly vary with the variation in the devices being used by the users.
| Displays | Banner image Dimensions |
|---|---|
| Video display | 2560 x 1440 pixels |
| Desktop display | 2560 x 423 pixels |
| Tablet display | 1855 x 423 pixels |
| Television | 2560 x 1440 pixels |
For a thorough understanding, refer to the image below:
Image from learn.g2
The right cover photo size on TV
The image displayed when accessing YouTube from TV will appear and be uploaded full or maximized. So a wise image size must be opted. So the accurate resolution would be 2560 x 1440 pixels which will cover the entire background of your channel.
The right cover photo size on desktop displays
The image size may vary to some extent as per the browser you are accessing with or the desktop itself. But generally, the suggested cover photo size for desktop displays is 2560 x 423 pixels.
The right cover photo size on Tablet displays
As per the recommendation for uploading the image while specifically considering the table display is 1855 x 423 pixels. This will cover the area appropriately.
FAQs about Youtube upload settings
What is the maximum YouTube upload limit of size?
The allowed maximum video file size for uploading is 128GB at present.
What is the maximum YouTube upload limit of length?
The allowed maximum video length today for uploading is 12 hours.
How the default upload setting is reset on YouTube?
Step 1: Sign In to your YouTube account using a browser.
Step 2: By clicking your profile icon on the top right corner of the pane, you’ll see the YouTube Studio option. Click on it.
Step 3: Go on settings option where a pop-up window will appear.
Step 4: Look for upload defaults and change the configurations on 2 tabs.
Step 5: Click on save button.
How is YouTube video uploaded using the mobile application?
Step 1: Sign in to your YouTube channel using your mobile phone.
Step 2: Tap on the video camera icon to upload a video. Grant access to your photo gallery and camera is asked by the app while uploading for the first time.
Step 3: You may “Go Live” or simply drag an already made video file to upload.
Step 4: Click “Next”.
Step 5: Enter the video name, select visibility level and then click upload.
How is YouTube video uploaded using a web browser?
Step 1: Sign in to your YouTube account in a web browser.
Step 2: Click on the video icon appearing on the top of the pane.
Step 3: Click on upload video in the drop-down.
Step 4: You will be redirected to the video upload page. Click “public” under “Select files to upload” option and choose visibility level (public, private or scheduled).
Step 5: Click on a large arrow for video file selection or simply drag the file onto the page.
Step 6: You may enter miscellaneous information related to the video while the video is being uploaded.
Step 7: Click on publish and you are done!
Read More to Get : Best Video Websites Like YouTube >>
Basic terminologies that you should know
Video Format
A file format is a way that is standard for the storage of information in the encoded form within the computer file. It entails how exactly the bits are used while encoding the information in a digital storage medium.
So, a video file format is basically a type of file format in order to store the digital data of a video in the computer system. Mostly, video is often stored using the lossy compression in order to reduce the file size.
Frame Rate
“Frame rate” essentially entails the frequency (rate) at which the simultaneous images display on the screen. These images or called “frames”. Frame rate is expressed in “frames per second or FPS”. The unit or term is applicable for film, cameras, motion capture, video, and computer graphics. This is also known as “frame frequency”, expressed in the unit “hertz”
Resolution
Resolution is a measure to entail the clarity and sharpness of an image and most often used as a metric to judge the quality of cameras, monitors, printers, etc.
It basically refers to the number of different pixels in each dimension which can be viewed in any display device.
File Size
File size refers to the space that a file occupies in a storage medium, like hard drive or USB. The measure of file sizes can be expressed in bytes (B), kilobytes (KB), megabytes (MB), gigabytes (GB), terabytes (TB), and so on.
As shown in the picture below, the files listed in the Windows Explorer assorted as per the file with the largest size first. The file with the name “family-safety.jpg” occupies the largest size of 47 KB and the smallest one with 32 KB size.
Codec
Codec is a device or maybe a computer program that is used to encode or decode a stream of digital data or signal. A codec is a short form of “coder-decoder”.
The basic function of a coder is to encode the stream of data or signal for storage or transmission, usually in an encrypted form.
While, a decoder decodes the encoded (possibly encrypted) data, which is merely a reverse process of a coder. The application of codec are in streaming media, videoconferencing, and video editing applications.
Aspect ratio:
This term refers to the proportion of your video. In other words, the video aspect ratio can be defined as the width or breadth (of an image or screen) with respect to its height. Such a ratio can be expressed or represented in the form of “width x height.
That means an aspect ratio of 4x3 refers to an image that is 4 units wide and 3 units high. Similarly, it can also be expressed with a colon in between the units such as 4:3 or 16:9.
Need a YouTube support?
If you need any support, guidance or may face any queries related to anything regarding your YouTube channel, here’s the link of YouTube support .
Final Verdict
Hopefully, with this detailed guide, you are now ready to make a wise decision regarding customizing your videos and channel as per viewers likeliness. So get ready to see your channel grow drastically!
Richard Bennett
Richard Bennett is a writer and a lover of all things video.
Follow @Richard Bennett
Also read:
- Blurring Identity Erasing Faces From Video Content for 2024
- [New] Edu-Stream 100 Cutting-Edge Learning YT
- In 2024, Decoding YouTube Exchange Threads
- Elite Alternative Edits Skip Youtube, Not Just Content for 2024
- In 2024, Essential Tactics for YouTube Advertising with Banners
- Livestream Landscape Analysis FB LIVE Vs. YT Live & TweetTV
- In 2024, Elongate Film for YouTube Compliance
- 2024 Approved Create Professional Movies on YouTube Quickly
- [New] Elevate Your Earning Game with YouTube's Member Status
- [Updated] Best ASMR Apps for Android and iOS You Should Know
- Best Practices in YouTube Thumbnail Sizes and Ratios
- [Updated] Beautifying Videos for YouTube Viewers
- Ensuring Thumbnails Show Shorts Video Troubleshooting
- What Is Parody and How to Make a Parody Video
- Unlocking Potential in 5-Second Videos
- [Updated] 6 Proven Techniques to Elevate Your YouTube Engagement and Reduce Churn
- How to Change Google Play Location On Vivo Y78t | Dr.fone
- AVI Video Format How to Open, Play, Edit AVI File, In 2024
- 2024 Approved 7 Best Video Player for Mac
- 2024 Approved The Leading 10 Competitors to Zoom for PC & Phone
- Fix Apple iPhone 6s Plus Stuck on Data Transfer Verified Solution! | Dr.fone
- Updated In 2024, Green Screen on a Budget Top 10 Free Apps for Android and iOS
- How to Screen Mirroring Lenovo ThinkPhone to PC? | Dr.fone
- [New] HarmonyHub Pro Downloads & Reviews for 2024
- [New] 2024 Approved Discovering the World's Most Admired TikTokers
- Simplified Guide Effortless iPad Screen Recording Techniques for 2024
- New Getting Acquainted with Google Play Musics Integrated Podcast Listening Capabilities for 2024
- In 2024, How to Mirror Samsung Galaxy S23+ to Mac? | Dr.fone
- Title: "Expert Tips Migrating Twitch Videos to YouTube"
- Author: Kevin
- Created at : 2024-05-25 15:13:25
- Updated at : 2024-05-26 15:13:25
- Link: https://youtube-videos.techidaily.com/expert-tips-migrating-twitch-videos-to-youtube/
- License: This work is licensed under CC BY-NC-SA 4.0.
