
:max_bytes(150000):strip_icc()/how-to-share-liked-songs-on-spotify-5200847-f4f39ccd5ec84965bd94ef86f0f93a94.jpg)
"Everyday Epics in a Lens Tips to Avoid Common Mistakes"
Everyday Epics in a Lens: Tips to Avoid Common Mistakes
The Dos and Don’ts of Daily Vlogging

Richard Bennett
Oct 26, 2023• Proven solutions
If you are making videos on YouTube, you’ll have come to a point where you feel daring enough to take on the ultimate challenge: daily vlogging.
You might have been inspired by other creators on YouTube or you might have heard of VEDA: Vlog every day April (or August). You might have also watched some videos from influencers telling you that the ruthless YouTube algorithm demands daily content if you aspire to grow an audience.
There are many reasons why you may want to try your hand at becoming a daily vlogger, but here are 3 motivating reasons to conquer your vlogging fears and get started.
Bonus Tip-The Best Daily Vlog Maker- Wondershare Filmora
Vlogging is an art and people use vlogging to upload videos daily to their YouTube channel. This is natural if you are recording videos daily, you will need a tool like Wondershare Filmora to edit your videos with precision. To make your task easy, Wondershare Filmora has all the features and effects that are required to edit a daily vlog video that you can upload directly from Filmora itself. You can make use of features like add text, background music, filters & effects, etc if you are a daily vlogger as it would help you a lot in making the video look professional in less time.


Why Daily Vlog Anyways?
Build discipline: Like exercising and eating healthy, you have to commit to it and do it regularly in order to see any lasting results. Vlogging is the same. However, if you’re a creator, making videos whenever you feel like it and want to give yourself a kick in the behind, daily vlogging is a practice that will keep you accountable. You have to do it every day. No excuses.
Practice more: How do the best become the best? They practice… every day. If what you want to do is become the greatest video creator you can be, make the best videos you can make, and build the largest following that you can, then let daily vlogging be your boot camp to reach those goals.
Please the YouTube algorithm: It’s true, YouTube wants to see that you are consistently posting fresh content. Every new video you upload will have a day or two to impress the algorithm, this metric is often referred to as view velocity . YouTube will give your video a lift, suggesting it to new viewers, if they see that it is being enjoyed. By publishing daily, you increase your chances of attracting more viewers.
Now that you know the benefits, how should you approach it?
The Dos and Don’ts of Daily Vlogging
1. Do Get Some Experience First
If you are starting out on YouTube, as in, you made one or two videos make sure you can vlog weekly for a few months before moving to daily. You wouldn’t run a marathon without training; you can hurt yourself if you do. Have an idea of what you are getting yourself into, otherwise, it can burn you out and ruin the joy of video creation for you completely.
2. Don’t Film Everything
Having a daily vlog does not mean always having the camera on. Every minute you film is a minute of footage you will have to watch later, a minute you will have to decide whether to cut from your final video. Every second of recorded footage is multiplied in the editing room and it would be impossible for you to meet your daily deadline if you have too much. The key is to start editing as you film, that way, you only film what you need. It doesn’t hurt to have extra footage, but being excessive can waste your time and add little to the final product.
3. Do Plan Out Your Day (Not Your Night)
Knowing where you need to go, who you are going to see and talk to, where you are going to have lunch, which route you are going to take home, and any other occurrences that can happen during the day will greatly increase your chances of success. A day is long and can be made longer when you have a video on your mind. Wouldn’t it be nice to save some of your decision making energy by having it all planned out? And if you are worried that over planning will reduce serendipitous moments that you want, don’t, your day won’t always go as planned… that’s just life.
Additionally, avoid filming at night. It will become a major stress to your health. Filming at night means pulling all-nighters to publish the next day, and then repeating that daily (nightly).
4. Don’t Spend too Long On a Script… Or Your Video
The beauty of daily vlog is to speak your mind and show your personality, not to perform a Shakespearean sonnet by heart. You shouldn’t try to memorize a whole script every day. That would be brutal! What you can have is an outline of the key points you want to hit, certain things you want to say, convey, or record to tell your story, knowing where you want certain cuts to happen helps too, but don’t workshop it too long, because tomorrow will be another show and done is better than perfect.
5. Do Use Templates, Presets, Hotkeys, and Shortcuts
Any chance you have to cut down on your editing time, use it. This means creating and properly storing templates of visuals you want to incorporate into your video. This means adding presets for effects that you feel you would use again. This means learning the editing hotkeys so you can streamline your process. Here are Filmora’s hotkeys .
6. Don’t Forget to Label Your Content
Staying organized is so important, especially as you begin to accumulate more and more footage. It might seem tedious initially, but this good habit can save you a lot of wasted hours later on when you need to find that specific shot that you swore you had…
7. Do Have A Goal
Have an idea of how long you are going to be going daily. Will it be one month, two months, or a year? Or will it be until you reach a certain amount of views, subscribers, or watch time? While it might feel liberating to venture into the great unknown without a clear destination, having a goal will allow you to keep motivated even when times are hard. After all, once you’ve hit your goal and still feel like there is more fuel in you, keep daily vlogging. There is no better feeling than exceeding your own expectations.
8. Don’t Worry About Equipment (But Be Aware of Bad Audio)
You’ve heard it before: you don’t need anything fancy to be a vlogger. If you are looking to increase your toolbox, we have a helpful YouTube gear starter guide for you. But look at it this way, there will be days when you realized that you forgot to charge the battery on your camera or that you left your tripod at home. Don’t abandon the whole project simply because you don’t have what you need.
The important thing is to film, tell a story, edit, and upload. You can do all that on your smartphone or computer webcam if you have to, so don’t let your equipment or lack thereof break your streak. If there is one thing you should put attention on is audio, if you don’t have excellent gear, try to avoid filming in loud places, such as construction sites, dance halls, or highway overpasses.
9. Do Bring a Camera With You Everywhere
Although you shouldn’t worry about your equipment, it is still a good habit to carry your camera with you everywhere. From the moment you wake up to the moment you go to sleep you are a daily vlogger, you never know when something will happen. Always be prepared. Your camera is to you, as a gun is to a soldier. It’s what sets you apart from all the civilians, so keep it close at hand.
10. Don’t Neglect Your Health
Earlier I compared daily vlogging to running a marathon, and like a marathon, there is a point where you need to be aware of yourself. You want to push yourself, but you don’t want to overdo it to a point where you damage your physical or mental health. Only you know when you have gone too far. If you feel like daily vlogging is ruining your life and the goal you set for yourself isn’t something you desire anymore, ask yourself: can I take a week off and decide if video creating is something I want to continue?
11. Do Watch Other Daily Vloggers
By seeing how other YouTubers have done daily vlogs, you can get ideas, see what aspect of their videos you like or dislike, and learn from their presentation, content, and community engagement. By watching daily vloggers, you can also start interacting with their content as well. It is always easier to stay motivated when you have support. By watching and reaching out to the daily vloggers you enjoy, you can build a network of people who are going through the same journey as you.
12. Don’t Forget About Your Audience
Remember that in the end, you are creating videos for someone else to enjoy. Even though you might be doing the daily vlog for yourself, if you want your viewers to return every day, you have to have an overall mission for your project. Is your message one that is aimed to motivate or do you want to document a journey? Don’t create your content in a vacuum, ask your viewers for feedback so you know how to improve.
Embarking on your daily vlogging adventure is not one to take lightly, but after 1 month, 1 season, or 1 year, you will be able to look back and see all that you have accomplished and feel proud. With the advice from this article, you can properly prepare yourself and enjoy each step of the process. Don’t overthink it, have fun!
Are you thinking of starting your daily vlog? Let us know what’s stopping you from the comments.
Richard Bennett
Richard Bennett is a writer and a lover of all things video.
Follow @Richard Bennett
Richard Bennett
Oct 26, 2023• Proven solutions
If you are making videos on YouTube, you’ll have come to a point where you feel daring enough to take on the ultimate challenge: daily vlogging.
You might have been inspired by other creators on YouTube or you might have heard of VEDA: Vlog every day April (or August). You might have also watched some videos from influencers telling you that the ruthless YouTube algorithm demands daily content if you aspire to grow an audience.
There are many reasons why you may want to try your hand at becoming a daily vlogger, but here are 3 motivating reasons to conquer your vlogging fears and get started.
Bonus Tip-The Best Daily Vlog Maker- Wondershare Filmora
Vlogging is an art and people use vlogging to upload videos daily to their YouTube channel. This is natural if you are recording videos daily, you will need a tool like Wondershare Filmora to edit your videos with precision. To make your task easy, Wondershare Filmora has all the features and effects that are required to edit a daily vlog video that you can upload directly from Filmora itself. You can make use of features like add text, background music, filters & effects, etc if you are a daily vlogger as it would help you a lot in making the video look professional in less time.
Why Daily Vlog Anyways?
Build discipline: Like exercising and eating healthy, you have to commit to it and do it regularly in order to see any lasting results. Vlogging is the same. However, if you’re a creator, making videos whenever you feel like it and want to give yourself a kick in the behind, daily vlogging is a practice that will keep you accountable. You have to do it every day. No excuses.
Practice more: How do the best become the best? They practice… every day. If what you want to do is become the greatest video creator you can be, make the best videos you can make, and build the largest following that you can, then let daily vlogging be your boot camp to reach those goals.
Please the YouTube algorithm: It’s true, YouTube wants to see that you are consistently posting fresh content. Every new video you upload will have a day or two to impress the algorithm, this metric is often referred to as view velocity . YouTube will give your video a lift, suggesting it to new viewers, if they see that it is being enjoyed. By publishing daily, you increase your chances of attracting more viewers.
Now that you know the benefits, how should you approach it?
The Dos and Don’ts of Daily Vlogging
1. Do Get Some Experience First
If you are starting out on YouTube, as in, you made one or two videos make sure you can vlog weekly for a few months before moving to daily. You wouldn’t run a marathon without training; you can hurt yourself if you do. Have an idea of what you are getting yourself into, otherwise, it can burn you out and ruin the joy of video creation for you completely.
2. Don’t Film Everything
Having a daily vlog does not mean always having the camera on. Every minute you film is a minute of footage you will have to watch later, a minute you will have to decide whether to cut from your final video. Every second of recorded footage is multiplied in the editing room and it would be impossible for you to meet your daily deadline if you have too much. The key is to start editing as you film, that way, you only film what you need. It doesn’t hurt to have extra footage, but being excessive can waste your time and add little to the final product.
3. Do Plan Out Your Day (Not Your Night)
Knowing where you need to go, who you are going to see and talk to, where you are going to have lunch, which route you are going to take home, and any other occurrences that can happen during the day will greatly increase your chances of success. A day is long and can be made longer when you have a video on your mind. Wouldn’t it be nice to save some of your decision making energy by having it all planned out? And if you are worried that over planning will reduce serendipitous moments that you want, don’t, your day won’t always go as planned… that’s just life.
Additionally, avoid filming at night. It will become a major stress to your health. Filming at night means pulling all-nighters to publish the next day, and then repeating that daily (nightly).
4. Don’t Spend too Long On a Script… Or Your Video
The beauty of daily vlog is to speak your mind and show your personality, not to perform a Shakespearean sonnet by heart. You shouldn’t try to memorize a whole script every day. That would be brutal! What you can have is an outline of the key points you want to hit, certain things you want to say, convey, or record to tell your story, knowing where you want certain cuts to happen helps too, but don’t workshop it too long, because tomorrow will be another show and done is better than perfect.
5. Do Use Templates, Presets, Hotkeys, and Shortcuts
Any chance you have to cut down on your editing time, use it. This means creating and properly storing templates of visuals you want to incorporate into your video. This means adding presets for effects that you feel you would use again. This means learning the editing hotkeys so you can streamline your process. Here are Filmora’s hotkeys .
6. Don’t Forget to Label Your Content
Staying organized is so important, especially as you begin to accumulate more and more footage. It might seem tedious initially, but this good habit can save you a lot of wasted hours later on when you need to find that specific shot that you swore you had…
7. Do Have A Goal
Have an idea of how long you are going to be going daily. Will it be one month, two months, or a year? Or will it be until you reach a certain amount of views, subscribers, or watch time? While it might feel liberating to venture into the great unknown without a clear destination, having a goal will allow you to keep motivated even when times are hard. After all, once you’ve hit your goal and still feel like there is more fuel in you, keep daily vlogging. There is no better feeling than exceeding your own expectations.
8. Don’t Worry About Equipment (But Be Aware of Bad Audio)
You’ve heard it before: you don’t need anything fancy to be a vlogger. If you are looking to increase your toolbox, we have a helpful YouTube gear starter guide for you. But look at it this way, there will be days when you realized that you forgot to charge the battery on your camera or that you left your tripod at home. Don’t abandon the whole project simply because you don’t have what you need.
The important thing is to film, tell a story, edit, and upload. You can do all that on your smartphone or computer webcam if you have to, so don’t let your equipment or lack thereof break your streak. If there is one thing you should put attention on is audio, if you don’t have excellent gear, try to avoid filming in loud places, such as construction sites, dance halls, or highway overpasses.
9. Do Bring a Camera With You Everywhere
Although you shouldn’t worry about your equipment, it is still a good habit to carry your camera with you everywhere. From the moment you wake up to the moment you go to sleep you are a daily vlogger, you never know when something will happen. Always be prepared. Your camera is to you, as a gun is to a soldier. It’s what sets you apart from all the civilians, so keep it close at hand.
10. Don’t Neglect Your Health
Earlier I compared daily vlogging to running a marathon, and like a marathon, there is a point where you need to be aware of yourself. You want to push yourself, but you don’t want to overdo it to a point where you damage your physical or mental health. Only you know when you have gone too far. If you feel like daily vlogging is ruining your life and the goal you set for yourself isn’t something you desire anymore, ask yourself: can I take a week off and decide if video creating is something I want to continue?
11. Do Watch Other Daily Vloggers
By seeing how other YouTubers have done daily vlogs, you can get ideas, see what aspect of their videos you like or dislike, and learn from their presentation, content, and community engagement. By watching daily vloggers, you can also start interacting with their content as well. It is always easier to stay motivated when you have support. By watching and reaching out to the daily vloggers you enjoy, you can build a network of people who are going through the same journey as you.
12. Don’t Forget About Your Audience
Remember that in the end, you are creating videos for someone else to enjoy. Even though you might be doing the daily vlog for yourself, if you want your viewers to return every day, you have to have an overall mission for your project. Is your message one that is aimed to motivate or do you want to document a journey? Don’t create your content in a vacuum, ask your viewers for feedback so you know how to improve.
Embarking on your daily vlogging adventure is not one to take lightly, but after 1 month, 1 season, or 1 year, you will be able to look back and see all that you have accomplished and feel proud. With the advice from this article, you can properly prepare yourself and enjoy each step of the process. Don’t overthink it, have fun!
Are you thinking of starting your daily vlog? Let us know what’s stopping you from the comments.
Richard Bennett
Richard Bennett is a writer and a lover of all things video.
Follow @Richard Bennett
Unique Video Identity: Designing Personalized Thumbnails
How To Add Custom Thumbnails to Your YouTube Videos
Richard Bennett
Mar 27, 2024• Proven solutions
YouTube custom thumbnails are a great way to get people’s attention to your YouTube video. It’s a pretty simple process but if you are wondering how to create a thumbnail and add the thumbnail to YouTube video and customize it with the correct size. You have come to the right place. While in this article, I will show you how to create and add a thumbnail to a YouTube video and how to customize the YouTube video thumbnail. Follow these easy steps below and add eyecatching customed thumbnails to your YouTube videos in no time.
- Part 1: Create and Add Custom Thumbnails to YouTube
- Part 2: Tools to Create Custom YouTube Video Thumbnails
- Part 3: How to Change A Thumbnail On YouTube
- Part 4: Things You Need to Know Before Making a YouTube Custom Thumbnail
- Part 5: Tips on How to Make Good YouTube Thumbnails to Get More Clicks
- Part 6: YouTube Thumbnail FAQs
How To Add Custom Thumbnails to Your YouTube Videos [Steps, Tools and Tips]
We have just made a video tutorial about how to make a YouTube video thumbnail, check it below to find out the tips and tricks of making customized YouTube thumbnail.
Part 1: How to Make a Thumbnail for YouTube and Add Custom Thumbnails to YouTube
After you’ve verified your account and made your thumbnail, it’s finally time to upload it to your video and make a custom thumbnail. To do this, go to Creator Studio and then Video Manager. You’ll see a button labeled “Edit” next to each video, and an arrow pointing down. Click Thumbnail Editor.
In Thumbnail Editor, you can use the still images in the video as a thumbnail, choose a solid background color for the thumbnail, or add other images from your computer. I will show you the steps of how to customize the video still as a video thumbnail.
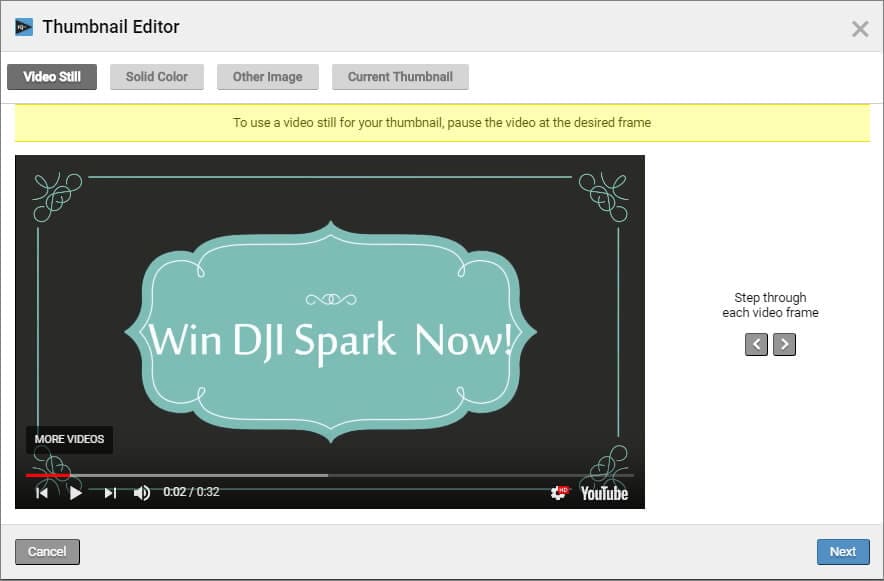
1. Preview the video and choose the target video still. You can click the Playback button and check the video and pause it at the desired frame. Or, you can step through each frame by clicking the Preview Frame button and Next Frame icon. Click Next to continue.
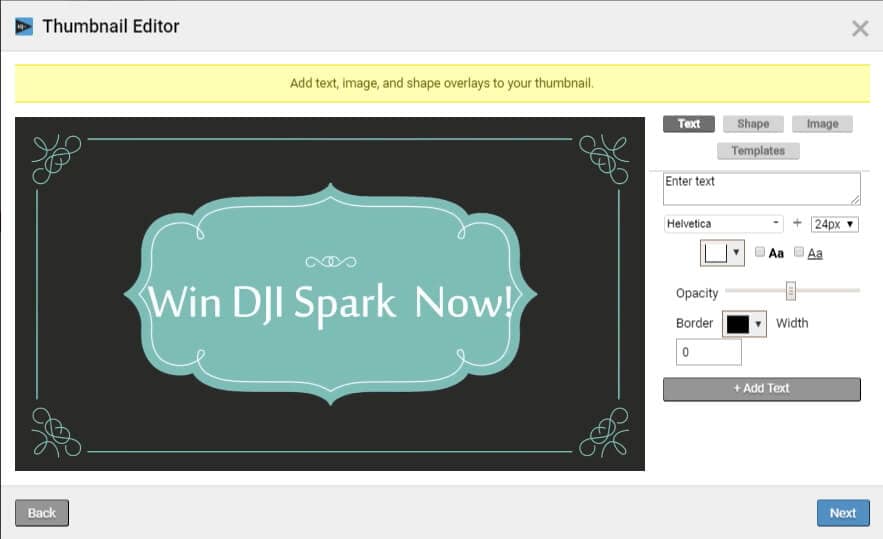
2. And now, you can add text, image and shape overlays to the thumbnail. You can change the text font, size, opacity and more.
3. Click Next to save the thumbnail and you will see how the thumbnail displays on different platforms such as YouTube, Facebook and Twitter. Click Save to save the video thumbnail.
In this way, you can add a custom thumbnail to the new videos and change the video thumbnail of the previously uploaded videos.
Part 2: Thumbnail Makers to Create Custom YouTube Thumbnails
Of course, you can use some of the best tools to make a YouTube video thumbnail. In this part, we will show you some of the best tools to create custom YouTube thumbnails.
Download Mac Version ](https://tools.techidaily.com/wondershare/filmora/download/ )
1. Create YouTube Thumbnail with Online solution - Canva
Canva is a free, powerful online image editing program with tons of great templates to get you started. One of their templates just happens to be YouTube thumbnails. Open Canva and select the “YouTube Thumbnail” design type. Use your own photo or choose from a huge library, then add text and effects to really make it stand out. Save and share — easy as that.
Check this video tutorial to see how to Make a Youtube Thumbnail using Canva.
You may also like: Best online Photo Editor
2. Design YouTube thumbnail with a Desktop solution - Gimp
Gimp is one of the most popular image editing programs around for one very simple reason: it’s powerful and free! Where Canva uses a lot of templates, Gimp gives you absolute, full control over how you want your image to look. Make a 1280x720 image and start putting together your eye-catching thumbnail exactly how you want to.
Check this video tutorial to see how to make professional Thumbnails for YouTube Videos with Gimp:
Part 3: How to Change A Thumbnail On YouTube
Note: YouTube allows verified YouTube accounts (accounts that provided YouTube with a working phone number) to upload custom thumbnail images and change them accordingly.
In this part, we’ll be going over how to change a thumbnail image on YouTube. There are pictures to make it easy to follow along.
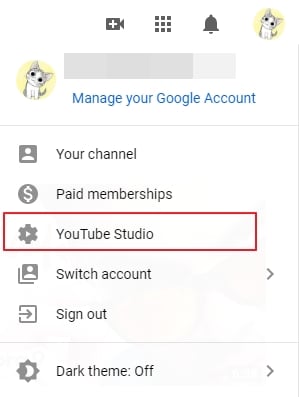
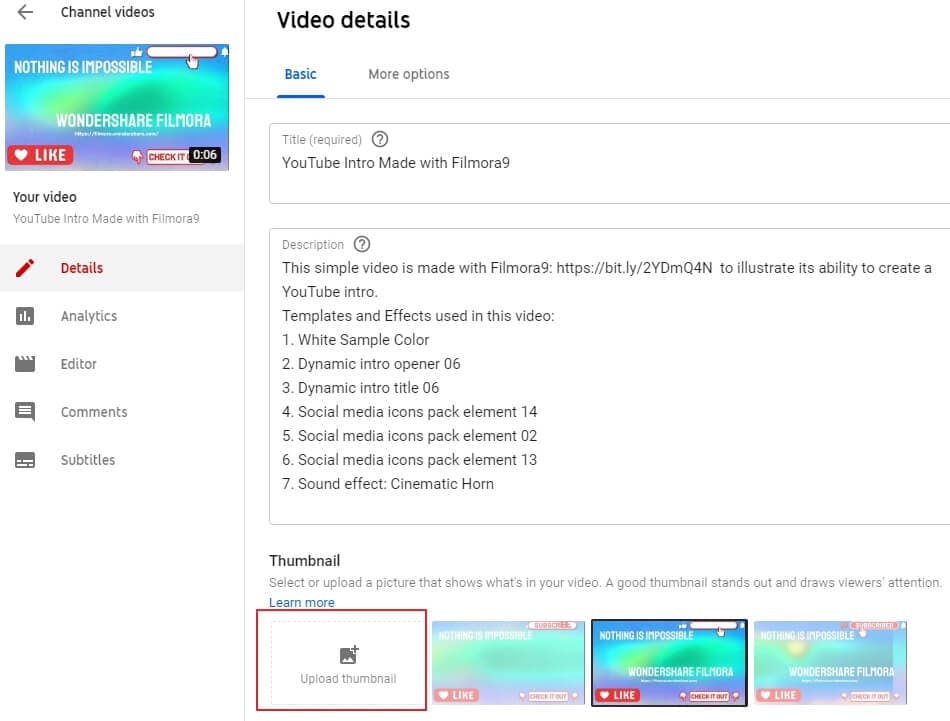
- After signing into YouTube with your Google account, click on your profile on the top right corner. Click on YouTube Studio from the drop-down menu.
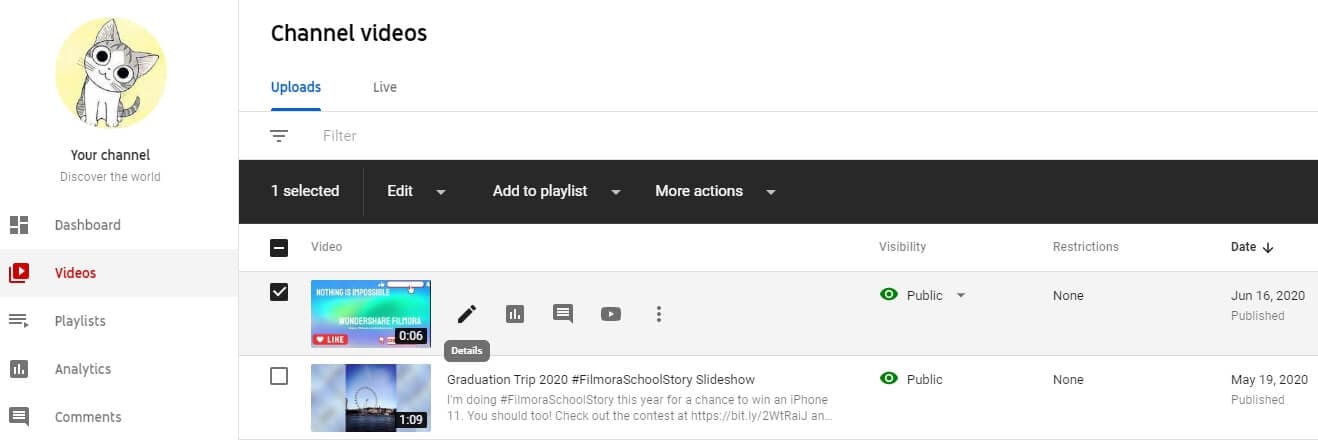
- On the left side of the page, click on Videos and then find your video and click on the details button.
- Find the Thumbnail section in the basic video details tab, and then click the Upload thumbnail to select the image that you want to upload.
- Finally, click on the Save button on the right upper corner. And just like that, in seven easy steps, we’re done changing the thumbnail of a YouTube video.
If you don’t have an image to upload but you want to check out some online resources to make your own, check out our Top YouTube Thumbnail Makers .
Part 4: Things You Need to Know Before Making a Custom Thumbnail
- About the proper YouTube video thumbnail size: Your thumbnail should be 1280x720 pixels in size and be less than 2MB. The minimum width of the image is 640 pixels.
- About the YouTube Image thumbnail format: Use .JPG, .PNG, .GIF or .BMP files for your thumbnail image.
- You’ll want your thumbnails to stand out. Bright colored text is a simple, easy way to draw people’s attention. Red, white, yellow, or orange are all popular choices.
- You can even do a little homework to see what colors others are using for similar videos to yours, and then choose different colors to stand out.
One word of warning: your thumbnail should be related to the content of your video. Misleading thumbnail images, if reported, will reflect poorly on your channel. You’ll get a negative rating in the community status part of your channel. This can actually remove your ability to use custom thumbnails, so keep it honest!
You may also like: How to Make YouTube Channel Art
To make a creative YouTube video, you may also need a powerful video editing software. Check how to edit a YouTube video in Filmora video editor and download it to try.
You may also like: Best video editing software for YouTube
Part 5: Tips on How to Make Good YouTube Thumbnails - Get More Clicks
The thumbnails of your videos play a huge role in convincing people to watch them; a good YouTube thumbnail will get you more views and more potential subscribers. This part will give you 6 tips on creating thumbnails that help grow your channel. Now let’s learn how to make thumbnails using Wondershare PixStudio.
1. Stay On Topic
Your thumbnail should tell a story; it should be clear from looking at it what viewers will get out of watching the video, be it knowledge or entertainment. If your thumbnail sets expectations that your video doesn’t deliver on, people will click away quickly. You may get views quickly, but you won’t get much watch time. That will tell YouTube’s search algorithm ‘people aren’t getting what they want from this, rank it lower’. That leads to fewer views over time, and gives the people who do manage to find your video a negative opinion of your channel.
Very few people intentionally use thumbnails that have nothing to do with the content of their videos – i.e, most people understand not to use a picture of a kitten in the thumbnail for their tech review, unless maybe their kitten is the one doing the review (which would be adorable, someone should do that). People who want serious advice won’t click, and people who click to see a kitten will click away fast.

This thumbnail had better be for a kitten’s iPhone review video or people will click away. Fast.
A mistake a lot of creators do make is creating a thumbnail that is meant to evoke an emotion which the video itself does not justify. For example, if you see a picture of a YouTuber looking nervous alongside text that reads ‘My Secret’, you will think they are going to share something deeply personal. You will be curious, and you may even be worried about them. You’ll probably click. Then, if their secret is that they don’t like pineapple on pizza, you’ll probably be angry. This technique gets clicks, but not a lot of watch time and it will lose you subs in the long run.
2. Don’t Be Mysterious
A good thumbnail doesn’t make people guess. Your thumbnail should tell people what’s in your video, not make them wonder about it. People want to know what they’re being asked to spend time watching.
Often, they will be looking for the answer to a specific question and will completely ignore anything that doesn’t show – in the thumbnail – that it has their answer.
Sometimes big channels can get away with stuff like this, because large portions of their audiences are interested in them as people and will already be curious about anything they post. This technique will not bring in new viewers, though.
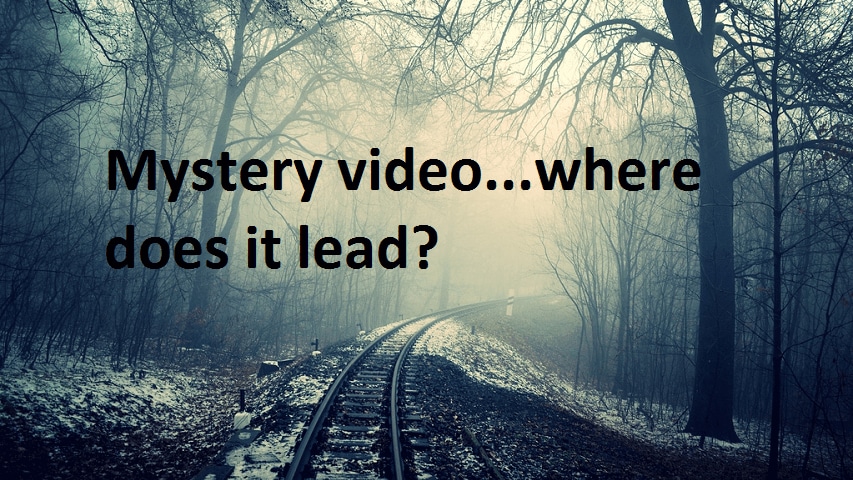
If this came up in a search for ‘smoky eye tutorial’, would you click it?
When people want answers, they want to feel confident that they video they click on will have those answers. If you have great content, then let people know it!
3. People Like People
Viewers are more likely to click on a thumbnail if they feel a connection when they look at it. One of the best ways to create a feeling of connection is through eye contact, and you can apply that principle to your YouTube thumbnails easily.
Just make sure you’re in them.
You can either compose a photo to use as your thumbnail, or use a screenshot from your video. Ideally, the image of you will convey the emotional tone of the video and tell potential viewers what it is about, besides you.
So, if you want to post a funny video that is also about making brownies, maybe a picture of you smiling while holding up a tray of brownies would be a better direction than just showing the brownies?
4. Check Out The Competition
Before you post your video, type your topic into YouTube’s search engine and see what comes up. This will give you insight into what kinds of thumbnails are performing well for other people, as well as what you can do to stand out in comparison.
Phil starts talking about thumbnails at 6:09, and he has great tips on checking out your competition!
For example, if all five of the top-ranked videos for the search ‘how to build a cabinet’ show images of the YouTuber smiling while holding a power tool, then your thumbnail for a video on the same topic should also be a picture of you smiling and holding a power tool. You know that works, so why not do it?
5. Use Color in Interesting Ways
You want to use colors that will help you stand out from the other search results. While checking out your competition if you notice that all the people in the other thumbnails are wearing black or navy blue, it will be a good idea for you to wear a brighter color for your shoot to grab a bit more attention.
Beyond simply using colors that are different from other people’s colors, you should consider the emotions different colors trigger.
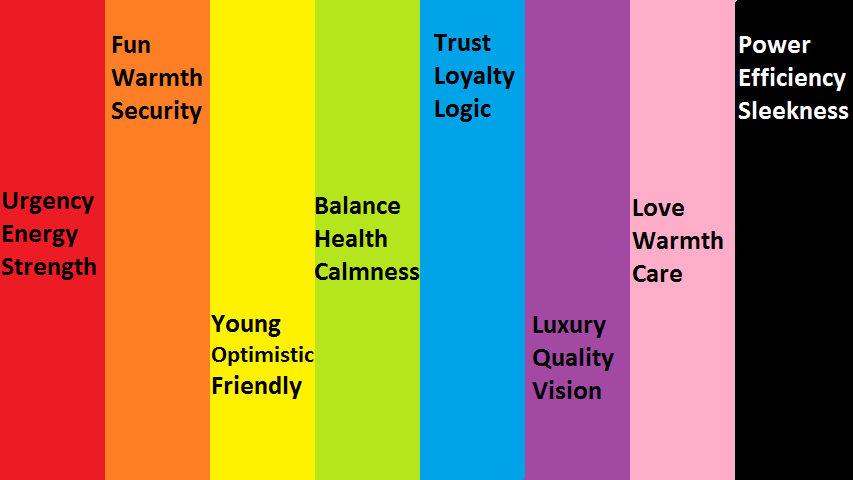
Maybe don’t use a lot of green and yellow in the thumbnail for your angry video rant?
6. Make Your Text Huge
Usually, you’ll want to use a bit of text in your thumbnail. It might be the full title of your video, or just a keyword or phrase. You don’t want to use a full sentence because you won’t have room for it if you’re using huge text.
The reason you should use huge text is so that people can read it. Remember that when people see your thumbnail in their search results, it will be much smaller than it will look while you are creating it. Text that looks big enough while you are creating your thumbnail will be much smaller when people are actually trying to read it, and that goes double for viewers watching on their small smartphone screens.
Frequently Asked Questions about YouTube Thumbnail
1. What is YouTube Thumbnail?
When you upload a video on YouTube, YouTube gives you three images to choose from in the selection of your video’s thumbnail image. These three images are just freeze-frame snapshots from different parts of your video, which may not tell your viewers what your video is really all about.
2. Can You Change YouTube Thumbnail After Publishing?
Yes, you can replace the auto-generated thumbnail with the customized thumbnail you like. But YouTube only allows verified YouTube accounts to upload custom thumbnail images.
3. How Long Does It Take for a Thumbnail to Change on YouTube?
Normally, if you have a good internet connection, you can see the thumbnail is changed within 10 seconds.
4. Why YouTube Thumbnail is Important?
When you get more people watching your video for longer, it increases your watch time and tells YouTube’s search algorithm ‘people like this, rank it higher’. Being ranked higher gets you more views, and even more watch time. It’s a wonderful cycle that all begins with a great thumbnail (paired with a good title and the right tags).
Richard Bennett
Richard Bennett is a writer and a lover of all things video.
Follow @Richard Bennett
Richard Bennett
Mar 27, 2024• Proven solutions
YouTube custom thumbnails are a great way to get people’s attention to your YouTube video. It’s a pretty simple process but if you are wondering how to create a thumbnail and add the thumbnail to YouTube video and customize it with the correct size. You have come to the right place. While in this article, I will show you how to create and add a thumbnail to a YouTube video and how to customize the YouTube video thumbnail. Follow these easy steps below and add eyecatching customed thumbnails to your YouTube videos in no time.
- Part 1: Create and Add Custom Thumbnails to YouTube
- Part 2: Tools to Create Custom YouTube Video Thumbnails
- Part 3: How to Change A Thumbnail On YouTube
- Part 4: Things You Need to Know Before Making a YouTube Custom Thumbnail
- Part 5: Tips on How to Make Good YouTube Thumbnails to Get More Clicks
- Part 6: YouTube Thumbnail FAQs
How To Add Custom Thumbnails to Your YouTube Videos [Steps, Tools and Tips]
We have just made a video tutorial about how to make a YouTube video thumbnail, check it below to find out the tips and tricks of making customized YouTube thumbnail.
Part 1: How to Make a Thumbnail for YouTube and Add Custom Thumbnails to YouTube
After you’ve verified your account and made your thumbnail, it’s finally time to upload it to your video and make a custom thumbnail. To do this, go to Creator Studio and then Video Manager. You’ll see a button labeled “Edit” next to each video, and an arrow pointing down. Click Thumbnail Editor.
In Thumbnail Editor, you can use the still images in the video as a thumbnail, choose a solid background color for the thumbnail, or add other images from your computer. I will show you the steps of how to customize the video still as a video thumbnail.
1. Preview the video and choose the target video still. You can click the Playback button and check the video and pause it at the desired frame. Or, you can step through each frame by clicking the Preview Frame button and Next Frame icon. Click Next to continue.
2. And now, you can add text, image and shape overlays to the thumbnail. You can change the text font, size, opacity and more.
3. Click Next to save the thumbnail and you will see how the thumbnail displays on different platforms such as YouTube, Facebook and Twitter. Click Save to save the video thumbnail.
In this way, you can add a custom thumbnail to the new videos and change the video thumbnail of the previously uploaded videos.
Part 2: Thumbnail Makers to Create Custom YouTube Thumbnails
Of course, you can use some of the best tools to make a YouTube video thumbnail. In this part, we will show you some of the best tools to create custom YouTube thumbnails.
Download Mac Version ](https://tools.techidaily.com/wondershare/filmora/download/ )
1. Create YouTube Thumbnail with Online solution - Canva
Canva is a free, powerful online image editing program with tons of great templates to get you started. One of their templates just happens to be YouTube thumbnails. Open Canva and select the “YouTube Thumbnail” design type. Use your own photo or choose from a huge library, then add text and effects to really make it stand out. Save and share — easy as that.
Check this video tutorial to see how to Make a Youtube Thumbnail using Canva.
You may also like: Best online Photo Editor
2. Design YouTube thumbnail with a Desktop solution - Gimp
Gimp is one of the most popular image editing programs around for one very simple reason: it’s powerful and free! Where Canva uses a lot of templates, Gimp gives you absolute, full control over how you want your image to look. Make a 1280x720 image and start putting together your eye-catching thumbnail exactly how you want to.
Check this video tutorial to see how to make professional Thumbnails for YouTube Videos with Gimp:
Part 3: How to Change A Thumbnail On YouTube
Note: YouTube allows verified YouTube accounts (accounts that provided YouTube with a working phone number) to upload custom thumbnail images and change them accordingly.
In this part, we’ll be going over how to change a thumbnail image on YouTube. There are pictures to make it easy to follow along.
- After signing into YouTube with your Google account, click on your profile on the top right corner. Click on YouTube Studio from the drop-down menu.
- On the left side of the page, click on Videos and then find your video and click on the details button.
- Find the Thumbnail section in the basic video details tab, and then click the Upload thumbnail to select the image that you want to upload.
- Finally, click on the Save button on the right upper corner. And just like that, in seven easy steps, we’re done changing the thumbnail of a YouTube video.
If you don’t have an image to upload but you want to check out some online resources to make your own, check out our Top YouTube Thumbnail Makers .
Part 4: Things You Need to Know Before Making a Custom Thumbnail
- About the proper YouTube video thumbnail size: Your thumbnail should be 1280x720 pixels in size and be less than 2MB. The minimum width of the image is 640 pixels.
- About the YouTube Image thumbnail format: Use .JPG, .PNG, .GIF or .BMP files for your thumbnail image.
- You’ll want your thumbnails to stand out. Bright colored text is a simple, easy way to draw people’s attention. Red, white, yellow, or orange are all popular choices.
- You can even do a little homework to see what colors others are using for similar videos to yours, and then choose different colors to stand out.
One word of warning: your thumbnail should be related to the content of your video. Misleading thumbnail images, if reported, will reflect poorly on your channel. You’ll get a negative rating in the community status part of your channel. This can actually remove your ability to use custom thumbnails, so keep it honest!
You may also like: How to Make YouTube Channel Art
To make a creative YouTube video, you may also need a powerful video editing software. Check how to edit a YouTube video in Filmora video editor and download it to try.
You may also like: Best video editing software for YouTube
Part 5: Tips on How to Make Good YouTube Thumbnails - Get More Clicks
The thumbnails of your videos play a huge role in convincing people to watch them; a good YouTube thumbnail will get you more views and more potential subscribers. This part will give you 6 tips on creating thumbnails that help grow your channel. Now let’s learn how to make thumbnails using Wondershare PixStudio.
1. Stay On Topic
Your thumbnail should tell a story; it should be clear from looking at it what viewers will get out of watching the video, be it knowledge or entertainment. If your thumbnail sets expectations that your video doesn’t deliver on, people will click away quickly. You may get views quickly, but you won’t get much watch time. That will tell YouTube’s search algorithm ‘people aren’t getting what they want from this, rank it lower’. That leads to fewer views over time, and gives the people who do manage to find your video a negative opinion of your channel.
Very few people intentionally use thumbnails that have nothing to do with the content of their videos – i.e, most people understand not to use a picture of a kitten in the thumbnail for their tech review, unless maybe their kitten is the one doing the review (which would be adorable, someone should do that). People who want serious advice won’t click, and people who click to see a kitten will click away fast.
This thumbnail had better be for a kitten’s iPhone review video or people will click away. Fast.
A mistake a lot of creators do make is creating a thumbnail that is meant to evoke an emotion which the video itself does not justify. For example, if you see a picture of a YouTuber looking nervous alongside text that reads ‘My Secret’, you will think they are going to share something deeply personal. You will be curious, and you may even be worried about them. You’ll probably click. Then, if their secret is that they don’t like pineapple on pizza, you’ll probably be angry. This technique gets clicks, but not a lot of watch time and it will lose you subs in the long run.
2. Don’t Be Mysterious
A good thumbnail doesn’t make people guess. Your thumbnail should tell people what’s in your video, not make them wonder about it. People want to know what they’re being asked to spend time watching.
Often, they will be looking for the answer to a specific question and will completely ignore anything that doesn’t show – in the thumbnail – that it has their answer.
Sometimes big channels can get away with stuff like this, because large portions of their audiences are interested in them as people and will already be curious about anything they post. This technique will not bring in new viewers, though.
If this came up in a search for ‘smoky eye tutorial’, would you click it?
When people want answers, they want to feel confident that they video they click on will have those answers. If you have great content, then let people know it!
3. People Like People
Viewers are more likely to click on a thumbnail if they feel a connection when they look at it. One of the best ways to create a feeling of connection is through eye contact, and you can apply that principle to your YouTube thumbnails easily.
Just make sure you’re in them.
You can either compose a photo to use as your thumbnail, or use a screenshot from your video. Ideally, the image of you will convey the emotional tone of the video and tell potential viewers what it is about, besides you.
So, if you want to post a funny video that is also about making brownies, maybe a picture of you smiling while holding up a tray of brownies would be a better direction than just showing the brownies?
4. Check Out The Competition
Before you post your video, type your topic into YouTube’s search engine and see what comes up. This will give you insight into what kinds of thumbnails are performing well for other people, as well as what you can do to stand out in comparison.
Phil starts talking about thumbnails at 6:09, and he has great tips on checking out your competition!
For example, if all five of the top-ranked videos for the search ‘how to build a cabinet’ show images of the YouTuber smiling while holding a power tool, then your thumbnail for a video on the same topic should also be a picture of you smiling and holding a power tool. You know that works, so why not do it?
5. Use Color in Interesting Ways
You want to use colors that will help you stand out from the other search results. While checking out your competition if you notice that all the people in the other thumbnails are wearing black or navy blue, it will be a good idea for you to wear a brighter color for your shoot to grab a bit more attention.
Beyond simply using colors that are different from other people’s colors, you should consider the emotions different colors trigger.
Maybe don’t use a lot of green and yellow in the thumbnail for your angry video rant?
6. Make Your Text Huge
Usually, you’ll want to use a bit of text in your thumbnail. It might be the full title of your video, or just a keyword or phrase. You don’t want to use a full sentence because you won’t have room for it if you’re using huge text.
The reason you should use huge text is so that people can read it. Remember that when people see your thumbnail in their search results, it will be much smaller than it will look while you are creating it. Text that looks big enough while you are creating your thumbnail will be much smaller when people are actually trying to read it, and that goes double for viewers watching on their small smartphone screens.
Frequently Asked Questions about YouTube Thumbnail
1. What is YouTube Thumbnail?
When you upload a video on YouTube, YouTube gives you three images to choose from in the selection of your video’s thumbnail image. These three images are just freeze-frame snapshots from different parts of your video, which may not tell your viewers what your video is really all about.
2. Can You Change YouTube Thumbnail After Publishing?
Yes, you can replace the auto-generated thumbnail with the customized thumbnail you like. But YouTube only allows verified YouTube accounts to upload custom thumbnail images.
3. How Long Does It Take for a Thumbnail to Change on YouTube?
Normally, if you have a good internet connection, you can see the thumbnail is changed within 10 seconds.
4. Why YouTube Thumbnail is Important?
When you get more people watching your video for longer, it increases your watch time and tells YouTube’s search algorithm ‘people like this, rank it higher’. Being ranked higher gets you more views, and even more watch time. It’s a wonderful cycle that all begins with a great thumbnail (paired with a good title and the right tags).
Richard Bennett
Richard Bennett is a writer and a lover of all things video.
Follow @Richard Bennett
Also read:
- 2024 Approved Cut Down Clutter How to Efficiently Handle Unwanted YouTube Content (PC/Mobile)
- Comprehensive Guide Your Shorts' Hidden Thumbnails
- Ultimate Crew for Photographic Rhythm Films
- 2024 Approved Detailed Tutorial Convert Your Shorts to the Best MP4
- 2024 Approved Critical ASMR Series to Experience
- 2024 Approved Capture Your Audience The Smartphone Guide to YouTube Thumbnails
- [New] Delving Into Mr. Beast's Economic Dominance
- 2024 Approved Audiences on the Rise Gauge
- Achieving Visual Excellence ASPECT RATIO Mastery on YOUTUBE
- 2024 Approved Avoid Pitfalls Maintaining YouTube Thumbnail Quality
- In 2024, Affiliate Allies for Small Channels An Easy Approach
- Making Everyday Moments Memorable on YouTube
- Access All Subtitles Top 10 Free Tools for YouTube Videos
- How to Edit YouTube Videos in Finalcut Pro for 2024
- [Updated] Dive Deep Into the Past with These Top 10 Student-Friendly YT Channels
- Insightful Analysis The Impact and Mechanics of YouTube's Shorts Fund
- How to Go Frame by Frame on YouTube Video? [5 Methods]
- In 2024, Essential Tips for Creating Compelling Free Ads on YouTube
- [Updated] Breaking Into Livestrances A Gamers' Guide to YouTube Success
- Essential List 5 Leading YouTube Shortened URL Services for 2024
- Swapping Sequence A Simple Guide to Reversed Playlists
- [Updated] Enhance Your Shorts' Appeal with Personalized Thumbnails
- Cognitive Conclaves Educational YT Powerhouses for 2024
- ASMR Video Knowledge for Beginners for 2024
- In 2024, Ace Advertising and Analytics YouTube's Universal Monetization Techniques
- Live Streamer Audience Metrics
- 2024 Approved Enhancing YouTube Presence with Custom Images
- [New] Elevating the End Scene in YouTube Productions
- [Updated] Beauty Bliss Essential Tutorials for Ultimate Style
- 2024 Approved Celebratory Moments Captured A List of the Most Beautiful Wedding Videos (8)
- 2024 Approved Cutting-Edge Strategies for YouTube Shorts to MP4 Exportation
- Crafting the Perfect Aesthetic with Controlled Lighting
- Convenient Method to Design Original Shorts Thumbnails for 2024
- 2024 Approved Elevate Youtube Presence Ideal Release Windows
- [New] Elevate Your Learning The Top 10 Educational Historians YT
- [New] Discovering the Top 10 News-Driven YouTube Pages
- In 2024, 10+ Free Apps to Convert YouTube Videos on Demand
- In 2024, Decoding Your YouTube's View-Zero Dilemma 10 Insights
- In 2024, A Step-by-Step Approach to Professional Video Sharing
- [New] Elevate Meta Descriptions Top Template Strategies
- [New] Brush Up Your Youtube Videos with Color Correction
- Discovering the Stars of YouTube's Best Music Videos, 2023
- Brevity in Action The Process of Shortening YouTube Videos for 2024
- In 2024, Elevate Your Channels Visibility Through Proven Methods
- In 2024, Captivating Viewers Top 10 Creative YT Reaction Tactics
- [New] A Peek Into Popularity List of the Top 10 YouTubers
- 2024 Approved Editing on Steroids Top 40 Final Cut Pro X Keyboard Shortcuts
- [New] Getting Started with OBS on Apple A Comprehensive Guide
- Updated In 2024, WMV Video Splitter Free Download Top Choices
- 2024 Approved Laughing Matters The Viral Meme Scoreboard
- [New] 2024 Approved From the Field to Social Sharing GoPro Streams on Facebook/Periscope
- Complete Tutorial to Use GPS Joystick to Fake GPS Location On Motorola G54 5G | Dr.fone
- In 2024, Ultimate Guide on Google Pixel 7a FRP Bypass
- Time Traveler's Guide Mastering Video Speed Adjustment
- Top 6 Apps/Services to Trace Any Motorola Moto G 5G (2023) Location By Mobile Number | Dr.fone
- Android Screen Stuck General Realme GT Neo 5 Partly Screen Unresponsive | Dr.fone
- [Updated] 2024 Approved Boost Engagement The Art of Adding Borders on Insta
- [Updated] 2024 Approved How to Get Snapchat on Mac? [Easy Guide]
- [New] Ballad Bliss Songs that Score Big on 'Will You?' Questions
- Best 10 Mock Location Apps Worth Trying On Realme GT Neo 5 | Dr.fone
- In 2024, Which Pokémon can Evolve with a Moon Stone For Gionee F3 Pro? | Dr.fone
- [Updated] Ultimate Earnings Prediction Top 6 TikTok Tools for 2024
- [Updated] Capturing the Action Overwatch Video Recordings for 2024
- How Can Xiaomi 14 UltraMirror Share to PC? | Dr.fone
- [New] How to Make Money on Vimeo Your Ultimate Guide to Vimeo Monetization
- Exceptional List Superior TikTok Downloaders (Watermark-Free)
- New Best Free Online MP3 Joiner to Merge Mp3 for Free for 2024
- How to Fix My Apple iPhone 11 Pro Max Location Is Wrong | Dr.fone
- [New] In 2024, Elite Selections 5 Fast Screen Recorders
- Solved Warning Camera Failed on Itel S23+ | Dr.fone
- How Can We Bypass Poco C50 FRP?
- New How To Make Split Screen Videos in Filmora
- Updated Harmonic Splitters Easy-to-Employ Perfect for Newcomers & Professionals Alike
- In 2024, How to Unlock Samsung Galaxy A05 Bootloader Easily
- Updated In 2024, Perfect Pitch with Autotune Installation Tutorial for Audacity Enthusiasts
- Best Fixes For Tecno Pop 7 Pro Hard Reset | Dr.fone
- New Finding High-Quality Monstrous Soundscapes for 2024
- [Updated] In 2024, OBS Repair Camera Functioning Now
- Remove Device Supervision From your Apple iPhone X
- Full Guide to Catch 100 IV Pokémon Using a Map On Poco C51 | Dr.fone
- In 2024, Dose Life360 Notify Me When Someone Checks My Location On Vivo Y100? | Dr.fone
- 5 Ways to Track Xiaomi Redmi Note 12 5G without App | Dr.fone
- [Updated] 2024 Approved IPad Timelapse Essentials for Beginners
- PlayCapture Pro Your Own Screen Recorder, Free for 2024
- Updated 2024 Approved Mastering FCP Editing Audio Like a Pro
- Title: "Everyday Epics in a Lens Tips to Avoid Common Mistakes"
- Author: Kevin
- Created at : 2024-05-25 15:12:48
- Updated at : 2024-05-26 15:12:48
- Link: https://youtube-videos.techidaily.com/everyday-epics-in-a-lens-tips-to-avoid-common-mistakes/
- License: This work is licensed under CC BY-NC-SA 4.0.
