
:max_bytes(150000):strip_icc():format(webp)/TikTok-vs-YouTube-a42ac0c72a4f4b1d9da8b7ae85b4205e.jpg)
"Essential 11 Zero-Cost YouTube Moniker Makers"
Essential 11 Zero-Cost YouTube Moniker Makers
11 Best Free YouTube Name Generators You Should Try

Richard Bennett
Oct 26, 2023• Proven solutions
A YouTube name has great importance for a dedicated YouTuber. Whether you want to hold great brand value in the market or trying to come up with a funny, catchy name, here’s a list of name generator software tools to get you the best YouTube channel name.
There are so many options for personalizing a cool YouTube name so you can get ideas for a catchy name. Check out some of the most commonly used YouTube name generator software that has achieved higher ranking from professionals.
- Part 1: Best 7 Free YouTube Name Generators Online
- Part 2: Best 4 Free YouTube Name Generator Quizzes
Best YouTube Video Editor - Filmora
After you have created your YouTube channel, do you want to edit videos and upload your first video? Here we recommend using Filmora to easily edit YouTube videos.
You can use Filmora to make YouTube videos with built-in royalty-free audio. Filmroa9 also can help you make YouTube intros. It includes more than 500 templates, transition, effects, and text resources.
Filmora is the best choice to make a split-screen and green screen video for YouTubers. Download it now to have a try!


Part 1: Best 7 Free YouTube Name Generators Online
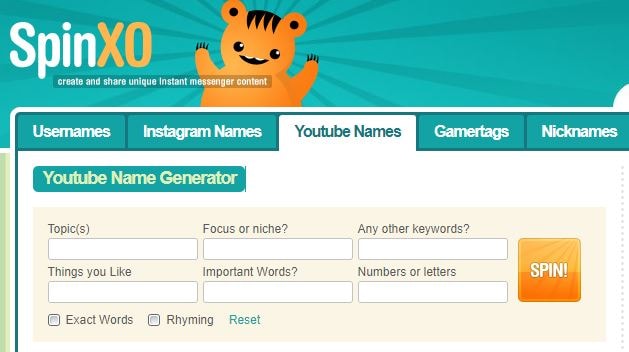
1. Spinxo
This platform allows users to find cool names as per their descriptions for characters, niche, etc. You can start the search with universal keywords as well as with a specific set of details. Spinxo also allows YouTubers to organize contests online to get the best name suggestions.
- Queries Needed: Queries can be raised on the basis of numbers of things you like such as Keywords, Niche, and Topics.
- Best for: Those who have few specific directions about the name.
- No. of Results: 30 names.
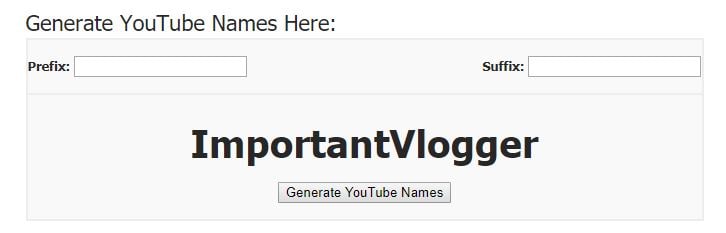
2. Name Generator
This name generator tool allows users to get the best combination of random names where details are more specific to a video related to your works like “vids,” “TV,” “director,” “channel,” etc. Every time you hit the generate button, it will bring out random names for selection.
- Queries Needed: Based on Suffix and Prefix
- Best for: Those who have particular directions with the name.
- No. of Results: 1
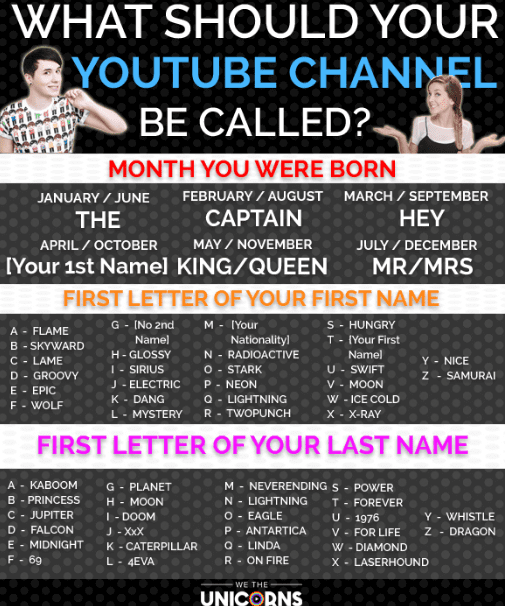
3. We the Unicorns
Here you will get fun-oriented suggestions for your YouTube names and the best part is that they have the ability to attract more audiences towards your platform. It uses details related to your birth, first name, and last name to create funny results.
- Queries Needed: NA
- Best for: Ultimate choice for those who need funny inspirations.
- No. of Results: A lot.
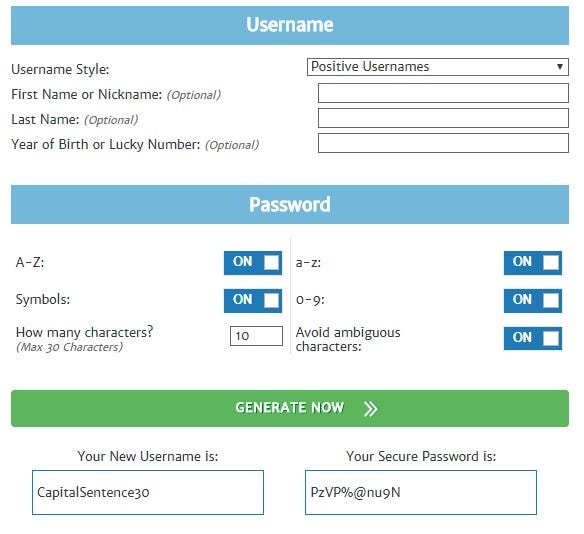
4. Speedy Password
Here you will be able to generate truly random, highly secure, funny passwords along with unique and funny YouTube usernames. Users simply need to update their preferences and it will display the best combinations.
- Queries Needed: Run queries on the basis of Keyword, Lucky Number, and Name Style.
- Best for: Those who follow certain directions for name generations.
- No. of Results: One name and one password.
5.Screen Name Generator
Gamers will definitely love this name generator tool that works on the basis of the prefix provided by YouTubers. It has several categories like fantasy name generators, username generators, place name generators, thing name generators, etc.
- Queries Needed: One can enquire with suffix and prefix.
- Best for: Those who have a specific direction and need for the name.
- No. of Results: One name.
6.Username Generator
Username Generator makes it easier to find game-specific usernames. Users can enter keywords and number of lines as their preferences and soon the software will provide the most appropriate results.
- Queries Needed: Based on the keywords only.
- Best for: those of all genres.
- No. of Results: Hundreds of names.
7.Scratch
With this tool, you can get names with caps specifications that look cool. You can pick game highlights for your channel name and in order to get much finer results one can prefer to put several words into the list.
- Queries Needed: Works with keywords only.
- Best for: Those of all genres.
- No. of Results: One name.
Part 2: Best 4 Free YouTube Name Generator Quizzes
8.ProProfs
It will help you get a unique YouTube name that matches your personality and your real name. You will get a kick out of the combination of questions served up in this quiz.
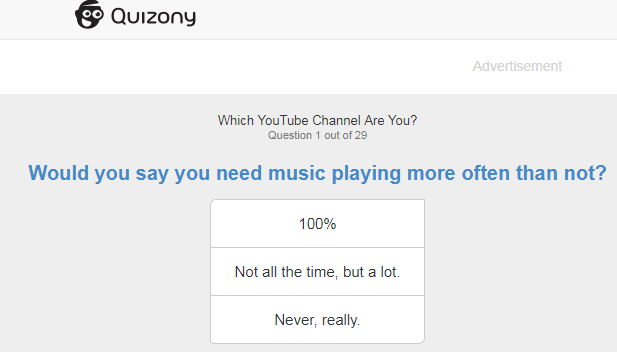
9.Quizony
A set of crazy questions will decide an interesting name for your game channel and it will be definitely loved by viewers.
10.Go to Quiz
If you want to get rid of boring names and want to switch to something effective based on your hobbies, music preferences, grades and personality then Go to Quiz is the best platform for you.
11.QuizBone
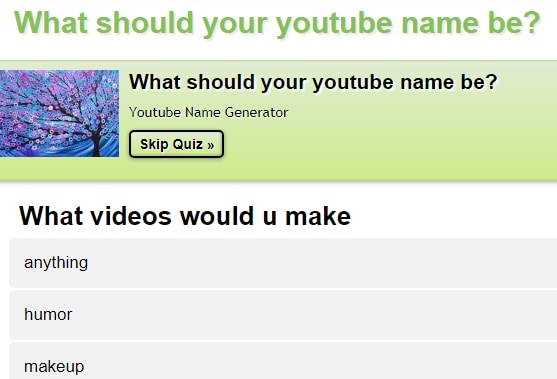
This YouTube name generator first asks you about your video content preferences, whether it is related to beauty, rants, giveaways, makeup, humor, or anything in a wide range and then produces relevant name that suits your personality as per quiz answers,
Think you got a funny or cool channel name? Share in the comments, and tell us if you’ve ever used a free YouTube name generator!
Richard Bennett
Richard Bennett is a writer and a lover of all things video.
Follow @Richard Bennett
Richard Bennett
Oct 26, 2023• Proven solutions
A YouTube name has great importance for a dedicated YouTuber. Whether you want to hold great brand value in the market or trying to come up with a funny, catchy name, here’s a list of name generator software tools to get you the best YouTube channel name.
There are so many options for personalizing a cool YouTube name so you can get ideas for a catchy name. Check out some of the most commonly used YouTube name generator software that has achieved higher ranking from professionals.
- Part 1: Best 7 Free YouTube Name Generators Online
- Part 2: Best 4 Free YouTube Name Generator Quizzes
Best YouTube Video Editor - Filmora
After you have created your YouTube channel, do you want to edit videos and upload your first video? Here we recommend using Filmora to easily edit YouTube videos.
You can use Filmora to make YouTube videos with built-in royalty-free audio. Filmroa9 also can help you make YouTube intros. It includes more than 500 templates, transition, effects, and text resources.
Filmora is the best choice to make a split-screen and green screen video for YouTubers. Download it now to have a try!
Part 1: Best 7 Free YouTube Name Generators Online
1. Spinxo
This platform allows users to find cool names as per their descriptions for characters, niche, etc. You can start the search with universal keywords as well as with a specific set of details. Spinxo also allows YouTubers to organize contests online to get the best name suggestions.
- Queries Needed: Queries can be raised on the basis of numbers of things you like such as Keywords, Niche, and Topics.
- Best for: Those who have few specific directions about the name.
- No. of Results: 30 names.
2. Name Generator
This name generator tool allows users to get the best combination of random names where details are more specific to a video related to your works like “vids,” “TV,” “director,” “channel,” etc. Every time you hit the generate button, it will bring out random names for selection.
- Queries Needed: Based on Suffix and Prefix
- Best for: Those who have particular directions with the name.
- No. of Results: 1
3. We the Unicorns
Here you will get fun-oriented suggestions for your YouTube names and the best part is that they have the ability to attract more audiences towards your platform. It uses details related to your birth, first name, and last name to create funny results.
- Queries Needed: NA
- Best for: Ultimate choice for those who need funny inspirations.
- No. of Results: A lot.
4. Speedy Password
Here you will be able to generate truly random, highly secure, funny passwords along with unique and funny YouTube usernames. Users simply need to update their preferences and it will display the best combinations.
- Queries Needed: Run queries on the basis of Keyword, Lucky Number, and Name Style.
- Best for: Those who follow certain directions for name generations.
- No. of Results: One name and one password.
5.Screen Name Generator
Gamers will definitely love this name generator tool that works on the basis of the prefix provided by YouTubers. It has several categories like fantasy name generators, username generators, place name generators, thing name generators, etc.
- Queries Needed: One can enquire with suffix and prefix.
- Best for: Those who have a specific direction and need for the name.
- No. of Results: One name.
6.Username Generator
Username Generator makes it easier to find game-specific usernames. Users can enter keywords and number of lines as their preferences and soon the software will provide the most appropriate results.
- Queries Needed: Based on the keywords only.
- Best for: those of all genres.
- No. of Results: Hundreds of names.
7.Scratch
With this tool, you can get names with caps specifications that look cool. You can pick game highlights for your channel name and in order to get much finer results one can prefer to put several words into the list.
- Queries Needed: Works with keywords only.
- Best for: Those of all genres.
- No. of Results: One name.
Part 2: Best 4 Free YouTube Name Generator Quizzes
8.ProProfs
It will help you get a unique YouTube name that matches your personality and your real name. You will get a kick out of the combination of questions served up in this quiz.
9.Quizony
A set of crazy questions will decide an interesting name for your game channel and it will be definitely loved by viewers.
10.Go to Quiz
If you want to get rid of boring names and want to switch to something effective based on your hobbies, music preferences, grades and personality then Go to Quiz is the best platform for you.
11.QuizBone
This YouTube name generator first asks you about your video content preferences, whether it is related to beauty, rants, giveaways, makeup, humor, or anything in a wide range and then produces relevant name that suits your personality as per quiz answers,
Think you got a funny or cool channel name? Share in the comments, and tell us if you’ve ever used a free YouTube name generator!
Richard Bennett
Richard Bennett is a writer and a lover of all things video.
Follow @Richard Bennett
Optimize Your Vlogs with Smart YouTube Editing Tips
How to Trim YouTube Videos?
Richard Bennett
Mar 27, 2024• Proven solutions
The world’s largest video sharing platform currently has nearly two billion active monthly users who upload over 400 hours of video content to their channels each minute. It is to see from these statistics why every video aspiring YouTubers post on their channels has to be perfect in every way in order to reach a wide audience. Fortunately, trimming a video even after you’ve uploaded it to YouTube is a quick and easy process, and in this article, we are going to show you a few different methods you can use to trim the videos you upload to YouTube. So, let’s get started.
In this article
- How to Trim a Video After You Upload it to Your YouTube Channel?
- Trimming a Video Before Posting On YouTube with Filmora Video Editor [4 Ways]
- Using Online Video Editing Platforms to Trim YouTube Videos
How to Trim a Video After You Upload it to Your YouTube Channel?
The YouTube Studio is no longer in beta phase, which means that the feature is here to stay. This is good news for all video creators who frequently update their YouTube videos after they upload them, as they no longer have to go through the endless uploads just because they wanted to trim a video.
Make sure that you’re signed into your YouTube channel, then click on your profile picture and select the YouTube Studio (Beta) option. On the left side of the screen, you’ll be able to see a menu that contains different subcategories like Analytics, Dashboard or Videos, so just click on the Videos option and proceed to select a video you’d like to trim. After the Videos submenu appears on the screen you should click on the Editor option and the video you selected will open in the YouTube’s video editor.

Click on the Trim button to start trimming the video and drag the blue bars located at the start and the end of the file to designate the portion of the video you’d like to remove. Preview the changes and confirm what you’ve made by clicking on the Save button located in the upper right corner of the screen and the new shortened version of the video will become available within a couple of hours.

In this way, you don’t need to take down the original video, edit it and re-upload. One of the benefits of trimming YouTube videos with the Trim feature in YouTube Editor is that this will keep your video URL and views and ranks etc.
Trimming a Video Before Posting On YouTube with Filmora Video Editor [4 Ways]
Method 1: Trim on Timeline
YouTubers who don’t want to rely on YouTube’s video editing capabilities can trim their footage with Filmora (to be honest, the Editor in YouTube platform has limited features). Filmora video editing software for PC and Mac computers offers a few different tools for trimming videos. After you’ve created a new project in Filmora, you should import a video clip into the editor by clicking on the Import drop-down menu and select the Import Media Files option. Each file you add to a project will be displayed in the Media tab, and you can just drag and drop it to a video track on the timeline.
All you have to do in order to trim a video after you’ve placed it on the timeline is drag one of its ends to the left or to the right. As you drag one of the clip’s edges the editor will only display the remaining footage while rendering the rest invisible. If at any point you want to access a portion of the video you’ve trimmed you just have to extend the file by dragging it until you’re able to see the segment you’re searching for.

Method 2: Using Filmora Split Tool
Filmora’s Split tool can help you separate the portion of the clip you want to remove from the segment you’d like to keep. Simply place the playhead at the exact location in the video clip where you want to make a cut, and click on the Split icon that looks like a pair of scissors. After the video is split, you should click on the clip you no longer need in order to select it and then hit the Delete button on your keyboard to remove it from the timeline.
Method 3: Using Scene Detection
Wondershare’s video editor also offers an automatic way to split a video clip into a number of separate scenes. Right-click on the video file located in the Filmora’s Media tab, and select the Scene Detection option from the menu and proceed to click on the Detect button, after the Scene Detection window pops up on the screen. The software will then automatically analyze the footage and divide it into separate scenes. Simply click on the Add to Timeline button once the process is completed to continue editing the video clip you’ve just split.

Method 4: Using Instant Cutter Tool
The Instant Cutter Tool enables you to quickly trim or merge high-resolution files recorded on action cameras as soon as you import them into a project in Filmora. Select the Import with Instant Cutter Tool option from the Import drop-down menu and wait for the Filmora Instant Cutter window to appear on the screen. In the upper left corner of this window, you will be able to see Trim and Merge tabs. Make sure that the Trim tab is selected and then click on the Open File button to import a video clip you’d like to trim. You can then use the trimming sliders to designate the parts of the video you’d like to remove or the set the In and Out points by clicking on the Set In Point or Set Out Point icons. Click on the Export button to save the new version of the video clip and click OK to complete the process.

Using Online Video Editing Platforms to Trim YouTube Videos
In case you’re looking for a tool that lets you save extracts of scenes from YouTube to your computer free of charge YT Cutter may be one of your best options.

This online video editing platform is remarkably easy to use since you just have to copy the link to the YouTube video you’d like to trim into YT Cutter’s URL box and then select how long the new video should be. Click on the Start and End buttons to set the duration of the video and click on the Download button to choose if you want to create a video, GIF or an audio file. The trimmed YouTube video will be available for download as soon as the platform processes it, and you just need to specify a folder on your hard drive before clicking on the Save button.
There’re many online video trimmers available on the market, some of them are totally free to use, check our guide about How to Trim Videos for Free Online .
Read More to Get : How to Download YouTube Videos without Any Software Easily >>
Conclusion
Trimming a video online or with a video editing software like Filmora is an effortless task that can be completed in just a couple of minutes. However, it is better to complete the entire video editing process before you upload a video to your YouTube channel because YouTube Studio and other online video editing platforms still offer only a limited amount of video editing tools. Which method of trimming YouTube videos do you like using the most? Leave a comment and share your opinions with us.
Richard Bennett
Richard Bennett is a writer and a lover of all things video.
Follow @Richard Bennett
Richard Bennett
Mar 27, 2024• Proven solutions
The world’s largest video sharing platform currently has nearly two billion active monthly users who upload over 400 hours of video content to their channels each minute. It is to see from these statistics why every video aspiring YouTubers post on their channels has to be perfect in every way in order to reach a wide audience. Fortunately, trimming a video even after you’ve uploaded it to YouTube is a quick and easy process, and in this article, we are going to show you a few different methods you can use to trim the videos you upload to YouTube. So, let’s get started.
In this article
- How to Trim a Video After You Upload it to Your YouTube Channel?
- Trimming a Video Before Posting On YouTube with Filmora Video Editor [4 Ways]
- Using Online Video Editing Platforms to Trim YouTube Videos
How to Trim a Video After You Upload it to Your YouTube Channel?
The YouTube Studio is no longer in beta phase, which means that the feature is here to stay. This is good news for all video creators who frequently update their YouTube videos after they upload them, as they no longer have to go through the endless uploads just because they wanted to trim a video.
Make sure that you’re signed into your YouTube channel, then click on your profile picture and select the YouTube Studio (Beta) option. On the left side of the screen, you’ll be able to see a menu that contains different subcategories like Analytics, Dashboard or Videos, so just click on the Videos option and proceed to select a video you’d like to trim. After the Videos submenu appears on the screen you should click on the Editor option and the video you selected will open in the YouTube’s video editor.
Click on the Trim button to start trimming the video and drag the blue bars located at the start and the end of the file to designate the portion of the video you’d like to remove. Preview the changes and confirm what you’ve made by clicking on the Save button located in the upper right corner of the screen and the new shortened version of the video will become available within a couple of hours.
In this way, you don’t need to take down the original video, edit it and re-upload. One of the benefits of trimming YouTube videos with the Trim feature in YouTube Editor is that this will keep your video URL and views and ranks etc.
Trimming a Video Before Posting On YouTube with Filmora Video Editor [4 Ways]
Method 1: Trim on Timeline
YouTubers who don’t want to rely on YouTube’s video editing capabilities can trim their footage with Filmora (to be honest, the Editor in YouTube platform has limited features). Filmora video editing software for PC and Mac computers offers a few different tools for trimming videos. After you’ve created a new project in Filmora, you should import a video clip into the editor by clicking on the Import drop-down menu and select the Import Media Files option. Each file you add to a project will be displayed in the Media tab, and you can just drag and drop it to a video track on the timeline.
All you have to do in order to trim a video after you’ve placed it on the timeline is drag one of its ends to the left or to the right. As you drag one of the clip’s edges the editor will only display the remaining footage while rendering the rest invisible. If at any point you want to access a portion of the video you’ve trimmed you just have to extend the file by dragging it until you’re able to see the segment you’re searching for.
Method 2: Using Filmora Split Tool
Filmora’s Split tool can help you separate the portion of the clip you want to remove from the segment you’d like to keep. Simply place the playhead at the exact location in the video clip where you want to make a cut, and click on the Split icon that looks like a pair of scissors. After the video is split, you should click on the clip you no longer need in order to select it and then hit the Delete button on your keyboard to remove it from the timeline.
Method 3: Using Scene Detection
Wondershare’s video editor also offers an automatic way to split a video clip into a number of separate scenes. Right-click on the video file located in the Filmora’s Media tab, and select the Scene Detection option from the menu and proceed to click on the Detect button, after the Scene Detection window pops up on the screen. The software will then automatically analyze the footage and divide it into separate scenes. Simply click on the Add to Timeline button once the process is completed to continue editing the video clip you’ve just split.
Method 4: Using Instant Cutter Tool
The Instant Cutter Tool enables you to quickly trim or merge high-resolution files recorded on action cameras as soon as you import them into a project in Filmora. Select the Import with Instant Cutter Tool option from the Import drop-down menu and wait for the Filmora Instant Cutter window to appear on the screen. In the upper left corner of this window, you will be able to see Trim and Merge tabs. Make sure that the Trim tab is selected and then click on the Open File button to import a video clip you’d like to trim. You can then use the trimming sliders to designate the parts of the video you’d like to remove or the set the In and Out points by clicking on the Set In Point or Set Out Point icons. Click on the Export button to save the new version of the video clip and click OK to complete the process.
Using Online Video Editing Platforms to Trim YouTube Videos
In case you’re looking for a tool that lets you save extracts of scenes from YouTube to your computer free of charge YT Cutter may be one of your best options.
This online video editing platform is remarkably easy to use since you just have to copy the link to the YouTube video you’d like to trim into YT Cutter’s URL box and then select how long the new video should be. Click on the Start and End buttons to set the duration of the video and click on the Download button to choose if you want to create a video, GIF or an audio file. The trimmed YouTube video will be available for download as soon as the platform processes it, and you just need to specify a folder on your hard drive before clicking on the Save button.
There’re many online video trimmers available on the market, some of them are totally free to use, check our guide about How to Trim Videos for Free Online .
Read More to Get : How to Download YouTube Videos without Any Software Easily >>
Conclusion
Trimming a video online or with a video editing software like Filmora is an effortless task that can be completed in just a couple of minutes. However, it is better to complete the entire video editing process before you upload a video to your YouTube channel because YouTube Studio and other online video editing platforms still offer only a limited amount of video editing tools. Which method of trimming YouTube videos do you like using the most? Leave a comment and share your opinions with us.
Richard Bennett
Richard Bennett is a writer and a lover of all things video.
Follow @Richard Bennett
Also read:
- Redefine Video Downloading Pick From These Top-Ranked, Free & On-Demand Apps for YouTube Shorts
- [Updated] Educational Gaming Content on YouTube
- In 2024, Efficient Processes for Uploading Videos From iOS Gadgets
- [New] A Comprehensible Walkthrough Finding Your YouTube Remarks
- Channel Your Creativity Crafting YouTube Trailers in Filmora
- [New] Avoid YouTube? These Mobile App Alternatives Rank Among the Best
- 2024 Approved Compile of Free, High-Quality Sound Clips for Videos
- In 2024, Cut to Impress YouTube Video Editing Made Simple
- 2024 Approved Counteract Vibration for Clear Captures
- In 2024, Demystifying YouTube's Keyword Power Play
- The Foundational Handbook to YouTube Business Success
- In 2024, Cutting-Edge Tips for Professional YouTube Content Creation
- Discover the Best 15 YouTube Science Think Tanks
- Dynamic Topic Suggestions for Streamers for 2024
- Eco-Effect Filmmaking YouTube's Guide to Green Magic for 2024
- [Updated] Avoiding Common Pitfalls in Uploading HD Videos to YouTube
- In 2024, Decoding Digital Dollars An Effective Triple Step Process to Determine Your Subscriber Profits
- [New] Accelerate YT Growth Strategies for 1K+ Subscribers
- Decoding the Visual Language of Live Videos on YouTube
- Restoring Your Online Presence Post-Strike
- 2024 Approved Enjoy 9 Complete, Uncut Holiday Cine Classics for No Cost
- Beyond Blockbuster Horizons Favorite Films
- Decoding TSeries’ Monetary Strategies on YouTube Video Platforms
- Dial Back Unrequested YouTube Recommendations for 2024
- Best Practices in YouTube Thumbnail Sizes and Ratios for 2024
- Revolutionary Tools for Next-Gen Streaming Experience
- In 2024, EditMelodiesPC Top Video & Music Pairing Software
- In 2024, Elevate Visuals Thumbnails with Flair
- [Updated] Epicurean Epiphanies Filming Feast Creation
- In 2024, A Comprehensive Look at Decelerating YouTube Video Speed (50 Chars)
- FIFA Visuals Key YouTube Video Trends
- Top 11 Economical Cameras for Professional Vloggers
- [Updated] Adding Vibrancy Easy YouTube Subscribe Animations with Filmora
- 2024 Approved Cultivate 1,000 Fanbase Followers Quickly
- [Updated] Essential Listings for Easy Access to YouTube Intro Files
- 2024 Approved Elevating Your Vlog Through Proper Lighting
- Combat Common YouTube Short Obstacles for 2024
- In 2024, Becoming a Top YouTuber with Gaming Livestreams
- Elite Audio Modifying Tools Tailored to YouTube Creators
- 2024 Approved Elevating Your Watch Experience YouTube List Shuffle
- Mastering the Art of Monetization with Ajey (CarryMinati)
- 2024 Approved Dialing in on YouTube Success Identifying Ranks Boosters
- [New] A Symphony in Silence Mastering Audio with Precision
- In 2024, How to Cast Poco X6 Screen to PC Using WiFi | Dr.fone
- Chromium Device Live Screen Recorder
- Luminary MegaScape Ultimate 4K Integrated Hubs
- [Updated] In 2024, Top 10 Screen Capture Apps for Discord Gamers
- New 2024 Approved Make a Killer Gaming Intro Best Software for PC and Mac
- Avoid Bots? Manual Linking Between Spotify & Discord Works for 2024
- [New] In 2024, Perfect Recording Companion 10 Best on Spotify Platforms
- Fix Cant Take Screenshot Due to Security Policy on Tecno Spark Go (2023) | Dr.fone
- How to Reset a Locked Vivo Y78t Phone
- The Professionals Method for Soundless iPhone Video Editing
- [Updated] In 2024, Best Free Call Apps on Android, Ranks Them
- In 2024, Uncovering Top 6 FREE, Internet-Based Tools for TikTok to MP3 Conversion
- How to Transfer Music from Vivo Y78+ (T1) Edition to iPod | Dr.fone
- In 2024, 10 Prime Free Images Hosts, Ensure Picture Longevity
- [Updated] The Art of Looking Back Unveiling Reversed Images on Social Media
- Title: "Essential 11 Zero-Cost YouTube Moniker Makers"
- Author: Kevin
- Created at : 2024-05-25 15:10:56
- Updated at : 2024-05-26 15:10:56
- Link: https://youtube-videos.techidaily.com/essential-11-zero-cost-youtube-moniker-makers/
- License: This work is licensed under CC BY-NC-SA 4.0.
