
:max_bytes(150000):strip_icc()/001-how-to-fix-google-maps-not-working-4802364-966f13bdac7b41f9a9d357d428e168f8.jpg)
Enhancing Video Experience on YouTube with Slower Playback (48 Chars)
Enhancing Video Experience on YouTube with Slower Playback (48 Chars)
YouTube Slow: How to Slow Down YouTube Videos [3 Ways]

Richard Bennett
Mar 27, 2024• Proven solutions
Have you ever wanted to learn something from a YouTube video, but found that the video is too fast? If you are wondering how to slow down YouTube videos, then you’re in the right place. Well, there are different ways to slow down YouTube videos and in this article, we will show you how to slow down the YouTube videos with 3 most effective ways: slow down the YouTube videos by changing playback video speed at playback, slow down YouTube video using YouTube’s Video Editor tools or change YouTube video speed to slow down or speed up with Wondershare Filmora video editor .
- Part 1: How to Play YouTube Videos in Slow Motion
- Part 2: Add Slow Motion with Wondershare Filmora (originally Wondershare Video Editor)
- Part 3: Add Slow Motion with YouTube Video Editor
Part 1: YouTube Slow Down: How to Play YouTube Videos in Slow Motion
While, you can now change the speed of any YouTube videos easily and watch YouTube videos in slow motion in a few steps. Below is how to slow down YouTube Videos:
- Open the video in YouTube
- Click the Settings icon on the bottom right and then you will see Autoplay, Annotations, Speed, Subtitles, and Quality options. By default, the speed is set to Normal. Click Speed and open the speed change options. The speed options are in multiples.
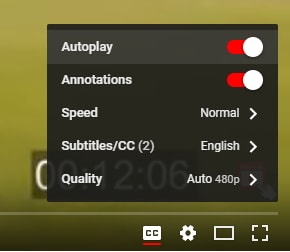
- Choose the target video speed from 0.25x, 0.5x, 0.75x to slow down the play back speed of the YouTube video. You can also select 1.25x, 1.5x, 1.75x or 2x to fast forward this YouTube video depending on how fast or slow you want the playback of the YouTube video to be.
- That’s it how to make a YouTube video slow down by changing the playback speed. If you selected 0.5X, you will see the playback speed is half of the original speed. You can now see the YouTube video is played back in a slower speed.
You May Also Like: Take good use of YouTube’s Enhancements feature to improve your video quality.
Besides, watching YouTube videos in slow motion, you can also make a slow motion video and upload to YouTube. The Flash from Zootopia is so impressive and you can see a lot of memes and gifs online about this funny cute sloth. In the following part, we will show you how to make a slow motion YouTube video like the sloth Flash in two ways by adding slow motion effects.
Part 2: Add Slow Motion to YT Videos with Wondershare Filmora video editor [3 Steps]
Wondershare Filmora is an easy-to-use yet powerful video editing tool to which let beginners edit their YouTube videos in minutes. It includes every classic video editing functions including adjust playback speed, trim, crop, rotate, split as well as many special editing features like Jump Cut, Mosaic Blur and Tilt Shift. Now let’s see how to add slow motion with this video editing software.


Step 1. Import Video Footage to Filmora Video Editor
First of all, you need to import all your video footage for YouTube videos to Filmora. If you want to slow down a video downloaded from online, like youtube, please make sure there is copyright issue for you to use the video before processing. In case that you want to download YouTube with free youtube downloader, you can try Wondershare Free Youtube Downloader and Video DownloadHelper (Firefox Add-on).
After downloading YouTube videos on hard disk, you can now import it to this YouTube video editor. The downloaded YouTube videos is usually in FLV format, and Filmora has a wide range of support for video formats, which includes FLV as well. You can either click “Import” on the primary windows and select YouTube FLV video file from your computer, or simply drag and drop YouTube FLV file to the User’s Album. Next, drag YouTube video from User’s Album to Timeline for editing.

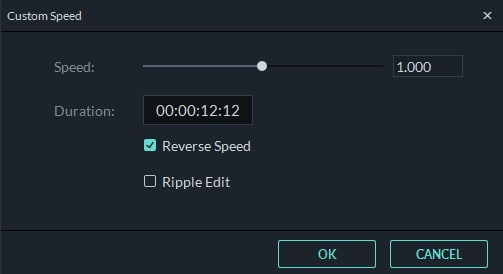
Step 2. One click to add slow motion to YouTube video
On the Timeline, click on the added YouTube video and select Speed and Duration to open up the video custom speed window. You will see the Speed option, Duration, Reverse Speed and Ripple Edit options. and the speed number indicates fast or slow motion. To slow down the YouTube video, drag the speed slider to left and you get a slow down version of the YouTube video. You can slow down the YouTube video in 0.01x. Click the OK button to save the slow motion settings and then click the Play button in the preview windows to have a look at the new YouTube slow down video. You can also change the duration of the YouTube video to change the YouTube video speed. For example, if you want to slow down a 30-second YouTube video to half speed, you can just enter the duration to 60 seconds to get a slow down motion effect.
With Filmora youtube video editor, you can also add the slow motion effects to some certain clips of the video footage. What you need to do is use the split feature to split the video first. Learn more details about How to Cut / Split / Trim Videos without Quality Loss
Step 3. Export slow down YouTube video
You could continue editing YouTube videos. When all done, click “Export” to save the result. You can save YouTube video in any popular formats on the computer by clicking “Format”. If you want to play YouTube video on iPod, iPhone, iPad, click “Device” and select your device. You can also share the YouTube video up to YouTube or Vimeo directly or burn YouTube video to DVD.

See, with Filmora video editor you can slow down YouTube videos with ease, what’s more, you can also apply reverse effects to play Youtube videos backwards. Download and try this YouTube Slow motion effect and you will master how to slow down YouTube videos.
Related:How to Make Slow/Fast Motion Videos
Part 3: Slow down YouTube videos with Slow Motion in YouTube Video Editor
Updated: From 20th September 2017 users will no longer be able to use the complimentary editing suite. Check the best YouTube video editor alternatives from this complete guide.
If you’ve ever been annoyed by the speed of your user-generated videos on YouTube, try out its own video editor. As YouTube has added a new “slow motion” tool to its YouTube Editor, it does pretty much exactly what it sounds like. Here is a simple guide on how to add slow motion with it.
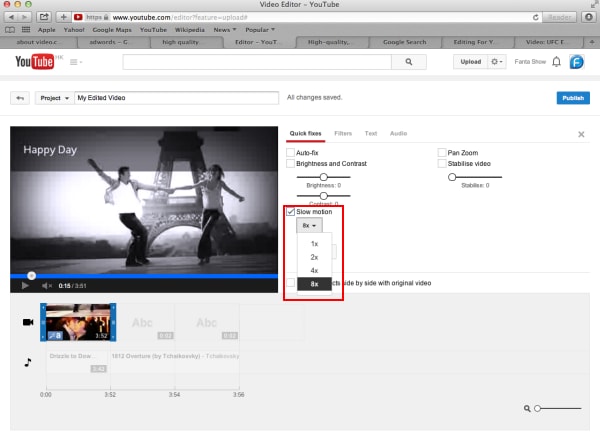
Step 1: Get Access to YouTube Video Editor. You can either go directly to the URL, which is https://www.youtube.com/editor , or click “Upload”>”Edit” to the Video Editor tab.
Step 2: Drag your video on the timeline and double click it. In the pop up window, you will see the “Slow Motion” option. Enable it and then select how slow you want the video to be. This applies the effect to the entire video that you’ve selected.
If you just want to slow down parts of the video, go back to the main editing tab, clip it from the original video using the slicing tool and add the slow-motion effect to that clip only. You can then arrange the different clips you have in the editor to create your final video.
Step 3: Tick the option “Preview effects side-by-side” with original video and then you can see how the original video plays compared to the one you’ve slowed down. If you’re happy with the result, hit “Done” to save the settings.
Conclusion
Above are the 3 ways that you can watch a YouTube video in slow motion, and slow down YouTube videos. You can directly change the playback speed of the YouTube video on Youtube, or download the YouTube video first and then slow down the speed of the YouTube video with some video editing software for YouTube like Filmora. No matter which way you prefer, we hope these information can help you slow down youtube videos.
Richard Bennett
Richard Bennett is a writer and a lover of all things video.
Follow @Richard Bennett
Richard Bennett
Mar 27, 2024• Proven solutions
Have you ever wanted to learn something from a YouTube video, but found that the video is too fast? If you are wondering how to slow down YouTube videos, then you’re in the right place. Well, there are different ways to slow down YouTube videos and in this article, we will show you how to slow down the YouTube videos with 3 most effective ways: slow down the YouTube videos by changing playback video speed at playback, slow down YouTube video using YouTube’s Video Editor tools or change YouTube video speed to slow down or speed up with Wondershare Filmora video editor .
- Part 1: How to Play YouTube Videos in Slow Motion
- Part 2: Add Slow Motion with Wondershare Filmora (originally Wondershare Video Editor)
- Part 3: Add Slow Motion with YouTube Video Editor
Part 1: YouTube Slow Down: How to Play YouTube Videos in Slow Motion
While, you can now change the speed of any YouTube videos easily and watch YouTube videos in slow motion in a few steps. Below is how to slow down YouTube Videos:
- Open the video in YouTube
- Click the Settings icon on the bottom right and then you will see Autoplay, Annotations, Speed, Subtitles, and Quality options. By default, the speed is set to Normal. Click Speed and open the speed change options. The speed options are in multiples.
- Choose the target video speed from 0.25x, 0.5x, 0.75x to slow down the play back speed of the YouTube video. You can also select 1.25x, 1.5x, 1.75x or 2x to fast forward this YouTube video depending on how fast or slow you want the playback of the YouTube video to be.
- That’s it how to make a YouTube video slow down by changing the playback speed. If you selected 0.5X, you will see the playback speed is half of the original speed. You can now see the YouTube video is played back in a slower speed.
You May Also Like: Take good use of YouTube’s Enhancements feature to improve your video quality.
Besides, watching YouTube videos in slow motion, you can also make a slow motion video and upload to YouTube. The Flash from Zootopia is so impressive and you can see a lot of memes and gifs online about this funny cute sloth. In the following part, we will show you how to make a slow motion YouTube video like the sloth Flash in two ways by adding slow motion effects.
Part 2: Add Slow Motion to YT Videos with Wondershare Filmora video editor [3 Steps]
Wondershare Filmora is an easy-to-use yet powerful video editing tool to which let beginners edit their YouTube videos in minutes. It includes every classic video editing functions including adjust playback speed, trim, crop, rotate, split as well as many special editing features like Jump Cut, Mosaic Blur and Tilt Shift. Now let’s see how to add slow motion with this video editing software.
Step 1. Import Video Footage to Filmora Video Editor
First of all, you need to import all your video footage for YouTube videos to Filmora. If you want to slow down a video downloaded from online, like youtube, please make sure there is copyright issue for you to use the video before processing. In case that you want to download YouTube with free youtube downloader, you can try Wondershare Free Youtube Downloader and Video DownloadHelper (Firefox Add-on).
After downloading YouTube videos on hard disk, you can now import it to this YouTube video editor. The downloaded YouTube videos is usually in FLV format, and Filmora has a wide range of support for video formats, which includes FLV as well. You can either click “Import” on the primary windows and select YouTube FLV video file from your computer, or simply drag and drop YouTube FLV file to the User’s Album. Next, drag YouTube video from User’s Album to Timeline for editing.
Step 2. One click to add slow motion to YouTube video
On the Timeline, click on the added YouTube video and select Speed and Duration to open up the video custom speed window. You will see the Speed option, Duration, Reverse Speed and Ripple Edit options. and the speed number indicates fast or slow motion. To slow down the YouTube video, drag the speed slider to left and you get a slow down version of the YouTube video. You can slow down the YouTube video in 0.01x. Click the OK button to save the slow motion settings and then click the Play button in the preview windows to have a look at the new YouTube slow down video. You can also change the duration of the YouTube video to change the YouTube video speed. For example, if you want to slow down a 30-second YouTube video to half speed, you can just enter the duration to 60 seconds to get a slow down motion effect.
With Filmora youtube video editor, you can also add the slow motion effects to some certain clips of the video footage. What you need to do is use the split feature to split the video first. Learn more details about How to Cut / Split / Trim Videos without Quality Loss
Step 3. Export slow down YouTube video
You could continue editing YouTube videos. When all done, click “Export” to save the result. You can save YouTube video in any popular formats on the computer by clicking “Format”. If you want to play YouTube video on iPod, iPhone, iPad, click “Device” and select your device. You can also share the YouTube video up to YouTube or Vimeo directly or burn YouTube video to DVD.
See, with Filmora video editor you can slow down YouTube videos with ease, what’s more, you can also apply reverse effects to play Youtube videos backwards. Download and try this YouTube Slow motion effect and you will master how to slow down YouTube videos.
Related:How to Make Slow/Fast Motion Videos
Part 3: Slow down YouTube videos with Slow Motion in YouTube Video Editor
Updated: From 20th September 2017 users will no longer be able to use the complimentary editing suite. Check the best YouTube video editor alternatives from this complete guide.
If you’ve ever been annoyed by the speed of your user-generated videos on YouTube, try out its own video editor. As YouTube has added a new “slow motion” tool to its YouTube Editor, it does pretty much exactly what it sounds like. Here is a simple guide on how to add slow motion with it.
Step 1: Get Access to YouTube Video Editor. You can either go directly to the URL, which is https://www.youtube.com/editor , or click “Upload”>”Edit” to the Video Editor tab.
Step 2: Drag your video on the timeline and double click it. In the pop up window, you will see the “Slow Motion” option. Enable it and then select how slow you want the video to be. This applies the effect to the entire video that you’ve selected.
If you just want to slow down parts of the video, go back to the main editing tab, clip it from the original video using the slicing tool and add the slow-motion effect to that clip only. You can then arrange the different clips you have in the editor to create your final video.
Step 3: Tick the option “Preview effects side-by-side” with original video and then you can see how the original video plays compared to the one you’ve slowed down. If you’re happy with the result, hit “Done” to save the settings.
Conclusion
Above are the 3 ways that you can watch a YouTube video in slow motion, and slow down YouTube videos. You can directly change the playback speed of the YouTube video on Youtube, or download the YouTube video first and then slow down the speed of the YouTube video with some video editing software for YouTube like Filmora. No matter which way you prefer, we hope these information can help you slow down youtube videos.
Richard Bennett
Richard Bennett is a writer and a lover of all things video.
Follow @Richard Bennett
Crafting a Comprehensive Audience Plan with Youtube & Twitch Multi-Streams
Youtube Video Maker - Wondershare Filmora
Provide abundant video effects - A creative video editor
Powerful color correction and grading
Detailed tutorials provided by the official channel
As the world has progressed, a great deal has changed, and it has transformed into a digital hub. People have started to use different platforms to entertain themselves, watch their favorite content online, gaming, music, sports, or any other form of entertainment.
Cross-platform streaming is a concept people have started to follow especially when it comes to gaming. The audience has a wide variety of choices when it comes to viewing live content online.
YouTube and Twitch are two major platforms streamers use to publish their content online for their targeted audience. They need to stream their content on YouTube and Twitch simultaneously as it engages a wider range of audiences worldwide, and newer streamers can benefit from it.
In this article
Part 1: How Can You Stream on Twitch and YouTube at the Same Time?
Part 2: How to Multi-stream using Streamlabs Prime
Part 3: Bonus Tips | Enlarge your Live Stream Performance!
Part 1: How Can You Stream on Twitch and YouTube at the Same Time?
To stream simultaneously on multiple platforms, a certain program or application is required to provide you with the required tools to enable you to broadcast your content. Several programs provide the option to stream to multiple websites at the same time e.g., Restream, Streamlabs Prime, and MelonApp.
Restream
Restream.io is a service that provides you with the option to broadcast your content to more than 30 different platforms including Twitch and YouTube. When you log in, you can choose the channels you wish to broadcast on and restream will issue a unique key for you.

After you have selected your desired selection, go to your broadcasting software, and choose Restream.io as your preferred service and insert your unique key provided by Restream.
Restream will let you use their services for free provided you use it with their watermark. It is recommended for newer users but if you wish to remove the watermark and go ad-free you will have to upgrade your plan.
Below is a step-by-step guide to help you stream using Restream.io
Step 1: Sign up or log in
The first step is to sign up on Restream. It will require you to choose a unique username, password and enter a valid email address.
Step 2: Choose your desired Platforms
From the list of different platforms, choose the ones you wish to stream to and add your channels by authorizing with the required credentials. Restream has an option of more than 30 platforms including YouTube, Twitch, Facebook, Twitter, and LinkedIn.

Step 3: Choose your subscription plan
Choose your desired plan that caters to your needs. Keep in mind that Restream is 100% free but free accounts do not come with recording or storage and will show a Restream watermark.

You can remove this watermark by upgrading your subscription plan to a Professional one from the dashboard.
Step 4: Choose the final streaming platforms
Connect all your channels so you can stream from a single platform. Click the platform icon and connect your preferred accounts with Restream.
Step 5: Tweak the settings according to your preference
Set up for streaming preferences and settings along with your streaming software. You can broadcast directly from your browser, multiple members from different locations, from your mobile phone, or even your GoPro. More available streaming features can be found on the Restream Help Center.

Restream also offers a wide range of services including the option to stream pre-recorded videos on Twitch at a preselected time and date. However, there is a caveat that you will not be able to multi-stream after you get an affiliate status on your Twitch channel.
Part 2: How to Multi-stream using Streamlabs Prime
Streamlabs Prime is the premium version of Streamlabs. It provides you with a range of 40+ apps that can also improve the quality of your streams and allow you to multi-stream. It is one of the best streaming software in the game currently.
Many content creators use Streamlabs to simultaneously run their streams on YouTube along with Twitch to grasp a wider range of audiences and get more views. One of the best things about Streamlabs is that you can connect to the broadcast services directly from the program without entering any stream key.
Streamlabs has included the option to Multi Stream on different platforms within its OBS client. Below are the steps required to set you up for streaming on YouTube and Twitch at the same time.
Step 1: Open the settings of your desired client
Click on the gear icon to open the settings on the bottom left of the client, click on the Stream tab where you will see the three main platforms for streaming.
Step 2: Add your preferred platforms
Add YouTube and Twitch by pressing the connect button; you can also add other services as well with the Add Destination feature.

Your stream will automatically be broadcast to all selected platforms when you go live. Although, you will be required to use the premium service of Streamlabs to ensure you can Multistream to different platforms at the same time.

Melon is a web-based service that lets you live-stream onto different platforms at the same time such as YouTube, Twitch, Facebook, and LinkedIn in just a matter of a few clicks. No downloads are required and there are umpteen options of customizations to personalize your feed according to your preference.
You can earn through donations from your live stream and are provided with the best customer support 24/7. Everything is hosted on a cloud-based setup and you can stream and record in 1080p.
Below are the steps to guide you on how to stream using the MelonApp.
Step 1: Login or Sign up
Login or Signup with your credentials into Melon and allow the required permissions i.e., microphone and camera.

Step 2: Choose your subscription plan
Choose your premium plan to avail of multi-streaming along with high-quality broadcasting, unlimited streaming, and tons of customization.

Step 3: Choose your desired platforms
Choose and connect the platforms you want to stream to from the Settings in the top right corner. If you have to reselect, simply click x, and reconnect to a different service.
Step 4: Finalize your preferences
Click on ‘Go Live’ and select the platforms for the current stream you wish to broadcast. Selected platforms will be highlighted.

Step 5: Go live
In the end, click next, put in the title of your stream and its description and you are all set to broadcast your content.
Part 3: Bonus Tips | Enlarge your Live Stream Performance
Now that you know how to stream on Twitch and YouTube, here are some tips to improve your live streams!
Tip # 1: Enhance Your Content
You can enhance your content in multiple ways to grasp a wider audience and get your message all around the globe.
Tip # 2: Introduce Graphics and Transitions
You can use interesting gifs, screens, intros, and outros for your streams. Announcing your streams beforehand can also help build up hype and make people anticipate your feed.
Tip # 3: Work More on Post Production
People stream different content on these streaming platforms including gaming, podcasts, educational and entertainment videos. Editing your content to near perfection is one of the most major aspects of a successful broadcast.
Tip # 4: Use Editing Tools to Make Your Videos Interesting
You can use different editing tools such as Wondershare Filmora which is a great video editing software that allows you to edit, trim, cut, add sounds and apply tons of effects to your content no matter what type or genre it is.
Tip # 5: Add Certain Effects to Appear Professional
You can also introduce motion tracking, keyframing, and use other powerful features, and that too for free using Wondershare Filmora. However, if you wish to go a step further you can always opt for their premium version and transcend into a world of endless options and opportunities to edit and enhance your content.
Tip # 6: Promote Your Content Using Social Media
Multi-streaming helps build up a wider community of fans as it is targeting different sets of people and you can also earn from your streams using advertisements and introducing click-on banners for brand endorsements.
Some platforms also let you promote and manage your merchandise, so it is always a good opportunity for these streaming clients and platforms.
Conclusion
Now you can also monetize your streams and broadcast on different platforms such as YouTube and Twitch at the same time. This will boost your reach and views in a very positive way. You can also tweak your content by editing it and inserting sound effects, gifs, and much more to make it more interesting and catchier.
And by multi-streaming on YouTube and Twitch, you will have a greater chance of being found by gaming sponsors and your growth will not be tied just to a single platform. You can also promote your streams on other social media platforms and your handles as well.
Pre-recorded videos are also a great way to present your content with perfection without any chances of being prone to any potential online mishaps.
As the world has progressed, a great deal has changed, and it has transformed into a digital hub. People have started to use different platforms to entertain themselves, watch their favorite content online, gaming, music, sports, or any other form of entertainment.
Cross-platform streaming is a concept people have started to follow especially when it comes to gaming. The audience has a wide variety of choices when it comes to viewing live content online.
YouTube and Twitch are two major platforms streamers use to publish their content online for their targeted audience. They need to stream their content on YouTube and Twitch simultaneously as it engages a wider range of audiences worldwide, and newer streamers can benefit from it.
In this article
Part 1: How Can You Stream on Twitch and YouTube at the Same Time?
Part 2: How to Multi-stream using Streamlabs Prime
Part 3: Bonus Tips | Enlarge your Live Stream Performance!
Part 1: How Can You Stream on Twitch and YouTube at the Same Time?
To stream simultaneously on multiple platforms, a certain program or application is required to provide you with the required tools to enable you to broadcast your content. Several programs provide the option to stream to multiple websites at the same time e.g., Restream, Streamlabs Prime, and MelonApp.
Restream
Restream.io is a service that provides you with the option to broadcast your content to more than 30 different platforms including Twitch and YouTube. When you log in, you can choose the channels you wish to broadcast on and restream will issue a unique key for you.
After you have selected your desired selection, go to your broadcasting software, and choose Restream.io as your preferred service and insert your unique key provided by Restream.
Restream will let you use their services for free provided you use it with their watermark. It is recommended for newer users but if you wish to remove the watermark and go ad-free you will have to upgrade your plan.
Below is a step-by-step guide to help you stream using Restream.io
Step 1: Sign up or log in
The first step is to sign up on Restream. It will require you to choose a unique username, password and enter a valid email address.
Step 2: Choose your desired Platforms
From the list of different platforms, choose the ones you wish to stream to and add your channels by authorizing with the required credentials. Restream has an option of more than 30 platforms including YouTube, Twitch, Facebook, Twitter, and LinkedIn.
Step 3: Choose your subscription plan
Choose your desired plan that caters to your needs. Keep in mind that Restream is 100% free but free accounts do not come with recording or storage and will show a Restream watermark.
You can remove this watermark by upgrading your subscription plan to a Professional one from the dashboard.
Step 4: Choose the final streaming platforms
Connect all your channels so you can stream from a single platform. Click the platform icon and connect your preferred accounts with Restream.
Step 5: Tweak the settings according to your preference
Set up for streaming preferences and settings along with your streaming software. You can broadcast directly from your browser, multiple members from different locations, from your mobile phone, or even your GoPro. More available streaming features can be found on the Restream Help Center.
Restream also offers a wide range of services including the option to stream pre-recorded videos on Twitch at a preselected time and date. However, there is a caveat that you will not be able to multi-stream after you get an affiliate status on your Twitch channel.
Part 2: How to Multi-stream using Streamlabs Prime
Streamlabs Prime is the premium version of Streamlabs. It provides you with a range of 40+ apps that can also improve the quality of your streams and allow you to multi-stream. It is one of the best streaming software in the game currently.
Many content creators use Streamlabs to simultaneously run their streams on YouTube along with Twitch to grasp a wider range of audiences and get more views. One of the best things about Streamlabs is that you can connect to the broadcast services directly from the program without entering any stream key.
Streamlabs has included the option to Multi Stream on different platforms within its OBS client. Below are the steps required to set you up for streaming on YouTube and Twitch at the same time.
Step 1: Open the settings of your desired client
Click on the gear icon to open the settings on the bottom left of the client, click on the Stream tab where you will see the three main platforms for streaming.
Step 2: Add your preferred platforms
Add YouTube and Twitch by pressing the connect button; you can also add other services as well with the Add Destination feature.
Your stream will automatically be broadcast to all selected platforms when you go live. Although, you will be required to use the premium service of Streamlabs to ensure you can Multistream to different platforms at the same time.
Melon is a web-based service that lets you live-stream onto different platforms at the same time such as YouTube, Twitch, Facebook, and LinkedIn in just a matter of a few clicks. No downloads are required and there are umpteen options of customizations to personalize your feed according to your preference.
You can earn through donations from your live stream and are provided with the best customer support 24/7. Everything is hosted on a cloud-based setup and you can stream and record in 1080p.
Below are the steps to guide you on how to stream using the MelonApp.
Step 1: Login or Sign up
Login or Signup with your credentials into Melon and allow the required permissions i.e., microphone and camera.
Step 2: Choose your subscription plan
Choose your premium plan to avail of multi-streaming along with high-quality broadcasting, unlimited streaming, and tons of customization.
Step 3: Choose your desired platforms
Choose and connect the platforms you want to stream to from the Settings in the top right corner. If you have to reselect, simply click x, and reconnect to a different service.
Step 4: Finalize your preferences
Click on ‘Go Live’ and select the platforms for the current stream you wish to broadcast. Selected platforms will be highlighted.
Step 5: Go live
In the end, click next, put in the title of your stream and its description and you are all set to broadcast your content.
Part 3: Bonus Tips | Enlarge your Live Stream Performance
Now that you know how to stream on Twitch and YouTube, here are some tips to improve your live streams!
Tip # 1: Enhance Your Content
You can enhance your content in multiple ways to grasp a wider audience and get your message all around the globe.
Tip # 2: Introduce Graphics and Transitions
You can use interesting gifs, screens, intros, and outros for your streams. Announcing your streams beforehand can also help build up hype and make people anticipate your feed.
Tip # 3: Work More on Post Production
People stream different content on these streaming platforms including gaming, podcasts, educational and entertainment videos. Editing your content to near perfection is one of the most major aspects of a successful broadcast.
Tip # 4: Use Editing Tools to Make Your Videos Interesting
You can use different editing tools such as Wondershare Filmora which is a great video editing software that allows you to edit, trim, cut, add sounds and apply tons of effects to your content no matter what type or genre it is.
Tip # 5: Add Certain Effects to Appear Professional
You can also introduce motion tracking, keyframing, and use other powerful features, and that too for free using Wondershare Filmora. However, if you wish to go a step further you can always opt for their premium version and transcend into a world of endless options and opportunities to edit and enhance your content.
Tip # 6: Promote Your Content Using Social Media
Multi-streaming helps build up a wider community of fans as it is targeting different sets of people and you can also earn from your streams using advertisements and introducing click-on banners for brand endorsements.
Some platforms also let you promote and manage your merchandise, so it is always a good opportunity for these streaming clients and platforms.
Conclusion
Now you can also monetize your streams and broadcast on different platforms such as YouTube and Twitch at the same time. This will boost your reach and views in a very positive way. You can also tweak your content by editing it and inserting sound effects, gifs, and much more to make it more interesting and catchier.
And by multi-streaming on YouTube and Twitch, you will have a greater chance of being found by gaming sponsors and your growth will not be tied just to a single platform. You can also promote your streams on other social media platforms and your handles as well.
Pre-recorded videos are also a great way to present your content with perfection without any chances of being prone to any potential online mishaps.
Also read:
- In 2024, Creating Accessibility Your Guide to an Intuitive YouTube Signup
- [Updated] Confirm Monetization Accuracy Essential Steps for Your YT Channels
- Best Practices in YouTube Thumbnail Sizes and Ratios
- [Updated] Cool Climates, Cozy Cinematics Selecting Winter Backgrounds
- Videographers’ Choice High-Quality Camera Lenses Reviewed
- Vital Guide to Cost-Effective Video and Photography Archives
- Elevate Your Content's Visibility with These Gadgets
- Event Ensemble Curating Best DJ Templates
- [Updated] Dominating Viewers' Spaces Channel Empire Rules
- 2024 Approved Emoji Tips for YT Comments A Quick Guide
- Affordable Methods to Craft Your Own YouTube Intros
- Analyzing the Influence of Financial Investment on YouTube Success Stories
- [Updated] Enchanting Viewers The Art of Crafting Engaging YouTube Description Templates
- Unending Suspension How to Erase YouTube Shorts
- What Is Parody and How to Make a Parody Video
- Add YouTube Melodies in iMovie Without Hurdles for 2024
- Getting Real Broadcast Your Life on Youtube Using OBS
- 2024 Approved Essential Guide to Writing Click-Worthy Youtube Titles
- In 2024, Crafted by Professionals Best Free Mobile Editors for Android
- [Updated] Audiences Delighted Best Editors to Transform Youtube Shorts
- A Comprehensive Guide to Achieving Smooth Color-Keying
- Banishing Black Edges on Your YouTube Video for 2024
- Elevating User Engagement with Detailed Video Chapters in YouTube for 2024
- How to Reset a Locked Oppo A58 4G Phone
- Ultimate Visual Experience EIZO's 4K Monitor Reviewed
- New Meme Mastery The Top 10 Apps for Android and iOS Users
- In 2024, Convert Spoken Words Into Written Content Using MS Word's In-Built Tools
- 2024 Approved Sail Through the Sea of TikTok Video Downloads
- In 2024, A Comprehensive Guide to iCloud Unlock On iPhone 14 Plus Online
- New 2024 Approved Perfect Your Playlist A Compilation of Elite MP3 Enhancement Services
- [New] 2024 Approved What's Cooking? 10 Viral Food Scenes on TikTok
- [New] In 2024, Guide to Recovering Stopped FB Livestreams
- [Updated] Curriculum Capturer's Selection Defining the Most Effective Recorders for 2024
- Taste Bud Travels Delicious Dishes From Abroad
- [Updated] 2024 Approved Efficient Twitters to Facebooks Exchanging
- Mastering Live Undo on Twitch Essential Tips and Strategies
- In 2024, Detailed guide of ispoofer for pogo installation On OnePlus 11R | Dr.fone
- All Things You Need to Know about Wipe Data/Factory Reset For Samsung Galaxy S21 FE 5G (2023) | Dr.fone
- New In 2024, Expert Picks Best Voice Isolation Technologies for Music Creators
- Title: Enhancing Video Experience on YouTube with Slower Playback (48 Chars)
- Author: Kevin
- Created at : 2024-05-25 15:09:46
- Updated at : 2024-05-26 15:09:46
- Link: https://youtube-videos.techidaily.com/enhancing-video-experience-on-youtube-with-slower-playback-48-chars/
- License: This work is licensed under CC BY-NC-SA 4.0.
