
:max_bytes(150000):strip_icc()/get-apps-not-in-app-store-1999916-d340eee3c6c84bfcbcd89df995856bd4.png)
"Enhance Videos at No Extra Cost Best Editors Ranked (Top 9)"
Enhance Videos at No Extra Cost: Best Editors Ranked (Top 9)
9 Best Free and Easy Editing Apps You Should Know

Richard Bennett
Dec 14, 2023• Proven solutions
Have you ever made a video 100% on your phone using a mobile video editing app?
If you’ve just started off on YouTube, there’s a good chance your main camera is the one in your phone. Actually, there’s a good chance of that even if you’ve been making YouTube videos for a while now.
Since you’re shooting videos on your phone, why shouldn’t you edit them there too? Here are 9 free video editing apps you can use for YouTube.
Note: This is not a ranked list. The apps will appear in alphabetical order.
- Adobe Premiere Clip (Android or iOS)
- Cameo (iOS)
- Clips (iOS)
- Filmora (Android or iOS)
- Funimate (Android or iOS)
- iMovie (iOS)
- Movie Maker Filmmaker by Alive (Android or iOS)
- PowerDirector (Android)
- Vlogit (Android or iOS)
Adobe Premiere Clip (Android or iOS )

Key Points:
- Automatic using clips. Times them to music
- Guides you with pop-up tips
- No text/title overlays
- Exports directly to YouTube
Adobe Premiere Pro is a professional-grade desktop editor, and Adobe Premiere Clip lives up to the quality standards set by its big-brother software. It is missing some features you might want for YouTube videos, like title effects, but it does have some bells and whistles. There’s a good selection of filters.

Making changes to your picture, like adjusting the exposure or the prevalence of highlights or shadows, is just a matter of sliding bars. The tools for splitting and duplicating clips are easy to find too. You just toggle between the two icons right above your video – the one that looks like a shutter and the one that looks like adjustment bars – to switch between the picture tools and the other tools.

You cannot add what you might normally think of as a title effect in Adobe Premiere Clip, so it’ll be hard to fully complete your video. You can add text cards to put in-between your video clips, but you can’t overlay the title on top of a clip.
You can share your video directly to YouTube when you export.
Cameo (iOS)

Key Points:
- Easy-to-apply themes
- Customizable titles
- Limited features
- Exports to 4K (if your clips are 4K)
Vimeo is a video sharing site with more of a ‘filmmaker’ focus than YouTube, so it isn’t a surprise that their mobile editing app Cameo can export high-quality 4K videos.
Like some of the other apps on this list, Cameo does not have a huge variety of functions. You can reorder your clips, trim them, add titles, and apply themes (essentially filter and title combos).
There are three icons on the main interface: Scissors, a Music Note, and Filters.
The Scissors will take you to the trimming screen, where you can make your clip shorter or longer.

You can also add a title in the trimming screen, but you will not be able to change the font style or color until you are in the Filter screen.
In the Filter screen (tap the overlapping filters icon on the main interface) you will be able to adjust the color of your text by tapping on the circle with the A in it. Tapping where it says ‘Font’ will change your font style.

You can also tap on Themes and choose a premade style.

Here’s what ‘Crush’ looks like applied:

My font was changed, and there’s also a filter now. In order to apply a filter, you must start with a theme.
Clips (iOS)

Key Points:
- Great selection of stickers
- Lacks some basic tools
- Simple interface
Clips is an intuitive app with a lot of options for decorating your videos. It is lacking in some of the more basic editings features you might expect (i.e. you cannot split clips or do any color correction), but it has a lot of fun features like stickers and emojis that could make up for that depending on your needs.

There are also more traditional effects, like filters and titles. There are a wide range of title options in styles that are popular on YouTube, and a fairly standard filter selection.

While you cannot split clips in this app, but trimming and reordering them is easy. For trimming, you just select the clip and then Trim to open a screen where you can drag the start and end points of the clip.
To rearrange your clips, just tap the clip you want to move and hold down. You’ll be able to drag it to a new location.
It’d be hard to rely on Clips exclusively as your YouTube video editor, but it’s well suited for Instagram or for making quick ‘on-the-go’ videos.
Filmora (Android or iOS)

Key Points:
- Export directly to YouTube
- 16:9 or 1:1 for Instagram
- Includes effects like transitions, filters, and overlays
- End-roll logo
You can make a complete video easily just by tapping and dragging in Filmora, and there are even effects like filters, transitions, and overlays you can add to make your video more polished.
After importing your media into Filmora (you can import videos and photos saved on your phone, or media which has been uploaded to a social media account like Facebook or Instagram) you can change the order of your clips by tapping one, pressing down for a moment, and then dragging your clips where you want them.
Trimming a clip is as simple as tapping on it and then Duration. You’ll get this screen where you can adjust the length easily by dragging the markers to beginning or endpoints.

Cropping and zooming are simple too.

Filmora comes with pre-made themes you can apply which include titles, filters, and other effects. These might not be ideal if you already have branding you like to use for YouTube, but in some situations, they can make video creation a lot faster.

Filmora comes loaded with music, or you can even import your own music from your phone.
Once you’re done, tap ‘save’ in the top right corner of your screen to export your video. From the save screen, you’ll be able to export your video directly to YouTube.

One potential drawback is that Filmora will add its own logo to the end of your exported video. This logo will not distract from your video content since it is added at the end and never overlaps any of your clips, but it still might not be ideal for all creators.
Funimate (Android or iOS )

Key Points:
- Easily add text and shapes
- Rainbow doodling
- Shake effects
- Small ‘Funimate’ watermark in videos from the free version
Funimate is lives up to the ‘fun’ promise in its name. It’s designed mostly for music videos/Musical.ly and while it is missing a lot of more typical editing options, there are a few free tools in Funimate that other apps just don’t have.
For example, there are shake and distortion effects available through Funimate that you usually only find in desktop software.
You can also draw rainbow designs on your video with your finger – no other app on this list can do that.
The text tool in Funimate is easy to use, and there are cool looking glow effects you can apply in the color selection screen. Those options are also available when you’re adding shapes, likes stars and sparkles.
Funimate is not built for typical editing, which is both its strength and its weakness. Trimming your clips is its own stage which you must complete before you start adding effects, and you cannot split clips or add multiple clips.
The free version of Funimate does add a small watermark to your videos in the bottom-right corner, but it is subtle enough that I almost missed it completely while reviewing the app.
iMovie (iOS)

Key Points:
- Trailer templates
- Themes
- Limited tools and resources
iMovie’s mobile app is designed for ease and includes things like ‘trailer templates’ and themes that allow you to make a video quickly and with minimal effort.
This streamlined app is limited in its features. Other apps on this list have left out color correction tools or clip splitting tools and instead loaded up on decorative features like stickers, emojis, and overlays. iMovie has left out these tools and does not have an abundance of decorative features either.
There are filters, themes, and titles, however.
The titles are simple but polished, and you’ll find all the standard types of filters.
The themes include a variety of graphics and are applied to your entire video, not individual clips. You can also apply one filter to your entire video.
iMovie also includes a decent selection of transitions, which you can apply easily by tapping the area between two clips.
Movie Maker Filmmaker by Alive (Android or iOS )

Key Points:
- Good title tool
- Stickers
- Change clip duration
- 16:9 or 1:1
Movie Maker Filmmaker (the app will be labeled ‘Alive’ in on your phone) has a lot of features that will help you put together a fun YouTube video. There’s a great selection of stickers, filters, and overlays and they’re all easy to apply. You just click on what you want and resize/reposition it in the player.

This app is missing a lot of basic editing features, however. You cannot adjust things like brightness or saturation. This won’t be a problem if you’re happy with your clips as-is, but it’s a bit odd to not have those options.
There is a text tool and while it is fairly basic, it is also flexible. There is a good selection of fonts to choose from, and you can also choose whether or not you want a colored background, and if your text should have a shadow.
Once you’ve decided on the look of your text you can drag it, resize it, and tilt it however you want in the preview screen.
A slightly odd feature of this app is that it doesn’t save your video to your phone or export it directly to YouTube. Instead, it saves it – and shares it – within the app and gives you the option of sharing it with YouTube after.
Power Director (Android)

Key Points:
- A timeline like desktop software
- All the basic editing features
- Lots of transitions
- Videos from the free version will be watermarked
The first thing you’ll notice when you open up Power Director is that the interface looks a lot like the interface of a lot of desktop editors with a very classic timeline. This familiarity could make it easy to jump into if you’re used to editing on your laptop.
However, Power Director is a bit less intuitive than most of the other apps on this list. I wouldn’t go so far as to say it’s difficult to use – it isn’t, it’s much easier than a lot of desktop software – but among mobile apps designed for streamlined efficiency it does stand out as being a bit harder to dive into.
That is partly because there’s a lot you can do with it. It has the tools you would expect in an editor. You can split and trim clips, and you have all the standard color tools including some that most mobile apps leave out.
A lot of apps have Brightness, Contrast, and Saturation, but PowerDirector also has Color Temperature and Tint.
In addition to editing tools, PowerDirector has bells and whistles like filters –
- and a ton of great transitions.
One drawback of PowerDirector is that the free version will watermark your videos. This watermark is not intrusive, but it isn’t as subtle as the Funimate one either.
You can export videos from PowerDirector directly to YouTube.
Vlogit (Android or iOS )

Key Points:
- Easy thumbnail maker
- Export directly to YouTube
- Animated stickers
Vlogit is also an app from the creators of the Filmora Video Editor. It isn’t quite as intuitive as Filmora, but the major benefit of Vlogit for YouTube creators is that it was designed with you in mind. It has features like animated stickers, emojis, and a thumbnail maker which were included specifically because YouTubers and vloggers need them.
All the usual adjustments you might want to make, like saturation or sharpness, are easy in Vlogit. So are adjustments to the length or crop of clips.
After you save your video you’ll have the option of creating a thumbnail using a screenshot from your video. You can add a colored border, text, emojis, and more!
Once you’re done, you can export directly to YouTube. Like Filmora, Vlogit does have a post-video logo roll.
Have you ever used a free mobile app to edit one of your YouTube videos? What did you use, and were you happy with the results?
Richard Bennett
Richard Bennett is a writer and a lover of all things video.
Follow @Richard Bennett
Richard Bennett
Dec 14, 2023• Proven solutions
Have you ever made a video 100% on your phone using a mobile video editing app?
If you’ve just started off on YouTube, there’s a good chance your main camera is the one in your phone. Actually, there’s a good chance of that even if you’ve been making YouTube videos for a while now.
Since you’re shooting videos on your phone, why shouldn’t you edit them there too? Here are 9 free video editing apps you can use for YouTube.
Note: This is not a ranked list. The apps will appear in alphabetical order.
- Adobe Premiere Clip (Android or iOS)
- Cameo (iOS)
- Clips (iOS)
- Filmora (Android or iOS)
- Funimate (Android or iOS)
- iMovie (iOS)
- Movie Maker Filmmaker by Alive (Android or iOS)
- PowerDirector (Android)
- Vlogit (Android or iOS)
Adobe Premiere Clip (Android or iOS )
Key Points:
- Automatic using clips. Times them to music
- Guides you with pop-up tips
- No text/title overlays
- Exports directly to YouTube
Adobe Premiere Pro is a professional-grade desktop editor, and Adobe Premiere Clip lives up to the quality standards set by its big-brother software. It is missing some features you might want for YouTube videos, like title effects, but it does have some bells and whistles. There’s a good selection of filters.
Making changes to your picture, like adjusting the exposure or the prevalence of highlights or shadows, is just a matter of sliding bars. The tools for splitting and duplicating clips are easy to find too. You just toggle between the two icons right above your video – the one that looks like a shutter and the one that looks like adjustment bars – to switch between the picture tools and the other tools.
You cannot add what you might normally think of as a title effect in Adobe Premiere Clip, so it’ll be hard to fully complete your video. You can add text cards to put in-between your video clips, but you can’t overlay the title on top of a clip.
You can share your video directly to YouTube when you export.
Cameo (iOS)
Key Points:
- Easy-to-apply themes
- Customizable titles
- Limited features
- Exports to 4K (if your clips are 4K)
Vimeo is a video sharing site with more of a ‘filmmaker’ focus than YouTube, so it isn’t a surprise that their mobile editing app Cameo can export high-quality 4K videos.
Like some of the other apps on this list, Cameo does not have a huge variety of functions. You can reorder your clips, trim them, add titles, and apply themes (essentially filter and title combos).
There are three icons on the main interface: Scissors, a Music Note, and Filters.
The Scissors will take you to the trimming screen, where you can make your clip shorter or longer.
You can also add a title in the trimming screen, but you will not be able to change the font style or color until you are in the Filter screen.
In the Filter screen (tap the overlapping filters icon on the main interface) you will be able to adjust the color of your text by tapping on the circle with the A in it. Tapping where it says ‘Font’ will change your font style.
You can also tap on Themes and choose a premade style.
Here’s what ‘Crush’ looks like applied:
My font was changed, and there’s also a filter now. In order to apply a filter, you must start with a theme.
Clips (iOS)
Key Points:
- Great selection of stickers
- Lacks some basic tools
- Simple interface
Clips is an intuitive app with a lot of options for decorating your videos. It is lacking in some of the more basic editings features you might expect (i.e. you cannot split clips or do any color correction), but it has a lot of fun features like stickers and emojis that could make up for that depending on your needs.
There are also more traditional effects, like filters and titles. There are a wide range of title options in styles that are popular on YouTube, and a fairly standard filter selection.
While you cannot split clips in this app, but trimming and reordering them is easy. For trimming, you just select the clip and then Trim to open a screen where you can drag the start and end points of the clip.
To rearrange your clips, just tap the clip you want to move and hold down. You’ll be able to drag it to a new location.
It’d be hard to rely on Clips exclusively as your YouTube video editor, but it’s well suited for Instagram or for making quick ‘on-the-go’ videos.
Filmora (Android or iOS)
Key Points:
- Export directly to YouTube
- 16:9 or 1:1 for Instagram
- Includes effects like transitions, filters, and overlays
- End-roll logo
You can make a complete video easily just by tapping and dragging in Filmora, and there are even effects like filters, transitions, and overlays you can add to make your video more polished.
After importing your media into Filmora (you can import videos and photos saved on your phone, or media which has been uploaded to a social media account like Facebook or Instagram) you can change the order of your clips by tapping one, pressing down for a moment, and then dragging your clips where you want them.
Trimming a clip is as simple as tapping on it and then Duration. You’ll get this screen where you can adjust the length easily by dragging the markers to beginning or endpoints.
Cropping and zooming are simple too.
Filmora comes with pre-made themes you can apply which include titles, filters, and other effects. These might not be ideal if you already have branding you like to use for YouTube, but in some situations, they can make video creation a lot faster.
Filmora comes loaded with music, or you can even import your own music from your phone.
Once you’re done, tap ‘save’ in the top right corner of your screen to export your video. From the save screen, you’ll be able to export your video directly to YouTube.
One potential drawback is that Filmora will add its own logo to the end of your exported video. This logo will not distract from your video content since it is added at the end and never overlaps any of your clips, but it still might not be ideal for all creators.
Funimate (Android or iOS )
Key Points:
- Easily add text and shapes
- Rainbow doodling
- Shake effects
- Small ‘Funimate’ watermark in videos from the free version
Funimate is lives up to the ‘fun’ promise in its name. It’s designed mostly for music videos/Musical.ly and while it is missing a lot of more typical editing options, there are a few free tools in Funimate that other apps just don’t have.
For example, there are shake and distortion effects available through Funimate that you usually only find in desktop software.
You can also draw rainbow designs on your video with your finger – no other app on this list can do that.
The text tool in Funimate is easy to use, and there are cool looking glow effects you can apply in the color selection screen. Those options are also available when you’re adding shapes, likes stars and sparkles.
Funimate is not built for typical editing, which is both its strength and its weakness. Trimming your clips is its own stage which you must complete before you start adding effects, and you cannot split clips or add multiple clips.
The free version of Funimate does add a small watermark to your videos in the bottom-right corner, but it is subtle enough that I almost missed it completely while reviewing the app.
iMovie (iOS)
Key Points:
- Trailer templates
- Themes
- Limited tools and resources
iMovie’s mobile app is designed for ease and includes things like ‘trailer templates’ and themes that allow you to make a video quickly and with minimal effort.
This streamlined app is limited in its features. Other apps on this list have left out color correction tools or clip splitting tools and instead loaded up on decorative features like stickers, emojis, and overlays. iMovie has left out these tools and does not have an abundance of decorative features either.
There are filters, themes, and titles, however.
The titles are simple but polished, and you’ll find all the standard types of filters.
The themes include a variety of graphics and are applied to your entire video, not individual clips. You can also apply one filter to your entire video.
iMovie also includes a decent selection of transitions, which you can apply easily by tapping the area between two clips.
Movie Maker Filmmaker by Alive (Android or iOS )
Key Points:
- Good title tool
- Stickers
- Change clip duration
- 16:9 or 1:1
Movie Maker Filmmaker (the app will be labeled ‘Alive’ in on your phone) has a lot of features that will help you put together a fun YouTube video. There’s a great selection of stickers, filters, and overlays and they’re all easy to apply. You just click on what you want and resize/reposition it in the player.
This app is missing a lot of basic editing features, however. You cannot adjust things like brightness or saturation. This won’t be a problem if you’re happy with your clips as-is, but it’s a bit odd to not have those options.
There is a text tool and while it is fairly basic, it is also flexible. There is a good selection of fonts to choose from, and you can also choose whether or not you want a colored background, and if your text should have a shadow.
Once you’ve decided on the look of your text you can drag it, resize it, and tilt it however you want in the preview screen.
A slightly odd feature of this app is that it doesn’t save your video to your phone or export it directly to YouTube. Instead, it saves it – and shares it – within the app and gives you the option of sharing it with YouTube after.
Power Director (Android)
Key Points:
- A timeline like desktop software
- All the basic editing features
- Lots of transitions
- Videos from the free version will be watermarked
The first thing you’ll notice when you open up Power Director is that the interface looks a lot like the interface of a lot of desktop editors with a very classic timeline. This familiarity could make it easy to jump into if you’re used to editing on your laptop.
However, Power Director is a bit less intuitive than most of the other apps on this list. I wouldn’t go so far as to say it’s difficult to use – it isn’t, it’s much easier than a lot of desktop software – but among mobile apps designed for streamlined efficiency it does stand out as being a bit harder to dive into.
That is partly because there’s a lot you can do with it. It has the tools you would expect in an editor. You can split and trim clips, and you have all the standard color tools including some that most mobile apps leave out.
A lot of apps have Brightness, Contrast, and Saturation, but PowerDirector also has Color Temperature and Tint.
In addition to editing tools, PowerDirector has bells and whistles like filters –
- and a ton of great transitions.
One drawback of PowerDirector is that the free version will watermark your videos. This watermark is not intrusive, but it isn’t as subtle as the Funimate one either.
You can export videos from PowerDirector directly to YouTube.
Vlogit (Android or iOS )
Key Points:
- Easy thumbnail maker
- Export directly to YouTube
- Animated stickers
Vlogit is also an app from the creators of the Filmora Video Editor. It isn’t quite as intuitive as Filmora, but the major benefit of Vlogit for YouTube creators is that it was designed with you in mind. It has features like animated stickers, emojis, and a thumbnail maker which were included specifically because YouTubers and vloggers need them.
All the usual adjustments you might want to make, like saturation or sharpness, are easy in Vlogit. So are adjustments to the length or crop of clips.
After you save your video you’ll have the option of creating a thumbnail using a screenshot from your video. You can add a colored border, text, emojis, and more!
Once you’re done, you can export directly to YouTube. Like Filmora, Vlogit does have a post-video logo roll.
Have you ever used a free mobile app to edit one of your YouTube videos? What did you use, and were you happy with the results?
Richard Bennett
Richard Bennett is a writer and a lover of all things video.
Follow @Richard Bennett
Mastering the Art of Viral YouTube Shorts Content
How to Get More Views with YouTube Shorts
Richard Bennett
Mar 27, 2024• Proven solutions
One of the biggest challenges that people face while using YouTube Shorts is how to get more views. Many new users wonder what and how should they prepare a video that is both 15-to-60 seconds long, and at the same time, it is engaging enough to make the audience view them with excitement.
With that said, the following sections discuss some best practices, and share a couple of tips to increase views on your YouTube Shorts videos.
- Part 1: Get More Views by Adding Shorts Video to the ‘Featured’ Section
- Part 2: Create Attractive Thumbnail for YouTube Shorts to Get More Views
- Part 3: Optimize YouTube Shorts to Get More Views
- Part 4: How to Analyze YouTube Shorts Performance
Part 1: Get More Views by Adding Shorts Video to the ‘Featured’ Section
Comparatively different from other videos, the ones that are added under the ‘Featured’ section are recommended to the audience throughout the YouTube platform on the basis of the algorithms that automatically determine which clips should be liked beach viewer individually.
![]()
A cross-platform for making videos anywhere for all creators

Why your video editing isn’t good enough? How about some creative inspo?
- 100 Million+ Users
- 150+ Countries and Regions
- 4 Million+ Social Media Followers
- 5 Million+ Stock Media for Use
* Secure Download

To elaborate, generally, YouTube suggests you a video as per your viewing history, browsing statistics, and other such information that the streaming media giant collects over time. On the other hand, the ‘Featured’ videos are suggested according to what YouTube ‘thinks’ might be of your interest, or could be somehow useful to you.
Therefore, when any clip is added as a ‘Featured’ video, YouTube suggests it to more viewers as compared to those that are published under the ‘Recommended’ category.
Note: Although there is a lot more to cover under the ‘Featured’ videos and channels section such as branding, advertisements, etc., such topics are beyond the scope of this piece.
Adding YouTube Shorts videos to the ‘Featured’ section is fairly simple, and the instructions given below explain how this can be done:
Note: It is assumed that you already have a couple of shorts video published on YouTube.
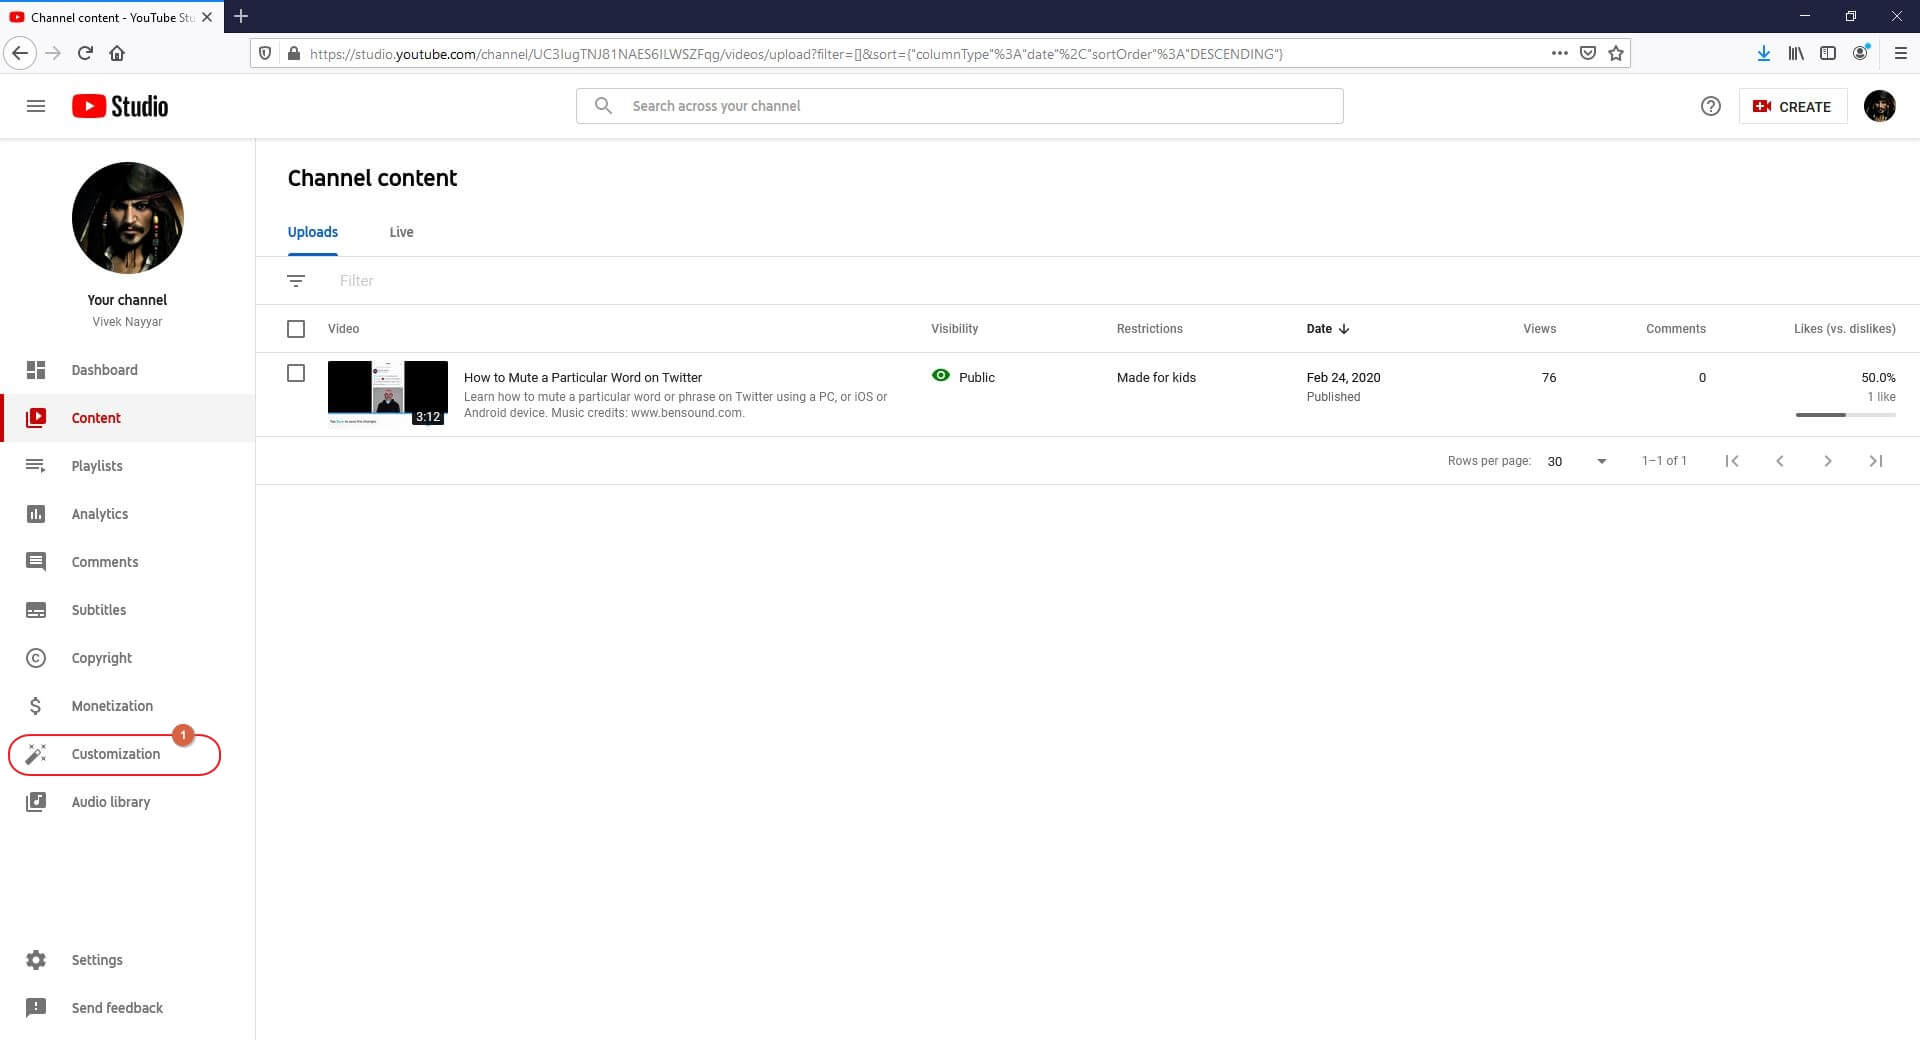
Step 1: Get to YouTube Studio Customization Section
Go to YouTube on your PC’s web browser, sign in to your Google account, click Your videos from the navigation bar in the left, and click Customization from the left bar when the Studio page opens up.
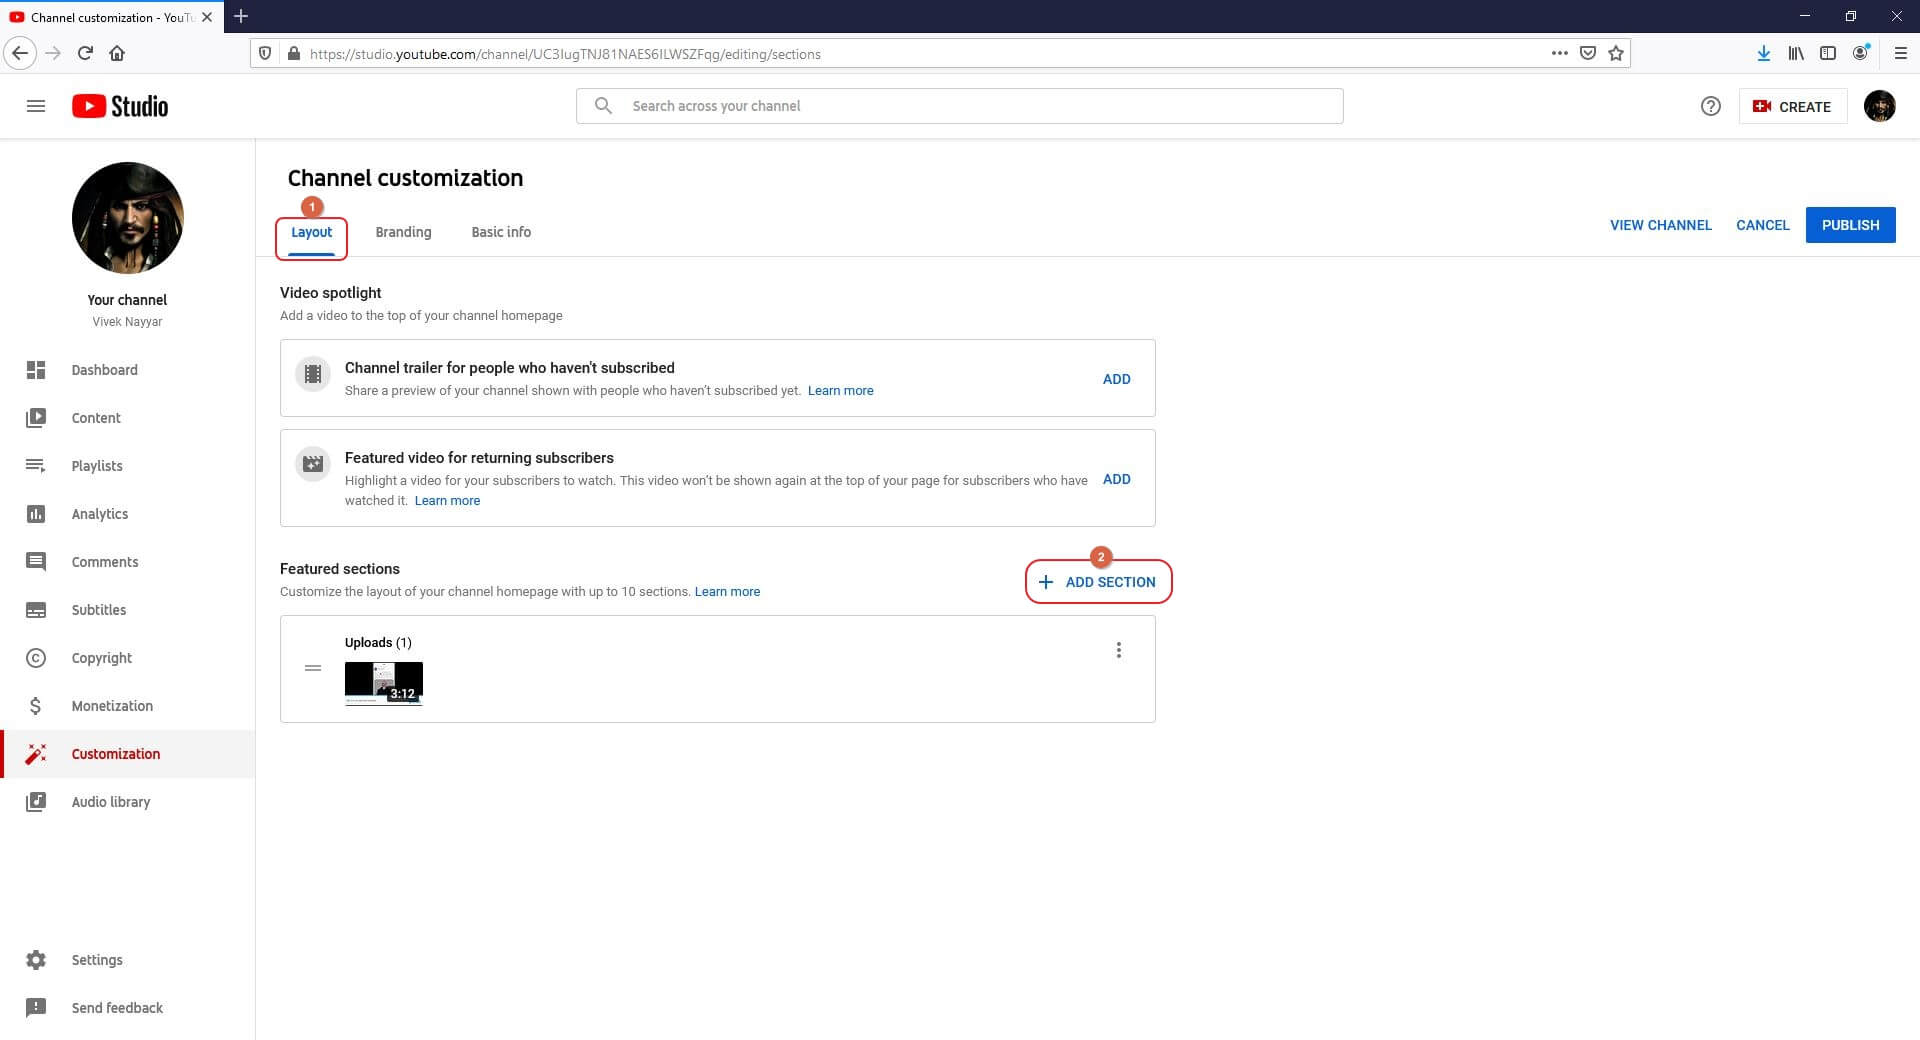
Step 2: Add YouTube Shorts
Click ADD SECTION from the Layout tab in the right window, and click Short videos from the list that appears next to add the YouTube Shorts category.
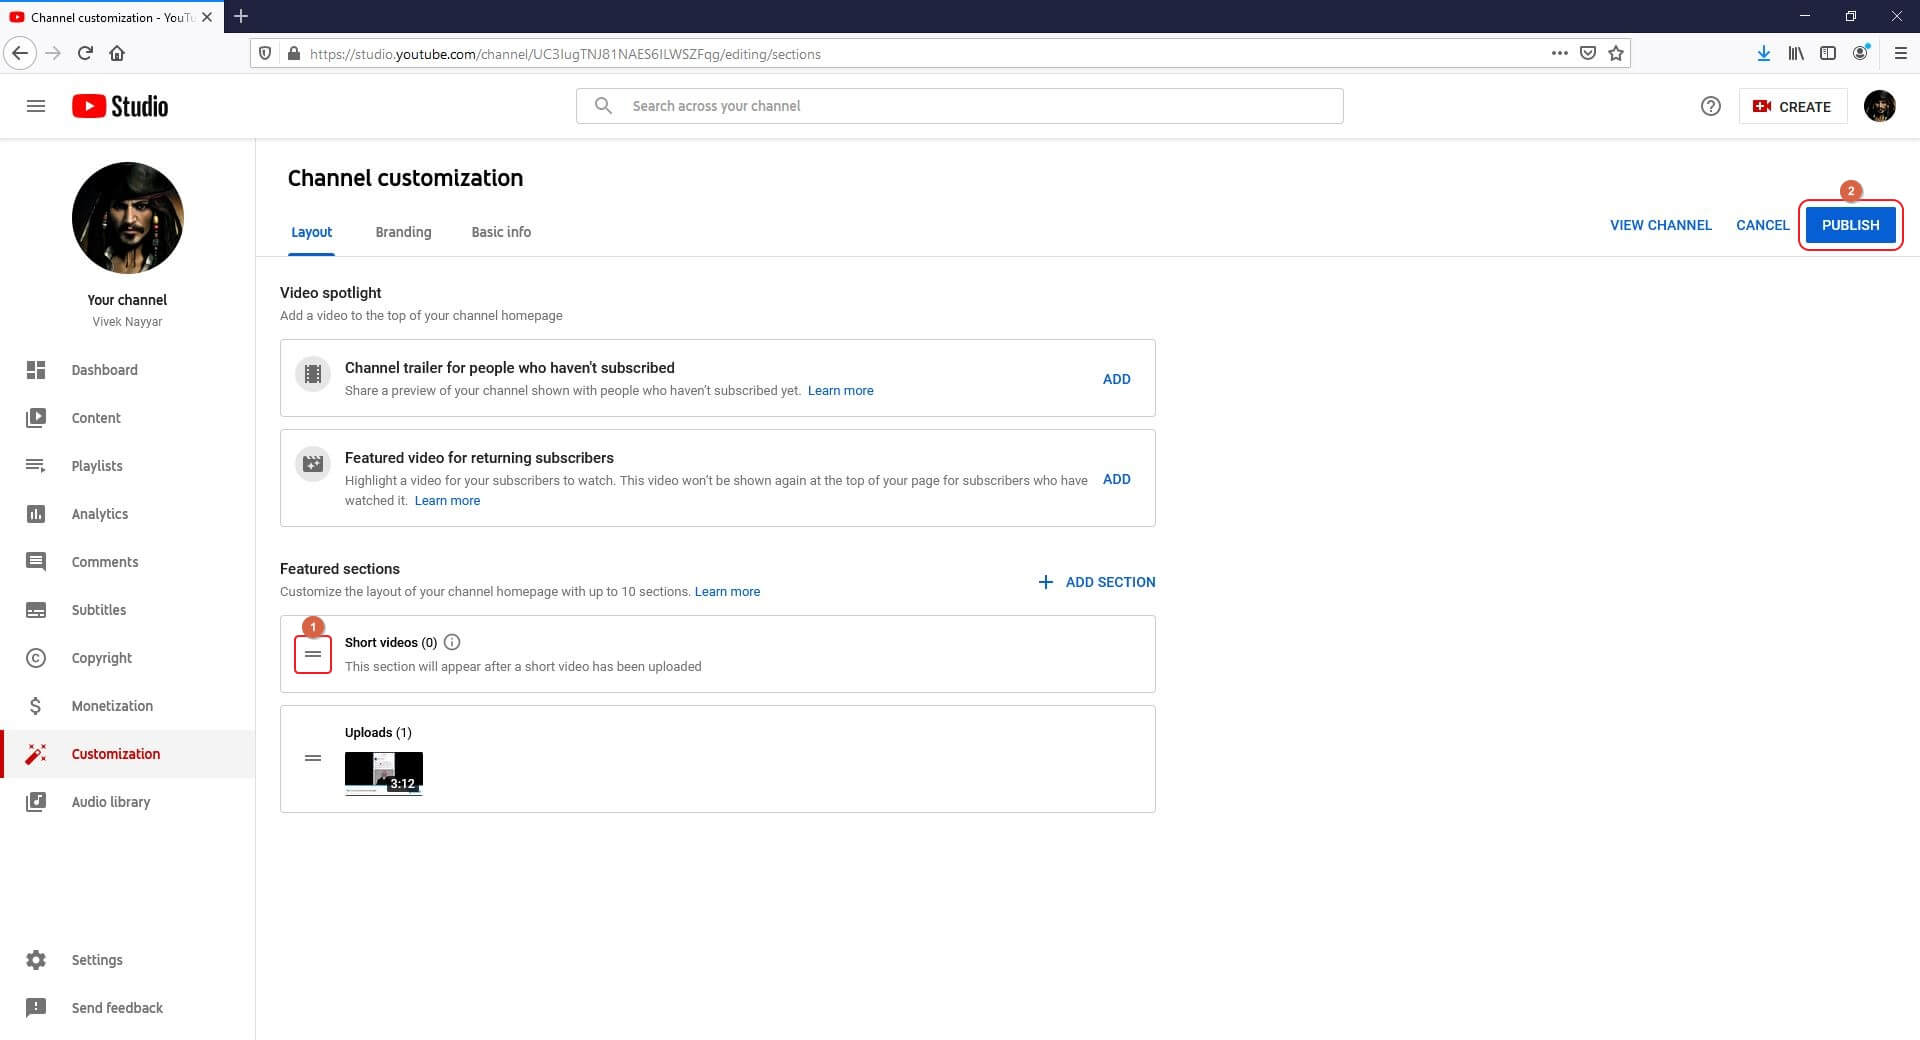
Step 3: Add Short videos to Featured sections and Save the Changes
Hold the Short videos bar from the moving handle at the left, and move it right below the Featured sections segment. Once the Short videos category is in the right place, click PUBLISH from the top-right corner of the page to save the changes. From this point onward, any YouTube Shorts video that you publish on your channel will be automatically added as ‘Featured’ after its approval.
Part 2: Create Attractive Thumbnail for YouTube Shorts to Get More Views
The thumbnails are the face of the videos that you publish anywhere online. Therefore, it is imperative to take down the default one that is automatically added by YouTube, and add your own, custom image instead.
To have your own thumbnail, you can either pick any frame from within the video itself, or you can upload a separate photo from your PC, and replace the existing one with it.
Things to Consider for creating attractive thumbnail
While using your custom image as a thumbnail for your YouTube Shots videos, a few things that you should keep in mind include:
- Relevance
Make sure that the new photo that you are planning to use as a thumbnail is relevant to the short video. Any image that is out of context might confuse the viewers, and you may lose your audience and the subscribers forever and for good.
- Clarity
Always use an image with clear content and large text (if any). This lets the viewers easily determine whether the video is of their interest.
- Correctness
You should avoid using misleading images as thumbnails. While such photos would attract more viewers initially, people will gradually lose trust in your channel if they do not find what they expect by the glimpse of the thumbnail.
Part 3: Optimize YouTube Shorts to Get More Views
The fact of the matter is, YouTube Shorts videos aren’t much different that any other video that you publish on the platform. Therefore, the process of optimizing both short and regular videos is identical.
A few things that are extremely important, and play a vital role in optimizing YouTube Shorts videos include:
- Attractive Thumbnail
As mentioned above, the thumbnail of a video is its face, and the prettier and appealing the face is the more audience will it attract, and the more hits your video will get. Therefore, ensure to make the thumbnail of your short videos as attractive as you possibly can.
- Compelling Title
The title says it all. Your short videos will have good chances of getting noticed and hits if they have an impulsive and compelling title that can give the viewers a summary of what they can expect from the clip.
- Detailed Description
The description of your short videos should be complete, and must explain the theme, genre, and nature of the clip. With the detailed description, the viewers will be able to assess if the video would be helpful to them in some manner.
- Tags
Make sure to add relevant tags to your short videos. For instance, adding ‘#Shorts’ in the title or description of the video tells YouTube that the clip is created for YouTube Shorts. Likewise, other tags that are related to the genre and/or theme of the short videos help YouTube suggest your media to the relevant audiences across the website.
![]()

Filmora - Best YouTube Shorts Video Editor for PC
- Easily record a video on PC and Mac.
- Edit videos quickly with a wide range of gaming effects.
- Rich video tempaltes and resources for YouTube videos.
- Export to MP4, MOV, MKV, GIF and multiple formats.
For Win 7 or later (64-bit)
For macOS 10.12 or later
 Secure Download


Part 4: How to Analyze YouTube Shorts Performance
YouTube Shorts are videos that are no more than 60 seconds long in length. When added under the ‘Featured’ category, you can see a significant amount of increment in the hits, and therefore the view count and the playback duration of your YouTube channel gets directly affected.
However, because these short videos cannot be monetized, at times you may notice that even though the total playback duration and view counts of your YouTube channel are high, your earnings may not be as much as what you would receive if those clips were published as regular videos.
FAQ: Will YouTube Shorts Performance Impact Other YouTube Stats?
Yes. As mentioned above, the view counts and playback durations of YouTube Shorts videos are added to your channel’s statistics. Therefore, with the number of views your short videos get, the overall performance of your YouTube stats is affected accordingly.
Richard Bennett
Richard Bennett is a writer and a lover of all things video.
Follow @Richard Bennett
Richard Bennett
Mar 27, 2024• Proven solutions
One of the biggest challenges that people face while using YouTube Shorts is how to get more views. Many new users wonder what and how should they prepare a video that is both 15-to-60 seconds long, and at the same time, it is engaging enough to make the audience view them with excitement.
With that said, the following sections discuss some best practices, and share a couple of tips to increase views on your YouTube Shorts videos.
- Part 1: Get More Views by Adding Shorts Video to the ‘Featured’ Section
- Part 2: Create Attractive Thumbnail for YouTube Shorts to Get More Views
- Part 3: Optimize YouTube Shorts to Get More Views
- Part 4: How to Analyze YouTube Shorts Performance
Part 1: Get More Views by Adding Shorts Video to the ‘Featured’ Section
Comparatively different from other videos, the ones that are added under the ‘Featured’ section are recommended to the audience throughout the YouTube platform on the basis of the algorithms that automatically determine which clips should be liked beach viewer individually.
![]()
A cross-platform for making videos anywhere for all creators
Why your video editing isn’t good enough? How about some creative inspo?
- 100 Million+ Users
- 150+ Countries and Regions
- 4 Million+ Social Media Followers
- 5 Million+ Stock Media for Use
* Secure Download
To elaborate, generally, YouTube suggests you a video as per your viewing history, browsing statistics, and other such information that the streaming media giant collects over time. On the other hand, the ‘Featured’ videos are suggested according to what YouTube ‘thinks’ might be of your interest, or could be somehow useful to you.
Therefore, when any clip is added as a ‘Featured’ video, YouTube suggests it to more viewers as compared to those that are published under the ‘Recommended’ category.
Note: Although there is a lot more to cover under the ‘Featured’ videos and channels section such as branding, advertisements, etc., such topics are beyond the scope of this piece.
Adding YouTube Shorts videos to the ‘Featured’ section is fairly simple, and the instructions given below explain how this can be done:
Note: It is assumed that you already have a couple of shorts video published on YouTube.
Step 1: Get to YouTube Studio Customization Section
Go to YouTube on your PC’s web browser, sign in to your Google account, click Your videos from the navigation bar in the left, and click Customization from the left bar when the Studio page opens up.
Step 2: Add YouTube Shorts
Click ADD SECTION from the Layout tab in the right window, and click Short videos from the list that appears next to add the YouTube Shorts category.
Step 3: Add Short videos to Featured sections and Save the Changes
Hold the Short videos bar from the moving handle at the left, and move it right below the Featured sections segment. Once the Short videos category is in the right place, click PUBLISH from the top-right corner of the page to save the changes. From this point onward, any YouTube Shorts video that you publish on your channel will be automatically added as ‘Featured’ after its approval.
Part 2: Create Attractive Thumbnail for YouTube Shorts to Get More Views
The thumbnails are the face of the videos that you publish anywhere online. Therefore, it is imperative to take down the default one that is automatically added by YouTube, and add your own, custom image instead.
To have your own thumbnail, you can either pick any frame from within the video itself, or you can upload a separate photo from your PC, and replace the existing one with it.
Things to Consider for creating attractive thumbnail
While using your custom image as a thumbnail for your YouTube Shots videos, a few things that you should keep in mind include:
- Relevance
Make sure that the new photo that you are planning to use as a thumbnail is relevant to the short video. Any image that is out of context might confuse the viewers, and you may lose your audience and the subscribers forever and for good.
- Clarity
Always use an image with clear content and large text (if any). This lets the viewers easily determine whether the video is of their interest.
- Correctness
You should avoid using misleading images as thumbnails. While such photos would attract more viewers initially, people will gradually lose trust in your channel if they do not find what they expect by the glimpse of the thumbnail.
Part 3: Optimize YouTube Shorts to Get More Views
The fact of the matter is, YouTube Shorts videos aren’t much different that any other video that you publish on the platform. Therefore, the process of optimizing both short and regular videos is identical.
A few things that are extremely important, and play a vital role in optimizing YouTube Shorts videos include:
- Attractive Thumbnail
As mentioned above, the thumbnail of a video is its face, and the prettier and appealing the face is the more audience will it attract, and the more hits your video will get. Therefore, ensure to make the thumbnail of your short videos as attractive as you possibly can.
- Compelling Title
The title says it all. Your short videos will have good chances of getting noticed and hits if they have an impulsive and compelling title that can give the viewers a summary of what they can expect from the clip.
- Detailed Description
The description of your short videos should be complete, and must explain the theme, genre, and nature of the clip. With the detailed description, the viewers will be able to assess if the video would be helpful to them in some manner.
- Tags
Make sure to add relevant tags to your short videos. For instance, adding ‘#Shorts’ in the title or description of the video tells YouTube that the clip is created for YouTube Shorts. Likewise, other tags that are related to the genre and/or theme of the short videos help YouTube suggest your media to the relevant audiences across the website.
![]()
Filmora - Best YouTube Shorts Video Editor for PC
- Easily record a video on PC and Mac.
- Edit videos quickly with a wide range of gaming effects.
- Rich video tempaltes and resources for YouTube videos.
- Export to MP4, MOV, MKV, GIF and multiple formats.
For Win 7 or later (64-bit)
For macOS 10.12 or later
Secure Download
Part 4: How to Analyze YouTube Shorts Performance
YouTube Shorts are videos that are no more than 60 seconds long in length. When added under the ‘Featured’ category, you can see a significant amount of increment in the hits, and therefore the view count and the playback duration of your YouTube channel gets directly affected.
However, because these short videos cannot be monetized, at times you may notice that even though the total playback duration and view counts of your YouTube channel are high, your earnings may not be as much as what you would receive if those clips were published as regular videos.
FAQ: Will YouTube Shorts Performance Impact Other YouTube Stats?
Yes. As mentioned above, the view counts and playback durations of YouTube Shorts videos are added to your channel’s statistics. Therefore, with the number of views your short videos get, the overall performance of your YouTube stats is affected accordingly.
Richard Bennett
Richard Bennett is a writer and a lover of all things video.
Follow @Richard Bennett
Also read:
- [Updated] Banishing Blackout Blues From YouTube Videos
- Uploading Finesse IMovie Videos Meeting YouTube Standards
- 2024 Approved Channel Conclusion Mastery - Makers & Templates for Best Practices
- [Updated] Discover the Epic Android Video Editor Apps
- [Updated] Cinema Comes at a Cost-Free Price Your Ultimate YouTube Movie List
- Amplifying Video Clarity on YouTube
- In 2024, Deciphering the Art of Personalized Playlist Curation for YouTube
- Beginner’s Essential Guide to YouTube Video Editing Magic for 2024
- 2024 Approved Digital Splendor on YouTube The Hue Harmonization Way
- [New] Cultivating a Positive Mindset Against Cyberbullying
- Leveraging Video Content for Revenue A 2024 Framework
- Boosting Channels' Growth Strategies for Effective Trailers
- Digital Footprint and Interactive Iconography Honors for 2024
- Crafting Cross-Social Media Content Strategy with YouTube & FB for 2024
- In 2024, Convert with Confidence Best Apps to Turn Spotify Into YouTube Channels
- Best Practices for Sharing Videos on Mobile Devices for 2024
- Enhancing Storytelling with Jump Cuts Technique for 2024
- In 2024, Comedy in Catchy Notes Best Parody Songs List
- Building a Fanbase with YouTube Streams for 2024
- Earnings Engineering Crafting a High Yield Strategy for Your YouTube Channel for 2024
- ImageSlice Editor
- Download YouTube Gallery Files Instantly
- Explore the Top 15 YouTube Binge Spots for Anime Lovers
- YouTube Short Mastery From Idea to Final Product
- Vogue Videos Compiling FREE YouTube Channel Frames
- YouTube Ad Creators, Tips and How-Tos
- In 2024, Digital Domination World's Top 10 Video Content Kings & Queens
- Pick 20 YouTube Music's Elite Creators
- Digital Dazzle Fine-Tuning Video Chrominance for Beauty
- 2024 Approved Channel Worth Watching YouTube Music Groups
- Building a Custom Link for YouTube's Auto-Subscribe for 2024
- [Updated] Elevate Your Channel with These Top 11 Budget-Friendly Tools
- 5 Leading Tools for Crafting Superior Video Titles and Tags
- 2024 Approved Building a Sustainable Income via YouTube and AdSense
- [Updated] Elevate Your Game Strategies for Stellar Gaming YouTube Banners
- New Bring Your Vision to Life Top Free and Paid 3D Video Creators
- [Updated] Mistakenly Refreshed TikTok - How to Go Back for 2024
- Updated In 2024, Tips for Synchronizing Volumes Across Tracks Using the VLC Media Player
- Updated In 2024, Move Over WMM Discover the Best Video Editors
- Convenient Video Sharing on Microsoft Hub
- New 2024 Approved These Titles Encapsulate the Concept of Bird Sound Collections or Archives that Are Available as MP3 Files, Highlighting Both Their Musical and Natural Elements
- 9 Best Phone Monitoring Apps for Huawei Nova Y71 | Dr.fone
- New Top 5 Sources for Legal Comedy Soundtracks Online
- 2024 Approved Navigating YouTube's Puzzling Buffering Patterns
- Bricked Your Infinix Smart 8 Pro? Heres A Full Solution | Dr.fone
- Discover 5 Easy Ways to Take Professional Quality Videos with Mac's Webcam
- In 2024, Unlocking an iCloud Locked iPad and Apple iPhone 8
- Adding Music to Photo Online
- New In 2024, What Makes a Great Video to Audio Converter? Key Features to Look For
- Updated 2024 Approved Design Cartoon Images With the Best Tools
- New Top-Rated Online Trailer Editing Services
- 2024 Approved Prime 10 Affordable Webcam Streamers
- In 2024, How to use iSpoofer on Poco M6 5G? | Dr.fone
- [Updated] A Stepwise Journey Through Windows 10 Recording
- [Updated] Decoding Social Media's New Wave 10 Realities About Reels
- Updated 2024 Approved Final Cut Pro Essentials Rotating Clips with Ease
- Updated A Comprehensive Guide to Adobe Auditions Tools and Functionalities for 2024
- In 2024, A Step-by-Step Guide on Using ADB and Fastboot to Remove FRP Lock on your Vivo V30
- [Updated] Unleash Creativity Your Comprehensible Guide to Sharing Animated Messages in Snapchat for 2024
- [Updated] Endless Memories FREE Saving on Instagram Stories
- A Step-by-Step Guide on Using ADB and Fastboot to Remove FRP Lock from your Honor X9a
- In 2024, Effective Guide to Cast Apple iPhone 13 Pro Max to MacBook without Hindrance | Dr.fone
- In 2024, Xiaomi Mix Fold 3 ADB Format Tool for PC vs. Other Unlocking Tools Which One is the Best?
- Title: "Enhance Videos at No Extra Cost Best Editors Ranked (Top 9)"
- Author: Kevin
- Created at : 2024-05-25 15:09:04
- Updated at : 2024-05-26 15:09:04
- Link: https://youtube-videos.techidaily.com/enhance-videos-at-no-extra-cost-best-editors-ranked-top-9/
- License: This work is licensed under CC BY-NC-SA 4.0.
