
:max_bytes(150000):strip_icc()/linksys-classic-micro-router-pro-6-8b16a5f340964425bdb89a3cc2f42e5d.jpg)
"Enhance Engagement Learn to Dim YouTube Video Backgrounds"
Enhance Engagement: Learn to Dim YouTube Video Backgrounds
How to Blur Background of Your YouTube Video

Richard Bennett
Mar 27, 2024• Proven solutions
A lot of YouTubers like to vlog in front of blurred backgrounds. Blurring the background of your YouTube video is a fast way to make it look more professional – you stand out when you are entirely in focus, and everything behind you is blurry. Plus, it is an easy way to disguise the room you are vlogging from.

Even if your set is clean, there could be things like books behind you, which will distract viewers; they will be trying to read the spines. Blurring out the background of your shot makes your video look polished and keeps people’s focus entirely on you.
- Part 1: Blur YouTube Video Background in Shooting Videos
- Part 2: Add Tilt-Shift Effects to Video in Editing
Part 1: How to Blur Background of Your YouTube Video in Shooting Videos
Blurring your background is also how you create a beautiful bokeh lighting effect. Bokeh is when you blur lights in the background of your shot, creating halo-like circles of light. By attaching a filter with a shape cut out to the camera lens, you can even generate bokeh lights in other shapes, like hearts or stars.
Aperture refers to the hole in your lens which allows light into your camera. A narrow aperture lets in less light, and a wide aperture lets in more. The wider your aperture is, the shallower your depth of field will be. Widening your aperture also helps your camera perform better in low-light situations. Widening your aperture too much under the wrong circumstances can let in too much light and result in your footage being overexposed.
Depth of Field is the area of your image that is in focus. If you have a large depth of field, then objects close to and far away from your camera will all be in focus. Only a select area will be focused and the rest will be blurred if you have a shallow depth of field.
F-Stops are the measurement of an aperture’s width. The higher your f-stop, the narrower your aperture will be. To create a blurred background or a bokeh effect, you need a wide aperture, and thus a small f-stop. F-stops are written like ‘f/1.4’. You need an f-stop of less than f/4 to blur your background, and less than f/2.8 for bokeh.
1. Blurring and Bokeh
Blurred backgrounds and bokeh are very closely related. A bokeh effect is essentially a blurred background that includes lights.
To achieve a blurred background or a bokeh effect, you need to have a shallow depth of field. That means a wide aperture and a low f-stop.
2. How to Blur your Background
Place your subject – in the case of a vlog, your subject is probably yourself – in a shallow depth of field, and they will remain sharply in focus while everything behind them is blurred.
If the subject is yourself, you might need a helper to either operate your camera or stand in for you while you set up your camera. You will need to be able to check that the place you plan to stand or sit is in focus.
To get a shallow depth of field, make sure your aperture is wide. Do this by setting a low f-stop. Ideally, your f-stop will be 2.8 or lower, but if your camera cannot go that low, then f/3 or f/4 can also work.
Creating a bokeh effect is mostly the same, except that it works best when your subject/depth of field is very close to the camera, and you have a light source off in the background. Zoom Lenses do not usually have wide enough apertures to create bokeh backgrounds.
Blur Video Background in Post-Production with Wondershare Filmora Video Editor
If you need to blur the video background after shooting, you can use some video editing software to add the bokeh effect or the tilt-off effect in post-production. Here, I will show you how to do that in Filmora.
Filmora is one of the most widely used video editing software among YouTubers. Its user-friendly interface and tutorial guide enables green-hands to start video editing quickly. Besides, you can find many free filters, effects, and elements pre-programmed, so you can use them directly without looking for presets and templates somewhere else.
1. Add Bokeh Filter to Video in Filmora
There are about 20 bokeh effects available in filters and overlays. You can find them easily by typing bokeh in the search bar in Effects.
Note: you should select Included to see all bokeh effects pre-programmed in Filmora. If you need more visual effects, just go to the Filmstock effects store.

Double click the bokeh effect to preview the result, and if you find the bokeh effect fits the video, just drop it to the track above the video. And the bokeh filter or overlay will be applied to the video automatically.
2. Use Tilt-Shift Circle/Linear Effect to Blur Video Background
Filmora features two tilt effects, tilt-shift circle and tilt-shift linear, which allows you to highlight people in the video, blur, and conceal the video background.
Go to the Effects tab and then switch to the Utility menu under Included category.

Here, I will select the Tilt-Shift Circle effect and drop it to the track above the video. Now, you can adjust the size, position, and intensity of the tilt-shift circle effect

You see, the video background is blurred, and the people are highlighted. Now it’s your turn to download the Filmora video editor and try it yourself.


Richard Bennett
Richard Bennett is a writer and a lover of all things video.
Follow @Richard Bennett
Richard Bennett
Mar 27, 2024• Proven solutions
A lot of YouTubers like to vlog in front of blurred backgrounds. Blurring the background of your YouTube video is a fast way to make it look more professional – you stand out when you are entirely in focus, and everything behind you is blurry. Plus, it is an easy way to disguise the room you are vlogging from.
Even if your set is clean, there could be things like books behind you, which will distract viewers; they will be trying to read the spines. Blurring out the background of your shot makes your video look polished and keeps people’s focus entirely on you.
- Part 1: Blur YouTube Video Background in Shooting Videos
- Part 2: Add Tilt-Shift Effects to Video in Editing
Part 1: How to Blur Background of Your YouTube Video in Shooting Videos
Blurring your background is also how you create a beautiful bokeh lighting effect. Bokeh is when you blur lights in the background of your shot, creating halo-like circles of light. By attaching a filter with a shape cut out to the camera lens, you can even generate bokeh lights in other shapes, like hearts or stars.
Aperture refers to the hole in your lens which allows light into your camera. A narrow aperture lets in less light, and a wide aperture lets in more. The wider your aperture is, the shallower your depth of field will be. Widening your aperture also helps your camera perform better in low-light situations. Widening your aperture too much under the wrong circumstances can let in too much light and result in your footage being overexposed.
Depth of Field is the area of your image that is in focus. If you have a large depth of field, then objects close to and far away from your camera will all be in focus. Only a select area will be focused and the rest will be blurred if you have a shallow depth of field.
F-Stops are the measurement of an aperture’s width. The higher your f-stop, the narrower your aperture will be. To create a blurred background or a bokeh effect, you need a wide aperture, and thus a small f-stop. F-stops are written like ‘f/1.4’. You need an f-stop of less than f/4 to blur your background, and less than f/2.8 for bokeh.
1. Blurring and Bokeh
Blurred backgrounds and bokeh are very closely related. A bokeh effect is essentially a blurred background that includes lights.
To achieve a blurred background or a bokeh effect, you need to have a shallow depth of field. That means a wide aperture and a low f-stop.
2. How to Blur your Background
Place your subject – in the case of a vlog, your subject is probably yourself – in a shallow depth of field, and they will remain sharply in focus while everything behind them is blurred.
If the subject is yourself, you might need a helper to either operate your camera or stand in for you while you set up your camera. You will need to be able to check that the place you plan to stand or sit is in focus.
To get a shallow depth of field, make sure your aperture is wide. Do this by setting a low f-stop. Ideally, your f-stop will be 2.8 or lower, but if your camera cannot go that low, then f/3 or f/4 can also work.
Creating a bokeh effect is mostly the same, except that it works best when your subject/depth of field is very close to the camera, and you have a light source off in the background. Zoom Lenses do not usually have wide enough apertures to create bokeh backgrounds.
Blur Video Background in Post-Production with Wondershare Filmora Video Editor
If you need to blur the video background after shooting, you can use some video editing software to add the bokeh effect or the tilt-off effect in post-production. Here, I will show you how to do that in Filmora.
Filmora is one of the most widely used video editing software among YouTubers. Its user-friendly interface and tutorial guide enables green-hands to start video editing quickly. Besides, you can find many free filters, effects, and elements pre-programmed, so you can use them directly without looking for presets and templates somewhere else.
1. Add Bokeh Filter to Video in Filmora
There are about 20 bokeh effects available in filters and overlays. You can find them easily by typing bokeh in the search bar in Effects.
Note: you should select Included to see all bokeh effects pre-programmed in Filmora. If you need more visual effects, just go to the Filmstock effects store.
Double click the bokeh effect to preview the result, and if you find the bokeh effect fits the video, just drop it to the track above the video. And the bokeh filter or overlay will be applied to the video automatically.
2. Use Tilt-Shift Circle/Linear Effect to Blur Video Background
Filmora features two tilt effects, tilt-shift circle and tilt-shift linear, which allows you to highlight people in the video, blur, and conceal the video background.
Go to the Effects tab and then switch to the Utility menu under Included category.
Here, I will select the Tilt-Shift Circle effect and drop it to the track above the video. Now, you can adjust the size, position, and intensity of the tilt-shift circle effect
You see, the video background is blurred, and the people are highlighted. Now it’s your turn to download the Filmora video editor and try it yourself.
Richard Bennett
Richard Bennett is a writer and a lover of all things video.
Follow @Richard Bennett
Boost Your Video’s Reach: Prime Time Strategy
Create High-Quality Video - Wondershare Filmora
An easy and powerful YouTube video editor
Numerous video and audio effects to choose from
Detailed tutorials provided by the official channel
Creators have one thing in mind when posting their content online. To be viewed by numerous followers and potential subscribers. For this, you need to run your channels tactfully. There are days when people throng the social media to watch upcoming content and videos. Perhaps you can make your best bets on such days. And is there any best day to post YouTube video?
Probably yes! People will settle on social media sites when they are more relaxed and off heavy duties on the weekdays. Let’s now dive into posting your videos and attaining some good leads.

In this article
01 Why is it important to post your YouTube video on the best days?
02 Best Days to Post on YouTube - General Practices
03 Best Days to Post on YouTube - Individual channel
Why is it important to post your YouTube video on the best days?
You are better off with best days to post on YouTube to increase the chances of getting more views. You want to make the biggest catch, and putting in a little effort will help you yield good results.
1) Your content never dies
The major advantage of posting on best days is that they hit the wall right from the onset of posting. You won’t need a lot of time to invest in expensive equipment. Remember, when viewers see your content immediately, they are posted, there are high chances of them sharing along with friends.
2) You’ll grow your audience worldwide
Growing a worldwide audience is every content creator’s dream. Posting your videos on the best days will open doors to new visitors who perhaps haven’t heard about you. It is even better to include captions so that people of all walks get your message deeply.
3) You’ll appear more on Google searches
Posting at the right time will help Google identify your content and make it appear on Google searches. Google uses an algorithm to check on many concepts of video posting. It means that posting your videos to YouTube on the best days will spike the graph and automatically get noticed by Google.
4) Your audience will promote you
Remember, when viewers go on searches, they look for something important to them. So, coming across your content at the right time will make an instant catch. They only want to fulfill their needs at that specific time. Hence will buy or promote you as long as what you sell is what they are looking for.
5) Increased subscribers
People want to associate themselves with new content. Anyone would be thrilled to hit the button on content that just popped up when they are online at their relaxed moments. You never know; you may just hit that 1,000 subscribers list by posting your videos on the best days.
Best Days to Post on YouTube - General Practices
How then do you know the best day to upload on YouTube? You can use general practices to pinpoint when your viewers are online or when your channel is at its peak.
- Weekday evenings
Weekdays are very busy days for everyone. People feel relaxed and ready to catch up on social media’s trending in the evening. So, posting in the evenings on weekdays may instantly help you get some increased views.
- Target Thursdays and Fridays
Depending on your YouTube content, you can target school-age children these days. If your content is about kid’s stuff and other online learning skills, then pushing it just before the weekend could give you some good visits. Kids tend to have various activities over the weekend and so, the best time for them to embark on online learning is just before the weekend kicks off.
- Weekends
Weekends will suit content that needs to sell products to the middle-class. Since they are busy the whole week with other duties, they probably find time over the weekend to chill and check out what’s happening around them and the world at large.
- End year
When it comes to the best months to post on YouTube, the end-year period tends to be the best. Usually, this is when companies and individuals are winding up on their busy schedules of the year. They want to get improvements and tips to start the next year. It is wise to spend more time online, giving the necessary tips and probably hooking up some potential customers.
Best Days to Post on YouTube - Individual channel
Stop guessing and find the facts right. Hitting on the road at the right time can get you as many viewers as possible. YouTube makes getting the facts right quite easy. Just use YouTube studio to know when your viewers are online.
First, go to YouTube Studio
Check in the “YouTube Studio” > “Analytics” > “Audience” option. Remember that your channel should have enough views for this option to give you relevant data.
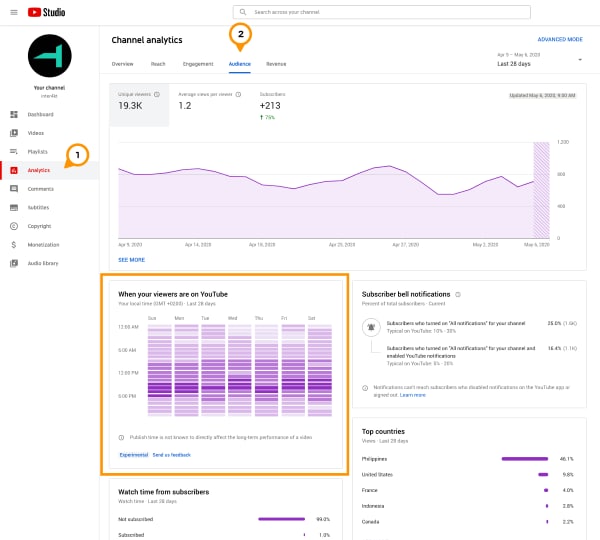
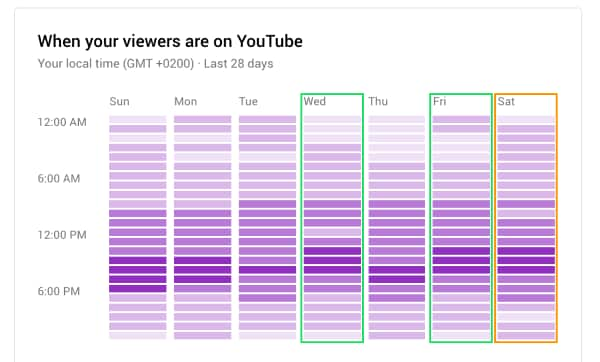
Find the hours with the darkest purple bars
You’ll realize that there are dark bars and light ones. The latter represent when few viewers are on your channel. Avoid posting during such times and focus when you have many viewers on site. Also, try to post a few hours before the peak time.

Focus on the days with the darkest bars
Apart from specific times of the day, you can focus on days of the week when your viewers are on your channel. You will mostly realize that the best days of the week to post to your channel are on weekends. It is quite typical as it’s the days when viewers are more relaxed and can find new things online. However, you can monitor your statistics and learn the number of days per week you need to emphasize more on posting your videos.
Post videos a day before the peak day
You can also dwell on the narrative; the early bird catches the worm. You can make an early catch since you know the day when your viewers will throng’ your channel, but you don’t know the time. Post videos a day before your channel goes busy. By this, you won’t leave any viewers outside your new postings.
A few hours before prime time
Another trick is to get your videos posted in good time. Once you have known the best hour of the day when viewers are likely to be active, make your video available a few hours before then. They’ll then get it rolling once they land into the channel for the newest updates. If not, you may miss out on views you would have gotten by making your video go public earlier.
Upload your videos in private a few hours before publishing
Yes, mistakes do happen, and you don’t want to be caught up in the mix of errors. You can increase perfection by uploading your videos for some hours before publishing them. It will give you a good time to check it out privately and iron out any concerns. You don’t want your video going viral with tons of mishaps.
Create High-Quality Video with Filmora to Ensure Video Engagement
Besides knowing the best days to post on YouTube, you have to give your audience quality for their time. Composing the best video is the killer for this course. Learn how to get high-quality videos with Filmora. It is a widely used video editing tool that comes in hand with lots of templates and effects. These features enable you to compose high-end videos in 4K and HD resolution. The effect of quality videos is that they’ll help you get many views because users will understand your video first. Filmora has an intuitive interface that will give you an easy time.
- Edit your videos with minimal effect. You can easily merge, crop, tilt, and perform more with Filmora.
- Easily do motion tracking from the main interface.
- It supports 4K and HD editing ability./li>
- Use the speed control feature to make your clips up to ten times faster or slower.
- Make magical moves with the Reverse feature. You can flip your videos and play them backward.
- Create stunning video colors in your video using the color tuning feature. You can adjust the white balance and the dynamic range of colors.
- Get quality sound with the noise removal feature.
For Win 7 or later (64-bit)
For macOS 10.12 or later
Conclusion
● You don’t have to guess the best days to upload to YouTube anymore. You can use YouTube algorithm Studio to calculate and give you the exact hours and days when your viewers are at bay. But again, this will only be effective if you have already gathered a substantial number of viewers. It will, therefore, not work for you if you are starting on YouTube. Usually, there isn’t enough data yet for the system to know the best time to publish, and neither know how your content performs in general.
● But all in all, you can use general practices to know when to post your content. Most likely, combine your efforts and don’t dwell on specific hours or days. Use both combined to reach as many audiences as possible.
Creators have one thing in mind when posting their content online. To be viewed by numerous followers and potential subscribers. For this, you need to run your channels tactfully. There are days when people throng the social media to watch upcoming content and videos. Perhaps you can make your best bets on such days. And is there any best day to post YouTube video?
Probably yes! People will settle on social media sites when they are more relaxed and off heavy duties on the weekdays. Let’s now dive into posting your videos and attaining some good leads.
In this article
01 Why is it important to post your YouTube video on the best days?
02 Best Days to Post on YouTube - General Practices
03 Best Days to Post on YouTube - Individual channel
Why is it important to post your YouTube video on the best days?
You are better off with best days to post on YouTube to increase the chances of getting more views. You want to make the biggest catch, and putting in a little effort will help you yield good results.
1) Your content never dies
The major advantage of posting on best days is that they hit the wall right from the onset of posting. You won’t need a lot of time to invest in expensive equipment. Remember, when viewers see your content immediately, they are posted, there are high chances of them sharing along with friends.
2) You’ll grow your audience worldwide
Growing a worldwide audience is every content creator’s dream. Posting your videos on the best days will open doors to new visitors who perhaps haven’t heard about you. It is even better to include captions so that people of all walks get your message deeply.
3) You’ll appear more on Google searches
Posting at the right time will help Google identify your content and make it appear on Google searches. Google uses an algorithm to check on many concepts of video posting. It means that posting your videos to YouTube on the best days will spike the graph and automatically get noticed by Google.
4) Your audience will promote you
Remember, when viewers go on searches, they look for something important to them. So, coming across your content at the right time will make an instant catch. They only want to fulfill their needs at that specific time. Hence will buy or promote you as long as what you sell is what they are looking for.
5) Increased subscribers
People want to associate themselves with new content. Anyone would be thrilled to hit the button on content that just popped up when they are online at their relaxed moments. You never know; you may just hit that 1,000 subscribers list by posting your videos on the best days.
Best Days to Post on YouTube - General Practices
How then do you know the best day to upload on YouTube? You can use general practices to pinpoint when your viewers are online or when your channel is at its peak.
- Weekday evenings
Weekdays are very busy days for everyone. People feel relaxed and ready to catch up on social media’s trending in the evening. So, posting in the evenings on weekdays may instantly help you get some increased views.
- Target Thursdays and Fridays
Depending on your YouTube content, you can target school-age children these days. If your content is about kid’s stuff and other online learning skills, then pushing it just before the weekend could give you some good visits. Kids tend to have various activities over the weekend and so, the best time for them to embark on online learning is just before the weekend kicks off.
- Weekends
Weekends will suit content that needs to sell products to the middle-class. Since they are busy the whole week with other duties, they probably find time over the weekend to chill and check out what’s happening around them and the world at large.
- End year
When it comes to the best months to post on YouTube, the end-year period tends to be the best. Usually, this is when companies and individuals are winding up on their busy schedules of the year. They want to get improvements and tips to start the next year. It is wise to spend more time online, giving the necessary tips and probably hooking up some potential customers.
Best Days to Post on YouTube - Individual channel
Stop guessing and find the facts right. Hitting on the road at the right time can get you as many viewers as possible. YouTube makes getting the facts right quite easy. Just use YouTube studio to know when your viewers are online.
First, go to YouTube Studio
Check in the “YouTube Studio” > “Analytics” > “Audience” option. Remember that your channel should have enough views for this option to give you relevant data.
Find the hours with the darkest purple bars
You’ll realize that there are dark bars and light ones. The latter represent when few viewers are on your channel. Avoid posting during such times and focus when you have many viewers on site. Also, try to post a few hours before the peak time.
Focus on the days with the darkest bars
Apart from specific times of the day, you can focus on days of the week when your viewers are on your channel. You will mostly realize that the best days of the week to post to your channel are on weekends. It is quite typical as it’s the days when viewers are more relaxed and can find new things online. However, you can monitor your statistics and learn the number of days per week you need to emphasize more on posting your videos.
Post videos a day before the peak day
You can also dwell on the narrative; the early bird catches the worm. You can make an early catch since you know the day when your viewers will throng’ your channel, but you don’t know the time. Post videos a day before your channel goes busy. By this, you won’t leave any viewers outside your new postings.
A few hours before prime time
Another trick is to get your videos posted in good time. Once you have known the best hour of the day when viewers are likely to be active, make your video available a few hours before then. They’ll then get it rolling once they land into the channel for the newest updates. If not, you may miss out on views you would have gotten by making your video go public earlier.
Upload your videos in private a few hours before publishing
Yes, mistakes do happen, and you don’t want to be caught up in the mix of errors. You can increase perfection by uploading your videos for some hours before publishing them. It will give you a good time to check it out privately and iron out any concerns. You don’t want your video going viral with tons of mishaps.
Create High-Quality Video with Filmora to Ensure Video Engagement
Besides knowing the best days to post on YouTube, you have to give your audience quality for their time. Composing the best video is the killer for this course. Learn how to get high-quality videos with Filmora. It is a widely used video editing tool that comes in hand with lots of templates and effects. These features enable you to compose high-end videos in 4K and HD resolution. The effect of quality videos is that they’ll help you get many views because users will understand your video first. Filmora has an intuitive interface that will give you an easy time.
- Edit your videos with minimal effect. You can easily merge, crop, tilt, and perform more with Filmora.
- Easily do motion tracking from the main interface.
- It supports 4K and HD editing ability./li>
- Use the speed control feature to make your clips up to ten times faster or slower.
- Make magical moves with the Reverse feature. You can flip your videos and play them backward.
- Create stunning video colors in your video using the color tuning feature. You can adjust the white balance and the dynamic range of colors.
- Get quality sound with the noise removal feature.
For Win 7 or later (64-bit)
For macOS 10.12 or later
Conclusion
● You don’t have to guess the best days to upload to YouTube anymore. You can use YouTube algorithm Studio to calculate and give you the exact hours and days when your viewers are at bay. But again, this will only be effective if you have already gathered a substantial number of viewers. It will, therefore, not work for you if you are starting on YouTube. Usually, there isn’t enough data yet for the system to know the best time to publish, and neither know how your content performs in general.
● But all in all, you can use general practices to know when to post your content. Most likely, combine your efforts and don’t dwell on specific hours or days. Use both combined to reach as many audiences as possible.
Also read:
- How Much Cash Can You Score for Watching A Million Videos?
- Best Screener Tech Perfect for Creating Viral YouTube Moments for 2024
- Skyrocket to Success Mastering SEO for YouTubers and Beyond
- [Updated] Champion Top Titles Best Free Video Caption Grabs
- More than Just Watch Time Understanding YouTube Views Calculation
- Jokes in Jams Best Funny Video Concepts Under Five Minutes
- Premium Viewership The Ultimate YouTube Wealth
- Essential Recording Steps for YouTube Audio Extraction for 2024
- Innovators Uniting Video, Sound & Imagery
- 2024 Approved A Visual Guide to Subtitling Techniques for Effective Dialogue Placement
- Streamlining Creation Top 10 Easy-to-Create Biz Channels on YouTube
- [Updated] Cinematic Composer Software
- Bite-Sized Video Specialist for 2024
- [New] Beyond Basic The Advanced Techniques of YouTube Counts
- In 2024, Crafting Cool YouTube Previews in iMovie Easily
- In 2024, Affiliate Acquaintanceships Elevating Budget Channels with Ease
- [New] Essential Anime Youtube Channels for Daily Happiness
- Expert Voice Editing Software for Video Content Makers
- Amplify Your Music Experience with YouTube's Playlist Guide
- [Updated] Earn on YouTube Decoding Recent Policy Changes
- A Comprehensively Reviewed List of YouTube Video Extractor Apps (Android) for 2024
- In 2024, Decoding Best Practices Navigating Through Top 9 Free Logo Creators
- In 2024, Crafting a Narrative Template for Online Educational Videos
- The 411 on Building Sports Video Gold
- Ranking the Most Rapidly Expanding YouTube Talks of Inspiration
- [Updated] Essential Guide to Mastering ASMR Experience
- 2024 Approved Cut the Clutter, Convert Videos Discover the Best Alternatives for Flv to YT
- Top 15 YouTube Experts in Modern Science Exploration
- Streamlining Your Gaming Playback
- Navigating the Monetization Maze on Youtube
- Core Principles YouTube's Social Contract
- Simple Steps to Great Videos Crafting 10 Basic Concepts Easily
- [New] In 2024, Mastering Video Sharing Understanding Vimeo Membership Plans
- The Ultimate Guide to Visiting Friends' Lives on TikTok
- Updated 2024 Approved Create Stunning Videos Best Music Photo Editors Reviewed
- Updated 2024 Approved How to Animate Image on Scroll and Text on Scroll?
- In 2024, Top 7 Epic Strategy Battles Unveiling Ultimate Total Wars
- [Updated] Pure Sound Capture on Your Mac
- [Updated] Harmonizing Imagery & Tunes on Social Media Platforms for 2024
- Home Button Not Working on Vivo Y78+? Here Are Real Fixes | Dr.fone
- MOV playback issues on Xiaomi Redmi Note 13 5G
- Everything You Need to Know about Lock Screen Settings on your Sony Xperia 1 V
- How To Repair Apple iPhone 14 Pro iOS System Issues? | Dr.fone
- Updated The Beginners Blueprint to Creating an Audio Book with Ease A Compreranly Updated Manual
- 2024 Approved StreamVid Studio Xtreme
- 2024 Approved Integrating Text Overlays Into Social Media Streaming
- Ultimate Guide on Apple iPhone 6 Plus iCloud Activation Lock Bypass
- Updated Tracking Down Immersive Echoes Resembling a Paintbrushs Path
- Updated In 2024, Best 8 Educational Video Websites for Teachers
- Why is iPogo not working On Realme 10T 5G? Fixed | Dr.fone
- 2024 Approved The Ultimate Guide to PPT Capture Excellence
- In 2024, Live Stream Longevity Preventing and Fixing Interruptions on Social Media
- How to Sign Excel Online with DigiSigner
- In 2024, How to Transfer Contacts from Lava Agni 2 5G to Other Android Devices Devices? | Dr.fone
- [New] 2024 Approved Country Calm A Curated List of Soothing Tunes to Dance & Unwind On TikTok
- Updated 2024 Approved Fast Forward Your Footage Top Time-Lapse Apps for Mobile
- [New] 2024 Approved Easy Implementation of Snap Camera on MS Teams
- What Is an AI Tool?
- Unlocking Made Easy The Best 10 Apps for Unlocking Your Oppo A2 Device
- In 2024, How to Unlock AT&T Apple iPhone 6 Plus with 3 Methods
- In 2024, Discovering Free Screen Recorders – Insightful Review, Best Picks
- How to Flash Dead Itel P55T Safely | Dr.fone
- A Guide Realme Note 50 Wireless and Wired Screen Mirroring | Dr.fone
- Title: "Enhance Engagement Learn to Dim YouTube Video Backgrounds"
- Author: Kevin
- Created at : 2024-05-25 15:08:51
- Updated at : 2024-05-26 15:08:51
- Link: https://youtube-videos.techidaily.com/enhance-engagement-learn-to-dim-youtube-video-backgrounds/
- License: This work is licensed under CC BY-NC-SA 4.0.
