"Elevating Your Vlogs with High-Quality Editing - Premiere Pro Style"
Elevating Your Vlogs with High-Quality Editing - Premiere Pro Style
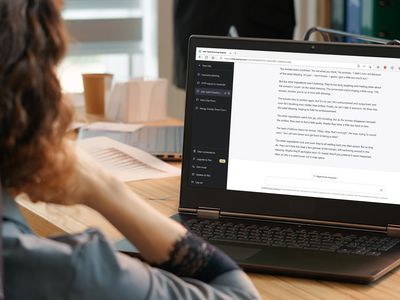
How to Edit YouTube Videos in Adobe Premiere

Richard Bennett
Mar 27, 2024• Proven solutions
You just made a few videos, and you want to edit them first before uploading to YouTube. The truth is that you may find the editing part a bit more challenging compared to uploading. However, there are now tools like Adobe Premiere that can help make the editing process easier. Read on and learn how to edit YouTube videos with Adobe Premier so that you can create amazing videos.
Related article:Adobe Premiere User Guide
Adobe Premiere is largely targeted towards professional users, and the best alternative you can use today, whether you are a professional user or just a casual YouTube user, is Wondershare Filmora . This is not only a highly effective video editing program, but it is also user-friendly and very easy to use.
 Download Mac Version ](https://tools.techidaily.com/wondershare/filmora/download/ )
Adobe is well known for having some of the leading video production tools in the industry. In fact, most of their tools ranging from the Premier Pro and Photoshop to Audition and many others have been used in many video and movie productions, including some of the popular theatrical releases of our times. Their latest professional video editor, Adobe Premier can be summarized as one of the best editors with versatility, depth, and power for high-quality video editing.
How to edit YouTube Videos with Adobe Premier
Step 1: Import the Video Clips
The first step in how to edit YouTube videos with Adobe Premier is to basically import the video clips you want to edit. This is achieved using a simple process of clicking “import” from the “file” drop-down menu. Once you have finished importing your photos or video files, you can then drag them from the sidebar and into the editing area.

Note
- If the videos you want to import are already published online, you can start the process by first downloading them directly from YouTube first, making sure to save them as MP4 files.
- The best way of importing videos from YouTube is by using an innovative video converter like Wondershare Video Converter Ultimate. This program will help in downloading and converting files to a format that is supported by Adobe Premier.
Step 2: Editing
The next step in how edit YouTube videos with Adobe Premiere is to start modifying the video files or photos the way you want. To achieve this, click on “Effects Control” and apply the desired effects. If you want to insert some text or words into your video, select “title” and then click “new title.” Now choose how you would like the words to behave, for instance, “Default Roll” makes the text roll upwards in the page.
Now drag the text that you have created into the editor area. If you want to edit the text, simply double-click to select it, and it will bring up a separate page where you can make further edits. You can then modify the text, font, and the positioning as well. This page also allows you to set whether the text will crawl or roll.

The final part of the process is to import your chosen audio file. This could be the chosen soundtrack for your presentation. Simply drag the audio file onto your editor. You can then modify how the length of your videos or photos by selecting and dragging the specific photo or video. Finally, press enter and your video will start rendering.
Step 3: Save the Edited File and Upload to YouTube
It is important to note that even as you edit YouTube videos with Adobe Premier, the software does not allow direct uploads to YouTube. This means you will need to save the edited file first on your computer and ensure you use a YouTube supported format. The most effective option is to use the codec, which will then save your file in the MPEG-4 format. This is the preferred format for YouTube and Video uploads.
Richard Bennett
Richard Bennett is a writer and a lover of all things video.
Follow @Richard Bennett
Richard Bennett
Mar 27, 2024• Proven solutions
You just made a few videos, and you want to edit them first before uploading to YouTube. The truth is that you may find the editing part a bit more challenging compared to uploading. However, there are now tools like Adobe Premiere that can help make the editing process easier. Read on and learn how to edit YouTube videos with Adobe Premier so that you can create amazing videos.
Related article:Adobe Premiere User Guide
Adobe Premiere is largely targeted towards professional users, and the best alternative you can use today, whether you are a professional user or just a casual YouTube user, is Wondershare Filmora . This is not only a highly effective video editing program, but it is also user-friendly and very easy to use.
Download Mac Version ](https://tools.techidaily.com/wondershare/filmora/download/ )
Adobe is well known for having some of the leading video production tools in the industry. In fact, most of their tools ranging from the Premier Pro and Photoshop to Audition and many others have been used in many video and movie productions, including some of the popular theatrical releases of our times. Their latest professional video editor, Adobe Premier can be summarized as one of the best editors with versatility, depth, and power for high-quality video editing.
How to edit YouTube Videos with Adobe Premier
Step 1: Import the Video Clips
The first step in how to edit YouTube videos with Adobe Premier is to basically import the video clips you want to edit. This is achieved using a simple process of clicking “import” from the “file” drop-down menu. Once you have finished importing your photos or video files, you can then drag them from the sidebar and into the editing area.
Note
- If the videos you want to import are already published online, you can start the process by first downloading them directly from YouTube first, making sure to save them as MP4 files.
- The best way of importing videos from YouTube is by using an innovative video converter like Wondershare Video Converter Ultimate. This program will help in downloading and converting files to a format that is supported by Adobe Premier.
Step 2: Editing
The next step in how edit YouTube videos with Adobe Premiere is to start modifying the video files or photos the way you want. To achieve this, click on “Effects Control” and apply the desired effects. If you want to insert some text or words into your video, select “title” and then click “new title.” Now choose how you would like the words to behave, for instance, “Default Roll” makes the text roll upwards in the page.
Now drag the text that you have created into the editor area. If you want to edit the text, simply double-click to select it, and it will bring up a separate page where you can make further edits. You can then modify the text, font, and the positioning as well. This page also allows you to set whether the text will crawl or roll.
The final part of the process is to import your chosen audio file. This could be the chosen soundtrack for your presentation. Simply drag the audio file onto your editor. You can then modify how the length of your videos or photos by selecting and dragging the specific photo or video. Finally, press enter and your video will start rendering.
Step 3: Save the Edited File and Upload to YouTube
It is important to note that even as you edit YouTube videos with Adobe Premier, the software does not allow direct uploads to YouTube. This means you will need to save the edited file first on your computer and ensure you use a YouTube supported format. The most effective option is to use the codec, which will then save your file in the MPEG-4 format. This is the preferred format for YouTube and Video uploads.
Richard Bennett
Richard Bennett is a writer and a lover of all things video.
Follow @Richard Bennett
Closing Your Vlog Right: Top 6 Free YouTube Outro Tools
Top 6 YouTube Outro Makers - Lots of FREE options
Richard Bennett
Oct 26, 2023• Proven solutions
YouTube outro makers can help your channel grow. Your outro, or end screen, on YouTube is your last chance to keep viewers on your channel. This can help you increase your channel’s watch time and get your videos ranked higher in search results.
Here are 6 outro maker sites where you can get outros and end cards. Check the bottom for our #1 pick!
6 YouTube Outro Makers With Templates
For even more End Screen Templates, click here .
1. Outro Maker
Overview: Outro Maker provides interactive, animated, end screens for YouTube videos at a low monthly cost.
On Outro Maker’s home page there’s a testimonials section featuring well-known YouTubers like Kandee Johnson. They’ve definitely got the social proof to back up their claims about ease and quality.
Outro Maker is a paid service ($3 per month for the basic package) and the biggest issue facing it is that a lot of the features it charges for have become free features of YouTube’s own end screen tool. You get access to templates and a template maker with Outro Maker, though, and that may be the important thing for you.
2. Biteable
Overview: Biteable skews more towards intros than outros, but makes up for it by being free.
Biteable has free video templates for YouTube intros and outros. You can use one of their pre-built options, or you can customize one of their video styles with your own logo, colors, and music.
This site definitely skews more towards intros than outros and they don’t really provide end screen cards. It would be up to you to choose a video style and customize it to make it work for your purpose, which shouldn’t be too much of a burden since the site is free.
3. Tube Arsenal
Overview: Tube Arsenal allows you to customize your intro on the site and download it for about $10.
Tube Arsenal has animated outro templates/end screen cards as well as an on-site clip editor you can use to customize them with your channel’s colors/logo/images. They have template cards with slots for videos/playlists as well as logos and subscribe buttons.
Tube Arsenal’s outros tend to cost $9 for 720p and $11 for 1080p. Some of their options include stylized ‘reveals’ of the ‘next video’ slots (i.e. they appear bit-by-bit from left to right) which will not be smoothly compatible with YouTube’s end screen tool (where the video previews will simply pop up).
4. Renderforest
Overview: Render Forest lets you download intros with 3D text for $20, and you can also use them as outros.
Render Forest is an intro maker that can also work as an outro maker (their templates aren’t set up like end screens). They have a lot of 3D options, which is something only a few other outro makers can offer, and they have been used by a lot of major brands.
One drawback of Renderforest is that it is significantly more expensive than other services on this list. It will cost you $20 for a 720p clip.
5. Panzoid
Overview: Panzoid is a completely free service where you can get high-quality outros with 3D text.
Panzoid is a community-driven site where creators make templates for intros and outros and post them for other creators to customize and download for free. There are a lot of high-quality clips on Panzoid, and most of what you find is 3D (a major perk).
6. Intro Cave
Overview: It costs $5 for a customized clip at Intro Cave.
As the name suggests, Intro Cave has a focus on intro videos. However, you can still use their customization system as an outro maker.
Although things do go on sale, they tend to charge $5 for a 720p clip.
YouTube Outro Maker Alternative-Wondershare Filmora
Wondershare Filmora is a great video editor for all creators. It has a large collection of video transitions, filters, overlays and text templates which can also help you customize your own templates. And its intuitive interface and easy-to-use editing tools will make your editing more efficient and quick! Let’s achieve a refined look with endless effects with Wondershare Filmora!

Richard Bennett
Richard Bennett is a writer and a lover of all things video.
Follow @Richard Bennett
Richard Bennett
Oct 26, 2023• Proven solutions
YouTube outro makers can help your channel grow. Your outro, or end screen, on YouTube is your last chance to keep viewers on your channel. This can help you increase your channel’s watch time and get your videos ranked higher in search results.
Here are 6 outro maker sites where you can get outros and end cards. Check the bottom for our #1 pick!
6 YouTube Outro Makers With Templates
For even more End Screen Templates, click here .
1. Outro Maker
Overview: Outro Maker provides interactive, animated, end screens for YouTube videos at a low monthly cost.
On Outro Maker’s home page there’s a testimonials section featuring well-known YouTubers like Kandee Johnson. They’ve definitely got the social proof to back up their claims about ease and quality.
Outro Maker is a paid service ($3 per month for the basic package) and the biggest issue facing it is that a lot of the features it charges for have become free features of YouTube’s own end screen tool. You get access to templates and a template maker with Outro Maker, though, and that may be the important thing for you.
2. Biteable
Overview: Biteable skews more towards intros than outros, but makes up for it by being free.
Biteable has free video templates for YouTube intros and outros. You can use one of their pre-built options, or you can customize one of their video styles with your own logo, colors, and music.
This site definitely skews more towards intros than outros and they don’t really provide end screen cards. It would be up to you to choose a video style and customize it to make it work for your purpose, which shouldn’t be too much of a burden since the site is free.
3. Tube Arsenal
Overview: Tube Arsenal allows you to customize your intro on the site and download it for about $10.
Tube Arsenal has animated outro templates/end screen cards as well as an on-site clip editor you can use to customize them with your channel’s colors/logo/images. They have template cards with slots for videos/playlists as well as logos and subscribe buttons.
Tube Arsenal’s outros tend to cost $9 for 720p and $11 for 1080p. Some of their options include stylized ‘reveals’ of the ‘next video’ slots (i.e. they appear bit-by-bit from left to right) which will not be smoothly compatible with YouTube’s end screen tool (where the video previews will simply pop up).
4. Renderforest
Overview: Render Forest lets you download intros with 3D text for $20, and you can also use them as outros.
Render Forest is an intro maker that can also work as an outro maker (their templates aren’t set up like end screens). They have a lot of 3D options, which is something only a few other outro makers can offer, and they have been used by a lot of major brands.
One drawback of Renderforest is that it is significantly more expensive than other services on this list. It will cost you $20 for a 720p clip.
5. Panzoid
Overview: Panzoid is a completely free service where you can get high-quality outros with 3D text.
Panzoid is a community-driven site where creators make templates for intros and outros and post them for other creators to customize and download for free. There are a lot of high-quality clips on Panzoid, and most of what you find is 3D (a major perk).
6. Intro Cave
Overview: It costs $5 for a customized clip at Intro Cave.
As the name suggests, Intro Cave has a focus on intro videos. However, you can still use their customization system as an outro maker.
Although things do go on sale, they tend to charge $5 for a 720p clip.
YouTube Outro Maker Alternative-Wondershare Filmora
Wondershare Filmora is a great video editor for all creators. It has a large collection of video transitions, filters, overlays and text templates which can also help you customize your own templates. And its intuitive interface and easy-to-use editing tools will make your editing more efficient and quick! Let’s achieve a refined look with endless effects with Wondershare Filmora!
Richard Bennett
Richard Bennett is a writer and a lover of all things video.
Follow @Richard Bennett
Also read:
- [New] The Roadmap To Becoming An Excellent Interviewer
- [Updated] 2024 Approved Navigating Through Interrupted Streams on Social Media
- 2024 Approved Flawless Endgame in VR Worlds
- 2024 Approved Instant Verbal to Written Conversion for Nothing
- Essential Thumbnail Strategies for Amplifying Viewership on YouTube
- Free Traffic on YouTube Tips That Actually Work
- In 2024, Adjust Your Video Feedback Control in YouTube
- In 2024, Affordable Online Education Hosting on YouTube
- In 2024, Crafting Success Pushing Your Video Into Top Charts
- In 2024, Full Guide on Mirroring Your Infinix Zero 30 5G to Your PC/Mac | Dr.fone
- Is It Worth Moving on to iOS 17: A Comprehensive Review
- Mastering the Art of Instagram Filter Use for 2024
- Overcoming Stubborn Chrome Freeze Problems – Tips and Tricks for Smooth Browsing
- Windows 11: Custom Shortcut for Safe Hardware Disconnect
- Title: Elevating Your Vlogs with High-Quality Editing - Premiere Pro Style
- Author: Kevin
- Created at : 2025-01-24 18:01:56
- Updated at : 2025-01-30 02:54:02
- Link: https://youtube-videos.techidaily.com/elevating-your-vlogs-with-high-quality-editing-premiere-pro-style/
- License: This work is licensed under CC BY-NC-SA 4.0.