

Elevate Your Youtube Presence with Audio
Elevate Your Youtube Presence with Audio
Create High-Quality Video - Wondershare Filmora
An easy and powerful YouTube video editor
Numerous video and audio effects to choose from
Detailed tutorials provided by the official channel
YouTube is a music lover’s paradise. With such a large community of music listeners on YouTube, many well-known and lesser-known musicians continue to upload their songs regularly. If you’re a music producer, you’ll probably want to do this as well. However, understanding how to upload music to YouTube might be difficult, so this article is created to assist you.
When you upload a song to YouTube, it becomes available to the entire globe. Unlike other streaming services, anyone can use YouTube for free. This is a one-of-a-kind platform for sharing music. This is an opportunity that every artist should take advantage of, with a potential audience of billions.
So, how do you go about uploading songs to YouTube? Regular file formats aren’t applicable; therefore, this is the only challenging component. YouTube does not recognize.mp3 or.mp4 files, which makes things a little more difficult for the average producer. It’s simple to get around this.
In this article
02 Why Is It Necessary To Upload Longer Videos And Music To Youtube?
03 How to upload your music to YouTube using Filmora?
Details On Youtube Music
YouTube recently added ‘YouTube Music’ to assist advertise the website as a music-focused destination. You don’t have to stay on the page for the music to keep playing, and there are no adverts if you pay for this service. Despite this, YouTube is still working to make its website more musical. The beauty of this is that even if you don’t want to pay, you still have access to all of YouTube’s music.
Using platforms like Spotify and Apple Music to distribute your music is a terrific way to get it out there. However, when compared to YouTube, there are several drawbacks. For starters, they are both expensive.
Even though this is critical for compensating artists, it already restricts the audience’s reach. Second, because there are so many music platforms to choose from, audiences are likely to have a favorite, which could mean they don’t have access to the platform you use to release your music. On the other hand, YouTube doesn’t have any of these problems.
YouTube’s other services are also free, making them accessible to everybody regardless of their financial position. This implies that you can access the site as long as you have a phone or a laptop. Many well-known musicians began their careers on YouTube. It provides a free platform for you to advertise yourself, regardless of your present level of popularity. Even some of the most popular profiles are musician accounts, demonstrating the site’s potential for musical promotion.
Why Is It Necessary To Upload Longer Videos And Music To Youtube?
YouTube enables video uploads of up to 15 minutes in length by default. If you try to upload a video that is more than 15 minutes long, it will fail. This is a YouTube restriction, not a Brightcove restriction. YouTube will notify you when your YouTube account has been activated for lengthier uploads. YouTube playlists are limited to 5,000 videos, and YouTube Music playlists should be similarly restricted.
Standard Accounts Have A Time Limit
The 2 GB, file size limit is backed by a 15-minute maximum runtime restriction in YouTube’s blog and Google’s 2011 upload rules. All YouTube videos had to be under 10 minutes long until 2010, but on July 29, 2010, YouTube announced that the maximum video duration had been expanded to 15 minutes. According to the company, this was the most requested modification by YouTube viewers, and it’s a natural move that takes full advantage of YouTube’s new 2 GB size restriction.
What Are The Benefits Of Uploading Music Or A Song On Youtube?
- YouTube Music is a music-specific YouTube that allows users to watch and listen to a nearly infinite archive in a music discovery app. It will enable fans to find and engage with artists by making it easier for them to discover the range and diversity of music material on YouTube.
- Adding music to your video makes it more engaging and gives it a professional look.
- Background music is intended to fill quiet and create an atmosphere rather than to be carefully listened to. It also allows for the creation of a unique ambiance with a more or less subtle background to elicit distinct emotions in the mind of an audiovisual production’s audience.
- Music can play a vital influence in the success of a video. The soundtrack can keep the viewer interested in the clip if the video itself is not entertaining.
How Can I Utilise Music Lawfully In My Youtube Videos?
If you want to use copyrighted music on YouTube lawfully, you’ll need to go out and seek permission from the original creator. The second side of music licensing is this. Copyright law ensures that creators are compensated when their work is used, and this is where YouTube’s music policy comes into play.
How to upload your music to YouTube using Filmora?
At the end of the day, YouTube is a video-sharing site. Even if listening to music with static backgrounds isn’t commonplace, including a video can’t hurt. Everything will be determined by your editing and design abilities. If you’re working on a simple project, adding some effects can help it stand out. To achieve this, there are a variety of software options available; pick one that best suits your needs. Today, we would like to recommend Filmora to you.
The songs in YouTube’s library can be used for both personal and commercial purposes. Any of the songs in Filmora’s library can be used in any way you like. There is no need for acknowledgment of non-commercial use, but you should aware that commercial use may not be permitted.
Moreover, Filmora is far more sophisticated than Windows Movie Maker and iMovie on Mac. It also allows you to create a professional-looking YouTube video with hundreds of presets such as filters, overlays, components, transitions, and blending several layers of effects and audio to enhance your YouTube tale.
Adding music to your video might help it go from excellent to extraordinary. Here’s a step-by-step guide on adding music to your YouTube videos. Knowing how to incorporate music into your YouTube videos can significantly improve the quality of your content. The majority of videos uploaded to YouTube have never been edited in any way.
This is due in part to a lack of experience, but it is also related to a lack of awareness. Including music in your films is an easy method to boost productivity, attract more viewers, and keep them watching for longer. It’s also simple to do straight within YouTube, albeit this isn’t the ideal option in the long run. So, here are a few options for adding music to YouTube videos by Filmora.
Step 1: The first step is to figure out where you want to put the audio
Download Wondershare Filmora from the official website and run it on your computer. After the software has been launched, go to ‘MEDIA’ and then to the ‘IMPORT’ option, which is located directly below the navigation bar. Now, select ‘Import Media Files’ from the drop-down menu to choose the video file, and then repeat the process to select the desired background music file.
Step 2: Adding music to a timeline
Hover your mouse over the audio and video files you just imported into Filmora, and then hit the ‘+’ sign (‘Add to Project’ will appear). You may also move the media files to the timeline by dragging them down.
Step 3: Make changes to the music file
By double-tapping the audio from the timeline, you can edit the music. The audio panel will appear at the top of the screen. You may fade in or out the audio, adjust the volume, pitch, and speed, and select suitable equalization.
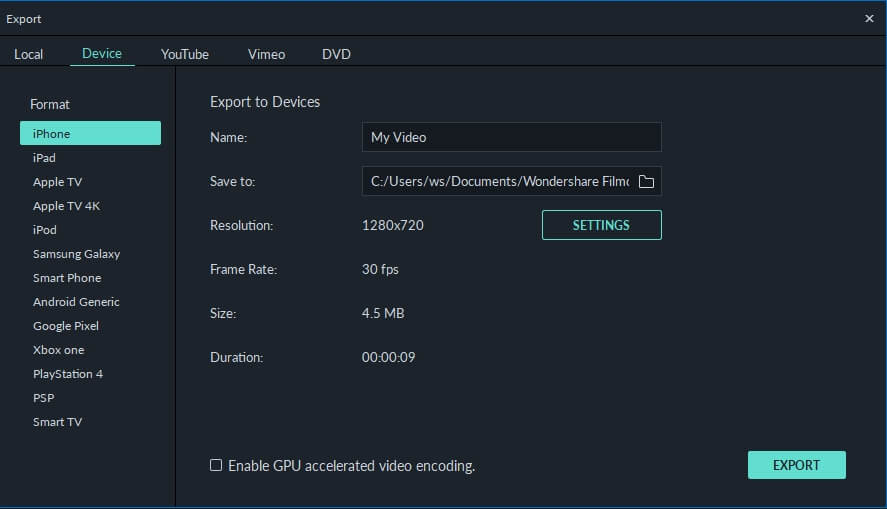
Step 4: Export your work
After you’ve made the adjustments you want to your movie, click the ‘EXPORT’ tab on the toolbar to export it. The produced file can be renamed, saved in.MP4 and.WMV formats, and set the resolution.
For Win 7 or later (64-bit)
For macOS 10.12 or later
Bouns! Where Can I Find Music For Youtube Videos?
YouTube’s music library is relatively small. The songs include both traditional public domain and generic royalty-free music. Your selections will be limited if you’re adding (or replacing) music directly from YouTube. This is why pre-editing your videos is the most pleasing thing you can do for them. This will enable you to add bespoke music from services.
Conclusion
● We hope you now have a better concept of how to post your song to YouTube if you’ve ever wondered. On the surface, posting songs to YouTube may appear complicated, but once you get the hang of it, it’ll be a snap. When considering how to promote your music, YouTube should not be disregarded. It’s rare to have a free platform to distribute music on, so make use of it. With such a massive YouTube user base, your potential audience is enormous. Get your song on the platform and promote it as much as possible. You never know who might come upon your tunes until you’ve made them public. This concluded the tutorial on how to upload music to YouTube.
YouTube is a music lover’s paradise. With such a large community of music listeners on YouTube, many well-known and lesser-known musicians continue to upload their songs regularly. If you’re a music producer, you’ll probably want to do this as well. However, understanding how to upload music to YouTube might be difficult, so this article is created to assist you.
When you upload a song to YouTube, it becomes available to the entire globe. Unlike other streaming services, anyone can use YouTube for free. This is a one-of-a-kind platform for sharing music. This is an opportunity that every artist should take advantage of, with a potential audience of billions.
So, how do you go about uploading songs to YouTube? Regular file formats aren’t applicable; therefore, this is the only challenging component. YouTube does not recognize.mp3 or.mp4 files, which makes things a little more difficult for the average producer. It’s simple to get around this.
In this article
02 Why Is It Necessary To Upload Longer Videos And Music To Youtube?
03 How to upload your music to YouTube using Filmora?
Details On Youtube Music
YouTube recently added ‘YouTube Music’ to assist advertise the website as a music-focused destination. You don’t have to stay on the page for the music to keep playing, and there are no adverts if you pay for this service. Despite this, YouTube is still working to make its website more musical. The beauty of this is that even if you don’t want to pay, you still have access to all of YouTube’s music.
Using platforms like Spotify and Apple Music to distribute your music is a terrific way to get it out there. However, when compared to YouTube, there are several drawbacks. For starters, they are both expensive.
Even though this is critical for compensating artists, it already restricts the audience’s reach. Second, because there are so many music platforms to choose from, audiences are likely to have a favorite, which could mean they don’t have access to the platform you use to release your music. On the other hand, YouTube doesn’t have any of these problems.
YouTube’s other services are also free, making them accessible to everybody regardless of their financial position. This implies that you can access the site as long as you have a phone or a laptop. Many well-known musicians began their careers on YouTube. It provides a free platform for you to advertise yourself, regardless of your present level of popularity. Even some of the most popular profiles are musician accounts, demonstrating the site’s potential for musical promotion.
Why Is It Necessary To Upload Longer Videos And Music To Youtube?
YouTube enables video uploads of up to 15 minutes in length by default. If you try to upload a video that is more than 15 minutes long, it will fail. This is a YouTube restriction, not a Brightcove restriction. YouTube will notify you when your YouTube account has been activated for lengthier uploads. YouTube playlists are limited to 5,000 videos, and YouTube Music playlists should be similarly restricted.
Standard Accounts Have A Time Limit
The 2 GB, file size limit is backed by a 15-minute maximum runtime restriction in YouTube’s blog and Google’s 2011 upload rules. All YouTube videos had to be under 10 minutes long until 2010, but on July 29, 2010, YouTube announced that the maximum video duration had been expanded to 15 minutes. According to the company, this was the most requested modification by YouTube viewers, and it’s a natural move that takes full advantage of YouTube’s new 2 GB size restriction.
What Are The Benefits Of Uploading Music Or A Song On Youtube?
- YouTube Music is a music-specific YouTube that allows users to watch and listen to a nearly infinite archive in a music discovery app. It will enable fans to find and engage with artists by making it easier for them to discover the range and diversity of music material on YouTube.
- Adding music to your video makes it more engaging and gives it a professional look.
- Background music is intended to fill quiet and create an atmosphere rather than to be carefully listened to. It also allows for the creation of a unique ambiance with a more or less subtle background to elicit distinct emotions in the mind of an audiovisual production’s audience.
- Music can play a vital influence in the success of a video. The soundtrack can keep the viewer interested in the clip if the video itself is not entertaining.
How Can I Utilise Music Lawfully In My Youtube Videos?
If you want to use copyrighted music on YouTube lawfully, you’ll need to go out and seek permission from the original creator. The second side of music licensing is this. Copyright law ensures that creators are compensated when their work is used, and this is where YouTube’s music policy comes into play.
How to upload your music to YouTube using Filmora?
At the end of the day, YouTube is a video-sharing site. Even if listening to music with static backgrounds isn’t commonplace, including a video can’t hurt. Everything will be determined by your editing and design abilities. If you’re working on a simple project, adding some effects can help it stand out. To achieve this, there are a variety of software options available; pick one that best suits your needs. Today, we would like to recommend Filmora to you.
The songs in YouTube’s library can be used for both personal and commercial purposes. Any of the songs in Filmora’s library can be used in any way you like. There is no need for acknowledgment of non-commercial use, but you should aware that commercial use may not be permitted.
Moreover, Filmora is far more sophisticated than Windows Movie Maker and iMovie on Mac. It also allows you to create a professional-looking YouTube video with hundreds of presets such as filters, overlays, components, transitions, and blending several layers of effects and audio to enhance your YouTube tale.
Adding music to your video might help it go from excellent to extraordinary. Here’s a step-by-step guide on adding music to your YouTube videos. Knowing how to incorporate music into your YouTube videos can significantly improve the quality of your content. The majority of videos uploaded to YouTube have never been edited in any way.
This is due in part to a lack of experience, but it is also related to a lack of awareness. Including music in your films is an easy method to boost productivity, attract more viewers, and keep them watching for longer. It’s also simple to do straight within YouTube, albeit this isn’t the ideal option in the long run. So, here are a few options for adding music to YouTube videos by Filmora.
Step 1: The first step is to figure out where you want to put the audio
Download Wondershare Filmora from the official website and run it on your computer. After the software has been launched, go to ‘MEDIA’ and then to the ‘IMPORT’ option, which is located directly below the navigation bar. Now, select ‘Import Media Files’ from the drop-down menu to choose the video file, and then repeat the process to select the desired background music file.
Step 2: Adding music to a timeline
Hover your mouse over the audio and video files you just imported into Filmora, and then hit the ‘+’ sign (‘Add to Project’ will appear). You may also move the media files to the timeline by dragging them down.
Step 3: Make changes to the music file
By double-tapping the audio from the timeline, you can edit the music. The audio panel will appear at the top of the screen. You may fade in or out the audio, adjust the volume, pitch, and speed, and select suitable equalization.
Step 4: Export your work
After you’ve made the adjustments you want to your movie, click the ‘EXPORT’ tab on the toolbar to export it. The produced file can be renamed, saved in.MP4 and.WMV formats, and set the resolution.
For Win 7 or later (64-bit)
For macOS 10.12 or later
Bouns! Where Can I Find Music For Youtube Videos?
YouTube’s music library is relatively small. The songs include both traditional public domain and generic royalty-free music. Your selections will be limited if you’re adding (or replacing) music directly from YouTube. This is why pre-editing your videos is the most pleasing thing you can do for them. This will enable you to add bespoke music from services.
Conclusion
● We hope you now have a better concept of how to post your song to YouTube if you’ve ever wondered. On the surface, posting songs to YouTube may appear complicated, but once you get the hang of it, it’ll be a snap. When considering how to promote your music, YouTube should not be disregarded. It’s rare to have a free platform to distribute music on, so make use of it. With such a massive YouTube user base, your potential audience is enormous. Get your song on the platform and promote it as much as possible. You never know who might come upon your tunes until you’ve made them public. This concluded the tutorial on how to upload music to YouTube.
Maximize Your Video Sound: Best Free WAV Extractors From YouTube
YouTube to WAV File: 4 Best Free Convert Solutions 
Richard Bennett
Mar 27, 2024• Proven solutions
YouTube to WAV converter is a very common phenomenon. This is done by the users as they want to play the video on selected devices.
In this article, we will help you manage to convert YouTube to WAV file with ease.
You will Learn :
- What is WAV?
- How to Convert YouTube to WAV Format? (4 Options)
- Tips to Convert YouTube to WAV
- Beside WAV Other Popular Formats for YouTube Videos
What is WAV?
WAV, known as Wave Form Audio File Format and is fully supported by Windows, is a common format that was launched back in 1991, which supports most of the older devices as well.
For the users that want uncompressed and lossless quality prefer to use WAV format. It is extended from the RIFF format to the RF64 format.
How to Convert YouTube to WAV Format?
Some many ways and programs can be used as YouTube to WAV converter. All these programs are easy to use and definitive guides are also available online. Some of the best ways are mentioned below.
Option 1: Convert YouTube to WAV by Wondershare Filmora
Filmora is by far the best program that can be used to convert YouTube to WAV format. YouTube to WAV file conversion has never been as easy as it is with this program. The program is easy to use and allows the users to overcome the issues which other programs present.
Features of the Program
- It is one of the very few programs that come with split-screen functionality. It means that the video and audio can be played simultaneously on a single interface.
- The audio equalizer ensures that the tuning is done as per the requirements.
- There is an advanced functionality of text editing which allows the users to mention the text onto the converted video as well.
- The UI of the program is graphical and hence it is easy to use. The independent reviews have granted a score of 9.5 based on this functionality of the program.
- The part selection is available in the program. It means that multiple conversions can be done at the same time without losing quality.
How to Convert YouTube to WAV Using Filmora?
This YouTube WAV converter is easy to use. The best part is that it is compatible with major platforms i.e. Windows and Mac. The processes for both will be explained in detail so that you can understand the program better.
The Process to Convert YouTube to WAV:
Step 1: Download Filmora for Windows or Mac (depends on your operating system).
If you want to download the program for Windows then click below download icon:

For Mac version download click below icon:

Step 2: There are three ways to import media into the program.
Methond 1: Click File > Import Media. Choose the YouTube file that you want to convert to WAV format. If the file is on another device then you can get it from there as well.

Method 2: Click Import Media on the main interface and select the file from the window that pops up.
Method 3: You can also drag and drop the files onto the interface to make sure that they are imported.
Step 3: You now just need to export the video in the WAV format. Click the Export button and then go for the Local tab. The export formats that are currently supported by the program are WMV, MP4, AVI, MOV, F4V, MKV, TS, 3GP, MPEG-2, WEBM, GIF and MP3.

Step 4: You can then alter the settings within the settings tab. The bit rate is the main thing that defines the quality of the video. Once the settings are done press OK
Step 5: You can also export the video as per the device that you want to play it on.
Step 6: You can also upload the video to social media platforms such as YouTube and Vimeo.
Step 7: You can also burn the converted format onto a DVD. Select the appropriate settings and press Export.
The process is explained as under. For video guides please visit Filmora 101 as it will get you the complete knowledge thoroughly.
You may also like: How to Convert YouTube to MP4 Safely? [Step by Step Guide] >>
Option 2: Other Way to Convert YouTube to WAV on Windows
5K Player is one of the best and the most used players that also work as YouTube to WAV conversion platform as well. The process is very easy to follow and is mentioned as under.
Step 1: Copy and paste the URL of the video on the desired location within the player. Click download and the process starts.

Step 2: Click “To Music” and select the WAV format from the drop-down that appears. You can also choose the bit rate, frame rate, and resolution. Once the conversion is completed you can save the file and the process ends here.
You may also like: >> How to to Convert WMV to MP4 Easily?
Option 3: Other Way to Convert YouTube to WAV on Mac
The Allavsoft is one of the best converters that can be used to convert YouTube to WAV on Mac. The process is simple and has been explained as under.
Step 1: Paste the URL of the YouTube video that you want to convert. You can also select the download quality and can access the file once the download has been completed.

Step 2: You can then select the format and once the conversion has been completed click the download button. The same has been depicted by numbers 2 and 3 in the picture below. WAV lossless quality should be selected from the dropdown to make sure that the work is done without any issue and problem.
Right format selection is important as the conversion is done instantly.
Option 4: YouTube to WAV Conversion Online
The process that you need to follow is explained as under.
Step 1: Visit https.//www.savethevideo.com/convert to access the converter.
Step 2: Paste the URL of the YouTube video that you want to convert and click the “Convert” button:

Step 3: Wait till the converter fetches the information.
Step 4: From the drop-down make sure that you select the WAV format.
Step 5: Click “Convert” once again and the process of conversion starts.
Step 6: The video then starts to download in the desired format.
Step 7: Click “Download” and save the file to the desired location. This concludes the process in full.
Tips to Convert YouTube to WAV
Below are some tips that would be useful for the users that want to convert YouTube to WAV format.
1. Always use the multipurpose software. It will allow you to download and convert the video at the same time-saving time.
2. Lossless quality is always to be selected while you are converting the format. It will make sure that the video is never compressed at all.
3. One of the best ways to convert the video is to disable the background noise. This will lead to awesome results.
4. Converting from YouTube to WAV also requires you to choose the software that is fast and reliable or else you will get the outcome which is not as per your requirements.
5. Free software programs can also get the malware to your system and therefore these are not recommended at all.
6. WAV is a format that is of high quality as the converters have loads of options so it is advised to use these carefully.
7. Make sure that the converters that are used are the ones that are highly rated and have a graphical user interface.
8. The YouTube to WAV downloader should be there on with the converter as it will make the process easy and you don’t need tons of software programs for a single purpose.
9. Always go for the program that supports the containers instead of just the format. If a program supports the containers then it is easy to convert a number of formats.
10. The conversion should be done with converters that do not cause any type of loss to enhance the quality as well.
Beside WAV Other Popular Formats for YouTube Videos
Many other video formats should be used to make sure that the best and the most advanced outcome is generated. Some of the most popular formats are as under.
- Audio Video Interleave Format, AVI
It is one of the oldest formats that are on the market. It was developed by Microsoft as a part of their video processing format for Windows. It was made publically available in 1992.
This one of the oldest formats is used universally. Many people consider it the standard to save videos. The AVI files are simple to use and are supported by almost every video player currently on the market.
It is easy to store as it takes less space than many other formats that are on the market. It will also let you transfer the files relatively faster due to the small size.
- Flash Video Format, FLV
The flash player by Adobe is one of the most common software programs on the system. This has made this video format one of the common ones on the market. The format can be played with ease as the supported plugins are there for other apps as well.
The flash content is supported by all browsers and therefore it is common to play these videos without any additional plugins. The best part of this format is the lossless quality that it provides to its users. Even if you compress these videos they remain HD as the quality remains the same.
- Apple QuickTime Movie, MOV
Among the Mac users, it is one of the most used formats. Developed by Apple it is a format that allows the users to overcome issues such as playback errors. The new version has also been launched which is known as QuickTime X.
The best part of this format is that it is available for Windows users as well. The files of the MOV format are usually of high quality. It is for the same that the size of such files is large as compared to other formats.
- Moving Pictures Expert Group 4, MP4
Introduced in 1998 it is a format that is used by the motion pictures association responsible for setting the standards. The format is widely used and is supported by various platforms as well as devices.
Even after the MP4 file is compressed it remains lossless and the quality remains the same. The HTML5 that has been launched currently also supports this format. It is compatible with almost all of the browsers that are on the market.
- 264
As the name suggests it is one of the best and the most used formats for HD videos. The compression remains lossless and even if the resolution is low the quality is maintained. The MP4 container is the one that is used to contain this format.
Most of the streaming devices, as well as the services, use this format while referring to HD video. The best part is that the format is widely accepted as industry standards for HD videos. Most of the users all over the world use this format to save their HD videos with ease.
- OGG
It is one of the most used video formats. It has been developed by the Xiph.org foundation to maintain the video as well as the audio quality on different platforms. The format is free and the documentation, as well as the configuration, can be downloaded by anyone.
- Advanced Systems Format, .ASF
If you want to stream videos then this is the format that is considered to be the best. It is still being used by the major popular streaming platforms of the world. The .ASF format is one of the best and it allows the users to overcome issues such as quality loss as well as streaming related issues.
You may also like: How to Post/Share a Video From YouTube on Instagram >>
Conclusion
If you require lossless compression then YouTube to WAV conversion is something that is required. Some many ways and means can be used to make sure that the idea is approached. The best way is to use Filmora as it is an easy and efficient operation.
The best way to get around the issue is to always use the service that is embedded with quality.
If you like this article then it is requested to comment and share it on social media. It will not only help others but will also let them have knowledgeable ideas.

Richard Bennett
Richard Bennett is a writer and a lover of all things video.
Follow @Richard Bennett
Richard Bennett
Mar 27, 2024• Proven solutions
YouTube to WAV converter is a very common phenomenon. This is done by the users as they want to play the video on selected devices.
In this article, we will help you manage to convert YouTube to WAV file with ease.
You will Learn :
- What is WAV?
- How to Convert YouTube to WAV Format? (4 Options)
- Tips to Convert YouTube to WAV
- Beside WAV Other Popular Formats for YouTube Videos
What is WAV?
WAV, known as Wave Form Audio File Format and is fully supported by Windows, is a common format that was launched back in 1991, which supports most of the older devices as well.
For the users that want uncompressed and lossless quality prefer to use WAV format. It is extended from the RIFF format to the RF64 format.
How to Convert YouTube to WAV Format?
Some many ways and programs can be used as YouTube to WAV converter. All these programs are easy to use and definitive guides are also available online. Some of the best ways are mentioned below.
Option 1: Convert YouTube to WAV by Wondershare Filmora
Filmora is by far the best program that can be used to convert YouTube to WAV format. YouTube to WAV file conversion has never been as easy as it is with this program. The program is easy to use and allows the users to overcome the issues which other programs present.
Features of the Program
- It is one of the very few programs that come with split-screen functionality. It means that the video and audio can be played simultaneously on a single interface.
- The audio equalizer ensures that the tuning is done as per the requirements.
- There is an advanced functionality of text editing which allows the users to mention the text onto the converted video as well.
- The UI of the program is graphical and hence it is easy to use. The independent reviews have granted a score of 9.5 based on this functionality of the program.
- The part selection is available in the program. It means that multiple conversions can be done at the same time without losing quality.
How to Convert YouTube to WAV Using Filmora?
This YouTube WAV converter is easy to use. The best part is that it is compatible with major platforms i.e. Windows and Mac. The processes for both will be explained in detail so that you can understand the program better.
The Process to Convert YouTube to WAV:
Step 1: Download Filmora for Windows or Mac (depends on your operating system).
If you want to download the program for Windows then click below download icon:
For Mac version download click below icon:
Step 2: There are three ways to import media into the program.
Methond 1: Click File > Import Media. Choose the YouTube file that you want to convert to WAV format. If the file is on another device then you can get it from there as well.
Method 2: Click Import Media on the main interface and select the file from the window that pops up.
Method 3: You can also drag and drop the files onto the interface to make sure that they are imported.
Step 3: You now just need to export the video in the WAV format. Click the Export button and then go for the Local tab. The export formats that are currently supported by the program are WMV, MP4, AVI, MOV, F4V, MKV, TS, 3GP, MPEG-2, WEBM, GIF and MP3.
Step 4: You can then alter the settings within the settings tab. The bit rate is the main thing that defines the quality of the video. Once the settings are done press OK
Step 5: You can also export the video as per the device that you want to play it on.
Step 6: You can also upload the video to social media platforms such as YouTube and Vimeo.
Step 7: You can also burn the converted format onto a DVD. Select the appropriate settings and press Export.
The process is explained as under. For video guides please visit Filmora 101 as it will get you the complete knowledge thoroughly.
You may also like: How to Convert YouTube to MP4 Safely? [Step by Step Guide] >>
Option 2: Other Way to Convert YouTube to WAV on Windows
5K Player is one of the best and the most used players that also work as YouTube to WAV conversion platform as well. The process is very easy to follow and is mentioned as under.
Step 1: Copy and paste the URL of the video on the desired location within the player. Click download and the process starts.
Step 2: Click “To Music” and select the WAV format from the drop-down that appears. You can also choose the bit rate, frame rate, and resolution. Once the conversion is completed you can save the file and the process ends here.
You may also like: >> How to to Convert WMV to MP4 Easily?
Option 3: Other Way to Convert YouTube to WAV on Mac
The Allavsoft is one of the best converters that can be used to convert YouTube to WAV on Mac. The process is simple and has been explained as under.
Step 1: Paste the URL of the YouTube video that you want to convert. You can also select the download quality and can access the file once the download has been completed.
Step 2: You can then select the format and once the conversion has been completed click the download button. The same has been depicted by numbers 2 and 3 in the picture below. WAV lossless quality should be selected from the dropdown to make sure that the work is done without any issue and problem.
Right format selection is important as the conversion is done instantly.
Option 4: YouTube to WAV Conversion Online
The process that you need to follow is explained as under.
Step 1: Visit https.//www.savethevideo.com/convert to access the converter.
Step 2: Paste the URL of the YouTube video that you want to convert and click the “Convert” button:
Step 3: Wait till the converter fetches the information.
Step 4: From the drop-down make sure that you select the WAV format.
Step 5: Click “Convert” once again and the process of conversion starts.
Step 6: The video then starts to download in the desired format.
Step 7: Click “Download” and save the file to the desired location. This concludes the process in full.
Tips to Convert YouTube to WAV
Below are some tips that would be useful for the users that want to convert YouTube to WAV format.
1. Always use the multipurpose software. It will allow you to download and convert the video at the same time-saving time.
2. Lossless quality is always to be selected while you are converting the format. It will make sure that the video is never compressed at all.
3. One of the best ways to convert the video is to disable the background noise. This will lead to awesome results.
4. Converting from YouTube to WAV also requires you to choose the software that is fast and reliable or else you will get the outcome which is not as per your requirements.
5. Free software programs can also get the malware to your system and therefore these are not recommended at all.
6. WAV is a format that is of high quality as the converters have loads of options so it is advised to use these carefully.
7. Make sure that the converters that are used are the ones that are highly rated and have a graphical user interface.
8. The YouTube to WAV downloader should be there on with the converter as it will make the process easy and you don’t need tons of software programs for a single purpose.
9. Always go for the program that supports the containers instead of just the format. If a program supports the containers then it is easy to convert a number of formats.
10. The conversion should be done with converters that do not cause any type of loss to enhance the quality as well.
Beside WAV Other Popular Formats for YouTube Videos
Many other video formats should be used to make sure that the best and the most advanced outcome is generated. Some of the most popular formats are as under.
- Audio Video Interleave Format, AVI
It is one of the oldest formats that are on the market. It was developed by Microsoft as a part of their video processing format for Windows. It was made publically available in 1992.
This one of the oldest formats is used universally. Many people consider it the standard to save videos. The AVI files are simple to use and are supported by almost every video player currently on the market.
It is easy to store as it takes less space than many other formats that are on the market. It will also let you transfer the files relatively faster due to the small size.
- Flash Video Format, FLV
The flash player by Adobe is one of the most common software programs on the system. This has made this video format one of the common ones on the market. The format can be played with ease as the supported plugins are there for other apps as well.
The flash content is supported by all browsers and therefore it is common to play these videos without any additional plugins. The best part of this format is the lossless quality that it provides to its users. Even if you compress these videos they remain HD as the quality remains the same.
- Apple QuickTime Movie, MOV
Among the Mac users, it is one of the most used formats. Developed by Apple it is a format that allows the users to overcome issues such as playback errors. The new version has also been launched which is known as QuickTime X.
The best part of this format is that it is available for Windows users as well. The files of the MOV format are usually of high quality. It is for the same that the size of such files is large as compared to other formats.
- Moving Pictures Expert Group 4, MP4
Introduced in 1998 it is a format that is used by the motion pictures association responsible for setting the standards. The format is widely used and is supported by various platforms as well as devices.
Even after the MP4 file is compressed it remains lossless and the quality remains the same. The HTML5 that has been launched currently also supports this format. It is compatible with almost all of the browsers that are on the market.
- 264
As the name suggests it is one of the best and the most used formats for HD videos. The compression remains lossless and even if the resolution is low the quality is maintained. The MP4 container is the one that is used to contain this format.
Most of the streaming devices, as well as the services, use this format while referring to HD video. The best part is that the format is widely accepted as industry standards for HD videos. Most of the users all over the world use this format to save their HD videos with ease.
- OGG
It is one of the most used video formats. It has been developed by the Xiph.org foundation to maintain the video as well as the audio quality on different platforms. The format is free and the documentation, as well as the configuration, can be downloaded by anyone.
- Advanced Systems Format, .ASF
If you want to stream videos then this is the format that is considered to be the best. It is still being used by the major popular streaming platforms of the world. The .ASF format is one of the best and it allows the users to overcome issues such as quality loss as well as streaming related issues.
You may also like: How to Post/Share a Video From YouTube on Instagram >>
Conclusion
If you require lossless compression then YouTube to WAV conversion is something that is required. Some many ways and means can be used to make sure that the idea is approached. The best way is to use Filmora as it is an easy and efficient operation.
The best way to get around the issue is to always use the service that is embedded with quality.
If you like this article then it is requested to comment and share it on social media. It will not only help others but will also let them have knowledgeable ideas.
Richard Bennett
Richard Bennett is a writer and a lover of all things video.
Follow @Richard Bennett
Also read:
- [New] Distinguishing Between YouTube Policies and CC Clauses
- [New] 30 Must-Have YouTube Intros Tools for Beginners, All Free
- [New] Buy YouTube Subscribers - Hundreds of Subscribers for $5?
- Boosting Engagement Customizing Your Shorts' First Impressions
- Uncover the Globe's Secrets with These Youtubers
- In 2024, Comprehensive Review The Journey From Vocaloids to VTubers
- Eliminated Invisible YouTube Micro Videos
- [Updated] Efficient Storytelling in Product Revelations
- Understanding Recent YouTube Financial Policies
- [Updated] Cutting-Edge Camera & Recording Apps for Smartphones' Most Reliable Sources
- [Updated] Disable Non-Specific YouTube Video Alerts
- [Updated] Crafting Quick-Cut Channel Sequences
- Mobile Filmmaking Mastery Creating Impactful YouTube Thumbnails
- The Newcomer's Playbook for Youtube Success Setup & Revenue Generation
- The Smart Youtuber's Playbook Fixing Short Snafus
- Tiny Videos Deciphered Crucial Elements
- [Updated] Best 10 YouTube Channels for Industry Insights
- Distinguishing Between YouTube Policies and CC Clauses
- Exploring Income Derived From Each Watch on Video Platforms
- [Updated] Enable Quiet YouTube BGPlay for iPhone & Android
- [Updated] Curb Automated YouTube Content Feeds
- The Definitive Playbook Enhancing Your Video's First Impression
- Boosting Engagement From the Start Premium, Paid-Free Intra Creators
- Youtube Shorts Earning Strategies Crucial Elements, Possible Returns
- Top 10+ Creative YouTubes Channel Names for Aspiring Vloggers (No More than 156 Characters)
- Defending Your Videos Against YouTube Copyright Strikes
- From Dorm Room to Mainstream Trending Short Hashtags
- In 2024, Digital Dominance Top YouTube Watch Count Chronicles
- Decoding Steps to Access Your Channel's Eyeballs for 2024
- Effortless YouTube Video to Text Conversion at No Cost!
- [Updated] Elevate Your Team with Expert Talent Selections
- 2024 Approved Charting the Unknown Visual Facts From 2017'S Youtube World
- [New] Alternative to YouTube for Video Lovers on iOS, Android
- In 2024, Avoid Commonplace Channel Titles Finding Uniqueness with Filmora
- Unveiling the Power of Tags in Your YouTube Content
- Crafting the Perfect Harmony Fusing Lyrics & Images with Lyric Video Maker for 2024
- Haul Video Production Boosting Viewership and Fun
- Unlock Flawless Loops on YouTube with These Tips
- In 2024, Design Your Closure The Best Free YouTube Tutorials
- In 2024, Essential Steps to Designing Exceptional YouTube Thumbnails
- Dailymotion vs YouTube Monetization Which Is More Profitable?
- [New] Club Craft How to Download Best DJ Vids
- How Do I Stop Someone From Tracking My Realme Narzo 60 Pro 5G? | Dr.fone
- Updated In 2024, Unveiling the Top 5 MP3 Converters and Mixers Optimized for macOS
- Samsung Galaxy A05 Music Recovery - Recover Deleted Music from Samsung Galaxy A05
- Innovative Insights for Aspiring Mac Users A Guide to Screen Recording
- [New] Pixels in Perfection Tweeting at Full HD Quality
- New Streamlining Sound Integration A Fast Fix Manual for Premiere Pro
- [New] 2024 Approved Prime 10 Terraria Game Enhancements
- Unlock the Power of a New Identity Step-by-Step Guide to Alter Your Game Character's Voice for FREE
- Updated Capturing Clarity An Intuitive Roadmap for Convenient and High-Quality Podcast Recordings
- [Updated] 2024 Approved How to Add Border to Instagram Video?
- 2024 Approved Mastering the Art of Instagram's Musical Emoji Use
- 2024 Approved Innovative 11 Audio Devices for Professionals
- In 2024, How to Hide/Fake Snapchat Location on Your Apple iPhone 6 Plus | Dr.fone
- In 2024, For People Wanting to Mock GPS on Oppo A56s 5G Devices | Dr.fone
- Updated In 2024, From Novice to Pro The Top Animation Maker Tools You Need to Know
- [New] Design Marvels Japanese Homescape in MC Landscape for 2024
- [Updated] Discover Unmissable Adventures in Sandbox Gaming for 2024
- Android Safe Mode - How to Turn off Safe Mode on Motorola Edge 40 Neo? | Dr.fone
- Updated In 2024, Converting MP3 to MP4? Heres What You Need to Know First
- New How Does the YouTube AI Algorithm Work for 2024
- [Updated] Press Pause on Anxiety with These Games
- Discover Visual Magic Best Lightroom LUT Picks to Revolutionize Your Workflow
- Influential Insights 30+ Biographical Ideas for Skyrocketing Followers on TikTok with Filmora
- New Top 5 Free WMV Video Merging Solutions for 2024
- Celestial Sound Shift Exploring the Features, User Manuals & Alternatives for Star Voice Transformation for 2024
- [Updated] Aerial Device Typologies
- In 2024, How to Come up With the Best Pokemon Team On Tecno Camon 20 Premier 5G? | Dr.fone
- Issues playing H.265 HEVC video on Edge 40 Neo
- In 2024, Unlock Apple ID without Phone Number On Apple iPhone 12 Pro Max
- New 2024 Approved Apex Audio Technician for Windows 10
- In 2024, Revolutionizing Voices Leading Real-Time Alteration Technologies
- Forgot Locked Apple iPhone X Password? Learn the Best Methods To Unlock
- In 2024, Unleash Your Creativity The Best Video Editing Apps
- Free and Easy 3GP Video Rotation Top Picks for This Year for 2024
- New Unleash Speed How to Add Realistic Motion Blur in Final Cut Pro
- [Updated] PC Strategies for Acquiring Twitter Jokes (GIFs)
- New In 2024, Top 10 Free Online Animated Logo Makers Everyone Should Know
- Updated How to Color-Correct an S-Log Footage for 2024
- Title: Elevate Your Youtube Presence with Audio
- Author: Kevin
- Created at : 2024-06-26 14:16:51
- Updated at : 2024-06-27 14:16:51
- Link: https://youtube-videos.techidaily.com/elevate-your-youtube-presence-with-audio/
- License: This work is licensed under CC BY-NC-SA 4.0.
