
:max_bytes(150000):strip_icc()/android-fotoo-0a616886a0824ebcb610688c8eb5a667.jpg)
Elevate Your Vlogging Game with Tripod Mastery for 2024
Elevate Your Vlogging Game with Tripod Mastery
How To Use a Tripod for Vlogging

Richard Bennett
Mar 27, 2024• Proven solutions
As you grow into a serious vlogger, a tripod will become an essential piece of equipment. You can get by for a long time setting your camera up on a stack of books, or an upside-down laundry hamper, but not forever. While these setups are great for a beginner, an intermediate vlogger will start to find them limiting. Even if you are an amazingly creative person who can create any camera setup without a tripod there will come a point where you will decide your creative energy is better spent on your video content.
This article will explain how to use a tripod and then introduce you to four different types.
Part 1: How To Set a Tripod for Vlogging
1. Setting Up Your Tripod
Step 1 – Pull out all three legs of your tripod and make sure it is standing stably. There will be tensioners on the legs which you can release in order to adjust your height. Once your legs are extended to the height you want continue adjusting them until your tripod is level. Some tripods have a built in bubble level, but if yours does not you can use a separate bubble level or make a guestimate.
Make sure when you are setting up your tripod that you point one of its legs towards your subject. This will give you room to stand behind your camera, in-between the other two legs. If you have one leg pointed directly behind your camera then you may trip over it. Or, you may knock over and damage your camera.
Step 2 – On the top of your tripod there will be a plate with a small hole and a screw. Remove this plate using either a clip or lever, depending on your tripod. Once your plate is detached screw it into the bottom of your camera. It should be tight, but not too tight or you risk damaging your camera.
Step 3 – Attach your plate, which now has your camera mounted to it, back onto your tripod.
Your tripod comes with a ‘head’. Your tripod’s head is what your camera is mounted on top of. There are several different types of tripod heads and mounts which are all useful for different things.
Ball Heads and Pan/Tilt Heads are the two most common types of tripod heads. Ball Heads allow you to adjust your camera’s position quite a bit before you start shooting. They are not good for adding in camera movements while you are filming, however, because you need to lock them in place. Pan/Tilt heads are great for creating camera movement. Most Pan/Tilt heads have a handle which you can use to make a smooth panning motion.
Part 2: Why Do You Need a Tripod: Benefits of Using Tripod
Why can’t you just hold a camera in your hand while shooting vlog entries for your YouTube channel? Honestly, you can, but the camera may shake a lot and your footage might end up being unusable. Putting a camera on a tripod reduces the probability of camera shake to the minimum and that is just the tip of the iceberg.
A huge amount of vlogs can be described as sit down videos, in which the host of the video sits in front of a camera and talks to the audience. Holding a camera while talking or trying to present a product to the viewers is next to impossible, so in order to avoid having to deal with a camera, you can simply put it on a tripod, find the best angle, and push the record button.
On the go videos, are recorded at exterior locations, and a lot of YouTubers choose to shoot these types of videos handheld, but this approach makes it difficult to maintain the same shot composition for long. A Monopod, Gorillapod or just a simple selfie stick can make your job much easier because they stabilize the camera. In addition, shooting smooth panning shots without a tripod is as difficult as it sounds.
Part 3: A Few Things You’ll Need to Consider Before You Buy a Tripod
There are thousands of different tripod models you can use for vlogging, but which model you’re going to choose depends mostly on the type of vlog you want to make. If you are planning on shooting all of your videos in the studio-like conditions, then portability isn’t such an important feature, while quite the opposite is true if you intend on filming all of your footage on outdoor locations.
However, there are certain traits you have to consider when choosing a tripod you’re going to use while recording your vlog entries.
Sturdiness: There is absolutely no point in spending money on a tripod that breaks easily. Although if your plan is to shoot vlogs at home or in a studio, then buying a cheaper plastic tripod isn’t such a bad option, since the clamps and joints won’t have to endure a lot of wear and tear. Consider buying a more durable tripod if you are going to be traveling a lot while working on your vlogs.
The Type of Camera: A number of factors can contribute to the weight of a camera, including battery grips or lenses, so before you buy a tripod make sure that it can support the weight of the camera you want to use to record your videos.
The Maximum Height: Most vloggers don’t really have to worry about how tall their tripod is, because they are not on their feet in any of the shots featured in the video. Vloggers working on DIY videos, cooking tutorials or any other type of vlog that involves movement and action should pay attention to this trait.
Photo or Video Tripods: Do you want to take beautiful panning shots? If the answer is yes then you should get a video tripod that enables you to move the camera smoothly in any direction. Photo tripods are a great option for static shots that don’t involve a lot of camera movement.
Mobility: The heavier a tripod is, the more stability it can provide, but carrying a tripod that weighs over 10 pounds to shoot sports or adventure vlogs can be a tiring endeavor. Although portability is a factor, it shouldn’t prevent you from buying a high-quality tripod that will ensure your footage is perfectly smooth and stable.
Part 4: 4 Types of Tripods
Full-Sized Tripods: are very sturdy, and as a result can be fairly heavy. Although you can take them a lot of places they are not convenient to carry for extended periods of time. They are the most reliable way to ensure you have absolutely no camera shake.
Compact Tripods: appear to be the same size as Full-Sized tripods, but they are actually much lighter. You can get the same height with a Compact Tripod as a Full-Sized tripod and it will be much easier to travel with. However, Compact Tripods are not as stable. If you are shooting for an extended period of time you may need to weigh your Compact Tripod down with sandbags to keep it steady.
Gorillapods: have flexible legs which can be wrapped around posts, fences, or anything else you may want to mount your camera on. They are also lightweight enough that you can carry them around while you shoot. If you bend it right you can essentially use your Gorillapod as a heavy-duty selfie-stick for your camera.
Table-Top Tripods: are very small and easy to travel with. You can leave one in your camera bag or your glove box. Table-Top Tripods are meant to be set up on top of desks or other stable surfaces and may not be ideal for heavier cameras.
Part 5: The 5 Best Tripods For YouTube Vlogging
Even if you know everything there is to know about tripods, the selection process can be daunting. That’s why we’ve shortlisted the top 5 tripods on the market, in an effort to make finding the right tripod for your vlog videos as quick an easy as it can possibly be. Let’s have a look.
1. CamRah Smartphone Tripod
Price: $24.99

An increasing number of Smartphones features powerful cameras that can record videos at high resolutions. Unfortunately, most iPhones and Android devices are lightweight, which makes it difficult to hold them perfectly still while shooting a video. CamRah Smartphone Tripod offers a perfect solution to this problem because it is easy to pack and you can carry it wherever you go, without needing the extra space.
It weighs just 0.6lbs and it is 10.8 inches tall. The tripod has a maximum load of 11lbs which means that besides Smartphones, you can also mount action cameras, webcams, or even smaller DSLR cameras onto it. The flexible legs made from high-density foam offer stability even when the CamRah Tripod is placed on an uneven surface.
Pros:
- Easily portable
- Affordable
- Jaws technology provides an extra strong grip of the camera
Cons:
- The tripod’s legs can’t be extended
- Can’t be used with professional cameras
2. Manfrotto Mini Travel Tripod
Price: $34.99

Yet another great option for shooting vlogs with a Smartphone. The Manfrotto Mini Travel Tripod kit is also an excellent choice for all vloggers who shoot their videos with compact cameras. The tripod weighs just 0.51lbs and it is 5.31 inches tall, which makes it a perfect travel companion. However, it can’t support cameras heavier than 2.2lbs, so you have to carefully choose the camera you want to put on this tripod.
The tripod’s rotatable head features a lock button that enables you to fix the camera at a certain position and to shoot a video from an angle you selected. You can’t extend the legs on this tripod so shooting high angle shots is not an option.
Pros:
- Small and durable
- Allows you to mount almost any Smartphone model
- Compatible with compact cameras
Cons:
- Limits your shot selection
- Tripod’s legs can’t be extended
3. Joby Gorilla Pod
Price: $22.50

This tripod is a superstar in the vlogging community because it is flexible, easy to set up and it fits into a pocket. Joby Gorilla Pod’s legs are segmented, so you can freely choose an angle from which you want to shoot, without having to worry about the camera’s stability. You can use this tripod on flat and uneven surfaces equally effectively.
Joby Gorilla weighs just 1lbs and its maximum height 11.6 inches, which makes it perfectly suited for talking heads videos. Using this tripod while you are on the go is also an option if you have a camera that weighs less than 3lbs.
Pros:
- Highly adjustable
- Sturdy and Lightweight
- Made from stainless steel
Cons:
- Can’t be used for panning shots
- Legs can be extended for just one inch
4. Manfrotto Compact Action Tripod
Price: $64.49
If you love shooting your vlogs at night or if you simply want a tripod you can use in the studio an outdoor conditions, then Manfrotto’s Compact Action Tripod is one the best options you have at your disposal. The ergonomic head features a mounting plate that is easy to use and which provides a perfect grip of a camera.
This tripod is designed to be used with consumer-level DSLR cameras, but you can use it to shoot videos with almost all types of cameras. The Compact Action Tripod has a maximum height of 51.57 inches, and it can’t hold cameras heavier than 3.30lbs.
Pros:
- Suitable for both photography and video
- Great for outdoor use
- Allows you to take a wide variety of shots
Cons:
- Can’t support a lot of weight
- Not perfectly suited for professional-level cameras
5. Magnus VT-4000 Fluid Head Tripod
Price: $159.95
Experienced vloggers who record their videos with professional cameras, will enjoy using the Magnus VT-4000 Fluid Head Tripod. The 59-inch tall tripod can support as much as 8.8lbs of weight, and it is designed to help you create perfectly stable shots. The superb panning and tilting option enable you to move your camera freely while recording smooth shots, free of camera shakes.
The quick release mounting plate is compatible with a wide range of cameras, so you can experiment and work with several different cameras while using the same tripod. You can hardly make a mistake if you choose to buy this tripod because you’ll be able to use it to record vlogs at interior and exterior locations.
Pros:
- Easily adjustable to any surface
- Perfect for high angle shots
- Heavy-duty locks
Cons:
- Weighs 7.9lbs
- Not the best choice for action and adventure vlogs
Richard Bennett
Richard Bennett is a writer and a lover of all things video.
Follow @Richard Bennett
Richard Bennett
Mar 27, 2024• Proven solutions
As you grow into a serious vlogger, a tripod will become an essential piece of equipment. You can get by for a long time setting your camera up on a stack of books, or an upside-down laundry hamper, but not forever. While these setups are great for a beginner, an intermediate vlogger will start to find them limiting. Even if you are an amazingly creative person who can create any camera setup without a tripod there will come a point where you will decide your creative energy is better spent on your video content.
This article will explain how to use a tripod and then introduce you to four different types.
Part 1: How To Set a Tripod for Vlogging
1. Setting Up Your Tripod
Step 1 – Pull out all three legs of your tripod and make sure it is standing stably. There will be tensioners on the legs which you can release in order to adjust your height. Once your legs are extended to the height you want continue adjusting them until your tripod is level. Some tripods have a built in bubble level, but if yours does not you can use a separate bubble level or make a guestimate.
Make sure when you are setting up your tripod that you point one of its legs towards your subject. This will give you room to stand behind your camera, in-between the other two legs. If you have one leg pointed directly behind your camera then you may trip over it. Or, you may knock over and damage your camera.
Step 2 – On the top of your tripod there will be a plate with a small hole and a screw. Remove this plate using either a clip or lever, depending on your tripod. Once your plate is detached screw it into the bottom of your camera. It should be tight, but not too tight or you risk damaging your camera.
Step 3 – Attach your plate, which now has your camera mounted to it, back onto your tripod.
Your tripod comes with a ‘head’. Your tripod’s head is what your camera is mounted on top of. There are several different types of tripod heads and mounts which are all useful for different things.
Ball Heads and Pan/Tilt Heads are the two most common types of tripod heads. Ball Heads allow you to adjust your camera’s position quite a bit before you start shooting. They are not good for adding in camera movements while you are filming, however, because you need to lock them in place. Pan/Tilt heads are great for creating camera movement. Most Pan/Tilt heads have a handle which you can use to make a smooth panning motion.
Part 2: Why Do You Need a Tripod: Benefits of Using Tripod
Why can’t you just hold a camera in your hand while shooting vlog entries for your YouTube channel? Honestly, you can, but the camera may shake a lot and your footage might end up being unusable. Putting a camera on a tripod reduces the probability of camera shake to the minimum and that is just the tip of the iceberg.
A huge amount of vlogs can be described as sit down videos, in which the host of the video sits in front of a camera and talks to the audience. Holding a camera while talking or trying to present a product to the viewers is next to impossible, so in order to avoid having to deal with a camera, you can simply put it on a tripod, find the best angle, and push the record button.
On the go videos, are recorded at exterior locations, and a lot of YouTubers choose to shoot these types of videos handheld, but this approach makes it difficult to maintain the same shot composition for long. A Monopod, Gorillapod or just a simple selfie stick can make your job much easier because they stabilize the camera. In addition, shooting smooth panning shots without a tripod is as difficult as it sounds.
Part 3: A Few Things You’ll Need to Consider Before You Buy a Tripod
There are thousands of different tripod models you can use for vlogging, but which model you’re going to choose depends mostly on the type of vlog you want to make. If you are planning on shooting all of your videos in the studio-like conditions, then portability isn’t such an important feature, while quite the opposite is true if you intend on filming all of your footage on outdoor locations.
However, there are certain traits you have to consider when choosing a tripod you’re going to use while recording your vlog entries.
Sturdiness: There is absolutely no point in spending money on a tripod that breaks easily. Although if your plan is to shoot vlogs at home or in a studio, then buying a cheaper plastic tripod isn’t such a bad option, since the clamps and joints won’t have to endure a lot of wear and tear. Consider buying a more durable tripod if you are going to be traveling a lot while working on your vlogs.
The Type of Camera: A number of factors can contribute to the weight of a camera, including battery grips or lenses, so before you buy a tripod make sure that it can support the weight of the camera you want to use to record your videos.
The Maximum Height: Most vloggers don’t really have to worry about how tall their tripod is, because they are not on their feet in any of the shots featured in the video. Vloggers working on DIY videos, cooking tutorials or any other type of vlog that involves movement and action should pay attention to this trait.
Photo or Video Tripods: Do you want to take beautiful panning shots? If the answer is yes then you should get a video tripod that enables you to move the camera smoothly in any direction. Photo tripods are a great option for static shots that don’t involve a lot of camera movement.
Mobility: The heavier a tripod is, the more stability it can provide, but carrying a tripod that weighs over 10 pounds to shoot sports or adventure vlogs can be a tiring endeavor. Although portability is a factor, it shouldn’t prevent you from buying a high-quality tripod that will ensure your footage is perfectly smooth and stable.
Part 4: 4 Types of Tripods
Full-Sized Tripods: are very sturdy, and as a result can be fairly heavy. Although you can take them a lot of places they are not convenient to carry for extended periods of time. They are the most reliable way to ensure you have absolutely no camera shake.
Compact Tripods: appear to be the same size as Full-Sized tripods, but they are actually much lighter. You can get the same height with a Compact Tripod as a Full-Sized tripod and it will be much easier to travel with. However, Compact Tripods are not as stable. If you are shooting for an extended period of time you may need to weigh your Compact Tripod down with sandbags to keep it steady.
Gorillapods: have flexible legs which can be wrapped around posts, fences, or anything else you may want to mount your camera on. They are also lightweight enough that you can carry them around while you shoot. If you bend it right you can essentially use your Gorillapod as a heavy-duty selfie-stick for your camera.
Table-Top Tripods: are very small and easy to travel with. You can leave one in your camera bag or your glove box. Table-Top Tripods are meant to be set up on top of desks or other stable surfaces and may not be ideal for heavier cameras.
Part 5: The 5 Best Tripods For YouTube Vlogging
Even if you know everything there is to know about tripods, the selection process can be daunting. That’s why we’ve shortlisted the top 5 tripods on the market, in an effort to make finding the right tripod for your vlog videos as quick an easy as it can possibly be. Let’s have a look.
1. CamRah Smartphone Tripod
Price: $24.99
An increasing number of Smartphones features powerful cameras that can record videos at high resolutions. Unfortunately, most iPhones and Android devices are lightweight, which makes it difficult to hold them perfectly still while shooting a video. CamRah Smartphone Tripod offers a perfect solution to this problem because it is easy to pack and you can carry it wherever you go, without needing the extra space.
It weighs just 0.6lbs and it is 10.8 inches tall. The tripod has a maximum load of 11lbs which means that besides Smartphones, you can also mount action cameras, webcams, or even smaller DSLR cameras onto it. The flexible legs made from high-density foam offer stability even when the CamRah Tripod is placed on an uneven surface.
Pros:
- Easily portable
- Affordable
- Jaws technology provides an extra strong grip of the camera
Cons:
- The tripod’s legs can’t be extended
- Can’t be used with professional cameras
2. Manfrotto Mini Travel Tripod
Price: $34.99
Yet another great option for shooting vlogs with a Smartphone. The Manfrotto Mini Travel Tripod kit is also an excellent choice for all vloggers who shoot their videos with compact cameras. The tripod weighs just 0.51lbs and it is 5.31 inches tall, which makes it a perfect travel companion. However, it can’t support cameras heavier than 2.2lbs, so you have to carefully choose the camera you want to put on this tripod.
The tripod’s rotatable head features a lock button that enables you to fix the camera at a certain position and to shoot a video from an angle you selected. You can’t extend the legs on this tripod so shooting high angle shots is not an option.
Pros:
- Small and durable
- Allows you to mount almost any Smartphone model
- Compatible with compact cameras
Cons:
- Limits your shot selection
- Tripod’s legs can’t be extended
3. Joby Gorilla Pod
Price: $22.50
This tripod is a superstar in the vlogging community because it is flexible, easy to set up and it fits into a pocket. Joby Gorilla Pod’s legs are segmented, so you can freely choose an angle from which you want to shoot, without having to worry about the camera’s stability. You can use this tripod on flat and uneven surfaces equally effectively.
Joby Gorilla weighs just 1lbs and its maximum height 11.6 inches, which makes it perfectly suited for talking heads videos. Using this tripod while you are on the go is also an option if you have a camera that weighs less than 3lbs.
Pros:
- Highly adjustable
- Sturdy and Lightweight
- Made from stainless steel
Cons:
- Can’t be used for panning shots
- Legs can be extended for just one inch
4. Manfrotto Compact Action Tripod
Price: $64.49
If you love shooting your vlogs at night or if you simply want a tripod you can use in the studio an outdoor conditions, then Manfrotto’s Compact Action Tripod is one the best options you have at your disposal. The ergonomic head features a mounting plate that is easy to use and which provides a perfect grip of a camera.
This tripod is designed to be used with consumer-level DSLR cameras, but you can use it to shoot videos with almost all types of cameras. The Compact Action Tripod has a maximum height of 51.57 inches, and it can’t hold cameras heavier than 3.30lbs.
Pros:
- Suitable for both photography and video
- Great for outdoor use
- Allows you to take a wide variety of shots
Cons:
- Can’t support a lot of weight
- Not perfectly suited for professional-level cameras
5. Magnus VT-4000 Fluid Head Tripod
Price: $159.95
Experienced vloggers who record their videos with professional cameras, will enjoy using the Magnus VT-4000 Fluid Head Tripod. The 59-inch tall tripod can support as much as 8.8lbs of weight, and it is designed to help you create perfectly stable shots. The superb panning and tilting option enable you to move your camera freely while recording smooth shots, free of camera shakes.
The quick release mounting plate is compatible with a wide range of cameras, so you can experiment and work with several different cameras while using the same tripod. You can hardly make a mistake if you choose to buy this tripod because you’ll be able to use it to record vlogs at interior and exterior locations.
Pros:
- Easily adjustable to any surface
- Perfect for high angle shots
- Heavy-duty locks
Cons:
- Weighs 7.9lbs
- Not the best choice for action and adventure vlogs
Richard Bennett
Richard Bennett is a writer and a lover of all things video.
Follow @Richard Bennett
Optimizing Video Income on Youtube: A Practical Guide
YouTube is a widely beloved platform that appeals to individuals of all age groups. If you understand how to harness its potential, YouTube can become a source of income. Generating income from YouTube videos becomes simple through YouTube video monetization. If you’re keen on monetizing your YouTube account, this article is your guide. You can turn it into a part-time gig or a full-time profession, potentially earning a solid income.
To earn well, your content must align with what viewers truly desire. Read this article to learn about how you can monetize YouTube videos, its rules, and requirements.
YouTube Monetization Helper Create the conditions for effective YouTube monetization with Wondershare Filmora!
Free Download Free Download Learn More

Part 1. How to Get Monetized on YouTube: Rules and Requirements
How to Monetize YouTube Channel
Begin making money from your YouTube videos through the YouTube Partner Program. You can create earnings from your YouTube channel by connecting it to your Google account. Monetize your website using Google AdSense.
Google AdSense generates substantial website revenue. If viewers interact with the ads in your videos, you earn money. Adding AdSense to your YouTube channel makes your videos monetizable.
Some videos cannot be monetized, however. Content must meet specific requirements to qualify for YouTube’s program. Criteria include content quality, community guidelines, and copyright compliance. Your YouTube channel can generate income once your videos meet these standards.
Monetizing YouTube Videos: What Are The Requirements?
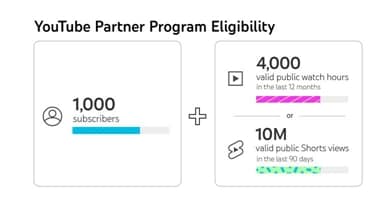
You can monetize your YouTube videos by joining the YouTube Partner Program. Everyone can create a YouTube account, but YPP requires certain requirements. Every time you create content, you must consider these requirements.
Prior to applying for the program, your channel must first accomplish the following:
- One thousand subscribers
- A total of 4,000 watch hours in the past year
Building your audience and creating great content will help you meet these requirements. Joining the YPP, and making sure your YouTube channel complies with YouTube’s rules and policies, is the more complicated aspect.
Those advertising on YouTube want to avoid being linked to low-quality content. Therefore, YouTube Partner Program members are encouraged to create unique, valuable videos.
When you upload content to YouTube, you’ll need to keep these things in mind. Those who plan on monetizing their videos should thoroughly read these documents. You also need to set up a Google AdSense account, which tracks and pays for your YouTube ads.

Part 2. 10 Proven Ways to Monetize Your YouTube Channel
10 Methods to Monetize YouTube Videos
You can monetize your YouTube videos in 10 different ways, including:
- Google Adsense
- Paid Sponsorship
- YouTube Premium
- Memberships
- Merchandise
- Invest in crowd-funding
- Stickers, chats, and thanks
- YouTube Shorts
- YouTube Brandconnect
- YouTube Shopping
1. Google AdSense
YouTube channel monetization is the most popular method. By adding AdSense to your videos, you can generate revenue from the ads displayed. You must adhere to our advertiser-friendly guidelines when creating your videos. The monetization of all videos may not be possible, therefore. YouTube and AdSense work seamlessly together. With no technical knowledge required, your monetization strategy can be set up and managed easily.

2. Paid Sponsorships
Sponsorship involves paying a content creator to use, demonstrate, or test a brand’s product in a video. Both the creator and the brand benefit from sponsorships provided by brands.
The rewards of sponsorship can be immense, but sponsorships are hard to come by. You can pitch relevant brands to partner with your influential channel if your channel has a large following.

3. YouTube Premium
Joining the YouTube Partner Program qualifies you for YouTube Premium. In addition, it can increase your earnings. YouTube Premium members get paid when they watch your content as a creator. The number of Premium members has now surpassed 20 million. It is possible that this may occur quite frequently. YouTube Premium will automatically pay you if someone watches your content.

4. Memberships
Creating membership tiers on your channel allows you to offer different perks to different levels of subscription. Using memberships has the main benefit of providing a more steady income stream. Ad revenue is a more traditional method of monetization. This feature is enabled by channels with at least 1,000 subscribers, and the creator sets fees.

5. Merchandise
You can sell merchandise on YouTube videos with over 10,000 subscribers using a merch shelf. By selling branded merchandise to your YouTube fans, you can generate additional revenue.
It’s especially useful for YouTube creators without their own website who want to sell merchandise. Currently, there are over 45 platforms or retailers worldwide that support merch, so growing your brand is easy.
6. Invest in crowd-funding
It’s not just for startups anymore; you can use crowdfunding to fund content creation on YouTube as well. You can find people to support your work through third-party applications like Patreon in exchange for perks. You can now place sponsor buttons on your YouTube videos, which allows you to crowdfund. With this, you can offer rewards in exchange for monthly funding like with Patreon.
7. Stickers, chats, and thanks
During live streams and premieres, creators can engage their fans with Super Chat and Super Stickers. In the live chat, fans can purchase Super Chats to display their message prominently. A Super Sticker is an animated image displayed during a live chat session. The Super Thanks feature enables creators to earn income from their videos. Additional appreciation may be expressed by those who wish to do so
8. YouTube Shorts
Using the YouTube app, short, vertical videos can be uploaded straight to YouTube using a smartphone. In the same way as Instagram Stories are uploaded to the social media site. The length of YouTube shorts is limited to 60 seconds. In 2021 and 2022, a $100 million fund will be distributed for YouTube Shorts. With this initial stage, YouTube Shorts began to monetize in May 2021. A YouTube Short will only be compensated if it meets the fund’s criteria.

9. YouTube BrandConnect
Brands and YouTube creators can work together on content campaigns through YouTube BrandConnect. In terms of product recommendations, audiences trust creators. It is also possible to partner with YouTube channels through BrandConnect
10. YouTube Shopping
YouTube shopping gives you the chance to promote your own products or those of other brands. It is possible to connect your store (such as Shopify) to YouTube. Add your products to videos, shorts, live streams, etc., as well as tag other brands’ products.
Part 3. Wondershare Filmora: A Video Editing Software to Help Edit YouTube Videos
Wondershare Filmora is your creative ally when it comes to enhancing and editing YouTube videos. Video editing software like Filmora allows you to produce visually engaging and captivating content. Creating the conditions for effective YouTube monetization.
Filmora is cross-platform compatible. Making it accessible for all creators, so you can work on your videos wherever you are. With Filmora, you can enhance your video content no matter what platform you’re using.
Edit YouTube videos with Filmora’s features
Using Filmora’s features, you can give your videos a professional edge.
Free Download For Win 7 or later(64-bit)
Free Download For macOS 10.14 or later
Adjustment Layer
Take the Adjustment Layer feature, for instance, which allows you to add general effects to multiple video clips simultaneously, saving you time and effort. This feature can make your video content more engaging, ultimately attracting a larger audience.
Split Screen
You can create eye-catching split-screen videos with Filmora’s Split Screen Video Editor. Simply click a button to create split-screen videos using premade templates. Enhancing the visual appeal and dynamic of your videos for easy monetization on YouTube.
Motion Tracking
Motion Tracking is another exciting feature that Filmora brings to the table. It enables you to track the movement of objects within your videos and pin graphics and media files to follow the motion magically. This not only adds a touch of professionalism to your videos but also keeps your audience engaged.
Video Effects
Filmora offers a treasure trove of creative possibilities with its Video Effects, including transitions, filters, titles, and motion elements that you won’t find elsewhere. These exclusive features will help you infuse your videos with creativity and style.
Mask and Blend
And let’s not forget the Mask and Blend feature, which allows you to create unique video effects by masking and blending video clips. With only a few clicks, you can create distinct video effects that will set your content apart.
Wondershare Filmora empowers you to take your YouTube videos to the next level. making them more visually appealing, engaging, and ultimately better suited for monetization.
Try Filmora out Free! Click here!
Free Download For Win 7 or later(64-bit)
Free Download For macOS 10.14 or later
Conclusion
For those aspiring to turn their passion into a source of income, YouTube is a treasure trove of opportunities. This comprehensive 2024 guide has shed light on the path to monetizing your YouTube channel. With Google AdSense, paid sponsorships, and YouTube Premium, you’ve learned the ropes of the YouTube Partner Program.
With Wondershare Filmora‘s user-friendly tools, your videos will stand out on a professional level. As a result, your YouTube dreams will become a reality in 2024 with dedication and these insights.
Free Download Free Download Learn More
Part 1. How to Get Monetized on YouTube: Rules and Requirements
How to Monetize YouTube Channel
Begin making money from your YouTube videos through the YouTube Partner Program. You can create earnings from your YouTube channel by connecting it to your Google account. Monetize your website using Google AdSense.
Google AdSense generates substantial website revenue. If viewers interact with the ads in your videos, you earn money. Adding AdSense to your YouTube channel makes your videos monetizable.
Some videos cannot be monetized, however. Content must meet specific requirements to qualify for YouTube’s program. Criteria include content quality, community guidelines, and copyright compliance. Your YouTube channel can generate income once your videos meet these standards.
Monetizing YouTube Videos: What Are The Requirements?
You can monetize your YouTube videos by joining the YouTube Partner Program. Everyone can create a YouTube account, but YPP requires certain requirements. Every time you create content, you must consider these requirements.
Prior to applying for the program, your channel must first accomplish the following:
- One thousand subscribers
- A total of 4,000 watch hours in the past year
Building your audience and creating great content will help you meet these requirements. Joining the YPP, and making sure your YouTube channel complies with YouTube’s rules and policies, is the more complicated aspect.
Those advertising on YouTube want to avoid being linked to low-quality content. Therefore, YouTube Partner Program members are encouraged to create unique, valuable videos.
When you upload content to YouTube, you’ll need to keep these things in mind. Those who plan on monetizing their videos should thoroughly read these documents. You also need to set up a Google AdSense account, which tracks and pays for your YouTube ads.
Part 2. 10 Proven Ways to Monetize Your YouTube Channel
10 Methods to Monetize YouTube Videos
You can monetize your YouTube videos in 10 different ways, including:
- Google Adsense
- Paid Sponsorship
- YouTube Premium
- Memberships
- Merchandise
- Invest in crowd-funding
- Stickers, chats, and thanks
- YouTube Shorts
- YouTube Brandconnect
- YouTube Shopping
1. Google AdSense
YouTube channel monetization is the most popular method. By adding AdSense to your videos, you can generate revenue from the ads displayed. You must adhere to our advertiser-friendly guidelines when creating your videos. The monetization of all videos may not be possible, therefore. YouTube and AdSense work seamlessly together. With no technical knowledge required, your monetization strategy can be set up and managed easily.
2. Paid Sponsorships
Sponsorship involves paying a content creator to use, demonstrate, or test a brand’s product in a video. Both the creator and the brand benefit from sponsorships provided by brands.
The rewards of sponsorship can be immense, but sponsorships are hard to come by. You can pitch relevant brands to partner with your influential channel if your channel has a large following.
3. YouTube Premium
Joining the YouTube Partner Program qualifies you for YouTube Premium. In addition, it can increase your earnings. YouTube Premium members get paid when they watch your content as a creator. The number of Premium members has now surpassed 20 million. It is possible that this may occur quite frequently. YouTube Premium will automatically pay you if someone watches your content.
4. Memberships
Creating membership tiers on your channel allows you to offer different perks to different levels of subscription. Using memberships has the main benefit of providing a more steady income stream. Ad revenue is a more traditional method of monetization. This feature is enabled by channels with at least 1,000 subscribers, and the creator sets fees.
5. Merchandise
You can sell merchandise on YouTube videos with over 10,000 subscribers using a merch shelf. By selling branded merchandise to your YouTube fans, you can generate additional revenue.
It’s especially useful for YouTube creators without their own website who want to sell merchandise. Currently, there are over 45 platforms or retailers worldwide that support merch, so growing your brand is easy.
6. Invest in crowd-funding
It’s not just for startups anymore; you can use crowdfunding to fund content creation on YouTube as well. You can find people to support your work through third-party applications like Patreon in exchange for perks. You can now place sponsor buttons on your YouTube videos, which allows you to crowdfund. With this, you can offer rewards in exchange for monthly funding like with Patreon.
7. Stickers, chats, and thanks
During live streams and premieres, creators can engage their fans with Super Chat and Super Stickers. In the live chat, fans can purchase Super Chats to display their message prominently. A Super Sticker is an animated image displayed during a live chat session. The Super Thanks feature enables creators to earn income from their videos. Additional appreciation may be expressed by those who wish to do so
8. YouTube Shorts
Using the YouTube app, short, vertical videos can be uploaded straight to YouTube using a smartphone. In the same way as Instagram Stories are uploaded to the social media site. The length of YouTube shorts is limited to 60 seconds. In 2021 and 2022, a $100 million fund will be distributed for YouTube Shorts. With this initial stage, YouTube Shorts began to monetize in May 2021. A YouTube Short will only be compensated if it meets the fund’s criteria.
9. YouTube BrandConnect
Brands and YouTube creators can work together on content campaigns through YouTube BrandConnect. In terms of product recommendations, audiences trust creators. It is also possible to partner with YouTube channels through BrandConnect
10. YouTube Shopping
YouTube shopping gives you the chance to promote your own products or those of other brands. It is possible to connect your store (such as Shopify) to YouTube. Add your products to videos, shorts, live streams, etc., as well as tag other brands’ products.
Part 3. Wondershare Filmora: A Video Editing Software to Help Edit YouTube Videos
Wondershare Filmora is your creative ally when it comes to enhancing and editing YouTube videos. Video editing software like Filmora allows you to produce visually engaging and captivating content. Creating the conditions for effective YouTube monetization.
Filmora is cross-platform compatible. Making it accessible for all creators, so you can work on your videos wherever you are. With Filmora, you can enhance your video content no matter what platform you’re using.
Edit YouTube videos with Filmora’s features
Using Filmora’s features, you can give your videos a professional edge.
Free Download For Win 7 or later(64-bit)
Free Download For macOS 10.14 or later
Adjustment Layer
Take the Adjustment Layer feature, for instance, which allows you to add general effects to multiple video clips simultaneously, saving you time and effort. This feature can make your video content more engaging, ultimately attracting a larger audience.
Split Screen
You can create eye-catching split-screen videos with Filmora’s Split Screen Video Editor. Simply click a button to create split-screen videos using premade templates. Enhancing the visual appeal and dynamic of your videos for easy monetization on YouTube.
Motion Tracking
Motion Tracking is another exciting feature that Filmora brings to the table. It enables you to track the movement of objects within your videos and pin graphics and media files to follow the motion magically. This not only adds a touch of professionalism to your videos but also keeps your audience engaged.
Video Effects
Filmora offers a treasure trove of creative possibilities with its Video Effects, including transitions, filters, titles, and motion elements that you won’t find elsewhere. These exclusive features will help you infuse your videos with creativity and style.
Mask and Blend
And let’s not forget the Mask and Blend feature, which allows you to create unique video effects by masking and blending video clips. With only a few clicks, you can create distinct video effects that will set your content apart.
Wondershare Filmora empowers you to take your YouTube videos to the next level. making them more visually appealing, engaging, and ultimately better suited for monetization.
Try Filmora out Free! Click here!
Free Download For Win 7 or later(64-bit)
Free Download For macOS 10.14 or later
Conclusion
For those aspiring to turn their passion into a source of income, YouTube is a treasure trove of opportunities. This comprehensive 2024 guide has shed light on the path to monetizing your YouTube channel. With Google AdSense, paid sponsorships, and YouTube Premium, you’ve learned the ropes of the YouTube Partner Program.
With Wondershare Filmora‘s user-friendly tools, your videos will stand out on a professional level. As a result, your YouTube dreams will become a reality in 2024 with dedication and these insights.
Also read:
- In 2024, Demystifying the World of YouTube and Its Keywords
- [Updated] Cutting-Edge Techniques for Powerful YouTube Thumbnail Designs
- [Updated] Ajey's Path to Prosperity Monetizing His Online Presence
- [New] 10 FREE YouTube Playlist Downloaders [Online/PC/Android/iOS]2
- 2024 Approved Endless Viewing with iPhone' Writes of Video
- Stay Ahead with Innovation Integrating YouTube Into Your Educational Approach
- [Updated] AdSense on YouTube Determining Your Income From 1K Viewer Engagement
- Chorus of Creators Guidelines for Sharing Sounds Online
- Efficiently Incorporate YouTube Playlists for Engaging Pages
- [New] Crafting Your Personal/Business YouTube Mobile Hub
- Affordable MCB Theme Images for Channels for 2024
- 2024'S Must-Watch Science Youtubers for a World of Knowledge
- [Updated] Discover Iconic Cinema Essential YouTube Channels
- Streamline Access 6 Leading Free & On-Demand YouTube Short Downloader Tools
- Transforming Channels with Powerful Visual Branding Strategies
- [Updated] Boosting Viewer Interest with Optimal Video Thumbnail Sizes
- Elevate Your Content's Reach in YouTube Shorts Formats for 2024
- Premier Top Selections Affordable SBD Applications
- Joshi's Playbook The Path to Earnings on Youtube
- In 2024, Beyond Indexation Understanding YouTube's Unlisted Mechanism
- [New] Best Practices in Confirming Your YouTube Access
- 2024 Approved Channel Marketing Making a Trailer that Sells More
- 2024 Approved Detailed Methods for Seamless WireCast Livestreams on YouTube
- [Updated] Epicurean Escapades Crafting Kitchen Films
- Master Higher Rankings on YT The Best SEO Tips and Tricks (1-11)
- Step-by-Step for YouTube Trailers in Filmora
- Elevate Engagement Crafting Effective YouTube Backlinks for 2024
- Formulating Engaging Content Excerpts for Streaming
- In 2024, Crafting Video Magic Summit
- Youtube Streaming Made Simple with OBS Guidebook
- 2024 Approved Avoiding a Zero Traffic Disaster The Top Ten Reasons and Remedies for YouTube Anonymity
- [Updated] DIY YouTube Music Collection A Comprehensive Online & App Method
- [New] Enjoy Endless Creativity Discover the Best in Cheap, Online Video Downloading
- Evaluating Rapid Subscription's Impact on Video Engagement for 2024
- [Updated] Basics of Online Videos The Easiest 10 Ideas for Beginners on YouTube
- Essential Guides to the Top 10 Student-Focused History Vlogs for 2024
- Captivating Viewers Top 10 Creative YT Reaction Tactics for 2024
- In 2024, Dial-Up Beats Easy Audio Posting to YouTubes
- [New] Bringing Your Vision Alive Transferring Vids From Premiere
- [New] Cultivate Creativity Inspiration-Driven Video Titles
- [New] Elevating Shorts Visibility A Thumbnail Transformation Journey
- In 2024, Elevate Your Online Impact with Effective Backlink Strategies
- [New] Adobe Premiere Tips YouTube Video Uploads
- Free Video Credits Expertise - Top 6 Maker Guide
- Beyond YouTube A Curated Selection of Top Videostreaming Sites for 2024
- In 2024, Closing with Panache Free YouTube's #1 Six
- In 2024, Crafting YouTube Video Trailers with Filmora's Guide
- Infuse Video Magic Crafting Captivating Background Images for Thumbnails
- New In 2024, 10 Best Free Spanish Text To Speech Converter Websites
- [Updated] 2024 Approved How to Elevate Your Social Influence The Six-Step Guide to Instagram Verified Status
- 10 Best Ways To Watch Cricket Live Streaming
- In 2024, Sim Unlock Nokia C32 Phones without Code 2 Ways to Remove Android Sim Lock
- Updated 2024 Approved Top 10 AI Subtitle Translators for Content Creators That Anyone Can Use
- In 2024, Harmony Hub Tech Evolution
- Updated Pro Animation Software The Ultimate Guide to Mac and Windows Tools
- [New] Unique and Personalized Approaches to Your TikTok PFP for 2024
- [New] Unlocking Screen Capturing Techniques on iPad
- [Updated] Flavor Quest The Best International Meals and Recipes
- [New] Innovative Techniques in Digital Display Recording
- [New] 2024 Approved Securing Your Gaming Victories Through FBX
- [New] Mobile Sharing Strategies Bytes & Vids, Not Retweets
- [Updated] Boost Engagement Sharing Streams From Twitch on FB for 2024
- [New] Unleash Creativity Mastering TikTok Audio for 2024
- In 2024, Change Location on Yik Yak For your Tecno Spark 20C to Enjoy More Fun | Dr.fone
- In 2024, How to Change GPS Location on Motorola Moto G14 Easily & Safely | Dr.fone
- Updated 2024 Approved Free Video Trimming and Merging Tools for Beginners A Comprehensive Guide
- [New] 2024 Approved Facebook Video Glitch How to Spot & Fix
- Title: Elevate Your Vlogging Game with Tripod Mastery for 2024
- Author: Kevin
- Created at : 2024-05-25 15:06:43
- Updated at : 2024-05-26 15:06:43
- Link: https://youtube-videos.techidaily.com/elevate-your-vlogging-game-with-tripod-mastery-for-2024/
- License: This work is licensed under CC BY-NC-SA 4.0.
