
:max_bytes(150000):strip_icc()/woman-driving-car-56a634855f9b58b7d0e066ee.jpg)
"Elevate Your Streaming Game From Twitch Viewers to YouTube Fans"
Elevate Your Streaming Game: From Twitch Viewers to YouTube Fans
Create High-Quality Video - Wondershare Filmora
An easy and powerful YouTube video editor
Numerous video and audio effects to choose from
Detailed tutorials provided by the official channel
Amidst many online applications is Twitch. This live streaming platform takes your experience to another level. You can use it to make crafts, play games, attract broadcasters, and many more. Twitch was launched in 2011, and since then, it has attracted millions of users, managing a database of about 4 million broadcasters by early 2020. With it, users can stream their activities as others watch in real-time. Just browse a category to find a stream.
You can also follow streamers that you like on the platform and get updates and notifications immediately after they are posted. But how do you start a career on a platform like Twitch? You need to broadcast and gather a large following. You can use built-in audiences from other platforms like Facebook. Let’s dive into the core of the matter and look at how to upload Twitch streams to YouTube and build your platform.

In this article
02 What is the benefit of uploading your Twitch Streams to YouTube
03 How to upload your Twitch Streams to YouTube
What is Twitch VOD?
Twitch Video on Demand (VOD) is a recording of previously streamed content. It provides briefings if you missed catching the Twitch live stream. Just watch the VOD from your favorite streamer and be engaged the best way possible. However, VODs don’t last forever. They are removed after two weeks of broadcast. But streamers with Partner Status can have their VODs last up to 60 days.
- How to enable Twitch VOD?
VODs are the best form to archive streams that your fans missed. Even though they are not enabled by default, you can manually enable them and not let your fans miss any important event from your channel. They’ll find it under the “Videos” tab on any Twitch channel. Follow these steps to enable VOD on your channel.
Step 1. Go to your profile icon in the top right corner of Twitch
Check in the “Channel & Video” section and locate the “Stream Key & Preferences” menu.

Step 2. Click on “Creator Dashboard”
Remember, you can enable VODs from your creator dashboard. Just go under the “Settings” tab and click on the “Stream section” of the creator dashboard. Check under the subtitle “VOD Settings” and get the option to store past broadcasts. You can also toggle the slider to store your past broadcasts.

Step 3 Click on the “Settings” tab on the left-hand side and go to Stream
You’ll get various drop-down menu options. Click on the “Settings” tab and choose the “Stream” option. The system will navigate to a new page, thus setting your preferences for VODs and clips.
Step 4. Go to “VOD Settings” and toggle on the “Store Past Broadcast.”
Ensure you have the toggle option turned ON under the “VOD Settings.” If it’s “ON,” you’ll realize the toggle will be purple, with a checkmark in it. Twitch will be confirmed to be enabled if it’s purple.

- Frequently Asked Question about Twitch VOD
These are some questions frequently asked by Twitch users.
1. How long will Twitch store my VOD
Your Twitch can either be stored for 14 or 60 days, depending on your level. For Twitch Prime, Twitch Partner or a Twitch Turbo user has their past broadcasts automatically saved for 60 days before deletion. But if you are not connected to these three options, your past broadcasts will be saved for only 14 days before deletion.
Since your past broadcasts cannot be live for more than 60 days, you have the option to download the video to your computer before the validity days expire and Twitch deletes it. You can use an External Hard drive to save the past broadcast content. Likewise, it is possible to turn your past broadcast content into Highlight and, in turn, permanently store them on Twitch.
2. What is the difference between Twitch VOD, Highlights, and Clips
Twitch VOD is a previously saved video of your live stream content. You choose to save either part or the entire content of your previously streamed content. More so, you don’t need any additional requirements to use VOD.
Highlights are short videos that have been edited from your past broadcast content. You can save them on Twitch permanently. Streamers majorly use highlights to save video game achievements. Unlike VOD Twitch that can be saved up to 60 days, Highlights usually lasts no more than 3 minutes.
- To make Highlights on Twitch, first, navigate to your Dashboard.
- Then scroll down and click on “Content” > “Video Producer.
- Next, press on “All Videos” to change them to “Past Broadcasts.”
- Now press the “Highlight” button, and Twitch will immediately open a new tab for “Twitch Highlighter Tool.”
- Then select the video part to include as “Highlight” and press the “Create Highlights” button.
- Wait a while for the process to be completed, and Voila! You have your Highlights created.
When it comes to Twitch Clip, you can capture special moments in a stream you are currently watching. On the same note, you can share clips with friends and other users on social media platforms. Such shared clips contain a link where others view the source or video from.
The clips you create will automatically be saved on the streamer’s channel on the “Clips” page, where other viewers can see them too. Nonetheless, you can download “clips” to your computer and, in turn, upload them whenever you want to. And note that you can help your stream grow via “Clips” by letting your viewers clip and share your stream moments.
- To create “Clips” on Twitch, identify which Streamers channel you wish to create a clip from.
- Then click on the “Clapper board” icon. Next, edit your clip between 5 and 60 seconds long.
- Finally, create a title and publish your Clip. You’ll also enjoy the privilege to share your clip’s link to other social media networks.
What is the benefit of uploading your Twitch Streams to YouTube
You stand to gain a lot when you upload your Twitch Streams to YouTube.
1) To enlighten your followers
Your followers will see your streams and make the best decisions. Viewers can check out your recordings and other highlights from past streams. It will help them decide whether they like what they see and probably join your live streams.
2) Twitch provides content for you to share and monetize on YouTube
Since Twitch streaming is more popular nowadays, many people throng it for content. It is not wise to rely entirely on Twitch to discover as a Twitch Streamer. Posting to YouTube will make it known within a short time. You would have announced your streams most nobly and kept your followers up to date, attracting new ones as well.
3) To keep your followers engaged even when you are offline
Even though live streaming is important, some viewers may not attend the live sessions due to different time zones or other commitments. In this regard, when uploaded to YouTube, Twitch will give them a chance to watch your content just whenever they log in. They, therefore, have the option to watch a Twitch VOD of the live stream they missed.
How to upload your Twitch Streams to YouTube
Check how to upload Twitch streams to YouTube from the Twitch website.
Step 1. Identify the little arrow next to your name on the Twitch website and click on it. Then click on the “Video Producer” to take you to a list of your Twitch videos.

Step 2. Check out and click on the “three-dots” on the video you wish to upload to YouTube. Click on the “Export” tab.
Step 3. A menu will then pop up. Here, you can fill in the description, title, and tags that you would like to appear on the YouTube video. There is an option for Twitch to split your video automatically. If you wish so, then tick the “Checkbox” to enable it. Then click on the “Start Export” option to export your Twitch streams to YouTube.

Bouns! Edit Your Twitch Video with Filmora
The quality of your video matters when it comes to uploading Twitch Streams to YouTube. Using a third-party tool to edit your video is the first step in ensuring your videos communicate meaningful content. Filmora comes in handy to bring your imaginations to life. Use it for simple creation without limits, even for beginners.
- Use it to track moving objects in video clips
- Easily match any image of the selected clip
- Its powerful tools let you edit your video by cropping, splitting, adjusting speed, etc
- The video keyframe easily indicates the beginning and end of the parameters
For Win 7 or later (64-bit)
For macOS 10.12 or later
Conclusion
● Don’t just focus on how to upload Twitch streams to YouTube but also consider the quality of video you are posting to YouTube. Remember, your video quality will speak much more of you than any other description. So, strive to produce quality videos using the best tool, Filmora. The app is easy to use and will elevate your views and imaginations through your video in the most impactful way.
Amidst many online applications is Twitch. This live streaming platform takes your experience to another level. You can use it to make crafts, play games, attract broadcasters, and many more. Twitch was launched in 2011, and since then, it has attracted millions of users, managing a database of about 4 million broadcasters by early 2020. With it, users can stream their activities as others watch in real-time. Just browse a category to find a stream.
You can also follow streamers that you like on the platform and get updates and notifications immediately after they are posted. But how do you start a career on a platform like Twitch? You need to broadcast and gather a large following. You can use built-in audiences from other platforms like Facebook. Let’s dive into the core of the matter and look at how to upload Twitch streams to YouTube and build your platform.
In this article
02 What is the benefit of uploading your Twitch Streams to YouTube
03 How to upload your Twitch Streams to YouTube
What is Twitch VOD?
Twitch Video on Demand (VOD) is a recording of previously streamed content. It provides briefings if you missed catching the Twitch live stream. Just watch the VOD from your favorite streamer and be engaged the best way possible. However, VODs don’t last forever. They are removed after two weeks of broadcast. But streamers with Partner Status can have their VODs last up to 60 days.
- How to enable Twitch VOD?
VODs are the best form to archive streams that your fans missed. Even though they are not enabled by default, you can manually enable them and not let your fans miss any important event from your channel. They’ll find it under the “Videos” tab on any Twitch channel. Follow these steps to enable VOD on your channel.
Step 1. Go to your profile icon in the top right corner of Twitch
Check in the “Channel & Video” section and locate the “Stream Key & Preferences” menu.
Step 2. Click on “Creator Dashboard”
Remember, you can enable VODs from your creator dashboard. Just go under the “Settings” tab and click on the “Stream section” of the creator dashboard. Check under the subtitle “VOD Settings” and get the option to store past broadcasts. You can also toggle the slider to store your past broadcasts.
Step 3 Click on the “Settings” tab on the left-hand side and go to Stream
You’ll get various drop-down menu options. Click on the “Settings” tab and choose the “Stream” option. The system will navigate to a new page, thus setting your preferences for VODs and clips.
Step 4. Go to “VOD Settings” and toggle on the “Store Past Broadcast.”
Ensure you have the toggle option turned ON under the “VOD Settings.” If it’s “ON,” you’ll realize the toggle will be purple, with a checkmark in it. Twitch will be confirmed to be enabled if it’s purple.
- Frequently Asked Question about Twitch VOD
These are some questions frequently asked by Twitch users.
1. How long will Twitch store my VOD
Your Twitch can either be stored for 14 or 60 days, depending on your level. For Twitch Prime, Twitch Partner or a Twitch Turbo user has their past broadcasts automatically saved for 60 days before deletion. But if you are not connected to these three options, your past broadcasts will be saved for only 14 days before deletion.
Since your past broadcasts cannot be live for more than 60 days, you have the option to download the video to your computer before the validity days expire and Twitch deletes it. You can use an External Hard drive to save the past broadcast content. Likewise, it is possible to turn your past broadcast content into Highlight and, in turn, permanently store them on Twitch.
2. What is the difference between Twitch VOD, Highlights, and Clips
Twitch VOD is a previously saved video of your live stream content. You choose to save either part or the entire content of your previously streamed content. More so, you don’t need any additional requirements to use VOD.
Highlights are short videos that have been edited from your past broadcast content. You can save them on Twitch permanently. Streamers majorly use highlights to save video game achievements. Unlike VOD Twitch that can be saved up to 60 days, Highlights usually lasts no more than 3 minutes.
- To make Highlights on Twitch, first, navigate to your Dashboard.
- Then scroll down and click on “Content” > “Video Producer.
- Next, press on “All Videos” to change them to “Past Broadcasts.”
- Now press the “Highlight” button, and Twitch will immediately open a new tab for “Twitch Highlighter Tool.”
- Then select the video part to include as “Highlight” and press the “Create Highlights” button.
- Wait a while for the process to be completed, and Voila! You have your Highlights created.
When it comes to Twitch Clip, you can capture special moments in a stream you are currently watching. On the same note, you can share clips with friends and other users on social media platforms. Such shared clips contain a link where others view the source or video from.
The clips you create will automatically be saved on the streamer’s channel on the “Clips” page, where other viewers can see them too. Nonetheless, you can download “clips” to your computer and, in turn, upload them whenever you want to. And note that you can help your stream grow via “Clips” by letting your viewers clip and share your stream moments.
- To create “Clips” on Twitch, identify which Streamers channel you wish to create a clip from.
- Then click on the “Clapper board” icon. Next, edit your clip between 5 and 60 seconds long.
- Finally, create a title and publish your Clip. You’ll also enjoy the privilege to share your clip’s link to other social media networks.
What is the benefit of uploading your Twitch Streams to YouTube
You stand to gain a lot when you upload your Twitch Streams to YouTube.
1) To enlighten your followers
Your followers will see your streams and make the best decisions. Viewers can check out your recordings and other highlights from past streams. It will help them decide whether they like what they see and probably join your live streams.
2) Twitch provides content for you to share and monetize on YouTube
Since Twitch streaming is more popular nowadays, many people throng it for content. It is not wise to rely entirely on Twitch to discover as a Twitch Streamer. Posting to YouTube will make it known within a short time. You would have announced your streams most nobly and kept your followers up to date, attracting new ones as well.
3) To keep your followers engaged even when you are offline
Even though live streaming is important, some viewers may not attend the live sessions due to different time zones or other commitments. In this regard, when uploaded to YouTube, Twitch will give them a chance to watch your content just whenever they log in. They, therefore, have the option to watch a Twitch VOD of the live stream they missed.
How to upload your Twitch Streams to YouTube
Check how to upload Twitch streams to YouTube from the Twitch website.
Step 1. Identify the little arrow next to your name on the Twitch website and click on it. Then click on the “Video Producer” to take you to a list of your Twitch videos.
Step 2. Check out and click on the “three-dots” on the video you wish to upload to YouTube. Click on the “Export” tab.
Step 3. A menu will then pop up. Here, you can fill in the description, title, and tags that you would like to appear on the YouTube video. There is an option for Twitch to split your video automatically. If you wish so, then tick the “Checkbox” to enable it. Then click on the “Start Export” option to export your Twitch streams to YouTube.
Bouns! Edit Your Twitch Video with Filmora
The quality of your video matters when it comes to uploading Twitch Streams to YouTube. Using a third-party tool to edit your video is the first step in ensuring your videos communicate meaningful content. Filmora comes in handy to bring your imaginations to life. Use it for simple creation without limits, even for beginners.
- Use it to track moving objects in video clips
- Easily match any image of the selected clip
- Its powerful tools let you edit your video by cropping, splitting, adjusting speed, etc
- The video keyframe easily indicates the beginning and end of the parameters
For Win 7 or later (64-bit)
For macOS 10.12 or later
Conclusion
● Don’t just focus on how to upload Twitch streams to YouTube but also consider the quality of video you are posting to YouTube. Remember, your video quality will speak much more of you than any other description. So, strive to produce quality videos using the best tool, Filmora. The app is easy to use and will elevate your views and imaginations through your video in the most impactful way.
The Essential Playbook: YouTube’s SEO Keywords Guide
Improve Your YouTube Video Performance with Wondershare Filmora
An easy and powerful video editor for YouTube Video
Numerous video and audio effects to choose from
Detailed tutorials provided by the official channel
With more than 1 billion hours of video watched every day, YouTube is the world’s second-largest search engine. That means you should optimize your videos for YouTube, so they rank well on Google and show up in YouTube searches.
YouTube keywords are the words you include in your video title, description, and anywhere that will help YouTube’s algorithm know what your video is about and what it entails. Keep reading to learn more about YouTube keyword research.
In this article
Why Do We Need to Research YouTube Keywords?
How to Research Keywords on YouTube?
Why Do We Need to Research YouTube Keywords?
Researching YouTube keywords is essential to your success. Here are three reasons why you might want to consider YouTube keyword research.
Helps You Know What Your Audience Is Searching for
Keyword research allows you to understand what people search for when they are on YouTube. In turn, this helps you know what your potential customers are seeking. You’ll then include these terms on your content to increase the chances of your audience finding you on YouTube.
It Helps You Rank Higher
You can use YouTube videos to promote brand awareness and market your product. Having high-ranking videos is a cost-effective way to push your target audience through the sales funnel.
When creating YouTube videos, you need to ensure you are reaching your target audience. And that is why researching keywords is crucial.
Once you have performed YouTube keyword research and determined the most suitable keywords for your topic, you can now use them to create target content for your audience. In turn, this will help you increase the number of subscribers on your YouTube channel. Your chances of your video showing up on YouTube will increase, which will bring traffic to your business.
It’s the Cheapest Way to Market Your Products or Services
Video marketing is expensive, and that is why you have to find every possible edge for your video marketing if you want to lower your costs and increase your ROI. For this reason, keyword research will ensure your audience finds you without spending loads of money that you could have used on services like Google Ads.
Because keyword research allows your target audience to find you, this means more opportunities for you. Most of the users will share entertaining videos.
How to Research Keywords on YouTube?
There are several ways of conducting keyword research for YouTube to find out what people are searching for and determine the content in your video. They include:
1. Using YouTube Search

Although this method doesn’t provide all available search options, it’s still good for getting an idea of the type of keyword with which you’re dealing.
You can start your research by typing the keywords into YouTube’s search bar and reviewing the displayed results. It might be helpful to check out similar videos or video playlists. If your search seems too wide, you can enter several keywords at once (separated by commas), which will help you find better results.
2. Using Google’s Keyword Planner Tool

This tool is helpful for keyword difficulty and monthly searches volume assessment. If you only want to know the number of organic visits a given keyword gets, Google Keyword Planner might be helpful. The tool allows you to create lists consisting of related keywords and provides information about CPC (cost per click) and potential traffic in general.
3. Using YouTube Suggestions
What makes YouTube unique is its ability to suggest content based on your location, subscription, and watch history. You can use this method to find keyword ideas if you have subscribed to relevant channels. Also, you can rely on YouTube suggestions to find out whether a topic is popular or not.
4. Using YouTube Analytics
YouTube has a built-in Keyword Tool that is extremely helpful for researching the best keywords to use in your video titles, descriptions, and tags. This method allows you to see video search keywords with which users are finding your content. It is possible to review top organic keywords together with the respective engagement metrics, including bounce rate and average view duration.
5. Using Third-Party YouTube Keyword Tools
Last but not least, there are several third-party tools available on the market that provide both keyword difficulty and organic traffic estimation data for YouTube keywords. Some of these tools also offer similar features, including recommendations based on your existing subscriptions. Let’s look at some of the popular YouTube tools that you can use.
vidIQ
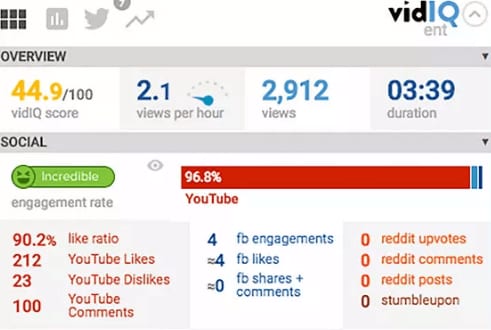
Designed to boost YouTube views, vidIQ is an effective SEO tool. The tool recommends keywords, descriptions, and titles that will help you to get more views and subscribers.
Performing vidIQ keyword research that relates to your video is a breeze. With just a few clicks, you will know what people are searching for and create content that they want to watch.
The tool allows you to enable inline keywords to know the tags your competitors use on search results. Use them to help you generate ideas relevant to your content. vidIQ also suggests ideal keywords like YouTube.
TubeBuddy

You can also use TubeBuddy to find and evaluate a range of YouTube keywords. You can do TubeBuddy keyword research on its mobile app or browser extension. The tool also shows how often people click on the results and how often users search a keyword.
Keyword Keg
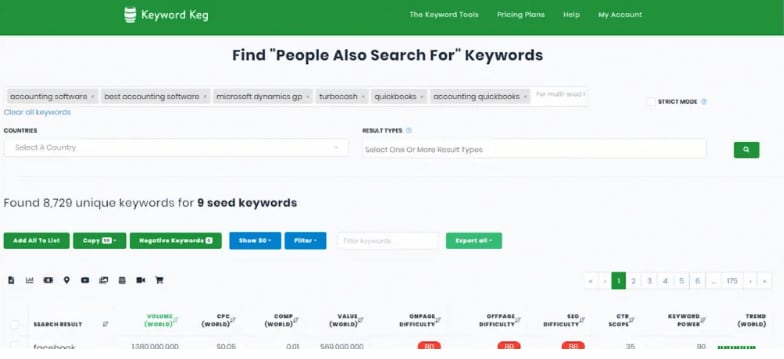
Using the YouTube suggest API, Keyword Keg shows you the terms users search most and the monthly number of searches. You’ll also see what other people are paying for CPC (cost per click). You can use this data to determine the best keywords for your YouTube videos.
Qusetion: Are keywords and Tags the Same Thing?
Answer: The main difference between tags and keywords is where you will place them. Keywords describe the content in your video to help search engines and YouTube’s algorithm find your video. Tags describe what the content in your video is about and how it’s connected.
Make Great YouTube Videos with Filmora
Having high-quality videos can make you stand out from your competitors. Filmora is a video editing software that allows you to create amazing YouTube videos. It has powerful editing tools that will enhance the quality of your videos.
You can also add over 800 cool effects and filters to your videos to make them fun to watch. With just a single click, you can add opacity and speed ramp effects as well as infinite zoom effects.
Additionally, you can adjust the dynamic range and white balance of Your YouTube videos. Furthermore, you can fine-tune the audio of your video to make it crisp and eliminate camera shake.
The best part is: Filmora is compatible with macOS X 10.12 or later and Windows 7, 8, and 10. It also supports all popular standard HD videos, audio, and image file formats.
Conclusion
Now that you know the importance of YouTube keyword research and how to perform keyword research, your target audience can find you easily.
With more than 1 billion hours of video watched every day, YouTube is the world’s second-largest search engine. That means you should optimize your videos for YouTube, so they rank well on Google and show up in YouTube searches.
YouTube keywords are the words you include in your video title, description, and anywhere that will help YouTube’s algorithm know what your video is about and what it entails. Keep reading to learn more about YouTube keyword research.
In this article
Why Do We Need to Research YouTube Keywords?
How to Research Keywords on YouTube?
Why Do We Need to Research YouTube Keywords?
Researching YouTube keywords is essential to your success. Here are three reasons why you might want to consider YouTube keyword research.
Helps You Know What Your Audience Is Searching for
Keyword research allows you to understand what people search for when they are on YouTube. In turn, this helps you know what your potential customers are seeking. You’ll then include these terms on your content to increase the chances of your audience finding you on YouTube.
It Helps You Rank Higher
You can use YouTube videos to promote brand awareness and market your product. Having high-ranking videos is a cost-effective way to push your target audience through the sales funnel.
When creating YouTube videos, you need to ensure you are reaching your target audience. And that is why researching keywords is crucial.
Once you have performed YouTube keyword research and determined the most suitable keywords for your topic, you can now use them to create target content for your audience. In turn, this will help you increase the number of subscribers on your YouTube channel. Your chances of your video showing up on YouTube will increase, which will bring traffic to your business.
It’s the Cheapest Way to Market Your Products or Services
Video marketing is expensive, and that is why you have to find every possible edge for your video marketing if you want to lower your costs and increase your ROI. For this reason, keyword research will ensure your audience finds you without spending loads of money that you could have used on services like Google Ads.
Because keyword research allows your target audience to find you, this means more opportunities for you. Most of the users will share entertaining videos.
How to Research Keywords on YouTube?
There are several ways of conducting keyword research for YouTube to find out what people are searching for and determine the content in your video. They include:
1. Using YouTube Search
Although this method doesn’t provide all available search options, it’s still good for getting an idea of the type of keyword with which you’re dealing.
You can start your research by typing the keywords into YouTube’s search bar and reviewing the displayed results. It might be helpful to check out similar videos or video playlists. If your search seems too wide, you can enter several keywords at once (separated by commas), which will help you find better results.
2. Using Google’s Keyword Planner Tool
This tool is helpful for keyword difficulty and monthly searches volume assessment. If you only want to know the number of organic visits a given keyword gets, Google Keyword Planner might be helpful. The tool allows you to create lists consisting of related keywords and provides information about CPC (cost per click) and potential traffic in general.
3. Using YouTube Suggestions
What makes YouTube unique is its ability to suggest content based on your location, subscription, and watch history. You can use this method to find keyword ideas if you have subscribed to relevant channels. Also, you can rely on YouTube suggestions to find out whether a topic is popular or not.
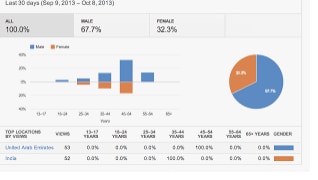
4. Using YouTube Analytics
YouTube has a built-in Keyword Tool that is extremely helpful for researching the best keywords to use in your video titles, descriptions, and tags. This method allows you to see video search keywords with which users are finding your content. It is possible to review top organic keywords together with the respective engagement metrics, including bounce rate and average view duration.
5. Using Third-Party YouTube Keyword Tools
Last but not least, there are several third-party tools available on the market that provide both keyword difficulty and organic traffic estimation data for YouTube keywords. Some of these tools also offer similar features, including recommendations based on your existing subscriptions. Let’s look at some of the popular YouTube tools that you can use.
vidIQ
Designed to boost YouTube views, vidIQ is an effective SEO tool. The tool recommends keywords, descriptions, and titles that will help you to get more views and subscribers.
Performing vidIQ keyword research that relates to your video is a breeze. With just a few clicks, you will know what people are searching for and create content that they want to watch.
The tool allows you to enable inline keywords to know the tags your competitors use on search results. Use them to help you generate ideas relevant to your content. vidIQ also suggests ideal keywords like YouTube.
TubeBuddy
You can also use TubeBuddy to find and evaluate a range of YouTube keywords. You can do TubeBuddy keyword research on its mobile app or browser extension. The tool also shows how often people click on the results and how often users search a keyword.
Keyword Keg
Using the YouTube suggest API, Keyword Keg shows you the terms users search most and the monthly number of searches. You’ll also see what other people are paying for CPC (cost per click). You can use this data to determine the best keywords for your YouTube videos.
Qusetion: Are keywords and Tags the Same Thing?
Answer: The main difference between tags and keywords is where you will place them. Keywords describe the content in your video to help search engines and YouTube’s algorithm find your video. Tags describe what the content in your video is about and how it’s connected.
Make Great YouTube Videos with Filmora
Having high-quality videos can make you stand out from your competitors. Filmora is a video editing software that allows you to create amazing YouTube videos. It has powerful editing tools that will enhance the quality of your videos.
You can also add over 800 cool effects and filters to your videos to make them fun to watch. With just a single click, you can add opacity and speed ramp effects as well as infinite zoom effects.
Additionally, you can adjust the dynamic range and white balance of Your YouTube videos. Furthermore, you can fine-tune the audio of your video to make it crisp and eliminate camera shake.
The best part is: Filmora is compatible with macOS X 10.12 or later and Windows 7, 8, and 10. It also supports all popular standard HD videos, audio, and image file formats.
Conclusion
Now that you know the importance of YouTube keyword research and how to perform keyword research, your target audience can find you easily.
With more than 1 billion hours of video watched every day, YouTube is the world’s second-largest search engine. That means you should optimize your videos for YouTube, so they rank well on Google and show up in YouTube searches.
YouTube keywords are the words you include in your video title, description, and anywhere that will help YouTube’s algorithm know what your video is about and what it entails. Keep reading to learn more about YouTube keyword research.
In this article
Why Do We Need to Research YouTube Keywords?
How to Research Keywords on YouTube?
Why Do We Need to Research YouTube Keywords?
Researching YouTube keywords is essential to your success. Here are three reasons why you might want to consider YouTube keyword research.
Helps You Know What Your Audience Is Searching for
Keyword research allows you to understand what people search for when they are on YouTube. In turn, this helps you know what your potential customers are seeking. You’ll then include these terms on your content to increase the chances of your audience finding you on YouTube.
It Helps You Rank Higher
You can use YouTube videos to promote brand awareness and market your product. Having high-ranking videos is a cost-effective way to push your target audience through the sales funnel.
When creating YouTube videos, you need to ensure you are reaching your target audience. And that is why researching keywords is crucial.
Once you have performed YouTube keyword research and determined the most suitable keywords for your topic, you can now use them to create target content for your audience. In turn, this will help you increase the number of subscribers on your YouTube channel. Your chances of your video showing up on YouTube will increase, which will bring traffic to your business.
It’s the Cheapest Way to Market Your Products or Services
Video marketing is expensive, and that is why you have to find every possible edge for your video marketing if you want to lower your costs and increase your ROI. For this reason, keyword research will ensure your audience finds you without spending loads of money that you could have used on services like Google Ads.
Because keyword research allows your target audience to find you, this means more opportunities for you. Most of the users will share entertaining videos.
How to Research Keywords on YouTube?
There are several ways of conducting keyword research for YouTube to find out what people are searching for and determine the content in your video. They include:
1. Using YouTube Search
Although this method doesn’t provide all available search options, it’s still good for getting an idea of the type of keyword with which you’re dealing.
You can start your research by typing the keywords into YouTube’s search bar and reviewing the displayed results. It might be helpful to check out similar videos or video playlists. If your search seems too wide, you can enter several keywords at once (separated by commas), which will help you find better results.
2. Using Google’s Keyword Planner Tool
This tool is helpful for keyword difficulty and monthly searches volume assessment. If you only want to know the number of organic visits a given keyword gets, Google Keyword Planner might be helpful. The tool allows you to create lists consisting of related keywords and provides information about CPC (cost per click) and potential traffic in general.
3. Using YouTube Suggestions
What makes YouTube unique is its ability to suggest content based on your location, subscription, and watch history. You can use this method to find keyword ideas if you have subscribed to relevant channels. Also, you can rely on YouTube suggestions to find out whether a topic is popular or not.
4. Using YouTube Analytics
YouTube has a built-in Keyword Tool that is extremely helpful for researching the best keywords to use in your video titles, descriptions, and tags. This method allows you to see video search keywords with which users are finding your content. It is possible to review top organic keywords together with the respective engagement metrics, including bounce rate and average view duration.
5. Using Third-Party YouTube Keyword Tools
Last but not least, there are several third-party tools available on the market that provide both keyword difficulty and organic traffic estimation data for YouTube keywords. Some of these tools also offer similar features, including recommendations based on your existing subscriptions. Let’s look at some of the popular YouTube tools that you can use.
vidIQ
Designed to boost YouTube views, vidIQ is an effective SEO tool. The tool recommends keywords, descriptions, and titles that will help you to get more views and subscribers.
Performing vidIQ keyword research that relates to your video is a breeze. With just a few clicks, you will know what people are searching for and create content that they want to watch.
The tool allows you to enable inline keywords to know the tags your competitors use on search results. Use them to help you generate ideas relevant to your content. vidIQ also suggests ideal keywords like YouTube.
TubeBuddy
You can also use TubeBuddy to find and evaluate a range of YouTube keywords. You can do TubeBuddy keyword research on its mobile app or browser extension. The tool also shows how often people click on the results and how often users search a keyword.
Keyword Keg
Using the YouTube suggest API, Keyword Keg shows you the terms users search most and the monthly number of searches. You’ll also see what other people are paying for CPC (cost per click). You can use this data to determine the best keywords for your YouTube videos.
Qusetion: Are keywords and Tags the Same Thing?
Answer: The main difference between tags and keywords is where you will place them. Keywords describe the content in your video to help search engines and YouTube’s algorithm find your video. Tags describe what the content in your video is about and how it’s connected.
Make Great YouTube Videos with Filmora
Having high-quality videos can make you stand out from your competitors. Filmora is a video editing software that allows you to create amazing YouTube videos. It has powerful editing tools that will enhance the quality of your videos.
You can also add over 800 cool effects and filters to your videos to make them fun to watch. With just a single click, you can add opacity and speed ramp effects as well as infinite zoom effects.
Additionally, you can adjust the dynamic range and white balance of Your YouTube videos. Furthermore, you can fine-tune the audio of your video to make it crisp and eliminate camera shake.
The best part is: Filmora is compatible with macOS X 10.12 or later and Windows 7, 8, and 10. It also supports all popular standard HD videos, audio, and image file formats.
Conclusion
Now that you know the importance of YouTube keyword research and how to perform keyword research, your target audience can find you easily.
Also read:
- 2024 Approved Beginner's Blueprint for Online Content Simple, Straightforward Video Projects
- Discover the Leading Online Video Cutter for YouTube
- FreeFire Gaming Guide Maximizing Video Impact
- Digital Dominion Rise as a YouTube Guru
- [New] Climbing to YouTube Zenith A Step-by-Step Guide to Creative Studio Mastery
- Ace the Art of Online Fame Trending on YouTube for 2024
- 2024 Approved Collaborative Listening Made Simple on YouTube
- Knowledge Currents Best YT for Academic Growth
- Dual-Stream Technique for Massive Viewer Growth for 2024
- 2024 Approved Essential Video Concepts Fueling Creativity in YouTube Channels
- Three Easy Ways to Harvest Youtube's Default Iconography
- In 2024, Attract 1,000 Viewers Quickly on YouTube
- 2024 Approved Essential Steps for Starting a YouTube Channel
- [New] Crafting Visuals The Science of YouTube Banners & Thumbnails
- Beat Drops in Seconds A Beginner’s Guide to Music Videos
- Unlock Audience Favorites 3 Powerful Tales
- YouTube Video Enhancement Through Strategic Illumination Methods
- Downloading YouTube Playlists Made Simple & Easy for 2024
- [New] Charting New Territory Strategies for YouTube Keyword Research
- Best Channel Discoveries in ASMR for 2024
- 2024 Approved Cutting Edge Capture Tips for Professional Sound Recording
- Transforming Your Live Streams for YouTube Twitch Edition
- Fostering Connection Through Respectful Engagement
- [Updated] Essential 5 Video Editing Software Excluding Youtube
- [New] A Step-by-Step Guide to YouTube Image Branding
- 5-Star Channel Cutting Long URLs Down for YouTube Videos
- Elevate Your Team with Expert Talent Selections
- [Updated] Best Practices for Inserting Text on YouTube Videos Effectively
- In 2024, Best YouTube Shorts Video Editing Apps for iOS and Android
- [New] Elevate Your Content Strategies to Climb YouTube Ranks
- Unsubscribing From Youtube Computer & Mobile Techniques
- Curating Historical Wisdom The Ultimate Student-Friendly Channel List (#1-10)
- Making Sense of Mukbangs Crafting Foodie Streams
- First Steps Toward Monetary Success on YouTube
- [Updated] Design Strategies for Top-Tier Valorant Thumbnails on Social Media
- 2024 Approved A Comprehensive Guide to Profile Picture Perfection on Discord
- In 2024, Effortless Video Editing How to Change Aspect Ratios Quickly
- Tutorial to Change Xiaomi Redmi Note 12 5G IMEI without Root A Comprehensive Guide
- Updated Ultimate Guide to Instantaneous Vocal Transformation Tools
- Perfect Your Profile Easy Guide for Instagram Videos From Desktop for 2024
- How to Transfer Photos From Vivo Y100 to Samsung Galaxy S21 Ultra | Dr.fone
- Proven Ways in How To Hide Location on Life360 For Tecno Spark 10 5G | Dr.fone
- 2024 Approved Rapid Retreival of Trendiest TikTok Vids
- In 2024, Here are Some of the Best Pokemon Discord Servers to Join On Apple iPhone 15 Pro | Dr.fone
- Updated 2024 Approved Top 5 Guitar-Centric Audio Capture Programs for Musicians
- Title: "Elevate Your Streaming Game From Twitch Viewers to YouTube Fans"
- Author: Kevin
- Created at : 2024-05-25 15:06:25
- Updated at : 2024-05-26 15:06:25
- Link: https://youtube-videos.techidaily.com/elevate-your-streaming-game-from-twitch-viewers-to-youtube-fans/
- License: This work is licensed under CC BY-NC-SA 4.0.
