
"Elevate Your Channel Game - TubeBuddy Insights for 2024"
Elevate Your Channel Game - TubeBuddy Insights
The Benefits of TubeBuddy | Manage Your YouTube Channel More Easily

Richard Bennett
Nov 01, 2022• Proven solutions
TubeBuddy is a YouTube certified extension for your Google Chrome browser. When you visit YouTube after installing TubeBuddy a whole new set of useful tools becomes available.
TubeBuddy’s tools were designed to save you time and effort when performing some of the more mundane tasks involved in running a YouTube channel, like adding cards. Many of TubeBuddy’s tools are completely free to use, but others might require a paid license. There are three levels of licensing: $9, $19, or $39 per month.
The Benefits of Using TubeBuddy for YouTube
- Increased Productivity
- Bulk Tools for Annotations, Cards, Thumbnails and More
- Quick Optimization for Your Video’s Tags
- Useful Data
Benefits of TubeBuddy
YouTubers who use TubeBuddy are able to spend less time on busy-work and more time on coming up with creative video ideas. Here are some of the ways TubeBuddy can help you, especially if you have a large or mid-sized channel:
1. Increased Productivity
Most of TubeBuddy’s Productivity Tools are available for free, but some require a $9 per month Pro license.
You can use these tools to get your videos ready for posting faster, embed them off-YouTube more easily, and save time by creating canned responses or templates for cards and annotations.
For example, you might find yourself creating the same YouTube Card over and over again to include it in every video you make. Creating a template through TubeBuddy will save you this effort.
Another great productivity tool is the Video Topic Planner. You can save video ideas you come up with, or ideas viewers have suggested to you, and arrange them in a queue so you never forget what you are planning to make next.
2. Bulk Tools for Annotations, Cards, Thumbnails and More
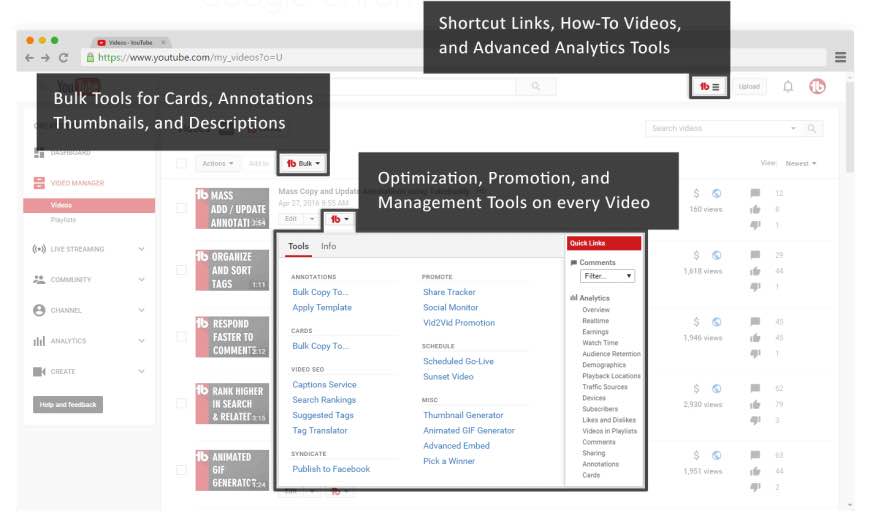
Most of TubeBuddy’s bulk processing tools require a $19 per month Star license.
Two of the most time-saving tools in this section are the Bulk Copy tools for cards and annotations. They will save you from having to recreate the same ones over and over. Then, using the Bulk Update tools, you will be able to make changes to all of your cards or annotations at once.
For example: if you use a YouTube Card to link to your personal website and include it in every video, and then you change your website, you change the link in all of your existing cards at once.
Another useful Bulk tool is Bulk Thumbnail Overlays, which will allow you to add a logo to all of your existing video thumbnails at once.
3. Quick Optimization for Your Video’s Tags
The SEO Tools in TubeBuddy will help you find the best tags for your videos and suggest tags you might want to target. Many of these tools are free, but others require a $19 Star license.
One of the best free tools in this category is View and Copy Video Tags. It allows you to see and copy the tags of other people’s videos. You will be able to see which keywords your competitors are targeting (and look for opportunities to target them more effectively). This can also save you a lot of time writing out tags that should really be the same as the ones on an existing video.
4. Useful Data
The most useful piece of data under Data and Research Tools is the Best Time to Publish. How many views you get on a video could vary greatly depending on when you post, and the best times to post vary depending on the demographics of your audience. This free tool from TubeBuddy will show you when you should be uploading.
Another interesting tool, which is unfortunately only available with $39 licenses, is the Competitor Scoreboard. It allows creators to compare their channels stats to those of their rival channels.
Have you ever tried TubeBuddy for YouTube?
Richard Bennett
Richard Bennett is a writer and a lover of all things video.
Follow @Richard Bennett
Richard Bennett
Nov 01, 2022• Proven solutions
TubeBuddy is a YouTube certified extension for your Google Chrome browser. When you visit YouTube after installing TubeBuddy a whole new set of useful tools becomes available.
TubeBuddy’s tools were designed to save you time and effort when performing some of the more mundane tasks involved in running a YouTube channel, like adding cards. Many of TubeBuddy’s tools are completely free to use, but others might require a paid license. There are three levels of licensing: $9, $19, or $39 per month.
The Benefits of Using TubeBuddy for YouTube
- Increased Productivity
- Bulk Tools for Annotations, Cards, Thumbnails and More
- Quick Optimization for Your Video’s Tags
- Useful Data
Benefits of TubeBuddy
YouTubers who use TubeBuddy are able to spend less time on busy-work and more time on coming up with creative video ideas. Here are some of the ways TubeBuddy can help you, especially if you have a large or mid-sized channel:
1. Increased Productivity
Most of TubeBuddy’s Productivity Tools are available for free, but some require a $9 per month Pro license.
You can use these tools to get your videos ready for posting faster, embed them off-YouTube more easily, and save time by creating canned responses or templates for cards and annotations.
For example, you might find yourself creating the same YouTube Card over and over again to include it in every video you make. Creating a template through TubeBuddy will save you this effort.
Another great productivity tool is the Video Topic Planner. You can save video ideas you come up with, or ideas viewers have suggested to you, and arrange them in a queue so you never forget what you are planning to make next.
2. Bulk Tools for Annotations, Cards, Thumbnails and More
Most of TubeBuddy’s bulk processing tools require a $19 per month Star license.
Two of the most time-saving tools in this section are the Bulk Copy tools for cards and annotations. They will save you from having to recreate the same ones over and over. Then, using the Bulk Update tools, you will be able to make changes to all of your cards or annotations at once.
For example: if you use a YouTube Card to link to your personal website and include it in every video, and then you change your website, you change the link in all of your existing cards at once.
Another useful Bulk tool is Bulk Thumbnail Overlays, which will allow you to add a logo to all of your existing video thumbnails at once.
3. Quick Optimization for Your Video’s Tags
The SEO Tools in TubeBuddy will help you find the best tags for your videos and suggest tags you might want to target. Many of these tools are free, but others require a $19 Star license.
One of the best free tools in this category is View and Copy Video Tags. It allows you to see and copy the tags of other people’s videos. You will be able to see which keywords your competitors are targeting (and look for opportunities to target them more effectively). This can also save you a lot of time writing out tags that should really be the same as the ones on an existing video.
4. Useful Data
The most useful piece of data under Data and Research Tools is the Best Time to Publish. How many views you get on a video could vary greatly depending on when you post, and the best times to post vary depending on the demographics of your audience. This free tool from TubeBuddy will show you when you should be uploading.
Another interesting tool, which is unfortunately only available with $39 licenses, is the Competitor Scoreboard. It allows creators to compare their channels stats to those of their rival channels.
Have you ever tried TubeBuddy for YouTube?
Richard Bennett
Richard Bennett is a writer and a lover of all things video.
Follow @Richard Bennett
Beginner’s Tutorial: Composing YouTube Video Content
How to Write a Script for a YouTube Video
Richard Bennett
Oct 26, 2023• Proven solutions
Thinking about how to write a script for a YouTube video?
You have a great idea for a video, but you’re just not sure how to express it on camera. Are you looking for ways to make your video attractive and interesting? Well, one way to do so is to create a well-structured script. Whether it is a 30-second video or a full-length movie, a script will guide the video creation process. Below are some tips to keep in mind if you want to learn how to write a script for your YouTube video.
- Before Write Your YouTube Script
- Writing a Script for a YouTube Video
- After Writing Your YouTube Video Script
- Bonus Tip- Add Subtitles to Your YouTube Video with Wondershare Filmora
Before You Write Your YouTube Script
Here are some things to do before you start writing your script for YouTube:
1. Collect Ideas
Before you write the script, it’s a good idea to gather ideas. If you think of something, or if something funny happens, write it down right away. Keep a pen and notebook handy that way you will not forget about it.
2. Find an area that is not distracting
Once you have gathered enough ideas for the YouTube video, the next step is to find a place where you can write in peace and be inspired. Avoid any distractions to ensure that you will be able to put all your thoughts and ideas onto paper.
Writing a Script for a YouTube Video
Now that you’re ready to sit down and write, here’s what you do:
1. Create an outline for your story
The first step in writing a script is to develop an outline for the story. You might think that it is an unnecessary step, but it’s one of the most important steps to writing a script. The outline serves as a guide that will make the finished product better compared to when you just tried to wing it. One tip on how to write a script for a YouTube video is to have an outline for the beginning, middle, and ending of the video. Once you have all the elements of the story, then you can start with the first draft of the script.
2. Set the tone
The tone you pick for the video will depend on your audience. It’s safe to assume that viewers want something that’s unique, informative, and engaging. In some cases, they look for a video that’s personal, and they can relate to it. Humor is also something that you should consider when writing a script.
3. Just keep writing
When you start writing it is important that you keep on doing it no matter what happens. Just write down everything that comes into your mind. After that, read what you’ve written. If you think that something needs to be replaced, then replace it. If you get more inspiration and think that the script is lacking, then add to it.
4. Make sure that the script is well structured
It’s important to learn how to write a script that is well structured. Divide the script into four parts: Opening, Primer, Body, and Closing.
For the Opening part, ask a simple question that can be answered in the Body. Use the Primer section to inform viewers what they should expect from the video. The Body will contain the main content of the video. It should cover all the things that viewers need to know. Lastly, the closing wraps up the video by providing social media details and a teaser for the next video.
Note:
- Keep It Concise
In a personal vlog-style video you might ramble and go off on amusing tangents, and that’s something viewers love within that genre. If you are trying to teach, however, your viewers will benefit more if you keep things concise and direct.
Tell people up front what point you are trying to make before you jump into making it.
- Be Interactive
Talk to people, not at them.
While you are scripting and focusing on the information you want to deliver, it’s easy to forget to be personal.
Remember to refer to your audience as ‘you’, not ‘you guys’ (you are speaking to individual viewers, not a collective) and to include moments of engagement throughout your videos. Ask your viewers questions to keep their minds active, this also encourages them to leave comments.
After Writing your YouTube Video Script
After writing the script, the next step is to invite a trusted friend or family member to look at the script. Ask them for their feedback and if they have any ideas to add. And don’t forget, be open-minded to feedback
These are the tips to keep in mind when considering how to write a script for a YouTube video.
Add Subtitles to Your YouTube Video with Wondershare Filmora
Creating subtitles with Wondershare Filmora is very easy and a newbie can easily add relevant texts to the video they are trying to edit with Filmora. You just simply need to launch Wondershare Filmora and import the video that you want to edit. Now, go to the Titles tab and select the template that you want to pick and drag it on the timeline and click Apply. This way you can easily start adding texts and titles to your videos and let the alphabets narrate your story.


Richard Bennett
Richard Bennett is a writer and a lover of all things video.
Follow @Richard Bennett
Richard Bennett
Oct 26, 2023• Proven solutions
Thinking about how to write a script for a YouTube video?
You have a great idea for a video, but you’re just not sure how to express it on camera. Are you looking for ways to make your video attractive and interesting? Well, one way to do so is to create a well-structured script. Whether it is a 30-second video or a full-length movie, a script will guide the video creation process. Below are some tips to keep in mind if you want to learn how to write a script for your YouTube video.
- Before Write Your YouTube Script
- Writing a Script for a YouTube Video
- After Writing Your YouTube Video Script
- Bonus Tip- Add Subtitles to Your YouTube Video with Wondershare Filmora
Before You Write Your YouTube Script
Here are some things to do before you start writing your script for YouTube:
1. Collect Ideas
Before you write the script, it’s a good idea to gather ideas. If you think of something, or if something funny happens, write it down right away. Keep a pen and notebook handy that way you will not forget about it.
2. Find an area that is not distracting
Once you have gathered enough ideas for the YouTube video, the next step is to find a place where you can write in peace and be inspired. Avoid any distractions to ensure that you will be able to put all your thoughts and ideas onto paper.
Writing a Script for a YouTube Video
Now that you’re ready to sit down and write, here’s what you do:
1. Create an outline for your story
The first step in writing a script is to develop an outline for the story. You might think that it is an unnecessary step, but it’s one of the most important steps to writing a script. The outline serves as a guide that will make the finished product better compared to when you just tried to wing it. One tip on how to write a script for a YouTube video is to have an outline for the beginning, middle, and ending of the video. Once you have all the elements of the story, then you can start with the first draft of the script.
2. Set the tone
The tone you pick for the video will depend on your audience. It’s safe to assume that viewers want something that’s unique, informative, and engaging. In some cases, they look for a video that’s personal, and they can relate to it. Humor is also something that you should consider when writing a script.
3. Just keep writing
When you start writing it is important that you keep on doing it no matter what happens. Just write down everything that comes into your mind. After that, read what you’ve written. If you think that something needs to be replaced, then replace it. If you get more inspiration and think that the script is lacking, then add to it.
4. Make sure that the script is well structured
It’s important to learn how to write a script that is well structured. Divide the script into four parts: Opening, Primer, Body, and Closing.
For the Opening part, ask a simple question that can be answered in the Body. Use the Primer section to inform viewers what they should expect from the video. The Body will contain the main content of the video. It should cover all the things that viewers need to know. Lastly, the closing wraps up the video by providing social media details and a teaser for the next video.
Note:
- Keep It Concise
In a personal vlog-style video you might ramble and go off on amusing tangents, and that’s something viewers love within that genre. If you are trying to teach, however, your viewers will benefit more if you keep things concise and direct.
Tell people up front what point you are trying to make before you jump into making it.
- Be Interactive
Talk to people, not at them.
While you are scripting and focusing on the information you want to deliver, it’s easy to forget to be personal.
Remember to refer to your audience as ‘you’, not ‘you guys’ (you are speaking to individual viewers, not a collective) and to include moments of engagement throughout your videos. Ask your viewers questions to keep their minds active, this also encourages them to leave comments.
After Writing your YouTube Video Script
After writing the script, the next step is to invite a trusted friend or family member to look at the script. Ask them for their feedback and if they have any ideas to add. And don’t forget, be open-minded to feedback
These are the tips to keep in mind when considering how to write a script for a YouTube video.
Add Subtitles to Your YouTube Video with Wondershare Filmora
Creating subtitles with Wondershare Filmora is very easy and a newbie can easily add relevant texts to the video they are trying to edit with Filmora. You just simply need to launch Wondershare Filmora and import the video that you want to edit. Now, go to the Titles tab and select the template that you want to pick and drag it on the timeline and click Apply. This way you can easily start adding texts and titles to your videos and let the alphabets narrate your story.
Richard Bennett
Richard Bennett is a writer and a lover of all things video.
Follow @Richard Bennett
Also read:
- [New] Cutting-Edge Computers Optimal Machines for Media Creation
- [New] In 2024, Foremost Websites Accelerating YouTube Traffic
- [Updated] 2024 Approved Pro Quality Footage Selecting the Ultimate 7 Cameras
- [Updated] Dismantling the Shadowy Video Barrier on YouTube
- [Updated] Enhancing Outreach with Strategic Partner Selection on YouTube
- 2024 Approved Harnessing LUTs for Enhanced Visual Effects in AR Experiences
- In 2024, Startups' Guide to Earnings on YouTube Platform
- In 2024, What Does Enter PUK Code Mean And Why Did The Sim Get PUK Blocked On Poco M6 5G Device
- Mirthful Moments The 10 Funniest YouTube Short Film Ideas Ever
- Proven YouTube SEO Methods for Video Rankings
- Tackling Teal Too Much? Clean up That Green Screen on Mac
- The Ultimate Verdict on Barnes and Noble's Nook GlowLight 4 E-Reader
- Top 24 Approaches to Enhance Your Channel's Popularity
- Top 3 Herramientas Esenciales Para La Copia Bit a Bit De Archivos Críticos en Linux Y Windows
- Troubleshooting Guide for Steam's Difficulty in Reaching Its Online Services
- Troubleshooting Steps: Solving Your Vizio TV Wi-Fi Connection Issues
- YouTube Live Broadcasting Demystified
- Title: Elevate Your Channel Game - TubeBuddy Insights for 2024
- Author: Kevin
- Created at : 2025-01-23 03:55:59
- Updated at : 2025-01-29 19:52:26
- Link: https://youtube-videos.techidaily.com/elevate-your-channel-game-tubebuddy-insights-for-2024/
- License: This work is licensed under CC BY-NC-SA 4.0.