
:max_bytes(150000):strip_icc()/001-Visual-voicemail-3d8aec660545471fbe131dc8ddc16535.jpg)
"Elevate Visibility Comprehensive Guide to Video Marketing Titles for 2024"
Elevate Visibility: Comprehensive Guide to Video Marketing Titles
Best 5 YouTube Tag Generators & Tips to Tag Videos Properly

Richard Bennett
Oct 26, 2023• Proven solutions
If you want a faster, easier way to use YouTube tags to get more views, here’s a list of top 5 YouTube tag generators.
Metadata and engagement are 2 key factors that YouTube uses to determine your video visibility. YouTube can’t read your video content, so YouTube tags help it understand which keyword search results or video suggestions should your video be featured. These tools are going to help you master YouTube keywords and search.
| Tag Generator | Price | Highlights & Additional Features |
|---|---|---|
| Rapid Tags | Free | Allows you to copy and save tags and features by language. It also comes with a tag analyzer and ranker. |
| Better Way to Web | Free | Detect tags from a Youtube Video. |
| Keyword Keg | From $8/Month. Shows Top 5 Results in Free Version. | Shows search Volume, trend, ad suggestion. |
| Tag Keywords | Free | A complete list of tags with filtering capabilities. |
| SEO Book | Free | Suggest tags based on your title, description, and keywords. |
Best 5 YouTube Tag Generators
1. Rapid Tags
Price: Free
As the name indicates, it can generate your desired tags fast. The best part is that users can also initiate a search on the basis of language filters.
Key Features:
- Allows users to copy and save tags.
- Comes with a tag ranker and analyzer tool.
2. Better Way to Web
Price: Free
There are two techniques to generate tags using the Better Way to Web tool. The very first option is to check relevant tags by using URLs and the second option is to initiate a search by specific keywords.
Key Features:
- Offers an easy way to check tags of your competitors.
- Fast response.
3. Keyword Keg
Price: From $8 per Month
It is the best way to optimize your channel tags, descriptions, and titles. One can filter out results with this advanced tool so that only highly relevant tags can be generated.
Key Features:
- Rated high for its easy search options.
- Serves better for staying on top of search engines.
4. Tags YouTube
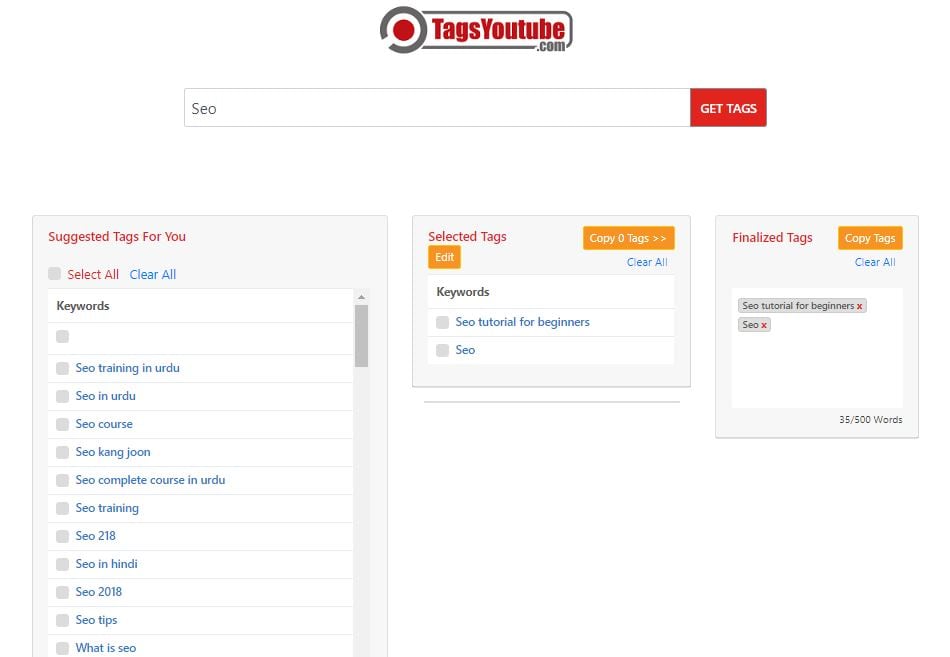
Price: Free
Simply type in the keywords you want ideas for and this tool will generate related words. Using TagsYouTube, you can optimize your YouTube keyword brainstorming process and help reach a wider audience.
Key Features:
- Filter the keywords that you want to apply to your video.
- One click copy button to copy all the tags you want.
5. SEO Book
Price: Free
This tool is offering high-quality results with competitive marketing strategies. Users can avail exact idea about where their keywords rank, and they can also track a new set of powerful keywords.
Key Features:
- Global footprint.
- Risk-free.
- Follow the most effective SEO strategies.
How to Tag Properly on YouTube?
Tip 1 Relevancy
The most important thing that you need to know about channel tags is that one must always stay away from misleading tags. Always check the relevance of tags or keywords before you add them to your channel. Working with highly relevant keywords may develop a slower route map to success with top rankings but it always promises a sustainable and more legitimate solution.
Tip 2 Mix Long Tail and General Tags
It is not sufficient to use general tags for channel posts, rather one should go for a mixture of the long tail and general tags. It helps to make your data more valuable because it can address a wide range of audience.
Tip 3 Use Around 10 Tags
You will not be able to get desired results with 3 or 4 tags, however, you won’t need 15 or 20 tags; rather an optimized solution is preferred. The best idea is to use almost 10 tags for one post as it can make your posts more relevant to the specific audience.
Tip 4 Analyze Competitors
Never forget to check the tags of your competitors; it will help you to improve your results against them. There are so many tools available online that can help you to track tags of your competitors so that you can also use a similar set of potential keywords.
Tip 5 Monitor and Update Tags
Stay tuned to new trends and then adjust strategy accordingly to make them more effective. It is a good idea to bring the best value to your videos with relevant audience attraction. It will soon update your videos into suggestions for related search results of the audience. On one side, it helps to make the perfect link between two related videos and at the same time, it helps to rank videos with higher ranking due to more specific keywords.
In 12 steps, you canimprove your YouTube SEO , see how!
Any good or bad experiences with YouTube tag generators? Share in the comment and discuss with other YouTubers!
Making Better YouTube Videos with Filmora
As one of the most widely used video editing software in YouTube video editing, Filmora provides lots of templates and effects with an intuitive interface, which saves much time. Download the free trial version and get started now.


Richard Bennett
Richard Bennett is a writer and a lover of all things video.
Follow @Richard Bennett
Richard Bennett
Oct 26, 2023• Proven solutions
If you want a faster, easier way to use YouTube tags to get more views, here’s a list of top 5 YouTube tag generators.
Metadata and engagement are 2 key factors that YouTube uses to determine your video visibility. YouTube can’t read your video content, so YouTube tags help it understand which keyword search results or video suggestions should your video be featured. These tools are going to help you master YouTube keywords and search.
| Tag Generator | Price | Highlights & Additional Features |
|---|---|---|
| Rapid Tags | Free | Allows you to copy and save tags and features by language. It also comes with a tag analyzer and ranker. |
| Better Way to Web | Free | Detect tags from a Youtube Video. |
| Keyword Keg | From $8/Month. Shows Top 5 Results in Free Version. | Shows search Volume, trend, ad suggestion. |
| Tag Keywords | Free | A complete list of tags with filtering capabilities. |
| SEO Book | Free | Suggest tags based on your title, description, and keywords. |
Best 5 YouTube Tag Generators
1. Rapid Tags
Price: Free
As the name indicates, it can generate your desired tags fast. The best part is that users can also initiate a search on the basis of language filters.
Key Features:
- Allows users to copy and save tags.
- Comes with a tag ranker and analyzer tool.
2. Better Way to Web
Price: Free
There are two techniques to generate tags using the Better Way to Web tool. The very first option is to check relevant tags by using URLs and the second option is to initiate a search by specific keywords.
Key Features:
- Offers an easy way to check tags of your competitors.
- Fast response.
3. Keyword Keg
Price: From $8 per Month
It is the best way to optimize your channel tags, descriptions, and titles. One can filter out results with this advanced tool so that only highly relevant tags can be generated.
Key Features:
- Rated high for its easy search options.
- Serves better for staying on top of search engines.
4. Tags YouTube
Price: Free
Simply type in the keywords you want ideas for and this tool will generate related words. Using TagsYouTube, you can optimize your YouTube keyword brainstorming process and help reach a wider audience.
Key Features:
- Filter the keywords that you want to apply to your video.
- One click copy button to copy all the tags you want.
5. SEO Book
Price: Free
This tool is offering high-quality results with competitive marketing strategies. Users can avail exact idea about where their keywords rank, and they can also track a new set of powerful keywords.
Key Features:
- Global footprint.
- Risk-free.
- Follow the most effective SEO strategies.
How to Tag Properly on YouTube?
Tip 1 Relevancy
The most important thing that you need to know about channel tags is that one must always stay away from misleading tags. Always check the relevance of tags or keywords before you add them to your channel. Working with highly relevant keywords may develop a slower route map to success with top rankings but it always promises a sustainable and more legitimate solution.
Tip 2 Mix Long Tail and General Tags
It is not sufficient to use general tags for channel posts, rather one should go for a mixture of the long tail and general tags. It helps to make your data more valuable because it can address a wide range of audience.
Tip 3 Use Around 10 Tags
You will not be able to get desired results with 3 or 4 tags, however, you won’t need 15 or 20 tags; rather an optimized solution is preferred. The best idea is to use almost 10 tags for one post as it can make your posts more relevant to the specific audience.
Tip 4 Analyze Competitors
Never forget to check the tags of your competitors; it will help you to improve your results against them. There are so many tools available online that can help you to track tags of your competitors so that you can also use a similar set of potential keywords.
Tip 5 Monitor and Update Tags
Stay tuned to new trends and then adjust strategy accordingly to make them more effective. It is a good idea to bring the best value to your videos with relevant audience attraction. It will soon update your videos into suggestions for related search results of the audience. On one side, it helps to make the perfect link between two related videos and at the same time, it helps to rank videos with higher ranking due to more specific keywords.
In 12 steps, you canimprove your YouTube SEO , see how!
Any good or bad experiences with YouTube tag generators? Share in the comment and discuss with other YouTubers!
Making Better YouTube Videos with Filmora
As one of the most widely used video editing software in YouTube video editing, Filmora provides lots of templates and effects with an intuitive interface, which saves much time. Download the free trial version and get started now.
Richard Bennett
Richard Bennett is a writer and a lover of all things video.
Follow @Richard Bennett
Effortlessly Sharing Content: How to Upload From iOS to YouTube
Create High-Quality Video - Wondershare Filmora
An easy and powerful YouTube video editor
Numerous video and audio effects to choose from
Detailed tutorials provided by the official channel
Initially, iOS users had the option to load videos directly to YouTube via the tap-to-upload feature. However, this option is missing in the recent iOS devices versions. Therefore, many users search for possible ways to post a video on YouTube from iPhone. For this, you have to put some considerations into place before moving on. The video title length should not exceed 100 characters, while the description is maintained at 5,000 characters. Also, ensure the video length doesn’t exceed 15 minutes. Let’s roll out the best ways to upload your videos and make that big catch on subscribers.

In this article
01 [ How to upload a video to YouTube from iPhone or iPad](#Part 1)
02 [Why your phone doesn’t post videos to YouTube](#Part 2)
03 [Make your YouTube video better with Filmora](#Part 3)
How to upload a video to YouTube from iPhone or iPad
Are you ready to start on that big adventure and share your videos on YouTube? Follow these steps to learn how to upload a video to YouTube from your iPhone.
Method 1: Upload using the YouTube iOS app
Using the YouTube app is the simplest way to upload your YouTube videos. The YouTube app should be installed on your iOS device.
Step 1. Launch the YouTube app on your device, then sign in to your account. If you don’t have an account yet, you will need to “Sign up” for a new one before continuing the upload process.
Step 2. Click on the “+” icon found at the bottom of the screen.
Step 3. Then choose the “Upload a video” option from the populated list of options.
Step 4. Check out the pop-up that appears and “Allow access” to it.
Step 5. Edit your video to your preference by trimming or cropping as you desire. Then click on the “Next” option.

Step 6. Add “title and description” to your video. Remember, the title should contain less than 100 characters and the description no more than 500 characters.
Step 7. Then set the visibility mode as “Public” to enable you to share your video over the internet.
Step 8. Click on the “Upload” button to finally upload your video to YouTube.

Method 2: Upload using Photo App
The Photo App has a “Share” option that you can use to upload your videos to YouTube. Here is the guide.
Step 1. Go to your iOS device and tap on the “Photos” app.
Step 2. Then tap on the “Videos Folder” to locate the video you wish to upload to YouTube.

Step 3. Next, tap on the video that you want to upload.
Step 4. Then tap on the “Share” icon located at the bottom left of your iOS device screen.
Step 5. You’ll then access a “Share” menu from where you have various share options for your video.
Step 6. Choose the “YouTube” option to continue to share your video there. At this juncture, ensure you have logged in to your Google Account.

Step 7. You need to provide a “Title” and “Description” of your video. Then go to the “Privacy” Options and make your video “Public.”
Step 8. Finally, tap on the “Publish” tab found at the top-right corner of your screen to make your video viewable by the public.

Method 3: Upload video to YouTube using Safari
Safari is another alternative method to upload a video to YouTube.
Step 1. First, go to “youtube.com” on Safari and sign in.

Step 2. Then tap on the “account” icon at the top right side of the screen.
Step 3. Hit on the “Upload” icon and wait to be redirected to the YouTube Studio desktop site.
Step 4. Click on the “Select Files” option.
Step 5. Choose the video you wish to add to YouTube from the “Photo” library and tap on the “Add” button.

Step 6. Add your video’s “title and description” and hit the “Next” button.
Step 7. Tap on the “Next” button once more to go to the “Visibility” page.
Step 8. Select the “Public” option to upload your video to the public.
Why your phone doesn’t post videos to YouTube
Despite learning how to upload to YouTube from iPhone, you may be perplexed to realize that your phone refuses to post videos to YouTube. What could be the reason?
1) YouTube issues
In most cases, the problem doesn’t arise from your phone but from YouTube. This streaming app may also experience some hitches along the way. Remember that even if your phone sync with your YouTube account to upload videos from the “Camera Roll,” YouTube isn’t managed from the Camera Roll but the YouTube app directly. You can solve the issue by signing out of your YouTube account and signing back in.
2) Connection Strength
Some videos may appear quite large and cause a time-out during the upload process. Check your Wi-Fi or internet connection strength to determine if it needs a boost or wait until the streaming strength is strong for a quick upload. Test your internet speed by searching “internet test speed” on Google. Then click the “Run Speed Test” in the search box. A window will open and give you an estimate of the Mbps that your connection is operating at. If too low, switch to other alternatives.
3) Verify your YouTube account
Verifying your account will help you to enjoy YouTube’s full features. It’s then that you’ll manage to upload videos without any drawbacks. Also, that’s when you’ll manage to upload longer videos that go beyond the 15-minute duration.
4) Pay attention to the video size
There is a limit for videos to post to YouTube. If it is too large or long, the upload will cancel before completion.
5) Be patient
YouTube can save your partial upload for 24 hours. So, you can continue to upload from where you left. Learn to be patient as there could be a surge of user traffic, especially during evenings.
Make your YouTube video better with Filmora
Good video quality will make you go miles ahead of your marketing gig. You can use Filmora mobile application to make your videos look better before uploading them to YouTube. This intuitive video editing app has advanced features and several ways to compose creative videos.
- Stunning video effects that let you add animated text to video
- Easily record your voice-overs with its perfect sound effects
- Split functionality that allows you to slice your video footage into two or more separate video clips
- Playback your clips in reverse and adjust the speed for fast or slow motion
- Select the best aspect ratio for your video
- Advanced camera to create emoji selfies and other video beautification
- Directly share your videos to social media sites like YouTube and Facebook.
Check out the steps to edit your video with Filmora on your iOS device
Step 1. Download and install Filmora
For iOS devices, go to the “Apple Store” to download and install the app. Also, allow it to access your videos, camera, and pictures in the process.
Step 2. Import video
You may already have a video in your library that you wish to upload to YouTube. Nonetheless, you can shoot a video afresh to add. To shoot one, you need to settle on a topic before recording and downloading other images you may need. Ensure you watch what you are filming and use adequate lighting during the shooting process.
Next, begin to import your video file. Just open the application and select the “Create new video” option. Then choose the “Video” icon and select a folder that contains the video to be added. Hit the “Add” button from the bottom right corner.
Step 3. Edit video
Filmora has several editing features to make your video better. Use the “Edit tools” feature to turn your video into an impeccable piece. Easily add filters, adjust the speed, or create subtitles, among other functions. You can also split, trim, or delete the unwanted clip parts.
It is important to add a title and description to your video. Just use the “Titles” button to add the title. Other precepts that you can add include transitions, sound like voice-over,
Step 4. Export and share
You’ve just finished creating and editing your video. Click on the “Save” tab and let the application export your video. Then select the “Save to Camera Roll” option to save the video to your iPhone. Finally, you can upload and share the video directly to your YouTube account.
Conclusion
● However, it appears to be a difficult task; you must have found relief after going through these procedures. You don’t need prior knowledge on how to upload a video to YouTube from your iPhone. Several options are at your disposal. You can use the Safari, YouTube app, or the Photo app to upload your videos. The better part is that you can create top-notch videos with Filmora. This mobile video editing app has a lot to offer, ensuring quality content.
Initially, iOS users had the option to load videos directly to YouTube via the tap-to-upload feature. However, this option is missing in the recent iOS devices versions. Therefore, many users search for possible ways to post a video on YouTube from iPhone. For this, you have to put some considerations into place before moving on. The video title length should not exceed 100 characters, while the description is maintained at 5,000 characters. Also, ensure the video length doesn’t exceed 15 minutes. Let’s roll out the best ways to upload your videos and make that big catch on subscribers.
In this article
01 [ How to upload a video to YouTube from iPhone or iPad](#Part 1)
02 [Why your phone doesn’t post videos to YouTube](#Part 2)
03 [Make your YouTube video better with Filmora](#Part 3)
How to upload a video to YouTube from iPhone or iPad
Are you ready to start on that big adventure and share your videos on YouTube? Follow these steps to learn how to upload a video to YouTube from your iPhone.
Method 1: Upload using the YouTube iOS app
Using the YouTube app is the simplest way to upload your YouTube videos. The YouTube app should be installed on your iOS device.
Step 1. Launch the YouTube app on your device, then sign in to your account. If you don’t have an account yet, you will need to “Sign up” for a new one before continuing the upload process.
Step 2. Click on the “+” icon found at the bottom of the screen.
Step 3. Then choose the “Upload a video” option from the populated list of options.
Step 4. Check out the pop-up that appears and “Allow access” to it.
Step 5. Edit your video to your preference by trimming or cropping as you desire. Then click on the “Next” option.
Step 6. Add “title and description” to your video. Remember, the title should contain less than 100 characters and the description no more than 500 characters.
Step 7. Then set the visibility mode as “Public” to enable you to share your video over the internet.
Step 8. Click on the “Upload” button to finally upload your video to YouTube.
Method 2: Upload using Photo App
The Photo App has a “Share” option that you can use to upload your videos to YouTube. Here is the guide.
Step 1. Go to your iOS device and tap on the “Photos” app.
Step 2. Then tap on the “Videos Folder” to locate the video you wish to upload to YouTube.
Step 3. Next, tap on the video that you want to upload.
Step 4. Then tap on the “Share” icon located at the bottom left of your iOS device screen.
Step 5. You’ll then access a “Share” menu from where you have various share options for your video.
Step 6. Choose the “YouTube” option to continue to share your video there. At this juncture, ensure you have logged in to your Google Account.
Step 7. You need to provide a “Title” and “Description” of your video. Then go to the “Privacy” Options and make your video “Public.”
Step 8. Finally, tap on the “Publish” tab found at the top-right corner of your screen to make your video viewable by the public.
Method 3: Upload video to YouTube using Safari
Safari is another alternative method to upload a video to YouTube.
Step 1. First, go to “youtube.com” on Safari and sign in.
Step 2. Then tap on the “account” icon at the top right side of the screen.
Step 3. Hit on the “Upload” icon and wait to be redirected to the YouTube Studio desktop site.
Step 4. Click on the “Select Files” option.
Step 5. Choose the video you wish to add to YouTube from the “Photo” library and tap on the “Add” button.
Step 6. Add your video’s “title and description” and hit the “Next” button.
Step 7. Tap on the “Next” button once more to go to the “Visibility” page.
Step 8. Select the “Public” option to upload your video to the public.
Why your phone doesn’t post videos to YouTube
Despite learning how to upload to YouTube from iPhone, you may be perplexed to realize that your phone refuses to post videos to YouTube. What could be the reason?
1) YouTube issues
In most cases, the problem doesn’t arise from your phone but from YouTube. This streaming app may also experience some hitches along the way. Remember that even if your phone sync with your YouTube account to upload videos from the “Camera Roll,” YouTube isn’t managed from the Camera Roll but the YouTube app directly. You can solve the issue by signing out of your YouTube account and signing back in.
2) Connection Strength
Some videos may appear quite large and cause a time-out during the upload process. Check your Wi-Fi or internet connection strength to determine if it needs a boost or wait until the streaming strength is strong for a quick upload. Test your internet speed by searching “internet test speed” on Google. Then click the “Run Speed Test” in the search box. A window will open and give you an estimate of the Mbps that your connection is operating at. If too low, switch to other alternatives.
3) Verify your YouTube account
Verifying your account will help you to enjoy YouTube’s full features. It’s then that you’ll manage to upload videos without any drawbacks. Also, that’s when you’ll manage to upload longer videos that go beyond the 15-minute duration.
4) Pay attention to the video size
There is a limit for videos to post to YouTube. If it is too large or long, the upload will cancel before completion.
5) Be patient
YouTube can save your partial upload for 24 hours. So, you can continue to upload from where you left. Learn to be patient as there could be a surge of user traffic, especially during evenings.
Make your YouTube video better with Filmora
Good video quality will make you go miles ahead of your marketing gig. You can use Filmora mobile application to make your videos look better before uploading them to YouTube. This intuitive video editing app has advanced features and several ways to compose creative videos.
- Stunning video effects that let you add animated text to video
- Easily record your voice-overs with its perfect sound effects
- Split functionality that allows you to slice your video footage into two or more separate video clips
- Playback your clips in reverse and adjust the speed for fast or slow motion
- Select the best aspect ratio for your video
- Advanced camera to create emoji selfies and other video beautification
- Directly share your videos to social media sites like YouTube and Facebook.
Check out the steps to edit your video with Filmora on your iOS device
Step 1. Download and install Filmora
For iOS devices, go to the “Apple Store” to download and install the app. Also, allow it to access your videos, camera, and pictures in the process.
Step 2. Import video
You may already have a video in your library that you wish to upload to YouTube. Nonetheless, you can shoot a video afresh to add. To shoot one, you need to settle on a topic before recording and downloading other images you may need. Ensure you watch what you are filming and use adequate lighting during the shooting process.
Next, begin to import your video file. Just open the application and select the “Create new video” option. Then choose the “Video” icon and select a folder that contains the video to be added. Hit the “Add” button from the bottom right corner.
Step 3. Edit video
Filmora has several editing features to make your video better. Use the “Edit tools” feature to turn your video into an impeccable piece. Easily add filters, adjust the speed, or create subtitles, among other functions. You can also split, trim, or delete the unwanted clip parts.
It is important to add a title and description to your video. Just use the “Titles” button to add the title. Other precepts that you can add include transitions, sound like voice-over,
Step 4. Export and share
You’ve just finished creating and editing your video. Click on the “Save” tab and let the application export your video. Then select the “Save to Camera Roll” option to save the video to your iPhone. Finally, you can upload and share the video directly to your YouTube account.
Conclusion
● However, it appears to be a difficult task; you must have found relief after going through these procedures. You don’t need prior knowledge on how to upload a video to YouTube from your iPhone. Several options are at your disposal. You can use the Safari, YouTube app, or the Photo app to upload your videos. The better part is that you can create top-notch videos with Filmora. This mobile video editing app has a lot to offer, ensuring quality content.
Also read:
- Discovering Underrated Gems This Year (Films)
- Essential Tips for Locating YouTube's Content Creation Hub for 2024
- Evaluating Rapid Subscription's Impact on Video Engagement for 2024
- Superior ASMR Microphone Guide You Must Read
- 2024 Approved Edu-Topic 10 Selective Learning Channels Online
- [New] Choosing Streaming Giants Vimeo, YouTube, or DailyMotion?
- Top YouTube Admakers Showcase Mastering Creative Campaigns
- [New] YouTube Shorts Description Everything You Need to Know
- 2024 Approved Bypass Latency with AV1 in YouTube Settings
- [Updated] Bright Ideas Effective Lighting in Vlogging
- Perfecting the Twitch-to-YouTube Content Transfer Process
- Demystifying the Process of Writing YouTube Video Content for 2024
- [Updated] Banish Odd Greens in Your YouTube Videos Using Mac Techniques
- Secure Methods for Youtube-to-MP4 Conversion
- Charting a Path to Monthly Earnings From YouTube
- Effortless Music Extraction Choose the Right Apps for YouTube & MP3 for 2024
- In 2024, Catch a Wider Net via Concurrent Streams to Youtube + Twitch
- Personalize Your Channel With Free Pics!
- [Updated] Collaborative Titling Across Technology Realms
- [Updated] Earning Potential Unveiled YouTube AdSense Earning per Thousand Video Observations
- Efficient Guide Image Conversion to Professional YouTube Thumbnails for 2024
- Micro Videos What's the Gist?
- [Updated] DSLR or Mirrorless for High-Quality Video Recording?
- [New] Delightful Digests A List of Top Food Channels
- 12 Best Vlogging Cameras with a Flip Screen for 2024
- 2024 Approved Building a Brand Through Consistently Engaging Vlogs
- [New] Essential Strategies for Memorable YouTube Closings
- The Comprehensible Guide to Earnings as a YouTube Channel
- [Updated] Boost Views with Your Own YouTube Thumbnail Design
- Affluent Streaming Stars
- Transform FLV Into YouTube Hits with These Top Alternatives
- Top 5 Best 3D Intro Makers for YouTube for 2024
- Disabling Apex Legends Cross-Play Best Platform Tactics Unveiled for 2024
- [Updated] In 2024, StreamMine Group Video Downloads
- Pattern Locks Are Unsafe Secure Your Vivo Y36 Phone Now with These Tips
- 2024 Approved Best Practices for Choosing Background Scores for Vlogs
- [New] 2024 Approved Universal Method for Recording Your Preferred YouTube Stream, No Matter the Device
- [Updated] 2024 Approved Whispers From the Past Secrets Unveiled in Age-Old Texts
- [Updated] 2024 Approved Cutting-Edge Third-Place iPad Audio Capture Apps
- In 2024, Apple ID Unlock On Apple iPhone 6s Plus? How to Fix it?
- How to Downgrade iPhone 6 without Data Loss? | Dr.fone
- [New] Strategies to Optimize Time and Quality in Thumbnail Design for 2024
- Straightforward Strategies for iPhone's Screen Recording for 2024
- Updated Mastering Facebook Live Your Complete Guide to Successful Streaming
- The Unseen Tactics to Dodge Facebook Shunning
- How to identify missing or malfunctioning drivers with Windows Device Manager on Windows 10 & 7
- Updated In 2024, Learn How to Create Animated Titles and Text in the Filmora Video Editor. This Is a Simple Step-by-Step Tutorial for Any Skill Level
- [Updated] Adept Approaches for Capturing High-Impact Presentations for 2024
- How To Fake GPS On Lava Yuva 3 For Mobile Legends? | Dr.fone
- 2024 Approved How To Generate Speech From Text | The Top Text-to-Speech Converters
- [Updated] In 2024, Streamline Your Content 5 Efficient Ways to Manipulate Vimeo Videos
- New 2024 Approved No Strings Attached Top 10 Free Online Video Editors with No Watermark
- In 2024, Design Your Own Face Online Best Free Tools and Websites
- In 2024, Inventive Story Naming Mastering Over 120 Ways for Snapchat Exclusivity
- 2024 Approved Expert Tips for Flawless Voice Alteration on TikTok
- [Updated] The Efficient TikTok Watcher's Toolkit (Fast Forward Edition)
- Title: "Elevate Visibility Comprehensive Guide to Video Marketing Titles for 2024"
- Author: Kevin
- Created at : 2024-05-25 15:05:23
- Updated at : 2024-05-26 15:05:23
- Link: https://youtube-videos.techidaily.com/elevate-visibility-comprehensive-guide-to-video-marketing-titles-for-2024/
- License: This work is licensed under CC BY-NC-SA 4.0.
