
:max_bytes(150000):strip_icc():format(webp)/GettyImages-971165690-1e0af1d9299f4fdba1225c2d20c739f2.jpg)
Effortlessly Blend Your YT Video with GS
Effortlessly Blend Your YT Video with GS
Create High-Quality Video - Wondershare Filmora
An easy and powerful YouTube video editor
Numerous video and audio effects to choose from
Detailed tutorials provided by the official channel
Advances in filmmaking have brought many concepts into reality. And the green screen is one common practice. Green screen technology is a technique where you use two images or video streams to composite them together. You can use any background images, either foreground or behind the actors. For YouTube, you can use green screen subscribe to facilitate video Call To Action. A green screen easily produces impossible scenes and expands filming ideas. Everything done at the Studio is also the best way to protect actors from hazardous environments.
More so, the best trick is to allow actors to appear together on the screen even when the scenes were captured separately. And did you know that subscribe green screen makes it easy to add YouTube Call To Action and direct viewers on what to do?

Methods to add a subscribe button to your video
Viewers are not likely to subscribe to any channel if they are not guided. One best method is to engage a subscribe button to your video and draw the attention of as many as possible.
1 Use Subscribe Green Screen
Put your green screen to work by subscribing to it. Follow these steps to produce eye-catching videos, with a call to action closing point.
Step 1. Set screen
You need to create a background at the Studio – and that’s the green screen. Keenly hand it on a frame before you start filming. Also, note that no wrinkles or fold-ups are visible.

Step 2. Adjust lighting
Lighting is important to facilitate high-resolution video output quality. Put appropriate lighting settings to avoid directional shadows and get the best results.
Step 3. Set up the subject
Give ample space between the subject and the green screen for an effective outcome. If they are too close, there will be a reflection of the green screen on the subject. It isn’t professional as it will be hard when it comes to matching to a different background.

Step 4. Start filming
Begin to film your video and ensure you take various shots for comparison. It is good to film at different angles to see what works best.
Step 5. Polish the rough cut
Tune all the footage to perfect video clips. It will save your efforts when keying out green screen footage. Remove the unwanted parts by trimming. You can also do other edits like merge and split where necessary.
Step 6. Key out the footage and edit the green screen
Your footage is now ready, and you are now free to edit the green screen. It is better to engage reliable editing software to remove the green traces in the shot.
Step 7. Paste the new background
Any background concept can now fit in. Add your desired background video or image in a new layer below the subject. You can continue to make other necessary adjustments like sharpness and hue for reality.
Step 8. Add Call To Action
Finally, tell your viewers to subscribe to your YouTube channel while watching the video. You can also introduce your other channels that aren’t yet known or those that have not reached 1,000 subscribers.
2 Using YouTube Studio
You can also enable the green screen to subscribe via the YouTube Studio. It is a YouTube application that provides you with the tools you need to create a successful YouTube channel. You can manage your videos, respond to comments and even add adverts to your content for pay. Here are the steps to add subscribe button.
Step 1. First, go directly to “studio.youtube.com” or click on your profile picture on the YouTube page to launch YT Studio.

Step 2. Click on the “Menu” option and choose the “Settings”> “Channel” option.

Step 3. Then select the “Choose” image and select which subscribe button image you wish to use as your branding watermark. You can easily get one on the Google images section.
Step 4. Next, choose the display time for the branding watermark. It could be a custom start time if you want the branding watermark to start showing at a specific time. You can also choose “End or video” for it to appear at the last 10 to 15 seconds of your video. Likewise, the branding watermark can show throughout the video if you choose the “Entire video” option.
Step 5. Finally, save the changes. Voila! Viewers can subscribe to your channel easily, with a single click of a button.
3 Using Subscribe Effects
You can also use the subscribers’ effects to add a Call To Action. Remember, your main aim is to increase the audience to your channel. And in most cases, viewers forget to subscribe even though they love your video. Perhaps they don’t understand the importance it holds to your channel. You can do this using a reliable video editor software – Filmora.
Filmora is a sophisticated tool that is easy to use and export your videos to your computer and upload them to YouTube. It has over 300 effects for YouTubers and comprises exclusive overlays for any scene. Follow these steps to add the subscribe button with subscribe effects.
Key Features of Filmora
- Edit and export your videos at up to 4K resolution
- Supports GIF animation, which you can use for CTA
- It has an advanced text editor
- Easily remove background noise for a polished video sound
- It has an audio equalizer functionality for audio uniformity
- It has the video stabilization functionality
For Win 7 or later (64-bit)
For macOS 10.12 or later
Step 1. Launch Filmora
Open Filmora on your computer, then navigate to the upper left corner of the screen. Click on the “Sample Colors” and select the “Green color.” Next, drag it to video track into the timeline. Then adjust the duration of your video track to your preference.

Step 2. Design the subscribe GIF animation
Use a different color shade to design the subscribe GIF animation. Take “Red” in this case as it smartly blends with the green color that we choose earlier. Drag the red color above the green background.

Step 3. Adjust the red box
Make the added color red button look like a subscribe button. Then place it at any point you want it to appear in front of the background.
Step 4. Add the subscribe text
Write a text into the button. Filmora offers you various styles of text to choose from. You can select the text style you want to use, then drag and drop it into the timeline.

Step 5. Edit title with “Subscribe”
Edit your text with the word “Subscribe,” then place it under the red rectangle and hit the “OK” button.
Step 6. Animate the “Subscribe” button
Double click on the “Red” button. Just go to the “Animate” tab and click on the “Customize” option. Next, click on the “Add” button.

Step 7. Animate text as well
Go to the “Text” option in the timeline and click on “Advanced” text editor. Then go to the “Animation” tab and select the animation you wish to use. Here, you can adjust your text’s start and ending time when you want it to start fading.
Step 8. Export GIF
Your Subscribe GIF is now ready to be exported to your video. Hit the “Export” button and select which format to export it in.

Extra Tip: Ways to Include Calls to Action on videos
Know how to include CTA in your video marketing strategy to boost your subscribers.
- Include Annotations
Annotations are eye-catching and a quick reminder for viewers. You have a variety to choose from, like bubbles, shoutouts, etc. They are used to remind you to subscribe to the channel, view another video, or comment after watching it. - Edit CTAs in your video
It lets the viewer know what to do next before the video ends. The likely reminder is to subscribe to the channel. They could also be reminded to watch the next video or leave a comment. - YouTube Ad Overlays also work
However, ad overlay is for content creators with Google AdWords enabled on their YT channel. Adding an Ad Overlay will link you to any part of the web. Do you want to know the best part? No cost at all! You only need to pay for the views you buy during your video promotion.
Conclusion
● The best strategy to get viewers to subscribe to your YouTube channel is to engage a Call To Action. A bigger number of subscribers guarantees more watch time and the possible growth of your channel. Subscribe green screen even makes it perfect as far as video creation is concerned. You can get different video background ideas and make every scene look authentic. You can engage a third-party tool like Filmora. It will effortlessly add a green screen subscribe in a few steps. Likewise, you can add annotations and other text styles to enhance your look.
Advances in filmmaking have brought many concepts into reality. And the green screen is one common practice. Green screen technology is a technique where you use two images or video streams to composite them together. You can use any background images, either foreground or behind the actors. For YouTube, you can use green screen subscribe to facilitate video Call To Action. A green screen easily produces impossible scenes and expands filming ideas. Everything done at the Studio is also the best way to protect actors from hazardous environments.
More so, the best trick is to allow actors to appear together on the screen even when the scenes were captured separately. And did you know that subscribe green screen makes it easy to add YouTube Call To Action and direct viewers on what to do?
Methods to add a subscribe button to your video
Viewers are not likely to subscribe to any channel if they are not guided. One best method is to engage a subscribe button to your video and draw the attention of as many as possible.
1 Use Subscribe Green Screen
Put your green screen to work by subscribing to it. Follow these steps to produce eye-catching videos, with a call to action closing point.
Step 1. Set screen
You need to create a background at the Studio – and that’s the green screen. Keenly hand it on a frame before you start filming. Also, note that no wrinkles or fold-ups are visible.
Step 2. Adjust lighting
Lighting is important to facilitate high-resolution video output quality. Put appropriate lighting settings to avoid directional shadows and get the best results.
Step 3. Set up the subject
Give ample space between the subject and the green screen for an effective outcome. If they are too close, there will be a reflection of the green screen on the subject. It isn’t professional as it will be hard when it comes to matching to a different background.
Step 4. Start filming
Begin to film your video and ensure you take various shots for comparison. It is good to film at different angles to see what works best.
Step 5. Polish the rough cut
Tune all the footage to perfect video clips. It will save your efforts when keying out green screen footage. Remove the unwanted parts by trimming. You can also do other edits like merge and split where necessary.
Step 6. Key out the footage and edit the green screen
Your footage is now ready, and you are now free to edit the green screen. It is better to engage reliable editing software to remove the green traces in the shot.
Step 7. Paste the new background
Any background concept can now fit in. Add your desired background video or image in a new layer below the subject. You can continue to make other necessary adjustments like sharpness and hue for reality.
Step 8. Add Call To Action
Finally, tell your viewers to subscribe to your YouTube channel while watching the video. You can also introduce your other channels that aren’t yet known or those that have not reached 1,000 subscribers.
2 Using YouTube Studio
You can also enable the green screen to subscribe via the YouTube Studio. It is a YouTube application that provides you with the tools you need to create a successful YouTube channel. You can manage your videos, respond to comments and even add adverts to your content for pay. Here are the steps to add subscribe button.
Step 1. First, go directly to “studio.youtube.com” or click on your profile picture on the YouTube page to launch YT Studio.
Step 2. Click on the “Menu” option and choose the “Settings”> “Channel” option.
Step 3. Then select the “Choose” image and select which subscribe button image you wish to use as your branding watermark. You can easily get one on the Google images section.
Step 4. Next, choose the display time for the branding watermark. It could be a custom start time if you want the branding watermark to start showing at a specific time. You can also choose “End or video” for it to appear at the last 10 to 15 seconds of your video. Likewise, the branding watermark can show throughout the video if you choose the “Entire video” option.
Step 5. Finally, save the changes. Voila! Viewers can subscribe to your channel easily, with a single click of a button.
3 Using Subscribe Effects
You can also use the subscribers’ effects to add a Call To Action. Remember, your main aim is to increase the audience to your channel. And in most cases, viewers forget to subscribe even though they love your video. Perhaps they don’t understand the importance it holds to your channel. You can do this using a reliable video editor software – Filmora.
Filmora is a sophisticated tool that is easy to use and export your videos to your computer and upload them to YouTube. It has over 300 effects for YouTubers and comprises exclusive overlays for any scene. Follow these steps to add the subscribe button with subscribe effects.
Key Features of Filmora
- Edit and export your videos at up to 4K resolution
- Supports GIF animation, which you can use for CTA
- It has an advanced text editor
- Easily remove background noise for a polished video sound
- It has an audio equalizer functionality for audio uniformity
- It has the video stabilization functionality
For Win 7 or later (64-bit)
For macOS 10.12 or later
Step 1. Launch Filmora
Open Filmora on your computer, then navigate to the upper left corner of the screen. Click on the “Sample Colors” and select the “Green color.” Next, drag it to video track into the timeline. Then adjust the duration of your video track to your preference.
Step 2. Design the subscribe GIF animation
Use a different color shade to design the subscribe GIF animation. Take “Red” in this case as it smartly blends with the green color that we choose earlier. Drag the red color above the green background.
Step 3. Adjust the red box
Make the added color red button look like a subscribe button. Then place it at any point you want it to appear in front of the background.
Step 4. Add the subscribe text
Write a text into the button. Filmora offers you various styles of text to choose from. You can select the text style you want to use, then drag and drop it into the timeline.
Step 5. Edit title with “Subscribe”
Edit your text with the word “Subscribe,” then place it under the red rectangle and hit the “OK” button.
Step 6. Animate the “Subscribe” button
Double click on the “Red” button. Just go to the “Animate” tab and click on the “Customize” option. Next, click on the “Add” button.
Step 7. Animate text as well
Go to the “Text” option in the timeline and click on “Advanced” text editor. Then go to the “Animation” tab and select the animation you wish to use. Here, you can adjust your text’s start and ending time when you want it to start fading.
Step 8. Export GIF
Your Subscribe GIF is now ready to be exported to your video. Hit the “Export” button and select which format to export it in.
Extra Tip: Ways to Include Calls to Action on videos
Know how to include CTA in your video marketing strategy to boost your subscribers.
- Include Annotations
Annotations are eye-catching and a quick reminder for viewers. You have a variety to choose from, like bubbles, shoutouts, etc. They are used to remind you to subscribe to the channel, view another video, or comment after watching it. - Edit CTAs in your video
It lets the viewer know what to do next before the video ends. The likely reminder is to subscribe to the channel. They could also be reminded to watch the next video or leave a comment. - YouTube Ad Overlays also work
However, ad overlay is for content creators with Google AdWords enabled on their YT channel. Adding an Ad Overlay will link you to any part of the web. Do you want to know the best part? No cost at all! You only need to pay for the views you buy during your video promotion.
Conclusion
● The best strategy to get viewers to subscribe to your YouTube channel is to engage a Call To Action. A bigger number of subscribers guarantees more watch time and the possible growth of your channel. Subscribe green screen even makes it perfect as far as video creation is concerned. You can get different video background ideas and make every scene look authentic. You can engage a third-party tool like Filmora. It will effortlessly add a green screen subscribe in a few steps. Likewise, you can add annotations and other text styles to enhance your look.
Affordable YouTube Intro Designs and Templates
How to Make a Cool Intro for YouTube? [+Free Templates]

Richard Bennett
Mar 27, 2024• Proven solutions
For a professional presence on YouTube intro is a must. It is for the same reason that how to make an intro is one of the most popular topic now.
It is the impression that will make sure that the users are attracted. The video’s success greatly depends upon the intro as it will allow the users to get the idea.
The good news is that YouTube intro making is not a complex process due to some software and websites offering the services, which we will discuss in this article.
You will learn :
- What Is YouTube Intro?
- Why You Need a YouTube Intro?
- How to Make Your Own Perfect YouTube Intro Easily?
- Key Takeaways to Create Great Attractive YouTube Intro
- Popular YouTube Intro Styles and Templates
Wondershare Filmstock Gaming Video Editing Skils ](https://filmstock.wondershare.com/creative-theme-game?source%5Fchannel=seo%5Farticle?spm=rs.filmora%5Fweb )
What Is YouTube Intro?
YouTube Intro is a short clip at the start of the video that introduces the maker as well as the topic under discussion. It can be rightfully called as the trademark of your channel. The intro tells the user who you really are. This is the only part of the video that is brief and allows the users to get the first impact of you.
There are thousands of software programs and websites that allow you to get breathtaking animated intros. You can use any of the intro templates to make your first impression the best of all. The user will get to know more about you and will also subscribe to your channel.
There are certain creators that divide the intro into different sections.
Making an intro has never been as easy as it is now. Kudos to the programs that are available online as well as offline.
Why You Need a YouTube Intro?
There are many reasons for which you need YouTube intro. Some reasons are mentioned as under for you better understanding.
- It will get you the relevant traffic
The intro will let the users know what your channel is all about. It will, in turn, get you the best and the most relevant leads. If you are running eCommerce business then the intro will get you into the limelight that you deserve.
- It makes a difference
It simply means that you will see a change in traffic as well as in the overall growth of your channel. You will also see the difference in the working of the channel. A good intro will bring in the relevant audience and this, in turn, will make sure that you get new ideas to make your channel stand out.
- Recognition
An intro makes sure that you get the recognition that you desire. It will also make sure that you get the best and the most advanced outcome that is related to your business. Getting recognition is like a dream come true for the vloggers.
It will make sure that the revenue bases, as well as the sales, are increased. The potential customers will only subscribe to your services and channel if your intro is relevant. Also, you need to keep it short and highly targeted.
How to Make Your Own Perfect YouTube Intro Using Filmora?
With the best and the most advanced techniques, Filmora is a program that will let you create the intro which is just awesome. The program is easy to use and will also make sure that you get to know its features in great detail. The interface, as well as the format support, is awesome.
You need not be a tech-savvy person to operate the program as it is self-explanatory. Fimora has been highly regarded as one of the best programs. It is all because of the viability that it provides to its users.
Features of the program
- The program supports a wide range of formats. You can export as well as import files in a wide range of formats.
- The user interface is intuitive and easy to understand. The graphical properties will make sure that you understand the working of it easily.
- There are more than 300 effects on the program that will make sure to get you the specialized experience you want to have with your channel.
- The intro can be directly uploaded to YouTube and there is no need to export and upload separately.
- The tech specialties of the program are highly in line with the current trends. Apart from intro making, there is a wide range of functions that the program can perform.


The Process to create your own YouTube intro by Filmora?
If you want to make intro using Filmora then it is advised to follow the steps as under to get the best outcome.
Step 1: Click on import or import media files on the main interface to make sure that the intro material is imported to the program.

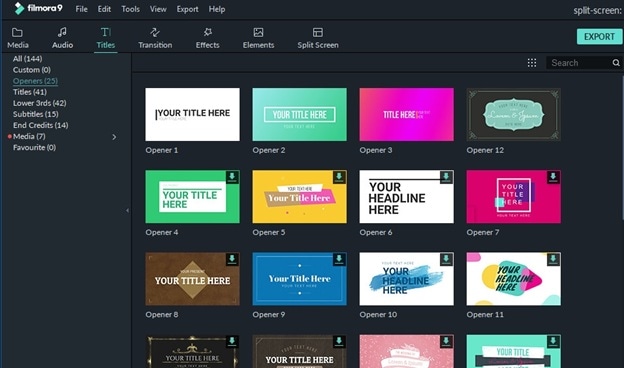
Step 2: Head over to “Title” and you can add them to you YouTube intro with ease:
Step 3: To add opener you need to head to “Opener” under Titles and right-click the one you want to select. Click apply and it will be added to the timeline.
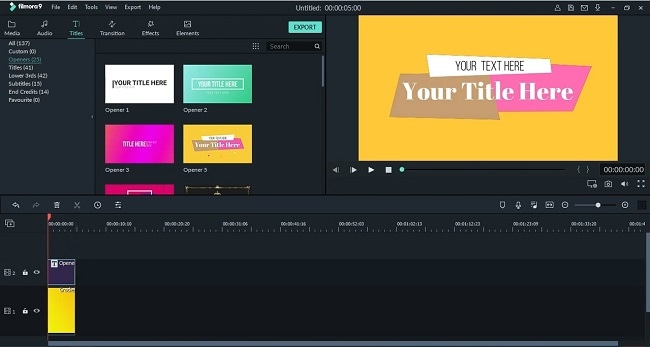
Step 4: You can also change the duration of the title effects. Drag its edge on the timeline you can also click the clock icon and enter new duration.
Step 5: Under the style tab you can change the font, text type, and other settings.

Step 6: To edit the intro, even more, click the “Advanced” button to access the advanced editing panel. Add text boxes, shapes and other effects from here.
Step 7: Under “Effects” you can access the filters and overlays to add to your project.
Step 8: The default length of the filter is 5 seconds that can be extended by dragging its corners on to the timeline.
Step 9: Under the audio heading you can change the volume of the sound of your intro to the level you want.
Step 10: You can also stabilize the video by right-clicking it in the timeline and then going to properties. You will see the stabilization editing panel.
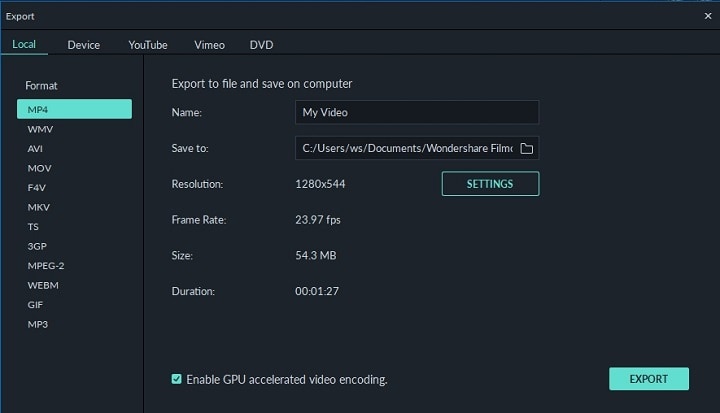
Step 11: Once the editing has been done you just need to click Export on the toolbar. Under the window that appears you can export the intro with respect to device, format, and can also burn it onto the DVD. If you want you can also directly upload the intro to YouTube and other social media platforms.
It’s very easy right? Download Filmora and make a click-driven intro now!
Key Takeaways to Create Great Attractive YouTube Intro
There are certain sections that will make sure that you get the best YouTube intro of all time. It is also important as the intro is regarded as the face of your channel. It will allow you to get the attention for your channel. Some important points are as under.
1. It must be to the point
If you want to impress your audience then remember that you only have 10 – 20 seconds. The longer the intro the bore it is. It must be highly relevant and must make sure that the users get the point of your channel. It will let you thrive a lot.
If for any reason there is an element of confusion within your intro it will never do well. If you want to know how to make an intro for YouTube then it is advised to keep reading on. This article will surely help you a lot.
2. Short means Sweet
The point is that your intro should be to the point. It means that you must never prolong your intro for any reason. Again here comes the element of relevancy.
It means that you must keep your intro as short as possible as it allows you to capture the audience in a far better manner. A short intro will make sure that you are getting the attention that you need when it comes to your channel. So it will boost your channel traffic a lot.
3. It must be in line with your channel theme
Again it is critical that your intro is relevant to your channel. It means that the intro made should represent your channel’s content instead of anything else. It will make sure that you get the best and most relevant audience.
This will once again boost your channel as well as traffic surge will also occur. You will get the best outcome that will make it possible for you to channel the traffic wherever you want. This, in turn, will also boost your channel revenue in case of monetization.
4. Awesome Music
It is the most important part that will impact your YouTube intro. Good music will make sure that you get the best outcome and the users are attracted. There are many YouTube channels that were only recognized as their music was awesome.
5. Clean Visuals
HD and the high quality intro is the key to your channel’s success. It is highly regarded as the best way to attract people. You must spend time to make sure that it looks great and to the point. This is one of the ways to make sure that your intro looks good and awesome.
6. Technically Sound
It is again important to note that technically the intro that has been made is sound and is to the point. From transitions to fade and from animations to PIP there are a lot of details that should be taken care of. It will make sure that you get the intro that is highly professional and specialized.
Popular YouTube Intro Styles and Templates
If you think making a intro yourself is too complex and time-consuming, I also find some popular YouTube intro templates for you. Some of the coolest YouTube intro styles are as follows.
1. Logo and URL Style
This is one of the most common and frequently used YouTube intro style. There are many templates that are associated with it. Some of these are mentioned as under. These effects are mostly used if you are running a tech channel but the use is not limited to this alone.
- Logo & URL Liquid effect Intro Video Template
- Logo Focus Intro Video Template
- Unveiling Logo & URL Intro Video Template
- Logo Sketch Intro Video Template
- Logo Art Intro Video Template
2. Promotional Style
For promotion, there are tons of intros that are available online and anyone can be used. The content creation with such templates is easy. It is because there are many changes that can be done to promote your channel. The best part of these templates is that they are highly customizable.
These templates can also be used to create art for the outros as well that will further solidify the channel. Promoting products at the start and end of the YouTube channel is simply an awesome and fun factor. Some of the coolest templates that can be used in this regard are as follows.
- YouTube Promo Kit by Pixrate
- Broadcast Package by Motionbear
- Typo Opener by BLAQMATRIX
- Promo Intro by 7 Roads
- Upbeat Opener by MBR effects
3. Gaming Intro Styles
It is s well-known fact that the gaming industry is booming. There are literally hundreds of gaming channels on YouTube that are working just awesome. The kiddos are earning are a lot with the channel and the future is also bright.
To get the best gaming intro you need to focus on the outcome on the gaming brand you are trying to promote. Some of the coolest gaming channel intros that could be used to get the work done are as follows.
Conclusion
This article has taught you well how to make an intro with ease and perfection. The different templates are available online which can be used to make awesome YouTube intros. The best software that you can find on the market is the Wondershare Filmora which makes the process a lot easier.
The program is known for the awesome workability as well as viability kudos to the developers of this awesome software. It is also recommended sharing this article on social media such as Facebook and Twitter so that the others can also benefit from it. It will also help others in creating awesome YouTube tutorials.
Richard Bennett
Richard Bennett is a writer and a lover of all things video.
Follow @Richard Bennett
Richard Bennett
Mar 27, 2024• Proven solutions
For a professional presence on YouTube intro is a must. It is for the same reason that how to make an intro is one of the most popular topic now.
It is the impression that will make sure that the users are attracted. The video’s success greatly depends upon the intro as it will allow the users to get the idea.
The good news is that YouTube intro making is not a complex process due to some software and websites offering the services, which we will discuss in this article.
You will learn :
- What Is YouTube Intro?
- Why You Need a YouTube Intro?
- How to Make Your Own Perfect YouTube Intro Easily?
- Key Takeaways to Create Great Attractive YouTube Intro
- Popular YouTube Intro Styles and Templates
Wondershare Filmstock Gaming Video Editing Skils ](https://filmstock.wondershare.com/creative-theme-game?source%5Fchannel=seo%5Farticle?spm=rs.filmora%5Fweb )
What Is YouTube Intro?
YouTube Intro is a short clip at the start of the video that introduces the maker as well as the topic under discussion. It can be rightfully called as the trademark of your channel. The intro tells the user who you really are. This is the only part of the video that is brief and allows the users to get the first impact of you.
There are thousands of software programs and websites that allow you to get breathtaking animated intros. You can use any of the intro templates to make your first impression the best of all. The user will get to know more about you and will also subscribe to your channel.
There are certain creators that divide the intro into different sections.
Making an intro has never been as easy as it is now. Kudos to the programs that are available online as well as offline.
Why You Need a YouTube Intro?
There are many reasons for which you need YouTube intro. Some reasons are mentioned as under for you better understanding.
- It will get you the relevant traffic
The intro will let the users know what your channel is all about. It will, in turn, get you the best and the most relevant leads. If you are running eCommerce business then the intro will get you into the limelight that you deserve.
- It makes a difference
It simply means that you will see a change in traffic as well as in the overall growth of your channel. You will also see the difference in the working of the channel. A good intro will bring in the relevant audience and this, in turn, will make sure that you get new ideas to make your channel stand out.
- Recognition
An intro makes sure that you get the recognition that you desire. It will also make sure that you get the best and the most advanced outcome that is related to your business. Getting recognition is like a dream come true for the vloggers.
It will make sure that the revenue bases, as well as the sales, are increased. The potential customers will only subscribe to your services and channel if your intro is relevant. Also, you need to keep it short and highly targeted.
How to Make Your Own Perfect YouTube Intro Using Filmora?
With the best and the most advanced techniques, Filmora is a program that will let you create the intro which is just awesome. The program is easy to use and will also make sure that you get to know its features in great detail. The interface, as well as the format support, is awesome.
You need not be a tech-savvy person to operate the program as it is self-explanatory. Fimora has been highly regarded as one of the best programs. It is all because of the viability that it provides to its users.
Features of the program
- The program supports a wide range of formats. You can export as well as import files in a wide range of formats.
- The user interface is intuitive and easy to understand. The graphical properties will make sure that you understand the working of it easily.
- There are more than 300 effects on the program that will make sure to get you the specialized experience you want to have with your channel.
- The intro can be directly uploaded to YouTube and there is no need to export and upload separately.
- The tech specialties of the program are highly in line with the current trends. Apart from intro making, there is a wide range of functions that the program can perform.
The Process to create your own YouTube intro by Filmora?
If you want to make intro using Filmora then it is advised to follow the steps as under to get the best outcome.
Step 1: Click on import or import media files on the main interface to make sure that the intro material is imported to the program.
Step 2: Head over to “Title” and you can add them to you YouTube intro with ease:
Step 3: To add opener you need to head to “Opener” under Titles and right-click the one you want to select. Click apply and it will be added to the timeline.
Step 4: You can also change the duration of the title effects. Drag its edge on the timeline you can also click the clock icon and enter new duration.
Step 5: Under the style tab you can change the font, text type, and other settings.
Step 6: To edit the intro, even more, click the “Advanced” button to access the advanced editing panel. Add text boxes, shapes and other effects from here.
Step 7: Under “Effects” you can access the filters and overlays to add to your project.
Step 8: The default length of the filter is 5 seconds that can be extended by dragging its corners on to the timeline.
Step 9: Under the audio heading you can change the volume of the sound of your intro to the level you want.
Step 10: You can also stabilize the video by right-clicking it in the timeline and then going to properties. You will see the stabilization editing panel.
Step 11: Once the editing has been done you just need to click Export on the toolbar. Under the window that appears you can export the intro with respect to device, format, and can also burn it onto the DVD. If you want you can also directly upload the intro to YouTube and other social media platforms.
It’s very easy right? Download Filmora and make a click-driven intro now!
Key Takeaways to Create Great Attractive YouTube Intro
There are certain sections that will make sure that you get the best YouTube intro of all time. It is also important as the intro is regarded as the face of your channel. It will allow you to get the attention for your channel. Some important points are as under.
1. It must be to the point
If you want to impress your audience then remember that you only have 10 – 20 seconds. The longer the intro the bore it is. It must be highly relevant and must make sure that the users get the point of your channel. It will let you thrive a lot.
If for any reason there is an element of confusion within your intro it will never do well. If you want to know how to make an intro for YouTube then it is advised to keep reading on. This article will surely help you a lot.
2. Short means Sweet
The point is that your intro should be to the point. It means that you must never prolong your intro for any reason. Again here comes the element of relevancy.
It means that you must keep your intro as short as possible as it allows you to capture the audience in a far better manner. A short intro will make sure that you are getting the attention that you need when it comes to your channel. So it will boost your channel traffic a lot.
3. It must be in line with your channel theme
Again it is critical that your intro is relevant to your channel. It means that the intro made should represent your channel’s content instead of anything else. It will make sure that you get the best and most relevant audience.
This will once again boost your channel as well as traffic surge will also occur. You will get the best outcome that will make it possible for you to channel the traffic wherever you want. This, in turn, will also boost your channel revenue in case of monetization.
4. Awesome Music
It is the most important part that will impact your YouTube intro. Good music will make sure that you get the best outcome and the users are attracted. There are many YouTube channels that were only recognized as their music was awesome.
5. Clean Visuals
HD and the high quality intro is the key to your channel’s success. It is highly regarded as the best way to attract people. You must spend time to make sure that it looks great and to the point. This is one of the ways to make sure that your intro looks good and awesome.
6. Technically Sound
It is again important to note that technically the intro that has been made is sound and is to the point. From transitions to fade and from animations to PIP there are a lot of details that should be taken care of. It will make sure that you get the intro that is highly professional and specialized.
Popular YouTube Intro Styles and Templates
If you think making a intro yourself is too complex and time-consuming, I also find some popular YouTube intro templates for you. Some of the coolest YouTube intro styles are as follows.
1. Logo and URL Style
This is one of the most common and frequently used YouTube intro style. There are many templates that are associated with it. Some of these are mentioned as under. These effects are mostly used if you are running a tech channel but the use is not limited to this alone.
- Logo & URL Liquid effect Intro Video Template
- Logo Focus Intro Video Template
- Unveiling Logo & URL Intro Video Template
- Logo Sketch Intro Video Template
- Logo Art Intro Video Template
2. Promotional Style
For promotion, there are tons of intros that are available online and anyone can be used. The content creation with such templates is easy. It is because there are many changes that can be done to promote your channel. The best part of these templates is that they are highly customizable.
These templates can also be used to create art for the outros as well that will further solidify the channel. Promoting products at the start and end of the YouTube channel is simply an awesome and fun factor. Some of the coolest templates that can be used in this regard are as follows.
- YouTube Promo Kit by Pixrate
- Broadcast Package by Motionbear
- Typo Opener by BLAQMATRIX
- Promo Intro by 7 Roads
- Upbeat Opener by MBR effects
3. Gaming Intro Styles
It is s well-known fact that the gaming industry is booming. There are literally hundreds of gaming channels on YouTube that are working just awesome. The kiddos are earning are a lot with the channel and the future is also bright.
To get the best gaming intro you need to focus on the outcome on the gaming brand you are trying to promote. Some of the coolest gaming channel intros that could be used to get the work done are as follows.
Conclusion
This article has taught you well how to make an intro with ease and perfection. The different templates are available online which can be used to make awesome YouTube intros. The best software that you can find on the market is the Wondershare Filmora which makes the process a lot easier.
The program is known for the awesome workability as well as viability kudos to the developers of this awesome software. It is also recommended sharing this article on social media such as Facebook and Twitter so that the others can also benefit from it. It will also help others in creating awesome YouTube tutorials.
Richard Bennett
Richard Bennett is a writer and a lover of all things video.
Follow @Richard Bennett
Also read:
- Charting a Path to YouTube Wealth CPM Analysis
- Best Screener Tech Perfect for Creating Viral YouTube Moments
- Joshi's Playbook The Path to Earnings on Youtube
- Discovering Popular Video Threads
- Flashy Fiddles Short Form Melodic Roles
- 2024 Approved Easy Way to Edit YouTube Videos in iMovie
- Essential YouTube Equipment For Starting Your Channel - What Do You Really Need, In 2024
- Boost Your Channel Top 14 Gaming Vids for YouTube Success
- [New] Cutting-Edge 8 Content Creators Skyrocketing Growth
- Channel Your Creativity Convert YouTube Clips Into Dynamic Gifs for 2024
- In 2024, Discover Your Top 10 Choice of Editors for YouTube Short Videos
- Understanding Recent YouTube Financial Policies
- [New] Decoding Dangerous Subscriber Scams Online
- Creating Content with Confidence Free YouTube Training
- The Formula to Fame Elevating Subscriber Numbers on Youtube
- [New] Anonymous Sharing Simplified Blurring Techniques for Videos
- 2024 Approved Essential Tips for FREE YouTube Video Transcriptions
- In 2024, Dodging Doubts A Guide to Vlogging's Most Common Anxieties
- Google Meet on YouTube Streaming Made Easy, Step by Step
- [Updated] Capture, Create, Curate Mobiles in Action for YouTube Thumbnails
- 2024 Approved Dissecting & Defeating Dreadful Greenscreen A Mac Editor's Directive
- [Updated] Charisma in Characters Two Ways to Enliven Text
- Engaging Audiences How-To's for Effective YouTube Logo Creation
- YouTube Profile Picture Templates – Free Downloads
- In 2024, Achieve Sharpness Camera Tips Without a Tripod
- Ultimate Camera Picks for Aspiring YouTubers
- Master Higher Rankings on YT The Best SEO Tips and Tricks (1-11)
- [Updated] Charting the Course From AdSense Income to Savings
- Charting Financial Horizons The Threefold Technique for Analyzing YouTube Earning Data
- [New] Crafting Captivating Content The Power of Hashtagging in Gaming YT
- [Updated] Chart a Course to Popularity The Fundamentals of Channel Featuring on Youtube
- The Blueprint to Establishing a Distinctive Marketing Persona
- Penny-Pinching Picks Microphones Under $50
- [Updated] Cutting-Edge Video Editing in YouTube Studio Explained
- Your Guide to 50 Creative, Free YouTube Advertising Options
- Orderly Path to YouTube's Hidden Treasure Troves
- In 2024, Earn Big on YouTube Shorts Tips for Profitable Content Creation
- In 2024, Beyond Indexation Understanding YouTube's Unlisted Mechanism
- [New] Embedding YT Playlists Seamlessly on Webpages
- 2024 Approved Boost Your Video's Impact with GS and YT Conversion
- Boost Visibility Selecting the Right YouTube Thumbnail Dimensions for 2024
- Top 27 Videosharing Platforms for Non-YouTube Users
- [New] Charting a Path to Profit Calculating Video View Requirements
- 2024 Approved Easy Steps to Save YouTube Videos
- Elite Channel Explorer Discover Prime Video Status for 2024
- Crafting Universal Streams for YouTube & Beyond Networks for 2024
- In 2024, 6 Methods for Switching from Apple iPhone 6 to Samsung | Dr.fone
- Full Guide How To Fix Connection Is Not Private on Infinix Hot 40i | Dr.fone
- New Speeding Up or Slowing Down Footage in Camtasia Made Easy
- [Updated] Discovering the Best in WebCam Videography Tech
- New 5 Essential Strategies for Capturing High-Quality Chromebook Sound
- Updated 2024 Approved Deejay Discovery Compile DJ Beats for Your Playlist
- Reliable User Guide to Fix HTC U23 Running Slow and Freezing | Dr.fone
- Boosting Visual Impact The 11 Best Practices for Color Workflow
- [New] Comprehensive Guide to Exceptional Mobile Screen Capture with Mobizen
- How to Simulate GPS Movement in AR games On Vivo V29e? | Dr.fone
- Crafting Impressive Instagram Story Bokeh Art for 2024
- How To Recover Data from iPhone 8 Plus? | Dr.fone
- [Updated] Best of Mobile #8 Ranked Free & Premium Apps for Android's Video Tiles
- New 2024 Approved Unveiling the Button Tap Acoustic Signature
- How to Resize FLV Videos EfficientlyWindows, Mac, Android, iPhone & Online
- In 2024, 3 Things You Must Know about Fake Snapchat Location On Samsung Galaxy F14 5G | Dr.fone
- [Updated] Audio Quality Boost for Skype Calls for 2024
- [New] Essential Recording Gear for Environmentalists
- New In 2024, Unlock the Power of Polyphonic Automation in Audacity with Free Plugins
- [New] 2024 Approved Navigate & Network Adding Desktop/Mobile Friends
- In 2024, Why Apple Account Disabled On your iPhone 12 Pro Max? How to Fix
- Life360 Learn How Everything Works On Infinix Smart 8 | Dr.fone
- The Ultimate Guide to Unlocking Your iPhone 12 mini on MetroPCS
- In 2024, The Top MKV Video Cutting Software for Mac
- [New] Influencing Instagram Step-by-Step Tutorial
- In 2024, The Magnificent Art of Pokemon Go Streaming On Honor Magic 6 Pro? | Dr.fone
- In 2024, How To Unlock iPhone 14 Plus Without Passcode? 4 Easy Methods
- Advanced Techniques for Educator's Lecture Capture on Mac for 2024
- In 2024, Can You Unlock Apple iPhone 14 Pro Max After Forgetting the Passcode?
- [New] 2024 Approved Instagram Insight Triumph in Transparency with 3 Techniques
- 2024 Approved Creating a Tranquil Auditory Space with Tech
- [New] Win10 Video Capture Pro - Professional Edition for 2024
- Screen Recording Innovations A Comparative Look
- Boost Engagement with Effective Wirecast Broadcasts on FB for 2024
- updated A Brief Review of CapCut Translate With Alternative
- Title: Effortlessly Blend Your YT Video with GS
- Author: Kevin
- Created at : 2024-05-25 15:04:41
- Updated at : 2024-05-26 15:04:41
- Link: https://youtube-videos.techidaily.com/effortlessly-blend-your-yt-video-with-gs/
- License: This work is licensed under CC BY-NC-SA 4.0.
