
:max_bytes(150000):strip_icc()/oldkeyboard01-94cacfa0b7874199899336292b82207f.jpg)
Effortless Video Upload From Apple Devices to YouTube Channel for 2024
Effortless Video Upload From Apple Devices to YouTube Channel
Create High-Quality Video - Wondershare Filmora
An easy and powerful YouTube video editor
Numerous video and audio effects to choose from
Detailed tutorials provided by the official channel
Initially, iOS users had the option to load videos directly to YouTube via the tap-to-upload feature. However, this option is missing in the recent iOS devices versions. Therefore, many users search for possible ways to post a video on YouTube from iPhone. For this, you have to put some considerations into place before moving on. The video title length should not exceed 100 characters, while the description is maintained at 5,000 characters. Also, ensure the video length doesn’t exceed 15 minutes. Let’s roll out the best ways to upload your videos and make that big catch on subscribers.

In this article
01 [ How to upload a video to YouTube from iPhone or iPad](#Part 1)
02 [Why your phone doesn’t post videos to YouTube](#Part 2)
03 [Make your YouTube video better with Filmora](#Part 3)
How to upload a video to YouTube from iPhone or iPad
Are you ready to start on that big adventure and share your videos on YouTube? Follow these steps to learn how to upload a video to YouTube from your iPhone.
Method 1: Upload using the YouTube iOS app
Using the YouTube app is the simplest way to upload your YouTube videos. The YouTube app should be installed on your iOS device.
Step 1. Launch the YouTube app on your device, then sign in to your account. If you don’t have an account yet, you will need to “Sign up” for a new one before continuing the upload process.
Step 2. Click on the “+” icon found at the bottom of the screen.
Step 3. Then choose the “Upload a video” option from the populated list of options.
Step 4. Check out the pop-up that appears and “Allow access” to it.
Step 5. Edit your video to your preference by trimming or cropping as you desire. Then click on the “Next” option.

Step 6. Add “title and description” to your video. Remember, the title should contain less than 100 characters and the description no more than 500 characters.
Step 7. Then set the visibility mode as “Public” to enable you to share your video over the internet.
Step 8. Click on the “Upload” button to finally upload your video to YouTube.

Method 2: Upload using Photo App
The Photo App has a “Share” option that you can use to upload your videos to YouTube. Here is the guide.
Step 1. Go to your iOS device and tap on the “Photos” app.
Step 2. Then tap on the “Videos Folder” to locate the video you wish to upload to YouTube.

Step 3. Next, tap on the video that you want to upload.
Step 4. Then tap on the “Share” icon located at the bottom left of your iOS device screen.
Step 5. You’ll then access a “Share” menu from where you have various share options for your video.
Step 6. Choose the “YouTube” option to continue to share your video there. At this juncture, ensure you have logged in to your Google Account.

Step 7. You need to provide a “Title” and “Description” of your video. Then go to the “Privacy” Options and make your video “Public.”
Step 8. Finally, tap on the “Publish” tab found at the top-right corner of your screen to make your video viewable by the public.

Method 3: Upload video to YouTube using Safari
Safari is another alternative method to upload a video to YouTube.
Step 1. First, go to “youtube.com” on Safari and sign in.

Step 2. Then tap on the “account” icon at the top right side of the screen.
Step 3. Hit on the “Upload” icon and wait to be redirected to the YouTube Studio desktop site.
Step 4. Click on the “Select Files” option.
Step 5. Choose the video you wish to add to YouTube from the “Photo” library and tap on the “Add” button.

Step 6. Add your video’s “title and description” and hit the “Next” button.
Step 7. Tap on the “Next” button once more to go to the “Visibility” page.
Step 8. Select the “Public” option to upload your video to the public.
Why your phone doesn’t post videos to YouTube
Despite learning how to upload to YouTube from iPhone, you may be perplexed to realize that your phone refuses to post videos to YouTube. What could be the reason?
1) YouTube issues
In most cases, the problem doesn’t arise from your phone but from YouTube. This streaming app may also experience some hitches along the way. Remember that even if your phone sync with your YouTube account to upload videos from the “Camera Roll,” YouTube isn’t managed from the Camera Roll but the YouTube app directly. You can solve the issue by signing out of your YouTube account and signing back in.
2) Connection Strength
Some videos may appear quite large and cause a time-out during the upload process. Check your Wi-Fi or internet connection strength to determine if it needs a boost or wait until the streaming strength is strong for a quick upload. Test your internet speed by searching “internet test speed” on Google. Then click the “Run Speed Test” in the search box. A window will open and give you an estimate of the Mbps that your connection is operating at. If too low, switch to other alternatives.
3) Verify your YouTube account
Verifying your account will help you to enjoy YouTube’s full features. It’s then that you’ll manage to upload videos without any drawbacks. Also, that’s when you’ll manage to upload longer videos that go beyond the 15-minute duration.
4) Pay attention to the video size
There is a limit for videos to post to YouTube. If it is too large or long, the upload will cancel before completion.
5) Be patient
YouTube can save your partial upload for 24 hours. So, you can continue to upload from where you left. Learn to be patient as there could be a surge of user traffic, especially during evenings.
Make your YouTube video better with Filmora
Good video quality will make you go miles ahead of your marketing gig. You can use Filmora mobile application to make your videos look better before uploading them to YouTube. This intuitive video editing app has advanced features and several ways to compose creative videos.
- Stunning video effects that let you add animated text to video
- Easily record your voice-overs with its perfect sound effects
- Split functionality that allows you to slice your video footage into two or more separate video clips
- Playback your clips in reverse and adjust the speed for fast or slow motion
- Select the best aspect ratio for your video
- Advanced camera to create emoji selfies and other video beautification
- Directly share your videos to social media sites like YouTube and Facebook.
Check out the steps to edit your video with Filmora on your iOS device
Step 1. Download and install Filmora
For iOS devices, go to the “Apple Store” to download and install the app. Also, allow it to access your videos, camera, and pictures in the process.
Step 2. Import video
You may already have a video in your library that you wish to upload to YouTube. Nonetheless, you can shoot a video afresh to add. To shoot one, you need to settle on a topic before recording and downloading other images you may need. Ensure you watch what you are filming and use adequate lighting during the shooting process.
Next, begin to import your video file. Just open the application and select the “Create new video” option. Then choose the “Video” icon and select a folder that contains the video to be added. Hit the “Add” button from the bottom right corner.
Step 3. Edit video
Filmora has several editing features to make your video better. Use the “Edit tools” feature to turn your video into an impeccable piece. Easily add filters, adjust the speed, or create subtitles, among other functions. You can also split, trim, or delete the unwanted clip parts.
It is important to add a title and description to your video. Just use the “Titles” button to add the title. Other precepts that you can add include transitions, sound like voice-over,
Step 4. Export and share
You’ve just finished creating and editing your video. Click on the “Save” tab and let the application export your video. Then select the “Save to Camera Roll” option to save the video to your iPhone. Finally, you can upload and share the video directly to your YouTube account.
Conclusion
● However, it appears to be a difficult task; you must have found relief after going through these procedures. You don’t need prior knowledge on how to upload a video to YouTube from your iPhone. Several options are at your disposal. You can use the Safari, YouTube app, or the Photo app to upload your videos. The better part is that you can create top-notch videos with Filmora. This mobile video editing app has a lot to offer, ensuring quality content.
Initially, iOS users had the option to load videos directly to YouTube via the tap-to-upload feature. However, this option is missing in the recent iOS devices versions. Therefore, many users search for possible ways to post a video on YouTube from iPhone. For this, you have to put some considerations into place before moving on. The video title length should not exceed 100 characters, while the description is maintained at 5,000 characters. Also, ensure the video length doesn’t exceed 15 minutes. Let’s roll out the best ways to upload your videos and make that big catch on subscribers.
In this article
01 [ How to upload a video to YouTube from iPhone or iPad](#Part 1)
02 [Why your phone doesn’t post videos to YouTube](#Part 2)
03 [Make your YouTube video better with Filmora](#Part 3)
How to upload a video to YouTube from iPhone or iPad
Are you ready to start on that big adventure and share your videos on YouTube? Follow these steps to learn how to upload a video to YouTube from your iPhone.
Method 1: Upload using the YouTube iOS app
Using the YouTube app is the simplest way to upload your YouTube videos. The YouTube app should be installed on your iOS device.
Step 1. Launch the YouTube app on your device, then sign in to your account. If you don’t have an account yet, you will need to “Sign up” for a new one before continuing the upload process.
Step 2. Click on the “+” icon found at the bottom of the screen.
Step 3. Then choose the “Upload a video” option from the populated list of options.
Step 4. Check out the pop-up that appears and “Allow access” to it.
Step 5. Edit your video to your preference by trimming or cropping as you desire. Then click on the “Next” option.
Step 6. Add “title and description” to your video. Remember, the title should contain less than 100 characters and the description no more than 500 characters.
Step 7. Then set the visibility mode as “Public” to enable you to share your video over the internet.
Step 8. Click on the “Upload” button to finally upload your video to YouTube.
Method 2: Upload using Photo App
The Photo App has a “Share” option that you can use to upload your videos to YouTube. Here is the guide.
Step 1. Go to your iOS device and tap on the “Photos” app.
Step 2. Then tap on the “Videos Folder” to locate the video you wish to upload to YouTube.
Step 3. Next, tap on the video that you want to upload.
Step 4. Then tap on the “Share” icon located at the bottom left of your iOS device screen.
Step 5. You’ll then access a “Share” menu from where you have various share options for your video.
Step 6. Choose the “YouTube” option to continue to share your video there. At this juncture, ensure you have logged in to your Google Account.
Step 7. You need to provide a “Title” and “Description” of your video. Then go to the “Privacy” Options and make your video “Public.”
Step 8. Finally, tap on the “Publish” tab found at the top-right corner of your screen to make your video viewable by the public.
Method 3: Upload video to YouTube using Safari
Safari is another alternative method to upload a video to YouTube.
Step 1. First, go to “youtube.com” on Safari and sign in.
Step 2. Then tap on the “account” icon at the top right side of the screen.
Step 3. Hit on the “Upload” icon and wait to be redirected to the YouTube Studio desktop site.
Step 4. Click on the “Select Files” option.
Step 5. Choose the video you wish to add to YouTube from the “Photo” library and tap on the “Add” button.
Step 6. Add your video’s “title and description” and hit the “Next” button.
Step 7. Tap on the “Next” button once more to go to the “Visibility” page.
Step 8. Select the “Public” option to upload your video to the public.
Why your phone doesn’t post videos to YouTube
Despite learning how to upload to YouTube from iPhone, you may be perplexed to realize that your phone refuses to post videos to YouTube. What could be the reason?
1) YouTube issues
In most cases, the problem doesn’t arise from your phone but from YouTube. This streaming app may also experience some hitches along the way. Remember that even if your phone sync with your YouTube account to upload videos from the “Camera Roll,” YouTube isn’t managed from the Camera Roll but the YouTube app directly. You can solve the issue by signing out of your YouTube account and signing back in.
2) Connection Strength
Some videos may appear quite large and cause a time-out during the upload process. Check your Wi-Fi or internet connection strength to determine if it needs a boost or wait until the streaming strength is strong for a quick upload. Test your internet speed by searching “internet test speed” on Google. Then click the “Run Speed Test” in the search box. A window will open and give you an estimate of the Mbps that your connection is operating at. If too low, switch to other alternatives.
3) Verify your YouTube account
Verifying your account will help you to enjoy YouTube’s full features. It’s then that you’ll manage to upload videos without any drawbacks. Also, that’s when you’ll manage to upload longer videos that go beyond the 15-minute duration.
4) Pay attention to the video size
There is a limit for videos to post to YouTube. If it is too large or long, the upload will cancel before completion.
5) Be patient
YouTube can save your partial upload for 24 hours. So, you can continue to upload from where you left. Learn to be patient as there could be a surge of user traffic, especially during evenings.
Make your YouTube video better with Filmora
Good video quality will make you go miles ahead of your marketing gig. You can use Filmora mobile application to make your videos look better before uploading them to YouTube. This intuitive video editing app has advanced features and several ways to compose creative videos.
- Stunning video effects that let you add animated text to video
- Easily record your voice-overs with its perfect sound effects
- Split functionality that allows you to slice your video footage into two or more separate video clips
- Playback your clips in reverse and adjust the speed for fast or slow motion
- Select the best aspect ratio for your video
- Advanced camera to create emoji selfies and other video beautification
- Directly share your videos to social media sites like YouTube and Facebook.
Check out the steps to edit your video with Filmora on your iOS device
Step 1. Download and install Filmora
For iOS devices, go to the “Apple Store” to download and install the app. Also, allow it to access your videos, camera, and pictures in the process.
Step 2. Import video
You may already have a video in your library that you wish to upload to YouTube. Nonetheless, you can shoot a video afresh to add. To shoot one, you need to settle on a topic before recording and downloading other images you may need. Ensure you watch what you are filming and use adequate lighting during the shooting process.
Next, begin to import your video file. Just open the application and select the “Create new video” option. Then choose the “Video” icon and select a folder that contains the video to be added. Hit the “Add” button from the bottom right corner.
Step 3. Edit video
Filmora has several editing features to make your video better. Use the “Edit tools” feature to turn your video into an impeccable piece. Easily add filters, adjust the speed, or create subtitles, among other functions. You can also split, trim, or delete the unwanted clip parts.
It is important to add a title and description to your video. Just use the “Titles” button to add the title. Other precepts that you can add include transitions, sound like voice-over,
Step 4. Export and share
You’ve just finished creating and editing your video. Click on the “Save” tab and let the application export your video. Then select the “Save to Camera Roll” option to save the video to your iPhone. Finally, you can upload and share the video directly to your YouTube account.
Conclusion
● However, it appears to be a difficult task; you must have found relief after going through these procedures. You don’t need prior knowledge on how to upload a video to YouTube from your iPhone. Several options are at your disposal. You can use the Safari, YouTube app, or the Photo app to upload your videos. The better part is that you can create top-notch videos with Filmora. This mobile video editing app has a lot to offer, ensuring quality content.
From Novice to Expert: Setting up a Sports Channel on Mac
How to Create a Sports YouTube Channel on Mac?

Richard Bennett
Dec 14, 2023• Proven solutions
It is no secret that there is a huge audience of sports, including e-sports and gaming, on YouTube who appreciates high-quality content. These viewers are searching for sports YouTubers who create insightful and entertaining content that isn’t only rich in terms of content but production as well. It means that sports channels on YouTube have to rely on special video editing effects to ensure they are delivering what their viewers expect.
That being said, it is usually not easy for aspiring sports YouTubers to start since they have little to no experience when it comes to creating premium sports videos for YouTube. This article will help you out in terms of starting a new YouTube sports channel, especially if you are a mac user.
- Section1. Necessary Elements of a YouTube Sports Channel
- Section2. Must Use Feature for Making a Sports YouTube Channel
- Section3. Which Video Editing Software Has these Features?

Section 1. Necessary Elements of a YouTube Sports Channel
If you want to start a YouTube sports channel, you need to keep in mind that sports videos are fundamentally different from other types of videos. This requires you to have a strong grasp not only on content but video editing as well. Here are some of the top elements that every YouTube sports channel needs.
1.Insightful Producer Perspective
First of all, you should try to have a clear and comprehensive understanding of the sport you are going to talk about on your channel. If you are just an amateur or a casual fan, you will need to do more preparation as a sports YouTuber.

2.Brief and Clear Delivery
The second most important thing is to communicate your perspective in an entertaining, brief, and interactive manner so your viewers remain engaged and keep coming back to your channel. If you fail to communicate properly, your viewers will go somewhere else to watch what they are looking for.
3.Advanced Video Editing
Apart from the content, you need to make yourself familiar with using advanced video editing features such as picture-in-picture, screen recording, and audio recording. These allow you to provide a high-quality viewing experience to your YouTube channel audience.
4.Branded Intro & Outro
You need to set yourself apart with the impactful branding of your sports YouTube channel. It means that the software you are using on your Mac needs to have smart editing features including the ability to add cool intros and outros that become the trademark of your sports channel.
You May Also Like:
- YouTuber Skillshare: Essential Video Cutting Skills For YouTubers>>>
- What is the Best MP4 Cutter for YouTubers On Mac?>>>
Section 2. Must Use Feature for Making a Sports YouTube Channel
There are many features that you may need in your sports content creation. High video quality will bring more views and attract more fans to your YouTube channel. Here are some features you may use in making sports videos.
1. Making a Sports YouTube Channel - Screen Recording
One of the top features that you must use in your sports content creation is screen recording. It is a vital feature for all sports YouTubers and it is used extensively for multiple reasons:
- It gives content creators the ability to give demonstrations in a clear and convenient manner that is easily understandable.
- Screen recording also allows them to create how-to and tutorial videos for games and other sports.
- They can also use this feature to record a video clip that may not be easy to include in the final video.
This feature will give your audience the opportunity to understand your point clearly without having to visualize everything in their heads. Everything you say would be right in front of them in the form of screen recording and they can easily get your perspective.
2. Making a Sports YouTube Channel- Picture in Picture
Another key feature that is widely used by YouTube sports channels is picture-in-picture, especially those who engage in live commentary while the game or match is still being played. As a Mac YouTube channel producer, you must use this feature to gain the following advantages:
- Picture in Picture allows you to stay visible to your audience while commentating or giving your opinion on a game.
- It also provides you with the ability to divert more focus on the game so the bigger part of the screen is dedicated to sports.
- You can also switch between the smaller and bigger video sections when necessary, for example during a break or interval.
- It gives you the opportunity to make your YouTube channel more personalized with your own take on picture-in-picture.
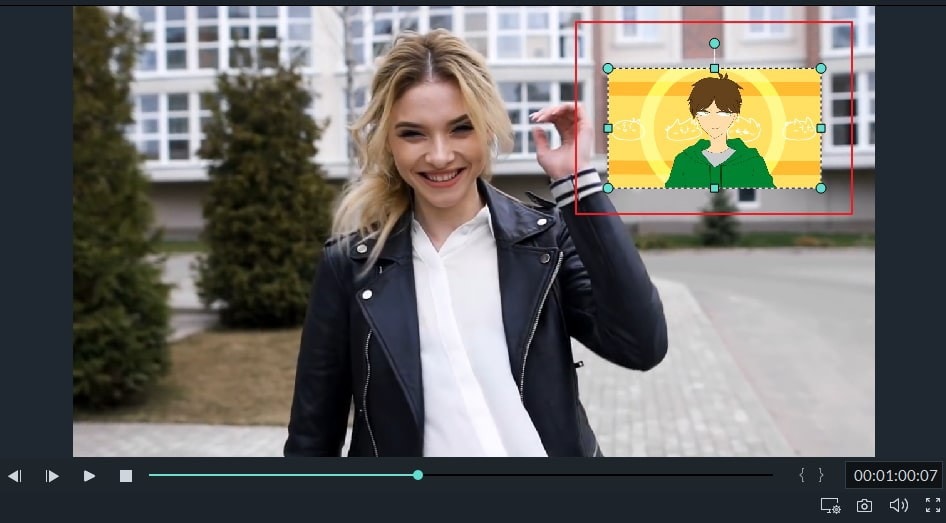
Picture in picture is a great feature for sports YouTubers on Mac as it keeps the video entertaining and personalized. Without using a picture-in-picture feature, you will find it difficult to compete with other sports YouTube channels.
3. Making a Sports YouTube Channel - Audio Recording
There are times when you cannot use the native audio of the sports video and need to add your own. It means that you need to record your own audio file and add it to the video before uploading it to your YouTube channel. This feature allows you to:
- Edit the audio of your sports video to make it more customizable according to your target audience.
- Remove the audio that might cause copyright issues and add your own to ensure your content remains original.
- Add your own remarks, commentary, and opinions in the video in full or in parts to make it more engaging and interactive.
- Make videos where you just need background music and don’t need the original audio such as montages, tributes, etc.


Clear and crisp audio recording is necessary to ensure that the video you upload on your sports YouTube channel is of high quality. Low-quality audio will damage the whole experience and leave a bad taste in the mouth of your viewers.
You May Also Like: Edit Audios in Wondershare Filmora For Mac
Filmstock Stock Media Library ](https://filmstock.wondershare.com/creative-theme-sports?spm=rs.filmora%5Fweb&source%5Fchannel=seo%5Farticle )
Section 3. What Video Editing Software Has these Features?
There are many video editing software applications that enable you to use the above-mentioned features. However, if you are just starting out and want to become a producer of your own YouTube sports channel using Mac, here are some of your options:
1. WonderShare Filmora X - Make sports channel editing easier
If you are just getting ready to do a YouTube sports channel and do not have any experience, Filmora is a good choice. There is no video editing software that provides better value.
This software contains most of the features and functions needed to create sports videos, such as audio and screen recording along with pip capability, and picture-in-picture. You can also use Filmora X to add cool branded intros and outros to customize your sports videos.
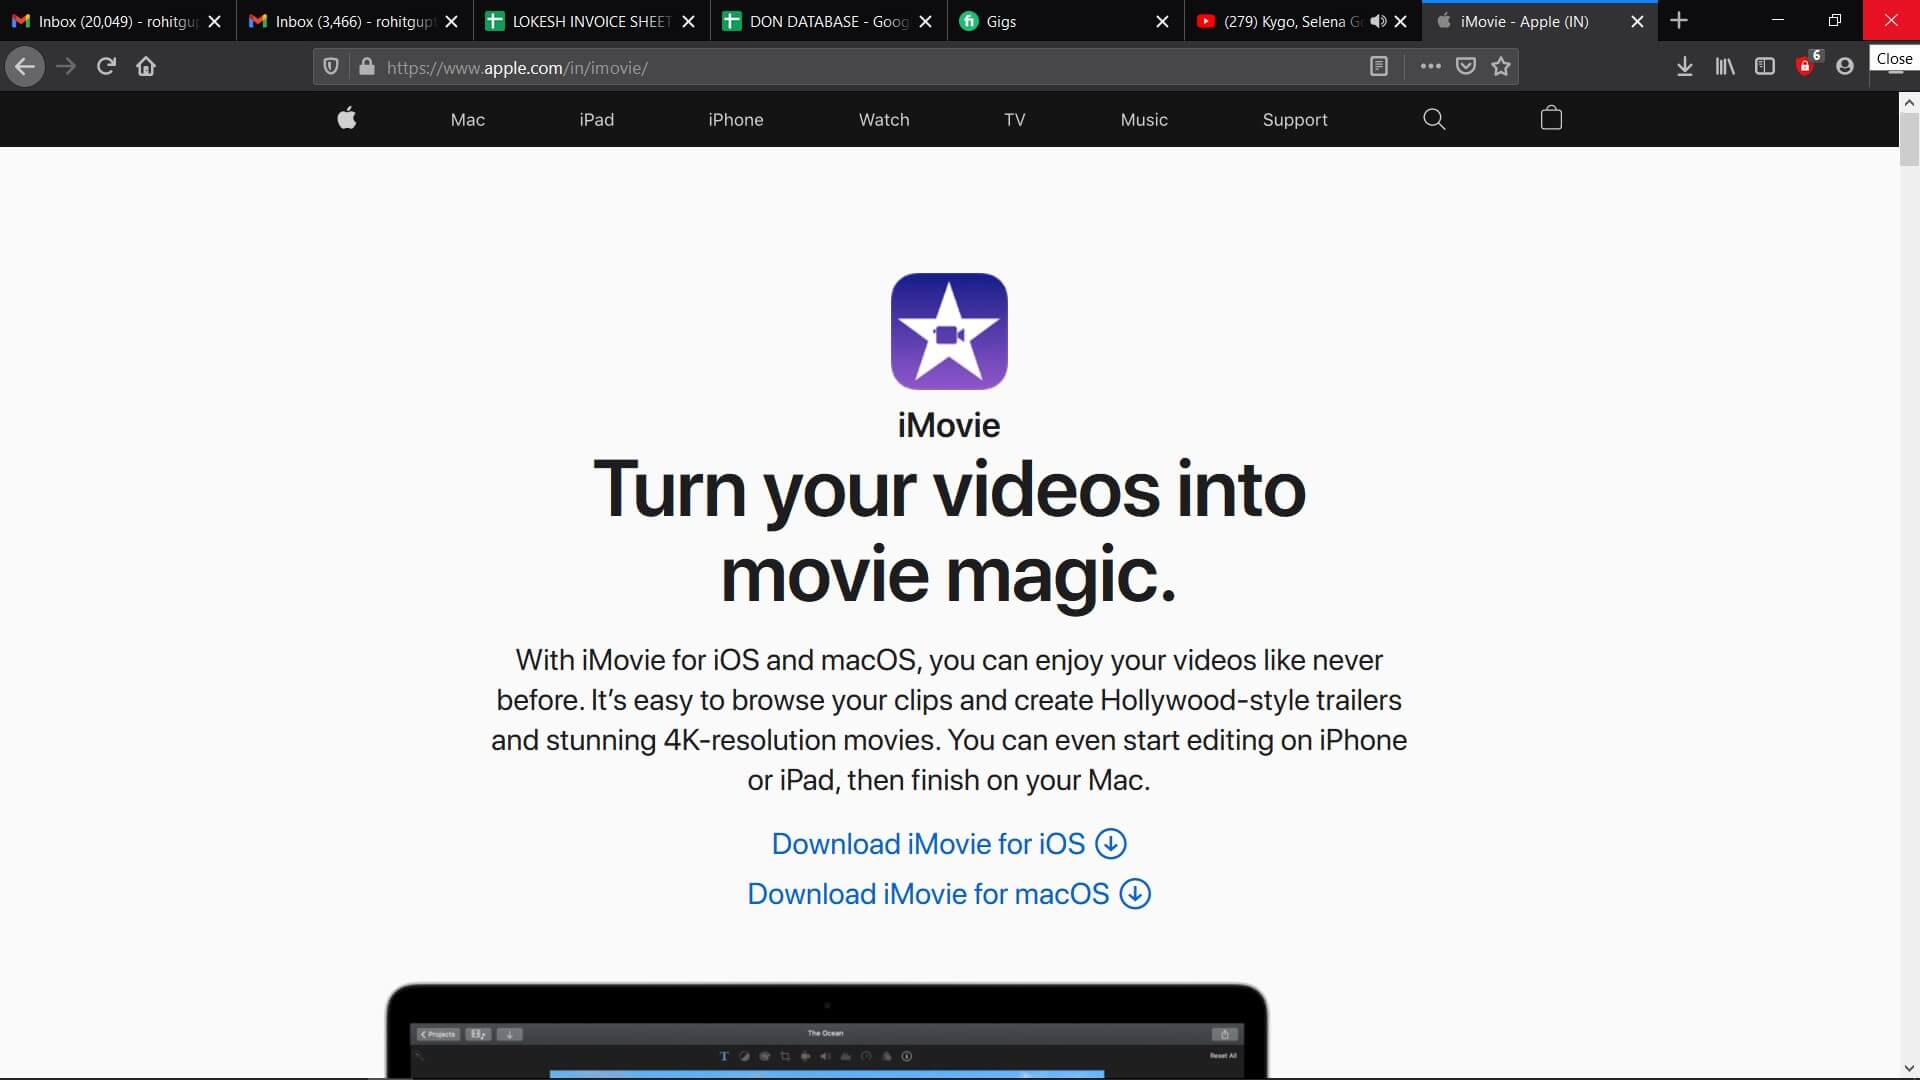
2.iMovie - Build-in software for Mac users
If you don’t want to rely on third-party software, the default built-in video editing software on Mac provides you with the basic editing features you may need.
3.Adobe Premiere Elements - Professional software to edit sport videos
If you want professional-grade software and don’t really care about the price, you can get Adobe Premiere Elements. Keep in mind that it is a highly advanced software for professionals and you may not need a wide variety of features offered here.
Richard Bennett
Richard Bennett is a writer and a lover of all things video.
Follow @Richard Bennett
Richard Bennett
Dec 14, 2023• Proven solutions
It is no secret that there is a huge audience of sports, including e-sports and gaming, on YouTube who appreciates high-quality content. These viewers are searching for sports YouTubers who create insightful and entertaining content that isn’t only rich in terms of content but production as well. It means that sports channels on YouTube have to rely on special video editing effects to ensure they are delivering what their viewers expect.
That being said, it is usually not easy for aspiring sports YouTubers to start since they have little to no experience when it comes to creating premium sports videos for YouTube. This article will help you out in terms of starting a new YouTube sports channel, especially if you are a mac user.
- Section1. Necessary Elements of a YouTube Sports Channel
- Section2. Must Use Feature for Making a Sports YouTube Channel
- Section3. Which Video Editing Software Has these Features?
Section 1. Necessary Elements of a YouTube Sports Channel
If you want to start a YouTube sports channel, you need to keep in mind that sports videos are fundamentally different from other types of videos. This requires you to have a strong grasp not only on content but video editing as well. Here are some of the top elements that every YouTube sports channel needs.
1.Insightful Producer Perspective
First of all, you should try to have a clear and comprehensive understanding of the sport you are going to talk about on your channel. If you are just an amateur or a casual fan, you will need to do more preparation as a sports YouTuber.
2.Brief and Clear Delivery
The second most important thing is to communicate your perspective in an entertaining, brief, and interactive manner so your viewers remain engaged and keep coming back to your channel. If you fail to communicate properly, your viewers will go somewhere else to watch what they are looking for.
3.Advanced Video Editing
Apart from the content, you need to make yourself familiar with using advanced video editing features such as picture-in-picture, screen recording, and audio recording. These allow you to provide a high-quality viewing experience to your YouTube channel audience.
4.Branded Intro & Outro
You need to set yourself apart with the impactful branding of your sports YouTube channel. It means that the software you are using on your Mac needs to have smart editing features including the ability to add cool intros and outros that become the trademark of your sports channel.
You May Also Like:
- YouTuber Skillshare: Essential Video Cutting Skills For YouTubers>>>
- What is the Best MP4 Cutter for YouTubers On Mac?>>>
Section 2. Must Use Feature for Making a Sports YouTube Channel
There are many features that you may need in your sports content creation. High video quality will bring more views and attract more fans to your YouTube channel. Here are some features you may use in making sports videos.
1. Making a Sports YouTube Channel - Screen Recording
One of the top features that you must use in your sports content creation is screen recording. It is a vital feature for all sports YouTubers and it is used extensively for multiple reasons:
- It gives content creators the ability to give demonstrations in a clear and convenient manner that is easily understandable.
- Screen recording also allows them to create how-to and tutorial videos for games and other sports.
- They can also use this feature to record a video clip that may not be easy to include in the final video.
This feature will give your audience the opportunity to understand your point clearly without having to visualize everything in their heads. Everything you say would be right in front of them in the form of screen recording and they can easily get your perspective.
2. Making a Sports YouTube Channel- Picture in Picture
Another key feature that is widely used by YouTube sports channels is picture-in-picture, especially those who engage in live commentary while the game or match is still being played. As a Mac YouTube channel producer, you must use this feature to gain the following advantages:
- Picture in Picture allows you to stay visible to your audience while commentating or giving your opinion on a game.
- It also provides you with the ability to divert more focus on the game so the bigger part of the screen is dedicated to sports.
- You can also switch between the smaller and bigger video sections when necessary, for example during a break or interval.
- It gives you the opportunity to make your YouTube channel more personalized with your own take on picture-in-picture.
Picture in picture is a great feature for sports YouTubers on Mac as it keeps the video entertaining and personalized. Without using a picture-in-picture feature, you will find it difficult to compete with other sports YouTube channels.
3. Making a Sports YouTube Channel - Audio Recording
There are times when you cannot use the native audio of the sports video and need to add your own. It means that you need to record your own audio file and add it to the video before uploading it to your YouTube channel. This feature allows you to:
- Edit the audio of your sports video to make it more customizable according to your target audience.
- Remove the audio that might cause copyright issues and add your own to ensure your content remains original.
- Add your own remarks, commentary, and opinions in the video in full or in parts to make it more engaging and interactive.
- Make videos where you just need background music and don’t need the original audio such as montages, tributes, etc.
Clear and crisp audio recording is necessary to ensure that the video you upload on your sports YouTube channel is of high quality. Low-quality audio will damage the whole experience and leave a bad taste in the mouth of your viewers.
You May Also Like: Edit Audios in Wondershare Filmora For Mac
Filmstock Stock Media Library ](https://filmstock.wondershare.com/creative-theme-sports?spm=rs.filmora%5Fweb&source%5Fchannel=seo%5Farticle )
Section 3. What Video Editing Software Has these Features?
There are many video editing software applications that enable you to use the above-mentioned features. However, if you are just starting out and want to become a producer of your own YouTube sports channel using Mac, here are some of your options:
1. WonderShare Filmora X - Make sports channel editing easier
If you are just getting ready to do a YouTube sports channel and do not have any experience, Filmora is a good choice. There is no video editing software that provides better value.
This software contains most of the features and functions needed to create sports videos, such as audio and screen recording along with pip capability, and picture-in-picture. You can also use Filmora X to add cool branded intros and outros to customize your sports videos.
2.iMovie - Build-in software for Mac users
If you don’t want to rely on third-party software, the default built-in video editing software on Mac provides you with the basic editing features you may need.
3.Adobe Premiere Elements - Professional software to edit sport videos
If you want professional-grade software and don’t really care about the price, you can get Adobe Premiere Elements. Keep in mind that it is a highly advanced software for professionals and you may not need a wide variety of features offered here.
Richard Bennett
Richard Bennett is a writer and a lover of all things video.
Follow @Richard Bennett
Also read:
- How to Convert YouTube Videos to MP3 Songs on Mac-2023 Update
- In 2024, Beyond Simplicity Exploring the Intricacies of YouTube’s View Count Algorithm
- [New] Crafting Intriguing YouTube Intros Without Spending
- [Updated] Achieve Seamless Transitions Premiere Videos on YouTube
- [New] Do Fake Followers Negatively Affect Your Brand?
- Efficient Broadcast Techniques Incorporating YouTube Loops on TV
- Negative Space Creating YouTube Reverse Videos
- [New] Bite-Sized Video Knowledge Now
- 2024 Approved Enhance Thumbnails Captivating Backdrops Magic
- [Updated] Behind the Sequence Celebrating YouTube's Top Cosmetics Artists
- 2024 Approved Best Microphone for YouTubers
- Mastering YouTube Channel Descriptions
- 2024 Approved Craft a Striking Thumbnail for YouTube Videos
- Aspect Ratio Fundamentals for Effective YouTube Content Creation
- Drive More Traffic Effective Strategies for YouTube Outros for 2024
- Content Creator's Arena Vs. Beta Studio Evolutionary Path
- Effortless Offline Viewing How to Save YouTube Videos for iPhone/iPad for 2024
- [New] Crafting Engaging, Extended Videos A YouTube Expert's Guide
- How Much Cash Can You Score for Watching A Million Videos?
- Youtubed Out Today's Most Fondly Watched Tracks
- How to Make YouTube Video The Ultimate Guide
- Parody Playground Top 10 Laugh-Out-Loud Songs
- [Updated] Deciphering Revenue Sharing in YouTube Shorts
- [New] Culinary Callings 30 Unique Show Title Suggestions
- 2024 Approved Amplify Your Earnings Universal Strategies for YouTube Revenue
- Cut Beyond Youtube Unveiling the Top 5 Video Editor Options for 2024
- Video Mastery Start Here - Essential SEO Gadgets
- From Videos to Vault AJay’s Revenue Journey on YouTube
- Unlocking YouTube Chat Insights
- 2024 Approved Chuckle Campaign 7 Ingenious Ideas for Funny YouTube Videos
- Windows Movie Maker A Toolkit for YouTube Videographers
- Channel Name Inspiration Strategies for Success
- In 2024, Crafting Engaging YouTube Beginnings Two Methods
- [New] Essential Economic Education Top 15 YouTube Picks
- In 2024, Cutting-Edge Techniques in Live-Streamed Gaming
- Navigating YouTube Success Through Strategic Studio Use
- [New] 8 Unique Workout Concepts for a Pulse-Raising Video Channel
- Curate Your Learning Best 15 Science YT Experts for 2024
- Building an Online Empire Ramp Up Video Views
- [New] Discover the Power of 5 Editors Beyond Youtube's Boundaries
- Navigating YouTube's Queue with Precision A Comprehensive Tutorial
- In 2024, Vivo X Fold 2 ADB Format Tool for PC vs. Other Unlocking Tools Which One is the Best?
- In 2024, Looking for Exciting Methods to Create Alluring GIFs Worthy of Making a Mass Appeal? Heres All About GIF Design You Will Ever Want to Know and Learn
- Innovative Ways to Record Mobile Content on Android
- 2024 Approved The Expert's Guide to Growing Valheim Crops Successfully
- 2024 Approved Decoding the Complexities of Discord Spoilers for Gamers
- Updated In This Article, I Will Share Top 40 Keyboard Shortcuts for Final Cut Pro and Ive Categorized Them to Make These Easier to Find for 2024
- 2024 Approved Comprehensive Guide to Ice Cream Watching Tools
- [New] Decoding the Top Rival to ShareX for 2024
- Proven Ways to Fix There Was A Problem Parsing the Package on Sony Xperia 1 V | Dr.fone
- In 2024, How to Unlock Vivo Y28 5G Pattern Lock if Forgotten? 6 Ways
- Try This Simple Trick to Make Instant 3D GIF that Pops Out of Your Screen. Here Are a Few Memorable Examples of the Most Popular 3D GIFs
- [Updated] 2024 Approved Integrating Spotify & Discord A Complete Guide
- [New] In 2024, Expert Techniques for High-Quality Xbox Screenshots
- [New] In 2024, Mastering Gaming Nostalgia Discovering The Most Acclaimed GB Console Emulators on PC
- [Updated] Unlock Vimeo's Potential Cutting Edge Video Tools
- [Updated] In 2024, Recording Skype Calls with Ease for Mac and PC Users
- [Updated] Best 8 High-Performance Screenshots for 2024
- [New] In 2024, Breaking Down 2023’S Highest-Viewed Tweets
- Title: Effortless Video Upload From Apple Devices to YouTube Channel for 2024
- Author: Kevin
- Created at : 2024-05-25 15:04:37
- Updated at : 2024-05-26 15:04:37
- Link: https://youtube-videos.techidaily.com/effortless-video-upload-from-apple-devices-to-youtube-channel-for-2024/
- License: This work is licensed under CC BY-NC-SA 4.0.
