
:max_bytes(150000):strip_icc():format(webp)/are-you-really-getting-dolby-atmos-sound-135ec4330d004250883e2acab9423191.jpg)
Effortless iMovie Music Enhancement Using YouTube Songs
Effortless iMovie Music Enhancement Using YouTube Songs
How to Add Music to iMovie from YouTube?

Marion Dubois
Nov 07, 2023• Proven solutions
Adding background music to videos makes the video more unique and interesting to see. iMovie is a professional video editing tool that lets you pimp your videos the way you want it with your desired music and other sound effects. With the introduction of background music, your video would become unique and stand out.
Though it is not easy to find the right music for your background music, YouTube is a good place to search for good sounds. That’s why in this article, we’ll see how to add music to iMovie from YouTube.
- Is It Possible to Add Music to iMovie from YouTube?
- Add YouTube Music to iMovie from iPhone & Mac [All-In-One Platform]
- How to Add Music to iMovie from YouTube on iPhone?
- How to Put Music from YouTube to iMovie on Mac?
Part 1. Is It Possible to Add Music to iMovie from YouTube?
iMovie is a tool developed by Apple for video editing designed to help users create unique, fun videos quickly. This outstanding video editor works only on Apple devices which includes macOS, iOS, and iPadOS. It embodies excellent tools for a media organization, color grading, soundtracks, and green-screen effects for your videos. To crown it all, it supports a few media formats.
If your media source is unavailable on your device, it could be since iMovie doesn’t support the format, or it may be under the protection of Digital Rights Management.
Now, even though you’ve downloaded the songs from YouTube to listen to them offline, you are allowed to stream them within the music player only and not apply them to other media forms.
So, if you want to add YouTube music to iMovie, you must remove the DRM restrictions first before converting the YouTube song to a format supported by iMovie. A professional YouTube music downloader can help you with all of this.
Part 2. Add YouTube Music to iMovie from iPhone & Mac
Here is an all-in-one method that to add a YouTube song to iMovie whether through iPhone or Mac. First, record the YouTube music, then add extracted audio files to iMovie.
Step 1: First download and install Filmora Video Editor from the button below and use the built-in ‘Screen Recorder‘ tool to record the YouTube video/music that you want to rip the audio from.
For Win 7 or later (64-bit)
 Secure Download
For macOS 10.14 or later
Secure Download


Step 2: Import the recorded video to Filmora, right click on the video track and select ‘Detach Audio‘ to seperate the audio track and the video track. Select the audio track and click the ‘Export‘ button to save ripped audio files.
Step 3: And now, you can use the extracted YouTube audio files to iMovie for forther editing. Plus, Filmora Video Editor provides with a music library, where you can choose background music or sound effect for your project according to your needs. It is also an expert in creating videos, worth to have a try!
Tips You May Not Want to Miss
Filmora is the best iMovie alternative on the market, which provides the best methods, tools, and techniques to add music to videos, video cutting easily, joining, inversion, and editing. It allows you to easily make movies, edit audio, apply effects and share your new movies on YouTube, Vimeo, DVD, TV, iPhone, iPad, iPod, etc.
Therefore, if you are using Filmora, adding music to videos is just a piece of cake. Just select the audio clip in the timeline, click the “Video and Audio Effects” button, and go to the “Audio Effects” option. Now you can freely choose any audio effect.
For Win 7 or later (64-bit)
Secure Download
For macOS 10.14 or later
Secure Download
Part 3. How to Add Music to iMovie from YouTube on iPhone?
In this part, let us read the most straightforward tutorial on how to add music from YouTube to iMovie on iPhone.
First Download Music from YouTube on iPhone
Downloading YouTube videos on your iPhone is confusing since Apple provides the apps available in the App store. If you jailbreak your phone, there are various other options, but here’s the simplest way if you don’t want to go that route.
Step 1: Download the app Documents by Readdle.
Step 2: Select the compass icon and go to https://www.videosolo.com/online-video-downloader/

Step 3: Paste a YouTube video link in the text box and select “Download”. After some seconds, the video will decode and produce a list of different output quality and format options.
Step 4: Hit the “Download” on the preferred output option.
Step 5: Enter a name and download location for the video.
Step 6: Hit the Downloads tab in the bottom navigation bar to view your downloaded videos within the Documents app.
Step 7: Go back to the Documents app home screen to save your downloaded video and open your Downloads folder.
Step 8: Look for the video you wish to edit and tap the three dots icon on it.
Step 9: Hit the Share button and then Save Video.
Step 10: You can search the downloaded YouTube videos in the Photos app.
Add Downloaded Music to iMovie
Step 1: Launch iMovie and Create a Project
Open the iMovie app and pick the “+” icon to create a project. Then, select a movie file from the media to which you want to add the music and add it to the created project.
Step2: Create Movie
Immediately the movie is added to the project, click on the “Create Movie”, enhance the quality of your video using any of iMovie’s many themes, and add the correct ambiance. Click on the icon like a gear and toggle “Theme Music”. Now you have to choose the theme you desire for your video.
Step 3: Select My Music
Now, it’s time to add audio of your choice, and if you don’t want to select from your existing collection, tap on the “+” icon below on the left side of your screen. Next, choose “Audio” and then select “My Music”.
Step 4: Select Audio from Playlist
Select from the playlist, artist, individual songs, or select from the albums you already have on your device and click on the “+” icon to add to your video. It is important to note that you cannot add multiple songs at once. Just add and adjust the sound as desired.
Finally, after the song has been added to the video successfully, export it to your gallery using the “Export” button and save it on your phone.

Filmora Video Editor
Best iMovie Alternative - Filmora Video Editor
Filmora Video Editor is an expert in creating and editing videos, it offers a ChatGPT plug-in and AI tools to enhance your creative vision. Make your idea into reality.
Try It Free Try It Free Try It Free Learn More >
Part 4. How to Add Music to iMovie from YouTube on Mac?
It is elementary to use YouTube songs in iMovie on Mac. You can easily drag the YouTube music file into your project from the Finder and the desktop. The YouTube music added into the project timeline behaves differently depending on the place you added them.
Download Music from YouTube on Mac
Various programs and tools can assist you in downloading YouTube videos on a Mac.
A straightforward way is to use the inbuilt screen capture tool of macOS. Hit the Command + Shift + 5 tabs to bring up the screen recording options.
You can either record an entire screen or choose a window and alter the options to add audio from your Mac’s internal microphone.

The ideal tool or app for downloading YouTube videos on Mac in high-tech quality is a 4K Video Downloader.
It’s free for a max of 30 downloads per day, or you can upgrade to one of its premium plans. The software can also download videos in around 8K quality and various other high-tech formats. And 4K Video Downloader can also grab whole playlists of YouTube.
Here’s how to use it:
Step 1: Launch the 4K Video Downloader and open the program.
Step 2: Find a YouTube video and copy the link.
Step 3: Hit the Paste Link button in the menu.
Step 4: Select the Download button after choosing from the list of quality and format options.
Step 5: Download the video and then click the three-dot icon, so you can play.
How to Add Music to iMovie
Step 1: Add YouTube Music to the Clip
To add a YouTube music file to a particular video clip, drag the YouTube music file under the video clip so that a bar appears. Next, release the button when you see the green “Add” symbol to set the music as a background song in your iMovie project.
To add a YouTube music file to the iMovie project: drag and drop the YouTube music file to your project, release the mouse button once you see the green color. Add a symbol to add a YouTube song to the iMovie project as background music.
Step 2: Add YouTube Music File to the iMovie Project
Just drag and drop the YouTube video file to your project. Then, release the button once you see the green “Add” sign to add background music from the YouTube file to your project.
Conclusion
So, guys, now, can you add music from YouTube to iMovie? I’m pretty sure you have a positive answer as you saw how to add music to iMovie from YouTube using a simple step method. Moreover, have fun and create magic with your discovery of Filmora Video Editor , as it allows you to explore its numerous features to make a movie.
For Win 7 or later (64-bit)
Secure Download
For macOS 10.14 or later
Secure Download
Marion Dubois
Marion Dubois is a writer and a lover of all things video.
Follow @Marion Dubois
Marion Dubois
Nov 07, 2023• Proven solutions
Adding background music to videos makes the video more unique and interesting to see. iMovie is a professional video editing tool that lets you pimp your videos the way you want it with your desired music and other sound effects. With the introduction of background music, your video would become unique and stand out.
Though it is not easy to find the right music for your background music, YouTube is a good place to search for good sounds. That’s why in this article, we’ll see how to add music to iMovie from YouTube.
- Is It Possible to Add Music to iMovie from YouTube?
- Add YouTube Music to iMovie from iPhone & Mac [All-In-One Platform]
- How to Add Music to iMovie from YouTube on iPhone?
- How to Put Music from YouTube to iMovie on Mac?
Part 1. Is It Possible to Add Music to iMovie from YouTube?
iMovie is a tool developed by Apple for video editing designed to help users create unique, fun videos quickly. This outstanding video editor works only on Apple devices which includes macOS, iOS, and iPadOS. It embodies excellent tools for a media organization, color grading, soundtracks, and green-screen effects for your videos. To crown it all, it supports a few media formats.
If your media source is unavailable on your device, it could be since iMovie doesn’t support the format, or it may be under the protection of Digital Rights Management.
Now, even though you’ve downloaded the songs from YouTube to listen to them offline, you are allowed to stream them within the music player only and not apply them to other media forms.
So, if you want to add YouTube music to iMovie, you must remove the DRM restrictions first before converting the YouTube song to a format supported by iMovie. A professional YouTube music downloader can help you with all of this.
Part 2. Add YouTube Music to iMovie from iPhone & Mac
Here is an all-in-one method that to add a YouTube song to iMovie whether through iPhone or Mac. First, record the YouTube music, then add extracted audio files to iMovie.
Step 1: First download and install Filmora Video Editor from the button below and use the built-in ‘Screen Recorder‘ tool to record the YouTube video/music that you want to rip the audio from.
For Win 7 or later (64-bit)
Secure Download
For macOS 10.14 or later
Secure Download
Step 2: Import the recorded video to Filmora, right click on the video track and select ‘Detach Audio‘ to seperate the audio track and the video track. Select the audio track and click the ‘Export‘ button to save ripped audio files.
Step 3: And now, you can use the extracted YouTube audio files to iMovie for forther editing. Plus, Filmora Video Editor provides with a music library, where you can choose background music or sound effect for your project according to your needs. It is also an expert in creating videos, worth to have a try!
Tips You May Not Want to Miss
Filmora is the best iMovie alternative on the market, which provides the best methods, tools, and techniques to add music to videos, video cutting easily, joining, inversion, and editing. It allows you to easily make movies, edit audio, apply effects and share your new movies on YouTube, Vimeo, DVD, TV, iPhone, iPad, iPod, etc.
Therefore, if you are using Filmora, adding music to videos is just a piece of cake. Just select the audio clip in the timeline, click the “Video and Audio Effects” button, and go to the “Audio Effects” option. Now you can freely choose any audio effect.
For Win 7 or later (64-bit)
Secure Download
For macOS 10.14 or later
Secure Download
Part 3. How to Add Music to iMovie from YouTube on iPhone?
In this part, let us read the most straightforward tutorial on how to add music from YouTube to iMovie on iPhone.
First Download Music from YouTube on iPhone
Downloading YouTube videos on your iPhone is confusing since Apple provides the apps available in the App store. If you jailbreak your phone, there are various other options, but here’s the simplest way if you don’t want to go that route.
Step 1: Download the app Documents by Readdle.
Step 2: Select the compass icon and go to https://www.videosolo.com/online-video-downloader/
Step 3: Paste a YouTube video link in the text box and select “Download”. After some seconds, the video will decode and produce a list of different output quality and format options.
Step 4: Hit the “Download” on the preferred output option.
Step 5: Enter a name and download location for the video.
Step 6: Hit the Downloads tab in the bottom navigation bar to view your downloaded videos within the Documents app.
Step 7: Go back to the Documents app home screen to save your downloaded video and open your Downloads folder.
Step 8: Look for the video you wish to edit and tap the three dots icon on it.
Step 9: Hit the Share button and then Save Video.
Step 10: You can search the downloaded YouTube videos in the Photos app.
Add Downloaded Music to iMovie
Step 1: Launch iMovie and Create a Project
Open the iMovie app and pick the “+” icon to create a project. Then, select a movie file from the media to which you want to add the music and add it to the created project.
Step2: Create Movie
Immediately the movie is added to the project, click on the “Create Movie”, enhance the quality of your video using any of iMovie’s many themes, and add the correct ambiance. Click on the icon like a gear and toggle “Theme Music”. Now you have to choose the theme you desire for your video.
Step 3: Select My Music
Now, it’s time to add audio of your choice, and if you don’t want to select from your existing collection, tap on the “+” icon below on the left side of your screen. Next, choose “Audio” and then select “My Music”.
Step 4: Select Audio from Playlist
Select from the playlist, artist, individual songs, or select from the albums you already have on your device and click on the “+” icon to add to your video. It is important to note that you cannot add multiple songs at once. Just add and adjust the sound as desired.
Finally, after the song has been added to the video successfully, export it to your gallery using the “Export” button and save it on your phone.
Filmora Video Editor
Best iMovie Alternative - Filmora Video Editor
Filmora Video Editor is an expert in creating and editing videos, it offers a ChatGPT plug-in and AI tools to enhance your creative vision. Make your idea into reality.
Try It Free Try It Free Try It Free Learn More >
Part 4. How to Add Music to iMovie from YouTube on Mac?
It is elementary to use YouTube songs in iMovie on Mac. You can easily drag the YouTube music file into your project from the Finder and the desktop. The YouTube music added into the project timeline behaves differently depending on the place you added them.
Download Music from YouTube on Mac
Various programs and tools can assist you in downloading YouTube videos on a Mac.
A straightforward way is to use the inbuilt screen capture tool of macOS. Hit the Command + Shift + 5 tabs to bring up the screen recording options.
You can either record an entire screen or choose a window and alter the options to add audio from your Mac’s internal microphone.
The ideal tool or app for downloading YouTube videos on Mac in high-tech quality is a 4K Video Downloader.
It’s free for a max of 30 downloads per day, or you can upgrade to one of its premium plans. The software can also download videos in around 8K quality and various other high-tech formats. And 4K Video Downloader can also grab whole playlists of YouTube.
Here’s how to use it:
Step 1: Launch the 4K Video Downloader and open the program.
Step 2: Find a YouTube video and copy the link.
Step 3: Hit the Paste Link button in the menu.
Step 4: Select the Download button after choosing from the list of quality and format options.
Step 5: Download the video and then click the three-dot icon, so you can play.
How to Add Music to iMovie
Step 1: Add YouTube Music to the Clip
To add a YouTube music file to a particular video clip, drag the YouTube music file under the video clip so that a bar appears. Next, release the button when you see the green “Add” symbol to set the music as a background song in your iMovie project.
To add a YouTube music file to the iMovie project: drag and drop the YouTube music file to your project, release the mouse button once you see the green color. Add a symbol to add a YouTube song to the iMovie project as background music.
Step 2: Add YouTube Music File to the iMovie Project
Just drag and drop the YouTube video file to your project. Then, release the button once you see the green “Add” sign to add background music from the YouTube file to your project.
Conclusion
So, guys, now, can you add music from YouTube to iMovie? I’m pretty sure you have a positive answer as you saw how to add music to iMovie from YouTube using a simple step method. Moreover, have fun and create magic with your discovery of Filmora Video Editor , as it allows you to explore its numerous features to make a movie.
For Win 7 or later (64-bit)
Secure Download
For macOS 10.14 or later
Secure Download
Marion Dubois
Marion Dubois is a writer and a lover of all things video.
Follow @Marion Dubois
Pioneer the Future of YouTube Content with TubeBuddy
The Benefits of TubeBuddy | Manage Your YouTube Channel More Easily

Richard Bennett
Nov 01, 2022• Proven solutions
TubeBuddy is a YouTube certified extension for your Google Chrome browser. When you visit YouTube after installing TubeBuddy a whole new set of useful tools becomes available.
TubeBuddy’s tools were designed to save you time and effort when performing some of the more mundane tasks involved in running a YouTube channel, like adding cards. Many of TubeBuddy’s tools are completely free to use, but others might require a paid license. There are three levels of licensing: $9, $19, or $39 per month.
The Benefits of Using TubeBuddy for YouTube
- Increased Productivity
- Bulk Tools for Annotations, Cards, Thumbnails and More
- Quick Optimization for Your Video’s Tags
- Useful Data
Benefits of TubeBuddy
YouTubers who use TubeBuddy are able to spend less time on busy-work and more time on coming up with creative video ideas. Here are some of the ways TubeBuddy can help you, especially if you have a large or mid-sized channel:
1. Increased Productivity
Most of TubeBuddy’s Productivity Tools are available for free, but some require a $9 per month Pro license.
You can use these tools to get your videos ready for posting faster, embed them off-YouTube more easily, and save time by creating canned responses or templates for cards and annotations.
For example, you might find yourself creating the same YouTube Card over and over again to include it in every video you make. Creating a template through TubeBuddy will save you this effort.
Another great productivity tool is the Video Topic Planner. You can save video ideas you come up with, or ideas viewers have suggested to you, and arrange them in a queue so you never forget what you are planning to make next.
2. Bulk Tools for Annotations, Cards, Thumbnails and More
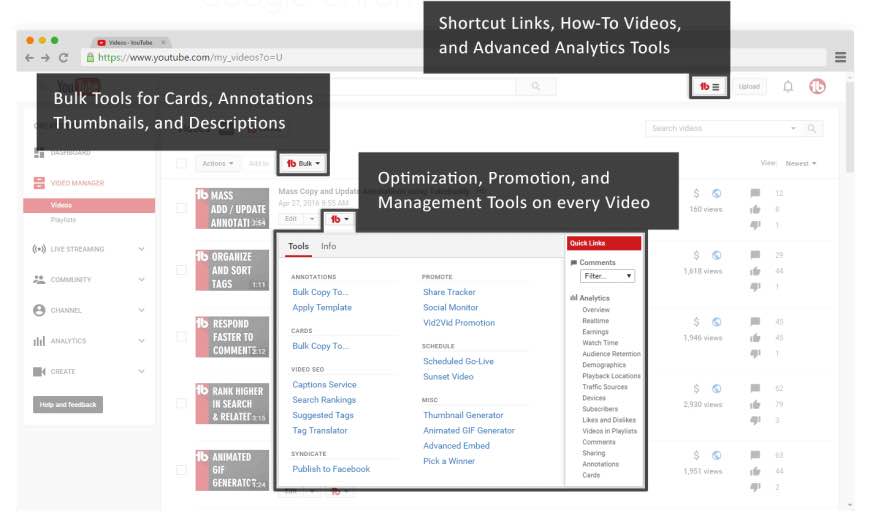
Most of TubeBuddy’s bulk processing tools require a $19 per month Star license.
Two of the most time-saving tools in this section are the Bulk Copy tools for cards and annotations. They will save you from having to recreate the same ones over and over. Then, using the Bulk Update tools, you will be able to make changes to all of your cards or annotations at once.
For example: if you use a YouTube Card to link to your personal website and include it in every video, and then you change your website, you change the link in all of your existing cards at once.
Another useful Bulk tool is Bulk Thumbnail Overlays, which will allow you to add a logo to all of your existing video thumbnails at once.
3. Quick Optimization for Your Video’s Tags
The SEO Tools in TubeBuddy will help you find the best tags for your videos and suggest tags you might want to target. Many of these tools are free, but others require a $19 Star license.
One of the best free tools in this category is View and Copy Video Tags. It allows you to see and copy the tags of other people’s videos. You will be able to see which keywords your competitors are targeting (and look for opportunities to target them more effectively). This can also save you a lot of time writing out tags that should really be the same as the ones on an existing video.
4. Useful Data
The most useful piece of data under Data and Research Tools is the Best Time to Publish. How many views you get on a video could vary greatly depending on when you post, and the best times to post vary depending on the demographics of your audience. This free tool from TubeBuddy will show you when you should be uploading.
Another interesting tool, which is unfortunately only available with $39 licenses, is the Competitor Scoreboard. It allows creators to compare their channels stats to those of their rival channels.
Have you ever tried TubeBuddy for YouTube?
Richard Bennett
Richard Bennett is a writer and a lover of all things video.
Follow @Richard Bennett
Richard Bennett
Nov 01, 2022• Proven solutions
TubeBuddy is a YouTube certified extension for your Google Chrome browser. When you visit YouTube after installing TubeBuddy a whole new set of useful tools becomes available.
TubeBuddy’s tools were designed to save you time and effort when performing some of the more mundane tasks involved in running a YouTube channel, like adding cards. Many of TubeBuddy’s tools are completely free to use, but others might require a paid license. There are three levels of licensing: $9, $19, or $39 per month.
The Benefits of Using TubeBuddy for YouTube
- Increased Productivity
- Bulk Tools for Annotations, Cards, Thumbnails and More
- Quick Optimization for Your Video’s Tags
- Useful Data
Benefits of TubeBuddy
YouTubers who use TubeBuddy are able to spend less time on busy-work and more time on coming up with creative video ideas. Here are some of the ways TubeBuddy can help you, especially if you have a large or mid-sized channel:
1. Increased Productivity
Most of TubeBuddy’s Productivity Tools are available for free, but some require a $9 per month Pro license.
You can use these tools to get your videos ready for posting faster, embed them off-YouTube more easily, and save time by creating canned responses or templates for cards and annotations.
For example, you might find yourself creating the same YouTube Card over and over again to include it in every video you make. Creating a template through TubeBuddy will save you this effort.
Another great productivity tool is the Video Topic Planner. You can save video ideas you come up with, or ideas viewers have suggested to you, and arrange them in a queue so you never forget what you are planning to make next.
2. Bulk Tools for Annotations, Cards, Thumbnails and More
Most of TubeBuddy’s bulk processing tools require a $19 per month Star license.
Two of the most time-saving tools in this section are the Bulk Copy tools for cards and annotations. They will save you from having to recreate the same ones over and over. Then, using the Bulk Update tools, you will be able to make changes to all of your cards or annotations at once.
For example: if you use a YouTube Card to link to your personal website and include it in every video, and then you change your website, you change the link in all of your existing cards at once.
Another useful Bulk tool is Bulk Thumbnail Overlays, which will allow you to add a logo to all of your existing video thumbnails at once.
3. Quick Optimization for Your Video’s Tags
The SEO Tools in TubeBuddy will help you find the best tags for your videos and suggest tags you might want to target. Many of these tools are free, but others require a $19 Star license.
One of the best free tools in this category is View and Copy Video Tags. It allows you to see and copy the tags of other people’s videos. You will be able to see which keywords your competitors are targeting (and look for opportunities to target them more effectively). This can also save you a lot of time writing out tags that should really be the same as the ones on an existing video.
4. Useful Data
The most useful piece of data under Data and Research Tools is the Best Time to Publish. How many views you get on a video could vary greatly depending on when you post, and the best times to post vary depending on the demographics of your audience. This free tool from TubeBuddy will show you when you should be uploading.
Another interesting tool, which is unfortunately only available with $39 licenses, is the Competitor Scoreboard. It allows creators to compare their channels stats to those of their rival channels.
Have you ever tried TubeBuddy for YouTube?
Richard Bennett
Richard Bennett is a writer and a lover of all things video.
Follow @Richard Bennett
Also read:
- Charting the Financial Pathway of TSeries Within YouTube Market Space for 2024
- [Updated] Crafting Competitive Edge Assessing Personal and Marketplace Videos
- [New] Constructing Inquiry Curtain Closers
- Skyrocket Viewer Numbers with the Top 12 Effective Tactics
- [Updated] Channel Success Strategies A Comprehensive Guide to Spotlighting
- Effortless Shuffle of Your YouTube Playlists
- [New] Download Your Favorite Videos Without Limits
- [Updated] Banishing Blackout Blues From YouTube Videos
- Start Streaming Sports A Mac-Based Channel Guide
- Visual Producer Hub
- Assessing Your Video Streaming Needs To Subscribe or Not to Subscribe, In 2024
- EditMelodiesPC Top Video & Music Pairing Software for 2024
- [Updated] Cutting-Edge Design Top 5 3D Intro Makers
- 2024 Approved How to Download Part of a YouTube Videos?
- Secrets of Saving Youtube Thumbnails in Various Formats
- The Real Score of YouTube Video Success Beyond Basic View Counts
- Elevate Your YouTube Content SEO Methods Revealed
- How To Restore Missing Messages Files from Y100i
- [Updated] Precision and Power Leading Kung Fu VR Titles for 2024
- [New] BENQ BL2711U 27” Professional 4K Monitor Review
- Updated In 2024, Smoother Skin in Minutes A Plugin-Free FCPX Editing Technique
- Updated 2024 Approved Melodic Monarchs An Exclusive Array of Free Royalty-Free Piano Music for the Art of Filmmaking and Editing
- 2024 Approved Crafting Star-Stirred Stories for Your WhatsApp Bio
- Become an Audio Trailblazer – Exclusive Vocal Change Techniques in Free Fire (Free) for 2024
- Comprehensive Review of Non-Google Augmented Reality Accessories
- Prime 17 Solutions for Removing Picture Outlines
- Hide location on Apple iPhone 15 Plus and Android without others knowing | Dr.fone
- Essential Tips for Optimal Screen Recording With ShowMore
- 11 Ways to Fix it When My Motorola Edge 40 Pro Wont Charge | Dr.fone
- Title: Effortless iMovie Music Enhancement Using YouTube Songs
- Author: Kevin
- Created at : 2024-05-25 15:04:25
- Updated at : 2024-05-26 15:04:25
- Link: https://youtube-videos.techidaily.com/effortless-imovie-music-enhancement-using-youtube-songs/
- License: This work is licensed under CC BY-NC-SA 4.0.
