
:max_bytes(150000):strip_icc()/MetrobyT-Mobilelogo-43185fc123d54b1fa301b05f4c01e173.jpg)
"Download YouTube Tunes with These 10+ No-Cost Audio Crackers for 2024"
Download YouTube Tunes with These 10+ No-Cost Audio Crackers
11 FREE YouTube Audio Rippers to Download Audio from YouTube

Shanoon Cox
Mar 27, 2024• Proven solutions
YouTube audio ripper is an application or web tool that lets you download the background audio of any particular video. It is free and easy to use and allows us to download audio from YouTube without any hassle.
We can download MP3, MP4, and many other popular formats. You can use a YouTube music ripper to download videos for offline listening or use it in any of your customized videos as background audio.
In this article, we are going to discuss briefly the 11 best YouTube music rippers that can be used to extract audio from YouTube.
Note: We resolutely oppose all forms of copyright-infringing downloads. This tutorial is only for downloading YouTube videos/audio materials from your own channel.
Part 1: Top 11 YouTube Audio Rippers to Download YouTube Audio
Here are some of the best and most commonly used YouTube audio ripper tools to convert and extract audio from YouTube videos. Read ahead and choose the best that is suitable according to your needs.
| 1 - Filmora YouTube Audio Ripper | 2 - Ytmp3 Converter | 3 - YouTube to MP3 Music |
|---|---|---|
| 4 - Yt1s.com | 5 - 320YTMp3 | 6 - Clickmp3 |
| 7 - Converto.io | 8 - Loader.to | 9 - Flv2mp3 |
| 10 - Ontiva | 11 - Y2mate |
1. Filmora YouTube Audio Ripper
Filmora YouTube Audio Ripper is the best audio ripper to achieve YouTube audio downloads. You only need 2 steps to extract audio files from any video including YouTube, with the highest audio quality. Plus, Filmora owns plenty of AI editing tools to help you upgrade and polish your media files.
For Win 7 or later (64-bit)
 Secure Download
For macOS 10.14 or later
Secure Download


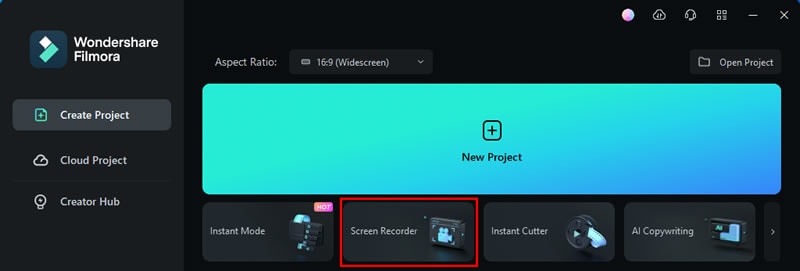
Step 1: First, download Filmora Video Editor from the button above and launch it. Click the ‘Screen Recorder‘ feature to record the screen. You can play YouTube Music or video in the background, then stop recording while the music finishes playing.
Step 2: Drag and drop the recording file to the timelime, click on the video track and select ‘Detach Audio‘ to extract audio track from recorded YouTube video/music. Then choose the audio track and click the ‘Export‘ button to save ripped audio files.
Here are more features of Filmora YouTube Audio Ripper:
- Download and record video or audio from YouTube or any other website.
- Easily edit video and audio with multiple AI tools.
- Offer popular effects, filters and stickers to make your video professional.
- Export video and audio with multiple formats, share on social media directly.
For Win 7 or later (64-bit)
Secure Download
For macOS 10.14 or later
Secure Download
2. Ytmp3 Converter
Ytmp3 Converter is a free and online YouTube audio ripper that will allow us to extract audio from YouTube video easily within a couple of minutes and does not require any software registration or installation. To convert a video, you simply need to copy the URL of the desired YouTube video, paste the copied URL in the address bar of the YouTube music ripper tool, choose a format and click the convert button. Once the video is converted and completed, you can download it by clicking the download button and enjoy your music in high-quality MP3 or MP4 format. It only has a single limitation that the video cannot be of more than 90 minutes for easy and quick conversion.
3. YouTube to MP3 Music
YouTube to MP3 Music is another leading YouTube music ripper tool that allows us to extract audio from YouTube video within few seconds. This YouTube audio ripper tool supports high-quality MP3 files up to 320 kbps. It supports multiple platforms, including Windows, Mac, Android, and iPhone. This tool does not require any installation. It has an amazing feature that other YouTube music ripper might not have and that it also supports video search by keyword and YouTube playlist and can even upload the file to the DropBox or Google Drive after it is converted.
4. Yt1s.com
Yt1s.com is a fast, safe, and very easy-to-use YouTube audio ripper tool that converts YouTube to MP3. You can extract audio from YouTube and download it for offline use. It does not have any limitations, so you can download as many videos as you want. It is completely safe and secure and has no virus as it is under the intense supervision of professionals. By using this YouTube music ripper, you can convert audio files in many different formats such as MP3, MP4, 3GP, M4A, and many more in the best quality available.
Try Filmora to Download YouTube Audio and Free Edit with AI!
Filmora YouTube Audio Ripper can easily download and extract audio from YouTube Video & Music with the original high quality. What’s more, it owns multiple AI tools for helping you edit audio and video for free. You can edit the soundtrack or mix the song if needed. Then you can share it with your friends or upload it to YouTube and other social media directly and gain more views!
Download and Edit YouTube Audio Download and Edit YouTube Audio Learn More >
5. 320YTMp3
320YTMp3 enables us to freely download audio from YouTube without any download limitation. It allows us to extract audio from YouTube in high-quality formats of Mp3, MP4, etc. This YouTube audio ripper is compatible with all the latest browsers and can extract audio from YouTube and other 1000+ popular sites. It includes three easy steps to convert audio to MP3. Just copy the video URL and paste that into the search box, and press the search button, now choose the MP3 quality and download your desired audio.
6. Clickmp3
Clickmp3 is a professional YouTube audio ripper tool that downloads high-quality MP3 files from YouTube within 5 seconds which usually might take up to several minutes. It is free to use and does not need any registration or browser extension. It is compatible with all platforms, devices, and operating systems. This YouTube music ripper does not contain any ads that might distract your conversion and is also completely safe from viruses that might infect your system. Click mp3 also offer unlimited downloads of YouTube video and duration limit.
7. Converto.io
Converto.io is an online music ripper tool that extract audio from YouTube videos. It is hundred percent free, fast, and easy to use. Through this YouTube audio ripper, you can download any video to MP3 or MP4 format. Simply copy the YouTube URL, paste the URL on Converto.io and click the convert button. This Converto.io also allows us to edit the filename, ID tags and select the part of the video that you want to cut or change by clicking the settings button. This YouTube audio ripper also provides a feature to add a cover to all the MP3s of your music collection.
8. Loader.to
Loader.to is one of the best YouTube audio ripper converters that enables us to download YouTube videos or even complete playlists. This YouTube music ripper is extremely easy and is user-friendly. By using Loader.io, you can not only extract audio from YouTube but also can convert the videos into many audio and video formats such as MP3, MP4, WAV, 4K, 8K, etc. Another feature of this tool is that you can convert and download one video at a time but can also convert an entire playlist at high speed. Loader.io also guarantees security while using this online tool and is trusted to provide reliable and smooth service.

Filmora YouTube Audio Ripper & Editor
Extract YouTube Audio and Edit with AI
Rip audio or video from YouTube with Filmora’s built-in screen recorder function. Edit YouTube audio & videos with the latest AI tools to enhance your creative vision. Upgrade your video and audio to get more attention.
Rip YouTube Audio Rip YouTube Audio Learn More >
9. Flv2mp3
Flv2mp3 YouTube audio ripper is an online tool to download audio from YouTube and 23 other supported video streaming services like TikTok, Facebook, Vimeo, and many more. Flv2mp3 converter is free and saves time by downloading multiple audio files at once. It is a multiformat youTube music ripper that supports a number of different and popular formats and will ensure a high-quality format no matter what quality of the video is provided in the URL. This Flv2mp3 converter is also available in Spanish, Portuguese, and Turkish language. There are two simple steps for using this YouTube music ripper; Just copy-paste the URL of the chosen video, click the convert button, and your file will start downloading to your device.
10. Ontiva Youtube Audio Ripper
Ontiva YouTube to MP3 converter is an online tool to extract audio from YouTube videos. There are multiple features and services of this YouTube audio ripper. You can download YouTube videos in MP3, MP4 as well as WAV format. Not just these, but there are other formats that we can choose from for our video. The quality of the video will totally depend on the internet speed that is being used while converting the video. It also allows conversion of YouTube playlist hassle-free, but this feature is for premium users only after registering an account, but the basic and simple features are free to use. It also supports multiple popular languages.
11. Y2mate
Y2mate is an easy and free-of-cost YouTube audio ripper to extract audio from YouTube videos in the best quality available in MP3 and MP4 formats. This tool uses high-speed encoders that ensure fast conversion. No registration is required. Y2mate is totally free. This YouTube music ripper tool also allows us to upload the converted files to the cloud platforms such as Google Drive, Dropbox, etc. It supports all browsers like Google Chrome, Firefox, Safari, and many more.
FAQs about YouTube Audio Ripper
Here we sorted out some frequently asked questions for YouTube audio ripper.
1. Is it legal to use a YouTube audio ripper?
Technically, it is not illegal to use a YouTube audio ripper to extract audio from YouTube videos, but it is illegal to use or download any copyright video without proper permission. Google has attempted to shut down numerous YouTube music ripper tools as YouTube proposes that it is a violation of their Terms and Services.
2. What are the common features of good YouTube audio rippers?
A good YouTube audio ripper will be easy to use; it will be free of cost without any registration or software installation, it should have multi-platform and multi-language support, it should maintain high quality and popular formats and ensuring security as well. Bulk download of converted videos and uploading to the cloud will be a plus for a good YouTube music ripper.
3. How can I get higher-quality audio?
To get higher quality audio using a YouTube audio ripper, you should have stable and high-speed internet. Many YouTube music ripper supports 128Kbps, 320Kbps and depends mostly on the internet speed.
4. What’s the highest audio quality conversion supported for the audio ripping?
The highest quality YouTube to MP3 conversion is of WAV file. Several YouTube audio rippers support WAV file conversion. WAV is a high-quality format due to the fact that it does compress the audio and contains all the raw information. The WAV file format is of much higher quality than the MP3 file.
Bonus Tip: The Most Recommended Audio Editor - Filmora
The latest version of Wondershare Filmora now offer AI technology to edit and manage your audio with ease! It has several AI features of audio editing that are discussed here.
For Win 7 or later (64-bit)
Secure Download
For macOS 10.14 or later
Secure Download
Using Filmora audio editor, we can add the audio downloaded from YouTube as a background and can change the tone. Filmora also offers a free music library that we can choose from. You can also split the audio by using the playhead in the timeline, or you can adjust the pitch, volume, or length of the audio. You can even mute the audio in a particular clip.
Filmora also allows us to add real-time voiceovers by just clicking the record button, and you will have 3 seconds before the recording starts and once you are completed, click the stop button to end the recording. There are many more audio editing features that Filmora offers, such as customizing and adding multiple tracks in a clip, audio fade in and out, adjusting audio speed, audio equalizer for changing frequency, and many more.
Shanoon Cox
Shanoon Cox is a writer and a lover of all things video.
Follow @Shanoon Cox
Shanoon Cox
Mar 27, 2024• Proven solutions
YouTube audio ripper is an application or web tool that lets you download the background audio of any particular video. It is free and easy to use and allows us to download audio from YouTube without any hassle.
We can download MP3, MP4, and many other popular formats. You can use a YouTube music ripper to download videos for offline listening or use it in any of your customized videos as background audio.
In this article, we are going to discuss briefly the 11 best YouTube music rippers that can be used to extract audio from YouTube.
Note: We resolutely oppose all forms of copyright-infringing downloads. This tutorial is only for downloading YouTube videos/audio materials from your own channel.
Part 1: Top 11 YouTube Audio Rippers to Download YouTube Audio
Here are some of the best and most commonly used YouTube audio ripper tools to convert and extract audio from YouTube videos. Read ahead and choose the best that is suitable according to your needs.
| 1 - Filmora YouTube Audio Ripper | 2 - Ytmp3 Converter | 3 - YouTube to MP3 Music |
|---|---|---|
| 4 - Yt1s.com | 5 - 320YTMp3 | 6 - Clickmp3 |
| 7 - Converto.io | 8 - Loader.to | 9 - Flv2mp3 |
| 10 - Ontiva | 11 - Y2mate |
1. Filmora YouTube Audio Ripper
Filmora YouTube Audio Ripper is the best audio ripper to achieve YouTube audio downloads. You only need 2 steps to extract audio files from any video including YouTube, with the highest audio quality. Plus, Filmora owns plenty of AI editing tools to help you upgrade and polish your media files.
For Win 7 or later (64-bit)
Secure Download
For macOS 10.14 or later
Secure Download
Step 1: First, download Filmora Video Editor from the button above and launch it. Click the ‘Screen Recorder‘ feature to record the screen. You can play YouTube Music or video in the background, then stop recording while the music finishes playing.
Step 2: Drag and drop the recording file to the timelime, click on the video track and select ‘Detach Audio‘ to extract audio track from recorded YouTube video/music. Then choose the audio track and click the ‘Export‘ button to save ripped audio files.
Here are more features of Filmora YouTube Audio Ripper:
- Download and record video or audio from YouTube or any other website.
- Easily edit video and audio with multiple AI tools.
- Offer popular effects, filters and stickers to make your video professional.
- Export video and audio with multiple formats, share on social media directly.
For Win 7 or later (64-bit)
Secure Download
For macOS 10.14 or later
Secure Download
2. Ytmp3 Converter
Ytmp3 Converter is a free and online YouTube audio ripper that will allow us to extract audio from YouTube video easily within a couple of minutes and does not require any software registration or installation. To convert a video, you simply need to copy the URL of the desired YouTube video, paste the copied URL in the address bar of the YouTube music ripper tool, choose a format and click the convert button. Once the video is converted and completed, you can download it by clicking the download button and enjoy your music in high-quality MP3 or MP4 format. It only has a single limitation that the video cannot be of more than 90 minutes for easy and quick conversion.
3. YouTube to MP3 Music
YouTube to MP3 Music is another leading YouTube music ripper tool that allows us to extract audio from YouTube video within few seconds. This YouTube audio ripper tool supports high-quality MP3 files up to 320 kbps. It supports multiple platforms, including Windows, Mac, Android, and iPhone. This tool does not require any installation. It has an amazing feature that other YouTube music ripper might not have and that it also supports video search by keyword and YouTube playlist and can even upload the file to the DropBox or Google Drive after it is converted.
4. Yt1s.com
Yt1s.com is a fast, safe, and very easy-to-use YouTube audio ripper tool that converts YouTube to MP3. You can extract audio from YouTube and download it for offline use. It does not have any limitations, so you can download as many videos as you want. It is completely safe and secure and has no virus as it is under the intense supervision of professionals. By using this YouTube music ripper, you can convert audio files in many different formats such as MP3, MP4, 3GP, M4A, and many more in the best quality available.
Try Filmora to Download YouTube Audio and Free Edit with AI!
Filmora YouTube Audio Ripper can easily download and extract audio from YouTube Video & Music with the original high quality. What’s more, it owns multiple AI tools for helping you edit audio and video for free. You can edit the soundtrack or mix the song if needed. Then you can share it with your friends or upload it to YouTube and other social media directly and gain more views!
Download and Edit YouTube Audio Download and Edit YouTube Audio Learn More >
5. 320YTMp3
320YTMp3 enables us to freely download audio from YouTube without any download limitation. It allows us to extract audio from YouTube in high-quality formats of Mp3, MP4, etc. This YouTube audio ripper is compatible with all the latest browsers and can extract audio from YouTube and other 1000+ popular sites. It includes three easy steps to convert audio to MP3. Just copy the video URL and paste that into the search box, and press the search button, now choose the MP3 quality and download your desired audio.
6. Clickmp3
Clickmp3 is a professional YouTube audio ripper tool that downloads high-quality MP3 files from YouTube within 5 seconds which usually might take up to several minutes. It is free to use and does not need any registration or browser extension. It is compatible with all platforms, devices, and operating systems. This YouTube music ripper does not contain any ads that might distract your conversion and is also completely safe from viruses that might infect your system. Click mp3 also offer unlimited downloads of YouTube video and duration limit.
7. Converto.io
Converto.io is an online music ripper tool that extract audio from YouTube videos. It is hundred percent free, fast, and easy to use. Through this YouTube audio ripper, you can download any video to MP3 or MP4 format. Simply copy the YouTube URL, paste the URL on Converto.io and click the convert button. This Converto.io also allows us to edit the filename, ID tags and select the part of the video that you want to cut or change by clicking the settings button. This YouTube audio ripper also provides a feature to add a cover to all the MP3s of your music collection.
8. Loader.to
Loader.to is one of the best YouTube audio ripper converters that enables us to download YouTube videos or even complete playlists. This YouTube music ripper is extremely easy and is user-friendly. By using Loader.io, you can not only extract audio from YouTube but also can convert the videos into many audio and video formats such as MP3, MP4, WAV, 4K, 8K, etc. Another feature of this tool is that you can convert and download one video at a time but can also convert an entire playlist at high speed. Loader.io also guarantees security while using this online tool and is trusted to provide reliable and smooth service.
Filmora YouTube Audio Ripper & Editor
Extract YouTube Audio and Edit with AI
Rip audio or video from YouTube with Filmora’s built-in screen recorder function. Edit YouTube audio & videos with the latest AI tools to enhance your creative vision. Upgrade your video and audio to get more attention.
Rip YouTube Audio Rip YouTube Audio Learn More >
9. Flv2mp3
Flv2mp3 YouTube audio ripper is an online tool to download audio from YouTube and 23 other supported video streaming services like TikTok, Facebook, Vimeo, and many more. Flv2mp3 converter is free and saves time by downloading multiple audio files at once. It is a multiformat youTube music ripper that supports a number of different and popular formats and will ensure a high-quality format no matter what quality of the video is provided in the URL. This Flv2mp3 converter is also available in Spanish, Portuguese, and Turkish language. There are two simple steps for using this YouTube music ripper; Just copy-paste the URL of the chosen video, click the convert button, and your file will start downloading to your device.
10. Ontiva Youtube Audio Ripper
Ontiva YouTube to MP3 converter is an online tool to extract audio from YouTube videos. There are multiple features and services of this YouTube audio ripper. You can download YouTube videos in MP3, MP4 as well as WAV format. Not just these, but there are other formats that we can choose from for our video. The quality of the video will totally depend on the internet speed that is being used while converting the video. It also allows conversion of YouTube playlist hassle-free, but this feature is for premium users only after registering an account, but the basic and simple features are free to use. It also supports multiple popular languages.
11. Y2mate
Y2mate is an easy and free-of-cost YouTube audio ripper to extract audio from YouTube videos in the best quality available in MP3 and MP4 formats. This tool uses high-speed encoders that ensure fast conversion. No registration is required. Y2mate is totally free. This YouTube music ripper tool also allows us to upload the converted files to the cloud platforms such as Google Drive, Dropbox, etc. It supports all browsers like Google Chrome, Firefox, Safari, and many more.
FAQs about YouTube Audio Ripper
Here we sorted out some frequently asked questions for YouTube audio ripper.
1. Is it legal to use a YouTube audio ripper?
Technically, it is not illegal to use a YouTube audio ripper to extract audio from YouTube videos, but it is illegal to use or download any copyright video without proper permission. Google has attempted to shut down numerous YouTube music ripper tools as YouTube proposes that it is a violation of their Terms and Services.
2. What are the common features of good YouTube audio rippers?
A good YouTube audio ripper will be easy to use; it will be free of cost without any registration or software installation, it should have multi-platform and multi-language support, it should maintain high quality and popular formats and ensuring security as well. Bulk download of converted videos and uploading to the cloud will be a plus for a good YouTube music ripper.
3. How can I get higher-quality audio?
To get higher quality audio using a YouTube audio ripper, you should have stable and high-speed internet. Many YouTube music ripper supports 128Kbps, 320Kbps and depends mostly on the internet speed.
4. What’s the highest audio quality conversion supported for the audio ripping?
The highest quality YouTube to MP3 conversion is of WAV file. Several YouTube audio rippers support WAV file conversion. WAV is a high-quality format due to the fact that it does compress the audio and contains all the raw information. The WAV file format is of much higher quality than the MP3 file.
Bonus Tip: The Most Recommended Audio Editor - Filmora
The latest version of Wondershare Filmora now offer AI technology to edit and manage your audio with ease! It has several AI features of audio editing that are discussed here.
For Win 7 or later (64-bit)
Secure Download
For macOS 10.14 or later
Secure Download
Using Filmora audio editor, we can add the audio downloaded from YouTube as a background and can change the tone. Filmora also offers a free music library that we can choose from. You can also split the audio by using the playhead in the timeline, or you can adjust the pitch, volume, or length of the audio. You can even mute the audio in a particular clip.
Filmora also allows us to add real-time voiceovers by just clicking the record button, and you will have 3 seconds before the recording starts and once you are completed, click the stop button to end the recording. There are many more audio editing features that Filmora offers, such as customizing and adding multiple tracks in a clip, audio fade in and out, adjusting audio speed, audio equalizer for changing frequency, and many more.
Shanoon Cox
Shanoon Cox is a writer and a lover of all things video.
Follow @Shanoon Cox
Capture It Right: Essential Camera Lenses for Video Blogging
A Vlogger’s Guide To Camera Lenses

Richard Bennett
Nov 01, 2022• Proven solutions
The staple of any vlog is the talking headshot, a shot of the speaker talking directly to the audience. You can compose this shot with different kinds of lenses for your interchangeable lens camera.
But which kind of lens is the right lens for you as a vlogger?
In this article, I’m going to help you figure that out.
- Part 1: Three Focal Length Groups: Wide, Standard, Telephoto
- Part 2: Vlogging With Each Focal Length Group
- Part 3: Crop Factor
- Part 4: Focal Length Equivalency Table
- Part 5: Aperture
- Part 6: Vlogging With a Fast Lens
- Part 7: Optical Image Stabilization
Three Focal Length Groups: Wide, Standard, Telephoto
There are three main ranges in focal lengths that camera lenses can be categorized into wide, standard, and telephoto.
Wide-Angle Lens
Wide-angle lenses can “see more.” They allow more of your scene to fit inside your frame. Objects that are closer to the lens appear much bigger while objects that are further away appear even smaller. Perspectives are also enhanced, making close objects and people that just make it into the sides of the frame appear more stretched out. Out of all the other ranges in focal lengths, wide-angle lenses will appear the least zoomed in.
Standard Lens
With standard lenses or normal lenses, you won’t get the stretched out objects or enhanced perspectives that you get from wide-angle lenses. Instead, standard lenses are meant to see scenes as the natural human eye is meant to see them. If you shoot a scene with both a wide-angle lens and a standard lens from the same position, you’ll notice that less of the scene fits into your frame. Standard lenses will appear more zoomed-in than wide-angle lenses, but less zoomed-in than telephoto lenses.
Telephoto Lens
Out of all the other ranges in focal lengths, telephoto lenses will appear the most zoomed in. This can be beneficial for the shooter who wants to get a closer shot of a scene without having to physically be in close proximity to the scene. Objects that are further away in the background also appear larger and closer than they would appear on wide-angle or standard lenses.
Vlogging With Each Focal Length Group
You can get your talking head footage using lenses from any of the three focal length groups. Depending on how you plan to vlog most of the time, though, one of the three focal lengths might be more suitable for you.
When to vlog with a wide-angle lens
Wide-angle lenses are the most commonly used lenses for vlogging. Wide-angle lenses are great when you need to be close to your camera. This might be the case for you if your recording space is small or if you want to film yourself as you hold your camera up with your own hand.
Being close to your camera not only gives you the option to use your camera’s built-in microphone, but it also gives you the option to make use of camera-mounted shotgun microphones.
When to vlog with a standard lens
Standard lenses are great when you have more space to be further away from your camera. The perspectives in your shot will look more natural through a standard lens, making your talking head footage feel more corporate or professional. You’ll also be able to get blurrier backgrounds using a standard lens versus a wide-angle lens.
Being further away from your camera, however, means that you’ll have to use a separate microphone positioned closer to you.
When to vlog with a telephoto lens
As telephoto lenses are even more zoomed in, you’ll need to be even further away from your camera to fit yourself inside your camera frame. Why would any vlogger ever need to be that far away from their camera? One word… teleprompter. If you want or need to stick to a script, you’ll have to be far away enough from your camera that it doesn’t appear like your eyes are scanning left to right. You then close in the distance with a telephoto lens.
In the above video, Marcos Rocha compares different focal lengths for talking head videos. Which focal length range do you like the look of?
Crop Factor
Focal lengths in camera lenses are measured in millimeters. You can vlog yourself handheld with a 24mm lens on a camera with a full-frame sensor (the sensor is the piece of hardware inside your camera that turns the light it receives into a digital image). But if you use a 24mm lens on a camera with a smaller sensor, like an APS-C sensor or even smaller Micro 4/3 sensor, more of you will get cropped out (see below).

In order to make up for the cropping that occurs, you will need to use a wider lens on cameras with smaller sensors to get the same shot you’d get with a full-frame camera.
Focal Length Equivalency Table
This table shows you the focal lengths needed to achieve the same shot between cameras with different sensor sizes. In order to take a shot as wide as the shot I took of myself with the 24mm lens on my full-frame camera, I would need a 15mm lens on an APS-C sensor camera or a 12mm lens on a micro 4/3 camera.
| Focal Length / Sensor | Full Frame | APS-C | Micro 4/3 |
|---|---|---|---|
| Wide (Handheld Selfie-Safe) | 16mm | 10mm | 8mm |
| Wide (Handheld Selfie-Safe) | 18mm | 11mm | 9mm |
| Wide (Handheld Selfie-Safe) | 24mm | 15mm | 12mm |
| Wide | 35mm | 22mm | 18mm |
| Standard | 50mm | 31mm | 25mm |
| Telephoto | 70mm | 44mm | 35mm |
| Telephoto | 100mm | 63mm | 50mm |
| Telephoto | 200mm | 125mm | 100mm |
Aperture

The next thing to consider when you’re looking for a lens is the aperture, the hole (often adjustable) within the lens that lets light in. Aperture for camera lenses is measured in f-stops (f/1.4, f/1.8, f/2.0) - the smaller the f-stop number, the larger the aperture (bigger hole letting even more light in).

Because larger aperture lenses let more light in, they need a shorter time for cameras to compose an image. This is why larger aperture lenses are also called “fast” lenses.
Fast lenses are more expensive because they cost more to produce. There’s a lot more that goes into them, including larger and higher quality glass elements.
But do you even need a fast lens?
Vlogging With a Fast Lens
Pros of Vlogging With a Fast Lens
- Better low-light performance
- Better autofocus performance
- Better “bokeh” (out-of-focus areas, like your background, having that nice blurry look that you see in a lot of movies)
Cons of Vlogging With a Fast Lens
- More expensive
- Moving subjects more likely to get out of focus when shooting with a large aperture
- Better continuous autofocus performance needed when shooting moving subjects with a large aperture
Optical Image Stabilization
Finally, you’ll have to decide whether or not you want your lens to have built-in optical image stabilization (OIS).
OIS is very beneficial to have on a lens if you’re a vlogger who films mostly handheld footage. Although this technology adds to the price of your lens as well, it can greatly help you to capture smoother footage that may otherwise be shaky. Nikon calls this technology “Vibration Reduction” (VR) for their lenses.
In the above video, you can see how much OIS can help to stabilize your footage. MicBergsma simultaneously compares the footage between two GoPro Hero5 Blacks, one with OIS on and one with OIS off.
If, however, you are shooting most of your vlogs on a tripod, you won’t need a lens with OIS.
Looking for ways to set up your talking-head shot for YouTube with any of these lenses? Check out our post on 4 Ways To Set Up Your Talking-Head Shots For YouTube .
Richard Bennett
Richard Bennett is a writer and a lover of all things video.
Follow @Richard Bennett
Richard Bennett
Nov 01, 2022• Proven solutions
The staple of any vlog is the talking headshot, a shot of the speaker talking directly to the audience. You can compose this shot with different kinds of lenses for your interchangeable lens camera.
But which kind of lens is the right lens for you as a vlogger?
In this article, I’m going to help you figure that out.
- Part 1: Three Focal Length Groups: Wide, Standard, Telephoto
- Part 2: Vlogging With Each Focal Length Group
- Part 3: Crop Factor
- Part 4: Focal Length Equivalency Table
- Part 5: Aperture
- Part 6: Vlogging With a Fast Lens
- Part 7: Optical Image Stabilization
Three Focal Length Groups: Wide, Standard, Telephoto
There are three main ranges in focal lengths that camera lenses can be categorized into wide, standard, and telephoto.
Wide-Angle Lens
Wide-angle lenses can “see more.” They allow more of your scene to fit inside your frame. Objects that are closer to the lens appear much bigger while objects that are further away appear even smaller. Perspectives are also enhanced, making close objects and people that just make it into the sides of the frame appear more stretched out. Out of all the other ranges in focal lengths, wide-angle lenses will appear the least zoomed in.
Standard Lens
With standard lenses or normal lenses, you won’t get the stretched out objects or enhanced perspectives that you get from wide-angle lenses. Instead, standard lenses are meant to see scenes as the natural human eye is meant to see them. If you shoot a scene with both a wide-angle lens and a standard lens from the same position, you’ll notice that less of the scene fits into your frame. Standard lenses will appear more zoomed-in than wide-angle lenses, but less zoomed-in than telephoto lenses.
Telephoto Lens
Out of all the other ranges in focal lengths, telephoto lenses will appear the most zoomed in. This can be beneficial for the shooter who wants to get a closer shot of a scene without having to physically be in close proximity to the scene. Objects that are further away in the background also appear larger and closer than they would appear on wide-angle or standard lenses.
Vlogging With Each Focal Length Group
You can get your talking head footage using lenses from any of the three focal length groups. Depending on how you plan to vlog most of the time, though, one of the three focal lengths might be more suitable for you.
When to vlog with a wide-angle lens
Wide-angle lenses are the most commonly used lenses for vlogging. Wide-angle lenses are great when you need to be close to your camera. This might be the case for you if your recording space is small or if you want to film yourself as you hold your camera up with your own hand.
Being close to your camera not only gives you the option to use your camera’s built-in microphone, but it also gives you the option to make use of camera-mounted shotgun microphones.
When to vlog with a standard lens
Standard lenses are great when you have more space to be further away from your camera. The perspectives in your shot will look more natural through a standard lens, making your talking head footage feel more corporate or professional. You’ll also be able to get blurrier backgrounds using a standard lens versus a wide-angle lens.
Being further away from your camera, however, means that you’ll have to use a separate microphone positioned closer to you.
When to vlog with a telephoto lens
As telephoto lenses are even more zoomed in, you’ll need to be even further away from your camera to fit yourself inside your camera frame. Why would any vlogger ever need to be that far away from their camera? One word… teleprompter. If you want or need to stick to a script, you’ll have to be far away enough from your camera that it doesn’t appear like your eyes are scanning left to right. You then close in the distance with a telephoto lens.
In the above video, Marcos Rocha compares different focal lengths for talking head videos. Which focal length range do you like the look of?
Crop Factor
Focal lengths in camera lenses are measured in millimeters. You can vlog yourself handheld with a 24mm lens on a camera with a full-frame sensor (the sensor is the piece of hardware inside your camera that turns the light it receives into a digital image). But if you use a 24mm lens on a camera with a smaller sensor, like an APS-C sensor or even smaller Micro 4/3 sensor, more of you will get cropped out (see below).
In order to make up for the cropping that occurs, you will need to use a wider lens on cameras with smaller sensors to get the same shot you’d get with a full-frame camera.
Focal Length Equivalency Table
This table shows you the focal lengths needed to achieve the same shot between cameras with different sensor sizes. In order to take a shot as wide as the shot I took of myself with the 24mm lens on my full-frame camera, I would need a 15mm lens on an APS-C sensor camera or a 12mm lens on a micro 4/3 camera.
| Focal Length / Sensor | Full Frame | APS-C | Micro 4/3 |
|---|---|---|---|
| Wide (Handheld Selfie-Safe) | 16mm | 10mm | 8mm |
| Wide (Handheld Selfie-Safe) | 18mm | 11mm | 9mm |
| Wide (Handheld Selfie-Safe) | 24mm | 15mm | 12mm |
| Wide | 35mm | 22mm | 18mm |
| Standard | 50mm | 31mm | 25mm |
| Telephoto | 70mm | 44mm | 35mm |
| Telephoto | 100mm | 63mm | 50mm |
| Telephoto | 200mm | 125mm | 100mm |
Aperture
The next thing to consider when you’re looking for a lens is the aperture, the hole (often adjustable) within the lens that lets light in. Aperture for camera lenses is measured in f-stops (f/1.4, f/1.8, f/2.0) - the smaller the f-stop number, the larger the aperture (bigger hole letting even more light in).
Because larger aperture lenses let more light in, they need a shorter time for cameras to compose an image. This is why larger aperture lenses are also called “fast” lenses.
Fast lenses are more expensive because they cost more to produce. There’s a lot more that goes into them, including larger and higher quality glass elements.
But do you even need a fast lens?
Vlogging With a Fast Lens
Pros of Vlogging With a Fast Lens
- Better low-light performance
- Better autofocus performance
- Better “bokeh” (out-of-focus areas, like your background, having that nice blurry look that you see in a lot of movies)
Cons of Vlogging With a Fast Lens
- More expensive
- Moving subjects more likely to get out of focus when shooting with a large aperture
- Better continuous autofocus performance needed when shooting moving subjects with a large aperture
Optical Image Stabilization
Finally, you’ll have to decide whether or not you want your lens to have built-in optical image stabilization (OIS).
OIS is very beneficial to have on a lens if you’re a vlogger who films mostly handheld footage. Although this technology adds to the price of your lens as well, it can greatly help you to capture smoother footage that may otherwise be shaky. Nikon calls this technology “Vibration Reduction” (VR) for their lenses.
In the above video, you can see how much OIS can help to stabilize your footage. MicBergsma simultaneously compares the footage between two GoPro Hero5 Blacks, one with OIS on and one with OIS off.
If, however, you are shooting most of your vlogs on a tripod, you won’t need a lens with OIS.
Looking for ways to set up your talking-head shot for YouTube with any of these lenses? Check out our post on 4 Ways To Set Up Your Talking-Head Shots For YouTube .
Richard Bennett
Richard Bennett is a writer and a lover of all things video.
Follow @Richard Bennett
Also read:
- Unleash Potential Access Premium Sound Effects!
- Elite Listings Easy Purchases of Startup YouTube Revenue Streams
- Video Voyage to Victory Secrets From YouTube Stars
- In 2024, Crafting Engaging, Extended Videos A YouTube Expert's Guide
- 2024 Approved Ensuring Effective Monetization Strategies for YT Channels
- In 2024, Charting Updates YouTube Money Standards
- In 2024, Discover Time's Tales Top 10 Historical Channels to Study With
- Converting YouTube Broadcasts Into Listenable Formats for 2024
- [Updated] A Comprehensive Tutorial for YouTube Customization Tools
- Top Editor's Alchemy Precision PC Editing + Harmony
- Unlock Easy Paths for Exceptional YT Thumbnails
- Anime's Best of 2023 on YouTube A Guide to Your Daily Dose
- [New] Digital Dominion Rise as a YouTube Guru
- Controlling Who Can Leave a Comment on Your YouTube Videos
- Essential 8 Linux Software for Editors for 2024
- In 2024, 9 Essential Apps for Pulling YouTube Videos (Android)
- [New] 2024 Approved Soundscape Scrutiny Listening Insights
- The Ultimate List of GIF Speed Changer Apps and Websites for 2024
- Nighttime Photography Success Tips & Tricks for 2024
- In 2024, Best 3 Vivo Y36i Emulator for Mac to Run Your Wanted Android Apps | Dr.fone
- Updated Bridging the Gap Between Sound and Scripts Advances in Audio Conversion (Year 2024)
- [New] Instagram Stories Harmonizing Photos for Maximum Impact
- In 2024, Soar High & Stream Straight - DJI Drone Techniques for Facebook Live
- [New] 2024 Approved TikTok App Not Loading on Chrome? Troubleshoot Now
- [Updated] Bridging Identities with 100 Creative and Empowering Insta Captions for 2024
- [Updated] Viral Success Starts with These 49-Quotable TikTok Statements
- Secure Your Gaming Memories 5 Essential VR Recording Methods for 2024
- In 2024, 10 Easy-to-Use FRP Bypass Tools for Unlocking Google Accounts On Itel P40
- [Updated] Streamlining Your iPhone 7 Video Saving Routine for 2024
- Title: "Download YouTube Tunes with These 10+ No-Cost Audio Crackers for 2024"
- Author: Kevin
- Created at : 2024-05-25 15:01:57
- Updated at : 2024-05-26 15:01:57
- Link: https://youtube-videos.techidaily.com/download-youtube-tunes-with-these-10plus-no-cost-audio-crackers-for-2024/
- License: This work is licensed under CC BY-NC-SA 4.0.
