
:max_bytes(150000):strip_icc()/GettyImages-1430921659-97a3a9e254e1450a89f0d9c41ffd7920.jpg)
Discovering Your YouTube Comments on Various Devices
Discovering Your YouTube Comments on Various Devices
How to Find Your Comments on YouTube?

Richard Bennett
Mar 27, 2024• Proven solutions
Have you ever felt worried about any YouTube comment that you published long ago, and later you realized that it was a mistake? Or, do you want to know what comments did you post and when? If so, YouTube offers a simple way of finding your past remarks, and making any changes to them if need be.
That said, the following sections teach you how to find your YouTube comments on a desktop or laptop computer, and also on a mobile device if you are a gadget freak.
- Part 1: How to Find Comments You’ve Posted on YouTube?
- Part 2: How to Find All YouTube Comments Your Channel Has Received?
- Part 3: How to Find Someone’s YouTube Comments by User Name?
- Part 4: How to Edit and Reply to YouTube Comments?
- Part 5: How to Moderate YouTube Comments?
- Part 6: Tips for Writing Good YouTube Comments
Part 1: How to Find All the Comments You’ve Posted on YouTube?
YouTube allows you to post comments on any video only if you are signed in to your Google account while browsing the streaming platform. Because of this, the portal is able to keep a record of your activities, thus enabling you to track all your comments, and take necessary action such as deleting or modifying them as required.
You can learn how to find all the comments you have posted on YouTube while using your preferred device by following the instructions given below:
1. Find Your YouTube Comments on a Desktop or Laptop Computer
Step 1: Sign In to Your YouTube Account
Launch your favorite web browser, go to the YouTube page, click SIGN IN from the top-right corner, and follow the on-screen instructions to enter your credentials and sign in to your Google/YouTube account.
Step 2: Get to the History Page
Click the Menu button from the top-left corner of the page, and then click History from the categories available in the navigation bar in the left.

Step 3: Access/View Your Past Comments
Click Comments from the right of the History page to view all the comments that you have posted earlier.

2. Find Your YouTube Comments on an iPhone
Unfortunately, at the time of this writing, the YouTube app for iOS doesn’t have the feature to view your comments history. However, there is a workaround where you can use a web browser on your smartphone to get this done. The process that is given below explains how to view your past YouTube comments on an iPhone:
Step 1: Sign In to Your YouTube Account on an Internet Browser
Launch your favorite web browser on your iPhone (Safari, the default one, is used here for illustration), go to https://m.youtube.com , tap the profile icon from the top-right corner, tap Sign in from the menu that appears, and follow the on-screen instructions to use your Google account credentials to sign in to YouTube.
Step 2: Access the Desktop Version of YouTube
Tap the More Options icon from the top-left corner of the browser, and then tap Request Desktop Website from the menu that appears to access the desktop version of YouTube on your iPhone.

Step 3: View Your Past YouTube Comments
Tap the Menu icon from the top-left corner of the YouTube page, and tap History from the menu that appears. On the History page, tap Comments from the right pane to view/access your YouTube comments that you posted in the past.

3. Find Your YouTube Comments on an Android Smartphone
As it is with iOS, the YouTube app for Android doesn’t allow you to view your comments history either. However, the workaround of using a web browser works pretty well on Android smartphones too, but with a few tweaks. The process of doing so is given below:
Step 1: Use a Web Browser to Sign In to Your YouTube Account
Launch Google Chrome on your Android smartphone (you can use any other web browser of your choice), and go to https://m.youtube.com . Notice how the interface automatically changes to the desktop version. Note: If the desktop version of the website isn’t visible, you can tap the More button (with three vertical dots) from the top-right corner of the browser, and check the Desktop site box.
Next, tap SIGN IN from the top-right corner of the YouTube page, enter your Google account credentials in the box available on the Sign in screen, enter your password when prompted, and sign in to your YouTube account.
Step 2: Choose a Web Browser (for Confirmation)
When the confirmation box pops up at the bottom, choose your preferred web browser, and tap the frequency of its usage for accessing YouTube. For instance, choose Chrome and Just once to use Google Chrome to access YouTube only for this session.
Step 3: View/Access Your Past YouTube Comments
Once you are signed in to your account, tap the Menu icon from the top-left corner of the YouTube page, and tap History from the menu that appears. When the History page opens up, tap Comments from the right pane to view and/or access your past YouTube comments.
Part 2: How to Find All YouTube Comments Your Channel Has Received?
If you own a YouTube channel and have posted several videos there, it is likely that you also have received a decent number of comments. Usually, these remarks are pretty helpful as they tell you how to improve your production quality, and what your audience prefers to watch in the future. Therefore, it is imperative to learn how to find all the comments that your YouTube channel has received, and the process given below explains exactly that:
1. Find Your Channel’s YouTube Comments on a Desktop or Laptop Computer
You can use your favorite web browser on a PC to easily find all the comments that the videos on your YouTube channel have received as long as you are signed in to your Google account. The step-by-step instructions on how this can be done are given below:
Step 1: Go to the Your videos Page
Open your favorite Internet browser, go to https://www.youtube.com , and sign in to your YouTube account as explained in the previous sections. Next, click the Menu icon from the top-left corner of the YouTube homepage, and click Your videos from the menu that appears.

Step 2: View the Comments
Make sure that the Uploads tab is selected on the Channel content window, and check the number under the Comments column of each video to see how many comments that particular film has received. You can click the number for any video to view its comments.

Step 3: Hide or Hold a Comment for Approval
Click the More icon from the right of the comment you want to moderate, and click Hide user from channel or Always approve comments from this user to hide the comments from the selected user or keep their comments on hold until you review and approve them respectively.

Note: To view all comments received on your YouTube channel, go to the Comments tab under YouTube Studio, and you will find all Channel comments & mentions.
2. Find Your Channel’s YouTube Comments on a Mobile App
This process is comparatively simpler than the previous one as all that you need to do is download the YT Studio app, and access a central location where all the comments for all the videos can be viewed. The process is given below:
Step 1: Obtain a Mobile App
Go to App Store or Google Play Store, and search and download the YT Studio app on your iPhone or Android smartphone (iPhone X is used here for illustration).
Step 2: View/Access All the Comments
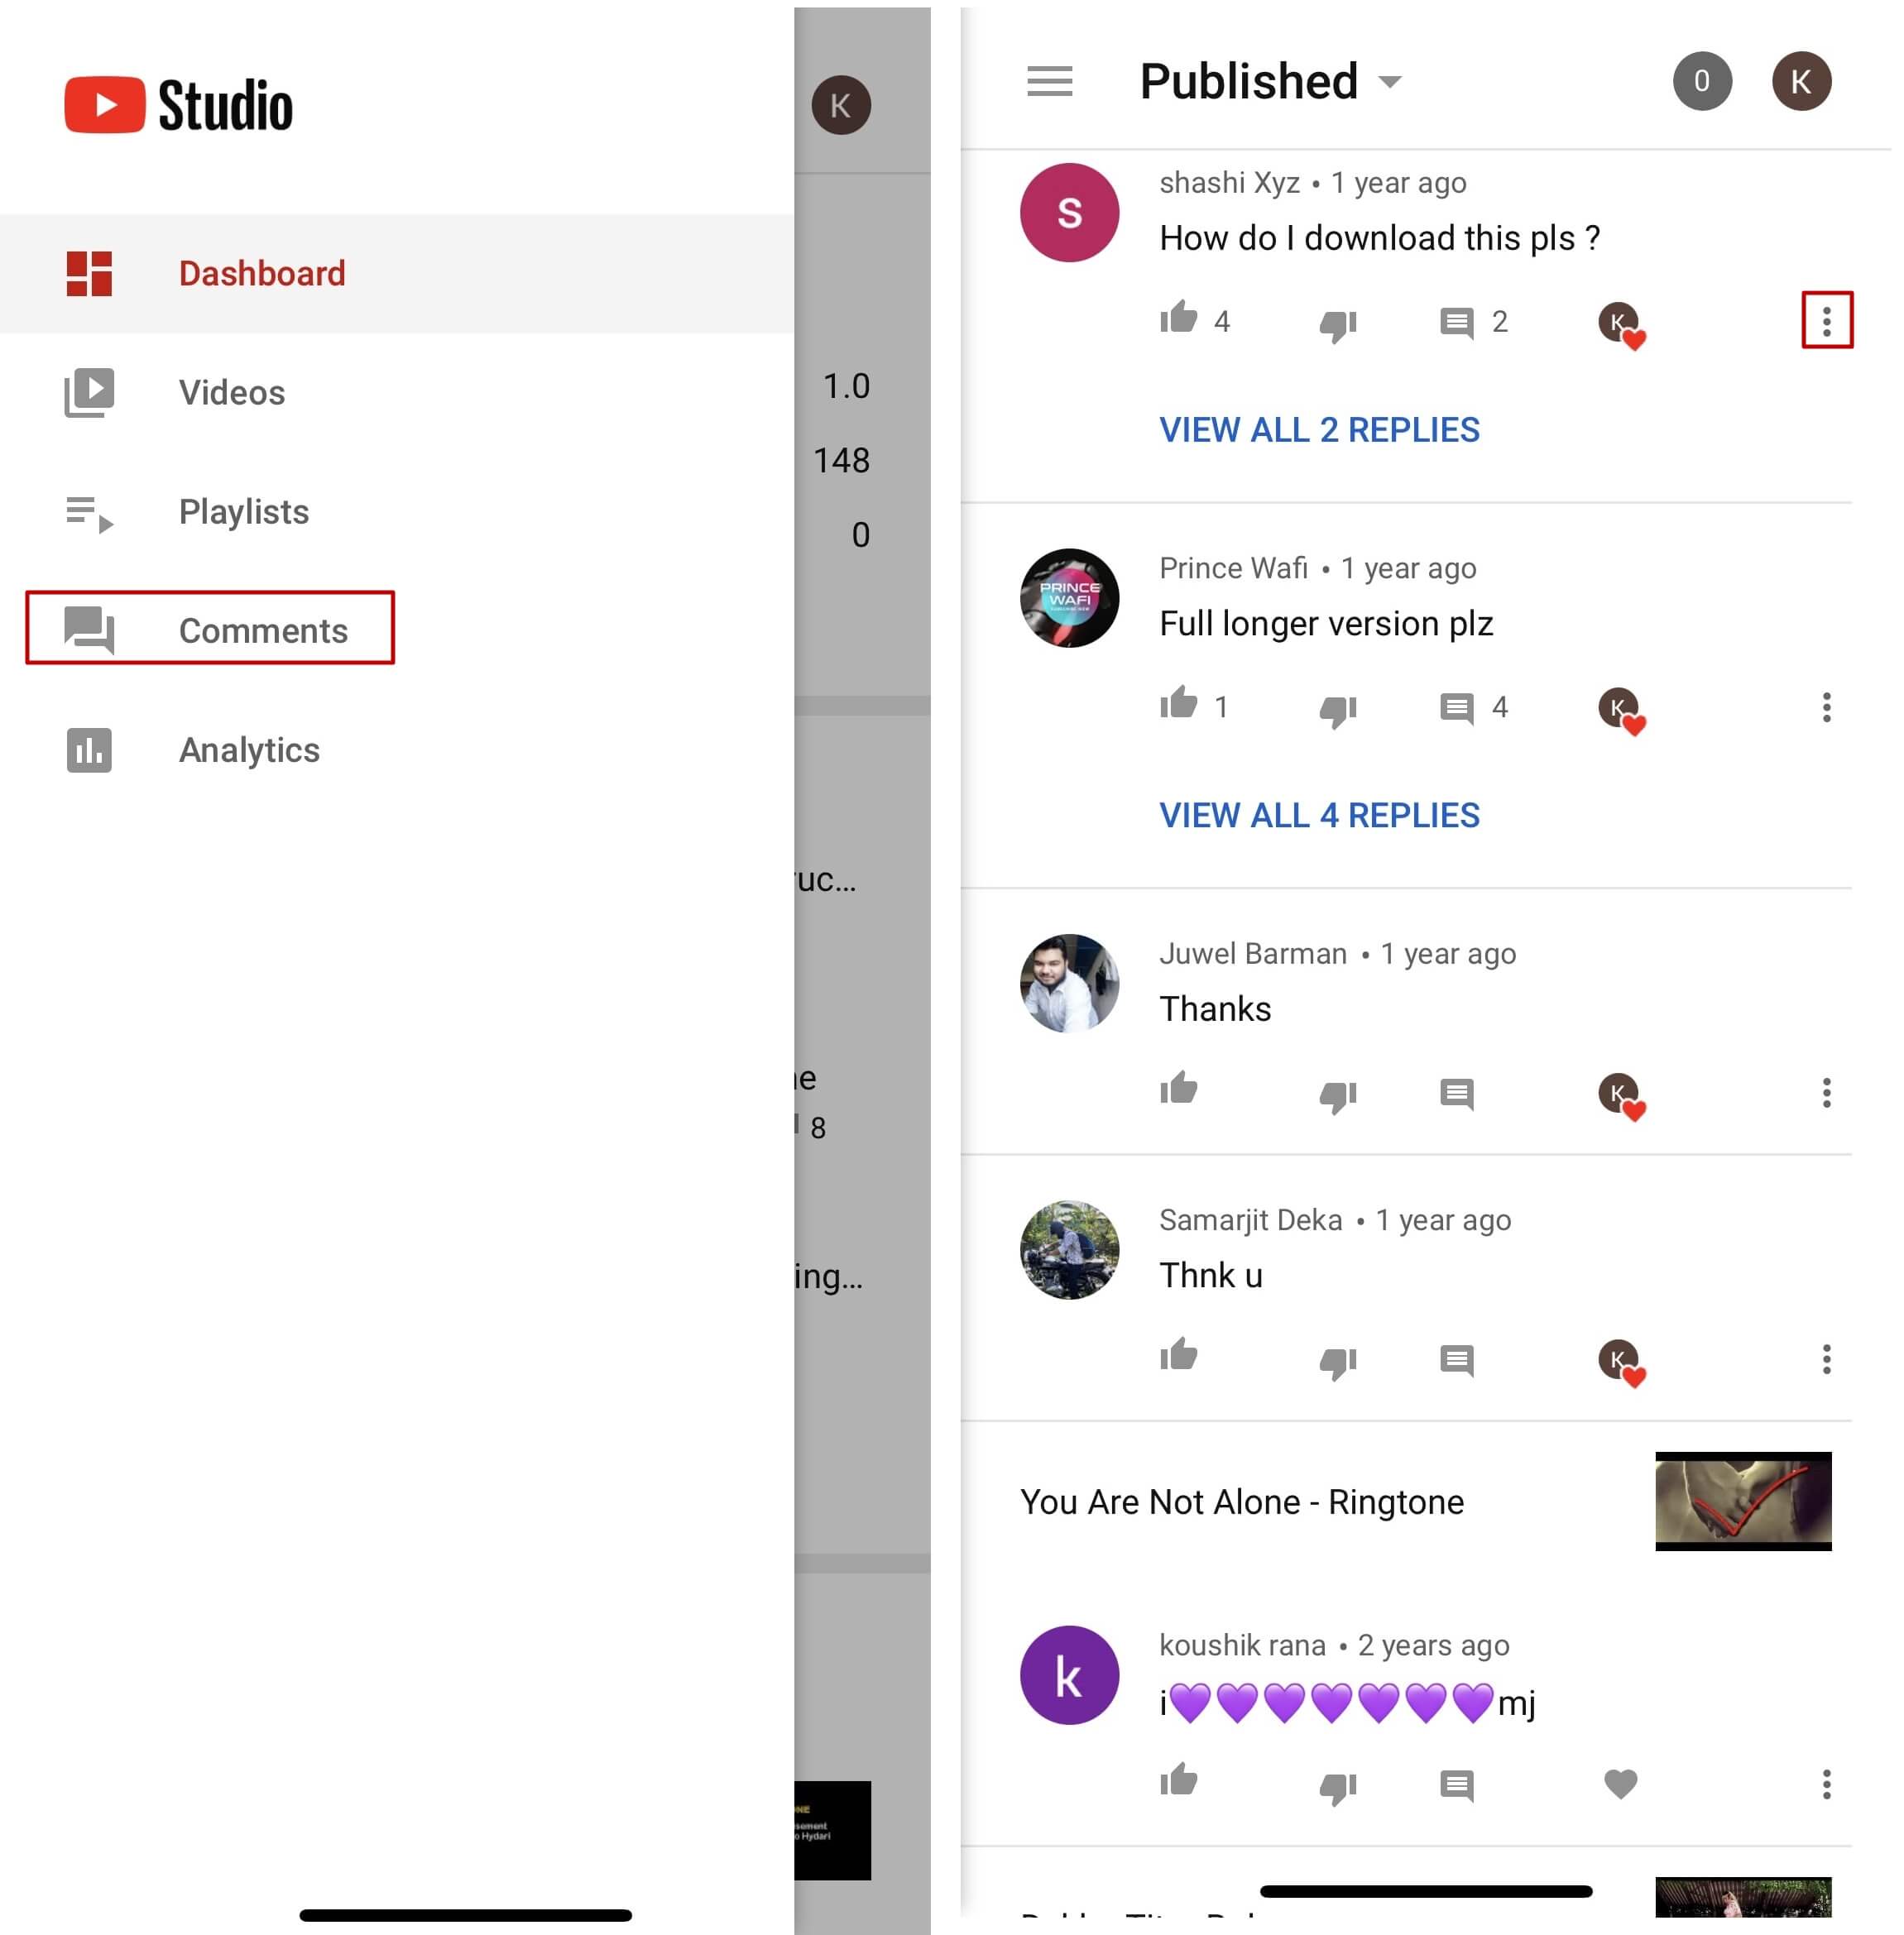
Launch the YT Studio app, and sign in to your YouTube account. Tap the Menu icon from the top-left corner of the interface, and tap Comments from the menu to view all the published comments for all the videos that you have received on your YouTube channel.
Step 3: Hide Users and View Held Comments
Tap the More button from the right of an inappropriate comment, and tap Hide user from channel from the menu that comes up. In addition, you can tap the More button next to Published from the top, and tap Held for review from the box that pops up to view the comments that are waiting for your approval.
Note: Unfortunately, you cannot hold the comments for approval using the YT Studio app. As a workaround, you can follow the procedure given earlier to access the desktop version of YouTube on your smartphone, and then use the method explained in the previous section to get this done. However, it is recommended that you do all such sensitive tasks on a laptop or desktop computer to avoid any errors.
Part 3: Find Someone’s YouTube Comments by User Name
If any of your YouTube videos has thousands of comments and you need to find a particular one from a specific user, checking each remark manually would be an extremely time-consuming and tedious task. Therefore, it is a good idea to let an efficient application do the job for you.
One program, a Google Chrome extension called YCS – YouTube Comment Search to be precise, can help you with this. All you are required to do is, install the extension, go to the video, and search the comment by the name of the user. The step-by-step instructions on how this can be done are given below:
Step 1: Install YCS – YouTube Comment Search
Launch Google Chrome on your desktop or laptop computer, search for YCS – YouTube Comment Search, click Add to Chrome, and click Add extension on the notification box that pops up to install the YCS – YouTube Comment Search extension on your instance of Google Chrome.
Step 2: Load All Comments
Go to your or any other’s YouTube video, and click Load All from the top-right corner of the YouTube Comment Search panel that is present under the description box to allow YCS to scan all the comments the video has received.

Step 3: Search Comments from a Particular User
Choose Comments from the search type drop-down list, enter the name of the user in question in the Search box, and click Search to fetch all their comments on the video.

Part 4: How to Edit and Reply to YouTube Comments?
Editing an existing YouTube comment that you have posted earlier, or replying to the one published by someone else is simple. The process is given below:
Step 1: Edit an Existing Comment
Use any of the methods explained above to locate your YouTube comment that you want to edit. Next, click the More icon from the right of the comment, click Edit from the menu, make the required changes to the text, and click SAVE.
Step 2: Reply to a Comment
Locate the comment that you want to reply to, click REPLY from under the comment, type your text in the available field, and click REPLY.

Part 5: How to Moderate YouTube Comments?
If you publish videos on YouTube that may put some impact on people’s lifestyle, you are likely to face criticism quite often. Therefore, you might want to moderate all your comments before they become visible to the audience so as not to spread negativity among the mass. Fortunately, YouTube helps you get this done easily, and the instructions that teach you the process are given below:
Step 1: Get to Your Channel’s Settings Box
Sign in to your YouTube account, click the Menu icon from the top-left corner of the homepage, and click Your videos from the menu that appears.
From the bottom of the navigation bar on the left of the YouTube Studio page, click Settings to open the channel’s Settings box.
Step 2: Moderate YouTube Comments
Go to the Community category from the left pane, and go to the Defaults tab from the right. Next, choose Hide all comments for review from the Comments on your new videos drop-down list, and click SAVE from the bottom-right corner of the box to moderate all YouTube comments that your new videos receive from this point onward.

Part 6: Tips for Writing Good YouTube Comments
While posting a comment on a YouTube video, it is imperative to keep a few things in mind. Some important tips that might come in handy in this regard are suggested below:
- Make your comment as relevant to the video as you possibly can
- Avoid using harsh language or slangs to maintain decency
- Be genuine while leaving feedback. However, make sure to choose polite words while typing a comment
- In case you want to add some suggestions, make sure to be humble
- Ignore the replies with inappropriate content
FAQs About YouTube Comments
Q1) Why can’t I see the comments I posted?
A: If you cannot see your comments, this could be because the owner or moderator has configured the channel or the video to hold all the comments for review before they are visible on YouTube.
In such a case, you are advised to wait for the authorized person to approve your remark before it is published. Another possibility is that the moderator/owner has added you to the ‘hidden users’ list due to some reason. Even in this case, your comment won’t be visible until you are removed from that list.
Q2) I have enabled ‘Notify me’ about comments and other activity on my channel or videos, but can’t see the comments on my video. Why?
A: You won’t be able to view the unpublished comments or those from the users you have added to the ‘hidden’ list. To fix this problem, you may want to disable moderation from your channel or the videos, and also unhide the users. The processes of both these configurations are explained in detail in the above sections.
Richard Bennett
Richard Bennett is a writer and a lover of all things video.
Follow @Richard Bennett
Richard Bennett
Mar 27, 2024• Proven solutions
Have you ever felt worried about any YouTube comment that you published long ago, and later you realized that it was a mistake? Or, do you want to know what comments did you post and when? If so, YouTube offers a simple way of finding your past remarks, and making any changes to them if need be.
That said, the following sections teach you how to find your YouTube comments on a desktop or laptop computer, and also on a mobile device if you are a gadget freak.
- Part 1: How to Find Comments You’ve Posted on YouTube?
- Part 2: How to Find All YouTube Comments Your Channel Has Received?
- Part 3: How to Find Someone’s YouTube Comments by User Name?
- Part 4: How to Edit and Reply to YouTube Comments?
- Part 5: How to Moderate YouTube Comments?
- Part 6: Tips for Writing Good YouTube Comments
Part 1: How to Find All the Comments You’ve Posted on YouTube?
YouTube allows you to post comments on any video only if you are signed in to your Google account while browsing the streaming platform. Because of this, the portal is able to keep a record of your activities, thus enabling you to track all your comments, and take necessary action such as deleting or modifying them as required.
You can learn how to find all the comments you have posted on YouTube while using your preferred device by following the instructions given below:
1. Find Your YouTube Comments on a Desktop or Laptop Computer
Step 1: Sign In to Your YouTube Account
Launch your favorite web browser, go to the YouTube page, click SIGN IN from the top-right corner, and follow the on-screen instructions to enter your credentials and sign in to your Google/YouTube account.
Step 2: Get to the History Page
Click the Menu button from the top-left corner of the page, and then click History from the categories available in the navigation bar in the left.
Step 3: Access/View Your Past Comments
Click Comments from the right of the History page to view all the comments that you have posted earlier.
2. Find Your YouTube Comments on an iPhone
Unfortunately, at the time of this writing, the YouTube app for iOS doesn’t have the feature to view your comments history. However, there is a workaround where you can use a web browser on your smartphone to get this done. The process that is given below explains how to view your past YouTube comments on an iPhone:
Step 1: Sign In to Your YouTube Account on an Internet Browser
Launch your favorite web browser on your iPhone (Safari, the default one, is used here for illustration), go to https://m.youtube.com , tap the profile icon from the top-right corner, tap Sign in from the menu that appears, and follow the on-screen instructions to use your Google account credentials to sign in to YouTube.
Step 2: Access the Desktop Version of YouTube
Tap the More Options icon from the top-left corner of the browser, and then tap Request Desktop Website from the menu that appears to access the desktop version of YouTube on your iPhone.
Step 3: View Your Past YouTube Comments
Tap the Menu icon from the top-left corner of the YouTube page, and tap History from the menu that appears. On the History page, tap Comments from the right pane to view/access your YouTube comments that you posted in the past.
3. Find Your YouTube Comments on an Android Smartphone
As it is with iOS, the YouTube app for Android doesn’t allow you to view your comments history either. However, the workaround of using a web browser works pretty well on Android smartphones too, but with a few tweaks. The process of doing so is given below:
Step 1: Use a Web Browser to Sign In to Your YouTube Account
Launch Google Chrome on your Android smartphone (you can use any other web browser of your choice), and go to https://m.youtube.com . Notice how the interface automatically changes to the desktop version. Note: If the desktop version of the website isn’t visible, you can tap the More button (with three vertical dots) from the top-right corner of the browser, and check the Desktop site box.
Next, tap SIGN IN from the top-right corner of the YouTube page, enter your Google account credentials in the box available on the Sign in screen, enter your password when prompted, and sign in to your YouTube account.
Step 2: Choose a Web Browser (for Confirmation)
When the confirmation box pops up at the bottom, choose your preferred web browser, and tap the frequency of its usage for accessing YouTube. For instance, choose Chrome and Just once to use Google Chrome to access YouTube only for this session.
Step 3: View/Access Your Past YouTube Comments
Once you are signed in to your account, tap the Menu icon from the top-left corner of the YouTube page, and tap History from the menu that appears. When the History page opens up, tap Comments from the right pane to view and/or access your past YouTube comments.
Part 2: How to Find All YouTube Comments Your Channel Has Received?
If you own a YouTube channel and have posted several videos there, it is likely that you also have received a decent number of comments. Usually, these remarks are pretty helpful as they tell you how to improve your production quality, and what your audience prefers to watch in the future. Therefore, it is imperative to learn how to find all the comments that your YouTube channel has received, and the process given below explains exactly that:
1. Find Your Channel’s YouTube Comments on a Desktop or Laptop Computer
You can use your favorite web browser on a PC to easily find all the comments that the videos on your YouTube channel have received as long as you are signed in to your Google account. The step-by-step instructions on how this can be done are given below:
Step 1: Go to the Your videos Page
Open your favorite Internet browser, go to https://www.youtube.com , and sign in to your YouTube account as explained in the previous sections. Next, click the Menu icon from the top-left corner of the YouTube homepage, and click Your videos from the menu that appears.
Step 2: View the Comments
Make sure that the Uploads tab is selected on the Channel content window, and check the number under the Comments column of each video to see how many comments that particular film has received. You can click the number for any video to view its comments.
Step 3: Hide or Hold a Comment for Approval
Click the More icon from the right of the comment you want to moderate, and click Hide user from channel or Always approve comments from this user to hide the comments from the selected user or keep their comments on hold until you review and approve them respectively.
Note: To view all comments received on your YouTube channel, go to the Comments tab under YouTube Studio, and you will find all Channel comments & mentions.
2. Find Your Channel’s YouTube Comments on a Mobile App
This process is comparatively simpler than the previous one as all that you need to do is download the YT Studio app, and access a central location where all the comments for all the videos can be viewed. The process is given below:
Step 1: Obtain a Mobile App
Go to App Store or Google Play Store, and search and download the YT Studio app on your iPhone or Android smartphone (iPhone X is used here for illustration).
Step 2: View/Access All the Comments
Launch the YT Studio app, and sign in to your YouTube account. Tap the Menu icon from the top-left corner of the interface, and tap Comments from the menu to view all the published comments for all the videos that you have received on your YouTube channel.
Step 3: Hide Users and View Held Comments
Tap the More button from the right of an inappropriate comment, and tap Hide user from channel from the menu that comes up. In addition, you can tap the More button next to Published from the top, and tap Held for review from the box that pops up to view the comments that are waiting for your approval.
Note: Unfortunately, you cannot hold the comments for approval using the YT Studio app. As a workaround, you can follow the procedure given earlier to access the desktop version of YouTube on your smartphone, and then use the method explained in the previous section to get this done. However, it is recommended that you do all such sensitive tasks on a laptop or desktop computer to avoid any errors.
Part 3: Find Someone’s YouTube Comments by User Name
If any of your YouTube videos has thousands of comments and you need to find a particular one from a specific user, checking each remark manually would be an extremely time-consuming and tedious task. Therefore, it is a good idea to let an efficient application do the job for you.
One program, a Google Chrome extension called YCS – YouTube Comment Search to be precise, can help you with this. All you are required to do is, install the extension, go to the video, and search the comment by the name of the user. The step-by-step instructions on how this can be done are given below:
Step 1: Install YCS – YouTube Comment Search
Launch Google Chrome on your desktop or laptop computer, search for YCS – YouTube Comment Search, click Add to Chrome, and click Add extension on the notification box that pops up to install the YCS – YouTube Comment Search extension on your instance of Google Chrome.
Step 2: Load All Comments
Go to your or any other’s YouTube video, and click Load All from the top-right corner of the YouTube Comment Search panel that is present under the description box to allow YCS to scan all the comments the video has received.
Step 3: Search Comments from a Particular User
Choose Comments from the search type drop-down list, enter the name of the user in question in the Search box, and click Search to fetch all their comments on the video.
Part 4: How to Edit and Reply to YouTube Comments?
Editing an existing YouTube comment that you have posted earlier, or replying to the one published by someone else is simple. The process is given below:
Step 1: Edit an Existing Comment
Use any of the methods explained above to locate your YouTube comment that you want to edit. Next, click the More icon from the right of the comment, click Edit from the menu, make the required changes to the text, and click SAVE.
Step 2: Reply to a Comment
Locate the comment that you want to reply to, click REPLY from under the comment, type your text in the available field, and click REPLY.
Part 5: How to Moderate YouTube Comments?
If you publish videos on YouTube that may put some impact on people’s lifestyle, you are likely to face criticism quite often. Therefore, you might want to moderate all your comments before they become visible to the audience so as not to spread negativity among the mass. Fortunately, YouTube helps you get this done easily, and the instructions that teach you the process are given below:
Step 1: Get to Your Channel’s Settings Box
Sign in to your YouTube account, click the Menu icon from the top-left corner of the homepage, and click Your videos from the menu that appears.
From the bottom of the navigation bar on the left of the YouTube Studio page, click Settings to open the channel’s Settings box.
Step 2: Moderate YouTube Comments
Go to the Community category from the left pane, and go to the Defaults tab from the right. Next, choose Hide all comments for review from the Comments on your new videos drop-down list, and click SAVE from the bottom-right corner of the box to moderate all YouTube comments that your new videos receive from this point onward.
Part 6: Tips for Writing Good YouTube Comments
While posting a comment on a YouTube video, it is imperative to keep a few things in mind. Some important tips that might come in handy in this regard are suggested below:
- Make your comment as relevant to the video as you possibly can
- Avoid using harsh language or slangs to maintain decency
- Be genuine while leaving feedback. However, make sure to choose polite words while typing a comment
- In case you want to add some suggestions, make sure to be humble
- Ignore the replies with inappropriate content
FAQs About YouTube Comments
Q1) Why can’t I see the comments I posted?
A: If you cannot see your comments, this could be because the owner or moderator has configured the channel or the video to hold all the comments for review before they are visible on YouTube.
In such a case, you are advised to wait for the authorized person to approve your remark before it is published. Another possibility is that the moderator/owner has added you to the ‘hidden users’ list due to some reason. Even in this case, your comment won’t be visible until you are removed from that list.
Q2) I have enabled ‘Notify me’ about comments and other activity on my channel or videos, but can’t see the comments on my video. Why?
A: You won’t be able to view the unpublished comments or those from the users you have added to the ‘hidden’ list. To fix this problem, you may want to disable moderation from your channel or the videos, and also unhide the users. The processes of both these configurations are explained in detail in the above sections.
Richard Bennett
Richard Bennett is a writer and a lover of all things video.
Follow @Richard Bennett
Top ASMR Gear: Expert-Picked Microphone Selections
Best ASMR Microphones
Richard Bennett
Mar 27, 2024• Proven solutions
ASMR can be triggered by visual, audio, and tactile stimuli, which is the reason why most YouTubers who produce this type of content dedicate a lot of attention to the image and sound quality.
Furthermore, the vast majority of ASMR videos you can find on YouTube utilizes audio triggers to spark the autonomous sensory meridian response in one form or the other. Consequently, the quality of the audio recording determines whether or not your videos will be able to trigger ASMR. That’s why we selected some of the ASMR microphones novice and seasoned YouTubers can use to record the audio for their ASMR YouTube videos.
Part 1: Which Features Should an ASMR Microphone Have?
Thinking that you can use any microphone you can lay your hands on to record sound for you ASMR videos is a mistake, because the quality of the recording may not be at a satisfactory level if your microphone is producing a lot of self-noise or if it is not able to pick up soft noises.
Let’s take a closer look at the features and ASMR microphone should have.
1. The mic’s source of power
A microphone can draw power from two sources, as you can either connect it to a computer via a USB cable or you can use an XLR cable to connect the device to an external power source.
The so-called Phantom Power can be any type of adapter or audio recorder that supplies a microphone with power. All professional condenser microphones are connected to a power source through an XLR connection although some mics can have a built-in phantom power source that requires only an AA battery to function normally.
2. The microphone’s recording direction
Although there are a number of direction categories of microphones, ASMR content produces commonly use Omnidirectional and Binaural mics.
As its name suggests, an omnidirectional microphone can pick up sounds from all sides, which makes it a good option if you want to record ambient sounds like brushing or tapping. However, you should also keep in mind that this type of microphone can capture background noises which may impact the overall quality of the recording.
The binaural mics are composed of two microphones are used to record the left and right channel separately. You don’t necessarily have to get a binaural microphone in order to create a binaural audio recording since you can just use two different microphones to record the left and right channels individually.
3. The level of self-noise a microphone makes
Recording low sounds can be challenging if your microphone is creating humming or crackling noises automatically. The so-called self-noise level a microphone makes is quantified in A-weighted decibels, and ideally, you should get a mic that makes around 15dBA in order to keep sounds a microphone produces automatically at the very minimum.
Besides the self-noise, you should also look into S/N (Signal to Noise Ratio) that depicts the ratio of signal power to noise power. A mic that has approximately 80dBA or more should enable you to record low voices without having to worry about the unwanted noises.
Part 2: What Are The Best Budget ASMR Microphones for Beginners?
If you are thinking about starting an ASMR YouTube channel, you don’t have to get a professional microphone right away, because there lots of affordable mics that will enable you to create crystal-clear audio recordings.
We’ve shortlisted a few of the best budget ASMR microphones for beginners on the market with the aim to help you narrow down your choices. Here’s what they have to offer.
1. Tascam DR-05X Stereo Handheld Digital Recorder
Price: $89.99
This versatile digital recorder can be used for different purposes that range from capturing audio for podcasts to recording your personal notes. The Tascam DR-05X is equipped with a pair of dual condenser microphones that enable you to record low or high sounds with the same level of efficiency.
The device is powered by two AA batteries and it can record for almost 18 hours continually before you have to change the batteries. The Tascam DR-05X’s interface is intuitive which allows you to adjust audio levels, delete a take you didn’t like, or add markers to a recording effortlessly.
What’s more, this handheld digital recorder has a USB port which enables you to connect it to a computer and use it to record audio during live streams or while creating a new ASMR video for your YouTube channel. Nonetheless, this omnidirectional digital recorder doesn’t have an XLR jack and you can’t use it to capture sound from professional microphones.
2. Blue Yeti USB Microphone
Price: $129.99
Arguably the most popular microphone within YouTube’s ASMR community Blue Yeti USB microphone is a versatile mic you can use to record ambient sounds and vocals. The microphone has three condenser capsules which enables you to record audio with it in a broad range of different contexts.
In addition, you can switch between stereo, omnidirectional, cardioid, and bidirectional pattern modes and choose the direction from which the microphone is going to pick up sounds. Blue Yeti has the 20 Hz to 20 kHz frequency response and it features the mute and gain buttons so that you can quickly adjust this value even if you are still recording.
The mic’s signal to noise ratio is 100dBA which means that it produces a minimum amount of noises while you’re recording low sounds. You can use this mic on Windows XP and all other later versions of the OS as well as macOS X or higher.
3. Zoom H4N Pro
Price: $218.99
Yet another digital recorder that is frequently used to capture the audio for ASMR videos. Zoom H4N Pro is equipped with x/Y stereo microphones capable of recording audio at 140dBA SPA and it offers the possibility to record sound on four channels.
What’s more, this device enables you to create 24-bit audio files that can have up to 96kHz, while its output level is set to -10dBu. Zoom H4N Pro has two XLR/TRS jacks that are equipped with locking connectors as well as a 400 W monaural speaker.
Besides connecting XLR microphones to this digital recorder, you can also connect the device to your computer or a Smartphone through its USB port. The device supports SD cards that have up to 32GB of storage space, which means that you can record hours of audio without having to worry about the size of these files.
4. Blue Microphones Baby Bottle SL Large-Diaphragm Condenser Microphone
Price: $399.99
Music industry professionals have been using microphones manufactured by Blue Microphones for decades, which is why it is hardly surprising that their Baby Bottle mic is one of the best ASMR microphones on the market.
This is a cardioid microphone that utilizes the pressure gradient to pick up sounds from all directions. In addition, the device has a large-diaphragm capsule that enables it to produce sounds that are clear and rich in detail.
Moreover, this model has a high pass filter and -20dBA pad that ensures you can record high and soft sounds with the same level of quality. The noise level of this USB microphone is 87dbA which means that it doesn’t create humming sounds while it is recording low sounds. In addition, the microphone’s vintage design makes it a trendy option for all ASMR video content creators in search of a powerful and esthetically pleasing microphone.
Part 3: Which High-End ASMR Mics You Should Try?
As your ASMR YouTube channel grows, the quality of the audio recordings you create is becoming increasingly important, because it impacts the overall quality of the content you’re sharing with your followers.
In case you’re looking for a microphone that is going to improve the quality of your audio recordings you should check out the mics below.
1. Rode NT1-A Stereo Vocal Condenser Microphone
Price: $439.00
Rode is probably the most famous microphone manufacturer in the world, as the company produced some of the best mics ever created. Their NT1-A Stereo Vocal Condenser Microphone features a 1’’ capsule that contains a gold plated diaphragm. The mic has a cardioid polar pattern and its maximum SPL capability cannot exceed 137dBSPL.
Moreover, you can pair two of the NT1-A microphones if you want to create a stereo or binaural recordings. This Rode’s model has a noise level of just 5dB, which makes it one of the best studio microphones on the market.
This mic requires one A battery to function, and it only has an XRL jack, which means that you cannot connect it to a computer via a USB cable. Although its price may seem a bit steep, the audio quality this microphone can produce more than justifies the high cost.
2. 3Dio FS Pro II
Price: $2, 057.88
In case you want to record your ASMR videos with a microphone that meets the highest industry standards, then 3Dio FS Pro II is one of the best choices you have at your disposal. The microphone has the shape of human ears and like all omnidirectional microphones, it can pick up sounds from all directions.
This model has two XLR jacks and a 3.5mm stereo output jack so that you can connect it to a 16-channel mixer or different types of audio recording devices. 3Dio FS Pro II needs 48 V to run normally and it uses 1.9 V batteries that can provide you with up 300 hours of recording time.
The microphone is designed to imitate the way human beings hear by preserving the direction from which the sound came. This means that the listeners of your ASMR recordings are going to be able to detect the direction from which the sounds are coming from.
We’ve summarized the key features of the mics mentioned above for helping you making a quick decision.
| Product name | Polar Pattern | Self-noise / S/N ratio | Power Source type | Best for | Price |
|---|---|---|---|---|---|
| Tascam DR-05X | Stereo, omnidirectional | 92dB | USB | Whispers and low sounds | $89.99 |
| Blue Yeti | Bidirectional, omnidirectional, cardioid, stereo | 100dB | USB | Low and high sounds | $129.99 |
| Zoom H4N Pro | Stereo, omnidirectional | 140dB | USB | Whispers and ambient sounds | $218.99 |
| Blue Microphones Baby Bottle SL Large-Diaphragm Condenser Microphone | Cardioid | 87dB | Phantom power | Whispers and ambient sounds | $399.99 |
| Rode NT1-A Stereo | Cardioid or binaural | 5dB | Phantom power | Ambient sounds and voice recordings | $439.00 |
| 3Dio FS Pro II | Binaural, omnidirectional | 14dB | Phantom power | Ambient sounds and voice recordings | $2, 057.88 |
Part 4: Frequently Asked Questions About ASMR Microphones
1. Should I use a USB or XLR microphone for ASMR recordings?
Although both USB and XLR microphones are frequently used to capture ASMR recordings, and XLR microphone produces a much better sound quality. So, if you want to prioritize the audio quality you should record all your ASMR videos with an XLR microphone.
However, there are quite a few affordable USB mics on the market that will enable you to capture sound in decent quality at a relatively low price.
2. Which type of microphone should be used to record ASMR sounds?
Condenser microphones are a much better option than the dynamic mics because they pick up soft sounds easily. Also, getting an XLR mic is usually a better choice than opting for a USB mic.
3. Is an omnidirectional microphone better for ASMR than the binaural mic?
The answer to this question depends on the type of ASMR video you want to create. If it is important for you to capture tapping or scratching sounds from all sides then you should choose an omnidirectional microphone.
A binaural mic will enable you to create a more immersive audio recording, but they are also more expensive.
Conclusion
In the world of video production, the quality of your equipment often determines how good the final product is going to be. That’s why a good microphone is one of the essential items for an ASMR artist.
Finding a good microphone you can use to record ASMR sounds shouldn’t be too difficult, because you can get a high-quality option in different price tiers. If you are on a budget, then a microphone like Blue Yeti may be a great choice, because it lets you choose between different polar patterns and it produces a great quality of sound.
On the other hand, 3Dio FS Pro II or Rode NT1-A Stereo microphones are worth investing in because they will enable you to record sound at a professional level.
Richard Bennett
Richard Bennett is a writer and a lover of all things video.
Follow @Richard Bennett
Richard Bennett
Mar 27, 2024• Proven solutions
ASMR can be triggered by visual, audio, and tactile stimuli, which is the reason why most YouTubers who produce this type of content dedicate a lot of attention to the image and sound quality.
Furthermore, the vast majority of ASMR videos you can find on YouTube utilizes audio triggers to spark the autonomous sensory meridian response in one form or the other. Consequently, the quality of the audio recording determines whether or not your videos will be able to trigger ASMR. That’s why we selected some of the ASMR microphones novice and seasoned YouTubers can use to record the audio for their ASMR YouTube videos.
Part 1: Which Features Should an ASMR Microphone Have?
Thinking that you can use any microphone you can lay your hands on to record sound for you ASMR videos is a mistake, because the quality of the recording may not be at a satisfactory level if your microphone is producing a lot of self-noise or if it is not able to pick up soft noises.
Let’s take a closer look at the features and ASMR microphone should have.
1. The mic’s source of power
A microphone can draw power from two sources, as you can either connect it to a computer via a USB cable or you can use an XLR cable to connect the device to an external power source.
The so-called Phantom Power can be any type of adapter or audio recorder that supplies a microphone with power. All professional condenser microphones are connected to a power source through an XLR connection although some mics can have a built-in phantom power source that requires only an AA battery to function normally.
2. The microphone’s recording direction
Although there are a number of direction categories of microphones, ASMR content produces commonly use Omnidirectional and Binaural mics.
As its name suggests, an omnidirectional microphone can pick up sounds from all sides, which makes it a good option if you want to record ambient sounds like brushing or tapping. However, you should also keep in mind that this type of microphone can capture background noises which may impact the overall quality of the recording.
The binaural mics are composed of two microphones are used to record the left and right channel separately. You don’t necessarily have to get a binaural microphone in order to create a binaural audio recording since you can just use two different microphones to record the left and right channels individually.
3. The level of self-noise a microphone makes
Recording low sounds can be challenging if your microphone is creating humming or crackling noises automatically. The so-called self-noise level a microphone makes is quantified in A-weighted decibels, and ideally, you should get a mic that makes around 15dBA in order to keep sounds a microphone produces automatically at the very minimum.
Besides the self-noise, you should also look into S/N (Signal to Noise Ratio) that depicts the ratio of signal power to noise power. A mic that has approximately 80dBA or more should enable you to record low voices without having to worry about the unwanted noises.
Part 2: What Are The Best Budget ASMR Microphones for Beginners?
If you are thinking about starting an ASMR YouTube channel, you don’t have to get a professional microphone right away, because there lots of affordable mics that will enable you to create crystal-clear audio recordings.
We’ve shortlisted a few of the best budget ASMR microphones for beginners on the market with the aim to help you narrow down your choices. Here’s what they have to offer.
1. Tascam DR-05X Stereo Handheld Digital Recorder
Price: $89.99
This versatile digital recorder can be used for different purposes that range from capturing audio for podcasts to recording your personal notes. The Tascam DR-05X is equipped with a pair of dual condenser microphones that enable you to record low or high sounds with the same level of efficiency.
The device is powered by two AA batteries and it can record for almost 18 hours continually before you have to change the batteries. The Tascam DR-05X’s interface is intuitive which allows you to adjust audio levels, delete a take you didn’t like, or add markers to a recording effortlessly.
What’s more, this handheld digital recorder has a USB port which enables you to connect it to a computer and use it to record audio during live streams or while creating a new ASMR video for your YouTube channel. Nonetheless, this omnidirectional digital recorder doesn’t have an XLR jack and you can’t use it to capture sound from professional microphones.
2. Blue Yeti USB Microphone
Price: $129.99
Arguably the most popular microphone within YouTube’s ASMR community Blue Yeti USB microphone is a versatile mic you can use to record ambient sounds and vocals. The microphone has three condenser capsules which enables you to record audio with it in a broad range of different contexts.
In addition, you can switch between stereo, omnidirectional, cardioid, and bidirectional pattern modes and choose the direction from which the microphone is going to pick up sounds. Blue Yeti has the 20 Hz to 20 kHz frequency response and it features the mute and gain buttons so that you can quickly adjust this value even if you are still recording.
The mic’s signal to noise ratio is 100dBA which means that it produces a minimum amount of noises while you’re recording low sounds. You can use this mic on Windows XP and all other later versions of the OS as well as macOS X or higher.
3. Zoom H4N Pro
Price: $218.99
Yet another digital recorder that is frequently used to capture the audio for ASMR videos. Zoom H4N Pro is equipped with x/Y stereo microphones capable of recording audio at 140dBA SPA and it offers the possibility to record sound on four channels.
What’s more, this device enables you to create 24-bit audio files that can have up to 96kHz, while its output level is set to -10dBu. Zoom H4N Pro has two XLR/TRS jacks that are equipped with locking connectors as well as a 400 W monaural speaker.
Besides connecting XLR microphones to this digital recorder, you can also connect the device to your computer or a Smartphone through its USB port. The device supports SD cards that have up to 32GB of storage space, which means that you can record hours of audio without having to worry about the size of these files.
4. Blue Microphones Baby Bottle SL Large-Diaphragm Condenser Microphone
Price: $399.99
Music industry professionals have been using microphones manufactured by Blue Microphones for decades, which is why it is hardly surprising that their Baby Bottle mic is one of the best ASMR microphones on the market.
This is a cardioid microphone that utilizes the pressure gradient to pick up sounds from all directions. In addition, the device has a large-diaphragm capsule that enables it to produce sounds that are clear and rich in detail.
Moreover, this model has a high pass filter and -20dBA pad that ensures you can record high and soft sounds with the same level of quality. The noise level of this USB microphone is 87dbA which means that it doesn’t create humming sounds while it is recording low sounds. In addition, the microphone’s vintage design makes it a trendy option for all ASMR video content creators in search of a powerful and esthetically pleasing microphone.
Part 3: Which High-End ASMR Mics You Should Try?
As your ASMR YouTube channel grows, the quality of the audio recordings you create is becoming increasingly important, because it impacts the overall quality of the content you’re sharing with your followers.
In case you’re looking for a microphone that is going to improve the quality of your audio recordings you should check out the mics below.
1. Rode NT1-A Stereo Vocal Condenser Microphone
Price: $439.00
Rode is probably the most famous microphone manufacturer in the world, as the company produced some of the best mics ever created. Their NT1-A Stereo Vocal Condenser Microphone features a 1’’ capsule that contains a gold plated diaphragm. The mic has a cardioid polar pattern and its maximum SPL capability cannot exceed 137dBSPL.
Moreover, you can pair two of the NT1-A microphones if you want to create a stereo or binaural recordings. This Rode’s model has a noise level of just 5dB, which makes it one of the best studio microphones on the market.
This mic requires one A battery to function, and it only has an XRL jack, which means that you cannot connect it to a computer via a USB cable. Although its price may seem a bit steep, the audio quality this microphone can produce more than justifies the high cost.
2. 3Dio FS Pro II
Price: $2, 057.88
In case you want to record your ASMR videos with a microphone that meets the highest industry standards, then 3Dio FS Pro II is one of the best choices you have at your disposal. The microphone has the shape of human ears and like all omnidirectional microphones, it can pick up sounds from all directions.
This model has two XLR jacks and a 3.5mm stereo output jack so that you can connect it to a 16-channel mixer or different types of audio recording devices. 3Dio FS Pro II needs 48 V to run normally and it uses 1.9 V batteries that can provide you with up 300 hours of recording time.
The microphone is designed to imitate the way human beings hear by preserving the direction from which the sound came. This means that the listeners of your ASMR recordings are going to be able to detect the direction from which the sounds are coming from.
We’ve summarized the key features of the mics mentioned above for helping you making a quick decision.
| Product name | Polar Pattern | Self-noise / S/N ratio | Power Source type | Best for | Price |
|---|---|---|---|---|---|
| Tascam DR-05X | Stereo, omnidirectional | 92dB | USB | Whispers and low sounds | $89.99 |
| Blue Yeti | Bidirectional, omnidirectional, cardioid, stereo | 100dB | USB | Low and high sounds | $129.99 |
| Zoom H4N Pro | Stereo, omnidirectional | 140dB | USB | Whispers and ambient sounds | $218.99 |
| Blue Microphones Baby Bottle SL Large-Diaphragm Condenser Microphone | Cardioid | 87dB | Phantom power | Whispers and ambient sounds | $399.99 |
| Rode NT1-A Stereo | Cardioid or binaural | 5dB | Phantom power | Ambient sounds and voice recordings | $439.00 |
| 3Dio FS Pro II | Binaural, omnidirectional | 14dB | Phantom power | Ambient sounds and voice recordings | $2, 057.88 |
Part 4: Frequently Asked Questions About ASMR Microphones
1. Should I use a USB or XLR microphone for ASMR recordings?
Although both USB and XLR microphones are frequently used to capture ASMR recordings, and XLR microphone produces a much better sound quality. So, if you want to prioritize the audio quality you should record all your ASMR videos with an XLR microphone.
However, there are quite a few affordable USB mics on the market that will enable you to capture sound in decent quality at a relatively low price.
2. Which type of microphone should be used to record ASMR sounds?
Condenser microphones are a much better option than the dynamic mics because they pick up soft sounds easily. Also, getting an XLR mic is usually a better choice than opting for a USB mic.
3. Is an omnidirectional microphone better for ASMR than the binaural mic?
The answer to this question depends on the type of ASMR video you want to create. If it is important for you to capture tapping or scratching sounds from all sides then you should choose an omnidirectional microphone.
A binaural mic will enable you to create a more immersive audio recording, but they are also more expensive.
Conclusion
In the world of video production, the quality of your equipment often determines how good the final product is going to be. That’s why a good microphone is one of the essential items for an ASMR artist.
Finding a good microphone you can use to record ASMR sounds shouldn’t be too difficult, because you can get a high-quality option in different price tiers. If you are on a budget, then a microphone like Blue Yeti may be a great choice, because it lets you choose between different polar patterns and it produces a great quality of sound.
On the other hand, 3Dio FS Pro II or Rode NT1-A Stereo microphones are worth investing in because they will enable you to record sound at a professional level.
Richard Bennett
Richard Bennett is a writer and a lover of all things video.
Follow @Richard Bennett
Also read:
- Harnessing Powerful Tools for Effective YouTubers' SEO
- [Updated] Elevate Views A Guide to Best YouTube Hash Tags
- [Updated] Elevate Your Content Strategies to Climb YouTube Ranks
- In 2024, 5-Top Link Minimizers Transforming YouTube Watchability
- Easy-Peasy YouTube Tutorials Making Content That Works for All for 2024
- [Updated] Controlling Comment Visibility on YouTube Videos
- [New] Daily Dosage of Serenity Top Yoga Channels for Life
- The Ultimate Guide to YouTube SEO Optimization
- Chart Your Course Navigating the Waters of YouTube Subscription Surges for 2024
- Obtain Exclusive Free Media From Elite 4 YouTube Clips
- [New] Conceptualists Engineering Marvel Online Worlds
- [New] Earning Through Online Beauty Networks
- A Pro's Handbook to YouTube Income Multiplatform Use
- Learn the Art of Crafting Short YouTube Videos
- Elevating Your Content's Impact An In-Depth Look at YouTube Thumbnail Size
- 7 Uncomplicated Steps for Skyrocketing Subscribers for 2024
- In 2024, Enhancing Viewer Interest with Accurate Time Stamping
- Choosing Streaming Giants Vimeo, YouTube, or DailyMotion for 2024
- The Ultimate Creator Toolkit Commanding Video Kingdoms
- Snappy and Simple Steps for Posting Short Videos Online
- 10 Best YouTube Keyword Tools to Get More Views
- Direct Transfer Path YouTube Content to Dailymotion Hub for 2024
- Precision Cinematography Ideal Lenses for Digital Storytellers
- [New] Beginner's Steps to Broadcast on Youtube via OBS
- [New] Elevating Your Video Content YouTube to IGTV Transition
- [Updated] Enchanting Viewers The Art of Crafting Engaging YouTube Description Templates
- In 2024, A Closer Look at YouTube’s ‘Unlisted’ Content Category
- 2024 Approved Connecting YouTube & TikTok Your Ultimate Step-by-Step Walkthrough
- [Updated] Engaging Viewers First Impressions The Art of Backdrop Selection in Thumbnails
- Maximize Youtube Income Insights and Techniques
- Exploring the World of YouTube Where Are My Comments?
- Elevate Your Video Game Top Tips for Perfect Live Thumbnails
- Innovative Orderings in YouTube Music Playlists
- [Updated] Breaking Into Livestrances A Gamers' Guide to YouTube Success
- Mastering the Download of Your YouTube Playlist Today!
- Beginner’s Essential Guide to YouTube Video Editing Magic for 2024
- [New] Delving Into the World of ASMR Soundscapes
- 5 Innovative YouTube Thumbnail Designers for Aspiring Filmmakers for 2024
- [New] Elevate Video Popularity with Strategic #Hashtags
- The Art & Science of Producing Engaging Try-On Vlogs
- How to Remove Black Bars From YouTube Videos
- [Updated] Dominating the Digital Space 5 Tips for Video Visibility Victory
- [Updated] In 2024, Here's What You Don't Know About Instagram Story Viewer
- [New] Elite Offline Screen Capturing Apps for PC for 2024
- In 2024, Tricks to Optimize Live Streaming of Your Snapchat Content
- [New] 2024 Approved Exploring Facebook's 2023 Video Revolution The Rise of Compact Clips
- Updated In 2024, Discover the Best Audio Conversion Software for Your Needs
- Updated 2024 Approved The Ultimate Pathway for iPhone Speech Capture and Documentation
- 2024 Approved Reel In Attention by Emulating TikTok Stardom on Instagram
- [Updated] Premier Hashtags Monitoring on Facebook, Twitter & Instagram
- In 2024, Easiest Guide How to Clone Oppo Reno 8T Phone? | Dr.fone
- [New] The Stealthy Lens Approach to Consuming Instagram Stories on Desktop & Mobile Devices for 2024
- New In 2024, Best Public Domain Picture Sites 2023 Edition
- Discovering Your Lately Watched Fb Movies Made Simple for 2024
- [Updated] Efficiently Documenting Your FB Chats & Meets
- 2024 Approved Unlocking Snapchat's Secret Symbolic Messages
- [Updated] Achieving Perfect Silence Swaps with Reaper
- Fixing Foneazy MockGo Not Working On Apple iPhone 14 Plus | Dr.fone
- [Updated] Mastering the Art of Facecam Videos for 2024
- Unlock Apple iPhone 6 Plus With Forgotten Passcode Different Methods You Can Try
- Complete Fixes To Solve iPhone 8 Plus Randomly Asking for Apple ID Password
- Overview of the Best Vivo Y100 5G Screen Mirroring App | Dr.fone
- New Ways You Can Master to Make Claymation Videos
- Title: Discovering Your YouTube Comments on Various Devices
- Author: Kevin
- Created at : 2024-05-25 15:00:21
- Updated at : 2024-05-26 15:00:21
- Link: https://youtube-videos.techidaily.com/discovering-your-youtube-comments-on-various-devices/
- License: This work is licensed under CC BY-NC-SA 4.0.
