
:max_bytes(150000):strip_icc():format(webp)/copilot-b197f8dd690845d5bf8ebbc082c89c20.jpg)
Discover the Leading Online Video Cutter for YouTube
Discover the Leading Online Video Cutter for YouTube
YouTube is one of the most popular video-sharing social media websites. It offers a wide range of media, including music videos, trailers, live broadcasts, games, and how-to videos. It also has the greatest societal influence because most artists, musicians, and significant corporations utilize this platform to promote their work.
However, because of the growing consumer interest in media content, many providers utilize it to advertise businesses and products. These paid marketing videos aren’t always relevant to the material you want to see. With these circumstances in mind, this article will help you find an excellent YouTube Video Trimmer Online, which you may use to clip and trim YouTube videos.
In this article
01 Part 1: Best YouTube Video Trimmer Online
02 Part 2: FAQs About Online YouTube Video Trimmer
Part 1: Best YouTube Video Trimmer Online
YouTube is amongst the most frequently used social media platform. People get their content ideas and teach others about them. However, videos might contain some unnecessary parts, and it can be a problem if you want to save the video. The following YouTube trimmers online can assist you.
1. Filmora Instant Cutter Tool [Offline but More Powerful]
Before you try the below online tools, Filmora Instant Cutter tool will be another choice when you need more powerful features. It lets you input huge video clips in formats and rapidly reduce or combine them without re-encoding. This is a very valuable tool when working with high-resolution movies. It supports MP4/MOV and MTS/M2TS video files.It maintains the quality of the video It supports 4K UHD video formats It allows you to merge the videos You can trim massive files with ease.
You can download Youtube videos first and then make trimming or add effects on it.
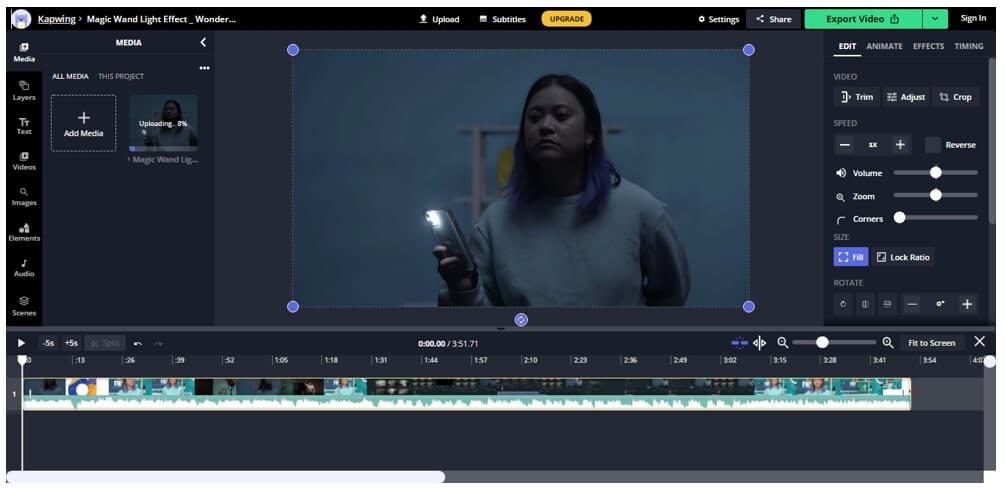
2. Kapwing
Kapwing is an online video editor that helps you edit videos without downloading the software. It features several editing tools with an easy-to-use interface. There’s no need to register yourself for editing the videos through Kapwing. That’s why it has millions of users worldwide.
Kapwing’s Video Trimmer makes it simple to trim YouTube videos. The service includes the same video cutting functionality as before but with a much prettier UI. After pasting the YouTube video URL to crop, you may use the easy-to-use timestamp slider to decide the sections of the YouTube video to edit.
Pros
- Different templates
- Multiple editing features
- Easy-to-use interface
- Fast
Cons
- Leaves a watermark if you don’t sign up
Find out more online video editors without a watermark.
3. VEED .iO
VEED.io video editor is a simple yet powerful video-editing program that allow s users to make stunning videos. VEED may be an important element of your sales funnel. With this program, you may edit, enhance, and add a lot of creativity to presentations, marketing videos, review videos, or video blogging.
You need to choose a file and start trimming it. After that, download the video with its easy-to-use interface. You need to sign up for editing the video with the VEED online tool. Moreover, there’s no watermark in the exported video.
Pros
- Fast and straightforward
- Multiple output options
- No watermark
Cons
- Minor bugs
4. Flixier
Flixier provides powerful video editing software with 1-minute exports to any device, easy collaboration, and enough cloud storage, all in one window. Flixier enables users to export any video, independent of technology. Cloud storage and complete version history are available, including feedback comments, sophisticated exporting, and email notifications.
Select a file and begin cutting it. Then, using the simple interface, download the video. No sign-up is required for the Flixier online tool to modify the video. In addition, there is no watermark in the exported video.
Pros
- 4x faster
- Cloud storage and history
- No registration
- Supports multiple operating systems
Cons
- Exports video up to one minute
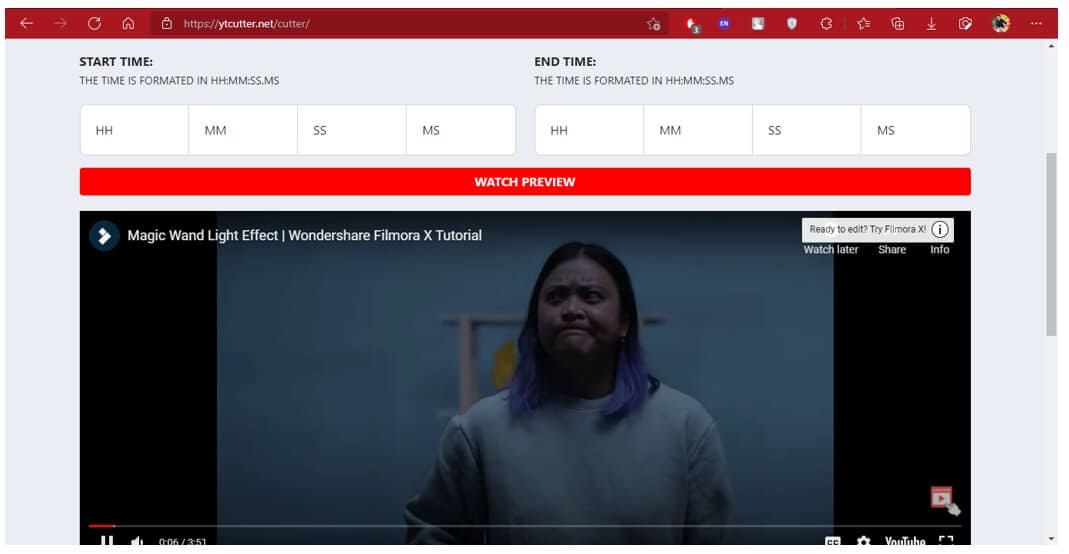
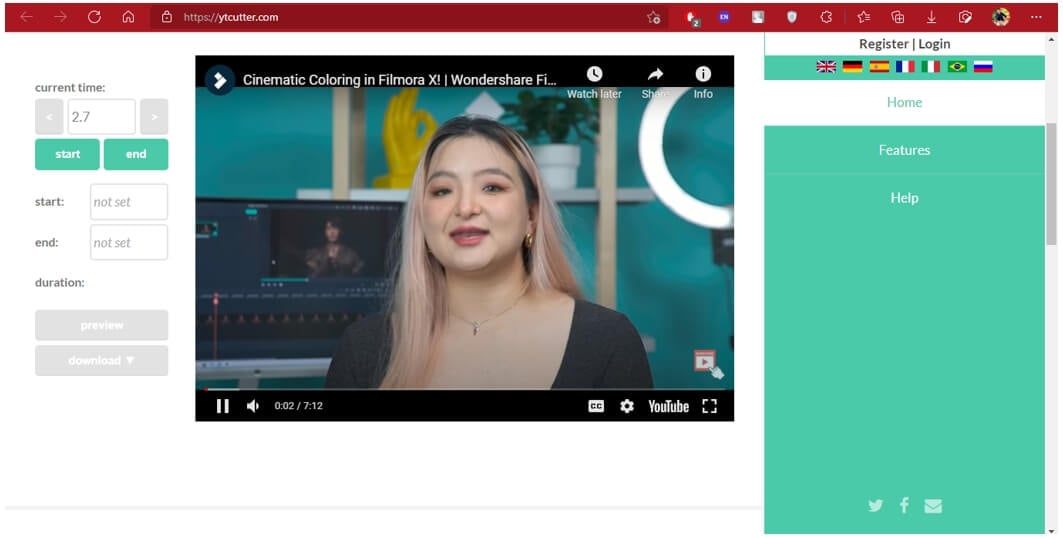
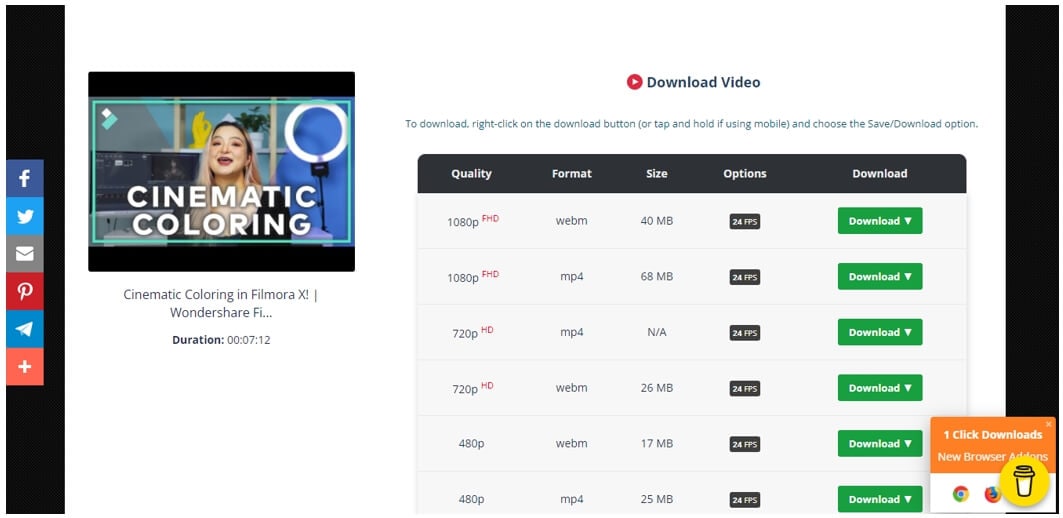
5. YTCutter.net
It is one of the best YouTube to mp3 converters online with trimmer available. YTCutter.net has various editing features that help you easily trim and modify the videos. It allows you to watch the video in preview mode before downloading it. It does not leave any watermark on the exported video.
You may extract favourite moments from YouTube videos with this ad-supported web tool. The app’s operation is rather simple. You have to paste a YouTube URL and set the start and end times. After that, you may download the cropped video, audio, or GIF. However, you need to register yourself for downloading the video through this tool.
Pros
- No watermark
- Simple interface
- Several editing features
Cons
- Requires an account to save the video to your profile or your device
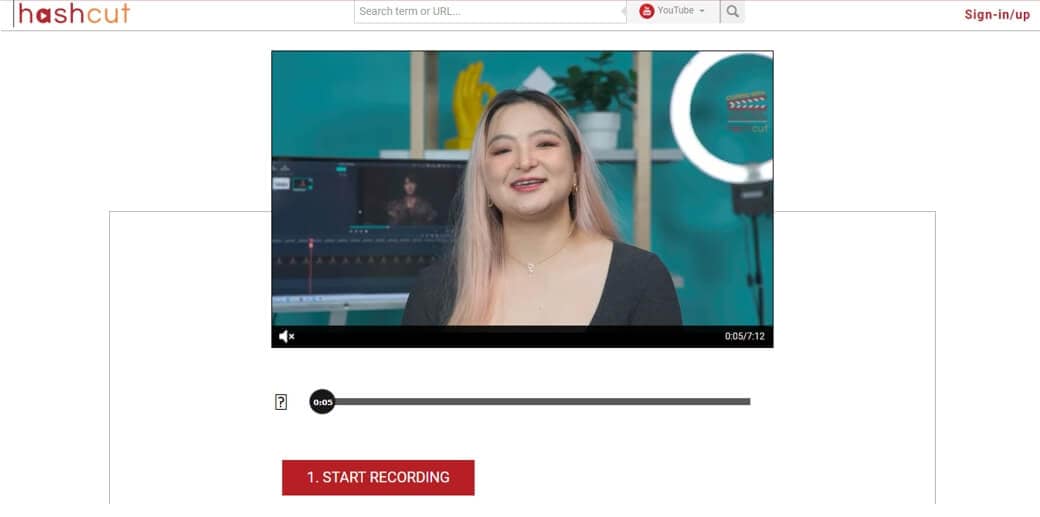
6. HashCut
HashCut is a unique YouTube online trimmer that allows you to save the highlights. It is possible to extract a segment from a YouTube video by tracing the section you require. Even better, you may customize the text and stickers with your tastes.
To begin, open your favourite web browser and navigate to the online YouTube trimmer. Paste the URL and specify the start and finish points of the clip you wish to obtain. Then, save the video. Furthermore, you may use its many capabilities to enhance the video, such as previewing footage, adding annotation, and embedding stickers on the film. It requires sign-up to edit the video and leaves a watermark on the exported one.
Pros
- Adds text and animations
- Chrome extension
- Preview Mode
- Embeds stickers
Cons
- Slow uploading procedure
7. YT Cutter
As the name indicates, YT Cutter is a YouTube video trimmer and downloader online that allows you to remove specific segments from YouTube videos. It can operate successfully online without any registration. Furthermore, you may accurately clip YouTube videos to 0.1 seconds, capture screenshots, and output files to video, animation GIF, or audio.
Paste the URL into the YT Cutter search field and wait for the video to refresh. Then, press the start and finish buttons to give your movie a beginning and an endpoint. Then, save the movie to your device in the format of your choice. Moreover, it does not leave any watermark on the exported video.
Pros
- No watermark
- User-friendly interface
- Supports multiple output formats
Cons
- Limited input formats
8. YouTube4kDownloader
Because of its simple interface, YouTube4kdownloader is a thorough and simple online YouTube video trimmer. It has a tool that allows you to trim or edit video segments from YouTube videos. One of its cutting features includes the ability to go to the beginning and conclusion of the choice for fast and easy clip trimming.
It also features a play and stop button that allows you to crop a specific scene from a YouTube video. Aside from that, it demonstrates three methods for sharing the cropped video link, including copying the plugin, the URL or media link, and watching the trimmed video on the YouTube website. It does not require sign-up for editing the video and leaves a watermark on the exported one.
Pros
- Trim specific segments
- No sign-up
- No watermark
Cons
- Completely web-based
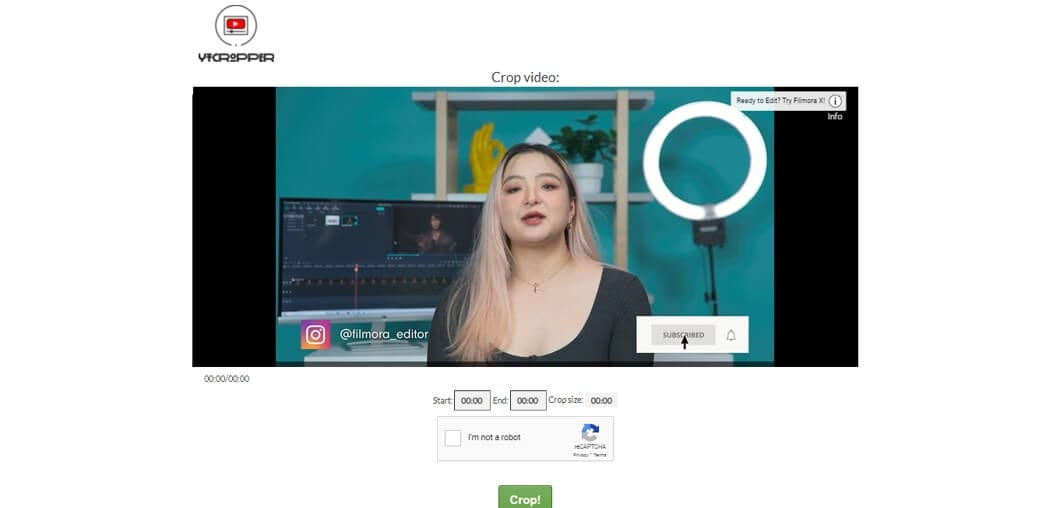
9. YT Cropper
Another YouTube video clipper online is YT Cropper, allowing users to extract particular clips from YouTube videos. Its Drag function allows users to choose a beginning and finishing point for the clips, and the markers will assist users in locating the clips that can be obtained that they desire. Users can make use of a one-of-a-kind feature known as looping.
Copy and paste the URL into the search field. Wait for the system to evaluate the video. Finally, use the markers to crop a select scene from a YouTube video. Then, to evaluate your clips, click the trim button. No sign-up and watermark are required for this YouTube trimmer.
Pros
- Looping feature
- Drag and drop function
- Easy trimming
Cons
- Slow
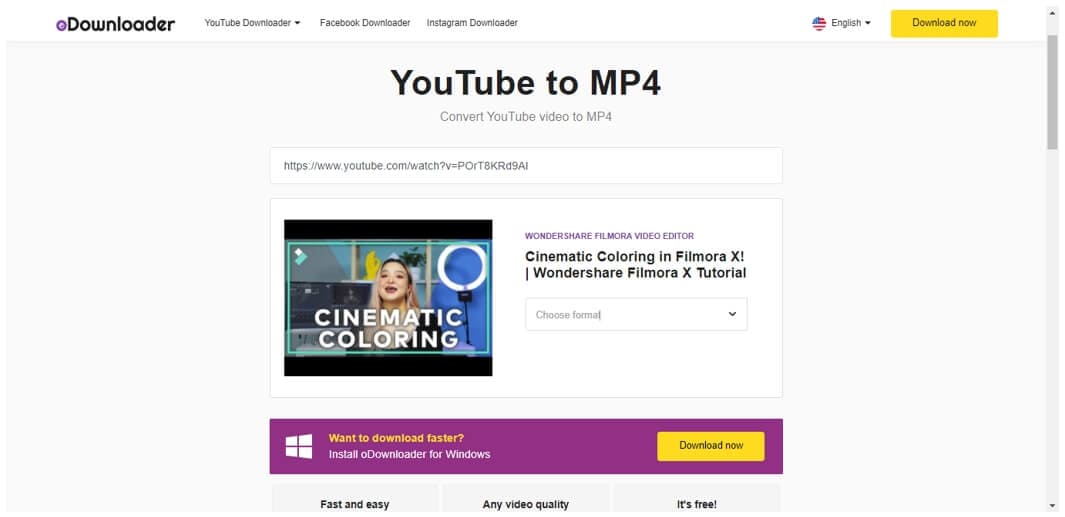
10. Odownloader
Odownloader Is another ad-supported YouTube trimmer that allows you to chop YouTube videos quickly. It allows you to download either audio alone or complete video. You may also choose between .webm and.mp4 formats.
Paste the link or URL into the search field and wait for the video to refresh. Then, press the start and finish buttons to give your movie a beginning and an endpoint. Then, save the movie to your device in the format of your choice. Moreover, it does not leave any watermark on the exported video.
Pros
- Exports in audio format as well
- Multiple output formats
- Easy-to-use
Cons
- Several ads
11. VideoCrops
It allows users to crop YouTube videos by dragging the two marks to the beginning and conclusion of the clip. It provides a high level of security, as only the users can access their data, which cannot be viewed by other users or on any site.
Cropping a video entails three steps. The video is first downloaded to the server. This may potentially take some time, depending on the length of the video. Second, the video has been trimmed. Finally, the video is saved as.MP4. You should also consider that this is a free site with limited resources.
Pros
- Easy trimming
- No watermark
- Free website
- High-level security
Cons
- Limited resources

Part 2: FAQs About Online YouTube Video Trimmer
Does YouTube have a trimmer?
Yes, you may cut videos after they’ve been uploaded to the YouTube site. You may chop off the beginning, middle, or ending of your movie on a computer. It is not necessary to re-upload a video to cut it. The video’s URL, view counts, and comments will remain unchanged. This functionality is only accessible for less than 6 hours long videos.
What is the difference between cut and trim in video editing?
Cutting is the process of separating pieces of a clip. You can reuse these portions in another video or delete them entirely. On the other hand, trimming is the process of eliminating or expanding the duration of a video clip’s front or tail regions in video editing.
Conclusion
Numerous programs will swiftly upload and trim your tiny movies, ideal for folks who make YouTube videos. Then, some tools can handle huge and bulky files and are ideal for file output and video quality. It’s a shame that some of these tools need payment to access their additional editing features. However, you have an excellent YouTube Video Trimmer Online, which is completely free and listed in detail within this article.
02 Part 2: FAQs About Online YouTube Video Trimmer
Part 1: Best YouTube Video Trimmer Online
YouTube is amongst the most frequently used social media platform. People get their content ideas and teach others about them. However, videos might contain some unnecessary parts, and it can be a problem if you want to save the video. The following YouTube trimmers online can assist you.
1. Filmora Instant Cutter Tool [Offline but More Powerful]
Before you try the below online tools, Filmora Instant Cutter tool will be another choice when you need more powerful features. It lets you input huge video clips in formats and rapidly reduce or combine them without re-encoding. This is a very valuable tool when working with high-resolution movies. It supports MP4/MOV and MTS/M2TS video files.It maintains the quality of the video It supports 4K UHD video formats It allows you to merge the videos You can trim massive files with ease.
You can download Youtube videos first and then make trimming or add effects on it.
2. Kapwing
Kapwing is an online video editor that helps you edit videos without downloading the software. It features several editing tools with an easy-to-use interface. There’s no need to register yourself for editing the videos through Kapwing. That’s why it has millions of users worldwide.
Kapwing’s Video Trimmer makes it simple to trim YouTube videos. The service includes the same video cutting functionality as before but with a much prettier UI. After pasting the YouTube video URL to crop, you may use the easy-to-use timestamp slider to decide the sections of the YouTube video to edit.
Pros
- Different templates
- Multiple editing features
- Easy-to-use interface
- Fast
Cons
- Leaves a watermark if you don’t sign up
Find out more online video editors without a watermark.
3. VEED .iO
VEED.io video editor is a simple yet powerful video-editing program that allow s users to make stunning videos. VEED may be an important element of your sales funnel. With this program, you may edit, enhance, and add a lot of creativity to presentations, marketing videos, review videos, or video blogging.
You need to choose a file and start trimming it. After that, download the video with its easy-to-use interface. You need to sign up for editing the video with the VEED online tool. Moreover, there’s no watermark in the exported video.
Pros
- Fast and straightforward
- Multiple output options
- No watermark
Cons
- Minor bugs
4. Flixier
Flixier provides powerful video editing software with 1-minute exports to any device, easy collaboration, and enough cloud storage, all in one window. Flixier enables users to export any video, independent of technology. Cloud storage and complete version history are available, including feedback comments, sophisticated exporting, and email notifications.
Select a file and begin cutting it. Then, using the simple interface, download the video. No sign-up is required for the Flixier online tool to modify the video. In addition, there is no watermark in the exported video.
Pros
- 4x faster
- Cloud storage and history
- No registration
- Supports multiple operating systems
Cons
- Exports video up to one minute
5. YTCutter.net
It is one of the best YouTube to mp3 converters online with trimmer available. YTCutter.net has various editing features that help you easily trim and modify the videos. It allows you to watch the video in preview mode before downloading it. It does not leave any watermark on the exported video.
You may extract favourite moments from YouTube videos with this ad-supported web tool. The app’s operation is rather simple. You have to paste a YouTube URL and set the start and end times. After that, you may download the cropped video, audio, or GIF. However, you need to register yourself for downloading the video through this tool.
Pros
- No watermark
- Simple interface
- Several editing features
Cons
- Requires an account to save the video to your profile or your device
6. HashCut
HashCut is a unique YouTube online trimmer that allows you to save the highlights. It is possible to extract a segment from a YouTube video by tracing the section you require. Even better, you may customize the text and stickers with your tastes.
To begin, open your favourite web browser and navigate to the online YouTube trimmer. Paste the URL and specify the start and finish points of the clip you wish to obtain. Then, save the video. Furthermore, you may use its many capabilities to enhance the video, such as previewing footage, adding annotation, and embedding stickers on the film. It requires sign-up to edit the video and leaves a watermark on the exported one.
Pros
- Adds text and animations
- Chrome extension
- Preview Mode
- Embeds stickers
Cons
- Slow uploading procedure
7. YT Cutter
As the name indicates, YT Cutter is a YouTube video trimmer and downloader online that allows you to remove specific segments from YouTube videos. It can operate successfully online without any registration. Furthermore, you may accurately clip YouTube videos to 0.1 seconds, capture screenshots, and output files to video, animation GIF, or audio.
Paste the URL into the YT Cutter search field and wait for the video to refresh. Then, press the start and finish buttons to give your movie a beginning and an endpoint. Then, save the movie to your device in the format of your choice. Moreover, it does not leave any watermark on the exported video.
Pros
- No watermark
- User-friendly interface
- Supports multiple output formats
Cons
- Limited input formats
8. YouTube4kDownloader
Because of its simple interface, YouTube4kdownloader is a thorough and simple online YouTube video trimmer. It has a tool that allows you to trim or edit video segments from YouTube videos. One of its cutting features includes the ability to go to the beginning and conclusion of the choice for fast and easy clip trimming.
It also features a play and stop button that allows you to crop a specific scene from a YouTube video. Aside from that, it demonstrates three methods for sharing the cropped video link, including copying the plugin, the URL or media link, and watching the trimmed video on the YouTube website. It does not require sign-up for editing the video and leaves a watermark on the exported one.
Pros
- Trim specific segments
- No sign-up
- No watermark
Cons
- Completely web-based
9. YT Cropper
Another YouTube video clipper online is YT Cropper, allowing users to extract particular clips from YouTube videos. Its Drag function allows users to choose a beginning and finishing point for the clips, and the markers will assist users in locating the clips that can be obtained that they desire. Users can make use of a one-of-a-kind feature known as looping.
Copy and paste the URL into the search field. Wait for the system to evaluate the video. Finally, use the markers to crop a select scene from a YouTube video. Then, to evaluate your clips, click the trim button. No sign-up and watermark are required for this YouTube trimmer.
Pros
- Looping feature
- Drag and drop function
- Easy trimming
Cons
- Slow
10. Odownloader
Odownloader Is another ad-supported YouTube trimmer that allows you to chop YouTube videos quickly. It allows you to download either audio alone or complete video. You may also choose between .webm and.mp4 formats.
Paste the link or URL into the search field and wait for the video to refresh. Then, press the start and finish buttons to give your movie a beginning and an endpoint. Then, save the movie to your device in the format of your choice. Moreover, it does not leave any watermark on the exported video.
Pros
- Exports in audio format as well
- Multiple output formats
- Easy-to-use
Cons
- Several ads
11. VideoCrops
It allows users to crop YouTube videos by dragging the two marks to the beginning and conclusion of the clip. It provides a high level of security, as only the users can access their data, which cannot be viewed by other users or on any site.
Cropping a video entails three steps. The video is first downloaded to the server. This may potentially take some time, depending on the length of the video. Second, the video has been trimmed. Finally, the video is saved as.MP4. You should also consider that this is a free site with limited resources.
Pros
- Easy trimming
- No watermark
- Free website
- High-level security
Cons
- Limited resources
Part 2: FAQs About Online YouTube Video Trimmer
Does YouTube have a trimmer?
Yes, you may cut videos after they’ve been uploaded to the YouTube site. You may chop off the beginning, middle, or ending of your movie on a computer. It is not necessary to re-upload a video to cut it. The video’s URL, view counts, and comments will remain unchanged. This functionality is only accessible for less than 6 hours long videos.
What is the difference between cut and trim in video editing?
Cutting is the process of separating pieces of a clip. You can reuse these portions in another video or delete them entirely. On the other hand, trimming is the process of eliminating or expanding the duration of a video clip’s front or tail regions in video editing.
Conclusion
Numerous programs will swiftly upload and trim your tiny movies, ideal for folks who make YouTube videos. Then, some tools can handle huge and bulky files and are ideal for file output and video quality. It’s a shame that some of these tools need payment to access their additional editing features. However, you have an excellent YouTube Video Trimmer Online, which is completely free and listed in detail within this article.
Enhancing Viewership with Informative YouTube Video Captions
How to Add Text to YouTube Video Before or After Uploading

Richard Bennett
Mar 27, 2024• Proven solutions
A great way to emphasize something you say in your vlog is to have your words appear next to you as you say them . Adding text to YouTube videos can look really professional. You might put a title at the beginning of your video, use bullet points to help people keep track of your monologue, or to highlight an important point by writing it on your screen. When you use text in your videos there are a few things you need to keep in mind. In this article, I will share with you 2 ways to add text/subtitles/captions to YouTube videos, whether you need to add text to the video during editing and upload it to YouTube later, or you have uploaded the video to YouTube already and want to add some captions and subtitles to complement it.
- Part 1: Add text to video before uploading YouTube
- Part 2: Add Text to YouTube video after uploading
- Part 3: Top 3 YouTube Video Text Tips
How to Add Text to YouTube Video Before Uploading
Before uploading the video to YouTube, it is recommended to add text to the video first. You can add simple texts and captions to videos with the free video editing software. To add more text effects to the video, you can use Filmora, Sony Vegas Movie Studio and Adobe Premiere CC based on your video editing skills and needs. These software programs are great video editors, which can help you input text easily.
1. Use Filmora to Add text to Videos
There are plenty of Text effects built in Filmora, you can apply motions and animation to texts, titles, subtitles, end credits and openers as well. Each title preset will present different effects. You can add multiple text boxes and place the text to any position in need. Besides writing texts to video, you can select the target font, size and color and customize the text effect in detail as well. To add text to a video in Filmora is easy, just follow the steps below:

- Open up Filmora and drag a clip into your timeline. Then, go to Text/Credit.
- Find a style that you like and drag it into your timeline where you want your text to appear. Make sure your text is selected in your timeline and click the Advanced Text Editing icon, which looks like a pen and paper.
- Insert your own words and drag your text to where you want it on the screen. Adjust the size by dragging the blue squares which surround your text.
- To change the color of your text, go into the Customize menu. You will find it near the top left of your screen. While you are in Customize there will be a section called Fill. This is where you select the color of your text. You can even change the fill type to ‘gradient fill’ and have your text transition between two colors.
- All of Filmora’s text options are animated – they fade, move around the screen, or perform some other type of action as they appear and disappear. To change the animation of your text select Animation next to Customize. A selection of different animations will appear. Double click on the one you want to apply to your text.
 Download Mac Version ](https://tools.techidaily.com/wondershare/filmora/download/ )
Check the detailed steps of how to add text to video in Filmora.
2. Use Windows Movie Maker
As a simple video editing software, Windows Movie Maker also allows you to add text to videos. It provides 3 different options for you to add Title, Caption and Credits to the YouTube videos. You can follow the steps below to add text to the video in WMM.

- To start, launch the Windows Movie Maker.
- After, select import video to insert the video that you want to add text with.
- Select edit movie then click make credits or titles.
- Then add the text that you want to include.
For the step by step tutorial of adding text to YouTube video, check How to Add Text to Video with Windows Movie Maker . Besides adding text to video, you can use Windows Movie Maker to edit YouTube video further. Learn How to trim, cut, combine, split video and add transitions and upload video to YouTube in Windows Movie Maker?
3. Use Sony Vegas Movie Studio
Adding text to YouTube videos in Sony Vegas is not so complicated if you are new to this software. You can adjust the color, size, font and duration of the text effect and add fade in and fade out effects. Follow the steps below to add texts to video in Vegas:

- Launch Sony Vegas Movie Studio.
- Click the View Menu then select Media Generators.
- Choose the generator that you want to use.
- After, drag the generator you have chosen on the timeline.
- Then, the video event FX dialogue box will appear.
- Enter the text that you want and modify it by changing the font, size and style.
4. Use Adobe Premiere CC
For professionals who are looking for a professional way to adding text to video and also have a sufficient budget, Adobe Premiere CC is always recommended. You can check the video and the steps below to add text to video in Premiere:
- Click open or create a project.
- Click the file menu then choose new and title.
- After, the text window will appear then utilize the text tool to add text.
- You can also edit your text using the commands that are provided in the Title Menu.
- Save the text that you have made by clicking the file menu then choose Save As.
How to Add Text to video in YouTube after uploading
Sometimes, we have uploaded a video to YouTube and then want to add subtitles/cc to the video later. The good news is that YouTube is not only a site for videos but is also the place where you can edit your videos in an instant. As you have read, adding text and captions to the uploaded YouTube videos is just a breeze.
Of course, you can only add and edit texts and captions to the video under your YouTube account. Here are the steps on how you can add text to your videos with YouTube Video Editor after the video is uploaded.
- Go to youtube.com then sign in to your account. After sign in your YouTube account, click your avatar and select Creator Studio to enter the creator studio interface.
- Click the Video Manager tab and in Videos section you will see all your videos uploaded to YouTube. Select the video that you want to add captions to and then select Subtitles/CC after clicking Edit button.
- Add Captions/Subtitles

While YouTube may have already created the subtitles automatically for your video with its speech recognition technology. If it does, you will see something like Published: English (Automatic) to the right of your video. If the automatically generated subtitles is not correct, you can edit it to improve the accuracy. Select the line that needs modification to make the edits.
If there is no auto-subtitles, you can choose from 3 ways to add subtitles and closed captions to the video: Upload a file, Transcribe and auto-sync and create new subtitles or CC.

Upload a file: upload a text transcript or timed subtitles file.
Transcribe and auto-sync: Type or paste in a full transcript of the video and subtitle timings will be set automatically.
Create new subtitles or CC: Create subtitles and closed captions by typing them in as you watch the video.
If you already have a caption file which contains both text and time codes, just click Upload a file and upload the text to the video.
- Once everything is okay, you can change the name of the video and you can do it in the box beside Project.
Cons of Using YouTube Video Editor
When you make use of this editor, you cannot shorten the clips for music. Moreover, since it is an online editor, you need to refresh the page in order to do the changes. Aside from YouTube Video Editor, you can use Adobe Premier Pro, MAGIX Vegas Pro, OpenShot and Avidemux.
From 20th September 2017 users will no longer be able to use the complementary editing suite. Check the best YouTube video editor alternatives from this complete guide to find out more YouTube video editor alternatives if you want to add text to video with more features and customization.
Top 3 Tips for Adding Text to YouTube Videos
1. Leave Room
If you know you are going to add text to your video then make sure you leave room for it in your frame. Consider standing off to one side instead of directly in front of your camera. You do not want to have to choose between not using text, making your text really small, or placing it over your face.
While planning out your frame and leaving room for your text, consider what color you are going to make the words and whether it will stand out and look good against your background.
2. Bigger is Better
People should be able to read your text without putting in any extra effort, such as straining their eyes to make out small words. If it takes effort to read your text then a lot of people will just ignore it. Your text should be big enough that somebody watching your video on their smartphone screen – where everything is shrunk down – can read it easily.
It is easier to make your text larger when you stick to titles, keywords, and short sentences.
3. Do Not Overuse
Text is a great tool for making something stand out. However, if you try to use text to emphasize too much of what you say it will lose its effect. Text does not stand out anymore once viewers get too used to seeing it. Too much text can even get annoying and cause people to click away from your videos.
Try to use text to emphasize only the most important things you say.

Richard Bennett
Richard Bennett is a writer and a lover of all things video.
Follow @Richard Bennett
Richard Bennett
Mar 27, 2024• Proven solutions
A great way to emphasize something you say in your vlog is to have your words appear next to you as you say them . Adding text to YouTube videos can look really professional. You might put a title at the beginning of your video, use bullet points to help people keep track of your monologue, or to highlight an important point by writing it on your screen. When you use text in your videos there are a few things you need to keep in mind. In this article, I will share with you 2 ways to add text/subtitles/captions to YouTube videos, whether you need to add text to the video during editing and upload it to YouTube later, or you have uploaded the video to YouTube already and want to add some captions and subtitles to complement it.
- Part 1: Add text to video before uploading YouTube
- Part 2: Add Text to YouTube video after uploading
- Part 3: Top 3 YouTube Video Text Tips
How to Add Text to YouTube Video Before Uploading
Before uploading the video to YouTube, it is recommended to add text to the video first. You can add simple texts and captions to videos with the free video editing software. To add more text effects to the video, you can use Filmora, Sony Vegas Movie Studio and Adobe Premiere CC based on your video editing skills and needs. These software programs are great video editors, which can help you input text easily.
1. Use Filmora to Add text to Videos
There are plenty of Text effects built in Filmora, you can apply motions and animation to texts, titles, subtitles, end credits and openers as well. Each title preset will present different effects. You can add multiple text boxes and place the text to any position in need. Besides writing texts to video, you can select the target font, size and color and customize the text effect in detail as well. To add text to a video in Filmora is easy, just follow the steps below:
- Open up Filmora and drag a clip into your timeline. Then, go to Text/Credit.
- Find a style that you like and drag it into your timeline where you want your text to appear. Make sure your text is selected in your timeline and click the Advanced Text Editing icon, which looks like a pen and paper.
- Insert your own words and drag your text to where you want it on the screen. Adjust the size by dragging the blue squares which surround your text.
- To change the color of your text, go into the Customize menu. You will find it near the top left of your screen. While you are in Customize there will be a section called Fill. This is where you select the color of your text. You can even change the fill type to ‘gradient fill’ and have your text transition between two colors.
- All of Filmora’s text options are animated – they fade, move around the screen, or perform some other type of action as they appear and disappear. To change the animation of your text select Animation next to Customize. A selection of different animations will appear. Double click on the one you want to apply to your text.
Download Mac Version ](https://tools.techidaily.com/wondershare/filmora/download/ )
Check the detailed steps of how to add text to video in Filmora.
2. Use Windows Movie Maker
As a simple video editing software, Windows Movie Maker also allows you to add text to videos. It provides 3 different options for you to add Title, Caption and Credits to the YouTube videos. You can follow the steps below to add text to the video in WMM.
- To start, launch the Windows Movie Maker.
- After, select import video to insert the video that you want to add text with.
- Select edit movie then click make credits or titles.
- Then add the text that you want to include.
For the step by step tutorial of adding text to YouTube video, check How to Add Text to Video with Windows Movie Maker . Besides adding text to video, you can use Windows Movie Maker to edit YouTube video further. Learn How to trim, cut, combine, split video and add transitions and upload video to YouTube in Windows Movie Maker?
3. Use Sony Vegas Movie Studio
Adding text to YouTube videos in Sony Vegas is not so complicated if you are new to this software. You can adjust the color, size, font and duration of the text effect and add fade in and fade out effects. Follow the steps below to add texts to video in Vegas:
- Launch Sony Vegas Movie Studio.
- Click the View Menu then select Media Generators.
- Choose the generator that you want to use.
- After, drag the generator you have chosen on the timeline.
- Then, the video event FX dialogue box will appear.
- Enter the text that you want and modify it by changing the font, size and style.
4. Use Adobe Premiere CC
For professionals who are looking for a professional way to adding text to video and also have a sufficient budget, Adobe Premiere CC is always recommended. You can check the video and the steps below to add text to video in Premiere:
- Click open or create a project.
- Click the file menu then choose new and title.
- After, the text window will appear then utilize the text tool to add text.
- You can also edit your text using the commands that are provided in the Title Menu.
- Save the text that you have made by clicking the file menu then choose Save As.
How to Add Text to video in YouTube after uploading
Sometimes, we have uploaded a video to YouTube and then want to add subtitles/cc to the video later. The good news is that YouTube is not only a site for videos but is also the place where you can edit your videos in an instant. As you have read, adding text and captions to the uploaded YouTube videos is just a breeze.
Of course, you can only add and edit texts and captions to the video under your YouTube account. Here are the steps on how you can add text to your videos with YouTube Video Editor after the video is uploaded.
- Go to youtube.com then sign in to your account. After sign in your YouTube account, click your avatar and select Creator Studio to enter the creator studio interface.
- Click the Video Manager tab and in Videos section you will see all your videos uploaded to YouTube. Select the video that you want to add captions to and then select Subtitles/CC after clicking Edit button.
- Add Captions/Subtitles
While YouTube may have already created the subtitles automatically for your video with its speech recognition technology. If it does, you will see something like Published: English (Automatic) to the right of your video. If the automatically generated subtitles is not correct, you can edit it to improve the accuracy. Select the line that needs modification to make the edits.
If there is no auto-subtitles, you can choose from 3 ways to add subtitles and closed captions to the video: Upload a file, Transcribe and auto-sync and create new subtitles or CC.
Upload a file: upload a text transcript or timed subtitles file.
Transcribe and auto-sync: Type or paste in a full transcript of the video and subtitle timings will be set automatically.
Create new subtitles or CC: Create subtitles and closed captions by typing them in as you watch the video.
If you already have a caption file which contains both text and time codes, just click Upload a file and upload the text to the video.
- Once everything is okay, you can change the name of the video and you can do it in the box beside Project.
Cons of Using YouTube Video Editor
When you make use of this editor, you cannot shorten the clips for music. Moreover, since it is an online editor, you need to refresh the page in order to do the changes. Aside from YouTube Video Editor, you can use Adobe Premier Pro, MAGIX Vegas Pro, OpenShot and Avidemux.
From 20th September 2017 users will no longer be able to use the complementary editing suite. Check the best YouTube video editor alternatives from this complete guide to find out more YouTube video editor alternatives if you want to add text to video with more features and customization.
Top 3 Tips for Adding Text to YouTube Videos
1. Leave Room
If you know you are going to add text to your video then make sure you leave room for it in your frame. Consider standing off to one side instead of directly in front of your camera. You do not want to have to choose between not using text, making your text really small, or placing it over your face.
While planning out your frame and leaving room for your text, consider what color you are going to make the words and whether it will stand out and look good against your background.
2. Bigger is Better
People should be able to read your text without putting in any extra effort, such as straining their eyes to make out small words. If it takes effort to read your text then a lot of people will just ignore it. Your text should be big enough that somebody watching your video on their smartphone screen – where everything is shrunk down – can read it easily.
It is easier to make your text larger when you stick to titles, keywords, and short sentences.
3. Do Not Overuse
Text is a great tool for making something stand out. However, if you try to use text to emphasize too much of what you say it will lose its effect. Text does not stand out anymore once viewers get too used to seeing it. Too much text can even get annoying and cause people to click away from your videos.
Try to use text to emphasize only the most important things you say.
Richard Bennett
Richard Bennett is a writer and a lover of all things video.
Follow @Richard Bennett
Also read:
- 2024 Approved Craft a Memorable YouTube Channel Brand for More Viewers
- Powerful Techniques Including YT Videos in Slides
- [Updated] Boosting Your Channel's Viewer Count - 12 Must-Try Approaches
- Breaking Down Barriers Adding Chapters to Create Cohesive YouTube Lessons
- Engage, Entertain and Captivate – Adopting Two-Point of View in Your Next YouTube Reaction Video (2 POV Method) for 2024
- Stand Out in a Sea of Content - Our Offer Includes 50 Free Banners
- Precision in Playback A Compreenhensive Guide to Youtube Video Loops
- Revolutionary Techniques for High-Quality Sound Recording, No Microphone Required
- Enhance Engagement Top Tools and Tips for Properly Tagged Videos for 2024
- Ultimate Selection of Free YouTube Introduction Makers
- Open Source Banner Resources A Gift to YouTubers
- [Updated] Affordable Gear for Aspiring Content Creators
- How to Create a Killer Unboxing Video An Ultimate Guide
- Uncovering Your Personalized Playlist Hideaway
- Digital Phenoms Who Has the Most Followers for 2024
- Harnessing Online Revenue Multiplatform Studio Use
- The Ultimate Guide to Downloading Standardized Images From Youtube
- In 2024, Efficiently Uploading YouTube Vids to Insta Profile
- Clear Shots for YouTube Filmmakers for 2024
- In 2024, Elite 10 Audio Boosters for OS X, iOS, Android
- 2024 Approved Drive Engagement Crafting an Animated Subscribe Button in Filmora's Step-by-Step Guide
- Taking Control YouTube Visibility Personalization
- Strategies to Purge YouTube's Video Buffer List
- Revenue Realization Strategies for Successful Monetization on YouTube Mobile
- The Complete Guide to Edit Your Video with YouTube Studio Editor
- Cyber Sovereigns YouTube’s Number One Tens
- In 2024, 11 Best Free YouTube Name Generators You Should Try
- 5 Best Sites for Quick Templates on YouTube for 2024
- Football Vids Premier Insights Into YouTube Tracks
- Dreamy Thumbnails Captivating Borders
- [New] Elevate Engagement on YouTube Fending Off Automated Audiences
- Updated Music-Infused Videos Made Easy A Guide to the Leading Apps and Websites for Audio Integration
- How to Add and Custom Slack Emoji-Wondershare Filmora for 2024
- [Updated] Expert Tips to Enrich Virtual Meetings with Screen Sharing for 2024
- New In 2024, Changing Dynamics of Auditory Experience in the Newest Adobe Rush Release
- Fix Cant Take Screenshot Due to Security Policy on Tecno Spark 20 Pro | Dr.fone
- New 2024 Approved How to Make a Talking AI Avatar From Photos Easy Guide
- Undelete lost music from Sony Xperia 5 V
- 2024 Approved Stepwise Guide to Conducting Video Chats on Laptop via WhatsApp
- New 2024 Approved Audio Alchemy Revealed A Deep Dive Into Premier Sound Design Software
- [New] 2024 Approved FB Video Mastery Effortless MP4 Extraction
- [New] 2024 Approved How to Enrich Social Media Content with Auto-Generated Speech
- 2024 Approved Smooth Video Uploads to TikTok with Chrome/Android/iOS (Updated )
- Reducing Noise in Videos Made Easy with Premiere Pro All Workable Methods
- How to Bypass Google FRP Lock on Nokia C300 Devices
- Replace Vanished Facebook Watch Icon
- How to Reset a Realme Narzo 60 Pro 5G Phone that is Locked?
- How To Change Oppo Reno 9A Lock Screen Clock in Seconds
- [New] Essential Skills for Harvesting and Storing GIFs From Facebook's Feed
- [New] In 2024, Acquiring IGTV Media Easily A Comprehensive PC/Mac Guide
- How To Check if Your Realme 12 Pro+ 5G Is Unlocked
- [Updated] The Complete Guide to Crafting Impressive Timelapse Films on iPad
- In 2024, From Start to Finish A Comprehensive Guide to QuickTime Video Editing on Mac
- [New] 2024 Approved Secure Insta Wealth with Our Safest & Most Effective Tips
- CatchEmAll Celebrate National Pokémon Day with Virtual Location On Xiaomi Civi 3 | Dr.fone
- [New] In 2024, Streamline Team Conferencing via Discord's Screen Sharing
- Evaluating Alternatives to Magix's ACID Pro
- Two Ways to Track My Boyfriends Samsung Galaxy Z Flip 5 without Him Knowing | Dr.fone
- [Updated] In 2024, Premium Tools for Virtual Meeting Efficiency
- Ways To Find Unlocking Codes For Oppo Reno 10 Pro+ 5G Phones
- Title: Discover the Leading Online Video Cutter for YouTube
- Author: Kevin
- Created at : 2024-05-25 14:59:36
- Updated at : 2024-05-26 14:59:36
- Link: https://youtube-videos.techidaily.com/discover-the-leading-online-video-cutter-for-youtube/
- License: This work is licensed under CC BY-NC-SA 4.0.
