
Direction and Intensity in Video Lighting for 2024
Direction and Intensity in Video Lighting
Lighting Tips for Vlogging: How to Light

Richard Bennett
Mar 27, 2024• Proven solutions
One of the best things you can do for your video quality is to ensure you have great lighting. Viewers find poor lighting distracting and it’s hard for them to see how great your content is if they are busy thinking about why your video is so dark. By creating a great lighting set up you can ensure that the people watching your videos are only thinking about how much they’re enjoying them.
Going outside and using natural light is the cheapest way to get a lot of light for your videos. If your vlog is not suited to the great outdoors then you need to get more strategic. You can turn on all the lights in your living room and still end up with a dark, grainy, video.
Video Lighting Basics: Three Point Lighting

The most common technique of lighting a scene is called three-point lighting. It involves three different sources of light in the shot and is used by portrait photographers, which is also a great method for lighting your vlog.
The brightest source of light is also known as the key light which need to be high quality. A window will work, but if you do not have access to one where you are filming then consider an LED panel light or a softbox light like the ones used in portrait photography.
This first light will create a dramatic shadow across half of your face. You want to reduce this shadow, but not get rid of it completely.
Rather than setting up another light source on the opposite side of the camera, put up a reflector to bounce some light back onto your face. This reflector is called your ‘Fill Light’.
The fill light is less bright than the primary source of light and it is placed on the side opposite to the key light. Its purpose is to reduce shadows produced by the key light and the reflector will need to be mounted on a stand.
The final step to creating three point lighting is to set up another light behind you. This is your ‘Backlight’, and it will help you stand out from your background. Backlight or Hair light is always placed behind and above the subject to create separation between the subject in the shot and the background. This basic lighting technique can be applied in almost every scene you shoot, which is why it is important to keep an open mind and to continue experimenting with possible light setups.
Watch Video! Top Lighting Tips for Vlogging
Lightning Tips for Aspiring YouTube Videographers
Becoming the master of light will take some time and practice, so it is crucial to remain curious and anxious to learn new tricks throughout that process if you want to continually become better. These tips will help you make the first steps on that journey.
1. Focus Your Key Light
Try to focus your Key Light so that it lights only you and not your background. Do this by mounting anything that can cast a shadow onto your Key Light to control the area where the light hits. If you are using a window for your Key Light then you can use a curtain. If you use a softbox light then your light will already be somewhat focused.
2. Use Natural Lighting
The light provided by the Sun is still the best light source, you can have in your video. The trouble is that natural light changes quickly, which makes it highly unpredictable. The best way to deal with this challenge is to come prepared to the set and to get the shot you want as quickly as you can.
3. Try DIY Lightning
Literally, anything from candles to LED light bulbs can serve as a source of light in a shot. You just need to pay attention to the light temperature, because warmer light sources may highlight reds and yellows that can make your footage look less realistic.
4. Use Lightning Kits
This is by far the best option if you want to be in complete control of the light on your set. You can adjust the intensity of the lights, use filters, diffusers and all sorts of other accessories to create the light that flatters the subjects of your videos. The only downside is that you’ll have to spend a considerable amount of money if you want to have a professional lighting kit.
5. Set up reflectors
Sets of reflectors are often under $50, so they are fairly affordable. However, some vloggers choose to forgo purchasing reflectors and make their own out of tinfoil.

If your strong main light is too hard on your eyes then you can use a translucent ‘reflector’ to soften it. Set your translucent reflector, or other screen, up in front of your main light to diffuse it.
If you are hosting a beauty vlog then you might consider a slightly different set up. Instead of having your main light off to one side set it up directly in front of you so your entire face is lit evenly. It is still a good idea to use fill lights in this set up to give you some dimension, and a backlight is even more essential for helping you stand out from the background. The even light hitting your face will also make you look flat if you do not use a backlight.

If you are using all of the lighting options available to you and your video still looks too dark then you can try brightening it by opening up the aperture of your camera lens/setting a lower f-stop. Letting more light into your camera can help your footage look brighter, although you also run the risk of making things look overexposed/ washed out if you are not careful.
If you are stuck shooting in low light conditions it is best to use a lens with a wider aperture/lower f-stop. This will make the best of the light you do have.
Richard Bennett
Richard Bennett is a writer and a lover of all things video.
Follow @Richard Bennett
Richard Bennett
Mar 27, 2024• Proven solutions
One of the best things you can do for your video quality is to ensure you have great lighting. Viewers find poor lighting distracting and it’s hard for them to see how great your content is if they are busy thinking about why your video is so dark. By creating a great lighting set up you can ensure that the people watching your videos are only thinking about how much they’re enjoying them.
Going outside and using natural light is the cheapest way to get a lot of light for your videos. If your vlog is not suited to the great outdoors then you need to get more strategic. You can turn on all the lights in your living room and still end up with a dark, grainy, video.
Video Lighting Basics: Three Point Lighting
The most common technique of lighting a scene is called three-point lighting. It involves three different sources of light in the shot and is used by portrait photographers, which is also a great method for lighting your vlog.
The brightest source of light is also known as the key light which need to be high quality. A window will work, but if you do not have access to one where you are filming then consider an LED panel light or a softbox light like the ones used in portrait photography.
This first light will create a dramatic shadow across half of your face. You want to reduce this shadow, but not get rid of it completely.
Rather than setting up another light source on the opposite side of the camera, put up a reflector to bounce some light back onto your face. This reflector is called your ‘Fill Light’.
The fill light is less bright than the primary source of light and it is placed on the side opposite to the key light. Its purpose is to reduce shadows produced by the key light and the reflector will need to be mounted on a stand.
The final step to creating three point lighting is to set up another light behind you. This is your ‘Backlight’, and it will help you stand out from your background. Backlight or Hair light is always placed behind and above the subject to create separation between the subject in the shot and the background. This basic lighting technique can be applied in almost every scene you shoot, which is why it is important to keep an open mind and to continue experimenting with possible light setups.
Watch Video! Top Lighting Tips for Vlogging
Lightning Tips for Aspiring YouTube Videographers
Becoming the master of light will take some time and practice, so it is crucial to remain curious and anxious to learn new tricks throughout that process if you want to continually become better. These tips will help you make the first steps on that journey.
1. Focus Your Key Light
Try to focus your Key Light so that it lights only you and not your background. Do this by mounting anything that can cast a shadow onto your Key Light to control the area where the light hits. If you are using a window for your Key Light then you can use a curtain. If you use a softbox light then your light will already be somewhat focused.
2. Use Natural Lighting
The light provided by the Sun is still the best light source, you can have in your video. The trouble is that natural light changes quickly, which makes it highly unpredictable. The best way to deal with this challenge is to come prepared to the set and to get the shot you want as quickly as you can.
3. Try DIY Lightning
Literally, anything from candles to LED light bulbs can serve as a source of light in a shot. You just need to pay attention to the light temperature, because warmer light sources may highlight reds and yellows that can make your footage look less realistic.
4. Use Lightning Kits
This is by far the best option if you want to be in complete control of the light on your set. You can adjust the intensity of the lights, use filters, diffusers and all sorts of other accessories to create the light that flatters the subjects of your videos. The only downside is that you’ll have to spend a considerable amount of money if you want to have a professional lighting kit.
5. Set up reflectors
Sets of reflectors are often under $50, so they are fairly affordable. However, some vloggers choose to forgo purchasing reflectors and make their own out of tinfoil.
If your strong main light is too hard on your eyes then you can use a translucent ‘reflector’ to soften it. Set your translucent reflector, or other screen, up in front of your main light to diffuse it.
If you are hosting a beauty vlog then you might consider a slightly different set up. Instead of having your main light off to one side set it up directly in front of you so your entire face is lit evenly. It is still a good idea to use fill lights in this set up to give you some dimension, and a backlight is even more essential for helping you stand out from the background. The even light hitting your face will also make you look flat if you do not use a backlight.
If you are using all of the lighting options available to you and your video still looks too dark then you can try brightening it by opening up the aperture of your camera lens/setting a lower f-stop. Letting more light into your camera can help your footage look brighter, although you also run the risk of making things look overexposed/ washed out if you are not careful.
If you are stuck shooting in low light conditions it is best to use a lens with a wider aperture/lower f-stop. This will make the best of the light you do have.
Richard Bennett
Richard Bennett is a writer and a lover of all things video.
Follow @Richard Bennett
Steps Towards Joining Filmora’s Certified Creative Circle
What is Filmora Certified Creative Program and How to Become an FCC

Liza Brown
Mar 27, 2024• Proven solutions
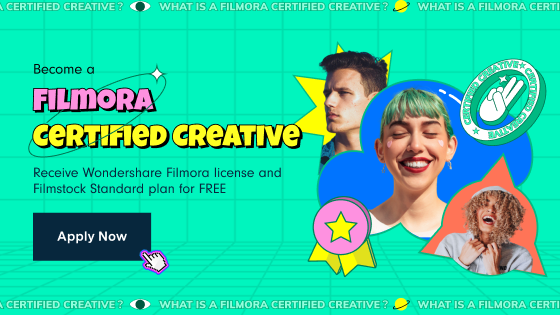
Do you know that you can now get paid to use Wondershare Filmora? If you are a video editing expert and would like to come up with tutorial videos, then Filmora has a surprise for you. With the newly launched Filmora Certified Creative program, you can get rewarded for using Filmore and sharing your creative ideas with others on social media platforms.
1. What does FCC Stand for?
FCC stands for Filmora Certified Creative program that has been recently launched by the video editing application. The program encourages long-term brand partnerships with educators, promoters, and content creators who would like to share their ideas on platforms like YouTube and Instagram.
Therefore, if you want to share all kinds of video tutorials or creative ideas on your social media platforms, then FCC can reward you to do the same. Wondershare Filmora wants to bring and reward all kinds of educators, instructors, and promoters of the brand in one place with the program. To help you, Filmora would provide dedicated materials and all the needed resources so that your tutorials and creative videos can reach out a wider audience.
2. What are the Key Benefits of Being a Filmora Certified Creative?
As a Filmora Certified Creative, you will get a free license of Wondershare Filmora and a Filmstock standard plan. You will also be rewarded with tons of other perks and financial assistance to expand your social media presence.
Here are some of the vital benefits that you can enjoy after being a Filmora Certified Creative:
- Free License
You will get a free license of Wondershare Filmora and a Filmstock standard plan to use the video editor and obtain stock media without any hassle.
- Substantial Funding
Filmora will also provide the needed financial assistance to help you kickstart your online courses and create informative videos.
- Social Referrals
Your work would be featured on the social media platforms of Filmora that has over 1 million followers.
- Corporate Gifts
As a Filmora Certified Creative, you will get some fantastic corporate gifts once your application is approved.
- Annual Awards
Selective creators will get an opportunity to attend the Filmora Certified Creative Fest and get personal awards for their work.
3. How Do I Become an FCC?
Becoming a Filmora Certified Creative is extremely simple. All you need to do is visit the Certified Creative page hosted on Filmora’s website and enter details such as your name, email address, and social media profile links.
A lot of content creators are already a part of the FCC program and have found the experience extremely rewarding.
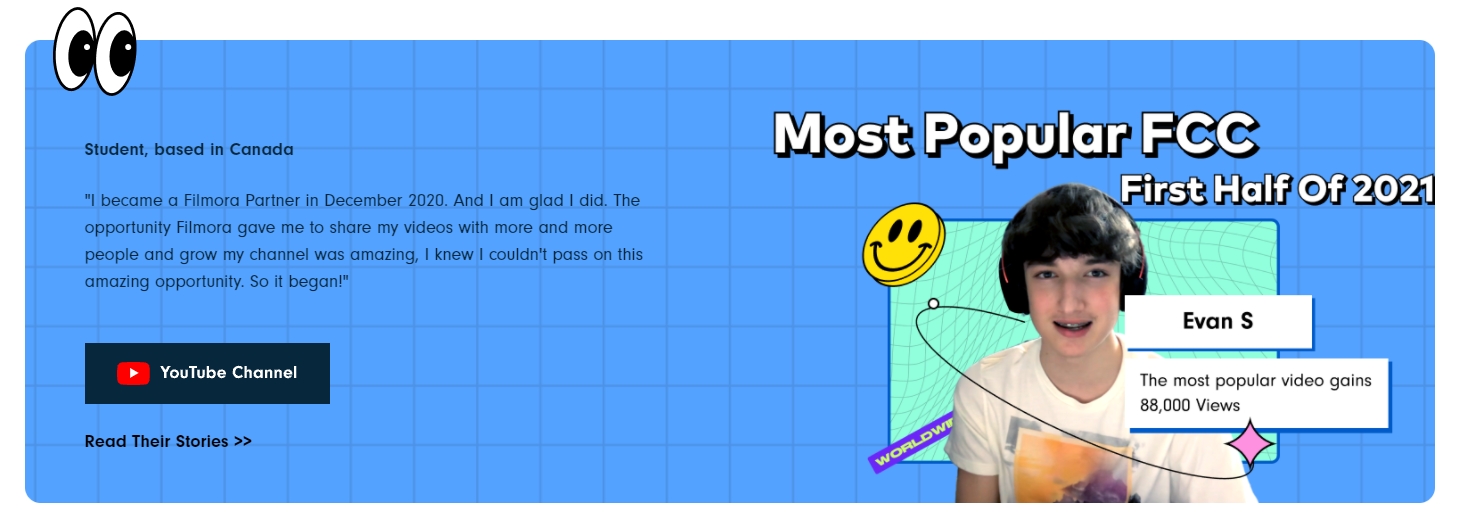
1. Evan S’ Story
Wondershare Filmora is an all-around amazing video editor, and that’s why I have been using it for over 3 years. My favorable features in Filmora would be Keyframing and Motion Tracking. I became a Filmora Partner in December 2020 - and I’m glad that I did. The opportunity that Filmora offered me to share my videos with more people and grow my channel was amazing, I knew I couldn’t pass on this amazing opportunity. And so, it began! I started making my Filmora videos, and I was proudly saying in each one that I’m a Filmora Partner. The Filmora team was also very friendly and nice, giving me a lot of support and creative freedom in the videos I was creating.
YouTube Channel: https://www.youtube.com/c/EsnoBTW/videos
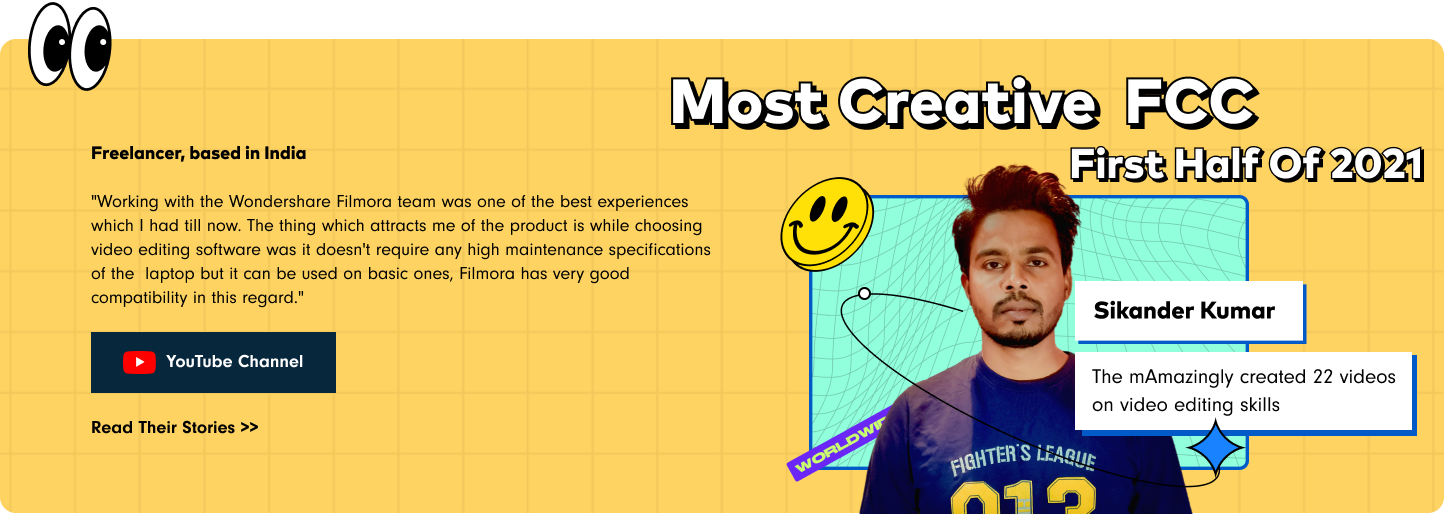
2. Sikander Kumar’s Story
When I uploaded my first Filmora tutorial video on YouTube, I never thought that one day, I will get an opportunity to work with the Wondershare Team. The day I got an email from the team, my mind was blown away, as for me it was idealistic. So, without any hesitation, I accepted the partnership program in December 2020, and the way it has worked was very smooth. Working with the Wondershare Filmora team was one of the best experiences that I had till now. The most attractive thing about the product is that it doesn’t require any high maintenance system specifications and can be used in almost every system. Filmora has very good compatibility in this regard.
YouTube Channel Link: https://www.youtube.com/channel/UCGNmLWGf0AHikaBLZ-ZbTwA/videos
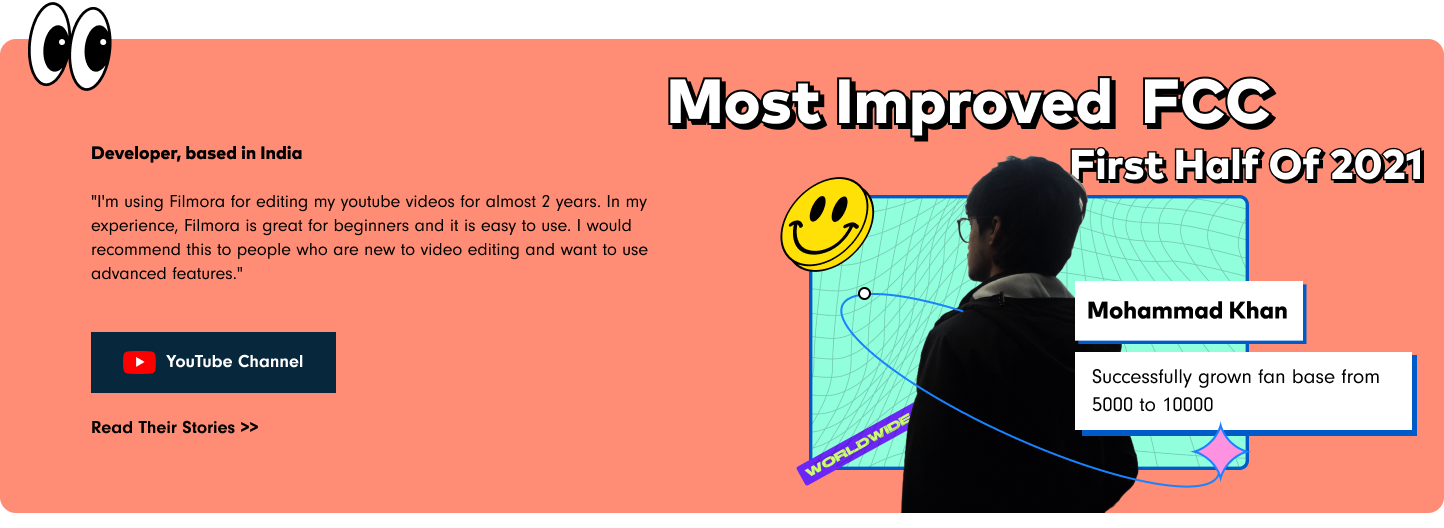
3. Mohammad Khan’s Story
I’m using Filmora for editing my YouTube videos for almost 2 years now. In my experience, Filmora is great for beginners, and it is quite easy to use. I would recommend it to people who are new to video editing and want to use advanced editing features. Filmora helped me make compelling and professional videos with just a few clicks. The Filmora team regularly updated the tool with new features according to the ongoing trends. I joined the partnership program back in December 2020. I love to share my knowledge with others on YouTube by making tutorials video on Filmora video editor so that others can also make professional videos with it.
YouTube Channel Link: https://www.youtube.com/c/PixlCreations/videos
Be a Part of Filmora’s FCC Program
If you love video editing and have creative ideas to share, then Filmora’s FCC program would be just the perfect launchpad that you need.
The joining criteria for the FCC program are extremely simple. You need to own a YouTube channel or an active Instagram profile to post your videos. You must use Filmora to come up with informative 5-minute tutorials exploring its editing features or updates.
All you need to do is post at least 5 videos on your channel that are related to Filmora in 6 months. That’s it! You are now all prepped up to be a part of the Filmora Certified Creative program and can enjoy its perks!
The Filmora Certified Creative program is now open and anyone meeting the above-listed criteria can apply to it. The program will certainly help you unleash your creative juices with the free license of Filmora and Filmstock. Besides that, you will also get tons of other perks and financial assistance to create an impressive presence on social media.
Head on and be an FCC to unleash your creative side with one of the best video editors out there.
Liza Brown
Liza Brown is a writer and a lover of all things video.
Follow @Liza Brown
Liza Brown
Mar 27, 2024• Proven solutions
Do you know that you can now get paid to use Wondershare Filmora? If you are a video editing expert and would like to come up with tutorial videos, then Filmora has a surprise for you. With the newly launched Filmora Certified Creative program, you can get rewarded for using Filmore and sharing your creative ideas with others on social media platforms.
1. What does FCC Stand for?
FCC stands for Filmora Certified Creative program that has been recently launched by the video editing application. The program encourages long-term brand partnerships with educators, promoters, and content creators who would like to share their ideas on platforms like YouTube and Instagram.
Therefore, if you want to share all kinds of video tutorials or creative ideas on your social media platforms, then FCC can reward you to do the same. Wondershare Filmora wants to bring and reward all kinds of educators, instructors, and promoters of the brand in one place with the program. To help you, Filmora would provide dedicated materials and all the needed resources so that your tutorials and creative videos can reach out a wider audience.
2. What are the Key Benefits of Being a Filmora Certified Creative?
As a Filmora Certified Creative, you will get a free license of Wondershare Filmora and a Filmstock standard plan. You will also be rewarded with tons of other perks and financial assistance to expand your social media presence.
Here are some of the vital benefits that you can enjoy after being a Filmora Certified Creative:
- Free License
You will get a free license of Wondershare Filmora and a Filmstock standard plan to use the video editor and obtain stock media without any hassle.
- Substantial Funding
Filmora will also provide the needed financial assistance to help you kickstart your online courses and create informative videos.
- Social Referrals
Your work would be featured on the social media platforms of Filmora that has over 1 million followers.
- Corporate Gifts
As a Filmora Certified Creative, you will get some fantastic corporate gifts once your application is approved.
- Annual Awards
Selective creators will get an opportunity to attend the Filmora Certified Creative Fest and get personal awards for their work.
3. How Do I Become an FCC?
Becoming a Filmora Certified Creative is extremely simple. All you need to do is visit the Certified Creative page hosted on Filmora’s website and enter details such as your name, email address, and social media profile links.
A lot of content creators are already a part of the FCC program and have found the experience extremely rewarding.
1. Evan S’ Story
Wondershare Filmora is an all-around amazing video editor, and that’s why I have been using it for over 3 years. My favorable features in Filmora would be Keyframing and Motion Tracking. I became a Filmora Partner in December 2020 - and I’m glad that I did. The opportunity that Filmora offered me to share my videos with more people and grow my channel was amazing, I knew I couldn’t pass on this amazing opportunity. And so, it began! I started making my Filmora videos, and I was proudly saying in each one that I’m a Filmora Partner. The Filmora team was also very friendly and nice, giving me a lot of support and creative freedom in the videos I was creating.
YouTube Channel: https://www.youtube.com/c/EsnoBTW/videos
2. Sikander Kumar’s Story
When I uploaded my first Filmora tutorial video on YouTube, I never thought that one day, I will get an opportunity to work with the Wondershare Team. The day I got an email from the team, my mind was blown away, as for me it was idealistic. So, without any hesitation, I accepted the partnership program in December 2020, and the way it has worked was very smooth. Working with the Wondershare Filmora team was one of the best experiences that I had till now. The most attractive thing about the product is that it doesn’t require any high maintenance system specifications and can be used in almost every system. Filmora has very good compatibility in this regard.
YouTube Channel Link: https://www.youtube.com/channel/UCGNmLWGf0AHikaBLZ-ZbTwA/videos
3. Mohammad Khan’s Story
I’m using Filmora for editing my YouTube videos for almost 2 years now. In my experience, Filmora is great for beginners, and it is quite easy to use. I would recommend it to people who are new to video editing and want to use advanced editing features. Filmora helped me make compelling and professional videos with just a few clicks. The Filmora team regularly updated the tool with new features according to the ongoing trends. I joined the partnership program back in December 2020. I love to share my knowledge with others on YouTube by making tutorials video on Filmora video editor so that others can also make professional videos with it.
YouTube Channel Link: https://www.youtube.com/c/PixlCreations/videos
Be a Part of Filmora’s FCC Program
If you love video editing and have creative ideas to share, then Filmora’s FCC program would be just the perfect launchpad that you need.
The joining criteria for the FCC program are extremely simple. You need to own a YouTube channel or an active Instagram profile to post your videos. You must use Filmora to come up with informative 5-minute tutorials exploring its editing features or updates.
All you need to do is post at least 5 videos on your channel that are related to Filmora in 6 months. That’s it! You are now all prepped up to be a part of the Filmora Certified Creative program and can enjoy its perks!
The Filmora Certified Creative program is now open and anyone meeting the above-listed criteria can apply to it. The program will certainly help you unleash your creative juices with the free license of Filmora and Filmstock. Besides that, you will also get tons of other perks and financial assistance to create an impressive presence on social media.
Head on and be an FCC to unleash your creative side with one of the best video editors out there.
Liza Brown
Liza Brown is a writer and a lover of all things video.
Follow @Liza Brown
Also read:
- [New] Bring Playlists Down to YouTube The 5 Best Conversion Resources
- [New] Transform Video Quality on TikTok (2 Ways)
- [Updated] Numerical Leaderboard Spotlight Eighth in Photo Blender for 2024
- [Updated] Step-by-Step Guide to Perfect GoPro Videos
- 2024 Approved Cognitive Conclaves Educational YT Powerhouses
- Apple iPhone 6s Asking for Passcode after iOS 17/14 Update, What to Do? | Dr.fone
- Digital Content Arena Competing Titans - Vimeo, YouTube, DailyMotion
- Empowerment in Entertainment Top 10 Inspirational Women for 2024
- Guide: Successfully Integrating Automatic Chatbots Into Your Discord Community
- In 2024, Engaging Vlogger Subjects Each Day
- In 2024, How to Unlock Samsung Galaxy S23+ Pattern Lock if Forgotten? 6 Ways
- Innovative & Inexpensive The Best Free YouTube Name Generators
- Mastering the Power of #Hashtags on Instagram Now for 2024
- Pioneering Video Design on a Shoestring Exclusive Tutorials for Free From Top 4 YouTube VFX Channels
- Step-by-Step Tutorial: Setting Up GoTo_Addons for Kodi, Your Premier One-Stop Entertainment Hub
- Top 4 Ways to Trace Vivo Y55s 5G (2023) Location | Dr.fone
- YouTube's Edge & Dailymotion's Charms An In-Depth Look
- Title: Direction and Intensity in Video Lighting for 2024
- Author: Kevin
- Created at : 2025-01-26 04:22:20
- Updated at : 2025-01-30 02:04:03
- Link: https://youtube-videos.techidaily.com/direction-and-intensity-in-video-lighting-for-2024/
- License: This work is licensed under CC BY-NC-SA 4.0.