
:max_bytes(150000):strip_icc()/iTethering-resized-56a532c53df78cf77286dec1.jpg)
Directing Twitch Viewers Seamlessly to YouTube Channel for 2024
Directing Twitch Viewers Seamlessly to YouTube Channel
Create High-Quality Video - Wondershare Filmora
An easy and powerful YouTube video editor
Numerous video and audio effects to choose from
Detailed tutorials provided by the official channel
Amidst many online applications is Twitch. This live streaming platform takes your experience to another level. You can use it to make crafts, play games, attract broadcasters, and many more. Twitch was launched in 2011, and since then, it has attracted millions of users, managing a database of about 4 million broadcasters by early 2020. With it, users can stream their activities as others watch in real-time. Just browse a category to find a stream.
You can also follow streamers that you like on the platform and get updates and notifications immediately after they are posted. But how do you start a career on a platform like Twitch? You need to broadcast and gather a large following. You can use built-in audiences from other platforms like Facebook. Let’s dive into the core of the matter and look at how to upload Twitch streams to YouTube and build your platform.

In this article
02 What is the benefit of uploading your Twitch Streams to YouTube
03 How to upload your Twitch Streams to YouTube
What is Twitch VOD?
Twitch Video on Demand (VOD) is a recording of previously streamed content. It provides briefings if you missed catching the Twitch live stream. Just watch the VOD from your favorite streamer and be engaged the best way possible. However, VODs don’t last forever. They are removed after two weeks of broadcast. But streamers with Partner Status can have their VODs last up to 60 days.
- How to enable Twitch VOD?
VODs are the best form to archive streams that your fans missed. Even though they are not enabled by default, you can manually enable them and not let your fans miss any important event from your channel. They’ll find it under the “Videos” tab on any Twitch channel. Follow these steps to enable VOD on your channel.
Step 1. Go to your profile icon in the top right corner of Twitch
Check in the “Channel & Video” section and locate the “Stream Key & Preferences” menu.

Step 2. Click on “Creator Dashboard”
Remember, you can enable VODs from your creator dashboard. Just go under the “Settings” tab and click on the “Stream section” of the creator dashboard. Check under the subtitle “VOD Settings” and get the option to store past broadcasts. You can also toggle the slider to store your past broadcasts.

Step 3 Click on the “Settings” tab on the left-hand side and go to Stream
You’ll get various drop-down menu options. Click on the “Settings” tab and choose the “Stream” option. The system will navigate to a new page, thus setting your preferences for VODs and clips.
Step 4. Go to “VOD Settings” and toggle on the “Store Past Broadcast.”
Ensure you have the toggle option turned ON under the “VOD Settings.” If it’s “ON,” you’ll realize the toggle will be purple, with a checkmark in it. Twitch will be confirmed to be enabled if it’s purple.

- Frequently Asked Question about Twitch VOD
These are some questions frequently asked by Twitch users.
1. How long will Twitch store my VOD
Your Twitch can either be stored for 14 or 60 days, depending on your level. For Twitch Prime, Twitch Partner or a Twitch Turbo user has their past broadcasts automatically saved for 60 days before deletion. But if you are not connected to these three options, your past broadcasts will be saved for only 14 days before deletion.
Since your past broadcasts cannot be live for more than 60 days, you have the option to download the video to your computer before the validity days expire and Twitch deletes it. You can use an External Hard drive to save the past broadcast content. Likewise, it is possible to turn your past broadcast content into Highlight and, in turn, permanently store them on Twitch.
2. What is the difference between Twitch VOD, Highlights, and Clips
Twitch VOD is a previously saved video of your live stream content. You choose to save either part or the entire content of your previously streamed content. More so, you don’t need any additional requirements to use VOD.
Highlights are short videos that have been edited from your past broadcast content. You can save them on Twitch permanently. Streamers majorly use highlights to save video game achievements. Unlike VOD Twitch that can be saved up to 60 days, Highlights usually lasts no more than 3 minutes.
- To make Highlights on Twitch, first, navigate to your Dashboard.
- Then scroll down and click on “Content” > “Video Producer.
- Next, press on “All Videos” to change them to “Past Broadcasts.”
- Now press the “Highlight” button, and Twitch will immediately open a new tab for “Twitch Highlighter Tool.”
- Then select the video part to include as “Highlight” and press the “Create Highlights” button.
- Wait a while for the process to be completed, and Voila! You have your Highlights created.
When it comes to Twitch Clip, you can capture special moments in a stream you are currently watching. On the same note, you can share clips with friends and other users on social media platforms. Such shared clips contain a link where others view the source or video from.
The clips you create will automatically be saved on the streamer’s channel on the “Clips” page, where other viewers can see them too. Nonetheless, you can download “clips” to your computer and, in turn, upload them whenever you want to. And note that you can help your stream grow via “Clips” by letting your viewers clip and share your stream moments.
- To create “Clips” on Twitch, identify which Streamers channel you wish to create a clip from.
- Then click on the “Clapper board” icon. Next, edit your clip between 5 and 60 seconds long.
- Finally, create a title and publish your Clip. You’ll also enjoy the privilege to share your clip’s link to other social media networks.
What is the benefit of uploading your Twitch Streams to YouTube
You stand to gain a lot when you upload your Twitch Streams to YouTube.
1) To enlighten your followers
Your followers will see your streams and make the best decisions. Viewers can check out your recordings and other highlights from past streams. It will help them decide whether they like what they see and probably join your live streams.
2) Twitch provides content for you to share and monetize on YouTube
Since Twitch streaming is more popular nowadays, many people throng it for content. It is not wise to rely entirely on Twitch to discover as a Twitch Streamer. Posting to YouTube will make it known within a short time. You would have announced your streams most nobly and kept your followers up to date, attracting new ones as well.
3) To keep your followers engaged even when you are offline
Even though live streaming is important, some viewers may not attend the live sessions due to different time zones or other commitments. In this regard, when uploaded to YouTube, Twitch will give them a chance to watch your content just whenever they log in. They, therefore, have the option to watch a Twitch VOD of the live stream they missed.
How to upload your Twitch Streams to YouTube
Check how to upload Twitch streams to YouTube from the Twitch website.
Step 1. Identify the little arrow next to your name on the Twitch website and click on it. Then click on the “Video Producer” to take you to a list of your Twitch videos.

Step 2. Check out and click on the “three-dots” on the video you wish to upload to YouTube. Click on the “Export” tab.
Step 3. A menu will then pop up. Here, you can fill in the description, title, and tags that you would like to appear on the YouTube video. There is an option for Twitch to split your video automatically. If you wish so, then tick the “Checkbox” to enable it. Then click on the “Start Export” option to export your Twitch streams to YouTube.

Bouns! Edit Your Twitch Video with Filmora
The quality of your video matters when it comes to uploading Twitch Streams to YouTube. Using a third-party tool to edit your video is the first step in ensuring your videos communicate meaningful content. Filmora comes in handy to bring your imaginations to life. Use it for simple creation without limits, even for beginners.
- Use it to track moving objects in video clips
- Easily match any image of the selected clip
- Its powerful tools let you edit your video by cropping, splitting, adjusting speed, etc
- The video keyframe easily indicates the beginning and end of the parameters
For Win 7 or later (64-bit)
For macOS 10.12 or later
Conclusion
● Don’t just focus on how to upload Twitch streams to YouTube but also consider the quality of video you are posting to YouTube. Remember, your video quality will speak much more of you than any other description. So, strive to produce quality videos using the best tool, Filmora. The app is easy to use and will elevate your views and imaginations through your video in the most impactful way.
Amidst many online applications is Twitch. This live streaming platform takes your experience to another level. You can use it to make crafts, play games, attract broadcasters, and many more. Twitch was launched in 2011, and since then, it has attracted millions of users, managing a database of about 4 million broadcasters by early 2020. With it, users can stream their activities as others watch in real-time. Just browse a category to find a stream.
You can also follow streamers that you like on the platform and get updates and notifications immediately after they are posted. But how do you start a career on a platform like Twitch? You need to broadcast and gather a large following. You can use built-in audiences from other platforms like Facebook. Let’s dive into the core of the matter and look at how to upload Twitch streams to YouTube and build your platform.
In this article
02 What is the benefit of uploading your Twitch Streams to YouTube
03 How to upload your Twitch Streams to YouTube
What is Twitch VOD?
Twitch Video on Demand (VOD) is a recording of previously streamed content. It provides briefings if you missed catching the Twitch live stream. Just watch the VOD from your favorite streamer and be engaged the best way possible. However, VODs don’t last forever. They are removed after two weeks of broadcast. But streamers with Partner Status can have their VODs last up to 60 days.
- How to enable Twitch VOD?
VODs are the best form to archive streams that your fans missed. Even though they are not enabled by default, you can manually enable them and not let your fans miss any important event from your channel. They’ll find it under the “Videos” tab on any Twitch channel. Follow these steps to enable VOD on your channel.
Step 1. Go to your profile icon in the top right corner of Twitch
Check in the “Channel & Video” section and locate the “Stream Key & Preferences” menu.
Step 2. Click on “Creator Dashboard”
Remember, you can enable VODs from your creator dashboard. Just go under the “Settings” tab and click on the “Stream section” of the creator dashboard. Check under the subtitle “VOD Settings” and get the option to store past broadcasts. You can also toggle the slider to store your past broadcasts.
Step 3 Click on the “Settings” tab on the left-hand side and go to Stream
You’ll get various drop-down menu options. Click on the “Settings” tab and choose the “Stream” option. The system will navigate to a new page, thus setting your preferences for VODs and clips.
Step 4. Go to “VOD Settings” and toggle on the “Store Past Broadcast.”
Ensure you have the toggle option turned ON under the “VOD Settings.” If it’s “ON,” you’ll realize the toggle will be purple, with a checkmark in it. Twitch will be confirmed to be enabled if it’s purple.
- Frequently Asked Question about Twitch VOD
These are some questions frequently asked by Twitch users.
1. How long will Twitch store my VOD
Your Twitch can either be stored for 14 or 60 days, depending on your level. For Twitch Prime, Twitch Partner or a Twitch Turbo user has their past broadcasts automatically saved for 60 days before deletion. But if you are not connected to these three options, your past broadcasts will be saved for only 14 days before deletion.
Since your past broadcasts cannot be live for more than 60 days, you have the option to download the video to your computer before the validity days expire and Twitch deletes it. You can use an External Hard drive to save the past broadcast content. Likewise, it is possible to turn your past broadcast content into Highlight and, in turn, permanently store them on Twitch.
2. What is the difference between Twitch VOD, Highlights, and Clips
Twitch VOD is a previously saved video of your live stream content. You choose to save either part or the entire content of your previously streamed content. More so, you don’t need any additional requirements to use VOD.
Highlights are short videos that have been edited from your past broadcast content. You can save them on Twitch permanently. Streamers majorly use highlights to save video game achievements. Unlike VOD Twitch that can be saved up to 60 days, Highlights usually lasts no more than 3 minutes.
- To make Highlights on Twitch, first, navigate to your Dashboard.
- Then scroll down and click on “Content” > “Video Producer.
- Next, press on “All Videos” to change them to “Past Broadcasts.”
- Now press the “Highlight” button, and Twitch will immediately open a new tab for “Twitch Highlighter Tool.”
- Then select the video part to include as “Highlight” and press the “Create Highlights” button.
- Wait a while for the process to be completed, and Voila! You have your Highlights created.
When it comes to Twitch Clip, you can capture special moments in a stream you are currently watching. On the same note, you can share clips with friends and other users on social media platforms. Such shared clips contain a link where others view the source or video from.
The clips you create will automatically be saved on the streamer’s channel on the “Clips” page, where other viewers can see them too. Nonetheless, you can download “clips” to your computer and, in turn, upload them whenever you want to. And note that you can help your stream grow via “Clips” by letting your viewers clip and share your stream moments.
- To create “Clips” on Twitch, identify which Streamers channel you wish to create a clip from.
- Then click on the “Clapper board” icon. Next, edit your clip between 5 and 60 seconds long.
- Finally, create a title and publish your Clip. You’ll also enjoy the privilege to share your clip’s link to other social media networks.
What is the benefit of uploading your Twitch Streams to YouTube
You stand to gain a lot when you upload your Twitch Streams to YouTube.
1) To enlighten your followers
Your followers will see your streams and make the best decisions. Viewers can check out your recordings and other highlights from past streams. It will help them decide whether they like what they see and probably join your live streams.
2) Twitch provides content for you to share and monetize on YouTube
Since Twitch streaming is more popular nowadays, many people throng it for content. It is not wise to rely entirely on Twitch to discover as a Twitch Streamer. Posting to YouTube will make it known within a short time. You would have announced your streams most nobly and kept your followers up to date, attracting new ones as well.
3) To keep your followers engaged even when you are offline
Even though live streaming is important, some viewers may not attend the live sessions due to different time zones or other commitments. In this regard, when uploaded to YouTube, Twitch will give them a chance to watch your content just whenever they log in. They, therefore, have the option to watch a Twitch VOD of the live stream they missed.
How to upload your Twitch Streams to YouTube
Check how to upload Twitch streams to YouTube from the Twitch website.
Step 1. Identify the little arrow next to your name on the Twitch website and click on it. Then click on the “Video Producer” to take you to a list of your Twitch videos.
Step 2. Check out and click on the “three-dots” on the video you wish to upload to YouTube. Click on the “Export” tab.
Step 3. A menu will then pop up. Here, you can fill in the description, title, and tags that you would like to appear on the YouTube video. There is an option for Twitch to split your video automatically. If you wish so, then tick the “Checkbox” to enable it. Then click on the “Start Export” option to export your Twitch streams to YouTube.
Bouns! Edit Your Twitch Video with Filmora
The quality of your video matters when it comes to uploading Twitch Streams to YouTube. Using a third-party tool to edit your video is the first step in ensuring your videos communicate meaningful content. Filmora comes in handy to bring your imaginations to life. Use it for simple creation without limits, even for beginners.
- Use it to track moving objects in video clips
- Easily match any image of the selected clip
- Its powerful tools let you edit your video by cropping, splitting, adjusting speed, etc
- The video keyframe easily indicates the beginning and end of the parameters
For Win 7 or later (64-bit)
For macOS 10.12 or later
Conclusion
● Don’t just focus on how to upload Twitch streams to YouTube but also consider the quality of video you are posting to YouTube. Remember, your video quality will speak much more of you than any other description. So, strive to produce quality videos using the best tool, Filmora. The app is easy to use and will elevate your views and imaginations through your video in the most impactful way.
Advanced Filmmaking Techniques: Selecting Top-Notch Lenses
Best Camera Lenses for YouTube

Richard Bennett
Mar 27, 2024• Proven solutions
A DSLR is the ideal camera for some vlogs, and using a DSLR means you get to customize the look of your vlog by choosing the perfect lens. Choosing the best camera lens for your YouTube channel can be tricky because there are so many options. This article will walk you through some of them, and make two recommendations of great vlogging lenses. If you already have a good understanding of how camera lenses work then feel free to scroll down to the lens recs.
Part 1. Understanding Lenses: Zoom lens, Fixed lens, aperture, f-stop
There are two main categories of camera lenses: ‘zoom’ – lenses that allow you to zoom in and out – and ‘fixed’. If your lenses are tools then zoom lenses are Swiss army knives; they are very versatile. Fixed lenses, also called prime lenses, have more specific purposes. Do you need a tool that can do a lot of things, or a tool that is perfect for one specific job? Sometimes it is useful to have access to both.
We have explained the differences between Fixed lens and Zoom lens and advantages of using each lens, check this article: Zoom Lens vs. Fixed Lenses: Which one is best for YouTuber? for the detailed information.
Before we get into the recommendations here is a little background information on lenses in general:
Beginner’s Guide to Aperture and F-Stops
In order to be able to select the lens you’ll be using to record your YouTube videos, you first need to understand a few very basic concepts, such as aperture or f-stops.
1.What is a lens’s aperture?
The aperture of your lens is the hole through which light reaches your camera’s sensor, or the film if you are using a film camera. The wider your aperture is the more light you are letting into your camera. In low light it is better to have a wide aperture, and when you are working with a lot of light it is better to have a narrow aperture so your footage is not overexposed.
Aperture is simply an opening in the lens that lets the light through. If you want to increase the amount of the light that is reaching the camera’s sensor you need to open up the aperture blades that are located in the lens. The f-values like f/1.2 or f/1.8 indicate that the aperture is wide open and that the camera is receiving the maximum amount of light a lens you’re using can provide.
2.What is an ‘f-stop’?
Light passes through your lens’s aperture on its way to your camera’s sensor, and the f-stop of your lens relates to the amount of light it lets in. The lower your f-stop, the wider your aperture, and the more light you are letting into your camera. The more light you let into your camera the easier it is to achieve a blurred background. A lot of vloggers love blurring their backgrounds because it is a quick way to disguising the rooms they are shooting in.
F-stops are written like ‘f/1.8’ or ‘f/4’ on your lens. For more information on f-stops and blurring your background read “The Best Bokeh Lens - How to Get the Blurred Background for YouTube Videos” and watch Tasha’s video.
F-stops or f-numbers indicate how open the aperture is, so for example if your camera is displaying f/32 value it means that your camera is letting very little light to get through to the camera’s sensor. The f-number depends on a few other parameters such as shutter speed, exposure or ISO values. Large apertures provide a shallow depth of field which creates a smooth and artistic background blur, while a small aperture enables you to keep both the background and the foreground of your shot in focus.
Part 2: Types of Camera Lenses
The visual aspect of a video may not be the only thing you’ll have to dedicate special attention to while recording your YouTube video, but it is surely one of the most important factors of the video production process. A lens you are using will largely contribute to the aesthetics of the video. That’s why you need to know which type of lens will deliver the best results when shooting different types of scenes. Here are some of the most common types of lenses you’ll encounter.
Standard lenses
These lenses are featured in almost all camera kits, so the chances are that if you have a DSLR camera you already have a standard, mid-range lens. These lenses commonly have a fixed 50mm focal length, although zoom lenses with focal lengths in the range between 35mm and 75mm are also considered standard. You can use them to capture medium shots, single or multiple figure shots, and in some cases establishing shots, because they offer enough versatility to cover a multitude of different scenes. Standard lenses often have large apertures, which makes them quite useful if you often shoot videos under light conditions you can’t control.
Macro lenses
Details, product shots or any other subject that can be filmed from close proximity looks better if they are recorded with macro lenses. The high contrast and sharpness these lenses provide allow you to create stunning close-ups of all hosts, guests or actors in your YouTube videos. What’s more, if you are presenting a new product to your audience you can use the macro lens to make some captivating shots that will attract more audience. Zoom lenses can also be used for macro photography and video, although prime macro lenses produce better results.
Telephoto lenses
The subjects of your videos don’t always have to be in your immediate surroundings, because telephoto lenses let you capture scenes that are several miles away from you. Wildlife or sports videographers frequently use telephoto lenses because they don’t have another way of getting close to their subjects. However, telephoto lenses with 70-300mm focal length can also be used to take stunning portraits or close up shots. The biggest downside of telephoto lenses is their weight because the lenses with higher focal lengths can weigh up to 10lbs, which makes them a bit inconvenient to always carry with you.
Wide-angle lenses
Recording videos of vast open spaces, breathtaking vistas or beautiful city views is much easier if you have a wide-angle lens. The short focal length allows the lens to have a wider field of view which covers more space than standard or telephoto lenses. Wide-angle lenses also have lower apertures than lenses with longer focal lengths which results in images that have a shallow depth of field. Ultra-wide lenses like fisheye distort the view so the videos recorded with these lenses often suffer from the lack of realism.
Specialist lenses
YouTubers who are working on demanding projects can try to solve their troubles by using a specialist lens. Soft-focus lenses can help you take better portraits while tilt-shift lenses allow you to control the perspective. However, it is hard to imagine a scenario in which you’ll need a specialist lense if you are just starting out since even experienced videographers only use special lenses when they have absolutely no better way to record a scene.
Part 3: Recommended Best Camera Lenses for Shooting YouTube Videos
Here are a couple great lenses that might be good fits for you and your YouTube channel. The thing that makes them both ideal for vlogging is that they have low enough f-stops to blur out your background.
| Camera Lens | Type | Price | Aperture | Focal Length |
|---|---|---|---|---|
| Canon EF-S 10-18mm f/4.5-5.6 IS STM Lens | Wide angle | $279 | f/4.5-5.6 | 10 -18mm |
| Rokinon 8mm f/3.5 | Fisheye | $249 | f/3.5 | 8mm |
| Canon 50mm f/1.8 STM Lens | Prime | $125 | f/1.8 | 50mm |
| Canon EF 135mm f/2L USM Lens | Telephoto | $999 | f/2 | 135mm |
| Tamron SP AF 17-50mm f/2.8 | Standard Zoom | $299 | f/2.8 | 17 -50mm |
| Sony 30mm f/3.5 Macro | Macro | $278 | f/3.5 | 30mm |
1.Canon EF-S 10-18mm f/4.5-5.6 IS STM Lens
Canon released this lens in 2014 and shortly after it has gained the reputation of one of the most reliable wide to ultra-wide lenses for Canon cameras. Like most STM lenses, it offers incredibly fast autofocus technology that makes it a great choice for fast-paced action videos. The lens is equipped with an image stabilization system which guarantees that your videos are going to remain sharp even if the camera wasn’t perfectly still while you were recording. Somewhat smaller aperture range makes this lens poor choice for low light scenes, although you can get decent results if you manage to keep the camera still.
2. Rokinon 8mm Ultra Wide f/3.5 Fisheye Lens
Outdoor videos look much cooler when they are recorded with a wide-angle lens because the wider field of view enables you to capture more space in a shot. Fisheye lenses were made popular by GoPro cameras because they make the videos look more fun while producing high image quality. Rokinon 8mm lens allows you to adjust focus and aperture manually so you can fine-tune your shot before hitting the record button. To make things even better this model is compatible with a wide range of cameras including Pentax, Canon or Nikon DSLRs. It has a relatively fast aperture that enables it to deliver solid performances under low light conditions.
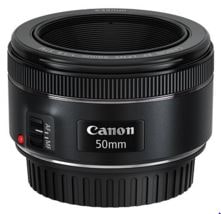
3.Canon EF 50mm f/1.8 STM Lens
The EF 50mm is a fixed lens with an f-stop of 1.8, which means it is great for blurring your background and performs well even in poorer lighting conditions. This is a really great lens for an opinion or beauty vlog, where you do not need to move around. You can stay put right where the focus is sharpest and stand out by blurring everything behind you. If you tend to reuse the same sets then you do not really need a zoom feature. If your shooting conditions rarely change then it is just as easy to use a reliable fixed lens like the EF 50mm since you will not need to be rethinking your set up and adjusting.
If you are looking for an inexpensive prime lens that lets you create sharp videos with shallow depth of field, you should look no further. This model is one of three Canon’s 50mm prime lenses, although the 50mm f/1.4 USM and 50mm f/1.2 ‘L’ USM models are much more expensive. You can use it to record a lot of different types of YouTube videos, like product reviews or makeup tutorials. The 50 mm f/1.8 STM lens doesn’t have image stabilization technology so you should try to be as still as you can possibly be when shooting handheld videos in order to avoid recording footage that has a lot of camera shakes.
4.Canon EF 135mm f/2L USM Lens
Recording moving objects from a distance requires you to have a lens that allows you to smoothly track their movements while keeping the subject in focus. The Canon EF 135mm f2/L USM lens is perhaps one of the best telephoto lenses on the market because it uses L glass that is widely accepted as the best in the industry. The Canon’s telephoto lens is compatible with ASP-C and Full Frame EF mount cameras. Keep in mind that this is also a prime lens and you can’t increase or decrease its focal length, but even so, it is a perfect choice for documentary-style videos.
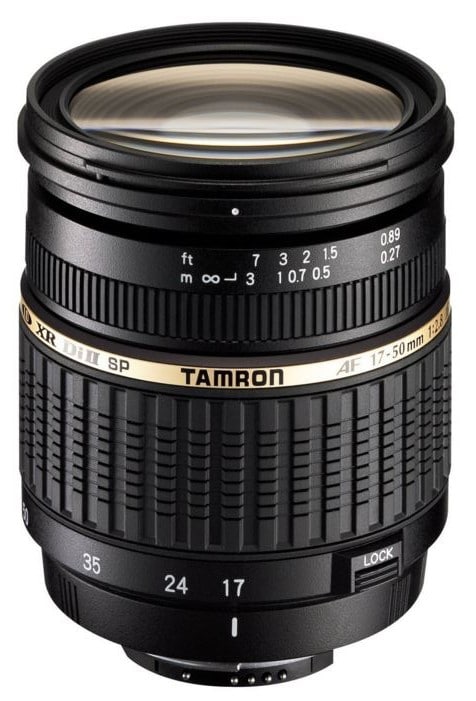
5.Tamron SP AF 17-50mm f/2.8 XR Di II LD Aspherical (IF) Lens
The Tamron’s standard zoom lens offers good value at a very reasonable price. The maximum aperture is f/2.8, while the minimum aperture value this lens supports is f/32, which means that its users can easily experiment with different depths of field. The lens is compatible with most Canon cameras so if you have a camera from another manufacturer you may have to use the lens adapter in order to mount it onto your camera. Like most standard zoom lenses, Tamron SP AF model is highly versatile and you can use it to record a wide range of different scenes.
A lot of zoom lenses do not have wide enough apertures to create blurred backgrounds, but this Tamron lens is an exception at f/2.8. This low f-stop also means that it performs better in poor lighting conditions than a lot of other zoom lenses. If your shooting conditions change a lot – if you often change locations, for example – then it will be good to have a sturdy, well-built, zoom lens like the AF 17-mm that can be quickly adapted to new angles and distances.
6.Sony 30mm f/3.5 Macro
All Sony’s APS-C format E mount cameras are compatible with this multi-purpose lens. When mounted the 30mm lens provides a 45mm focal length equivalent, which means that you can use it to take macro shots of products or to record medium or close-up shots. This is a prime lens, so changing the focal length isn’t really an option, but the 1:1 life-size magnification, as well as the 0.9-inch working distance, allow you to get close to the subjects in the video. The aperture range is between f/3.5 and f/22 which means that you can choose how shallow the depth of field in your shot should be.
If you are using a 4k camera to shoot your YouTube video, check out best camera lens for 4k professional production.
Richard Bennett
Richard Bennett is a writer and a lover of all things video.
Follow @Richard Bennett
Richard Bennett
Mar 27, 2024• Proven solutions
A DSLR is the ideal camera for some vlogs, and using a DSLR means you get to customize the look of your vlog by choosing the perfect lens. Choosing the best camera lens for your YouTube channel can be tricky because there are so many options. This article will walk you through some of them, and make two recommendations of great vlogging lenses. If you already have a good understanding of how camera lenses work then feel free to scroll down to the lens recs.
Part 1. Understanding Lenses: Zoom lens, Fixed lens, aperture, f-stop
There are two main categories of camera lenses: ‘zoom’ – lenses that allow you to zoom in and out – and ‘fixed’. If your lenses are tools then zoom lenses are Swiss army knives; they are very versatile. Fixed lenses, also called prime lenses, have more specific purposes. Do you need a tool that can do a lot of things, or a tool that is perfect for one specific job? Sometimes it is useful to have access to both.
We have explained the differences between Fixed lens and Zoom lens and advantages of using each lens, check this article: Zoom Lens vs. Fixed Lenses: Which one is best for YouTuber? for the detailed information.
Before we get into the recommendations here is a little background information on lenses in general:
Beginner’s Guide to Aperture and F-Stops
In order to be able to select the lens you’ll be using to record your YouTube videos, you first need to understand a few very basic concepts, such as aperture or f-stops.
1.What is a lens’s aperture?
The aperture of your lens is the hole through which light reaches your camera’s sensor, or the film if you are using a film camera. The wider your aperture is the more light you are letting into your camera. In low light it is better to have a wide aperture, and when you are working with a lot of light it is better to have a narrow aperture so your footage is not overexposed.
Aperture is simply an opening in the lens that lets the light through. If you want to increase the amount of the light that is reaching the camera’s sensor you need to open up the aperture blades that are located in the lens. The f-values like f/1.2 or f/1.8 indicate that the aperture is wide open and that the camera is receiving the maximum amount of light a lens you’re using can provide.
2.What is an ‘f-stop’?
Light passes through your lens’s aperture on its way to your camera’s sensor, and the f-stop of your lens relates to the amount of light it lets in. The lower your f-stop, the wider your aperture, and the more light you are letting into your camera. The more light you let into your camera the easier it is to achieve a blurred background. A lot of vloggers love blurring their backgrounds because it is a quick way to disguising the rooms they are shooting in.
F-stops are written like ‘f/1.8’ or ‘f/4’ on your lens. For more information on f-stops and blurring your background read “The Best Bokeh Lens - How to Get the Blurred Background for YouTube Videos” and watch Tasha’s video.
F-stops or f-numbers indicate how open the aperture is, so for example if your camera is displaying f/32 value it means that your camera is letting very little light to get through to the camera’s sensor. The f-number depends on a few other parameters such as shutter speed, exposure or ISO values. Large apertures provide a shallow depth of field which creates a smooth and artistic background blur, while a small aperture enables you to keep both the background and the foreground of your shot in focus.
Part 2: Types of Camera Lenses
The visual aspect of a video may not be the only thing you’ll have to dedicate special attention to while recording your YouTube video, but it is surely one of the most important factors of the video production process. A lens you are using will largely contribute to the aesthetics of the video. That’s why you need to know which type of lens will deliver the best results when shooting different types of scenes. Here are some of the most common types of lenses you’ll encounter.
Standard lenses
These lenses are featured in almost all camera kits, so the chances are that if you have a DSLR camera you already have a standard, mid-range lens. These lenses commonly have a fixed 50mm focal length, although zoom lenses with focal lengths in the range between 35mm and 75mm are also considered standard. You can use them to capture medium shots, single or multiple figure shots, and in some cases establishing shots, because they offer enough versatility to cover a multitude of different scenes. Standard lenses often have large apertures, which makes them quite useful if you often shoot videos under light conditions you can’t control.
Macro lenses
Details, product shots or any other subject that can be filmed from close proximity looks better if they are recorded with macro lenses. The high contrast and sharpness these lenses provide allow you to create stunning close-ups of all hosts, guests or actors in your YouTube videos. What’s more, if you are presenting a new product to your audience you can use the macro lens to make some captivating shots that will attract more audience. Zoom lenses can also be used for macro photography and video, although prime macro lenses produce better results.
Telephoto lenses
The subjects of your videos don’t always have to be in your immediate surroundings, because telephoto lenses let you capture scenes that are several miles away from you. Wildlife or sports videographers frequently use telephoto lenses because they don’t have another way of getting close to their subjects. However, telephoto lenses with 70-300mm focal length can also be used to take stunning portraits or close up shots. The biggest downside of telephoto lenses is their weight because the lenses with higher focal lengths can weigh up to 10lbs, which makes them a bit inconvenient to always carry with you.
Wide-angle lenses
Recording videos of vast open spaces, breathtaking vistas or beautiful city views is much easier if you have a wide-angle lens. The short focal length allows the lens to have a wider field of view which covers more space than standard or telephoto lenses. Wide-angle lenses also have lower apertures than lenses with longer focal lengths which results in images that have a shallow depth of field. Ultra-wide lenses like fisheye distort the view so the videos recorded with these lenses often suffer from the lack of realism.
Specialist lenses
YouTubers who are working on demanding projects can try to solve their troubles by using a specialist lens. Soft-focus lenses can help you take better portraits while tilt-shift lenses allow you to control the perspective. However, it is hard to imagine a scenario in which you’ll need a specialist lense if you are just starting out since even experienced videographers only use special lenses when they have absolutely no better way to record a scene.
Part 3: Recommended Best Camera Lenses for Shooting YouTube Videos
Here are a couple great lenses that might be good fits for you and your YouTube channel. The thing that makes them both ideal for vlogging is that they have low enough f-stops to blur out your background.
| Camera Lens | Type | Price | Aperture | Focal Length |
|---|---|---|---|---|
| Canon EF-S 10-18mm f/4.5-5.6 IS STM Lens | Wide angle | $279 | f/4.5-5.6 | 10 -18mm |
| Rokinon 8mm f/3.5 | Fisheye | $249 | f/3.5 | 8mm |
| Canon 50mm f/1.8 STM Lens | Prime | $125 | f/1.8 | 50mm |
| Canon EF 135mm f/2L USM Lens | Telephoto | $999 | f/2 | 135mm |
| Tamron SP AF 17-50mm f/2.8 | Standard Zoom | $299 | f/2.8 | 17 -50mm |
| Sony 30mm f/3.5 Macro | Macro | $278 | f/3.5 | 30mm |
1.Canon EF-S 10-18mm f/4.5-5.6 IS STM Lens
Canon released this lens in 2014 and shortly after it has gained the reputation of one of the most reliable wide to ultra-wide lenses for Canon cameras. Like most STM lenses, it offers incredibly fast autofocus technology that makes it a great choice for fast-paced action videos. The lens is equipped with an image stabilization system which guarantees that your videos are going to remain sharp even if the camera wasn’t perfectly still while you were recording. Somewhat smaller aperture range makes this lens poor choice for low light scenes, although you can get decent results if you manage to keep the camera still.
2. Rokinon 8mm Ultra Wide f/3.5 Fisheye Lens
Outdoor videos look much cooler when they are recorded with a wide-angle lens because the wider field of view enables you to capture more space in a shot. Fisheye lenses were made popular by GoPro cameras because they make the videos look more fun while producing high image quality. Rokinon 8mm lens allows you to adjust focus and aperture manually so you can fine-tune your shot before hitting the record button. To make things even better this model is compatible with a wide range of cameras including Pentax, Canon or Nikon DSLRs. It has a relatively fast aperture that enables it to deliver solid performances under low light conditions.
3.Canon EF 50mm f/1.8 STM Lens
The EF 50mm is a fixed lens with an f-stop of 1.8, which means it is great for blurring your background and performs well even in poorer lighting conditions. This is a really great lens for an opinion or beauty vlog, where you do not need to move around. You can stay put right where the focus is sharpest and stand out by blurring everything behind you. If you tend to reuse the same sets then you do not really need a zoom feature. If your shooting conditions rarely change then it is just as easy to use a reliable fixed lens like the EF 50mm since you will not need to be rethinking your set up and adjusting.
If you are looking for an inexpensive prime lens that lets you create sharp videos with shallow depth of field, you should look no further. This model is one of three Canon’s 50mm prime lenses, although the 50mm f/1.4 USM and 50mm f/1.2 ‘L’ USM models are much more expensive. You can use it to record a lot of different types of YouTube videos, like product reviews or makeup tutorials. The 50 mm f/1.8 STM lens doesn’t have image stabilization technology so you should try to be as still as you can possibly be when shooting handheld videos in order to avoid recording footage that has a lot of camera shakes.
4.Canon EF 135mm f/2L USM Lens
Recording moving objects from a distance requires you to have a lens that allows you to smoothly track their movements while keeping the subject in focus. The Canon EF 135mm f2/L USM lens is perhaps one of the best telephoto lenses on the market because it uses L glass that is widely accepted as the best in the industry. The Canon’s telephoto lens is compatible with ASP-C and Full Frame EF mount cameras. Keep in mind that this is also a prime lens and you can’t increase or decrease its focal length, but even so, it is a perfect choice for documentary-style videos.
5.Tamron SP AF 17-50mm f/2.8 XR Di II LD Aspherical (IF) Lens
The Tamron’s standard zoom lens offers good value at a very reasonable price. The maximum aperture is f/2.8, while the minimum aperture value this lens supports is f/32, which means that its users can easily experiment with different depths of field. The lens is compatible with most Canon cameras so if you have a camera from another manufacturer you may have to use the lens adapter in order to mount it onto your camera. Like most standard zoom lenses, Tamron SP AF model is highly versatile and you can use it to record a wide range of different scenes.
A lot of zoom lenses do not have wide enough apertures to create blurred backgrounds, but this Tamron lens is an exception at f/2.8. This low f-stop also means that it performs better in poor lighting conditions than a lot of other zoom lenses. If your shooting conditions change a lot – if you often change locations, for example – then it will be good to have a sturdy, well-built, zoom lens like the AF 17-mm that can be quickly adapted to new angles and distances.
6.Sony 30mm f/3.5 Macro
All Sony’s APS-C format E mount cameras are compatible with this multi-purpose lens. When mounted the 30mm lens provides a 45mm focal length equivalent, which means that you can use it to take macro shots of products or to record medium or close-up shots. This is a prime lens, so changing the focal length isn’t really an option, but the 1:1 life-size magnification, as well as the 0.9-inch working distance, allow you to get close to the subjects in the video. The aperture range is between f/3.5 and f/22 which means that you can choose how shallow the depth of field in your shot should be.
If you are using a 4k camera to shoot your YouTube video, check out best camera lens for 4k professional production.
Richard Bennett
Richard Bennett is a writer and a lover of all things video.
Follow @Richard Bennett
Also read:
- 4 Secrets for Adding Online Vids Seamlessly in PPT for 2024
- In 2024, Do Paid Followers Impact Channel Popularity?
- [Updated] Best 10 Screen Recorders for YouTube
- __Warranty and Lifespan Higher Quality LED Systems May Come with a Higher Upfront Price but Can Offer Longer Lifespans and Better Performance, Which Should Be Considered in the Overall Cost Evaluation.
- Stop Unsolicited YouTube Suggestion Rollouts
- How-To Wipe Out Your YouTube Buffered Videos
- YouTube's Music Magic Best Free Tools for WAV Conversion
- 2024 Approved Easy Audio Extraction Methods From Online Videos
- [Updated] Best Practices in Selecting YouTube Video Extractor Apps for Android
- [Updated] Creating Content with Purpose Balancing Job & YouTube
- [New] 2017 Data Overload Infographics & Surprising YT Stats
- Effortless Audio Downloads These 24 Tools Split YouTube Sounds for 2024
- Essential Steps to Designing Exceptional YouTube Thumbnails
- The Power of Perception Transforming Thumbnails with Captivating BGs & FX
- Master Crafters Fusing Visual & Acoustic Art
- Producing Channel Trailer Synopses A Guide
- In 2024, Enhance Interaction Share Your Custom YouTube Playlist
- Trailblazers Creating Engaging Marvellous Universe
- Revisiting the Golden Age of Cinema Video Tutorials
- Unleash Your Potential Skyrocketing Numbers of YouTubers' Subscribers
- In 2024, Assessing Subforsup's Reliability in Safely Amplifying YouTube Viewers
- [Updated] Break the Ice - How to Make a Hit YouTube Reaction in Just 15 Minutes or Less
- Effective Visual Branding Crafting Compelling YouTube Logos for 2024
- [Updated] A Compreshift Guide to Creating Profitable & Engaging YouTube Collaborations
- Strategic Thumbnail Design Maximizing Online Exposure
- Bite-Sized Video Specialist for 2024
- 2024 Approved 8 Unbeatable Zero-Price Software Choices For Online Media Makers
- 2024 Approved Chart-Toppers on Screen Uploading Songs Methodically
- The Art of Short-to-MP4 Format Transformation
- Building Audience Connection with Empowerment Vlogs
- Breakthrough YouTube Success Essential Tips From Creator Studio Guide
- 2024 Approved Audiences on the Move Tracker Apps
- 8 Best Webspots FREE Eco-Backdrops and Footage Collection for 2024
- Unlocking Mobile Content Guide to Establishing Easy Business & Personal Channels
- The Secret Sauce of Submillion Success Youtube Edition
- Endless Entertainment The Science Behind YouTube Loops for 2024
- In 2024, Copyright Laws and Screencasting of Online Video Platforms (YouTube)
- 2024 Approved Enhancing Video Reach Convert YT to IGTV
- Discover the Most Reliable Royalty-Free Audio Libraries for 2024
- [Updated] Boost Your Earnings on YouTube Shorts A Guide
- DIY YouTube Music Collection A Comprehensive Online & App Method
- In 2024, Budding Creators Set Up a Profitable YouTube Chanel
- Mastering Desktop & Mobile Incorporate Timestamps on YouTube
- Exploring Income Average Creator Revenue From Adverts on YouTube?
- 2024 Approved Enhancing Video Experience on YouTube with Slower Playback (48 Chars)
- The Pinnacle of Engagement Custom YouTube Shorts Thumbnails Guide
- 2024 Approved Easy Steps for Exporting Videos From YouTube to Dailymotion
- The Mobile Filmmaker's Blueprint Crafting Viral Thumbnails for YouTubes
- 2024 Approved 8 Essential Video Editing Tools That Wont Slow You Down
- [New] 2024 Approved Seamless Scratching for Chrome Devices
- How to Use Pokémon Emerald Master Ball Cheat On Vivo Y27s | Dr.fone
- Best Waterproof GoPro Filters for Undersea Film for 2024
- 7 Solutions to Fix Chrome Crashes or Wont Open on Tecno Pova 5 | Dr.fone
- [Updated] 2024 Approved Essential Xbox External Drives Review Summary
- New 2024 Approved The Top 12 Audio Converters for Seamless File Conversion
- A Perfect Guide To Remove or Disable Google Smart Lock On Google Pixel 8
- [New] Effortless and Accurate How To Capture Every Hulu Playback for 2024
- In 2024, Secure & Seamless Transfer Backing Up Camera to Snapchat
- PictureProfessional Expert Guide to Adjusting IG Content Sizes
- In 2024, About Oppo Reno 11F 5G FRP Bypass
- [Updated] Advanced Anonymization Techniques to Blur Faces
- New Stay Active with These Top-Rated Motion Tracking Apps for 2024
- Elaborate Study of Uncomplicated HDR Techniques
- 3 Things You Must Know about Fake Snapchat Location On Realme Narzo N53 | Dr.fone
- Updated From Video to MP3 The Essential YouTube Audio Download Guide for 2024
- How to Change Google Play Location On Vivo Y56 5G | Dr.fone
- In 2024, 3 Methods to Mirror Tecno Pova 5 Pro to Roku | Dr.fone
- New In 2024, Speed Up Your Video Workflow with QuickTime Player
- In 2024, Apple ID is Greyed Out From iPhone 14 Plus How to Bypass?
- How to use Pokemon Go Joystick on Oppo Reno 9A? | Dr.fone
- In 2024, Where Is the Best Place to Catch Dratini On Oppo K11 5G | Dr.fone
- Title: Directing Twitch Viewers Seamlessly to YouTube Channel for 2024
- Author: Kevin
- Created at : 2024-05-25 14:59:09
- Updated at : 2024-05-26 14:59:09
- Link: https://youtube-videos.techidaily.com/directing-twitch-viewers-seamlessly-to-youtube-channel-for-2024/
- License: This work is licensed under CC BY-NC-SA 4.0.
