
:max_bytes(150000):strip_icc()/GettyImages-723499483-5a3df61e13f129003723eb42.jpg)
Decoding the Mystery of Where Are My YouTube Comments for 2024
Decoding the Mystery of Where Are My YouTube Comments?
How to Find Your Comments on YouTube?

Richard Bennett
Mar 27, 2024• Proven solutions
Have you ever felt worried about any YouTube comment that you published long ago, and later you realized that it was a mistake? Or, do you want to know what comments did you post and when? If so, YouTube offers a simple way of finding your past remarks, and making any changes to them if need be.
That said, the following sections teach you how to find your YouTube comments on a desktop or laptop computer, and also on a mobile device if you are a gadget freak.
- Part 1: How to Find Comments You’ve Posted on YouTube?
- Part 2: How to Find All YouTube Comments Your Channel Has Received?
- Part 3: How to Find Someone’s YouTube Comments by User Name?
- Part 4: How to Edit and Reply to YouTube Comments?
- Part 5: How to Moderate YouTube Comments?
- Part 6: Tips for Writing Good YouTube Comments
Part 1: How to Find All the Comments You’ve Posted on YouTube?
YouTube allows you to post comments on any video only if you are signed in to your Google account while browsing the streaming platform. Because of this, the portal is able to keep a record of your activities, thus enabling you to track all your comments, and take necessary action such as deleting or modifying them as required.
You can learn how to find all the comments you have posted on YouTube while using your preferred device by following the instructions given below:
1. Find Your YouTube Comments on a Desktop or Laptop Computer
Step 1: Sign In to Your YouTube Account
Launch your favorite web browser, go to the YouTube page, click SIGN IN from the top-right corner, and follow the on-screen instructions to enter your credentials and sign in to your Google/YouTube account.
Step 2: Get to the History Page
Click the Menu button from the top-left corner of the page, and then click History from the categories available in the navigation bar in the left.

Step 3: Access/View Your Past Comments
Click Comments from the right of the History page to view all the comments that you have posted earlier.

2. Find Your YouTube Comments on an iPhone
Unfortunately, at the time of this writing, the YouTube app for iOS doesn’t have the feature to view your comments history. However, there is a workaround where you can use a web browser on your smartphone to get this done. The process that is given below explains how to view your past YouTube comments on an iPhone:
Step 1: Sign In to Your YouTube Account on an Internet Browser
Launch your favorite web browser on your iPhone (Safari, the default one, is used here for illustration), go to https://m.youtube.com , tap the profile icon from the top-right corner, tap Sign in from the menu that appears, and follow the on-screen instructions to use your Google account credentials to sign in to YouTube.
Step 2: Access the Desktop Version of YouTube
Tap the More Options icon from the top-left corner of the browser, and then tap Request Desktop Website from the menu that appears to access the desktop version of YouTube on your iPhone.

Step 3: View Your Past YouTube Comments
Tap the Menu icon from the top-left corner of the YouTube page, and tap History from the menu that appears. On the History page, tap Comments from the right pane to view/access your YouTube comments that you posted in the past.

3. Find Your YouTube Comments on an Android Smartphone
As it is with iOS, the YouTube app for Android doesn’t allow you to view your comments history either. However, the workaround of using a web browser works pretty well on Android smartphones too, but with a few tweaks. The process of doing so is given below:
Step 1: Use a Web Browser to Sign In to Your YouTube Account
Launch Google Chrome on your Android smartphone (you can use any other web browser of your choice), and go to https://m.youtube.com . Notice how the interface automatically changes to the desktop version. Note: If the desktop version of the website isn’t visible, you can tap the More button (with three vertical dots) from the top-right corner of the browser, and check the Desktop site box.
Next, tap SIGN IN from the top-right corner of the YouTube page, enter your Google account credentials in the box available on the Sign in screen, enter your password when prompted, and sign in to your YouTube account.
Step 2: Choose a Web Browser (for Confirmation)
When the confirmation box pops up at the bottom, choose your preferred web browser, and tap the frequency of its usage for accessing YouTube. For instance, choose Chrome and Just once to use Google Chrome to access YouTube only for this session.
Step 3: View/Access Your Past YouTube Comments
Once you are signed in to your account, tap the Menu icon from the top-left corner of the YouTube page, and tap History from the menu that appears. When the History page opens up, tap Comments from the right pane to view and/or access your past YouTube comments.
Part 2: How to Find All YouTube Comments Your Channel Has Received?
If you own a YouTube channel and have posted several videos there, it is likely that you also have received a decent number of comments. Usually, these remarks are pretty helpful as they tell you how to improve your production quality, and what your audience prefers to watch in the future. Therefore, it is imperative to learn how to find all the comments that your YouTube channel has received, and the process given below explains exactly that:
1. Find Your Channel’s YouTube Comments on a Desktop or Laptop Computer
You can use your favorite web browser on a PC to easily find all the comments that the videos on your YouTube channel have received as long as you are signed in to your Google account. The step-by-step instructions on how this can be done are given below:
Step 1: Go to the Your videos Page
Open your favorite Internet browser, go to https://www.youtube.com , and sign in to your YouTube account as explained in the previous sections. Next, click the Menu icon from the top-left corner of the YouTube homepage, and click Your videos from the menu that appears.

Step 2: View the Comments
Make sure that the Uploads tab is selected on the Channel content window, and check the number under the Comments column of each video to see how many comments that particular film has received. You can click the number for any video to view its comments.

Step 3: Hide or Hold a Comment for Approval
Click the More icon from the right of the comment you want to moderate, and click Hide user from channel or Always approve comments from this user to hide the comments from the selected user or keep their comments on hold until you review and approve them respectively.

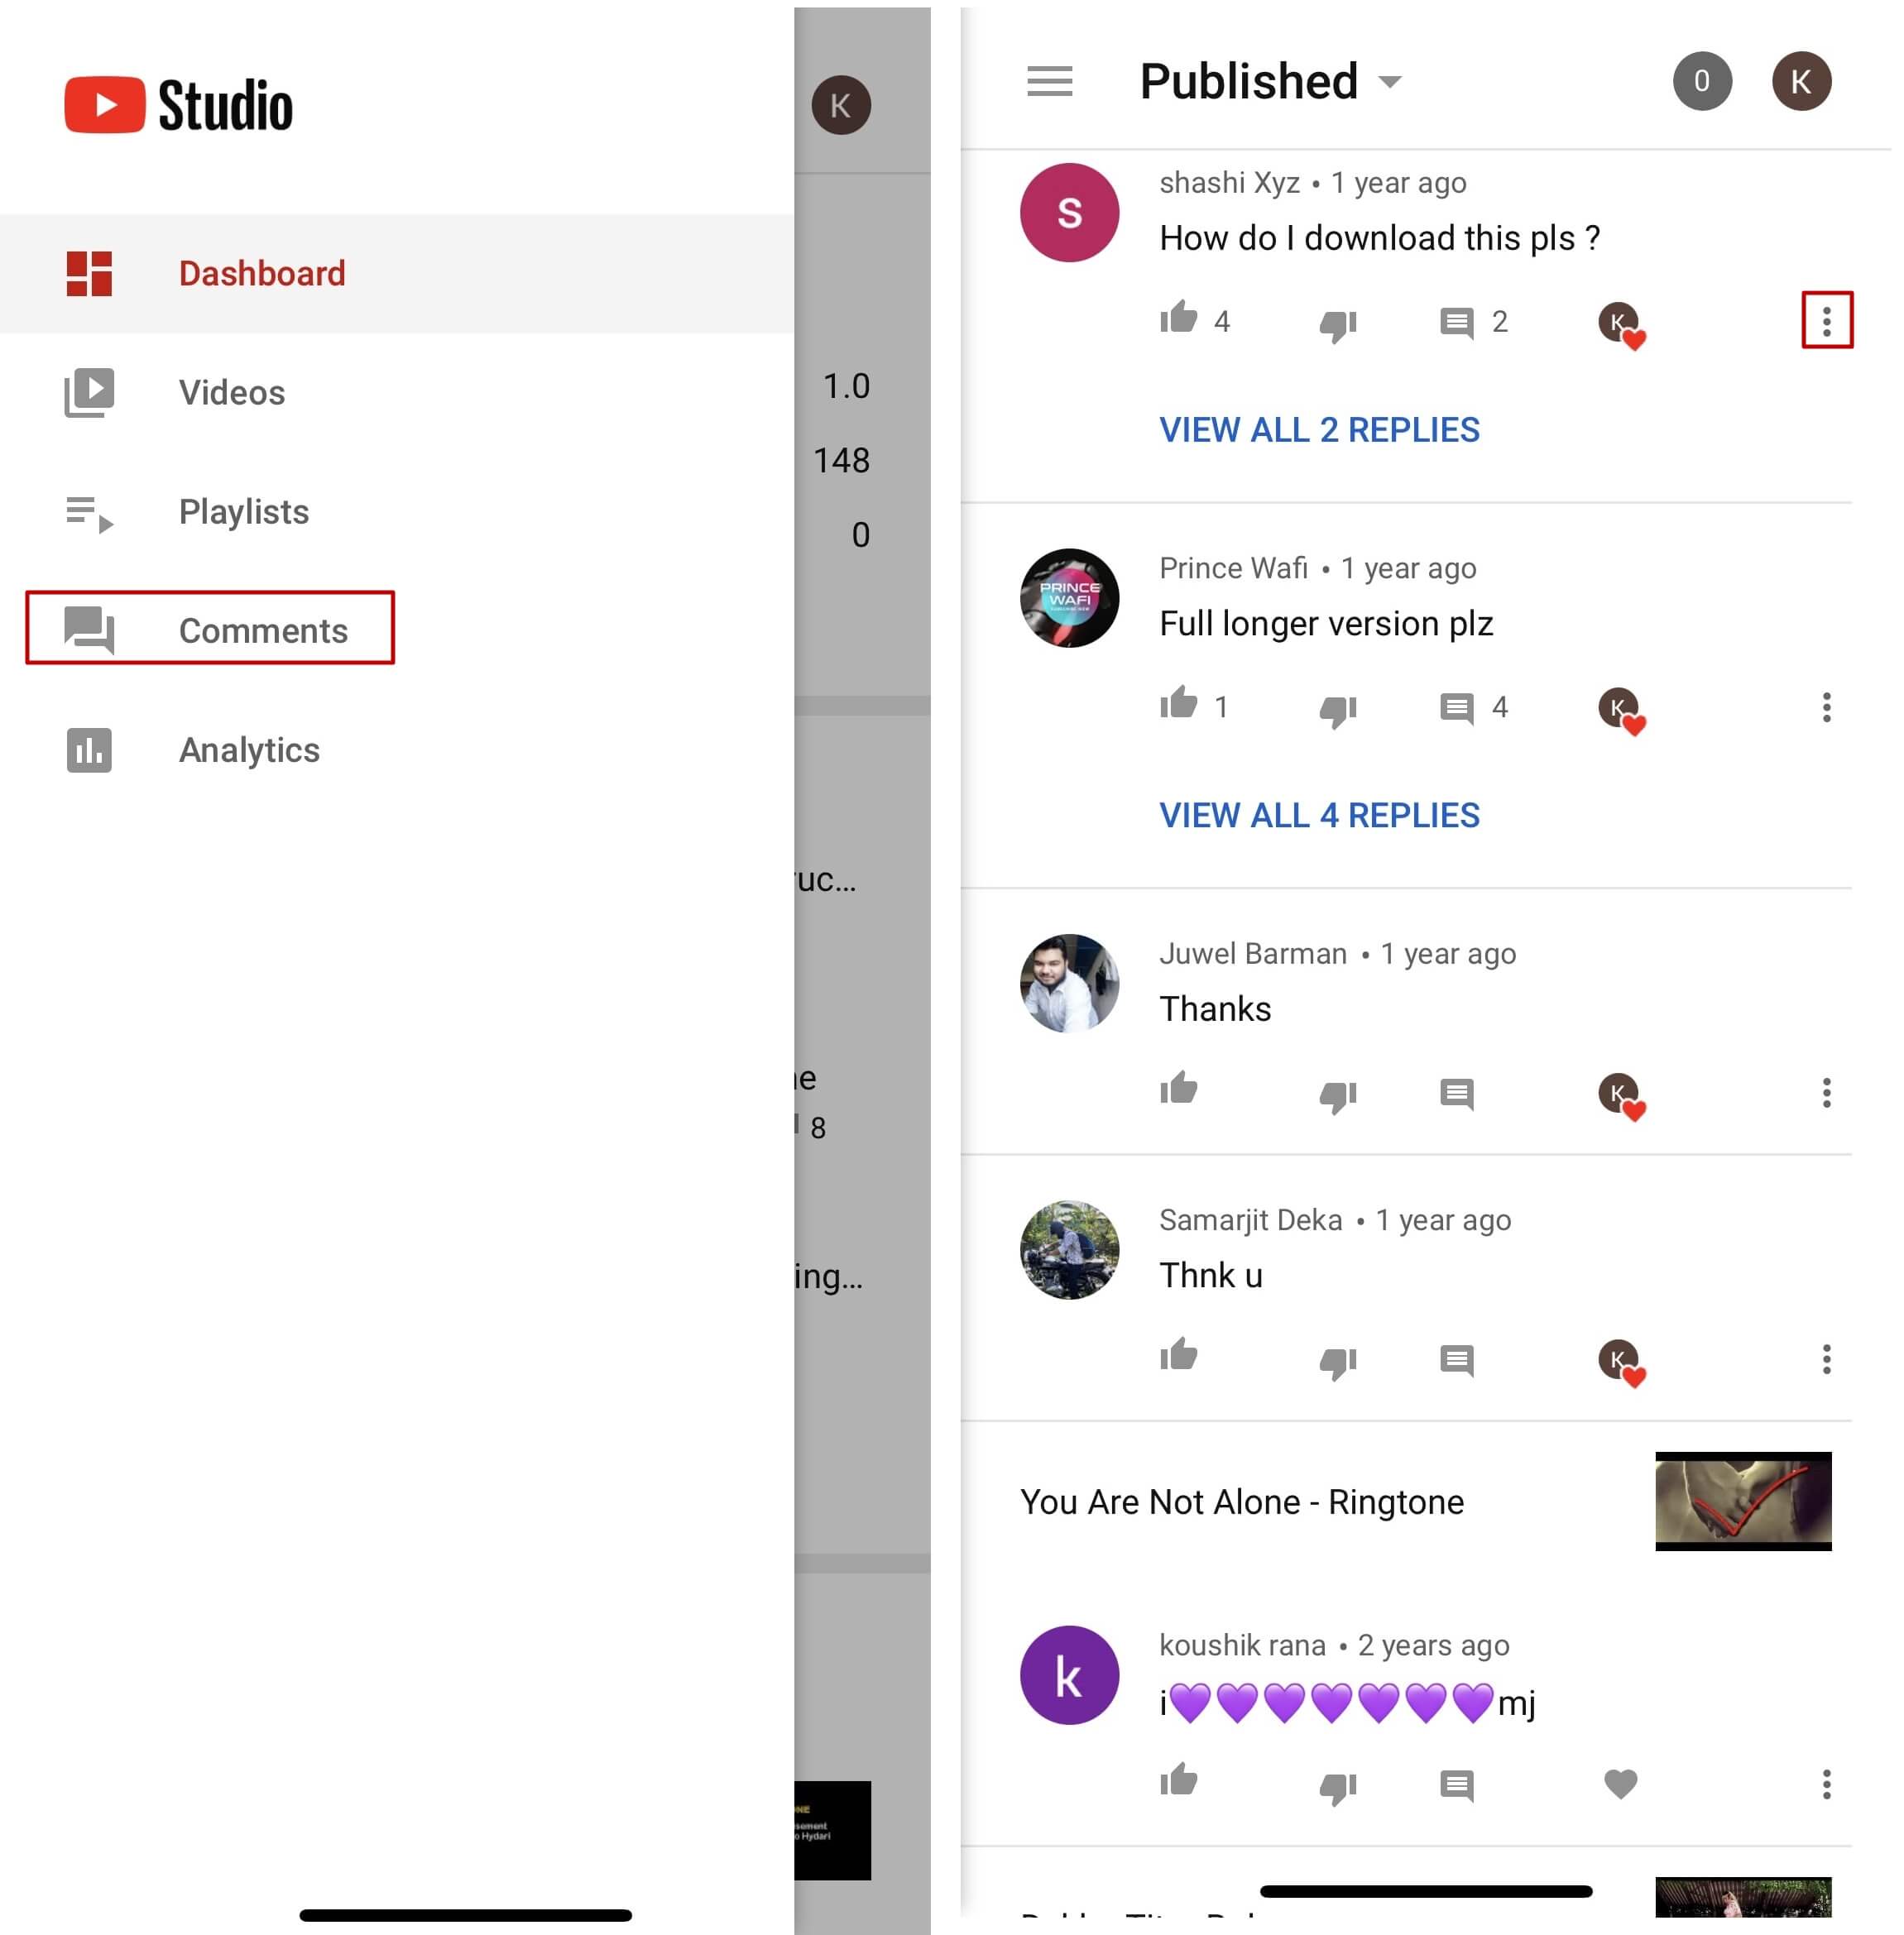
Note: To view all comments received on your YouTube channel, go to the Comments tab under YouTube Studio, and you will find all Channel comments & mentions.
2. Find Your Channel’s YouTube Comments on a Mobile App
This process is comparatively simpler than the previous one as all that you need to do is download the YT Studio app, and access a central location where all the comments for all the videos can be viewed. The process is given below:
Step 1: Obtain a Mobile App
Go to App Store or Google Play Store, and search and download the YT Studio app on your iPhone or Android smartphone (iPhone X is used here for illustration).
Step 2: View/Access All the Comments
Launch the YT Studio app, and sign in to your YouTube account. Tap the Menu icon from the top-left corner of the interface, and tap Comments from the menu to view all the published comments for all the videos that you have received on your YouTube channel.
Step 3: Hide Users and View Held Comments
Tap the More button from the right of an inappropriate comment, and tap Hide user from channel from the menu that comes up. In addition, you can tap the More button next to Published from the top, and tap Held for review from the box that pops up to view the comments that are waiting for your approval.
Note: Unfortunately, you cannot hold the comments for approval using the YT Studio app. As a workaround, you can follow the procedure given earlier to access the desktop version of YouTube on your smartphone, and then use the method explained in the previous section to get this done. However, it is recommended that you do all such sensitive tasks on a laptop or desktop computer to avoid any errors.
Part 3: Find Someone’s YouTube Comments by User Name
If any of your YouTube videos has thousands of comments and you need to find a particular one from a specific user, checking each remark manually would be an extremely time-consuming and tedious task. Therefore, it is a good idea to let an efficient application do the job for you.
One program, a Google Chrome extension called YCS – YouTube Comment Search to be precise, can help you with this. All you are required to do is, install the extension, go to the video, and search the comment by the name of the user. The step-by-step instructions on how this can be done are given below:
Step 1: Install YCS – YouTube Comment Search
Launch Google Chrome on your desktop or laptop computer, search for YCS – YouTube Comment Search, click Add to Chrome, and click Add extension on the notification box that pops up to install the YCS – YouTube Comment Search extension on your instance of Google Chrome.
Step 2: Load All Comments
Go to your or any other’s YouTube video, and click Load All from the top-right corner of the YouTube Comment Search panel that is present under the description box to allow YCS to scan all the comments the video has received.

Step 3: Search Comments from a Particular User
Choose Comments from the search type drop-down list, enter the name of the user in question in the Search box, and click Search to fetch all their comments on the video.

Part 4: How to Edit and Reply to YouTube Comments?
Editing an existing YouTube comment that you have posted earlier, or replying to the one published by someone else is simple. The process is given below:
Step 1: Edit an Existing Comment
Use any of the methods explained above to locate your YouTube comment that you want to edit. Next, click the More icon from the right of the comment, click Edit from the menu, make the required changes to the text, and click SAVE.
Step 2: Reply to a Comment
Locate the comment that you want to reply to, click REPLY from under the comment, type your text in the available field, and click REPLY.

Part 5: How to Moderate YouTube Comments?
If you publish videos on YouTube that may put some impact on people’s lifestyle, you are likely to face criticism quite often. Therefore, you might want to moderate all your comments before they become visible to the audience so as not to spread negativity among the mass. Fortunately, YouTube helps you get this done easily, and the instructions that teach you the process are given below:
Step 1: Get to Your Channel’s Settings Box
Sign in to your YouTube account, click the Menu icon from the top-left corner of the homepage, and click Your videos from the menu that appears.
From the bottom of the navigation bar on the left of the YouTube Studio page, click Settings to open the channel’s Settings box.
Step 2: Moderate YouTube Comments
Go to the Community category from the left pane, and go to the Defaults tab from the right. Next, choose Hide all comments for review from the Comments on your new videos drop-down list, and click SAVE from the bottom-right corner of the box to moderate all YouTube comments that your new videos receive from this point onward.

Part 6: Tips for Writing Good YouTube Comments
While posting a comment on a YouTube video, it is imperative to keep a few things in mind. Some important tips that might come in handy in this regard are suggested below:
- Make your comment as relevant to the video as you possibly can
- Avoid using harsh language or slangs to maintain decency
- Be genuine while leaving feedback. However, make sure to choose polite words while typing a comment
- In case you want to add some suggestions, make sure to be humble
- Ignore the replies with inappropriate content
FAQs About YouTube Comments
Q1) Why can’t I see the comments I posted?
A: If you cannot see your comments, this could be because the owner or moderator has configured the channel or the video to hold all the comments for review before they are visible on YouTube.
In such a case, you are advised to wait for the authorized person to approve your remark before it is published. Another possibility is that the moderator/owner has added you to the ‘hidden users’ list due to some reason. Even in this case, your comment won’t be visible until you are removed from that list.
Q2) I have enabled ‘Notify me’ about comments and other activity on my channel or videos, but can’t see the comments on my video. Why?
A: You won’t be able to view the unpublished comments or those from the users you have added to the ‘hidden’ list. To fix this problem, you may want to disable moderation from your channel or the videos, and also unhide the users. The processes of both these configurations are explained in detail in the above sections.
Richard Bennett
Richard Bennett is a writer and a lover of all things video.
Follow @Richard Bennett
Richard Bennett
Mar 27, 2024• Proven solutions
Have you ever felt worried about any YouTube comment that you published long ago, and later you realized that it was a mistake? Or, do you want to know what comments did you post and when? If so, YouTube offers a simple way of finding your past remarks, and making any changes to them if need be.
That said, the following sections teach you how to find your YouTube comments on a desktop or laptop computer, and also on a mobile device if you are a gadget freak.
- Part 1: How to Find Comments You’ve Posted on YouTube?
- Part 2: How to Find All YouTube Comments Your Channel Has Received?
- Part 3: How to Find Someone’s YouTube Comments by User Name?
- Part 4: How to Edit and Reply to YouTube Comments?
- Part 5: How to Moderate YouTube Comments?
- Part 6: Tips for Writing Good YouTube Comments
Part 1: How to Find All the Comments You’ve Posted on YouTube?
YouTube allows you to post comments on any video only if you are signed in to your Google account while browsing the streaming platform. Because of this, the portal is able to keep a record of your activities, thus enabling you to track all your comments, and take necessary action such as deleting or modifying them as required.
You can learn how to find all the comments you have posted on YouTube while using your preferred device by following the instructions given below:
1. Find Your YouTube Comments on a Desktop or Laptop Computer
Step 1: Sign In to Your YouTube Account
Launch your favorite web browser, go to the YouTube page, click SIGN IN from the top-right corner, and follow the on-screen instructions to enter your credentials and sign in to your Google/YouTube account.
Step 2: Get to the History Page
Click the Menu button from the top-left corner of the page, and then click History from the categories available in the navigation bar in the left.
Step 3: Access/View Your Past Comments
Click Comments from the right of the History page to view all the comments that you have posted earlier.
2. Find Your YouTube Comments on an iPhone
Unfortunately, at the time of this writing, the YouTube app for iOS doesn’t have the feature to view your comments history. However, there is a workaround where you can use a web browser on your smartphone to get this done. The process that is given below explains how to view your past YouTube comments on an iPhone:
Step 1: Sign In to Your YouTube Account on an Internet Browser
Launch your favorite web browser on your iPhone (Safari, the default one, is used here for illustration), go to https://m.youtube.com , tap the profile icon from the top-right corner, tap Sign in from the menu that appears, and follow the on-screen instructions to use your Google account credentials to sign in to YouTube.
Step 2: Access the Desktop Version of YouTube
Tap the More Options icon from the top-left corner of the browser, and then tap Request Desktop Website from the menu that appears to access the desktop version of YouTube on your iPhone.
Step 3: View Your Past YouTube Comments
Tap the Menu icon from the top-left corner of the YouTube page, and tap History from the menu that appears. On the History page, tap Comments from the right pane to view/access your YouTube comments that you posted in the past.
3. Find Your YouTube Comments on an Android Smartphone
As it is with iOS, the YouTube app for Android doesn’t allow you to view your comments history either. However, the workaround of using a web browser works pretty well on Android smartphones too, but with a few tweaks. The process of doing so is given below:
Step 1: Use a Web Browser to Sign In to Your YouTube Account
Launch Google Chrome on your Android smartphone (you can use any other web browser of your choice), and go to https://m.youtube.com . Notice how the interface automatically changes to the desktop version. Note: If the desktop version of the website isn’t visible, you can tap the More button (with three vertical dots) from the top-right corner of the browser, and check the Desktop site box.
Next, tap SIGN IN from the top-right corner of the YouTube page, enter your Google account credentials in the box available on the Sign in screen, enter your password when prompted, and sign in to your YouTube account.
Step 2: Choose a Web Browser (for Confirmation)
When the confirmation box pops up at the bottom, choose your preferred web browser, and tap the frequency of its usage for accessing YouTube. For instance, choose Chrome and Just once to use Google Chrome to access YouTube only for this session.
Step 3: View/Access Your Past YouTube Comments
Once you are signed in to your account, tap the Menu icon from the top-left corner of the YouTube page, and tap History from the menu that appears. When the History page opens up, tap Comments from the right pane to view and/or access your past YouTube comments.
Part 2: How to Find All YouTube Comments Your Channel Has Received?
If you own a YouTube channel and have posted several videos there, it is likely that you also have received a decent number of comments. Usually, these remarks are pretty helpful as they tell you how to improve your production quality, and what your audience prefers to watch in the future. Therefore, it is imperative to learn how to find all the comments that your YouTube channel has received, and the process given below explains exactly that:
1. Find Your Channel’s YouTube Comments on a Desktop or Laptop Computer
You can use your favorite web browser on a PC to easily find all the comments that the videos on your YouTube channel have received as long as you are signed in to your Google account. The step-by-step instructions on how this can be done are given below:
Step 1: Go to the Your videos Page
Open your favorite Internet browser, go to https://www.youtube.com , and sign in to your YouTube account as explained in the previous sections. Next, click the Menu icon from the top-left corner of the YouTube homepage, and click Your videos from the menu that appears.
Step 2: View the Comments
Make sure that the Uploads tab is selected on the Channel content window, and check the number under the Comments column of each video to see how many comments that particular film has received. You can click the number for any video to view its comments.
Step 3: Hide or Hold a Comment for Approval
Click the More icon from the right of the comment you want to moderate, and click Hide user from channel or Always approve comments from this user to hide the comments from the selected user or keep their comments on hold until you review and approve them respectively.
Note: To view all comments received on your YouTube channel, go to the Comments tab under YouTube Studio, and you will find all Channel comments & mentions.
2. Find Your Channel’s YouTube Comments on a Mobile App
This process is comparatively simpler than the previous one as all that you need to do is download the YT Studio app, and access a central location where all the comments for all the videos can be viewed. The process is given below:
Step 1: Obtain a Mobile App
Go to App Store or Google Play Store, and search and download the YT Studio app on your iPhone or Android smartphone (iPhone X is used here for illustration).
Step 2: View/Access All the Comments
Launch the YT Studio app, and sign in to your YouTube account. Tap the Menu icon from the top-left corner of the interface, and tap Comments from the menu to view all the published comments for all the videos that you have received on your YouTube channel.
Step 3: Hide Users and View Held Comments
Tap the More button from the right of an inappropriate comment, and tap Hide user from channel from the menu that comes up. In addition, you can tap the More button next to Published from the top, and tap Held for review from the box that pops up to view the comments that are waiting for your approval.
Note: Unfortunately, you cannot hold the comments for approval using the YT Studio app. As a workaround, you can follow the procedure given earlier to access the desktop version of YouTube on your smartphone, and then use the method explained in the previous section to get this done. However, it is recommended that you do all such sensitive tasks on a laptop or desktop computer to avoid any errors.
Part 3: Find Someone’s YouTube Comments by User Name
If any of your YouTube videos has thousands of comments and you need to find a particular one from a specific user, checking each remark manually would be an extremely time-consuming and tedious task. Therefore, it is a good idea to let an efficient application do the job for you.
One program, a Google Chrome extension called YCS – YouTube Comment Search to be precise, can help you with this. All you are required to do is, install the extension, go to the video, and search the comment by the name of the user. The step-by-step instructions on how this can be done are given below:
Step 1: Install YCS – YouTube Comment Search
Launch Google Chrome on your desktop or laptop computer, search for YCS – YouTube Comment Search, click Add to Chrome, and click Add extension on the notification box that pops up to install the YCS – YouTube Comment Search extension on your instance of Google Chrome.
Step 2: Load All Comments
Go to your or any other’s YouTube video, and click Load All from the top-right corner of the YouTube Comment Search panel that is present under the description box to allow YCS to scan all the comments the video has received.
Step 3: Search Comments from a Particular User
Choose Comments from the search type drop-down list, enter the name of the user in question in the Search box, and click Search to fetch all their comments on the video.
Part 4: How to Edit and Reply to YouTube Comments?
Editing an existing YouTube comment that you have posted earlier, or replying to the one published by someone else is simple. The process is given below:
Step 1: Edit an Existing Comment
Use any of the methods explained above to locate your YouTube comment that you want to edit. Next, click the More icon from the right of the comment, click Edit from the menu, make the required changes to the text, and click SAVE.
Step 2: Reply to a Comment
Locate the comment that you want to reply to, click REPLY from under the comment, type your text in the available field, and click REPLY.
Part 5: How to Moderate YouTube Comments?
If you publish videos on YouTube that may put some impact on people’s lifestyle, you are likely to face criticism quite often. Therefore, you might want to moderate all your comments before they become visible to the audience so as not to spread negativity among the mass. Fortunately, YouTube helps you get this done easily, and the instructions that teach you the process are given below:
Step 1: Get to Your Channel’s Settings Box
Sign in to your YouTube account, click the Menu icon from the top-left corner of the homepage, and click Your videos from the menu that appears.
From the bottom of the navigation bar on the left of the YouTube Studio page, click Settings to open the channel’s Settings box.
Step 2: Moderate YouTube Comments
Go to the Community category from the left pane, and go to the Defaults tab from the right. Next, choose Hide all comments for review from the Comments on your new videos drop-down list, and click SAVE from the bottom-right corner of the box to moderate all YouTube comments that your new videos receive from this point onward.
Part 6: Tips for Writing Good YouTube Comments
While posting a comment on a YouTube video, it is imperative to keep a few things in mind. Some important tips that might come in handy in this regard are suggested below:
- Make your comment as relevant to the video as you possibly can
- Avoid using harsh language or slangs to maintain decency
- Be genuine while leaving feedback. However, make sure to choose polite words while typing a comment
- In case you want to add some suggestions, make sure to be humble
- Ignore the replies with inappropriate content
FAQs About YouTube Comments
Q1) Why can’t I see the comments I posted?
A: If you cannot see your comments, this could be because the owner or moderator has configured the channel or the video to hold all the comments for review before they are visible on YouTube.
In such a case, you are advised to wait for the authorized person to approve your remark before it is published. Another possibility is that the moderator/owner has added you to the ‘hidden users’ list due to some reason. Even in this case, your comment won’t be visible until you are removed from that list.
Q2) I have enabled ‘Notify me’ about comments and other activity on my channel or videos, but can’t see the comments on my video. Why?
A: You won’t be able to view the unpublished comments or those from the users you have added to the ‘hidden’ list. To fix this problem, you may want to disable moderation from your channel or the videos, and also unhide the users. The processes of both these configurations are explained in detail in the above sections.
Richard Bennett
Richard Bennett is a writer and a lover of all things video.
Follow @Richard Bennett
Streamline Visual Marking in Youtube Posts with Watermarks & Logos
How to Add Logo or Watermark to YouTube Video
Richard Bennett
Mar 27, 2024• Proven solutions
A watermark is a still image that is usually plugged in the videos, for the purpose of claiming copyrights or publicity purpose. YouTube generally carries a “branding” option where you can brand your video with your channel. This doesn’t provide a stable watermark. Therefore, when someone downloads that video using a second party (YouTube downloader) it gets removed. For this purpose the legal author will have to put a Channel watemark on their YouTube videos. In this guide, we will show you how to add watermark to your YouTube videos, existing or new.
You May Also Like:
Best Watermark Apps for iPhone - How to Watermark Photos on iPhone >>
Wondershare AniEraser Seamless, Effortless, Intuitive.
AniEraser makes it easy to perfect any photo or video; no matter the device or platform - experience a smooth, effortless transformation of your image and maximize its potential with just one click.
Make your moment perfect.
Free Download Free Download Edit online

![]()
How to Add a Watermark to Your YouTube Videos
- Part 1: How to add logo or watermark to in existing YouTube videos
- Part 2: Add logos or watermarks to your videos before uploading
Part 1: How to add logo or watermark to in existing YouTube videos
To add a watermark to your previously uploaded videos you will need to have created and saved your watermark outside of your video editing program.
- Sign in to your YouTube account. Click on the thumbnail image of your account at the top right corner. This will give you a drop down menu. Then Click on the small gear (indicating settings)

- This will lead you to setting center. Click on “view additional features”

- To the left of the window, Click the third option of “branding”
- Click on “add watermark”. Then you can choose an image from your computer. After your image is uploaded, click save.

Notes
YouTube watermark size: Your watermark should be transparent, square, and larger than 50x50 pixels, which is the size it will be shrunk down to when it appears in the corner of your videos.
YouTube watermark starting time: you will have the option of choosing a start time for your watermark, making it appear only at the end of your video, or having it there for the entire length of your video. Once that is done click ‘Update’ and your watermark will be applied to your videos.
YouTube watermark color: Youtube suggests that your watermark have only one color. The point is that you should not use anything flashy that will take attention away from your video, so having two or three colors is not necessarily wrong if your design is subtle.
Here is a tutorial video for how to add watermark to Your YouTube videos:
Part 2: Add logos or watermarks to your videos before uploading
1. Wondershare Filmora
Wondershare Filmora which is one of the ideal video editing tools especially when it comes to watermarking your videos . It helps you in adding static and video watermarks over the video. The basic theme of the video watermarking is the concept of picture-in-picture .
![]()
The following steps have to be taken to add a watermark:
- Add the video and watermarking data by drag dropping it into the workspace
- Drag the required video on the timeline and the watermark on it as well
- Adjust the watermark and add pre-made special effects to it
- Mask the watermark in the shape you like
- Save the video
 Download Mac Version ](https://tools.techidaily.com/wondershare/filmora/download/ )
2. Windows movie maker
Windows movie maker is free default windows software that can easily add watermark to your videos to secure your copyrights. It can cater two types of watermarks; images and text. For images, it just supports PNG and GIF format files and generally doesn’t support transparency. Moreover, an external file, Windows Logo Locator is needed for placing the logo at different positions.
How to add watermark to video with Windows Movie Maker
Adding Text watermark:
- Open windows movie maker
- Click on ‘videos’ under the title of import.
- Import your video to the timeline.
- Right beneath imports under the category of edit you will find ‘titles and credits’. Click.
- Enter the text for watermark.
- Choose the title positioning, font and transparency.
- Add title. You will find it along the length of timeline. You may drag to expand it, for viewing it during the entire videos length. Select file and click publish video.
Adding image watermark:
The image should be in .PNG or .GIF format.
- Save the image in >C:\Program Files\Movie Maker\Shared\AddOnTFX\.
- Download a logo Locator as per your installed windows from FX archives.
- Select the location of the logo in your video where you want it to appear.
- Choose the screen size and the logo size
- Type the name of the file of the logo you had already saved with the extension. For e.g. logo.png
- Copy the text that appears underneath and paste it on the notepad and save the typed file in >C:\Program Files\Movie Maker\Shared\AddOnTFX\.
- Open windows movie maker again.
- Choose title and credits underneath the edit category.
- Press space bar once and then click ‘change the title animation’.
- You will see your image there. Click on ad title and press Ctrl+p to publish.

Part 3: How to Create a Transparent logo for Youtube Channel
Do you want to make a transparent image as logo for your YouTube? If you want to brand your YouTube channel, we believe it is a must to add transparent logo for YouTube branding. Actually, you can do this in Filmora just with a green screen image. Check the steps below to know the secret.
Step 1: Import video and image to Filmora
Open Filmora. Choose Create New Project. Click import media files here in Media library. Select your video and a green screen image. In fact, a green screen video is also accessable, but usually brand logo is image. Now drag them onto timeline.

Step 2: Import video and image to Filmora
Right click on the image clip in the timeline. Choose Green Screen. You will see the image is transparent in the preview window. Now, you need to adjust some details. You can adjust edge thickness and edge feather to better edge. If the green screen background is not totally removed, drag tolerance to adjust it.

Step 3: Scale the logo
You can clip the image clip first and go to preview window to scale it down or up by dragging the green dot. You can put the YouTube logo at corner.
![]()
Richard Bennett
Richard Bennett is a writer and a lover of all things video.
Follow @Richard Bennett
Richard Bennett
Mar 27, 2024• Proven solutions
A watermark is a still image that is usually plugged in the videos, for the purpose of claiming copyrights or publicity purpose. YouTube generally carries a “branding” option where you can brand your video with your channel. This doesn’t provide a stable watermark. Therefore, when someone downloads that video using a second party (YouTube downloader) it gets removed. For this purpose the legal author will have to put a Channel watemark on their YouTube videos. In this guide, we will show you how to add watermark to your YouTube videos, existing or new.
You May Also Like:
Best Watermark Apps for iPhone - How to Watermark Photos on iPhone >>
Wondershare AniEraser Seamless, Effortless, Intuitive.
AniEraser makes it easy to perfect any photo or video; no matter the device or platform - experience a smooth, effortless transformation of your image and maximize its potential with just one click.
Make your moment perfect.
Free Download Free Download Edit online
![]()
How to Add a Watermark to Your YouTube Videos
- Part 1: How to add logo or watermark to in existing YouTube videos
- Part 2: Add logos or watermarks to your videos before uploading
Part 1: How to add logo or watermark to in existing YouTube videos
To add a watermark to your previously uploaded videos you will need to have created and saved your watermark outside of your video editing program.
- Sign in to your YouTube account. Click on the thumbnail image of your account at the top right corner. This will give you a drop down menu. Then Click on the small gear (indicating settings)
- This will lead you to setting center. Click on “view additional features”
- To the left of the window, Click the third option of “branding”
- Click on “add watermark”. Then you can choose an image from your computer. After your image is uploaded, click save.
Notes
YouTube watermark size: Your watermark should be transparent, square, and larger than 50x50 pixels, which is the size it will be shrunk down to when it appears in the corner of your videos.
YouTube watermark starting time: you will have the option of choosing a start time for your watermark, making it appear only at the end of your video, or having it there for the entire length of your video. Once that is done click ‘Update’ and your watermark will be applied to your videos.
YouTube watermark color: Youtube suggests that your watermark have only one color. The point is that you should not use anything flashy that will take attention away from your video, so having two or three colors is not necessarily wrong if your design is subtle.
Here is a tutorial video for how to add watermark to Your YouTube videos:
Part 2: Add logos or watermarks to your videos before uploading
1. Wondershare Filmora
Wondershare Filmora which is one of the ideal video editing tools especially when it comes to watermarking your videos . It helps you in adding static and video watermarks over the video. The basic theme of the video watermarking is the concept of picture-in-picture .
![]()
The following steps have to be taken to add a watermark:
- Add the video and watermarking data by drag dropping it into the workspace
- Drag the required video on the timeline and the watermark on it as well
- Adjust the watermark and add pre-made special effects to it
- Mask the watermark in the shape you like
- Save the video
Download Mac Version ](https://tools.techidaily.com/wondershare/filmora/download/ )
2. Windows movie maker
Windows movie maker is free default windows software that can easily add watermark to your videos to secure your copyrights. It can cater two types of watermarks; images and text. For images, it just supports PNG and GIF format files and generally doesn’t support transparency. Moreover, an external file, Windows Logo Locator is needed for placing the logo at different positions.
How to add watermark to video with Windows Movie Maker
Adding Text watermark:
- Open windows movie maker
- Click on ‘videos’ under the title of import.
- Import your video to the timeline.
- Right beneath imports under the category of edit you will find ‘titles and credits’. Click.
- Enter the text for watermark.
- Choose the title positioning, font and transparency.
- Add title. You will find it along the length of timeline. You may drag to expand it, for viewing it during the entire videos length. Select file and click publish video.
Adding image watermark:
The image should be in .PNG or .GIF format.
- Save the image in >C:\Program Files\Movie Maker\Shared\AddOnTFX\.
- Download a logo Locator as per your installed windows from FX archives.
- Select the location of the logo in your video where you want it to appear.
- Choose the screen size and the logo size
- Type the name of the file of the logo you had already saved with the extension. For e.g. logo.png
- Copy the text that appears underneath and paste it on the notepad and save the typed file in >C:\Program Files\Movie Maker\Shared\AddOnTFX\.
- Open windows movie maker again.
- Choose title and credits underneath the edit category.
- Press space bar once and then click ‘change the title animation’.
- You will see your image there. Click on ad title and press Ctrl+p to publish.
Part 3: How to Create a Transparent logo for Youtube Channel
Do you want to make a transparent image as logo for your YouTube? If you want to brand your YouTube channel, we believe it is a must to add transparent logo for YouTube branding. Actually, you can do this in Filmora just with a green screen image. Check the steps below to know the secret.
Step 1: Import video and image to Filmora
Open Filmora. Choose Create New Project. Click import media files here in Media library. Select your video and a green screen image. In fact, a green screen video is also accessable, but usually brand logo is image. Now drag them onto timeline.
Step 2: Import video and image to Filmora
Right click on the image clip in the timeline. Choose Green Screen. You will see the image is transparent in the preview window. Now, you need to adjust some details. You can adjust edge thickness and edge feather to better edge. If the green screen background is not totally removed, drag tolerance to adjust it.
Step 3: Scale the logo
You can clip the image clip first and go to preview window to scale it down or up by dragging the green dot. You can put the YouTube logo at corner.
![]()
Richard Bennett
Richard Bennett is a writer and a lover of all things video.
Follow @Richard Bennett
Also read:
- Accelerated Pathway Through Keying Fundamentals for 2024
- [New] A Deep Dive Into YouTube App Features on Smartphones
- [Updated] Building a Brand Through YouTube A Strategic Guide
- The Ultimate Compilation Budget-Friendly Editing Tools
- Endless Creativity FREE YouTube Art Resources
- Simplified Methods to Validate Your YouTube Status
- [New] Editor's Assistant Top 5 Portable Devices for VFX Artists
- [Updated] Boost Channels and Views Through Savvy YouTube Analysis
- The Ultimate Guide to Creating FREE YouTube Outros #1-6
- In 2024, Educational History Vlogs - The Ultimate List
- Free Film Festivals at Your Fingertips - Top 10 Picks for Viewers
- [New] Does YouTube Offer Frequent Payments to You?
- In 2024, Acquire No-Cost Sounds for Videos & Podcasts
- Continuous Viewing Setup Your YouTube Clips for TV Repetition for 2024
- How to Authenticate Your YT Account? A Hint List
- The Top 10 Capture Cards for YouTube You Should Know
- In 2024, Elevate Your Youtube Profitability Anywhere, Anytime
- In 2024, Can Genuine Growth Outpace Faux Followers' Effects?
- Transfer Tactics for Seamless Online Video Sharing
- From Concrete Jungles to Eco Havens Rethinking Urban Living
- Demystifying Income Flow to Creators Within the Short Video Model for 2024
- 2024 Approved Best 7 High-Resolution DSLRs for Engaging Video Blogs
- A Beginner's Guide to Embedding YouTube Playlists in Code
- Swift Guide to Chromakey and Background Separation
- Apple Media Access and Download YouTube Videos on iPhone/iPad for 2024
- 2024 Approved Building a Bridge Between Twitch and YouTube Audience Loyalty
- Exclusive Guide to Top YouTube-to-WebM Conversion Software
- [New] Cutting-Edge Editing Techniques YouTube & Comparable Tools
- Get Noticed on YouTube The Ultimate List of FreeFire Tag Tips
- In 2024, 5 Innovative YouTube Thumbnail Designers for Aspiring Filmmakers
- [Updated] A Comprehensive Look at Decelerating YouTube Video Speed (50 Chars)
- Streamlining Your Filming Setup The Beginner's Companion
- 2024 Approved Elevating Video Previews A Compreayer Approach for YouTube
- Rhythmic Revelations Top 15 Vlogs Celebrating Music Creators' Stories
- [Updated] Elevate YouTube Content Advanced Editing Using WM Maker
- Creating an Easy-to-Use Subscribe URL for Your YT Channel
- In 2024, A Deep Dive Into the Top 9 YouTube Downloader Apps for Android
- [New] Curating the Perfect Soundtrack YouTube's Best Audio Sites Ranked
- Constructing Captivating Conclusions for 2024
- New YouTube Thumbnail Design Blueprint Size, Style, and Success for 2024
- Unearth Thrilling Sonic Experiences
- Kinemaster Zoom Mastery Guide A Filmmaker's Toolkit
- Step Into Stardom Building Starry-Eyed TikTok Dances on MacOS
- In 2024, How To Unlock Stolen iPhone 14 Pro In Different Conditionsin | Dr.fone
- 2024 Approved Tracing Back Rooms Filled With Angry Pooch Barks
- 2024 Approved The Beginner's Guide to Joining Facebook
- 2024 Approved Advanced Tactics for Maximizing the Use of Virtual Boards During Zoom Sessions (Desktop/iOS/Android)
- 8 Solutions to Fix Find My Friends Location Not Available On Realme C53 | Dr.fone
- The 10 Best MP3 to Text File Transcription Aids at Zero Cost - Accommodating with ExpressSlide Pro Integration for 2024
- [New] Tailored Guide to Following and Watching Facebook Broadcasts
- In 2024, How to Fix Locked Apple ID from iPhone 8
- Apple ID Locked or Disabled From iPhone 12? 7 Mehtods You Cant-Miss
- Updated Ranking the Top Video Editors for Adding Music and Soundtracks for 2024
- Experts Selection The Premier MP3 Snipper Software for Mac Devices, Updated for 2024
- Omegle Explored Understanding the Platform, Its Community Dynamics & Safety Protocols for 2024
- [New] 2024 Approved Instagram Feed Adding Videos
- [New] Crafting Realistic 3D Text Designs in Photoshop
- In 2024, How To Leave a Life360 Group On Nokia G310 Without Anyone Knowing? | Dr.fone
- [Updated] Storing Session Videos in GH
- Forgotten The Voicemail Password Of OnePlus Ace 2? Try These Fixes
- [New] In 2024, Easy Ways to Record a PowerPoint Presentation
- Title: Decoding the Mystery of Where Are My YouTube Comments for 2024
- Author: Kevin
- Created at : 2024-05-25 14:57:19
- Updated at : 2024-05-26 14:57:19
- Link: https://youtube-videos.techidaily.com/decoding-the-mystery-of-where-are-my-youtube-comments-for-2024/
- License: This work is licensed under CC BY-NC-SA 4.0.
