
:max_bytes(150000):strip_icc()/ScreenShot2022-01-13at12.25.09PM-aa52f1508d6b489b84df85c774669e89.png)
Decoding the Features That Make YouTube Premium Special
Decoding the Features That Make YouTube Premium Special
Create High-Quality Video - Wondershare Filmora
An easy and powerful YouTube video editor
Numerous video and audio effects to choose from
Detailed tutorials provided by the official channel
It was formerly known as YouTube Red three years ago when it first launched. It brings to your screen tones of perks for better viewing. However, the service isn’t still widely known, and most people are on the verge of understanding what is entailed in the subscription. Most YouTube premium subscribers attest that the service is of value and are even relieved of the constant ads in the Free version. Dive into the article for more insights.
In this article
02 Is YouTube Premium worth subscribing to?
What is YouTube Premium?
This streaming service was initially launched in 2014 and was later rebranded in 2018 as YouTube Premium. It includes YouTube music and other features that Google added to it. You can download content, perform background playback and even get access to YouTube original content. Note that this came at a cost as its price was raised. But what remains is that you get value for your money.
1. What service is included in the Premium subscription?
The Premium subscription is an after-sought service that includes these services.
Background play: It allows one to play your videos in the background, enabling you to use the app as a music player.
Offline playback: Easily view your videos on your phone or tablet. It means you can download a video or music and play them while not on the internet.
Ad-free videos: Say goodbye to popular ads with YouTube Free subscription. You already catered for your freedom in the subscription.
YouTube Music Premium: YouTube music is available for free even though you won’t download it for offline playback on this tier.
Flip between apps swiftly: Your videos will continue playing even if you switch to another app. You can flip apps on your device, like check emails, read Twitter, scroll to texts and still play your videos.
2. The price of a YouTube Premium subscription
YouTube Premium isn’t different from other services. Like most streaming services, you get family and student plans. YouTube Premium costs your $6.99 monthly subscription for students’ plans. You, however, need to verify that you are a student. A family plan comes at $17.99 per month, where you can add up to five members. Single YouTube Premium will cost you $11.99 a month
3. Does YouTube Premium provide an annual plan?
No. YouTube Premium does not provide an annual plan. You can only pay your subscription per month.
4. What is the difference between YouTube TV and YouTube Premium
Even though they sound similar, YouTube TV and YouTube Premium are different in many aspects. While YouTube Premium is a paid subscription, YouTube TV is a live streaming service. Let’s explore more differences.
What is included
If you subscribe to YouTube Premium, then you unlock other streaming features. These include watching YouTube without ads on its apps, managing offline viewing, playing your videos in the background, and getting YouTube Music, among others.
You can watch various channels over the internet with YouTube TV, live. It offers you close to 90 channels cutting across lifestyle, news, entertainment, sports, etc. Likewise, you can stream live broadcasts from top networks like NBC, FOX, ABC, etc. It will also splash your screen with news channels from BBC America, CNN, FOX News, etc.
Cost
When it comes to pricing, YouTube Premium costs $11.00 per month with a free, one-month trial for new subscribers. It also has different plans for students and families. On the other hand, YouTube TV starts at $64.99 per month. However, first-time subscribers can get a free offer of up to one week at no cost. This rate may seem high, but it is competitive with other live TV streaming services.
Accessibility
YouTube TV is readily available on the web, mobile platforms, and media streaming devices like Fire TV and Chromecast. You can also download the YouTube TV app to enjoy it on players like game consoles and PlayStations. For YouTube Premium, you’ll easily access it by subscription.
However, there are areas where both YouTube TV and YouTube Premium overlap. Both will let you watch YouTube Originals.
You will also enjoy your videos without adverts interruption. Additionally, it would be best to have an internet connection to stream your videos before downloading. And after downloading and saving your files, you can stream them offline on YouTube Premium.
So, which is better?
YouTube Premium subscribers think it’s the better choice. For one, if you like entertainment from services like Hulu, Netflix, Disney, and much more, then YouTube Premium has you covered than YouTube TV.
Q&A: Is YouTube Premium subscription available in all countries?
● YouTube Premium is not available in some countries. The likely reason is that those countries’ laws prevent it from being offered.
● But worry less, you can still access YouTube Premium even if it’s not available in your country. You can switch to an alternative county and stream videos.
- Make a quick switch by first clicking the “Country” button on the bottom of the YouTube homepage. Here, you’ll view various available countries where YouTube Premium is accessible.
- Then click any country of choice to switch to. It will give you that country’s YouTube version.
- You can also change your language if it presents a foreign language video and description. Just click on the “Language” button on the page.
- Finally, access and play any YouTube premium video virtually from the country you switched to.
Is YouTube Premium worth subscribing to?
Even with the lack of YouTube Premium annual subscription, it still beats all odds to subscribe to this streaming service.
1) Offline playback
Office playback is one reason why YouTube lovers opt for the Premium subscription. Saving your videos for offline listening gives you more advantages than needing to be online to stream your videos. You can do it by simply checking for the “Download” icon below the video you wish to save on your device for later watching. You are then free to stream your files at any time, on the go!
2) Free of ads at last
YouTube streaming is much better without ever interacting with adverts. There are no pop-ups with the Premium version, letting you enjoy every bit of your video streaming. Again, such interruptions aren’t healthy for a tutorial session. Without ads, you can fully concentrate on video playing, letting you get quality value for your time.
3) Get original content
By fact, it is clear that this platform lets you interact with high-end artists who dwell on giving original content to their viewers. You’ll get a perfect chance to subscribe to artists who offer content, i.e., exclusive to the paid tier.
4) Included Google Play Music for free
It’s a double party for YouTube Premium subscribers. You have the advantage of getting Google Play Music when you subscribe to YouTube Music Premium. More so, the Google Play library gives you tones of music from their library. Combined with YouTube Premium offers, you won’t have any reason not to feel entertained from any genre of choice.
Some improvements will go a long way
Despite all the reasons to subscribe to YouTube Premium, it still needs a minor improvement to perfection.
- The YouTube Premium service’s availability is limited compared to the initial YouTube version. Therefore, some countries prohibit its usage and are only accessible in about 70 countries. Hopefully, it will be available worldwide so that no user is limited.
- YouTube Premium subscription does not give any discounts on any of the subscriptions. And being that it has no yearly subscriptions, the amount remains the same whether you opt for one month or pay it times 12 for the year. There should be some considerations for offers, primarily when you cover the one-year payments.
- Some users feel the price is higher than other streaming services. However, YouTube claims to offer free Google Play music. Perhaps this is the reason for the slight rise.
- This streaming service lacks some extras like rentals and charged station subscriptions. Other features like “lyrics” to the songs have also not been catered for. Likewise, some extra information like the title or genre of the video you watch is not included. These small extras could go a long way if they were to be added.
- YouTube Premium also seems to pay attention to celebrities other than YouTubers. Most originals are not exclusive to Premium subscribers, while you can watch them with ads on a free account.
Conclusion
● Amidst the many YouTube subscriptions, YouTube Premium has come a long way. Additionally, it hasn’t covered all the countries just yet. However, it has eliminated the presence of annoying ads that are prominent with the free YouTube service. More so, you get free access to Google Play Music, among other added values. Despite those, the app still needs some improvements in its services to incorporate YouTube Premium subscribers in its walk fully.
Beauty Brilliance: Masterclasses and Product Explorations
Ultimate Guide to Beauty on YouTube - Gear, Makeup Tutorials, and More

Richard Bennett
Oct 26, 2023• Proven solutions
Beauty and lifestyle are two of the most popular categories on YouTube, and they might also be the categories most associated with brand deals. Whether you’re hoping to earn revenue as a beauty influencer, or just want to post some fun makeup tutorials, this guide is for you!
We’ll walk you through deciding on a theme for your channel, setting up your equipment, and give you tips for actually recording your videos.
1. **[Finding Your Niche in Beauty or Lifestyle](#niche)**
- Types of Beauty Videos – Your Content Strategy
- How to Get Products to Review
- Simple Camera Setup for Beauty Vloggers
- Lighting for Beauty
- Top Ring Lights for YouTube
- Build Your Own Diva Ring Light
- How to Make a Makeup Tutorial – Before You Start
- How to Make a Makeup Tutorial – Recording
- How to Make a Makeup Tutorial – After Shooting
Best YouTube Video Editor- Wondershare Filmora
Wondershare Filmora is specifically made keeping quality on priority and to make sure all the videos are edited well with the highest accuracy. You can trim, merge, crop, add background music, rotate videos as well as add motion elements, animated texts, overlays, and filters, etc. to your makeup video, and the video can also be uploaded to YouTube or burned to DVD directly.


Finding Your Niche in Beauty or Lifestyle
As a new makeup, beauty, or lifestyle YouTuber you’ll be jumping into a category that’s already packed with thousands of channels. In order to gain any momentum, you’ll have to decide on a particular thing you want to be known for. That’s your niche.
People looking for beauty tutorials are often looking for someone who has something in particular in common with them. Hairstyling for a specific ethnicity, for example, is a potential niche because people want to learn how to style their own hair, not a hair in general.
Another way you could find a niche is by taking on a specific area of interest, like a skincare channel with a focus on coping with acne or a makeup channel with a focus on natural products.
SunKissAlba has a lifestyle channel that focuses on a ‘natural’ niche. She posts videos about every aspect of her lifestyle from putting on makeup to cooking, but natural/non-toxic products are a constant theme through everything she does. By niching her channel she hasn’t limited what kinds of videos she can do at all - she posts a huge variety of different types of videos. What she has done is to make her channel particularly valuable to audiences interested in things that are natural or organic.
Types of Beauty Videos – Your Content Strategy
It’s a lot easier to come up with weekly video ideas when you have an overarching strategy.
The easiest way to figure out what kinds of videos you should make (and this can also help determine your niche!) is to think about what you already do and enjoy. If skincare is particularly important to you, for example, then you could build a content strategy that includes things like your favorite sunscreen, what different ingredients in skincare products are for, or even how to make a DIY face mask.
The same thing goes if you love doing big glamourous makeups for going out. Think about what you like, and that will determine what you should talk about in your videos.
Instead of buying new products to use in videos, try to use and showcase what you already have.
Here are some common types of beauty and lifestyle videos:
Get Ready With Me: a video where you put your makeup on which helps your audience get to know you better.
Monthly Favorites: showcases your favorite products from the last month.
Makeup Collection: viewers will want to see what you have.
DIY: create something, like a homemade moisturizer, and show your viewers how to make their own.
Makeup Hauls: show off what you’ve bought recently.
Lookbooks: put together a few looks based on a theme, like a specific color or event.
First Impressions: show yourself using a new product for the first time.
Makeup Tutorials: teach your viewers how to achieve a particular look, like a smokey eye.
What’s In My Bag: empty your handbag to show viewers what you carry around with you, particularly your most essential makeup.
My Routine: show viewers your morning skincare routine, or how you usually take your makeup off before bed. Any of your beauty-related routines will be interesting to your followers.
You should also be ready to jump on trends as they jump up. You can get a bump in viewership from people searching for a particular trend. Here are a couple of examples of past trends:
- Boyfriend Does My Makeup
- Kid’s Makeup Challenge
- No Mirror Makeup Challenge
How to Get Products to Review
You probably already know that a lot of the products popular beauty YouTubers review in their videos were sent to them for free. Brands want to get their products into the hands of creators who have ‘influence’ both in the hopes that their audiences will decide to buy them and as part of generating buzz – getting more people talking about their products so more people become interested.
In order for a brand to consider sending you a free product to review or feature in a video, you will first have to have a large enough following.
What is ‘large enough’? There’s no magic number of YouTube subscribers or Instagram followers. How large your following needs to be will depend on what brands you want to work with, as well as whether your channel has a specific niche.
Large brands will want to work with larger creators. Smaller brands that are still trying to build notoriety may be more open to working with creators whose followings are not as large.
If you have a very specific niche then that could create more opportunities for you as a mid-sized YouTuber. If you specialize in styling curly black hair, and a brand is marketing a product made specifically for styling curly black hair, then your smaller following will be more valuable to that brand than the larger audience of a more general channel.
Here are 4 tips for getting free products for review:
- Follow your favorite brands on Instagram and subscribe to their YouTube channels. Make sure to take them when you feature their products in your posts or videos.
- Focus on growing your community/audience. As you start getting more subscribers and building up momentum for your channel, brands might start reaching out to you. We’ve got some tips on growing your YouTube channel here .
- Make a pitch to a brand. The first step in this is figuring out who to pitch to. You can send smaller brands DMs via Instagram or Twitter and politely ask for contact info for a PR person. Never ask for free product or sponsorship at this point, just information you can use to contact PR.
- Send an email with your pitch to the brand’s PR person. Your email should introduce yourself, describe your content, and talk about what type of audience you have (how many subscribers, where are they located, how old are they, etc. This information is all available in your Creator Studio analytics).
Make sure to link to your channel so they can verify what you say (do not hide your subscriber count).
Emphasize what value you could provide the brand with (i.e. ‘I’ve had a lot of success with videos on managing acne and I’m sure my subscribers would love to see a review of your cream’) and outline what kind of video you’d like to make (i.e. a five-minute review focusing on the product, or a short feature in a longer makeup tutorial).
Simple Camera Setup for Beauty Vloggers
There are a lot of different ways to set up your camera for a ‘talking head’ video (anything that is primarily you talking to the camera). Keep reading to learn about a popular ring-light setup for beauty videos, or click here to learn 4 different camera setups .
In an ideal situation, this is what you’ll build your setup out of:
- Camera with a flip-out screen
- Ring light
- Camera-mounted shotgun mic
- Tripod (unless you can mount your camera inside your ring light)
If you don’t have access to all of the equipment above, try some of these:
- Smartphone camera
- DIY ring light
- Smartphone shotgun mic or LAV
Step 1: Set your camera and ring light (your camera should be sitting directly behind your ring light, or mounted inside of it) up about 3 feet away from your subject (yourself).
You might want to experiment with sitting at different distances to see how the lighting looks on your face.
Step 2: Set your camera up a bit higher than your face and tilt it down towards yourself (shooting from slightly above is always more flattering). It should be set up at about a 15° angle to you.
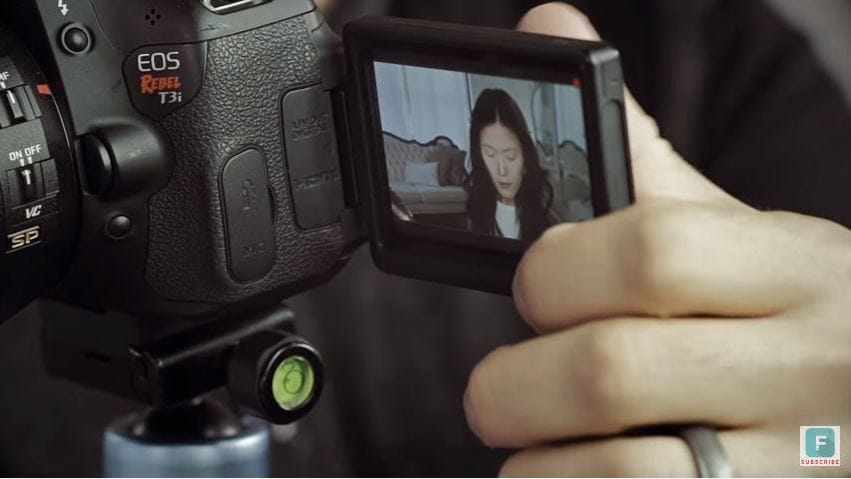
Step 3: Check your frame (this is easiest if your camera has a screen that flips out) to make sure there’s not too much empty space in your shot.
Step 4: Adjust your camera’s focus so your picture is clear. You may need to set up a lamp, chair, or stuffed animal as a stand-in for yourself while you stand behind the camera adjusting the focus.
Turn off autofocus and adjust your focus manually by turning the focus ring on your lens, if you’re using a DSLR or mirrorless camera.
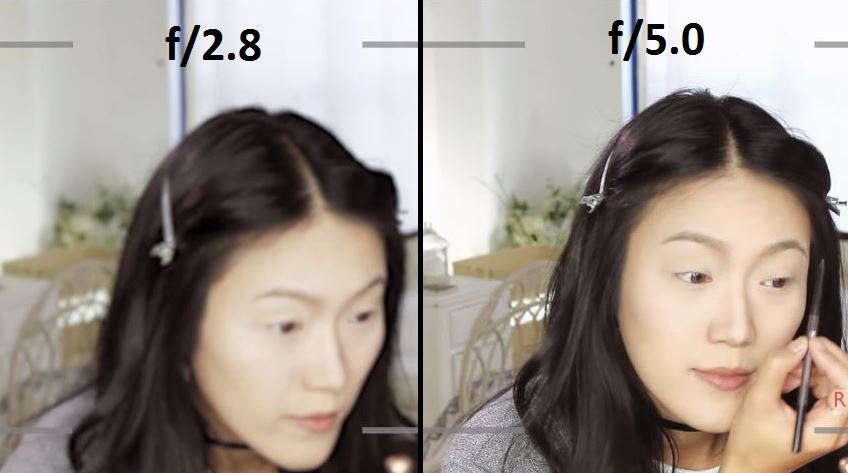
Step 5: Set your f-stop (aperture) so that your depth of field is deep enough for you to lean forwards or backward without becoming blurry.
An aperture of f/5.0 is good if you’re going to be moving around a lot, but if you’re not going to be moving much and want a blurry background you might want to go with f/2.8 or lower.
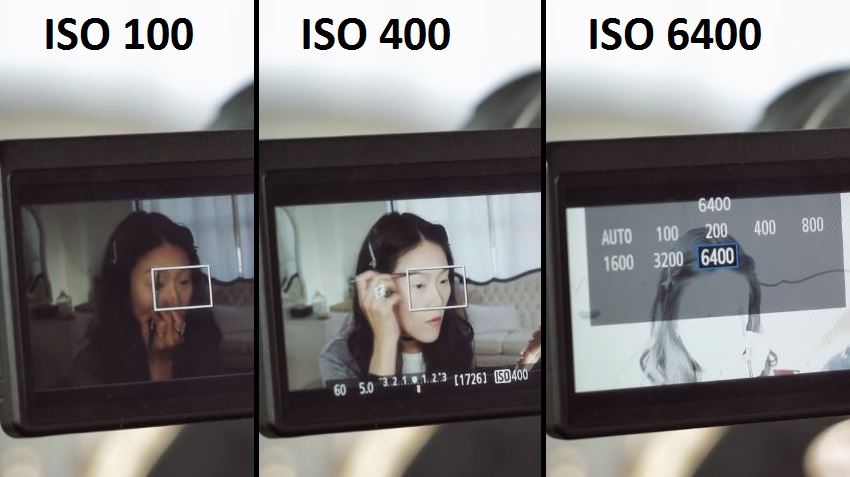
Step 6: Set your ISO (film speed). A lower ISO will give you a darker, but higher quality, image. A higher ISO will lower your quality and give you a brighter image.
ISO 400 should be a happy medium for shooting inside with your ring light, but you may need to try out a couple of settings to find one perfect for your situation.
For more info on camera settings for beauty videos, click here .
Lighting for Beauty
The key to achieving a high-quality picture for your beauty video is having a lot of light.
A ring light (whether it’s one you purchase or one you make) will give you even light over your whole face, and that may be enough. Ring lights are considered one of the biggest ‘secrets’ to beauty on YouTube (as explained in this Racked article ).
There are, however, some reasons you might want additional light:
To Light your Background/Space
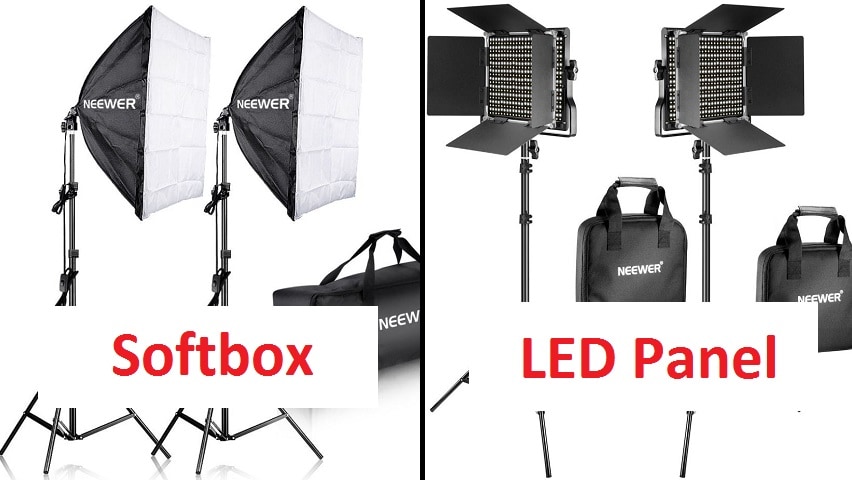
If you only have a ring light/front light then you may end up looking like you’re surrounded by shadows. If you want more light for your space you can use windows, household lamps, or professional video lights like softboxes or LED panels.
To Stand Out Against your Background (‘Backlighting’)
A front light that’s lighting you evenly is also lighting whatever’s behind you evenly, which can make your overall picture look flat.
Setting up a light to shine up at you from behind will help you pop out from your background by creating a silhouette.
You can use an LED panel or a household lamp as a backlight.
To Add Dimension to Your Face (Side Lights/ Fill Lights)
Setting up lights to hit you from the sides will help you look more three dimensional. It can also give your video a general quality boost because the picture quality is always better when there’s tons of light.
You can use softboxes, LED panels, clamp lights, household lamps, or any other light source you can think of.
Lighting Tips!
* **_Use ‘daylight’ bulbs in any household lighting/clamp lights you use._ This way, your light will all be the same color and you won’t have to do a lot of color correction (the more yellow-colored light most indoor lights give off will make you look orange).**
You can buy daylight-colored bulbs for about $5.
- Clamp lights ($10 each) and paper lanterns ($10 each) provide great lighting and are much more affordable than professional lighting kits. The paper lanterns will provide even, diffused, light and the clamp lights will be easy to set up wherever you need them.
- Check out these DIY tips for creating your own reflectors and diffusers .
Top Ring Lights for YouTube
1. Neewer Dimmable Fluorescent Ring Light - $110
One cool feature of the Neewer Ring Light is that you can choose between daylight and a more orange-tinted light depending on which of the included filters you use. In almost all situations you’ll want to use white light/daylight because the orange light will make you look orange, but if you ever wanted to create a warmer image to achieve a particular effect you’d have that option with this light.
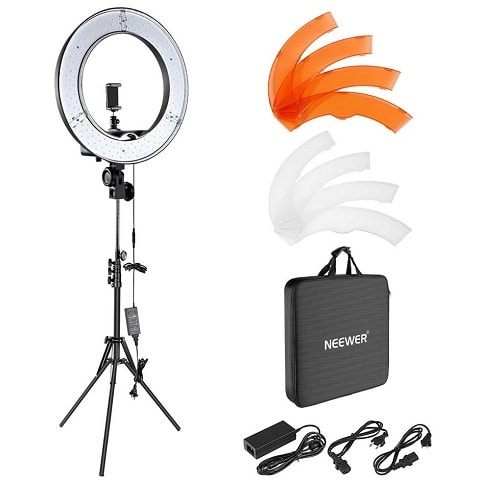
This light is dimmable and can be adjusted to the angle that suits your shot. That’s true of our number 2 pick too, and the second place light actually has a slight edge over the Neewer light because its color temperature is 5400K which is slightly closer to daylight than Neewer’s 5500K, but that’s honestly not super important for YouTube. They’re close enough that you won’t be able to tell the difference, and this light is over $100 more affordable.
2. Prismatic Halo Ring Light - $260
This lightweight ring light is easy to transport, set up, and mount your phone or camera to. It’s a fluorescent ‘daylight’ (5400K) light, so the colors in your videos will look natural.
This light is dimmable, so you can turn it down if it’s too bright, and the Prismatic Light Stand will allow you to tilt your light to the perfect angle. This will be handy if you’re mounting your camera inside the ring but want to place it slightly above your face instead of having it look at you head on.
Build Your Own Diva Ring Light
A ring light is an important tool for a lot of beauty YouTubers, but it doesn’t fit into everyone’s budget. Here’s one popular way to create your own ring light for about $20.
A lot of people have done this DIY, but we’re using Kevin’s video because we love how he added the stand.
What you need:
- A wire wreath frame
- Zip ties
- LED rope light (16 ft, daylight)
- Tinfoil
- Metal paper towel stand
- Scissors
Step 1: Wrap your wreath frame in tinfoil. Make sure the tinfoil is shaped to the wreath so that there is a curve on the inside where your rope light can sit.
Step 2: Place your rope light inside the curve of your frame. Wind it around for 3 loops so you have 2 rows of lighting tube sitting next to each other.
Step 3: Use the zip ties to fasten in the rope light. Wrap them tightly around your frame and lights in several (6-8) places.
Step 4: Cut off the tails of the zip ties.
This is your ring light. Continue to step 5 if you want it to have a stand (you might just want to clip it up somewhere).
Step 5: Fasten your ring light tightly to your paper towel stand securely with several zip ties. Make sure to fasten it at the bottom (where the excess rope light is coming out of your ring light). Cut off the tails of the zip ties.
How to Make a Makeup Tutorial – Before You Start
Before you start recording your makeup tutorial there are a few things you should do.
- Write an outline. You might even want to write yourself a transcript. Having a concrete plan before you start recording will help ensure your tutorial is useful for viewers. You’ll realize where you might need to slow down and show a particular step in more detail, or where your viewers might find a particular step tricky, in a way you want if you just jump into a makeup routine you know perfectly.
- Layout your supplies. Make sure everything you need for your tutorial is laid out neatly in front of you so you can access it all easily. Try to use clean brushes – it just looks nicer.
- Tidy up. If you want your viewers to trust you when it comes to aesthetics, it’s important that your studio area is clean and tidy. You may even want to use a backdrop.
- Do a video test. Before you start your video for real, start recording and shoot some test footage. Watch that back to make sure you like the look of your frame, your face is never blurry, and you’re happy with the overall look of things.
- Do an audio test. If you’re going to be talking in your video instead of recording a voiceover after, do an audio test to make sure your audience will be able to hear you clearly.
How to Make a Makeup Tutorial – Recording
Here are some things to keep in mind while you record your makeup tutorial:
- Show what you’re using. When you use a product, brush, or any other beauty supply make sure to let your audience know what you’re using and why you chose it. This isn’t about promoting brands, it’s about making it easy for viewers to duplicate your results.
If you’re using autofocus, you can hold products up to the screen and wait for it to kick in. If you’re not using autofocus, just hold them up next to you for a moment. You can also shoot separate closeups of each product and cut them into your main tutorial video. - Highlight small details. Describe what you’re doing in a lot of detail and don’t gloss over anything. Assume the person watching your tutorial doesn’t know anything about putting on makeup.
- Take stills for your thumbnail. Remember to take some still photos of your finished makeup to use in your YouTube thumbnail.
How to Make a Makeup Tutorial – After Shooting
Once you’ve finished recording and put away all your camera gear, there’s still work to do. You still need to edit your video and post it on YouTube. Here are some tips for that:
- Add transitions and effects. If you have several clips or even just distinct sections of your main clip, then adding transitions can be a great way to hold your viewers’ attention.
If you spend a lot of time on a repetitive step, you may want to speed that part up and make it a time-lapse. - Add your intro. Having a short (usually around 5 seconds) intro sequence is a great way to strengthen your personal lifestyle brand. You can download free intros right here on filmora.io .
- Title your video. Make sure your most important keyword – the type of look you’re creating, or a product you’re reviewing – is near the beginning of your video’s title. Searching for the topic of your video and writing a title similar to the highest-ranking results is a good way to start.
Remember to include what type of video you made, i.e. ‘tutorial’, ‘review’, or ‘get ready with me’, in your title. People might include these kinds of words in their search queries and, even if they find your video another way, they’ll probably want to know what they’re clicking on before they click. - Customize your thumbnail. Again, search for your video’s topic and see what comes up. You want your thumbnail to look related to the top results, but you also want it to jump out at potential viewers. There may be something you can add to the thumbnail photos you took that will help you stand out, like a bright border, an emoji, or a closeup of a product you feature in the video.
- Write a detailed description. Putting the products you use in your video description will help your viewers, and it’s a great place to include affiliate links if you ever join an affiliate program (like Amazon’s) to generate some revenue.
Are you already making beauty videos? If so, let us know if you have any of your own tips!
Richard Bennett
Richard Bennett is a writer and a lover of all things video.
Follow @Richard Bennett
Richard Bennett
Oct 26, 2023• Proven solutions
Beauty and lifestyle are two of the most popular categories on YouTube, and they might also be the categories most associated with brand deals. Whether you’re hoping to earn revenue as a beauty influencer, or just want to post some fun makeup tutorials, this guide is for you!
We’ll walk you through deciding on a theme for your channel, setting up your equipment, and give you tips for actually recording your videos.
1. **[Finding Your Niche in Beauty or Lifestyle](#niche)**
- Types of Beauty Videos – Your Content Strategy
- How to Get Products to Review
- Simple Camera Setup for Beauty Vloggers
- Lighting for Beauty
- Top Ring Lights for YouTube
- Build Your Own Diva Ring Light
- How to Make a Makeup Tutorial – Before You Start
- How to Make a Makeup Tutorial – Recording
- How to Make a Makeup Tutorial – After Shooting
Best YouTube Video Editor- Wondershare Filmora
Wondershare Filmora is specifically made keeping quality on priority and to make sure all the videos are edited well with the highest accuracy. You can trim, merge, crop, add background music, rotate videos as well as add motion elements, animated texts, overlays, and filters, etc. to your makeup video, and the video can also be uploaded to YouTube or burned to DVD directly.
Finding Your Niche in Beauty or Lifestyle
As a new makeup, beauty, or lifestyle YouTuber you’ll be jumping into a category that’s already packed with thousands of channels. In order to gain any momentum, you’ll have to decide on a particular thing you want to be known for. That’s your niche.
People looking for beauty tutorials are often looking for someone who has something in particular in common with them. Hairstyling for a specific ethnicity, for example, is a potential niche because people want to learn how to style their own hair, not a hair in general.
Another way you could find a niche is by taking on a specific area of interest, like a skincare channel with a focus on coping with acne or a makeup channel with a focus on natural products.
SunKissAlba has a lifestyle channel that focuses on a ‘natural’ niche. She posts videos about every aspect of her lifestyle from putting on makeup to cooking, but natural/non-toxic products are a constant theme through everything she does. By niching her channel she hasn’t limited what kinds of videos she can do at all - she posts a huge variety of different types of videos. What she has done is to make her channel particularly valuable to audiences interested in things that are natural or organic.
Types of Beauty Videos – Your Content Strategy
It’s a lot easier to come up with weekly video ideas when you have an overarching strategy.
The easiest way to figure out what kinds of videos you should make (and this can also help determine your niche!) is to think about what you already do and enjoy. If skincare is particularly important to you, for example, then you could build a content strategy that includes things like your favorite sunscreen, what different ingredients in skincare products are for, or even how to make a DIY face mask.
The same thing goes if you love doing big glamourous makeups for going out. Think about what you like, and that will determine what you should talk about in your videos.
Instead of buying new products to use in videos, try to use and showcase what you already have.
Here are some common types of beauty and lifestyle videos:
Get Ready With Me: a video where you put your makeup on which helps your audience get to know you better.
Monthly Favorites: showcases your favorite products from the last month.
Makeup Collection: viewers will want to see what you have.
DIY: create something, like a homemade moisturizer, and show your viewers how to make their own.
Makeup Hauls: show off what you’ve bought recently.
Lookbooks: put together a few looks based on a theme, like a specific color or event.
First Impressions: show yourself using a new product for the first time.
Makeup Tutorials: teach your viewers how to achieve a particular look, like a smokey eye.
What’s In My Bag: empty your handbag to show viewers what you carry around with you, particularly your most essential makeup.
My Routine: show viewers your morning skincare routine, or how you usually take your makeup off before bed. Any of your beauty-related routines will be interesting to your followers.
You should also be ready to jump on trends as they jump up. You can get a bump in viewership from people searching for a particular trend. Here are a couple of examples of past trends:
- Boyfriend Does My Makeup
- Kid’s Makeup Challenge
- No Mirror Makeup Challenge
How to Get Products to Review
You probably already know that a lot of the products popular beauty YouTubers review in their videos were sent to them for free. Brands want to get their products into the hands of creators who have ‘influence’ both in the hopes that their audiences will decide to buy them and as part of generating buzz – getting more people talking about their products so more people become interested.
In order for a brand to consider sending you a free product to review or feature in a video, you will first have to have a large enough following.
What is ‘large enough’? There’s no magic number of YouTube subscribers or Instagram followers. How large your following needs to be will depend on what brands you want to work with, as well as whether your channel has a specific niche.
Large brands will want to work with larger creators. Smaller brands that are still trying to build notoriety may be more open to working with creators whose followings are not as large.
If you have a very specific niche then that could create more opportunities for you as a mid-sized YouTuber. If you specialize in styling curly black hair, and a brand is marketing a product made specifically for styling curly black hair, then your smaller following will be more valuable to that brand than the larger audience of a more general channel.
Here are 4 tips for getting free products for review:
- Follow your favorite brands on Instagram and subscribe to their YouTube channels. Make sure to take them when you feature their products in your posts or videos.
- Focus on growing your community/audience. As you start getting more subscribers and building up momentum for your channel, brands might start reaching out to you. We’ve got some tips on growing your YouTube channel here .
- Make a pitch to a brand. The first step in this is figuring out who to pitch to. You can send smaller brands DMs via Instagram or Twitter and politely ask for contact info for a PR person. Never ask for free product or sponsorship at this point, just information you can use to contact PR.
- Send an email with your pitch to the brand’s PR person. Your email should introduce yourself, describe your content, and talk about what type of audience you have (how many subscribers, where are they located, how old are they, etc. This information is all available in your Creator Studio analytics).
Make sure to link to your channel so they can verify what you say (do not hide your subscriber count).
Emphasize what value you could provide the brand with (i.e. ‘I’ve had a lot of success with videos on managing acne and I’m sure my subscribers would love to see a review of your cream’) and outline what kind of video you’d like to make (i.e. a five-minute review focusing on the product, or a short feature in a longer makeup tutorial).
Simple Camera Setup for Beauty Vloggers
There are a lot of different ways to set up your camera for a ‘talking head’ video (anything that is primarily you talking to the camera). Keep reading to learn about a popular ring-light setup for beauty videos, or click here to learn 4 different camera setups .
In an ideal situation, this is what you’ll build your setup out of:
- Camera with a flip-out screen
- Ring light
- Camera-mounted shotgun mic
- Tripod (unless you can mount your camera inside your ring light)
If you don’t have access to all of the equipment above, try some of these:
- Smartphone camera
- DIY ring light
- Smartphone shotgun mic or LAV
Step 1: Set your camera and ring light (your camera should be sitting directly behind your ring light, or mounted inside of it) up about 3 feet away from your subject (yourself).
You might want to experiment with sitting at different distances to see how the lighting looks on your face.
Step 2: Set your camera up a bit higher than your face and tilt it down towards yourself (shooting from slightly above is always more flattering). It should be set up at about a 15° angle to you.
Step 3: Check your frame (this is easiest if your camera has a screen that flips out) to make sure there’s not too much empty space in your shot.
Step 4: Adjust your camera’s focus so your picture is clear. You may need to set up a lamp, chair, or stuffed animal as a stand-in for yourself while you stand behind the camera adjusting the focus.
Turn off autofocus and adjust your focus manually by turning the focus ring on your lens, if you’re using a DSLR or mirrorless camera.
Step 5: Set your f-stop (aperture) so that your depth of field is deep enough for you to lean forwards or backward without becoming blurry.
An aperture of f/5.0 is good if you’re going to be moving around a lot, but if you’re not going to be moving much and want a blurry background you might want to go with f/2.8 or lower.
Step 6: Set your ISO (film speed). A lower ISO will give you a darker, but higher quality, image. A higher ISO will lower your quality and give you a brighter image.
ISO 400 should be a happy medium for shooting inside with your ring light, but you may need to try out a couple of settings to find one perfect for your situation.
For more info on camera settings for beauty videos, click here .
Lighting for Beauty
The key to achieving a high-quality picture for your beauty video is having a lot of light.
A ring light (whether it’s one you purchase or one you make) will give you even light over your whole face, and that may be enough. Ring lights are considered one of the biggest ‘secrets’ to beauty on YouTube (as explained in this Racked article ).
There are, however, some reasons you might want additional light:
To Light your Background/Space
If you only have a ring light/front light then you may end up looking like you’re surrounded by shadows. If you want more light for your space you can use windows, household lamps, or professional video lights like softboxes or LED panels.
To Stand Out Against your Background (‘Backlighting’)
A front light that’s lighting you evenly is also lighting whatever’s behind you evenly, which can make your overall picture look flat.
Setting up a light to shine up at you from behind will help you pop out from your background by creating a silhouette.
You can use an LED panel or a household lamp as a backlight.
To Add Dimension to Your Face (Side Lights/ Fill Lights)
Setting up lights to hit you from the sides will help you look more three dimensional. It can also give your video a general quality boost because the picture quality is always better when there’s tons of light.
You can use softboxes, LED panels, clamp lights, household lamps, or any other light source you can think of.
Lighting Tips!
* **_Use ‘daylight’ bulbs in any household lighting/clamp lights you use._ This way, your light will all be the same color and you won’t have to do a lot of color correction (the more yellow-colored light most indoor lights give off will make you look orange).**
You can buy daylight-colored bulbs for about $5.
- Clamp lights ($10 each) and paper lanterns ($10 each) provide great lighting and are much more affordable than professional lighting kits. The paper lanterns will provide even, diffused, light and the clamp lights will be easy to set up wherever you need them.
- Check out these DIY tips for creating your own reflectors and diffusers .
Top Ring Lights for YouTube
1. Neewer Dimmable Fluorescent Ring Light - $110
One cool feature of the Neewer Ring Light is that you can choose between daylight and a more orange-tinted light depending on which of the included filters you use. In almost all situations you’ll want to use white light/daylight because the orange light will make you look orange, but if you ever wanted to create a warmer image to achieve a particular effect you’d have that option with this light.
This light is dimmable and can be adjusted to the angle that suits your shot. That’s true of our number 2 pick too, and the second place light actually has a slight edge over the Neewer light because its color temperature is 5400K which is slightly closer to daylight than Neewer’s 5500K, but that’s honestly not super important for YouTube. They’re close enough that you won’t be able to tell the difference, and this light is over $100 more affordable.
2. Prismatic Halo Ring Light - $260
This lightweight ring light is easy to transport, set up, and mount your phone or camera to. It’s a fluorescent ‘daylight’ (5400K) light, so the colors in your videos will look natural.
This light is dimmable, so you can turn it down if it’s too bright, and the Prismatic Light Stand will allow you to tilt your light to the perfect angle. This will be handy if you’re mounting your camera inside the ring but want to place it slightly above your face instead of having it look at you head on.
Build Your Own Diva Ring Light
A ring light is an important tool for a lot of beauty YouTubers, but it doesn’t fit into everyone’s budget. Here’s one popular way to create your own ring light for about $20.
A lot of people have done this DIY, but we’re using Kevin’s video because we love how he added the stand.
What you need:
- A wire wreath frame
- Zip ties
- LED rope light (16 ft, daylight)
- Tinfoil
- Metal paper towel stand
- Scissors
Step 1: Wrap your wreath frame in tinfoil. Make sure the tinfoil is shaped to the wreath so that there is a curve on the inside where your rope light can sit.
Step 2: Place your rope light inside the curve of your frame. Wind it around for 3 loops so you have 2 rows of lighting tube sitting next to each other.
Step 3: Use the zip ties to fasten in the rope light. Wrap them tightly around your frame and lights in several (6-8) places.
Step 4: Cut off the tails of the zip ties.
This is your ring light. Continue to step 5 if you want it to have a stand (you might just want to clip it up somewhere).
Step 5: Fasten your ring light tightly to your paper towel stand securely with several zip ties. Make sure to fasten it at the bottom (where the excess rope light is coming out of your ring light). Cut off the tails of the zip ties.
How to Make a Makeup Tutorial – Before You Start
Before you start recording your makeup tutorial there are a few things you should do.
- Write an outline. You might even want to write yourself a transcript. Having a concrete plan before you start recording will help ensure your tutorial is useful for viewers. You’ll realize where you might need to slow down and show a particular step in more detail, or where your viewers might find a particular step tricky, in a way you want if you just jump into a makeup routine you know perfectly.
- Layout your supplies. Make sure everything you need for your tutorial is laid out neatly in front of you so you can access it all easily. Try to use clean brushes – it just looks nicer.
- Tidy up. If you want your viewers to trust you when it comes to aesthetics, it’s important that your studio area is clean and tidy. You may even want to use a backdrop.
- Do a video test. Before you start your video for real, start recording and shoot some test footage. Watch that back to make sure you like the look of your frame, your face is never blurry, and you’re happy with the overall look of things.
- Do an audio test. If you’re going to be talking in your video instead of recording a voiceover after, do an audio test to make sure your audience will be able to hear you clearly.
How to Make a Makeup Tutorial – Recording
Here are some things to keep in mind while you record your makeup tutorial:
- Show what you’re using. When you use a product, brush, or any other beauty supply make sure to let your audience know what you’re using and why you chose it. This isn’t about promoting brands, it’s about making it easy for viewers to duplicate your results.
If you’re using autofocus, you can hold products up to the screen and wait for it to kick in. If you’re not using autofocus, just hold them up next to you for a moment. You can also shoot separate closeups of each product and cut them into your main tutorial video. - Highlight small details. Describe what you’re doing in a lot of detail and don’t gloss over anything. Assume the person watching your tutorial doesn’t know anything about putting on makeup.
- Take stills for your thumbnail. Remember to take some still photos of your finished makeup to use in your YouTube thumbnail.
How to Make a Makeup Tutorial – After Shooting
Once you’ve finished recording and put away all your camera gear, there’s still work to do. You still need to edit your video and post it on YouTube. Here are some tips for that:
- Add transitions and effects. If you have several clips or even just distinct sections of your main clip, then adding transitions can be a great way to hold your viewers’ attention.
If you spend a lot of time on a repetitive step, you may want to speed that part up and make it a time-lapse. - Add your intro. Having a short (usually around 5 seconds) intro sequence is a great way to strengthen your personal lifestyle brand. You can download free intros right here on filmora.io .
- Title your video. Make sure your most important keyword – the type of look you’re creating, or a product you’re reviewing – is near the beginning of your video’s title. Searching for the topic of your video and writing a title similar to the highest-ranking results is a good way to start.
Remember to include what type of video you made, i.e. ‘tutorial’, ‘review’, or ‘get ready with me’, in your title. People might include these kinds of words in their search queries and, even if they find your video another way, they’ll probably want to know what they’re clicking on before they click. - Customize your thumbnail. Again, search for your video’s topic and see what comes up. You want your thumbnail to look related to the top results, but you also want it to jump out at potential viewers. There may be something you can add to the thumbnail photos you took that will help you stand out, like a bright border, an emoji, or a closeup of a product you feature in the video.
- Write a detailed description. Putting the products you use in your video description will help your viewers, and it’s a great place to include affiliate links if you ever join an affiliate program (like Amazon’s) to generate some revenue.
Are you already making beauty videos? If so, let us know if you have any of your own tips!
Richard Bennett
Richard Bennett is a writer and a lover of all things video.
Follow @Richard Bennett
Also read:
- [Updated] Apple's Mobile Posting Playbook for YouTube Success
- [New] Best 7 Multimedia Cameras For Quality Live Streams & Video Blogs
- In 2024, A World Beyond Men Top 10 Inspirational YouTube Stars
- Master Guide to YouTube Community Expectations
- Subforsub Usage Does It Enhance YouTube Fan Count Safely?
- The Video Creator’s Guide to IGTV & YouTube Finding the Right Fit
- [Updated] Cut Beyond Youtube Unveiling the Top 5 Video Editor Options
- Streamlining Monetization Strategies on YouTube
- Exploring the World of ASPECT RATIOS in YOUTUBE Content
- Professional Lenses & Cameras for Youtubers
- Elevate Video Playback with YouTube's Latest Feature - AV1
- The Leading 10 Online History Educators on Youtube
- Best Mac Slicer Software Enhance Video Production Prowess for 2024
- [Updated] Best 10 YouTube Volume Boosters for Windows, macOS, Android, and iPhone
- In 2024, Astonishing Visuals on Thumbnails
- In 2024, Decoding YouTube Shorts All You Need to Understand
- [Updated] Elevate Your Content Top 8 No-Cost Video Editing Software
- No Budget? No Problem! Here's Your List of Free Intra Experts
- Unlocking Monetization Success A 3-Step System to Determine Your YouTube Earnings
- Elevate Video Playback Embrace the Power of AV1 in YouTube
- Investing Wisdom in Webcams Finest Stocks Channels
- [New] Enhancing Comments with Emojis on YouTube
- [New] Charting Your Path to Higher YouTube Spotlight
- Tap Into Endless Creativity – Our Compilation of over 50 FREE Advertising Masterpieces!
- [Updated] Channel Titles That Shine How to Innovate
- Master Your Hashtags The Path to 6-Figure Youtube Success
- [Updated] Echo Video Storyteller
- In 2024, Channel Boosting Mastery Unveiling the Best 5 Video Marketing Strategies
- The Pinnacle of Amusement Select 15 Laughing-Out-Loud Channels
- The Ultimate List of No-Cost Sound Sites for Filmmakers
- In 2024, Audio Outliers Best Sound Distortion Apps for Your Device
- Elevate Your Channel Game - TubeBuddy Insights for 2024
- Effortless Conversion Youtube Videos to Mac Ratio for 2024
- [New] Bite-Sized Script Producer
- In 2024, Connoisseurs Melding Visionary Sounds & Frames
- Techniques and Strategies for Swift Removal of Comments
- Study Aids Top 10 Educational History Channels
- The Ultimate Selection of YouTube Content Cutters Online
- Channel Identity Reimagined Best Name Generators Listed for 2024
- Counteracting Bot Influence for Higher Traffic for 2024
- Maximize Visuals in YouTubespace with Effective Tools
- Digital Arcade Over a Hundred Game Channels
- 2024 Approved A Compreayer's Guide to Monetizing Videos Critical View Figures
- In 2024, Discovering and Dominating Unique Segments in YouTube
- In 2024, Boost Eco-Ad Impact Combining Greener Gear & Subscriptions
- [Updated] Cross-Platform Content Dimensions YouTube, Facebook, Insta & More
- In 2024, Bridging the Gap YouTube Editing Mastered in iMovie Workflows
- [Updated] Ultimate Guide 10 Superior Vimeo Downloader Apps for 2024
- Wondering the Best Alternative to Hola On Infinix Smart 8 Plus? Here Is the Answer | Dr.fone
- Free2X Webcam Recorder Software Review
- [Updated] 2024 Approved Unveiling Professional Monitor Recording by ZDSoft
- 2024 Approved Replace Sony Vegas Discover the Best Video Editing Software for Windows
- Unlock Efficiency Screen Recording on Mac via Keyboard Shortcuts
- [Updated] Primary Screening Footage Study and Off-the-Cuff Selections for 2024
- Symbolizing Sound Designing a Captivating Podcast Image
- Methods to Change GPS Location On Xiaomi Redmi Note 12T Pro | Dr.fone
- 2024 Approved Deciphering the Disappearance of Recommended Video Content in Your Newsfeed
- New Your Easy Guide to Proficient Voice Recording on a Mac for Non-Tech Savvy Individuals for 2024
- 2024 Approved Optimal OBS Configuration for Budget PCs
- [Updated] In 2024, Master Plan Top 6 Modernist Minecraft Villas
- How to Restore iPhone 14 Pro from Backup when iTunes Backup is Corrupt or not compatible | Stellar
- DiscoEmote Studio - Crafting the Ultimate Emojis for 2024
- New Easily Implemented Phonetic Adjustment Features Exploration of Functions, Regulations, and Diverse Methods for 2024
- 2024 Approved Top-Ranked Windows 10 Harmony Conductor
- Download Instagram Reels Effortlessly, Anytime for 2024
- How to Intercept Text Messages on Oppo Find X6 Pro | Dr.fone
- New In 2024, Make an Impact How to Resize Your Facebook Video Cover for Maximum Visibility
- In 2024, MC Homestead Plans The Top 6
- [Updated] In 2024, Top 15 FF Extensions For Easy FB Video Download
- [New] Premium Guide Capturing and Storing Tweets Jokes on PC for 2024
- [New] Interactive Video Content Adding Dynamic Text to TikToks
- 2024 Approved Elite 10 TikTok Effects Dominating Trendsetting Videos
- In 2024, How to Screen Mirroring Xiaomi Redmi A2+? | Dr.fone
- In 2024, Comparing GoPro's Max and Hero 11 for the Best Video Quality
- In 2024, How To Change Country on App Store for iPhone 15 Pro With 7 Methods | Dr.fone
- Navigating Your Phone's Podcast Landscape
- Discovering Advanced Video Formats AV1 & VP9
- Subtlety in Audio Mixdown with Alive
- [New] Redirect Mac Images to Custom Folder
- In 2024, Does Airplane Mode Turn off GPS Location On Nokia C22? | Dr.fone
- In 2024, Bridge the Gap Transferring Files From PC to iOS
- [Updated] In 2024, Lose Yourself to Laughter Best 10 Jokes
- 2024 Approved Essential Webinar Tools Roundup
- Title: Decoding the Features That Make YouTube Premium Special
- Author: Kevin
- Created at : 2024-05-25 14:57:16
- Updated at : 2024-05-26 14:57:16
- Link: https://youtube-videos.techidaily.com/decoding-the-features-that-make-youtube-premium-special/
- License: This work is licensed under CC BY-NC-SA 4.0.
