
:max_bytes(150000):strip_icc()/Echo-Pop-vs-Echo-Dot-09671f8f0db34e33a2bcdbbfba71dea3.jpg)
"Cutting-Edge Video Tools Opt for Studio or Latest Beta Version for 2024"
Cutting-Edge Video Tools: Opt for Studio or Latest Beta Version
YouTube Creator Studio vs. YouTube Studio (Beta): Which One is Better?

Richard Bennett
Oct 26, 2023• Proven solutions
In 2017, YouTube revealed YouTube Studio Beta , a video management and analytics dashboard that will replace the classic Creator Studio that most YouTubers are familiar with by 2021.
In this article, we will look at the new features YouTube Studio Beta has, what we can expect from it in the future, and why YouTube will eventually phase out the older YouTube Creator Studio… and whether that change will be an improvement.
Edit YouTube Videos with Filmora
As one of the most widely used video editing software in YouTube video editing, Filmora provides lots of templates and effects with an intuitive interface, which saves much time. Download the free trial version and get started now.


Why YouTube Is Getting Rid of Classic Creator Studio?
Data-driven YouTubers have long loved the YouTube Creator Studio. It has supplied so much information that it took this comprehensive post about Analytics to highlight all the insights. So why would YouTube change it?
Change to a popular social media platform is always worrisome to content creators because it means there will be a new learning phase forced upon them. While the Classic YouTube Creator Studio has a lot of features and functionality, the data was often hard to interpret and inconvenient to find. Many creators weren’t sure where their data was located or how to use the information presented to them.
YouTube Studio was designed to be a friendly management and analysis tool. YouTube also offers more guidance, showcasing the key metrics the algorithm uses to evaluate the success of a video more prominently. Additionally, the graphs presented offer more clarity, shortening the time a creator spends finding the information they need.
Undoubtedly, YouTube updated its Creator Studio to offer a tool that enables its users to better understand their video performance and make better content that serves YouTube’s requirements.
Intro to YouTube Studio (Beta)
YouTube Studio (Beta), for many YouTubers, is now the default. However, for the time being, creators can still switch back to the Classic view (as some of the features are still being built). YouTube’s objective is to receive data of their own by understanding how creators are using the new Studio and gaining feedback to improve upon it.
If you have any feedback, simply click on this button on the bottom left menu of the YouTube Studio (Beta) and send YouTube your thoughts.
In addition to the new layout of the tools and dashboards, YouTube Studio (Beta) will also debut 3 metrics for creators:
1. Impressions: See the total reach of all your videos or each individual video. Each time your video thumbnail and title are visible to the user counts as an impression.
2. Click-through rate: Determine how click-worthy your thumbnails and titles are, by seeing the percentage of people who click into your video.
3. Unique viewers: Know how many different people have watched your videos. This data can be used to compare the size of your subscriber base to the actual number of your audience.
Tips for Using YouTube Studio Beta Features
Now that you are more familiar with the new YouTube Studio (Beta), let us dive into what you can accomplish with all the new features.
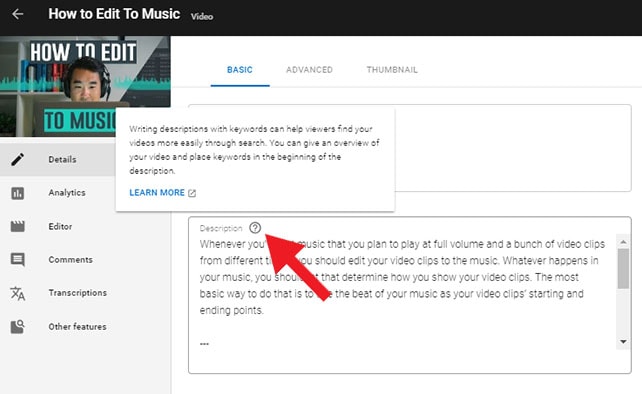
1. Optimization Tips
In the past, there has been a lot of speculations about how creators should treat their video titles and descriptions. Well, now YouTube is letting you know exactly which area to focus on. Simply hover over any “?” icon to see the advice and click “Learn More” to go to YouTube Creator Academy to get more details.
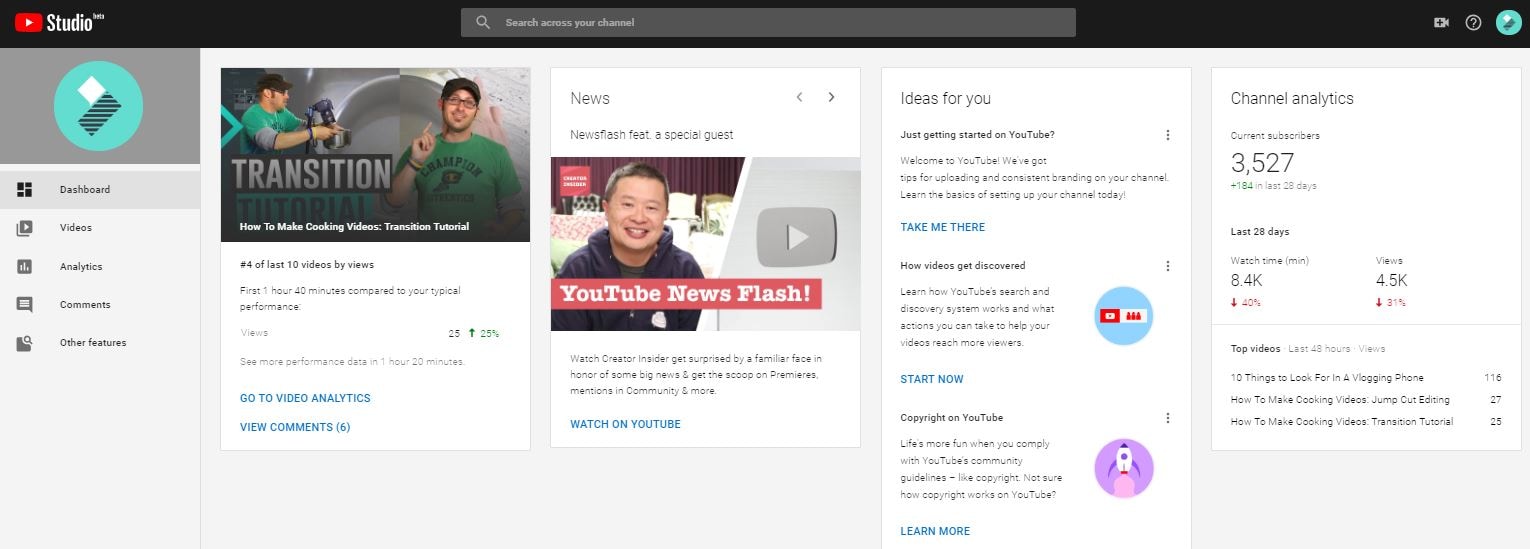
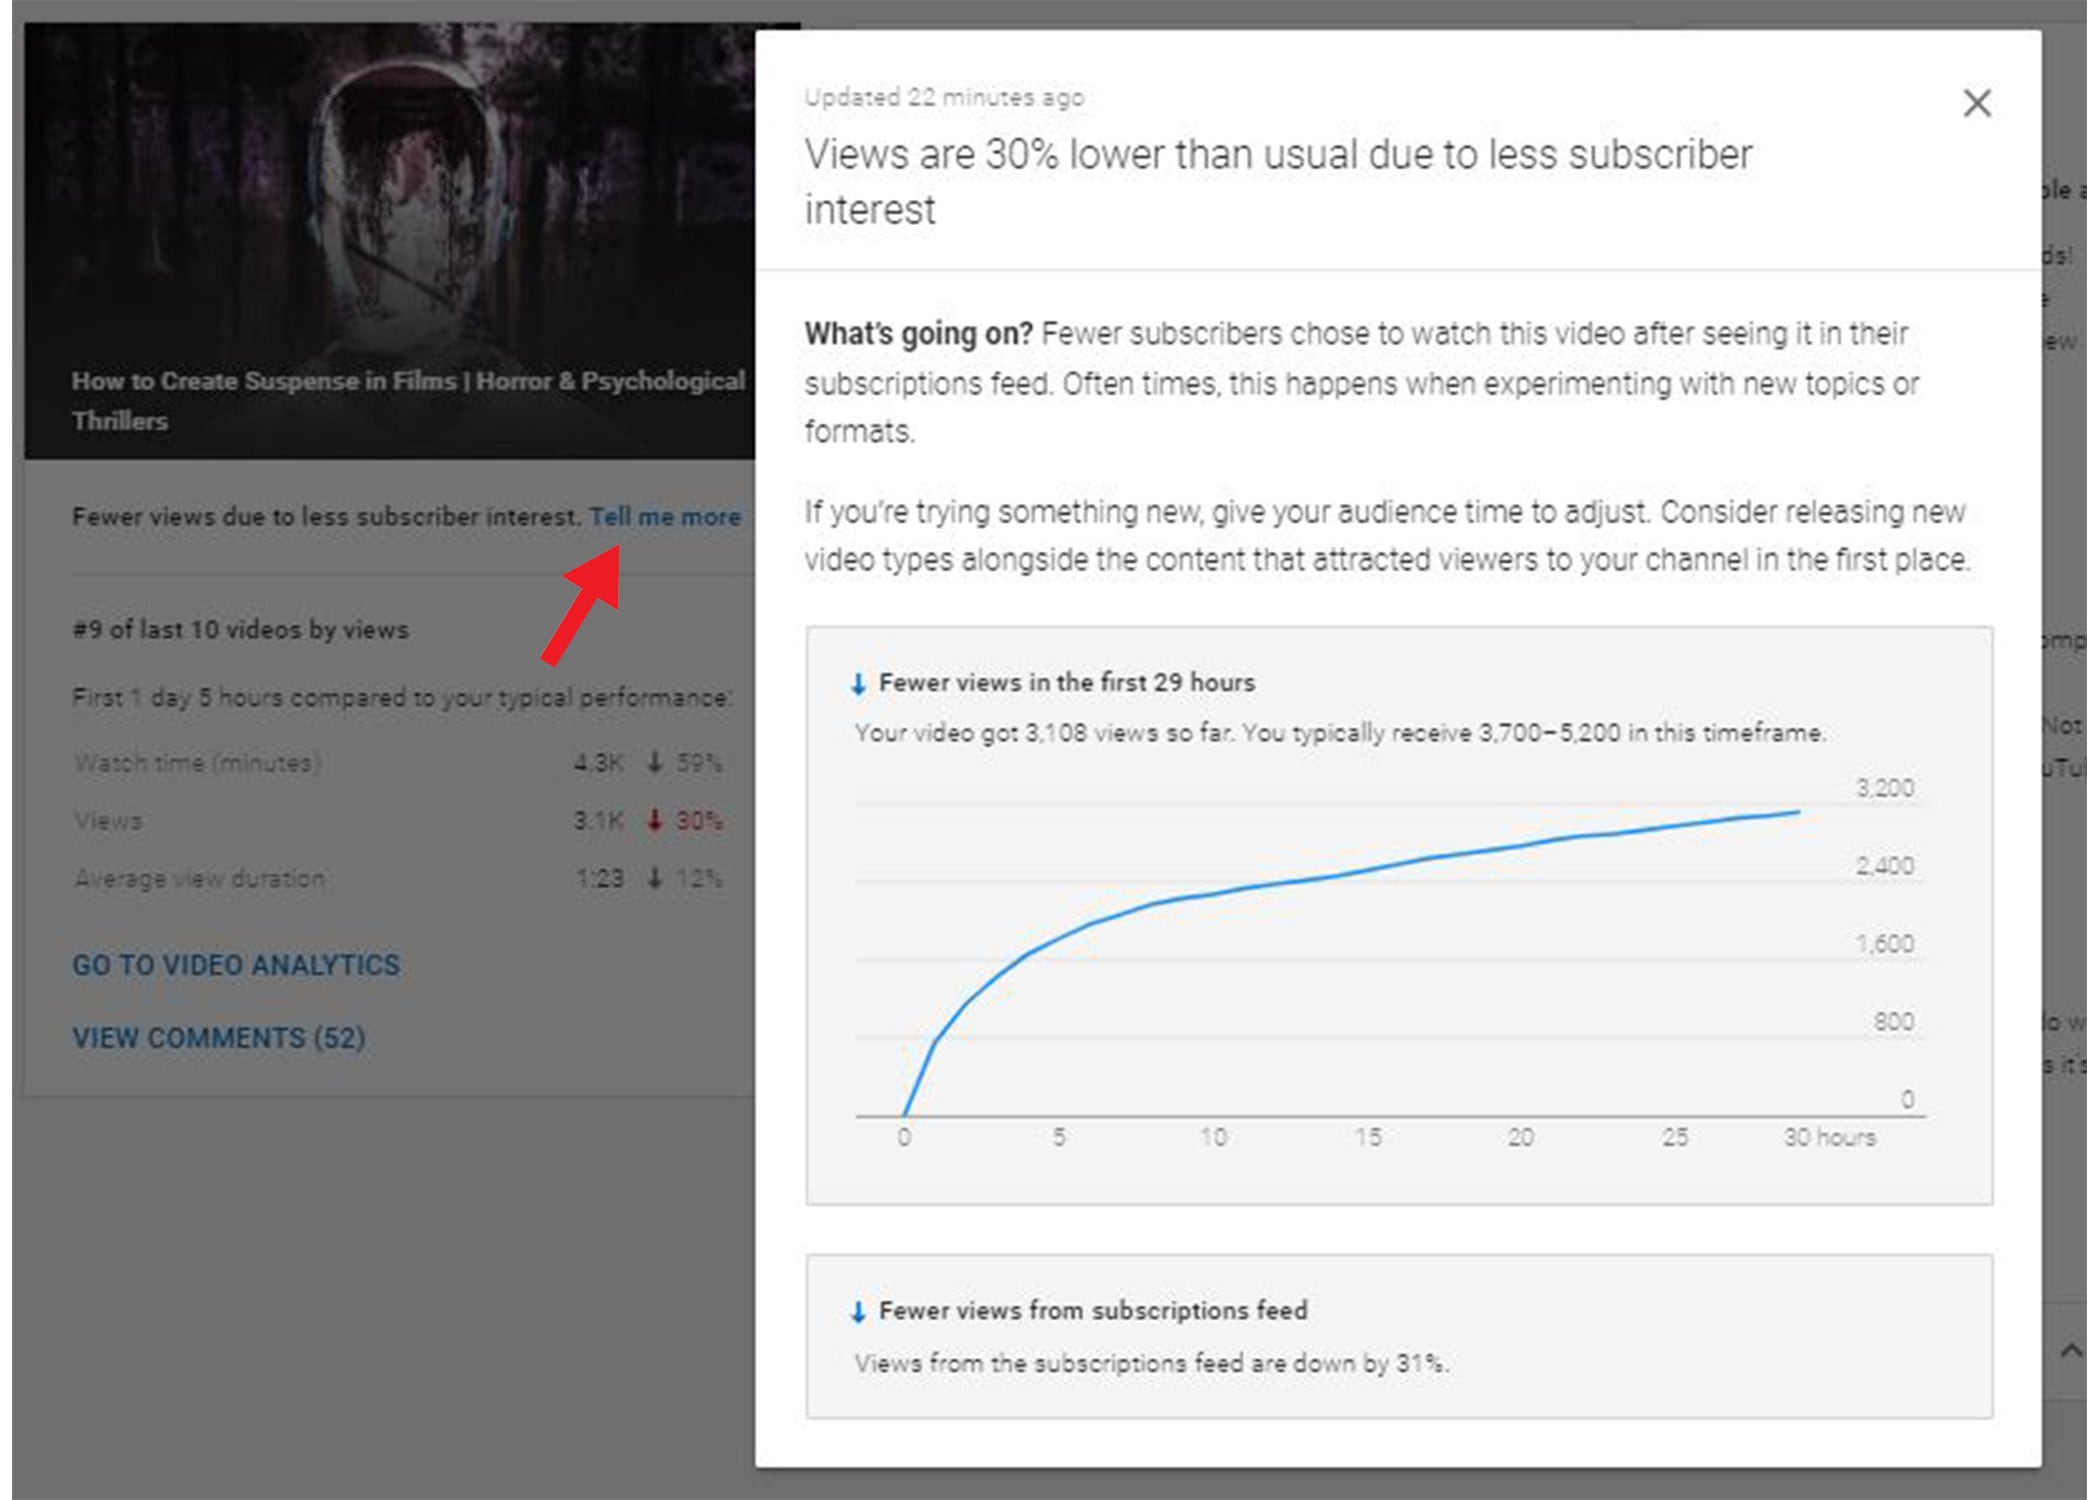
2. Recent Video Data
See data and improvement tips for your latest video. If YouTube identifies a notable issue with your video, they will help you by offering tips, which you can click “Tell Me More” to look into.
YouTube wants you to know how your videos are performing in the first few days. In order for YouTube to determine whether your content is worth sharing, it wants to know how your audience is responding to it right away. This means, the launch of your video matters.
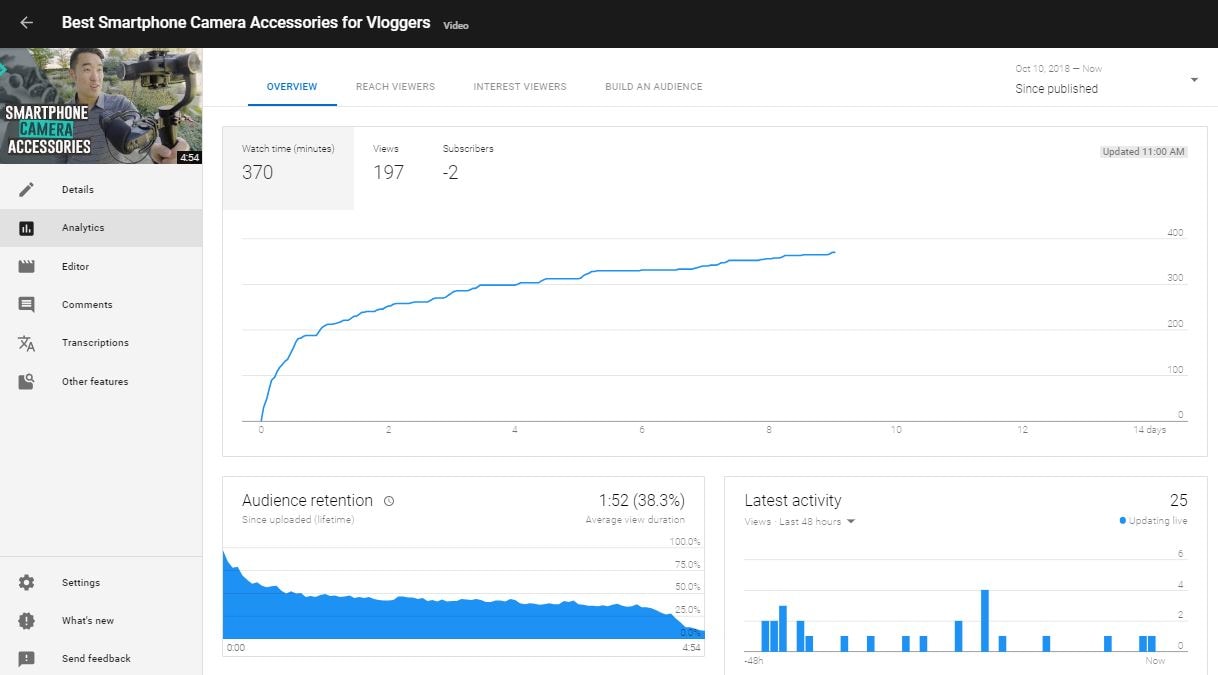
3. Video Analysis
In the Classic Creator Studio, you couldn’t get an aggregated view of all the important video data on one dashboard. You would have to click to each set of analytics individually and then dive deeper. This ate up your precious content creation time and made it hard to combine insights. Now with Studio Beta, you can see all the critical data in one spot. Right away, you can see how that video is performing through different factors. This will let you know where audience retention is dropping off or which traffic source is supplying most of the views.
4. Watch Time Funnel
The objective is to increase watch time, the metric YouTube puts the most weight on. With the new Watch Time Funnel, which you can find in the Analytics section under the Reach Viewer dashboard, you can see exactly at which level of your channel or wherein an individual video you will need to improve.
If the impression numbers are low, that means you need to improve how your video is being discovered by doing more research to understand what your viewers are searching for.
If the click-through rate (CTR) is low, then you will have to improve your thumbnail and title. This will better entice your audience to click. According to Google, half of all videos have an average CTR of 2-10%.
If the average view duration is not up to your standards, then you will have to improve your content itself. While it is most ideal to have all your viewers watch all the way to the end of all your videos, that is certainly unrealistic. However, 60-70% is a great number to aim towards.

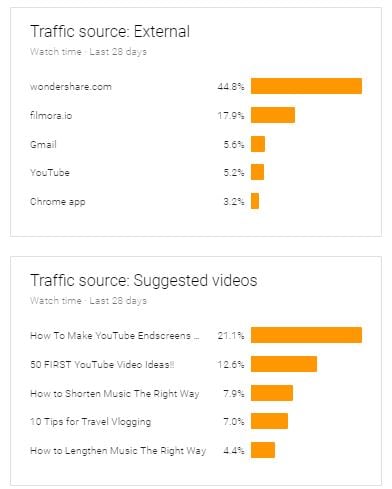
5. Traffic Sources
YouTube now presents all the different traffic sources in one easy-to-find page in the Reach Viewer tab, so creators no longer have to click between them to analyze where their traffic is coming from. This new design is far less intimidating and messy. At a glance, you can now see where the majority of your audiences are coming from.
YouTube has always put a lot of value into its analytic tools, and with YouTube Studio Beta the features and design are continuously improving. Having better data and understanding of how an individual video or an entire channel is performing will help creators succeed on this ever more competitive platform.
Have you tried the new YouTube Studio (Beta)? What are your thoughts? Please let us know in the comments below.
Richard Bennett
Richard Bennett is a writer and a lover of all things video.
Follow @Richard Bennett
Richard Bennett
Oct 26, 2023• Proven solutions
In 2017, YouTube revealed YouTube Studio Beta , a video management and analytics dashboard that will replace the classic Creator Studio that most YouTubers are familiar with by 2021.
In this article, we will look at the new features YouTube Studio Beta has, what we can expect from it in the future, and why YouTube will eventually phase out the older YouTube Creator Studio… and whether that change will be an improvement.
Edit YouTube Videos with Filmora
As one of the most widely used video editing software in YouTube video editing, Filmora provides lots of templates and effects with an intuitive interface, which saves much time. Download the free trial version and get started now.
Why YouTube Is Getting Rid of Classic Creator Studio?
Data-driven YouTubers have long loved the YouTube Creator Studio. It has supplied so much information that it took this comprehensive post about Analytics to highlight all the insights. So why would YouTube change it?
Change to a popular social media platform is always worrisome to content creators because it means there will be a new learning phase forced upon them. While the Classic YouTube Creator Studio has a lot of features and functionality, the data was often hard to interpret and inconvenient to find. Many creators weren’t sure where their data was located or how to use the information presented to them.
YouTube Studio was designed to be a friendly management and analysis tool. YouTube also offers more guidance, showcasing the key metrics the algorithm uses to evaluate the success of a video more prominently. Additionally, the graphs presented offer more clarity, shortening the time a creator spends finding the information they need.
Undoubtedly, YouTube updated its Creator Studio to offer a tool that enables its users to better understand their video performance and make better content that serves YouTube’s requirements.
Intro to YouTube Studio (Beta)
YouTube Studio (Beta), for many YouTubers, is now the default. However, for the time being, creators can still switch back to the Classic view (as some of the features are still being built). YouTube’s objective is to receive data of their own by understanding how creators are using the new Studio and gaining feedback to improve upon it.
If you have any feedback, simply click on this button on the bottom left menu of the YouTube Studio (Beta) and send YouTube your thoughts.
In addition to the new layout of the tools and dashboards, YouTube Studio (Beta) will also debut 3 metrics for creators:
1. Impressions: See the total reach of all your videos or each individual video. Each time your video thumbnail and title are visible to the user counts as an impression.
2. Click-through rate: Determine how click-worthy your thumbnails and titles are, by seeing the percentage of people who click into your video.
3. Unique viewers: Know how many different people have watched your videos. This data can be used to compare the size of your subscriber base to the actual number of your audience.
Tips for Using YouTube Studio Beta Features
Now that you are more familiar with the new YouTube Studio (Beta), let us dive into what you can accomplish with all the new features.
1. Optimization Tips
In the past, there has been a lot of speculations about how creators should treat their video titles and descriptions. Well, now YouTube is letting you know exactly which area to focus on. Simply hover over any “?” icon to see the advice and click “Learn More” to go to YouTube Creator Academy to get more details.
2. Recent Video Data
See data and improvement tips for your latest video. If YouTube identifies a notable issue with your video, they will help you by offering tips, which you can click “Tell Me More” to look into.
YouTube wants you to know how your videos are performing in the first few days. In order for YouTube to determine whether your content is worth sharing, it wants to know how your audience is responding to it right away. This means, the launch of your video matters.
3. Video Analysis
In the Classic Creator Studio, you couldn’t get an aggregated view of all the important video data on one dashboard. You would have to click to each set of analytics individually and then dive deeper. This ate up your precious content creation time and made it hard to combine insights. Now with Studio Beta, you can see all the critical data in one spot. Right away, you can see how that video is performing through different factors. This will let you know where audience retention is dropping off or which traffic source is supplying most of the views.
4. Watch Time Funnel
The objective is to increase watch time, the metric YouTube puts the most weight on. With the new Watch Time Funnel, which you can find in the Analytics section under the Reach Viewer dashboard, you can see exactly at which level of your channel or wherein an individual video you will need to improve.
If the impression numbers are low, that means you need to improve how your video is being discovered by doing more research to understand what your viewers are searching for.
If the click-through rate (CTR) is low, then you will have to improve your thumbnail and title. This will better entice your audience to click. According to Google, half of all videos have an average CTR of 2-10%.
If the average view duration is not up to your standards, then you will have to improve your content itself. While it is most ideal to have all your viewers watch all the way to the end of all your videos, that is certainly unrealistic. However, 60-70% is a great number to aim towards.
5. Traffic Sources
YouTube now presents all the different traffic sources in one easy-to-find page in the Reach Viewer tab, so creators no longer have to click between them to analyze where their traffic is coming from. This new design is far less intimidating and messy. At a glance, you can now see where the majority of your audiences are coming from.
YouTube has always put a lot of value into its analytic tools, and with YouTube Studio Beta the features and design are continuously improving. Having better data and understanding of how an individual video or an entire channel is performing will help creators succeed on this ever more competitive platform.
Have you tried the new YouTube Studio (Beta)? What are your thoughts? Please let us know in the comments below.
Richard Bennett
Richard Bennett is a writer and a lover of all things video.
Follow @Richard Bennett
The Insider’s Look at Optimizing YouTube Video Audio
How to Edit Audio on YouTube
Richard Bennett
Mar 27, 2024• Proven solutions
In this article, we are going to show you how to edit audio with YouTube Video Editor, and the tips on adding your own audio file to YouTube.
- Part 1: Add your Own Audio File to YouTube Video
- Part 2: How to Edit Audio with YouTube Video Editor
Part 1: Add your Own Audio File to YouTube Video
Tools You Are Going to Need
YouTube video editor is far from meeting the needs of people who want to have more control on their audio. On the bright side, if you are interested in learning how to edit audio on YouTube, there is a solution. There are many video editors in the market that allow you to add your own music or audio files to a video. Windows Movie Maker, iMovie, Adobe Premiere, and Magisto are some of the video editors available for you to choose from. In this guide, we recommend the Wondershare Filmora video editor. Below is a quick tutorial about how to edit audio in Filmora.
Download Mac Version ](https://tools.techidaily.com/wondershare/filmora/download/ )
Why Should You Choose Wondershare Filmora?
There are many advantages associated with the use of Wondershare Filmora. You will see that it allows you to fully edit any audio file and gain 100% control over your files. It is an integrated solution that lacks nothing in terms of efficiency and quality standards. To be more specific, Filmora offers the following unique features:
- Built-in audio editing tools that allow you to gain full control of your audio in an easy way
- Exclusive audio track that enables you to mute, detach or even de-noise the audio from video
- All audio effects can easily be adjusted with one click only
- The built-in Equalizer is capable enough to create amazing audio effects
- Directly upload your video to YouTube, Facebook or Vimeo from Wondershare Filmora
How to add audio files to YouTube video with Wondershare Filmora
Do you want to know more about audio editing? Please read this article: How to add audio to video.
Step 1 Import Video Clips into Filmora
Filmora supports a wide range of video formats, such as MKV, MOV, AVI, WebM and MP4, you can import the video clip shot with Camera, smartphone or camcorder easily to it.
Step 2 Detach Audio
If you want to edit the original audio of the video, you can choose to split the audio file from the video by using the Audio Detach option on Wondershare Filmora. Then, the audio file will be shown in the audio track, and you can cut or trim it.

Note: If you do not want to keep the original audio file in the video, you can delete it from the audio track directly.
Step 3Add Audio Files
Wondershare Filmora offers you multiple royalty free audio effects and music in its rich audio library. What is more, you can also import your own music or audio file from your computer or iTunes. Of course, you should know that the audio should be royalty free for you to make use of. In a different situation, you cannot upload it and benefit from its quality and nature.
Step 4Edit Audio
In this step, you can adjust the audio volume and pitch, etc. There are multiple options for you to benefit from, including the Audio Equalizer, Music, Mix Audio. In this way, you can make sure that the audio is exactly like you have wanted it to be. For further information as to how you can improve the sound quality of your recorded videos, you can check out: How to improve sound quality of recorded videos.
Step 5Save Your Work and Upload on YouTube
If you are satisfied with your work on the audio file and you wish to publish it, the process is quite simple. You just hit Export and select to upload the video to YouTube. After signing in to your YouTube account, you will be ready to start uploading the audio file.

In case you wish to edit the audio from an already published video, you have to download the video first. Then, you can follow the steps above to edit the audio file in Filmora. As one of the widely used video editing software for YouTubers, Filmora is here to empower your imagination. Just download the free trial version and try it now.
Part 2: How to Edit Audio with YouTube Video Editor
Unfortunately, YouTube does not allow users to upload audio files such as MP3, WAV, etc. Instead, you can only upload audio files which are offered by YouTube in the first place. Since YouTube has got a plentiful audio library, you can find a lot of audio there. In this part, we will show you how to add and edit audio with YouTube Video Editor.
You may also like: How to Add Music to YouTube Videos >>
Note: From 20th September 2017 users will no longer be able to use the complimentary editing suite. Check the best YouTube video editor alternatives from this complete guide. In the following part, I will show you how to add audio track , replace the original audio and adjust the audio position and length as well.
- Step 1: Sign in to your YouTube account
- **Step 2:**Click your profile avatar and select Creator Studio option.
- Step 3: In the left pane, go to Video Manager and then click Videos. In the Videos list, choose the video that you want to add new audio track, and then select Audio from the Edit button.

- Step 4: Now you can add or replace the audio in your video. Here you will find that there are various songs and audio files you can choose from. Click ADD TO VIDEO and the audio track will be added to the video directly.

- Step 5: Now you will see the audio track appears at the bottom of the player. Here you can trim and drag the audio bar to adjust the audio positon and length. To Trim the audio, click the beginning or the end of the audio bar and then drag it to the left or right. After trimming, drag it to meet the target position.

Conclusion
Normally, it would be better to add and edit audio to video before updating to YouTube. In this case, Filmora is highly recommended as one of the best video editor for YouTubers , which provides some royalty free music sound in the Music Library to choose from and also the audio editing tools like remove background noise from the video, add fade in and fade out effects with ease or play the video backward or fast forward.
Richard Bennett
Richard Bennett is a writer and a lover of all things video.
Follow @Richard Bennett
Richard Bennett
Mar 27, 2024• Proven solutions
In this article, we are going to show you how to edit audio with YouTube Video Editor, and the tips on adding your own audio file to YouTube.
- Part 1: Add your Own Audio File to YouTube Video
- Part 2: How to Edit Audio with YouTube Video Editor
Part 1: Add your Own Audio File to YouTube Video
Tools You Are Going to Need
YouTube video editor is far from meeting the needs of people who want to have more control on their audio. On the bright side, if you are interested in learning how to edit audio on YouTube, there is a solution. There are many video editors in the market that allow you to add your own music or audio files to a video. Windows Movie Maker, iMovie, Adobe Premiere, and Magisto are some of the video editors available for you to choose from. In this guide, we recommend the Wondershare Filmora video editor. Below is a quick tutorial about how to edit audio in Filmora.
Download Mac Version ](https://tools.techidaily.com/wondershare/filmora/download/ )
Why Should You Choose Wondershare Filmora?
There are many advantages associated with the use of Wondershare Filmora. You will see that it allows you to fully edit any audio file and gain 100% control over your files. It is an integrated solution that lacks nothing in terms of efficiency and quality standards. To be more specific, Filmora offers the following unique features:
- Built-in audio editing tools that allow you to gain full control of your audio in an easy way
- Exclusive audio track that enables you to mute, detach or even de-noise the audio from video
- All audio effects can easily be adjusted with one click only
- The built-in Equalizer is capable enough to create amazing audio effects
- Directly upload your video to YouTube, Facebook or Vimeo from Wondershare Filmora
How to add audio files to YouTube video with Wondershare Filmora
Do you want to know more about audio editing? Please read this article: How to add audio to video.
Step 1 Import Video Clips into Filmora
Filmora supports a wide range of video formats, such as MKV, MOV, AVI, WebM and MP4, you can import the video clip shot with Camera, smartphone or camcorder easily to it.
Step 2 Detach Audio
If you want to edit the original audio of the video, you can choose to split the audio file from the video by using the Audio Detach option on Wondershare Filmora. Then, the audio file will be shown in the audio track, and you can cut or trim it.
Note: If you do not want to keep the original audio file in the video, you can delete it from the audio track directly.
Step 3Add Audio Files
Wondershare Filmora offers you multiple royalty free audio effects and music in its rich audio library. What is more, you can also import your own music or audio file from your computer or iTunes. Of course, you should know that the audio should be royalty free for you to make use of. In a different situation, you cannot upload it and benefit from its quality and nature.
Step 4Edit Audio
In this step, you can adjust the audio volume and pitch, etc. There are multiple options for you to benefit from, including the Audio Equalizer, Music, Mix Audio. In this way, you can make sure that the audio is exactly like you have wanted it to be. For further information as to how you can improve the sound quality of your recorded videos, you can check out: How to improve sound quality of recorded videos.
Step 5Save Your Work and Upload on YouTube
If you are satisfied with your work on the audio file and you wish to publish it, the process is quite simple. You just hit Export and select to upload the video to YouTube. After signing in to your YouTube account, you will be ready to start uploading the audio file.
In case you wish to edit the audio from an already published video, you have to download the video first. Then, you can follow the steps above to edit the audio file in Filmora. As one of the widely used video editing software for YouTubers, Filmora is here to empower your imagination. Just download the free trial version and try it now.
Part 2: How to Edit Audio with YouTube Video Editor
Unfortunately, YouTube does not allow users to upload audio files such as MP3, WAV, etc. Instead, you can only upload audio files which are offered by YouTube in the first place. Since YouTube has got a plentiful audio library, you can find a lot of audio there. In this part, we will show you how to add and edit audio with YouTube Video Editor.
You may also like: How to Add Music to YouTube Videos >>
Note: From 20th September 2017 users will no longer be able to use the complimentary editing suite. Check the best YouTube video editor alternatives from this complete guide. In the following part, I will show you how to add audio track , replace the original audio and adjust the audio position and length as well.
- Step 1: Sign in to your YouTube account
- **Step 2:**Click your profile avatar and select Creator Studio option.
- Step 3: In the left pane, go to Video Manager and then click Videos. In the Videos list, choose the video that you want to add new audio track, and then select Audio from the Edit button.
- Step 4: Now you can add or replace the audio in your video. Here you will find that there are various songs and audio files you can choose from. Click ADD TO VIDEO and the audio track will be added to the video directly.
- Step 5: Now you will see the audio track appears at the bottom of the player. Here you can trim and drag the audio bar to adjust the audio positon and length. To Trim the audio, click the beginning or the end of the audio bar and then drag it to the left or right. After trimming, drag it to meet the target position.
Conclusion
Normally, it would be better to add and edit audio to video before updating to YouTube. In this case, Filmora is highly recommended as one of the best video editor for YouTubers , which provides some royalty free music sound in the Music Library to choose from and also the audio editing tools like remove background noise from the video, add fade in and fade out effects with ease or play the video backward or fast forward.
Richard Bennett
Richard Bennett is a writer and a lover of all things video.
Follow @Richard Bennett
Also read:
- Navigating the World of Viral Unboxing Content
- YouTube Income Guide - What's New?
- In 2024, Audio Amplified Today's Hits Backdropping YT Shorts
- Decode and Resolve YouTube Short Errors
- [Updated] Discover Leading Video Ranking Tools for YouTube Success
- Unlock the Secret to Massive Engagement 3 Top Tips for Making Powerful Two-POV Reaction Videos on YouTube
- [New] Comparing Micro-Video Formats The Battle of TikTok and YouTube Shorts
- Elevate Your Content with Effective Video SEO for 2024
- 2024 Approved Audio Outliers Best Sound Distortion Apps for Your Device
- In 2024, Essential 7 DSLRs to Elevate Virtual Presentations & Broadcasts
- YouTube’s Best Budget Movies for Leisurely Evenings
- 2024 Approved Elevate Content Discovery The TubeBuddy Way
- Investigating Top Viewed Comments
- [Updated] Elevate Your Content Game with These 5 Proven YouTube Marketing Hacks
- Ensuring Copyright Compliance in Youtube-to-MP4 for 2024
- [Updated] 10 Premium Yoga Channels for Ultimate Fitness Journey
- 2024 Approved Earth’s Premier Online Income Tycoon
- Captivating Audiences Adopting YouTube Vlogger Charisma for 2024
- [New] 10 Strategies for Boosting Your YouTube Visibility
- 2024 Approved Enhancing Video Content IPhone/iPad Screen Capture Basics
- The Ultimate How-To for Controlling YouTube Playback Speed
- Flow & Flourish with These Elite Yogis Online
- Channel-Building Gear A Quick Start Guide for 2024
- In 2024, Channel Confidence Tips for Trending on YouTube
- Achieving a Noiseless Presence on Social Video Platforms for 2024
- [Updated] Crafting Illusions with Video Edits
- Top YouTube Networks for Breaking News
- 2024 Approved Beyond the Watch Party A Comparison of 27 Video Streaming Alternatives
- Ajey's YouTube Earnings Insight - 2023 for 2024
- Boost Your Video's Impact with GS and YT Conversion for 2024
- [New] A Step-by-Step Guide for Creating Channel Trailers that Convert Viewers Into Customers
- [Updated] Essential PC Editing Skills for Compelling YouTube Videos
- [Updated] Enlarge Your Digital Footprint Proven Methods to Multi-Stream on Youtube & Twitch
- High-Quality Hurdles Navigating YouTube's Policies for 4K Submissions
- Enhancing Your Spotify Collection with YouTube Music Integration
- Your Gateway to Classic Games Best-in-Class 5GB Advance Emulators Compatible with PCs
- [New] In 2024, Audio From Visuals Making Mp3s From Instagram Content
- 3 Facts You Need to Know about Screen Mirroring Vivo T2x 5G | Dr.fone
- New 2024 Approved The Editors Edge Techniques for Removing Background Noise and Selective Muting in Video Post-Production
- 2024 Approved The Ultimate Guide to Cropping Images in Final Cut Pro X
- How to Unlock Infinix Note 30 Phone without PIN
- In 2024, Full Guide to Fix iToolab AnyGO Not Working On Motorola Moto G34 5G | Dr.fone
- In 2024, Ultimate Guide to Non-Time Restricted Recorders
- Easy Peasy Reaction Videos A Beginners Guide to Filmora
- In 2024, Android to Apple How To Transfer Photos From Xiaomi Redmi 12 to iPad Easily | Dr.fone
- How to Fix Lava Blaze 2 5G Find My Friends No Location Found? | Dr.fone
- 2024 Approved Create Stunning Videos with Music Best Mobile Apps
- How To Fix Part of the Touch Screen Not Working on Poco C51 | Dr.fone
- In 2024, How To Bypass Oppo A2 FRP In 3 Different Ways
- New Adobe Premiere vs Sony Vegas Which Video Editor Reigns Supreme ?
- In 2024, Effortless Audio Conversion Top 12 Converters Reviewed
- Updated Silence Meets You An Easy, Step-by-Step Approach to Disabling Zoom Microphones for 2024
- What Does a Blue Icon Signify on FB Messenger, In 2024
- 2024 Approved Getting Started on Discord A Comprehensive Guide to Broadcasting
- New 2024 Approved Create Engaging Videos with These Top-Rated Explainer Tools
- How to Fix Unfortunately, Contacts Has Stopped Error on Honor X50 GT | Dr.fone
- Mastering Video Enlargement on YouTube
- Unlock Your Visual Potential The Leading Ten Tools for Instagram Grids for 2024
- 2024 Approved Optimal Team Call Aesthetics Pre-Call & Post-Call Tweaks
- The Ultimate List of Top 5 PC Screen Grabbers Ranked #1-#5 for 2024
- Title: "Cutting-Edge Video Tools Opt for Studio or Latest Beta Version for 2024"
- Author: Kevin
- Created at : 2024-05-25 14:56:31
- Updated at : 2024-05-26 14:56:31
- Link: https://youtube-videos.techidaily.com/cutting-edge-video-tools-opt-for-studio-or-latest-beta-version-for-2024/
- License: This work is licensed under CC BY-NC-SA 4.0.
